 Boats For Sale:


79BFN |
Post Reply 
|
Page 123 7> |
| Author | |
the grinch 
Senior Member 

Joined: November-25-2008 Location: Lexington, NC Status: Offline Points: 150 |
 Post Options Post Options
") Thanks(0) Thanks(0)
 Quote Reply Quote Reply
 Topic: 79BFN Topic: 79BFNPosted: January-20-2009 at 11:08pm |
|
Okay........I've started my rebuild.
I probably wouldn't post this, but I'm going to do a few different things in this build that may be useful to others. I will primarily be using, of course, epoxy resin, however, I will be using some two-part epoxy adhesives in a few applications. I am also planning to build my own engine cradle of sorts. I do have some preliminary concerns with the overall shape and contours of the 79BF primary stringers and how the motor/trans mounts are located, however, I will attempt something. I'm going to get a little more involved in it this weekend and I'll get some of your opinions later. Here is where I am so far. 


|
|
 |
|
|
the grinch
Senior Member
Joined: November-25-2008 Location: Lexington, NC Status: Offline Points: 150 |
Post Options
Thanks(0)
Quote Reply
Posted: January-20-2009 at 11:16pm |
|
Sorry guys. I'm new at the picture thing, I'll try some more.


|
|
|
|
|
8122pbrainard
Grand Poobah 

Joined: September-14-2006 Location: Three Lakes Wi. Status: Offline Points: 41040 |
Post Options
Thanks(0)
Quote Reply
Posted: January-20-2009 at 11:20pm |
|
Kirk,
Before this thread gets longer, please go back and edit you post. Use the "enter" key between the pictures and they will stack top to bottom instead of side to side. It makes reading and looking at the pictures easier. Keep us posted with your ideas. We've got plenty of experts here to critique them before you get into a potential problem. So, it sounds like you're going to be getting some "sample" epoxies!!! |
|
|
|
|
WakeSlayer
Grand Poobah

Joined: March-15-2006 Location: United States Status: Offline Points: 2138 |
Post Options
Thanks(0)
Quote Reply
Posted: January-20-2009 at 11:21pm |
|
Go back and edit your post, hit enter to add a line between each photo. Also, if you are able to resize to 7 inches wide they fit perfectly without having to scroll over.
|
|
|
Mike N
1968 Mustang |
|
|
|
|
WakeSlayer
Grand Poobah
Joined: March-15-2006 Location: United States Status: Offline Points: 2138 |
Post Options
Thanks(0)
Quote Reply
Posted: January-20-2009 at 11:23pm |
|
Looks like a lot of fun, btw !!
|
|
|
Mike N
1968 Mustang |
|
|
|
|
the grinch
Senior Member
Joined: November-25-2008 Location: Lexington, NC Status: Offline Points: 150 |
Post Options
Thanks(0)
Quote Reply
Posted: January-21-2009 at 12:44am |
|
Thanks for the help guys. Let's try a few more.


|
|
|
|
|
the grinch
Senior Member
Joined: November-25-2008 Location: Lexington, NC Status: Offline Points: 150 |
Post Options
Thanks(0)
Quote Reply
Posted: January-21-2009 at 8:22pm |
|
Have you seen all of my rot? It's amazing someone would take such bad care of something. If you'll look at one of the pictures that shows the motor mounts, you can see that I drilled some holes in the primary stringers. I drilled with a 3/4" hole saw to get a core sample from them. I was amazed that two of the four cores were completly dry. The stringers are very solid, however, that moisture in there will eventually be a problem so they got go! Here are a few shots to bring some things up to date.


|
|
|
|
|
BuffaloBFN
Grand Poobah

Joined: June-24-2007 Location: Gainesville,GA Status: Offline Points: 6094 |
Post Options
Thanks(0)
Quote Reply
Posted: January-21-2009 at 8:29pm |
|
You need a new key chain!

Looks like nice work...I almost recognize some of it. You did check the keel piece? Mine was a mess. |
|
|
|
|
the grinch
Senior Member
Joined: November-25-2008 Location: Lexington, NC Status: Offline Points: 150 |
Post Options
Thanks(0)
Quote Reply
Posted: January-21-2009 at 8:36pm |
|
You probably can't tell from the pics., but the bulkhead that is furthest forward is bonded to the hull with epoxy adhesive. The other two are in with the epoxy resin mixed with cabosil and 1/2" fiber. Using the epoxy adhesive is a far cleaner and simpler method. I don't know the exact strength specs of the epoxy resin, however, the epoxy adhesive is around the 3000psi range. In my testing, which was quite simplified, the adhesive is stronger in this application. I don't think we're trying to reinvent the wheel with these repairs and the mat/cloth is what adds the strength overall, however, I just wanted to try something a little different. There is only one downside that I see to using the adhesive..........the cost. That's why I chose to do the other two with the resin combination. I am going to do some more on the project with the adhesives and I will detail my use in those applications with pics.
|
|
|
|
|
the grinch
Senior Member
Joined: November-25-2008 Location: Lexington, NC Status: Offline Points: 150 |
Post Options
Thanks(0)
Quote Reply
Posted: January-21-2009 at 8:49pm |
|
I wish all I needed was a new key chain! The keel piece was good except for an exposed part in the very front where the factory glass work was crap. I cut it back a few inches and it dry/hard wood. I did not replace the wood here, only cleaned up and repaired with new epoxy/glass. There were some black colored patches in the glass up against that keel piece that can probably be seen in the pics. Those areas are where scrap wood was laying against it and foamed over. As a matter of fact, there were scrap pieces of wood all in the foam and of coarse usually laying against the hull and rotten. This boat has been inside my shop since August of 2007 and it's amazing how much water and moisture was still in the foam.
|
|
|
|
|
8122pbrainard
Grand Poobah
Joined: September-14-2006 Location: Three Lakes Wi. Status: Offline Points: 41040 |
Post Options
Thanks(0)
Quote Reply
Posted: January-22-2009 at 9:58am |
|
Kirk.
You sure made lots of progress in one day. Keep it up!! Greg asked about the inner keel towards the bow. I too am curious if you took a core sample from it. Greg's, as mentioned was a mess! |
|
|
|
|
the grinch
Senior Member
Joined: November-25-2008 Location: Lexington, NC Status: Offline Points: 150 |
Post Options
Thanks(0)
Quote Reply
Posted: January-22-2009 at 11:18am |
|
Can not tell a lie.........I started digging foam 6 months ago. I had some other projects going on and thought the boat could use a little more drying out time. I'm on it full bore right now, or at least every weekend. It's amazing how long it takes before you make progress. I wanted to have the floor in by the end of Feb.............we'll see how I do.
|
|
|
|
|
WakeSlayer
Grand Poobah
Joined: March-15-2006 Location: United States Status: Offline Points: 2138 |
Post Options
Thanks(0)
Quote Reply
Posted: January-24-2009 at 4:33am |
|
To borrow from Donovan (Nautiless) You are going to have to give it horns to get even remotely close by the end of Feb. I just added up my hours on the Mustang last night and have just broken 200 hours. Being the first time I have done anything like this probably attributes to a few of the hours. However this also does not include time spent researching and ordering parts. Time spent running to West or Home Depot or the hardware store, etc. I started at the very beginning of Nov and still am a ways away. I am at it at least parts of 4 nights a week and both days on the weekends as my wife will allow me.
If it weren't her boat I would probably be........ It is a sickness. |
|
|
Mike N
1968 Mustang |
|
|
|
|
nautiless
Senior Member

Joined: June-30-2008 Location: South Africa Status: Offline Points: 186 |
Post Options
Thanks(0)
Quote Reply
Posted: January-24-2009 at 10:14am |
|
Kirk:
Good on you in bringing new life to this BF. I'm sure the rewards will be well worth the effort. Your first corner to turn will be when you stop breaking things and start building up piece for piece. Don't be discouraged by the passage of time but start and keep the end in mind. |
|
|
|
|
the grinch
Senior Member
Joined: November-25-2008 Location: Lexington, NC Status: Offline Points: 150 |
Post Options
Thanks(0)
Quote Reply
Posted: January-26-2009 at 2:31am |
|
I had an efficient weekend on the BF. The two big obstacles I've been putting off were the engine cradle and removing the primary stringers. The cradle is done with the exception of the U-bolts for the pylon. It is a little different, in regards to it only tying into the motor mounts and not the transmission mounts as well. I was a little concerned with the change in the angle from the motor mounts to the trans. mounts not to mention the curvature in the stringer. After thinking about this for the last two months, I reminded myself that the only reason I wanted to add a cradle was to take some stress off of the floor. It should work just fine.


|
|
|
|
|
the grinch
Senior Member
Joined: November-25-2008 Location: Lexington, NC Status: Offline Points: 150 |
Post Options
Thanks(0)
Quote Reply
Posted: January-26-2009 at 2:55am |
|
By the way, the first stringer came out in one piece and took maybe 15 minutes. I zipped down both sides, wacked it with a rubber mallet 4 or 5 times, and pryed it out with a crowbar. I don't have my fir 2x's yet, so I concentrated on the secondary stringer. It took alot of adjustment to get it right, however, I left tonight with one side laminated and one side of the lateral supports laminated as well. Going to pick that fir up tommorrow and get on that stringer tommorrow night.
|
|
|
|
|
79nautique
Grand Poobah

Joined: January-27-2004 Location: United States Status: Offline Points: 7872 |
Post Options
Thanks(0)
Quote Reply
Posted: January-26-2009 at 12:52pm |
|
not so sure your craddle is finished, as I think your going to run into a big oh *************** it shortly.
|
|
|
|
|
BuffaloBFN
Grand Poobah
Joined: June-24-2007 Location: Gainesville,GA Status: Offline Points: 6094 |
Post Options
Thanks(0)
Quote Reply
Posted: January-26-2009 at 3:02pm |
|
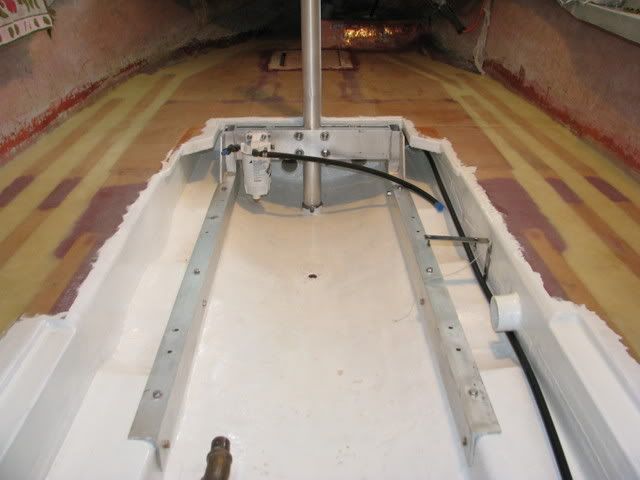
Chris, is this what you mean?

|
|
|
|
|
79nautique
Grand Poobah
Joined: January-27-2004 Location: United States Status: Offline Points: 7872 |
Post Options
Thanks(0)
Quote Reply
Posted: January-26-2009 at 4:25pm |
|
well maybe it is different on the BFN but your picture doesn't look right either. From what I remember and maybe the BFN's are not the same, but the angle sat on top of the stringers then the c-channels where below and tucked under the deck.
Yours looks like it is sitting on the hull and some extra material was added. This is not like the design I have seen for the 80-81 SN, so being a BF maybe it's ok it just doesn't look right to me. |
|
|
|
|
the grinch
Senior Member
Joined: November-25-2008 Location: Lexington, NC Status: Offline Points: 150 |
Post Options
Thanks(0)
Quote Reply
Posted: January-27-2009 at 12:35am |
|
Chris,
If you look at my previous picture of the two mounts sitting on the lone stringer, you will see how low the stringers are in the 79BF. After I removed this stringer, I discovered they made it with a 2x4 and had a small 3/4" wedge stapled on at the highest part......not much there. You are correct, in that it sits down on, and rests on the stringers and the actual 3"channel that crosses is below floor height and will slightly sit under the floors edge. I was almost lucky in the way this had to be built because of its simplicity. The lateral bulkhead (the piece the vent hoses come through) sits too close to the pylon to make one like on Greg's 88BF. It would also completely block off the vent ducts and the mechanical ducts. I'll post pics. once I get the new stringers in and can mount the cradle. |
|
|
|
|
the grinch
Senior Member
Joined: November-25-2008 Location: Lexington, NC Status: Offline Points: 150 |
Post Options
Thanks(0)
Quote Reply
Posted: January-27-2009 at 12:46am |
|
Check out how clean this stringer came out.

I was able to get the secondary stringer dry fit along with the lateral supports that brace it. Started laminating. The shop is averaging about 36degrees unless I'm there with the heater running. I should be able to get back on the other side of these by Wed. night and get one of the primary stringers laminated on one side. 
|
|
|
|
|
eric lavine
Grand Poobah
Joined: August-13-2006 Location: United States Status: Offline Points: 13413 |
Post Options
Thanks(0)
Quote Reply
Posted: January-27-2009 at 10:27am |
|
nice to pool your resin when you lay the new wood, dont grind it away
|
|
|
"the things you own will start to own you"
|
|
|
|
|
eric lavine
Grand Poobah
Joined: August-13-2006 Location: United States Status: Offline Points: 13413 |
Post Options
Thanks(0)
Quote Reply
Posted: January-27-2009 at 10:30am |
|
for a keel board a built last night, i used 1x3's staggard, board glass board glass board...very strong, i wound up right over the 2 inch mark on the width
|
|
|
"the things you own will start to own you"
|
|
|
|
|
BuffaloBFN
Grand Poobah
Joined: June-24-2007 Location: Gainesville,GA Status: Offline Points: 6094 |
Post Options
Thanks(0)
Quote Reply
Posted: January-27-2009 at 10:35am |
|
The pic above may be misleading...
|
|
|
|
|
Luchog
Grand Poobah

Joined: April-17-2007 Location: Argentina Status: Offline Points: 2135 |
Post Options
Thanks(0)
Quote Reply
Posted: January-27-2009 at 1:05pm |
|
Grinch, really tight work you've pulled here!!!
My question is why would you put those pieces where the vent tubes go through before the stringers? |
|
|
|
|
the grinch
Senior Member
Joined: November-25-2008 Location: Lexington, NC Status: Offline Points: 150 |
Post Options
Thanks(0)
Quote Reply
Posted: January-27-2009 at 10:27pm |
|
I guess there were really two reasons for starting up front. I was really tired of being up under that dash and was ready to get some of the nasty work done. The main reason was with the nearly completely decomposed bulkhead at the pylon and my plans to compromise some type of a cradle, I needed some type of baseline to start with. By that, I mean I had to make the bulkheads and figure out the clearance for the vents and other ducts as not to interfere with the cradle. I didn't, however, have to glass them in, I was just ready to be out from under that dash for a while.
|
|
|
|
|
the grinch
Senior Member
Joined: November-25-2008 Location: Lexington, NC Status: Offline Points: 150 |
Post Options
Thanks(0)
Quote Reply
Posted: January-30-2009 at 12:32am |
|
I really wish I had gone with the faster epoxy now. I bought the medium, and with the shop temps kind of low, it's taking forever for it to dry. I'm talking 2 days! I could have made alot of progress this week.
If anyone has figured out a way to laminate both sides of a board at once, let me know. |
|
|
|
|
WakeSlayer
Grand Poobah
Joined: March-15-2006 Location: United States Status: Offline Points: 2138 |
Post Options
Thanks(0)
Quote Reply
Posted: January-30-2009 at 1:37pm |
|
Grinch,
Are you using West or US? I used West 105/205. Is done drying in a few hours. I keep my shop between 50-55 when not in there. It would be tough to do large boards on both sides, but little stuff, you can clamp with decal backing paper, shiny side to the epoxy. Or pieces of stiff blister packing. A trick I heard from the Boat Dr. Mike |
|
|
Mike N
1968 Mustang |
|
|
|
|
Hollywood
Moderator Group 

Joined: February-04-2004 Location: Twin Lakes, WI Status: Offline Points: 13512 |
Post Options
Thanks(0)
Quote Reply
Posted: January-30-2009 at 1:49pm |
|
I'm glad someone is finally restoring this boat! The pictures look great, what are your plans with the engine, doesn't it have at least one sleeve?
|
|
|
|
|
the grinch
Senior Member
Joined: November-25-2008 Location: Lexington, NC Status: Offline Points: 150 |
Post Options
Thanks(0)
Quote Reply
Posted: January-30-2009 at 8:11pm |
|
Mike,
Thanks for the trick on the decal backing paper. I bought some wax paper today and I'm going to give it a try on some small stuff as well. I'm using the UScomposite stuff. I'm happy with it with the exception of the dry time. If I could keep my shop 50-55, I think I'd be fine, but I can't do that when I'm not there. |
|
|
|
|
Post Reply
|
Page 123 7> |
 Tweet
Tweet
|
| Forum Jump | Forum Permissions You cannot post new topics in this forum You cannot reply to topics in this forum You cannot delete your posts in this forum You cannot edit your posts in this forum You cannot create polls in this forum You cannot vote in polls in this forum |


 Topic Options