79BFN
Printed From: CorrectCraftFan.com
Category: Repairs and Maintenance
Forum Name: Boat Maintenance
Forum Discription: Discuss maintenance of your Correct Craft
URL: http://www.CorrectCraftFan.com/forum/forum_posts.asp?TID=12717
Printed Date: June-05-2024 at 6:29pm
Topic: 79BFN
Posted By: the grinch
Subject: 79BFN
Date Posted: January-20-2009 at 11:08pm
|
Okay........I've started my rebuild.
I probably wouldn't post this, but I'm going to do a few different things in this build that may be useful to others. I will primarily be using, of course, epoxy resin, however, I will be using some two-part epoxy adhesives in a few applications. I am also planning to build my own engine cradle of sorts. I do have some preliminary concerns with the overall shape and contours of the 79BF primary stringers and how the motor/trans mounts are located, however, I will attempt something. I'm going to get a little more involved in it this weekend and I'll get some of your opinions later. Here is where I am so far. 


|
Replies:
Posted By: the grinch
Date Posted: January-20-2009 at 11:16pm
Sorry guys. I'm new at the picture thing, I'll try some more.


|
Posted By: 8122pbrainard
Date Posted: January-20-2009 at 11:20pm
|
Kirk,
Before this thread gets longer, please go back and edit you post. Use the "enter" key between the pictures and they will stack top to bottom instead of side to side. It makes reading and looking at the pictures easier. Keep us posted with your ideas. We've got plenty of experts here to critique them before you get into a potential problem. So, it sounds like you're going to be getting some "sample" epoxies!!! ------------- /diaries/details.asp?ID=1622" rel="nofollow - 54 Atom /diaries/details.asp?ID=2179" rel="nofollow - 77 Tique 64 X55 Dunphy Keep it original, Pete < |
Posted By: WakeSlayer
Date Posted: January-20-2009 at 11:21pm
|
Go back and edit your post, hit enter to add a line between each photo. Also, if you are able to resize to 7 inches wide they fit perfectly without having to scroll over. ------------- Mike N 1968 Mustang |
Posted By: WakeSlayer
Date Posted: January-20-2009 at 11:23pm
|
Looks like a lot of fun, btw !! ------------- Mike N 1968 Mustang |
Posted By: the grinch
Date Posted: January-21-2009 at 12:44am
Thanks for the help guys. Let's try a few more.


|
Posted By: the grinch
Date Posted: January-21-2009 at 8:22pm
Have you seen all of my rot? It's amazing someone would take such bad care of something. If you'll look at one of the pictures that shows the motor mounts, you can see that I drilled some holes in the primary stringers. I drilled with a 3/4" hole saw to get a core sample from them. I was amazed that two of the four cores were completly dry. The stringers are very solid, however, that moisture in there will eventually be a problem so they got go! Here are a few shots to bring some things up to date.


|
Posted By: BuffaloBFN
Date Posted: January-21-2009 at 8:29pm
You need a new key chain! 
Looks like nice work...I almost recognize some of it. You did check the keel piece? Mine was a mess. ------------- http://correctcraftfan.com/diaries/details.asp?ID=2331&sort=&pagenum=12&yrstart=1986&yrend=1990" rel="nofollow - 1988 BFN-sold "It's a Livin' Thing...What a Terrible Thing to Lose" ELO |
Posted By: the grinch
Date Posted: January-21-2009 at 8:36pm
| You probably can't tell from the pics., but the bulkhead that is furthest forward is bonded to the hull with epoxy adhesive. The other two are in with the epoxy resin mixed with cabosil and 1/2" fiber. Using the epoxy adhesive is a far cleaner and simpler method. I don't know the exact strength specs of the epoxy resin, however, the epoxy adhesive is around the 3000psi range. In my testing, which was quite simplified, the adhesive is stronger in this application. I don't think we're trying to reinvent the wheel with these repairs and the mat/cloth is what adds the strength overall, however, I just wanted to try something a little different. There is only one downside that I see to using the adhesive..........the cost. That's why I chose to do the other two with the resin combination. I am going to do some more on the project with the adhesives and I will detail my use in those applications with pics. |
Posted By: the grinch
Date Posted: January-21-2009 at 8:49pm
| I wish all I needed was a new key chain! The keel piece was good except for an exposed part in the very front where the factory glass work was crap. I cut it back a few inches and it dry/hard wood. I did not replace the wood here, only cleaned up and repaired with new epoxy/glass. There were some black colored patches in the glass up against that keel piece that can probably be seen in the pics. Those areas are where scrap wood was laying against it and foamed over. As a matter of fact, there were scrap pieces of wood all in the foam and of coarse usually laying against the hull and rotten. This boat has been inside my shop since August of 2007 and it's amazing how much water and moisture was still in the foam. |
Posted By: 8122pbrainard
Date Posted: January-22-2009 at 9:58am
|
Kirk.
You sure made lots of progress in one day. Keep it up!! Greg asked about the inner keel towards the bow. I too am curious if you took a core sample from it. Greg's, as mentioned was a mess! ------------- /diaries/details.asp?ID=1622" rel="nofollow - 54 Atom /diaries/details.asp?ID=2179" rel="nofollow - 77 Tique 64 X55 Dunphy Keep it original, Pete < |
Posted By: the grinch
Date Posted: January-22-2009 at 11:18am
| Can not tell a lie.........I started digging foam 6 months ago. I had some other projects going on and thought the boat could use a little more drying out time. I'm on it full bore right now, or at least every weekend. It's amazing how long it takes before you make progress. I wanted to have the floor in by the end of Feb.............we'll see how I do. |
Posted By: WakeSlayer
Date Posted: January-24-2009 at 4:33am
|
To borrow from Donovan (Nautiless) You are going to have to give it horns to get even remotely close by the end of Feb. I just added up my hours on the Mustang last night and have just broken 200 hours. Being the first time I have done anything like this probably attributes to a few of the hours. However this also does not include time spent researching and ordering parts. Time spent running to West or Home Depot or the hardware store, etc. I started at the very beginning of Nov and still am a ways away. I am at it at least parts of 4 nights a week and both days on the weekends as my wife will allow me.
If it weren't her boat I would probably be........ It is a sickness. ------------- Mike N 1968 Mustang |
Posted By: nautiless
Date Posted: January-24-2009 at 10:14am
|
Kirk:
Good on you in bringing new life to this BF. I'm sure the rewards will be well worth the effort. Your first corner to turn will be when you stop breaking things and start building up piece for piece. Don't be discouraged by the passage of time but start and keep the end in mind. ------------- 1982 SN 2001 RIP (Resto in Progress) http://www.correctcraftfan.com/diaries/details.asp?ID=4400 - Don's Diary |
Posted By: the grinch
Date Posted: January-26-2009 at 2:31am
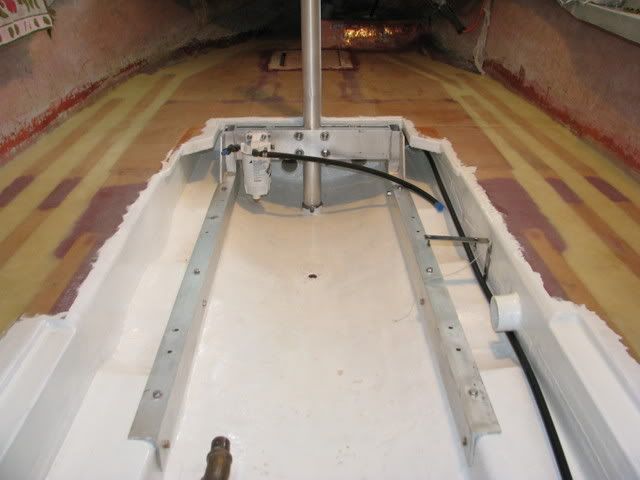
I had an efficient weekend on the BF. The two big obstacles I've been putting off were the engine cradle and removing the primary stringers. The cradle is done with the exception of the U-bolts for the pylon. It is a little different, in regards to it only tying into the motor mounts and not the transmission mounts as well. I was a little concerned with the change in the angle from the motor mounts to the trans. mounts not to mention the curvature in the stringer. After thinking about this for the last two months, I reminded myself that the only reason I wanted to add a cradle was to take some stress off of the floor. It should work just fine.


|
Posted By: the grinch
Date Posted: January-26-2009 at 2:55am
| By the way, the first stringer came out in one piece and took maybe 15 minutes. I zipped down both sides, wacked it with a rubber mallet 4 or 5 times, and pryed it out with a crowbar. I don't have my fir 2x's yet, so I concentrated on the secondary stringer. It took alot of adjustment to get it right, however, I left tonight with one side laminated and one side of the lateral supports laminated as well. Going to pick that fir up tommorrow and get on that stringer tommorrow night. |
Posted By: 79nautique
Date Posted: January-26-2009 at 12:52pm
|
not so sure your craddle is finished, as I think your going to run into a big oh *************** it shortly. ------------- http://www.correctcraftfan.com/diaries/details.asp?ID=756&sort=&pagenum=1&yrstart=1979&yrend=1979 - 79 nautique |
Posted By: BuffaloBFN
Date Posted: January-26-2009 at 3:02pm
Chris, is this what you mean?
 ------------- http://correctcraftfan.com/diaries/details.asp?ID=2331&sort=&pagenum=12&yrstart=1986&yrend=1990" rel="nofollow - 1988 BFN-sold "It's a Livin' Thing...What a Terrible Thing to Lose" ELO |
Posted By: 79nautique
Date Posted: January-26-2009 at 4:25pm
|
well maybe it is different on the BFN but your picture doesn't look right either. From what I remember and maybe the BFN's are not the same, but the angle sat on top of the stringers then the c-channels where below and tucked under the deck.
Yours looks like it is sitting on the hull and some extra material was added. This is not like the design I have seen for the 80-81 SN, so being a BF maybe it's ok it just doesn't look right to me. ------------- http://www.correctcraftfan.com/diaries/details.asp?ID=756&sort=&pagenum=1&yrstart=1979&yrend=1979 - 79 nautique |
Posted By: the grinch
Date Posted: January-27-2009 at 12:35am
|
Chris,
If you look at my previous picture of the two mounts sitting on the lone stringer, you will see how low the stringers are in the 79BF. After I removed this stringer, I discovered they made it with a 2x4 and had a small 3/4" wedge stapled on at the highest part......not much there. You are correct, in that it sits down on, and rests on the stringers and the actual 3"channel that crosses is below floor height and will slightly sit under the floors edge. I was almost lucky in the way this had to be built because of its simplicity. The lateral bulkhead (the piece the vent hoses come through) sits too close to the pylon to make one like on Greg's 88BF. It would also completely block off the vent ducts and the mechanical ducts. I'll post pics. once I get the new stringers in and can mount the cradle. |
Posted By: the grinch
Date Posted: January-27-2009 at 12:46am
Check out how clean this stringer came out.

I was able to get the secondary stringer dry fit along with the lateral supports that brace it. Started laminating. The shop is averaging about 36degrees unless I'm there with the heater running. I should be able to get back on the other side of these by Wed. night and get one of the primary stringers laminated on one side. 
|
Posted By: eric lavine
Date Posted: January-27-2009 at 10:27am
|
nice to pool your resin when you lay the new wood, dont grind it away ------------- "the things you own will start to own you" |
Posted By: eric lavine
Date Posted: January-27-2009 at 10:30am
|
for a keel board a built last night, i used 1x3's staggard, board glass board glass board...very strong, i wound up right over the 2 inch mark on the width ------------- "the things you own will start to own you" |
Posted By: BuffaloBFN
Date Posted: January-27-2009 at 10:35am
The pic above may be misleading...
 ------------- http://correctcraftfan.com/diaries/details.asp?ID=2331&sort=&pagenum=12&yrstart=1986&yrend=1990" rel="nofollow - 1988 BFN-sold "It's a Livin' Thing...What a Terrible Thing to Lose" ELO |
Posted By: Luchog
Date Posted: January-27-2009 at 1:05pm
|
Grinch, really tight work you've pulled here!!!
My question is why would you put those pieces where the vent tubes go through before the stringers? ------------- http://www.correctcraftfan.com/diaries/details.asp?ID=2095" rel="nofollow - 1980 Ski Nautique Commander 351W |
Posted By: the grinch
Date Posted: January-27-2009 at 10:27pm
| I guess there were really two reasons for starting up front. I was really tired of being up under that dash and was ready to get some of the nasty work done. The main reason was with the nearly completely decomposed bulkhead at the pylon and my plans to compromise some type of a cradle, I needed some type of baseline to start with. By that, I mean I had to make the bulkheads and figure out the clearance for the vents and other ducts as not to interfere with the cradle. I didn't, however, have to glass them in, I was just ready to be out from under that dash for a while. |
Posted By: the grinch
Date Posted: January-30-2009 at 12:32am
|
I really wish I had gone with the faster epoxy now. I bought the medium, and with the shop temps kind of low, it's taking forever for it to dry. I'm talking 2 days! I could have made alot of progress this week.
If anyone has figured out a way to laminate both sides of a board at once, let me know. |
Posted By: WakeSlayer
Date Posted: January-30-2009 at 1:37pm
|
Grinch,
Are you using West or US? I used West 105/205. Is done drying in a few hours. I keep my shop between 50-55 when not in there. It would be tough to do large boards on both sides, but little stuff, you can clamp with decal backing paper, shiny side to the epoxy. Or pieces of stiff blister packing. A trick I heard from the Boat Dr. Mike ------------- Mike N 1968 Mustang |
Posted By: Hollywood
Date Posted: January-30-2009 at 1:49pm
|
I'm glad someone is finally restoring this boat! The pictures look great, what are your plans with the engine, doesn't it have at least one sleeve? ------------- |
Posted By: the grinch
Date Posted: January-30-2009 at 8:11pm
|
Mike,
Thanks for the trick on the decal backing paper. I bought some wax paper today and I'm going to give it a try on some small stuff as well. I'm using the UScomposite stuff. I'm happy with it with the exception of the dry time. If I could keep my shop 50-55, I think I'd be fine, but I can't do that when I'm not there. |
Posted By: the grinch
Date Posted: January-30-2009 at 8:26pm
|
Hollywood,
The guy that rebuilt this engine last is a local hi-performance engine builder. I went to see him and he remembered the motor well. He says it ought to be fine. It's really not even broken in since the rebuild. The PO installed it and at that point evidently had some ignition problems and tried resolving with a GM HEI distributor from a truck. When I bought it, it would barely idol at 2,000rpm. With the help of SKIDIM, I replaced the distributor and straightened out some wiring issues. I also noticed the choke linkage on the carb was missing and in desperate need of a rebuild. I had a kit and a few carbs laying around that I was able to make a good one from. I put her in the water and she fired first turn and idled @ about 700rpm. I knew she needed the floor but wanted to make sure I didn't have a POS, so I went for a little cruise. Holy cow, did she vibrate and needless to say I returned to the dock. I figure with all the other rigging on the boat, the PO must not have done any coupling alignment when he installed the motor. I'm guessing, since it wouldn't idle, he didn't even know he had an alignment issue. I didn't mess with aligning, since I knew the motor was going to come out for the stringer rebuild. So........I'll cross that bridge in a few months. |
Posted By: MartyMabe
Date Posted: January-31-2009 at 4:22pm
|
Hey Kirk If you need any help drop me an email. I live in High Point,ThanksMarty ------------- 66 Skylark http://www.correctcraftfan.com/diaries/details.asp?ID=5041" rel="nofollow - 93 SN If you're not living in NC, you're just camping out! |
Posted By: the grinch
Date Posted: February-05-2009 at 1:33am
|
Marty,
My shop is at 513 English Rd. in High Point, I'll be around there this weekend if you want to take a look at the progress. If the rollup door is closed, just pick it up and come on in. If I'm making alot of noise, don't startle me too bad, I keep the ball bat close by to run the panhandlers off. If you know the area, you'll know that it's on the fringe of a bad section of town. |
Posted By: the grinch
Date Posted: February-05-2009 at 1:46am
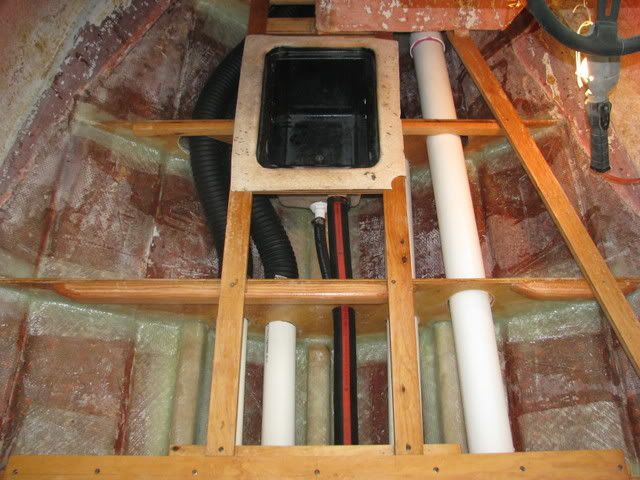
| I'm not exactly to the point yet, however, I've been thinking about the mounting of the battery box. The battery box in the boat is all fiberglass and has no lip/flange around the top. When I removed it, there were 1x2's stapled around the outside perimeter that I believe kept it in check with the floor surface. These 1x2's were of course rotten and due to there deterioration, I believe were a poor means of sealing/attaching to the floor and bulkhead. Has anyone reengineered the attachment of their box and feel it is a much better method than what the factory used? |
Posted By: WakeSlayer
Date Posted: February-05-2009 at 9:24am
|
I am not sure how this would work in your application. I epoxied a couple coated boards to the hull so that a regular plastic battery box will sit level with the the tops of my longitudinal supports. I then ran a couple shorter boards front to back so it is loosely framed in there. I fixed the strap under the box, also, so with slits in the upper wide side of the box I can even secure it. I have two 1" holes drilled high on the sides. This is so I can have my battery cables tag into my cable tube going to the motor, and I have power cables for my stereo running forward and just coming out under the floor in the bow. I have little tiny screws that will hold the box to the bottom boards and the perimeter of the top all the way around. Using a plastic box, I wanted it removeable in case it ever cracked. Because the box sits level with my supports, I have an oversized cutout in my floor board that sits tightly over it. Nearly an interference fit. this is prior to installing the cables 
installed. 
Just an idea... ------------- Mike N 1968 Mustang |
Posted By: 79nautique
Date Posted: February-05-2009 at 12:15pm
|
i wouldn't suggest runnig the battery cables the way you have, Your going to have one hell of a time running cables through it and making that 90 turn then you also have the sharp edge that is going to short the cable over time, even if you radius the edhge the cables going to bounce up and down on it. Orginally the battery box had it's own tube to the bilge area and when using the proper gauge cables you will not be able to make the radius tight enough. Major heads akes down the road I'm afraid. ------------- http://www.correctcraftfan.com/diaries/details.asp?ID=756&sort=&pagenum=1&yrstart=1979&yrend=1979 - 79 nautique |
Posted By: BuffaloBFN
Date Posted: February-05-2009 at 7:41pm
|
Mike, do you have provisions for drains up there? ------------- http://correctcraftfan.com/diaries/details.asp?ID=2331&sort=&pagenum=12&yrstart=1986&yrend=1990" rel="nofollow - 1988 BFN-sold "It's a Livin' Thing...What a Terrible Thing to Lose" ELO |
Posted By: BuffaloBFN
Date Posted: February-05-2009 at 8:24pm
Kirk, this was my solution. I didn't have what you started with, but I suspect your setup evolved into mine. With a few exceptions, this is the '88 factory set-up.
------------- http://correctcraftfan.com/diaries/details.asp?ID=2331&sort=&pagenum=12&yrstart=1986&yrend=1990" rel="nofollow - 1988 BFN-sold "It's a Livin' Thing...What a Terrible Thing to Lose" ELO |
Posted By: the grinch
Date Posted: February-05-2009 at 10:10pm
|
I appreciate the help guys. I had previously studied both of your posts to see how you guys had attacked this installation but, I you may realize that the fiberglass bat.box just doesn't have that lip like on the plastic ones. I am considering using Mike's procedure with some support underneath and then Gregg's procedure on or around the upper perimeter. I should be able to get a good overlap of the upper perimeter with glass going down into the box and therefore making a good watertight bond. I really think the lack of a good seal and attachment, along with a 50lb. battery made this a problem area for water getting into the foam in the bilge. Of coarse, there was also the problem with poorly attached and sealed drain hose and cable hose as well. I have a way to go with the stringers before getting to this point, I was just planning ahead.
I should have drive side stringers all glassed in by Saturday and ready to dig out the other side by Sunday. I do have the new stringers cut already based on the complete one I removed on the drive side. I do, however, anticipate a little tweaking, which is fine because I'm waiting on cloth to show up from US Composites for laminating. I had to order some more cabosil as well. You really go through that stuff putting in those stringers. I'll take some pics of my progress on Sunday. |
Posted By: BuffaloBFN
Date Posted: February-05-2009 at 10:32pm
|
The drain issue is here in the forum somewhere...you and I aren't the only ones. The originals were hardlines(pvc in mine) and that's why I went to the flexible lines. I also think it is good for the battery to not be sitting directly on the hull.
Stuff moves! ------------- http://correctcraftfan.com/diaries/details.asp?ID=2331&sort=&pagenum=12&yrstart=1986&yrend=1990" rel="nofollow - 1988 BFN-sold "It's a Livin' Thing...What a Terrible Thing to Lose" ELO |
Posted By: the grinch
Date Posted: February-05-2009 at 10:36pm
I found some pics of her before I started. Generally, the hull exterior in pretty good shape with the exception of handfull of blisters and some nicks and gouges.


 ------------- It takes a big hole to bury an elephant. Kirk Miller [URL=http://www.correctcraftfan.com/forum/register.asp?FID=7]KIRKS79/URL] |
Posted By: jbear
Date Posted: February-06-2009 at 1:15am
|
Everytime I see pictures of your job Greg I am impressed all over again. Those gotta be some of the smoothest stringers ever.
Excited about the 14th yet? I called and left you a couple of messages on your voice phone. john ------------- "Loud pipes save lives" AdamT sez "I'm Canadian and a beaver lover myself"... |
Posted By: storm34
Date Posted: February-06-2009 at 2:00am
|
Hey Grinch, What are those manifolds to in the last pic? Nice looking shop! ------------- |
Posted By: BuffaloBFN
Date Posted: February-06-2009 at 8:08am
I thought that was you! Sorry we missed the call; we're early to bed, early to rise around here. Yea, we're really looking forward to the trip, and the trip is looking like a blast!!! ------------- http://correctcraftfan.com/diaries/details.asp?ID=2331&sort=&pagenum=12&yrstart=1986&yrend=1990" rel="nofollow - 1988 BFN-sold "It's a Livin' Thing...What a Terrible Thing to Lose" ELO |
 jbear wrote:
Posted By: the grinch
Date Posted: February-08-2009 at 11:22pm
|
Chris,
Those are big tube headers I built for my racer. You can see them in this pic. 
------------- It takes a big hole to bury an elephant. Kirk Miller [URL=http://www.correctcraftfan.com/forum/register.asp?FID=7]KIRKS79/URL] |
Posted By: the grinch
Date Posted: February-08-2009 at 11:44pm
|
OK....had some warm temps this wkend and plenty of time to get some work done. Looks like the warm temps will be around all week and that helps this epoxy dry a little faster.
I'm hoping to have the other side cut out by mid week so I can test fit my stringers on the other side. I realized today that I may not have enough epoxy to put the other stringers in. I should have thought about it last week when I ordered that cabosil. I guess that SKIBUM's thread was a little conservative on 5gallons to do the stringers and supports. I'm going to put my brain to work and try to figure out exactly how much material it's going to take to finish this project up and place a final order with US Composite. It wouldn't be so bad if it didn't take about 4 bus. days to get the order. 


 ------------- It takes a big hole to bury an elephant. Kirk Miller [URL=http://www.correctcraftfan.com/forum/register.asp?FID=7]KIRKS79/URL] |
Posted By: 79nautique
Date Posted: February-09-2009 at 1:00pm
|
I'm hoping that you are going to add a lot more cloth as well, asking a lot of the spars amount you currently have to hold the stringer in place. ------------- http://www.correctcraftfan.com/diaries/details.asp?ID=756&sort=&pagenum=1&yrstart=1979&yrend=1979 - 79 nautique |
Posted By: Riley
Date Posted: February-09-2009 at 1:35pm
|
Nice work. ------------- |
Posted By: storm34
Date Posted: February-09-2009 at 5:46pm
|
Thats a sweet machine!! Can't looks like your on you way to a sweet boat as well!! ------------- |
Posted By: the grinch
Date Posted: February-10-2009 at 2:43am
|
Chris,
There are 4 overlapping layers between the primary and secondary. There are three overlapping layers from the primary down into the bilge. It's hard to see the 2", 4", and 8" cloth under the mat, but it's there. The foam goes between the two stringers and gets leveled to the shape of the primary and then glassed over all the way down into the bilge. I was planning on at least three layers on this final layup. Do you guys think I need more on the primary before the final layup? I want the strength, but have to keep the build up of height under close watch as well. ------------- It takes a big hole to bury an elephant. Kirk Miller [URL=http://www.correctcraftfan.com/forum/register.asp?FID=7]KIRKS79/URL] |
Posted By: WakeSlayer
Date Posted: February-11-2009 at 6:57pm
they are not run how you think. they are not installed in the pic aboce. they go out the rear of the box, 45* to a very smooth edged (and loomed) oval hole in the tube that you can see, and then another 45* to the bilge. No headsakes forthcoming. Greg, I did not provide drains, simply because the box is too low to have it above he hull, and I do not want water going forward. This is a limited use boat, covered, my vent tube is intact, and I can get any water that would ever get up there. The box will be removeable with just a couple little screws. Mike ------------- Mike N 1968 Mustang |
Posted By: the grinch
Date Posted: February-19-2009 at 3:54am
|
Well, I was hoping to be pouring foam by now but I'm not Looks like my estimate of end of Feb. completion is going to be stretched a little. I managed to get the foam out of the other side and the stringers cut out in one night, however the grinding.........! Wow, I hated grinding before and now I really hate it. I haven't had any project time in over a week, but looks like tommorrow night might be a date. Going to do some test fitting and hopefully some laminatin! Going to be cold the next few days, but if all goes well, I might get'm glassed in by Sunday. We'll see. ------------- It takes a big hole to bury an elephant. Kirk Miller [URL=http://www.correctcraftfan.com/forum/register.asp?FID=7]KIRKS79/URL] |
Posted By: critter
Date Posted: February-19-2009 at 12:48pm
|
Kirk,
Where did you get your Foam? I got mine from US Composites and their site says that the temp needs to be at least 75 for best expansion. I have been waiting months for the temps to get back that high to pour my Barracuda. Are you going to pour indoors ? I am not far from you over here in New Hill, just out of Raleigh. And it is not expect to get to 75 for some time yet. Let me know when you are going to pour and if I am not already committed, I would like to stop by and help or watch. ------------- 1980 Ski Nautique 1966 Barracuda |
Posted By: the grinch
Date Posted: February-20-2009 at 2:13am
|
Roger,
I'm ordering foam tommorrow. Comming from US Comp. as well. I can get my booth up to 80 as long as the outside temp is at least 45. I have to run two heaters to get it there, but I'll have to do it if I'm going to get this thing finished by Spring. I just need it to be that warm long enough to do the pours, but it looks like I'm at least 2 weeks out on having everything ready. I'll give you a heads up when I get a little closer. I was able to test fit remaining stringers and start laminating tonight. Hoping to get them glassed in by the end of the wkend. ------------- It takes a big hole to bury an elephant. Kirk Miller [URL=http://www.correctcraftfan.com/forum/register.asp?FID=7]KIRKS79/URL] |
Posted By: the grinch
Date Posted: March-02-2009 at 3:04pm
|
Question for Gregg. I noticed on the Pumpkin Patch that you posed the question on the layers of what and how much for the floor glass over the foam. I also noticed no answers. What did you end up doing? Looks like one more order from UScomposites. ------------- It takes a big hole to bury an elephant. Kirk Miller [URL=http://www.correctcraftfan.com/forum/register.asp?FID=7]KIRKS79/URL] |
Posted By: BuffaloBFN
Date Posted: March-03-2009 at 10:58am
|
I used mat, cloth, and biaxial. I also soaked in the top of the foam. At the time I wondered if that would be enough; now I wonder if it could have been lightened a touch. ------------- http://correctcraftfan.com/diaries/details.asp?ID=2331&sort=&pagenum=12&yrstart=1986&yrend=1990" rel="nofollow - 1988 BFN-sold "It's a Livin' Thing...What a Terrible Thing to Lose" ELO |
Posted By: the grinch
Date Posted: March-03-2009 at 12:00pm
|
Gregg,
Did you do it in that order? I thought about using cloth as the final layer, just because it rolls out a little smoother. Where the layers will reach the sides of the hull, did you layer in any of the 2,4,or 8" tape cloth? ------------- It takes a big hole to bury an elephant. Kirk Miller [URL=http://www.correctcraftfan.com/forum/register.asp?FID=7]KIRKS79/URL] |
Posted By: BuffaloBFN
Date Posted: March-03-2009 at 1:40pm
|
Yep, in that order.
On the sides, I put down a strip of mat to smooth the transition, and then let the edges run up the sides a little. In a few places I did add an extra strip or two. At this point I was pretty sure everything was staying where I put it, and so was paying more attention to whether or not it would drain or hold a puddle. I also wrapped the inside edge into the bilge hoping to tie everything together(cloth only). ------------- http://correctcraftfan.com/diaries/details.asp?ID=2331&sort=&pagenum=12&yrstart=1986&yrend=1990" rel="nofollow - 1988 BFN-sold "It's a Livin' Thing...What a Terrible Thing to Lose" ELO |
Posted By: the grinch
Date Posted: March-04-2009 at 1:05am
Finally remembered to take the camera with me to the shop this evening. I didn't get much done in the evenings last week, however, I put in alot of hours over the weekend. The observer side stringers and supports are in. I still have some glass work to do on the bulkheads and then I'll be ready for foam.


------------- It takes a big hole to bury an elephant. Kirk Miller [URL=http://www.correctcraftfan.com/forum/register.asp?FID=7]KIRKS79/URL] |
Posted By: the grinch
Date Posted: March-04-2009 at 1:15am
I was doing some cleaning up tonight and had all the tools I've been using laying on a table and thought I'd share. Of course the electric grinder has had the biggest workout, but two other tools have been a big help in this project..... the variable speed buffer with the nylon bristle brush on it was used to get all of the old carpet and glue off of the hull sides, and the big "scraper bar" takes the work out of foam removal.....wish I had thought of this before I made it to the observer side!
 ------------- It takes a big hole to bury an elephant. Kirk Miller [URL=http://www.correctcraftfan.com/forum/register.asp?FID=7]KIRKS79/URL] |
Posted By: WakeSlayer
Date Posted: March-04-2009 at 1:24am
|
^^ I wish I had done that. It would have made a great picture. I had a ton of tools employed for the job. My folks live at my farm in the summertime, and have their own impressive collection of tools they leave in my shop, in addition to my own. Nearly all got used. I used the same color sharpie you have, even. My multi tool is similar to the one you have next to the chisels. But mine has a much needed bottle opener on it.
Your work looks great, keep at it !! ------------- Mike N 1968 Mustang |
Posted By: the grinch
Date Posted: March-04-2009 at 1:38am
|
Thanks Gregg for the floor info.
I thought I'd show you guys a little problem I ran into on some plywood that I cut for the floor center section. It had a 1" bow in it and I was worried about it being a little too bowed to lay flat on the bulkheads. I have a bunch of lead bricks that I use on the race truck and used them to help take out the bow while laminating. I had it perfectly flat with a straight edge for laminating, however, after the epoxy set up and I removed the weights, I still have a 1/2" bow. Still better than what I started with but I guess I should have wet the ply with the weight set up to take the bow out completly. You can't tell from the pic but the plywood is sitting on a 2x4 at each end so it is suspended above the concrete floor.  ------------- It takes a big hole to bury an elephant. Kirk Miller [URL=http://www.correctcraftfan.com/forum/register.asp?FID=7]KIRKS79/URL] |
Posted By: the grinch
Date Posted: March-04-2009 at 1:54am
One more while I have some time here. I took a pic of some respirators which you can't live without when doing all the grinding. Glad to be done with all of that! Use the one on the left, it's a 3M 7192 which I think is a large. They are available in 3 sizes, however, most people use the large. The one on the right is only good for stopping golfballs, grasshoppers, and grass clippings, and anything smaller will usually get by the fit against your face.
 ------------- It takes a big hole to bury an elephant. Kirk Miller [URL=http://www.correctcraftfan.com/forum/register.asp?FID=7]KIRKS79/URL] |
Posted By: eric lavine
Date Posted: March-04-2009 at 10:07am
|
I upgraded to full face, you can get there in and grind away, they are pricey but well worth the money...but your right dont attempt working with glass with nothing on at all ------------- "the things you own will start to own you" |
Posted By: WakeSlayer
Date Posted: March-04-2009 at 1:43pm
|
No way even with the dust mask. I used a full suit, respirator, goggles, gloves taped on. Everything. In the early stages I cut a 1 foot section with the dremel and my arms itched for 3-4 days. That was enough.
kirk, I had a couple small bows in my plywood too. I used even more weight than that and never did fully get them out. I decided to live with it and put them in anyway. Screwing them down takes most if not all of it out anyway. ------------- Mike N 1968 Mustang |
Posted By: the grinch
Date Posted: March-04-2009 at 10:56pm
|
I'm use to the itch as I do alot of demonstrations in heavy truck body shops repairing smc and glass hoods. However, the eye protection is a must as well. I was doing some quick work with the grinder and didn't grab the glasses, and boy was that a mistake. It took me two days of flushing my eye to get some trash out of it.
The lead bricks don't look like much, but they are 10pds. each so that's 80pds. sitting in the middle of that plywood. I made a bunch more of these things in preparation for this project knowing that I would need them for weighing down stringers and such. The bricks are handy and I've used them for a bunch of different projects. ------------- It takes a big hole to bury an elephant. Kirk Miller [URL=http://www.correctcraftfan.com/forum/register.asp?FID=7]KIRKS79/URL] |
Posted By: BuffaloBFN
Date Posted: March-05-2009 at 12:05am
Good thing you're not 12 or under! ------------- http://correctcraftfan.com/diaries/details.asp?ID=2331&sort=&pagenum=12&yrstart=1986&yrend=1990" rel="nofollow - 1988 BFN-sold "It's a Livin' Thing...What a Terrible Thing to Lose" ELO |
Posted By: the grinch
Date Posted: March-05-2009 at 2:04am
|
Yea......what are the effects of lead poisoning anyway? I don't have any hair to loose, but I do have these twitches, and seem to be getting more honory with age. Hey, that's a good excuse.......side effects from lead poisoning. Should have told that to my x-wife, she blamed it on bourbon!
------------- It takes a big hole to bury an elephant. Kirk Miller [URL=http://www.correctcraftfan.com/forum/register.asp?FID=7]KIRKS79/URL] |
Posted By: WakeSlayer
Date Posted: March-05-2009 at 2:42pm
I was grinding the tip off of a small screw on Saturday night to fix my tach lens. I wear glasses and had the shield in front of the wheel. Somehow, I caught a little piece of stainless in the eye. Teared about a pint before it came out. Was unable to flush it out either. Musta just worked out itself. Could still feel the scratch for three days. Always ALWAYS with the eye protection. You only get two. ------------- Mike N 1968 Mustang |
Posted By: the grinch
Date Posted: March-06-2009 at 4:12am
|
Confirmed! I've had that little christmas tree grinder layed against my eyeball at the emergency room and I definitely don't want that again. ------------- It takes a big hole to bury an elephant. Kirk Miller [URL=http://www.correctcraftfan.com/forum/register.asp?FID=7]KIRKS79/URL] |
Posted By: eric lavine
Date Posted: March-06-2009 at 10:20am
|
q-tips dipped in vaseline will almost 99% of the time get something out of the eye, drag it across each direction to snag it,
went for the drill or christmas tree many moons ago, too much pain afterwards for me.....q-tip wprks well ------------- "the things you own will start to own you" |
Posted By: WakeSlayer
Date Posted: March-09-2009 at 10:29pm
|
Luckily, the debris came out of my eye. What in the hell is the christmas tree? Do I even want to know?
------------- Mike N 1968 Mustang |
Posted By: the grinch
Date Posted: March-09-2009 at 10:33pm
|
It's a bit in a grinder that they use for removing debris stuck in the eyeball. So....no,you don't want to know. ------------- It takes a big hole to bury an elephant. Kirk Miller [URL=http://www.correctcraftfan.com/forum/register.asp?FID=7]KIRKS79/URL] |
Posted By: 79TiqueRebuild
Date Posted: March-09-2009 at 10:56pm
| I've had that done the Dr. said it had already begun to rust. no fun... wear eye protection so you can enjoy the scenery..... |
Posted By: the grinch
Date Posted: March-10-2009 at 3:31am
Hey, thanks to Pete, I have the three correct decals for rear sides. You can see the difference in the size of the "CC since" decals that came from Pete. Pete's are on the right. Check out the little paper boat with the "C" note in it. That was a b'day present from my super creative girlfriend.
 ------------- It takes a big hole to bury an elephant. Kirk Miller [URL=http://www.correctcraftfan.com/forum/register.asp?FID=7]KIRKS79/URL] |
Posted By: the grinch
Date Posted: March-12-2009 at 8:39pm
|
I placed my 4th and last order with USComposites Tuesday before last. On last Thursday they called to tell me that the 1.5oz chopped mat had been discontinued by their supplier. On Tuesday of this week I received the order. This tells me that my order was not even looked at until 2 days after they received it! If I did business like that I wouldn't be in business very long! I can normally order anything in the Southeast and have it normal UPS in 2 days. For future reference, anyone who may start a project and need fabric and epoxy should shop it out. I'm not at all impressed with their service and I ordered the chopped strand mat I needed from FIBERGLASSITE.COM ------------- It takes a big hole to bury an elephant. Kirk Miller [URL=http://www.correctcraftfan.com/forum/register.asp?FID=7]KIRKS79/URL] |
Posted By: the grinch
Date Posted: March-24-2009 at 2:03am
Had a great wknd with some decent weather and was able to get some things done. I'm posting this one picture of the plywood floor that encompasses the ski pylon and battery box because someone had asked on another post. I bonded some strips to the bottom that will catch against the front side of the bulkheads should there be great leverage on the floor structure from the pylon.
 ------------- It takes a big hole to bury an elephant. Kirk Miller [URL=http://www.correctcraftfan.com/forum/register.asp?FID=7]KIRKS79/URL] |
Posted By: the grinch
Date Posted: March-24-2009 at 2:14am
Now it's in and battery box glassed in.

The foam is about done with the exception of a few low spots left to fill. Future reference for others, is to be sure and leave enough room around the vent tubes at the transom to be able to trim foam and glass and seal around. Mine are a little tight but I'll have to make do. I probably wasted more foam than I should have, but it was difficult to calculate and get even pours. I would also recommend that saving your empty resin gallon jugs and cutting the top off makes excellent containers for mixing and pouring foam. The jugs have some type of coating on them that keeps the foam from sticking too bad and they are somewhat flexible for making a pouring spout as well.  ------------- It takes a big hole to bury an elephant. Kirk Miller [URL=http://www.correctcraftfan.com/forum/register.asp?FID=7]KIRKS79/URL] |
Posted By: the grinch
Date Posted: March-24-2009 at 2:29am
Here are a few more of the foam.

 ------------- It takes a big hole to bury an elephant. Kirk Miller [URL=http://www.correctcraftfan.com/forum/register.asp?FID=7]KIRKS79/URL] |
Posted By: the grinch
Date Posted: March-24-2009 at 2:35am
Almost forgot........ever notice how these older boats had no cup holders? I'm going to put plenty in before I'm done and here is where the first is going.
 ------------- It takes a big hole to bury an elephant. Kirk Miller [URL=http://www.correctcraftfan.com/forum/register.asp?FID=7]KIRKS79/URL] |
Posted By: the grinch
Date Posted: March-24-2009 at 2:38am
|
After looking at this picture, I notice that I need a new decal beside the shifter. Anyone have this decal? ------------- It takes a big hole to bury an elephant. Kirk Miller [URL=http://www.correctcraftfan.com/forum/register.asp?FID=7]KIRKS79/URL] |
Posted By: JDiggs
Date Posted: March-24-2009 at 3:59am
|
Looking great. How did you do the holes thru the bulkhead. Just ran the PVC thru? Looks like you got something around it?
What's the hole in the side of the stringer? |
Posted By: 79TiqueRebuild
Date Posted: March-24-2009 at 9:08pm
| Great idea on the cup holders, I'm going add that to my plans. Looks like you are moving right along thanks for the pics. |
Posted By: the grinch
Date Posted: March-25-2009 at 3:40pm
|
The PVC is just run through the bulkheads and sealed with 3M5200. After glassing is finished, I'll put another coat of 5200 around them. I'm not exactly sure what hole you're seeing in the stringer. There would be one in the ds primary stringer for the bolt which holds the steering cable pivot. The only other holes would be in the secondary stringers and they would be PVC vent tubes running under the floor back to the transom. ------------- It takes a big hole to bury an elephant. Kirk Miller [URL=http://www.correctcraftfan.com/forum/register.asp?FID=7]KIRKS79/URL] |
Posted By: JDiggs
Date Posted: March-26-2009 at 2:17am
| Thanks man. I was mistaken. It's not in the stringer, its above it. (different than my tique config) As seen in your last photo showing the bilge in the lower right corner. Great idea on the cup holders. Im going to try this and make a combo speaker box/cupholder out of it. |
Posted By: JoeinNY
Date Posted: March-26-2009 at 2:26am
|
FYI, That sticker is for sale in the parts section, if you cant find it let me know and I will post a link when I am on a computer and not my phone.. ------------- http://www.correctcraftfan.com/diaries/details.asp?ID=1477 - 1983 Ski Nautique 2001 1967 Mustang 302 "Decoy" http://www.youtube.com/watch?v=cO5MkcBXBBs - Holeshot Video |
Posted By: the grinch
Date Posted: March-27-2009 at 10:33am
|
Thanks Joe, I'll do some searching when I get time as well. ------------- It takes a big hole to bury an elephant. Kirk Miller [URL=http://www.correctcraftfan.com/forum/register.asp?FID=7]KIRKS79/URL] |
Posted By: Hollywood
Date Posted: March-27-2009 at 2:13pm
|
http://www.correctcraftfan.com/forum/forum_posts.asp?TID=12742&PN=1 - No need to search, I think this is the thread Joe is talking about ------------- |
Posted By: the grinch
Date Posted: March-28-2009 at 10:48pm
|
Thanks Kevin, I need to verify that yellow decal is the correct one. ------------- It takes a big hole to bury an elephant. Kirk Miller [URL=http://www.correctcraftfan.com/forum/register.asp?FID=7]KIRKS79/URL] |
Posted By: the grinch
Date Posted: March-28-2009 at 11:02pm
I took some pictures last night of the "log" after removing the prop shaft. The log seems to be wallowed out pretty bad. I don't know if it's visible in these pics but I need to know if I need to do something about this?


The shaft must have been replaced by PO. There is hardly a scratch on it.  ------------- It takes a big hole to bury an elephant. Kirk Miller [URL=http://www.correctcraftfan.com/forum/register.asp?FID=7]KIRKS79/URL] |
Posted By: 8122pbrainard
Date Posted: March-29-2009 at 11:41am
|
Kirk,
Looks like there are a couple areas where the log is worn all the way through the bottom. Classic case of running the boat with rotten stringers and bad engine alignment. The one hole looks like it's right under the hose connecting the log to the stuffing box. Since the hose covering the hole would be the only thing keeping the water out (if it even covers the hole!) I'd recommend grinding it out and glassing in a new one. Do a search for "Buck Algonquin" and you'll find the logs. Best time to set a new log is when you have the engine and shaft in and aligned with the strut/cutlass bearing. Then, the shaft will give you the reference point to the exact position of the log. I wonder what the old shaft looked like? ------------- /diaries/details.asp?ID=1622" rel="nofollow - 54 Atom /diaries/details.asp?ID=2179" rel="nofollow - 77 Tique 64 X55 Dunphy Keep it original, Pete < |
Posted By: BuffaloBFN
Date Posted: March-29-2009 at 11:58am
I bet it looked like a stair baluster.  ------------- http://correctcraftfan.com/diaries/details.asp?ID=2331&sort=&pagenum=12&yrstart=1986&yrend=1990" rel="nofollow - 1988 BFN-sold "It's a Livin' Thing...What a Terrible Thing to Lose" ELO |
Posted By: 79TiqueRebuild
Date Posted: March-29-2009 at 12:13pm
| Now I know what I'll do today pull shaft and check mine. I wanted to look at that cutlass Bearing and see what size hose and packing I will need. |
Posted By: the grinch
Date Posted: March-29-2009 at 1:51pm
|
Looks like the grinder is comming out again.
From the looks of things, PO had a problem at some point. The strut bearing is a non-metalic version that looks new and of course the shaft itself looks new.(The PO did tell me it had a new shaft in it.) When I finally got the boat running and was able to put it in gear, I noticed some serious vibration. I dismissed this as a major problem because I new the PO was the one who put the motor in last and was sure he didn't align the coupling. I new this because I asked him if he had any problems aligning it and he said, "No, it bolted right up." ????????? So....I dismissed the vibration and figured it would be solved when I put everything in and aligned. Now I'm wondering, was the shaft and strut bearing replaced because he thought that would take care of his vibration problem? The prop has hit the bottom of the hull before because the repair is obvious, but I don't know when or why. From the looks of the Buck Algonquin site, they ought to have the log I need. So, I'll get the grinder warmed up. ------------- It takes a big hole to bury an elephant. Kirk Miller [URL=http://www.correctcraftfan.com/forum/register.asp?FID=7]KIRKS79/URL] |
Posted By: eric lavine
Date Posted: March-29-2009 at 1:54pm
|
those famous last words, it bolted right up....it was fine, ------------- "the things you own will start to own you" |
Posted By: Pgaboeing
Date Posted: March-30-2009 at 12:05pm
|
Kirk, I've been following your post as I do my stringers. Great info, Where did you find the nylon bristle brush for your grinder.
Thanks. Paul |
Posted By: the grinch
Date Posted: March-30-2009 at 8:05pm
|
Paul, the one I have can be found at most automotive paint stores. I sell them, and looked up a price which was $33 and change. We don't have our website up and running just yet so I can't direct you there, but I have seen them for around $25 at local jobber stores. I think the brand name to look for is ASTRO if I'm not mistaken. ------------- It takes a big hole to bury an elephant. Kirk Miller [URL=http://www.correctcraftfan.com/forum/register.asp?FID=7]KIRKS79/URL] |
Posted By: the grinch
Date Posted: March-30-2009 at 8:14pm
I was able to cut the log out yesterday and yes, it definitely had severe wear in two places all the way through. I found what seems to be the replacement from Buck Algonquin's website, however, they don't sell direct to end user and had to order from a distributor. Comming from Florida, so I should have by the end of the week. If it matches up I'll post the part number.

 ------------- It takes a big hole to bury an elephant. Kirk Miller [URL=http://www.correctcraftfan.com/forum/register.asp?FID=7]KIRKS79/URL] |
Posted By: Pgaboeing
Date Posted: March-30-2009 at 9:47pm
|
Kirk,
Thanks, I was able to get one main stringer and two substringers out of the boat this weekend. Time to get into some wood work. Paul |
Posted By: 79TiqueRebuild
Date Posted: March-30-2009 at 10:47pm
|
I checked mine after seeing your post and it look real good no wear. Looking at the area around it though the glass in that square area was gray color while the rest was a salmon. Maybe the p.o had replaced.
Is that hose special or can I use a piece of cooling hose? |