 Boats For Sale:


Driver’s Seat Rebuild 84 SN 2001 |
Post Reply 
|
| Author | |
wesman 
Groupie 
Joined: April-14-2005 Location: United States Status: Offline Points: 42 |
 Post Options Post Options
") Thanks(0) Thanks(0)
 Quote Reply Quote Reply
 Topic: Driver’s Seat Rebuild 84 SN 2001 Topic: Driver’s Seat Rebuild 84 SN 2001Posted: March-13-2007 at 12:41pm |
|
Hi, I am rebuilding the driver's seat on my 1984 Ski Nautique 2001. The plywood is rotted and I have the seat upholstery and padding removed. Looks like the previous owner used regular staples that rusted badly and only used soffit staples to nail the plywood sides/back, and bottom together! No wonder it was falling apart! Anyway, I plan on using 1/2" exterior plywood and possibly coating with epoxy once it is together. What fasteners should I use to connect the pieces? Stainless screws? Seems like whatever I use will not be too strong a bind since it is being screwed into 1/2 plywood. Are there any other fasteners, like anchor bolts, that anyone recommends? Also, where can I buy a new seat sliding railing that matches the oem seat railing and about how much does one cost?? Mine is badly rusted, and one of the mounting bolts is rusted to a nub. Good news is that my fiberglass base is in great shape with no cracks! What do you recommend I use to coat the seat frame to extend its life? Help, advice is appreciated!
|
|
|
Wesman
|
|
 |
|
|
8122pbrainard
Grand Poobah 

Joined: September-14-2006 Location: Three Lakes Wi. Status: Offline Points: 41040 |
Post Options
Thanks(0)
Quote Reply
Posted: March-13-2007 at 3:32pm |
|
Wesman, It may not have been the previous owner using regular staples. CC in some areas has the habit of not using stainless nor anodizing the aluminum they use.
Coating the ply with epoxy is a good idea to try to seal it from moisture. Stainless "T" nuts are great for screwing into thinner plywood. They are available in machine screw as well as fractional sizes. You can find them at a good hardware or home center. These are the anchors you may be thinking about. I don't know about the rail but am sure someone else here will. If the seat frame is aluminum, I would have it clear (or color) anodized. The anodizer will be able to clean it up and then coat it. |
|
|
|
|
wesman
Groupie
Joined: April-14-2005 Location: United States Status: Offline Points: 42 |
Post Options
Thanks(0)
Quote Reply
Posted: March-13-2007 at 4:30pm |
|
Thanks for the info and advice 8122pbrainard. The upholstery was redone by the original owner, and he used the non-ss staples. Sorry to hear that even CC didn't use SS staples on some of the boats. My seat frame is all plywood with no alumunum. I know about t-nuts, but don't think they will work in this case, since the screws will need to go in the ends of the plywood. Maybe I can use a piece of angled solid wood blocks to reinforce where the frame pieces are joined, then put the t-nut into the block...may not be able to fit the seat bottom and back cushions in though. Regarding the epoxy, if I coat the plywood with epoxy, then would I be able to staple into it when I attach the upholstery? Thanks again for the info and reply! Wesley
|
|
|
Wesman
|
|
|
|
|
dans
Senior Member 
Joined: March-23-2006 Location: United States Status: Offline Points: 187 |
Post Options
Thanks(0)
Quote Reply
Posted: March-13-2007 at 7:15pm |
|
I just rebuilt all my seats & coming pads before taking it to the vinyl shop. I used non treated plywood (3/4 for observers bottom). Cut wood , Sanded smooth , Coated with epoxy & used T nuts. I found all old bolts had to be cut off and T - nuts work better epoxied to the boards after they are hammered in so they don't spin the wood . I re-used my combing pad hardware & epoxied the pole pieces to the wood. Thanks , Dan
|
|
|
|
|
8122pbrainard
Grand Poobah
Joined: September-14-2006 Location: Three Lakes Wi. Status: Offline Points: 41040 |
Post Options
Thanks(0)
Quote Reply
Posted: March-14-2007 at 4:54am |
|
Wesman, Ok, now I understand that you what to screw into the EDGE of the ply to hold the "box" together. Glued triangular gussets in the corners are good but require clamping or nailing/stapling in place so the epoxy can set up and that can get involved. Here's a Method I have used on ply and end grain wood as well as reinforcing sloppy wood holes from repeated hardware removal. Pre Drill generous size pilot holes larger than the root dia. of the screw. #8's would be fine. (I use SS sheet metal screws because they have a aggresive and full length thread) Get some disposable plastic syringes sometimes sold as glue injectors. Using the epoxy you plan on using to coat the ply, don't add any fillers and using the syringe fill all your pilot holes. You may need to fill them a couple times because the epoxy really gets sucked into the wood around the pilot hole. After curing you will probably need to redrill the pilots holes again to remove excess epoxy. If the screw is difficult to drive in, drill a larger pilot hole. You do not what to put to much outward pressure on the hole and risk splitting the ply. Let the screw threads do the work. About 1" of screw engaugement into the edge of the ply is good so you will need 1 1/2" screws. You will end up with a VERY strong assemby.
Who's epoxy are you planning on using and have you used it before? One other tip; to extend the working time of the mixed epoxy, put it in a shallow pan like a pie plate rather than a cup. In a cup, all the heat generated from the curring epoxy is concentrated and it can get away from you. Also, mix small batches as it goes farther than you think. You can always mix more. The epoxy coating shouln't prevent the staples from going in. You won't be putting on that thick of a coating. Be sure to get plenty on the edges though. It will really get sucked in. |
|
|
|
|
Randy_in_Ohio
Platinum Member 

Joined: September-13-2006 Location: N. Canton, OH. Status: Offline Points: 1891 |
Post Options
Thanks(0)
Quote Reply
Posted: March-14-2007 at 8:22am |
|
I looked everywhere for the seat rails. Only place I was able to find them was through my local CC dealer (Vandevere). they cost about $20 for each side.
|
|
|
|
|
8122pbrainard
Grand Poobah
Joined: September-14-2006 Location: Three Lakes Wi. Status: Offline Points: 41040 |
Post Options
Thanks(0)
Quote Reply
Posted: March-14-2007 at 8:29am |
|
Anyone have a picture to post of what these rails look like? Remember, I'm a old CC fan and not well informed on anything newer than a 80!!!
|
|
|
|
|
wesman
Groupie
Joined: April-14-2005 Location: United States Status: Offline Points: 42 |
Post Options
Thanks(0)
Quote Reply
Posted: March-14-2007 at 8:57am |
|
Great advice 8122pbrainard, thanks! I thought about using Gorilla glue to do the same thing you dicussed using epoxy, but epoxy makes much more sense! What kind of epoxy do you recommend and where can I get it? I am assuming you are talking about epoxy fiberglass resin, right? Regarding stainless steel staples, can I find these at a Home Depot or a Lowe's? I have only seen the normal staples, but then again, I have never looked for the SS ones. I also need to find some sheets of poly filler to cover the plywood side rails before I replace the upholstery...thinking a fabric store would have that stuff. Good news about the rails, I took my grinder and ground out the rusted bolts, so I am just going to replace them with SS bolts and I should be good to go. I soaked the bearings with penetrating oil and now they move freely, so I am not going to replace them after all...just going to remove the rust and spray primer on it (it will be under the seat, so it doesn't have to be pretty!). I will try and get pics up of the rails later. Thanks for all the great advice!
|
|
|
Wesman
|
|
|
|
|
8122pbrainard
Grand Poobah
Joined: September-14-2006 Location: Three Lakes Wi. Status: Offline Points: 41040 |
Post Options
Thanks(0)
Quote Reply
Posted: March-14-2007 at 9:37am |
|
Yes, straight epoxy resin. Besides using it for laminating fiberglass,there are a whole bunch of fillers that you can add to it to thicken it for different purposes. West epoxy brand is probably the most popular and available at most marine supplys like West marine. It is however more expensive than others. You can do a search for Mas epoxy and do some reading. You will need a set of metering pumps that go into the tops of the part A&B containers so you will get the exact mixing ratio. They will be available from whoever you get the epoxy from. The stuff will not go bad with age so you can use it for other things. I would start with a quart of resin and the corresponding size of hardener. Oh, rolling on the coating on the ply is easier than brushing. A 3"or 4" roller and cover would be great for the seat base. Avoid the cheap foam covers at the hardware as they will far apart from the resin.
I just saw SS staples at Home Depot the other day. SS is softer than the regular ones so sometimes they don't like to go into the wood without bending so don't get ones any longer than you really need. 1/4" ? The thin poly (I'm assuming foam) is somthing the upholstery or fabric shop would have. Glad to here you salvaged your sliders. If you are just going to paint them, I love the "cold galvanizing" in a spray can for projects like the slider rails |
|
|
|
|
Bob's2001
Senior Member
Joined: March-28-2005 Location: Lake Jackson TX Status: Offline Points: 241 |
Post Options
Thanks(0)
Quote Reply
Posted: March-14-2007 at 4:53pm |
|
I have used Monel staples. I got them at a local hardware store. They are Arrowbrand. Monel won't rust and is pretty hard.
|
|
|
Bob Ed
83 2001 |
|
|
|
|
wesman
Groupie
Joined: April-14-2005 Location: United States Status: Offline Points: 42 |
Post Options
Thanks(0)
Quote Reply
Posted: March-14-2007 at 9:27pm |
|
Thanks for the wonderful advice everyone!
Well, I went shopping today and got all the parts needed to re-do my driver's seat frame: 1/2" plywood from Home Depot West Marine Epoxy Resin to coat the plywood with some fiber filler to reinforce the joints #8 SS sheet metal screws, flat head to join the plywood pieces, 1.5 inches long poly filler from the local fabric store (I felt like a fish out of water in that store!) stainless steel lock nuts and bolts to replace the rusted ones on the slide rail (I had to grind out the old ones) spray primer and cold galvanizing paint for the rails after I sand off the rust 3/8" SS staples (fit the T50 Arrow Heavy Duty Staple Gun), from Home Depot Wish me luck! I will post pics when done! Wesley |
|
|
Wesman
|
|
|
|
|
81nautique
Grand Poobah

Joined: September-03-2005 Location: Big Rock, Il Status: Offline Points: 5772 |
Post Options
Thanks(0)
Quote Reply
Posted: March-14-2007 at 9:45pm |
|
Sorry I didn't see this thread earlier. I rebuilt all my seats last winter. I used 5/8" ply, bisquit jointed all seams to help line everything up while assembling, used countersunk stainless screws and waterproof polyurethane glue. Then coated everything in resin and applied a little cloth on all the outside seams for a little more strength. They are rock solid and much better than when they left the factory.
|
|
|
You can’t change the wind but you can adjust your sails
|
|
|
|
|
8122pbrainard
Grand Poobah
Joined: September-14-2006 Location: Three Lakes Wi. Status: Offline Points: 41040 |
Post Options
Thanks(0)
Quote Reply
Posted: March-15-2007 at 7:04am |
|
Wesley, Did you get the metering pumps for the West epoxy? The mix ratio is critical with the West. With the Mas, they say it isn't and you can even "eye ball" it in measuring containers. I however like the pumps because you can mix up small (1 pump stroke) batches plus they aren't as messy. If you got the pumps, don't forget to purge the air out.
81, Nice job on the seat bases. I'm sure they will last allot longer than the OEM's!! |
|
|
|
|
wesman
Groupie
Joined: April-14-2005 Location: United States Status: Offline Points: 42 |
Post Options
Thanks(0)
Quote Reply
Posted: March-15-2007 at 10:20am |
|
8122pbrainard, yes, I sprang for the metering pumps along with a gallon of the epoxy resin and a quart of the slow cure hardener. I wasn't sure if a quart would be enough, and the cost for a gallon was better than having to buy multiple quarts. Plus, I'm sure I will be using the remaining resin for redoing other boat seats eventually.
I cut out the seat pieces yesterday. My hand wasn't as steady on the cut with the sabre saw, so I will be doing quite a bit of sanding to even out everything. 81, very nice job on the seat bases. I hope my driver's seat base turns out that good! |
|
|
Wesman
|
|
|
|
|
8122pbrainard
Grand Poobah
Joined: September-14-2006 Location: Three Lakes Wi. Status: Offline Points: 41040 |
Post Options
Thanks(0)
Quote Reply
Posted: March-15-2007 at 10:54am |
|
Wesley, I forgot to ask if you found the syringes. West offers them as one of their accesory items so if you found a well stocked store they would have them.
If you havent worked with epoxy before, I'm sure you will find it quite easy and actually fun to work with. |
|
|
|
|
wesman
Groupie
Joined: April-14-2005 Location: United States Status: Offline Points: 42 |
Post Options
Thanks(0)
Quote Reply
Posted: March-16-2007 at 10:38pm |
|
8122pbrainard, I forgot to mention that I did pick up some of those disposable syringes at West Marine.
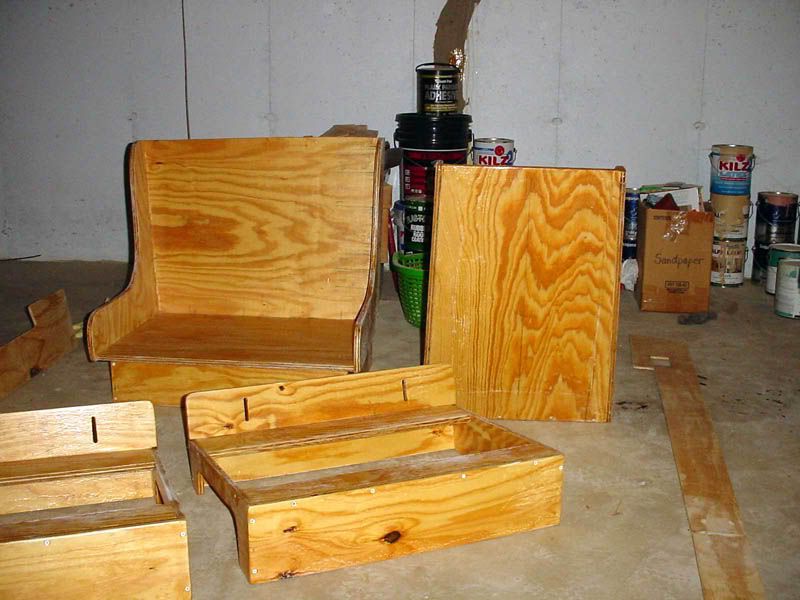
I started on the project yesterday. I sanded the edges smooth on the top portions of the seat assemble so there wouldn't be any sharp corners for the upholstery. Then, I preassembled everything by drilling small pilot holes and fastening with the SS srews to make sure everthing lined up ok. I disassembled everything and overdrilled the lower parts of the screw holes and filled them with epoxy to increase the holding strength. Boy, the holes in the plywood really drinks the epoxy. I also applied the first coat of epoxy to the plywood. I will have to spend the next several days topping off the screw holes with epoxy. |
|
|
Wesman
|
|
|
|
|
8122pbrainard
Grand Poobah
Joined: September-14-2006 Location: Three Lakes Wi. Status: Offline Points: 41040 |
Post Options
Thanks(0)
Quote Reply
Posted: March-17-2007 at 12:51pm |
|
Wesley, I did warn you about the epoxy really getting sucked up in the holes!! The end result of this method is a joint that's allot stronger than any anchoring method.
The syringes can be reused. Let the epoxy cure and it will pop out with a little force. Sounds like you're making good progress. |
|
|
|
|
Post Reply
|
|
 Tweet
Tweet
|
| Forum Jump | Forum Permissions You cannot post new topics in this forum You cannot reply to topics in this forum You cannot delete your posts in this forum You cannot edit your posts in this forum You cannot create polls in this forum You cannot vote in polls in this forum |


 Topic Options