 Boats For Sale:


Floor/stringer repair: how far? |
Post Reply 
|
Page 123> |
| Author | |
duckfamily 
Newbie 
Joined: June-11-2006 Location: United States Status: Offline Points: 23 |
 Post Options Post Options
") Thanks(0) Thanks(0)
 Quote Reply Quote Reply
 Topic: Floor/stringer repair: how far? Topic: Floor/stringer repair: how far?Posted: December-27-2006 at 8:43pm |
|
I need help. I have pulled everything out of my 77 Ski Nautique. I have drilled into the stringers in several areas and have yet to find good wood. I do not have the time or expertize to redo the floor. I am in North Dakota but willing to travel. Please let me know.
ducky@gondtc.com. Thanks. |
|
|
Correct Craft owner for 13 years.
|
|
 |
|
|
Friday
Newbie
Joined: November-22-2006 Location: United States Status: Offline Points: 8 |
Post Options
Thanks(0)
Quote Reply
Posted: November-23-2006 at 10:16am |
|
Thanks for the reply, I only have a small 1.5' x 3' area so I'm going to try your method. I'll post and let you know how it turns out.
|
|
|
|
|
TRBenj
Grand Poobah 

Joined: June-29-2005 Location: NWCT Status: Offline Points: 21109 |
Post Options
Thanks(0)
Quote Reply
Posted: November-23-2006 at 1:34am |
|
Friday, it has only been a few months since I completed my floor, so I cant tell you you how well it will hold up. It appears to be at least as strong as the original floor, though- it is very hard and about the same thickness. The foam I poured is also more dense than it was from the factory- I dont doubt it was originally 2 lb density.
If I were to go it again, I dont know if I would use the 5200 on the bulkhead. Otherwise, I think my approach was very well thought out. If you plan on replacing the entire floor, I would do it with plywood over light density foam (2 lb). If you only have a spot repair or a single stringer to replace, its worth considering my method. Its no small task to put down 7 layers of fibergla$$- its time intensive and a rather unpleasant project. I certainly dont doubt its strength though. |
|
|
|
|
Friday
Newbie
Joined: November-22-2006 Location: United States Status: Offline Points: 8 |
Post Options
Thanks(0)
Quote Reply
Posted: November-22-2006 at 11:49pm |
|
Sorry, I'm trying to decide between using the fibergla$$ over foam technique or replacing the whole floor with plywood. Thanks
|
|
|
|
|
Friday
Newbie
Joined: November-22-2006 Location: United States Status: Offline Points: 8 |
Post Options
Thanks(0)
Quote Reply
Posted: November-22-2006 at 10:19pm |
|
I'm planning on using this same process on my 83', looks like you did a great job. I'm putting together a web page to post all the pics of the project. I have a couple of questions. Its been awhile since it looks like you've completed the project, how are the floors holding up? Would you recommend the same process for others, if not what would you do differently? Thanks for the help!!
|
|
|
|
|
TRBenj
Grand Poobah
Joined: June-29-2005 Location: NWCT Status: Offline Points: 21109 |
Post Options
Thanks(0)
Quote Reply
Posted: August-03-2006 at 12:03pm |
|
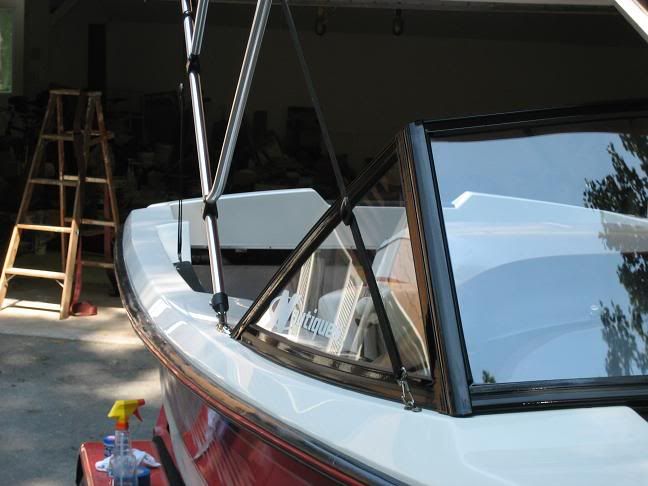
A little better shot of the powdercoated windshield:
|
|
|
|
|
TRBenj
Grand Poobah
Joined: June-29-2005 Location: NWCT Status: Offline Points: 21109 |
Post Options
Thanks(0)
Quote Reply
Posted: August-03-2006 at 8:27am |
|
Mark, I also expected all of my work to be done in a week- 5 weeks later, here I am. Laying down the glass on the floor took the most time due to all the layers and having to measure and cut so many pieces. I busted most of it out in 14 hrs though.
Joel, I like the spare there too. My real motivation to move it was to gain access to the ring welded on the trailer to attach the turnbuckle. I wanted something holding the front of the boat down, rather than just forward- its solid as a rock now. Hollywood, its all about product placement. Im expecting my sponsorship from A/B to come through any day now. 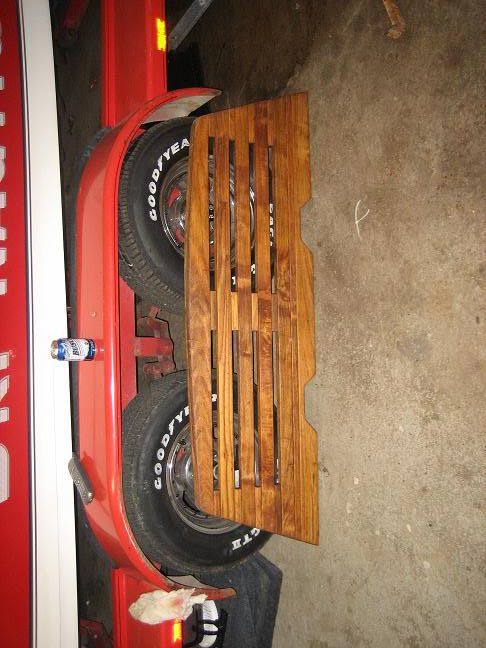
|
|
|
|
|
M3Fan
Grand Poobah

Joined: October-22-2005 Location: United States Status: Offline Points: 3185 |
Post Options
Thanks(0)
Quote Reply
Posted: August-03-2006 at 12:38am |
|
You moved the spare to the side of the trailer- smart move. That thing drove me NUTS in the old spot. Such a simple fix.
|
|
|
|
|
marks
Groupie 
Joined: April-23-2004 Location: United States Status: Offline Points: 96 |
Post Options
Thanks(0)
Quote Reply
Posted: August-03-2006 at 12:28am |
|
Tim,
I am still not done yet. This whole process sure has taken more time than I originally thought. Of course, at first I though I was fixing about 2 square feet of area. I have all of the foam in and plan to start laying fiberglass on Friday. I have plenty of mat and cloth, but I am worried that I am going to run short of resin. I only have 3 gallons, but based on your pics, I think I am replacing a little more floor area. I think I will order another gallon just to be safe. That's a bummer about the carpet. I have read a number of posts where someone has ordered yards of carpet, but received only a few feet. I bet you will be glad to get your boat back in the water. You have done a great job. I have been following the thread on your motor upgrade and I am looking forward to hearing how it performs. |
|
|
|
|
Hollywood
Moderator Group 

Joined: February-04-2004 Location: Twin Lakes, WI Status: Offline Points: 13510 |
Post Options
Thanks(0)
Quote Reply
Posted: August-02-2006 at 10:30pm |
Which is why I was expecting to see beer cans scattered all over the garage... |
|
|
|
|
TRBenj
Grand Poobah
Joined: June-29-2005 Location: NWCT Status: Offline Points: 21109 |
Post Options
Thanks(0)
Quote Reply
Posted: August-02-2006 at 10:08pm |
|
I took a few pics but they all came out crappy. Ill snap some more tomorrow in natural light. Proof that its actually together:
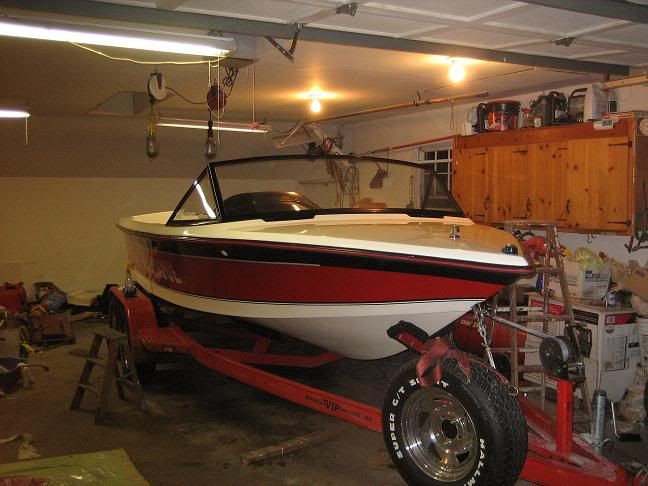
I hope it still feels as fast as it did without a windshield! |
|
|
|
|
TRBenj
Grand Poobah
Joined: June-29-2005 Location: NWCT Status: Offline Points: 21109 |
Post Options
Thanks(0)
Quote Reply
Posted: August-02-2006 at 8:00pm |
Funny you should ask! My dad and I just finished wrestling it back together. Not a fun job- the powdercoating adds some thickness to the metal so all the tolerances are much tighter. Of course, struggling with it in 100 degree heat makes it that much more enjoyable! Ill post some pics once I get it cleaned up. |
|
|
|
|
M3Fan
Grand Poobah
Joined: October-22-2005 Location: United States Status: Offline Points: 3185 |
Post Options
Thanks(0)
Quote Reply
Posted: August-02-2006 at 7:32pm |
|
Did you get the windshield back together?
|
|
|
|
|
TRBenj
Grand Poobah
Joined: June-29-2005 Location: NWCT Status: Offline Points: 21109 |
Post Options
Thanks(0)
Quote Reply
Posted: August-02-2006 at 2:46pm |
|
In total I used 3.5 gallons of resin (plus the associated amount of hardener). I went through about 6 yards of mat, and 4-5 yards of cloth. This includes the stringer repair as well as the floor.
You done with your floor yet Mark? |
|
|
|
|
marks
Groupie
Joined: April-23-2004 Location: United States Status: Offline Points: 96 |
Post Options
Thanks(0)
Quote Reply
Posted: August-02-2006 at 2:13pm |
|
Looks good. How much resin and how many yards of fiberglass did you end up using?
|
|
|
|
|
TRBenj
Grand Poobah
Joined: June-29-2005 Location: NWCT Status: Offline Points: 21109 |
Post Options
Thanks(0)
Quote Reply
Posted: August-01-2006 at 11:45pm |
|
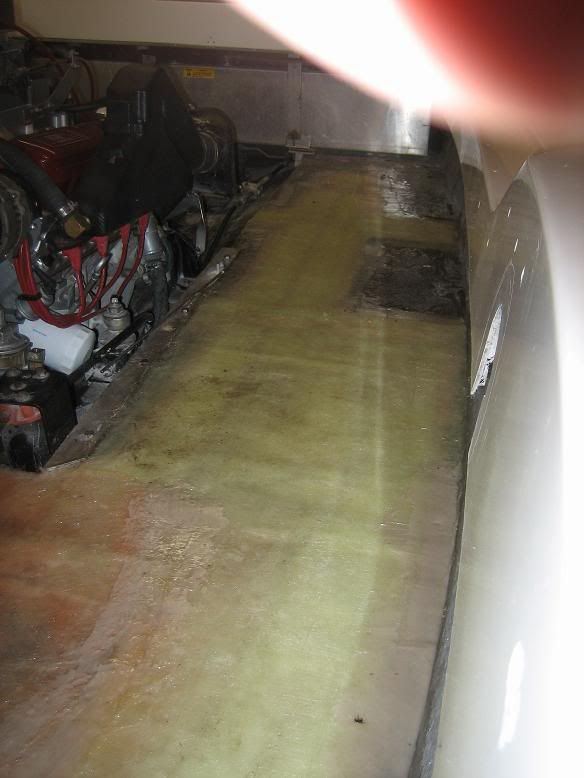
Thanks David. I am very tired of this floor project- no more fiberglass please! It came out pretty well and should be plenty strong. I will probably grind the edges on the battery box and motorbox before installing the carpet.
Perhaps there will be another project boat in my future... but I will enjoy being on the water for the time being! |
|
|
|
|
David F
Platinum Member
Joined: June-11-2004 Location: United States Status: Offline Points: 1770 |
Post Options
Thanks(0)
Quote Reply
Posted: August-01-2006 at 5:07pm |
|
Looks like you did a good job. Isn't it fun to fiberglass? I can see that you have good overlap onto the existing fiberglass, so your repairs should be plenty strong.
It looks like you still need to grind on the edges a bit (otherwise you will cut yourself eventually). Also, it looks my assessment of 6-8 layers and 2.66 gallons of resin was pretty close. Again, great job. |
|
|
|
|
TRBenj
Grand Poobah
Joined: June-29-2005 Location: NWCT Status: Offline Points: 21109 |
Post Options
Thanks(0)
Quote Reply
Posted: August-01-2006 at 12:01am |
|
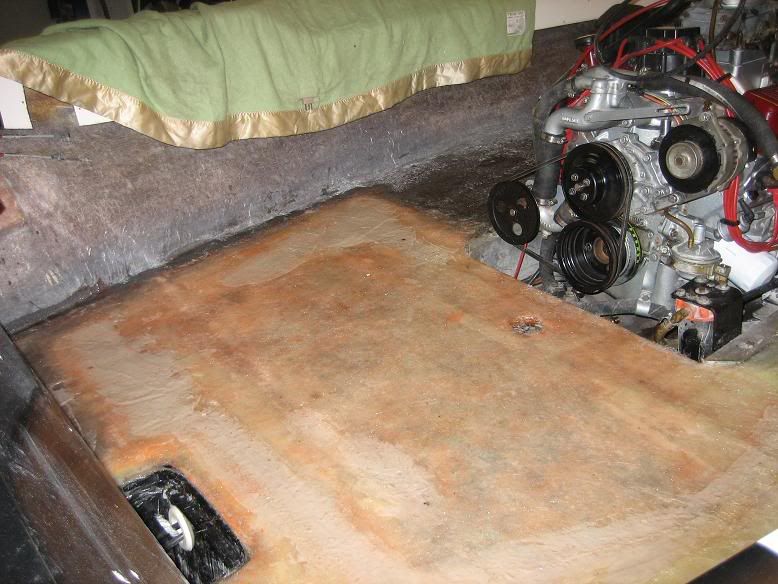
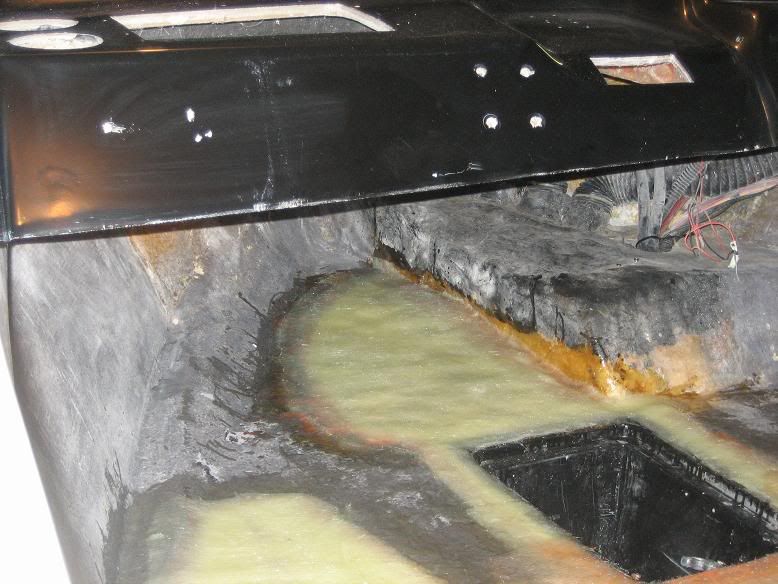
Update: the floor is now done. I had it 95% complete last weekend but ran out of resin. Today I put the last 2 layers of glass on the front wood section and then faired everything out with thickened resin (talc).
Over the stringer, I put down a total of 7 layers. On the front section (under the bow) I put down 5 layers since it wont be a high traffic area (this area was repaired previously with only 1 layer of mat). Over the wood, I put down 3. Seems to be at least as thick as the factory floor and plenty strong. Now that its faired, it should be at least as level as it was- though thats not saying much! Its now ready for carpet- it would be nice if I was sent the 13 yards of carpet that I ordered instead of 11 feet, but this may just give everyone attending the CCFan NE reunion a chance to see my glass work first hand! Pics: 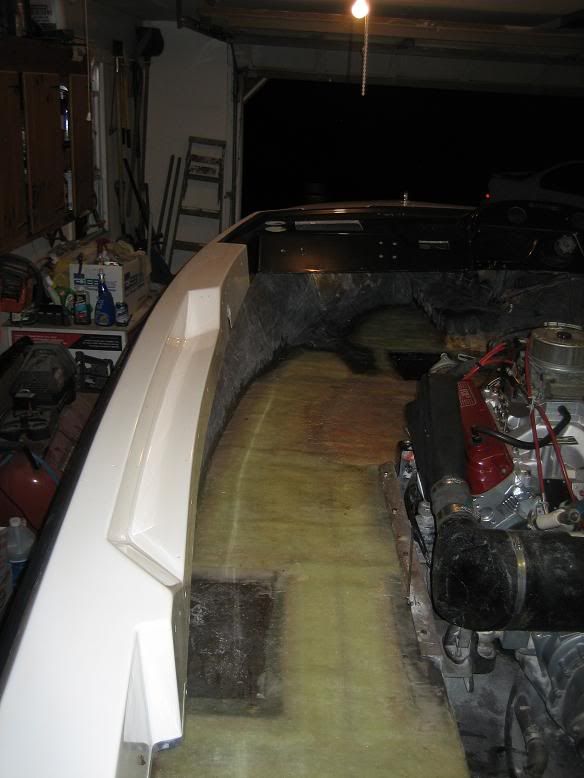
|
|
|
|
|
marks
Groupie
Joined: April-23-2004 Location: United States Status: Offline Points: 96 |
Post Options
Thanks(0)
Quote Reply
Posted: July-18-2006 at 5:08pm |
|
I'm in Champaign Illinois, about 100 miles south of Chicago. There are not a lot of lakes around here, so we actually ski in the cooling lake for a nuke.
I was worried about the high temps and humidity we have here during the summer, so when I bought my supplies from US composites, I opted for the slow hardener for the layup work and bought a small amount of the 1:1 stuff for gluing and patching. I haven't used any of the slow stuff yet, but on Sunday in the 95 degree temps the 1:1 epoxy had only 1/2 the pot life indicated at 80 degrees. |
|
|
|
|
TRBenj
Grand Poobah
Joined: June-29-2005 Location: NWCT Status: Offline Points: 21109 |
Post Options
Thanks(0)
Quote Reply
Posted: July-18-2006 at 4:24pm |
|
Mark, photobucket is very easy. Once theyre scanned in, you just upload the images. The 95 degree weather we're having is plenty warm for curing resin, but Im not sure the excessive humidity helps. Either way it was perfect weather to be working on the boat rather than at the lake!
 Where are you located? Where are you located?
|
|
|
|
|
marks
Groupie
Joined: April-23-2004 Location: United States Status: Offline Points: 96 |
Post Options
Thanks(0)
Quote Reply
Posted: July-18-2006 at 4:01pm |
|
Tim,
I've been taking pictures, but I'm old school and still use a film camera. When I get them developed, I will post a few of them. I need to figure out how to do the photobucket thing. As far as skiing verses fiberglass work, I guess my priorities were a little messed up. The 95+ degree weather would have been perfect for curing epoxy resin. |
|
|
|
|
TRBenj
Grand Poobah
Joined: June-29-2005 Location: NWCT Status: Offline Points: 21109 |
Post Options
Thanks(0)
Quote Reply
Posted: July-18-2006 at 3:07pm |
|
Mark, I am certainly no expert, but judging from my stringer install I'd say those numbers are correct. The mat added a lot more thickness than the cloth, which was very thin. With the 3 layers on the stringer (mat/cloth/mat), Id say total thickness was ~1/16".
Scaling that up to 7 or 9 layers would put me somewhere around 1/8"-3/16" thickness, which is what I want. Too bad you had to ski all day saturday. This fiberglass work is much more fun!  Id love to see pics of your project if you have any, btw. Id love to see pics of your project if you have any, btw.
|
|
|
|
|
JoeinNY
Grand Poobah

Joined: October-19-2005 Location: United States Status: Offline Points: 5693 |
Post Options
Thanks(0)
Quote Reply
Posted: July-18-2006 at 2:58pm |
|
sounds like from both of your sources the mat is giving you more thickness than I would have guessed and that will help out. I am not guessing on the cloth though I have used all kinds extensively, and the 6oz 1/100th inch is about right. Don't know how 1.5 oz mat gives more thickness than that but I have never used mat in a project except as a thin finishing layer before painting and it seems to be the case based on the info presented.
-Joe. |
|
|
|
|
marks
Groupie
Joined: April-23-2004 Location: United States Status: Offline Points: 96 |
Post Options
Thanks(0)
Quote Reply
Posted: July-18-2006 at 2:36pm |
|
Guys,
According to one of my books on boat repair, it says that 1.5oz mat will yield about 1/32 inch thickness and 6oz cloth about 1/100 inch. Does this sound correct or is it way off? Thanks, Mark |
|
|
|
|
TRBenj
Grand Poobah
Joined: June-29-2005 Location: NWCT Status: Offline Points: 21109 |
Post Options
Thanks(0)
Quote Reply
Posted: July-18-2006 at 2:14pm |
|
Joe, youre right- the cloth Im using is fairly light and didnt add a lot of thickness. The mat seems to have more weight to it, though its only supposed to be 1.5oz. The glass seemed to be fairly thick when I did the stringer, and I only used 3 layers. It also seemed quite strong and very hard. Just by eyeballing it, I thought 7 layers would be thicker than 1/8". When I spoke to the US Composites rep, he talked me out of going with the 6oz S-glass (saying it was overkill) and that the 4oz E-glass was plenty thick and strong for my application.
David, I have just over 2 gallons of resin left (plus the associated hardener). As you can see in the pics, I am not going the full width of the floor- there is only 3" of foam on either side of the stringer for the most part. The section that is close to full width is about 30" long. Only the one perpendicular support spans all the way to the main stringer, so I should only have to wrap into the bilge over a 3-6" section. I think I will proceed with the repair as planned and hope I get the thickness I need from the materials I have. Thanks to everyone for their input! |
|
|
|
|
JoeinNY
Grand Poobah
Joined: October-19-2005 Location: United States Status: Offline Points: 5693 |
Post Options
Thanks(0)
Quote Reply
Posted: July-18-2006 at 1:47pm |
|
TRBenj,
I think you will be surprised at how little it builds up. I would use more or thicker layers for your application. The foam support provides a lot of strength but you are going to need enough impact resistance to not have a ski fin drop or something of the like to start a delamination effect that will produce an eventual soft spot. 79, I have vacuum bagged bike frames and racing canoes before but that floor was done with a mohair roller standing in the center of the engine cutout and smoothing my way out, it involved a lot of bending over and reaching and it sucked, and it wouldnt work if the boat was a little bigger as I would not have been able to reach far enough. I did the bottom two layers out of the boat, used thicken expoxy to attach it to the stingers and the sides and create the fillet at the sides then did the 3layers (with some staggered overlaps) in progressively larger overlaps up the sidewalls of the boat. It is very light and stiff and should last forever but incredibly expensive. The foam for the floor alone was easily 300 dollars for a very small boat. The Mohair rolling process definitely used a bit more epoxy than vacumm bagging would have, but there were only on or two fairly inconsequential bubbles. -Joe. |
|
|
|
|
David F
Platinum Member
Joined: June-11-2004 Location: United States Status: Offline Points: 1770 |
Post Options
Thanks(0)
Quote Reply
Posted: July-18-2006 at 1:31pm |
|
You can, but the floor with be much thicker than you need in order to get the flexural strenght that you need.
If I were you, I would glass on side of the floor at a time. Do one side full thickness and let it cure. Once it cures, grind the edge where the other side of the floor will join it to a 12:1 taper. This way, you can work inside the boat and not worry about stepping in your work. The easiest way to spread resin on a large area is with a foam paint roller. Roll out air each third layer at a minimum. After overall thickness achieved, fill in low spots with scrap mat. Turn down each layer onto the side of the main stringer going further down each layer (make sure to grind off the bilge paint first. The mat will not want to make the 90 degree bend, so you may consider easing (1/2" radius or so) the corner. If you want the corner nice a sharp when you are done, cut narrow strips of mat (or cloth) and and build up the corner. Then when cured, you can grind the corner square again. You will have to modify this aproach in the area of the aluminum engine frame, but hopefully, yoiu get the idea. Remember, CC did not use woven roving (18oz.) in the construction of the floor (at least not in my boat). Depending on the material you purchased, you may need only 6-8 layers. Do a quick test to find out. How many gallons of resin did you purchase. I would guess you need to start with 2.66 gallons, especially since you are doing the entire floor. |
|
|
|
|
TRBenj
Grand Poobah
Joined: June-29-2005 Location: NWCT Status: Offline Points: 21109 |
Post Options
Thanks(0)
Quote Reply
Posted: July-18-2006 at 1:10pm |
|
Now you guys have me thinking. I thought that 7 layers of the lighter weight stuff would still be plenty thick. Would it be better to replace 1 or 2 layers of the cloth with some 18oz woven roving to get some more strength/thickness, rather than doing 10+ layers?
|
|
|
|
|
79nautique
Grand Poobah

Joined: January-27-2004 Location: United States Status: Offline Points: 7872 |
Post Options
Thanks(0)
Quote Reply
Posted: July-18-2006 at 12:10pm |
|
joe did you vaccum bag the sandwich layup or just brush/spray on the resin to wet out the cloth layers?
|
|
|
|
|
David F
Platinum Member
Joined: June-11-2004 Location: United States Status: Offline Points: 1770 |
Post Options
Thanks(0)
Quote Reply
Posted: July-18-2006 at 12:02pm |
|
The minimum overall thickness should be 1/8" in my oppinion. I agree, it will take 8-10 layers depending on the mat being used. The mat overcomes the diagonal weakness inherent in the cloth (or woven roving). CC does NOT (at least in my boat) orient the woven roving at a 45 degree angle in their hulls.
A test layup should be done to determine the number of alternating layers required to achieve 1/8" thickness. |
|
|
|
|
Post Reply
|
Page 123> |
 Tweet
Tweet
|
| Forum Jump | Forum Permissions You cannot post new topics in this forum You cannot reply to topics in this forum You cannot delete your posts in this forum You cannot edit your posts in this forum You cannot create polls in this forum You cannot vote in polls in this forum |


 Topic Options
 TRBenj wrote: