Floor/stringer repair: how far?
Printed From: CorrectCraftFan.com
Category: Repairs and Maintenance
Forum Name: Boat Maintenance
Forum Discription: Discuss maintenance of your Correct Craft
URL: http://www.CorrectCraftFan.com/forum/forum_posts.asp?TID=4002
Printed Date: April-16-2024 at 2:23am
Topic: Floor/stringer repair: how far?
Posted By: TRBenj
Subject: Floor/stringer repair: how far?
Date Posted: June-27-2006 at 10:03pm
|
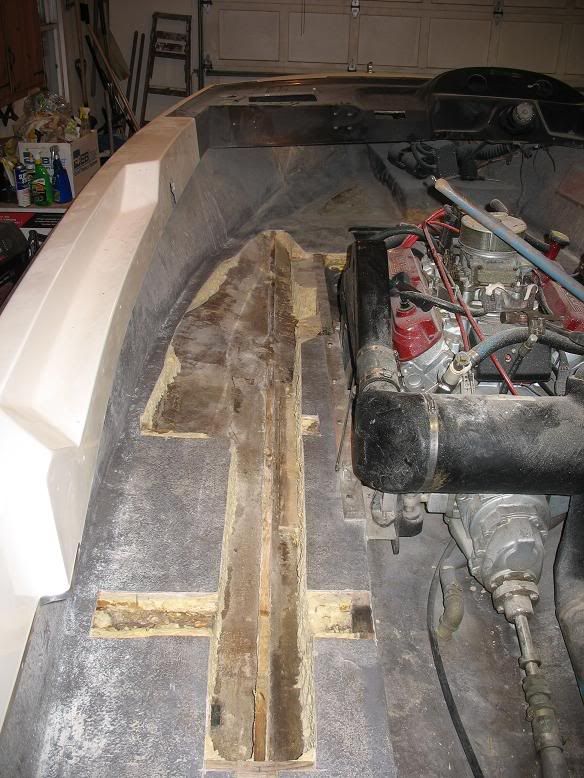
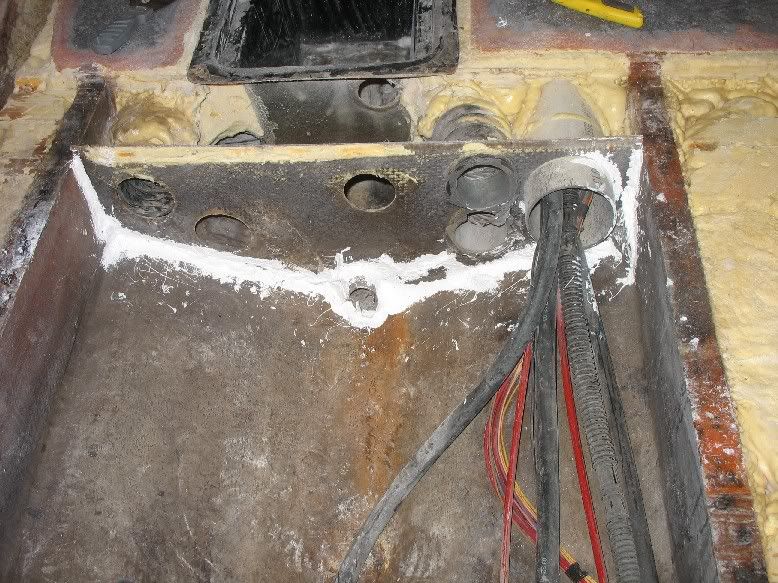
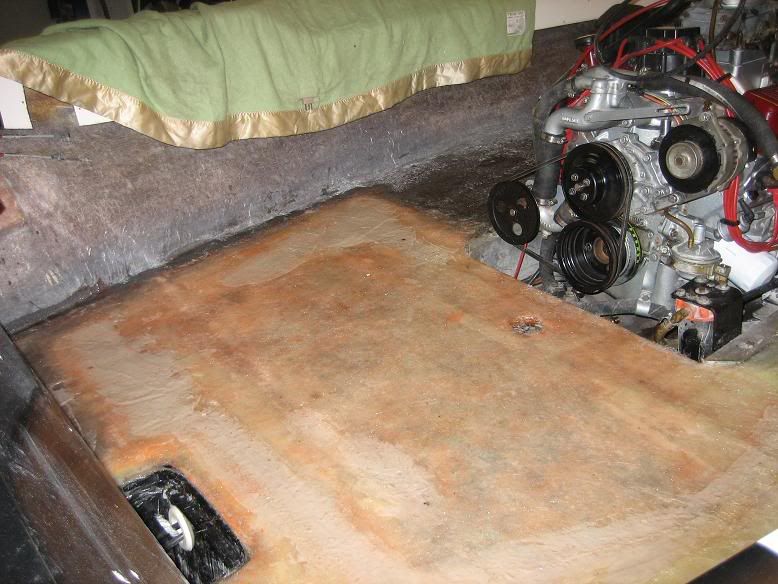
Today I started what I thought would be a relatively simple floor patch. I had a soft spot under the observer seat that I cut out, revealing some rotted wood. The wood located between the motor and battery box is rotted on the port side, mostly outwards of the main stringer.
Good news: Ive cut the fiberglass back and have found good wood. Only the board closest to the motor absolutely needs replacing- all the others span both main stringers without any rot. I think anything outside the main stringer can be replaced with foam and glass. Also, all the foam is dry. My boat must be new enough that its all closed cell. Most importantly, the main stringer feels solid. Bad news: Since the foam didnt absorb any water, it had to go somewhere- my secondary stringer on the port side is rotted as far as Ive dared to cut back. Outside the 1'x3' area that was soft, the floor is solid. All the foam surrounding it is dry. I still havent found where that secondary stringer dries up (if at all) and Ive already come across one perpendicular piece that is rotted as well. Question: Where do I go from here? Obviously I need to do something with the rotted stringer- can it be fixed or is replacing the only option? Seems a shame to tear in real deep since the foam is still dry. 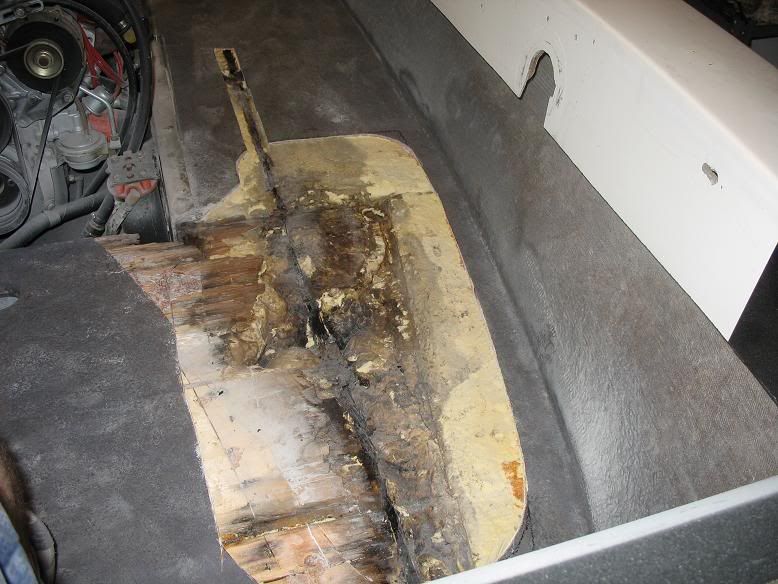
|
Replies:
Posted By: fuelctrl
Date Posted: June-27-2006 at 10:31pm
| I1m doing a partial restoration so I can ride this summer and full restoration this winter. My boat is a 78 tique and it is better to do it rite the first time. I1`ve gutted al the foam from the seats back and only took 3 days. the web site I found is awsome and check it out for reference. The guys have done alot of these and it is not that hard. The work I have done so far is on the forum maintenance foam, rot and gut 2 days ago. Here`s the web page http://www.rotdoctor.com/glass/GLrotrepair.html |
Posted By: M3Fan
Date Posted: June-28-2006 at 8:26am
| You're killing me with these pictures. I'd inject the secondary with GitRot or whatever... perhaps drilling holes along the secondary through the floor further back to inject it. Let it dry out and glass her over. I have no experience with this at all but I think tearing out the whole floor is extreme. |
Posted By: TRBenj
Date Posted: June-28-2006 at 9:28am
|
I hope that replacing the whole floor wont be necessary. My main concern at this point is the secondary stringer. I am going to pull out the wood in the front and inspect the stringers on the starboard side. If they are solid (like I suspect they are) then Ill concentrate my efforts on the one rotted port stringer.
What I can see now is pretty well rotted (soaked with water and crumbling) so Im going to keep digging until I find it dry. Most likely I will have to replace the whole thing. All the foam is dry, so would it be possible to just remove the foam directly surrounding it to give me room to glass the new stringer in, then re-foam the void and glass over? Or is there some reason I should remove all the foam on that side? ------------- |
Posted By: David F
Date Posted: June-28-2006 at 12:18pm
|
That method will work fine and is a good plan IMHO. You may find water between the foam and hull. If so, you need to let it dry out and then find the source of water intrusion. Look for cracks in the fiberglass at 90 degree bends and corners (bilge area). Repair as necessary. ------------- |
Posted By: Tim D
Date Posted: June-28-2006 at 1:25pm
|
Looks like a classic case where water has entered the plywood on the edge and delaminated it. ------------- Tim D |
Posted By: TRBenj
Date Posted: July-10-2006 at 3:12pm
|
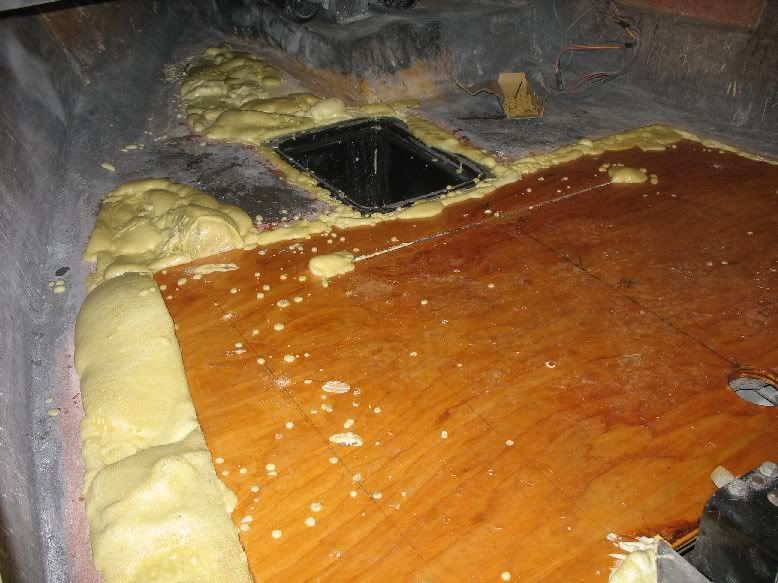
I know everyone loves pictures, so I thought I would give a quick update with my progress.
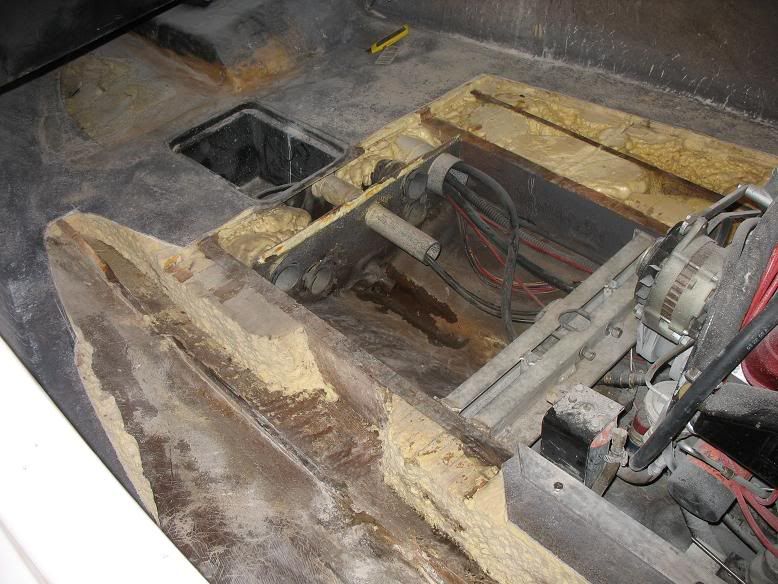
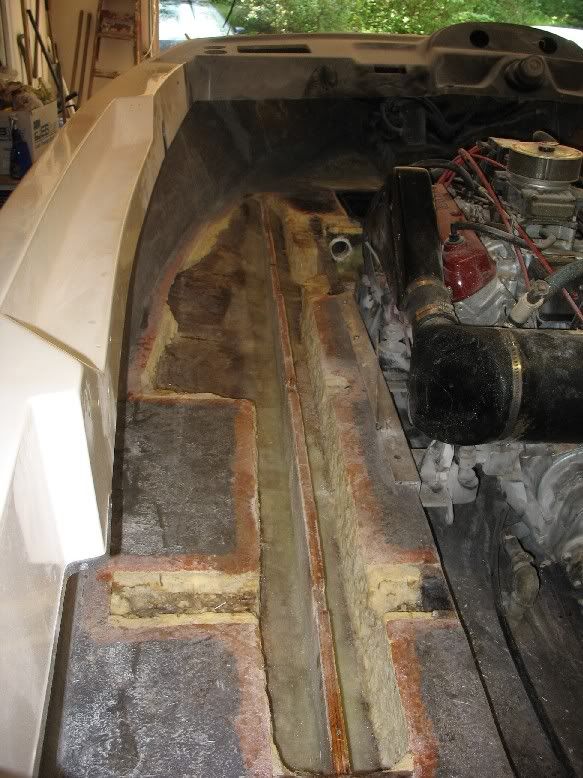
After finding the rot, the first thing I did was remove the wood between the pylon and battery box. 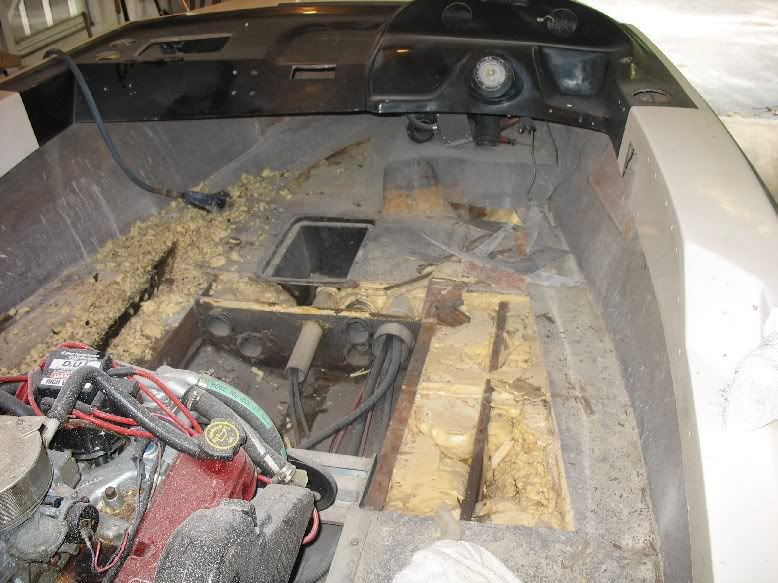
Then I cut back the fiberglass over the rotted stringer until I found decent wood. Then I started removing the foam surrounding the stringer. 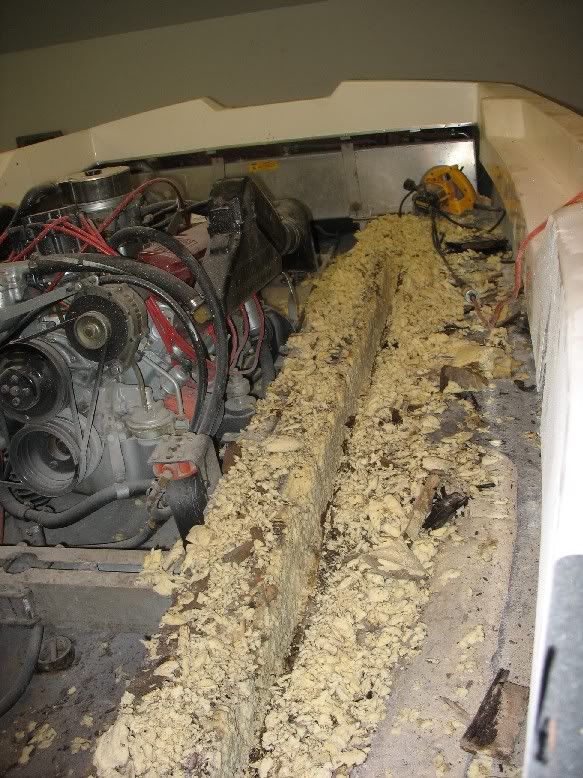
 ------------- |
Posted By: TRBenj
Date Posted: July-10-2006 at 3:24pm
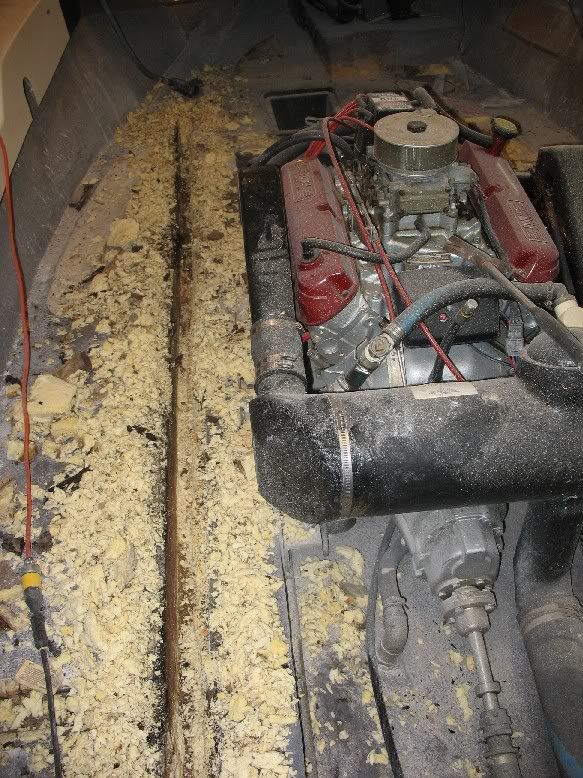
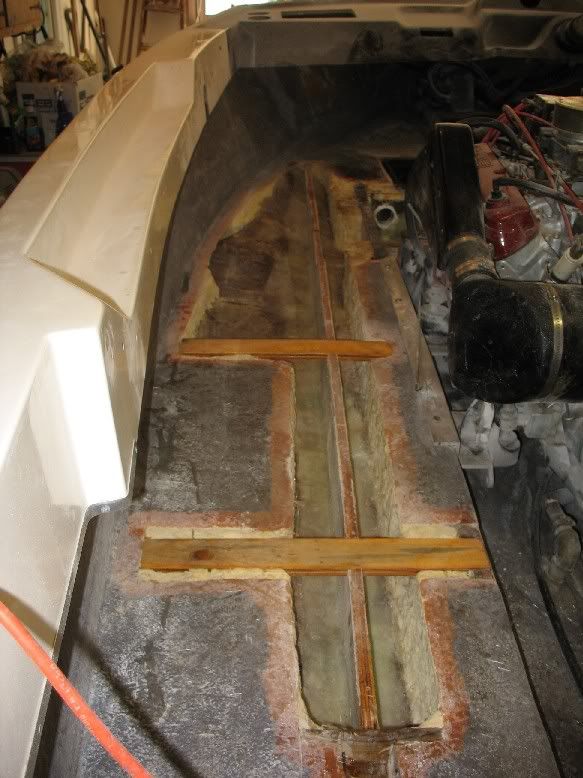
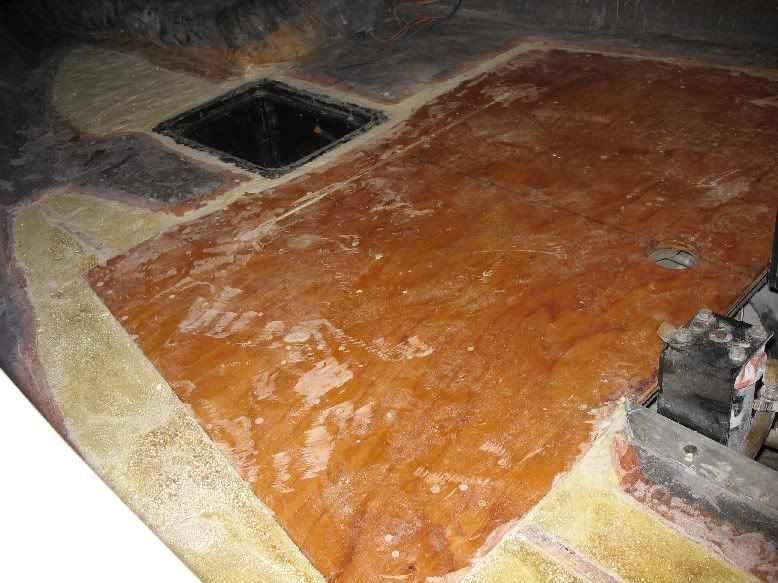
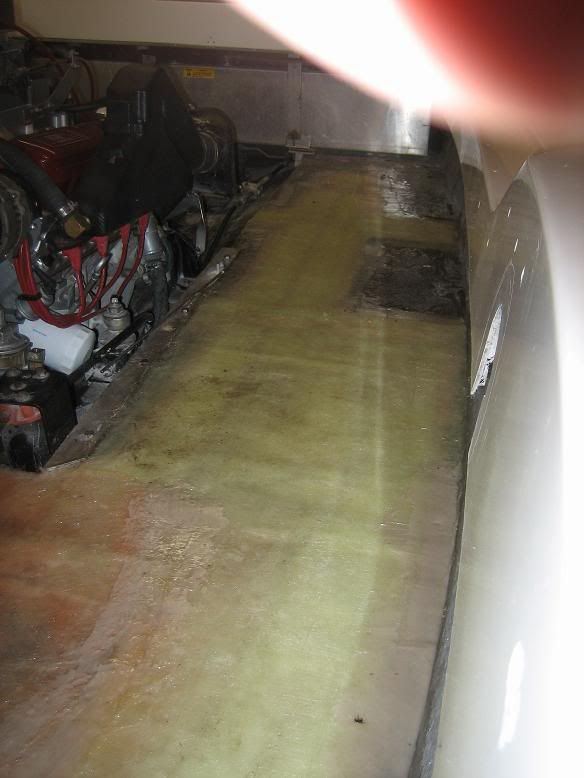
Once I was finished digging, I removed all the rotted parts. I only had to remove the entire depth of the stringer over a 2' section (right where the original soft spot was). I cut out as much wet wood as I could and shaved down the remaining portion of the stringer. I removed any foam that had come delaminated from the hull.
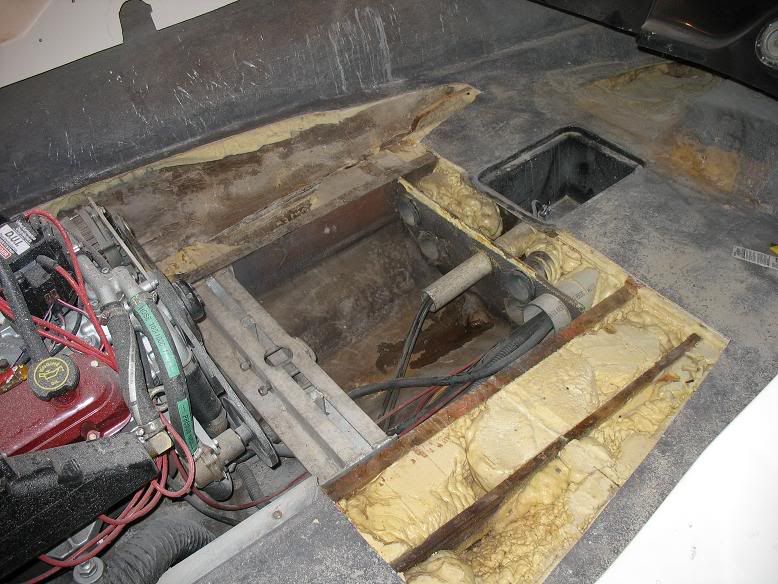
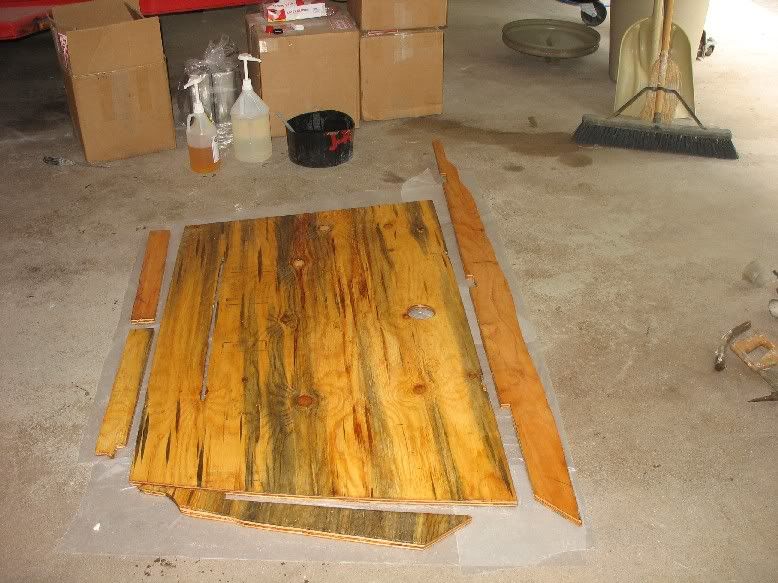
I then built the new replacement stringer and front flooring section out of 23/32" structural fir plywood (no pics yet). I treated all exposed wood (main stringers, starboard outbound stringer and the remaining part of the port stringer being replaced) with Rot Doctor CPES. The boat sat in the sun all weekend, so the minimal water that was between the foam and hull seems to be gone now. Everything will dry out a few more days before I get to work on it again. The plan is: 1. Coat wood to be installed with epoxy resin 2. Glass down new stringer 3. Pour the foam, grind it level when it dries 4. Install front floor section 5. Glass everything over Ill snap a few more pics as I progress. I cant wait to get this floor done so I can start working on the motor! ------------- |
Posted By: 79nautique
Date Posted: July-10-2006 at 3:25pm
|
you should have covered the carb before you made the mess, now you'll have some of the foam in your carb. ------------- http://www.correctcraftfan.com/diaries/details.asp?ID=756&sort=&pagenum=1&yrstart=1979&yrend=1979 - 79 nautique |
Posted By: JoeinNY
Date Posted: July-10-2006 at 3:45pm
|
Whats a little foam in the carb amongst friends? Looks like good work here, I have some simliar work instore down the road with the "new" 1983 2001 I just towed home, doesn't look nearly as bad as the 67, the foam in there was of the sort where if it was wet anywhere it was wet everywhere. Whatcha doing with the motor.
-Joe. ------------- http://www.correctcraftfan.com/diaries/details.asp?ID=1477 - 1983 Ski Nautique 2001 1967 Mustang 302 "Decoy" http://www.youtube.com/watch?v=cO5MkcBXBBs - Holeshot Video |
Posted By: TRBenj
Date Posted: July-10-2006 at 3:54pm
|
79, youre right- the motor is a real mess. Everything about this job is messy and rather unpleasant. Ill make sure I blow out the flame arrestor.
Joe, Ive got some GT40p heads, a Weiand Stealth intake and a Cam Research camshaft waiting to be installed. I think that work will be much more enjoyable! ------------- |
Posted By: Jim_In_Houston
Date Posted: July-11-2006 at 1:25am
|
Nice work. Installing the cam, heads, and intake will be much more enjoyable. For me, turning bolts is always more fun than running a saw. Besides, the stringer repair is necessary maintenance - the bolt-ons are for fun and elected performance upgrades. Sort of like mowing and raking the lawn compared to laying out the foundation for a new room expansion. ------------- Happy owner of a '66 and a '68 Mustang |
Posted By: marks
Date Posted: July-11-2006 at 10:19am
|
TRBenj,
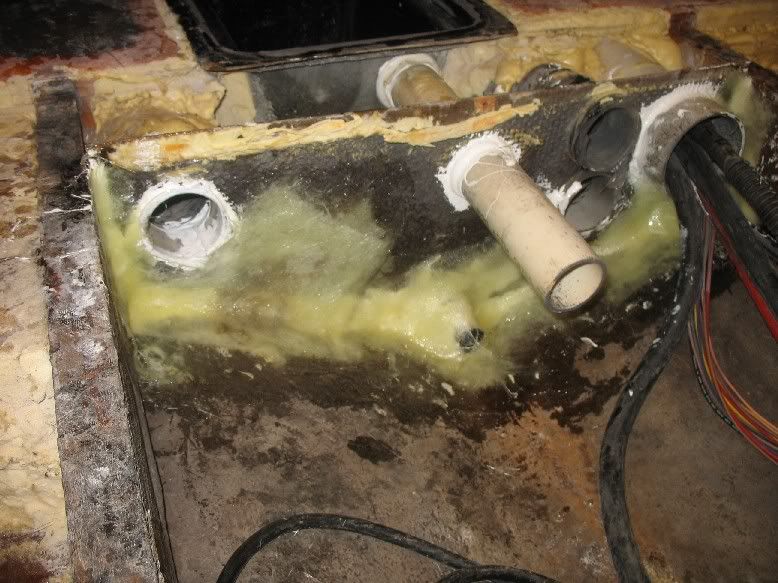
Your floor repair looks like a mirror image of what I am going through on my 89 SN right now. I started out repairing a couple of soft spots on the port side of the boat, but then found the wood had rotted out under the driver seat and that I had water in the foam on the starboard side of the boat between the primary stringer and secondary stringer. One thing I noticed in your pictures, is the perpetual wet spot in the bilge, just behind the bulkhead. I too had this. I finally had to take a look, and removed the battery box and dug the foam out. The top of the foam was dry, but the bottom few inches was totally saturated. The bulkhead was leaking water into the bow of the boat. The joint between the bulkhead and hull had cracked, and the caulking around the battery box hose had failed. I don't know if it something you have to repair, but I thought I would point it out. I have questioned myself on it many times, but once I started there was no going back. There was really no wood in the bow that was harmed by the water as the level was below the stringers. However, the water does seem to wick its way around. It has turned out to be the hardest part of the repair though. It is still ongoing, but I should be done in about a week. Mark |
Posted By: TRBenj
Date Posted: July-11-2006 at 1:25pm
|
Mark, thanks for pointing that out. I will inspect the bulkhead more closely- it sure isnt secured very well at the sides. Not sure how well the bottom is sealed. Youre right, that spot has constantly been wet, so there may be some water between the foam and the hull in the bow. I will stick my hand down in between the battery box and see if anything feels wet- I might as well fix anything now while its apart.
If it is in fact wet up there between the foam and hull, I *should* be OK if I can get it to dry out and reseal the bulkhead. Ive noticed that my foam is in excellent shape everywhere- nothing is waterlogged. Must be good closed cell stuff. ------------- |
Posted By: TRBenj
Date Posted: July-12-2006 at 4:16pm
|
Mark,
I reached my hand down under the battery box and there is some standing water there. The foam I could touch doesnt seem too bad- so Im hoping that Im OK. I want to pull the battery box to see the condition of the foam towards the front- any tips on how to get it out? Ive cut it out from the fiberglass floor and seperated the top edge from the foam. Still stuck in there- Im afraid if I force it out Ill crack it since its only fiberglasss. Any hints you can provide would be appreciated! ------------- |
Posted By: Munday
Date Posted: July-13-2006 at 12:06am
|
Man I hate to see that,since my 92 is just like it.I have a small soft spot below observers seat also and I ain't gonna look at it very close now till after this season is over.I was planning to recarpet this winter so
now I'll be alot more prepared for what I uncover. Looks like your doing a nice job,think I'll go ahead and pull my motor out of the way when I do mine. Good luck Munday |
Posted By: marks
Date Posted: July-13-2006 at 10:03am
|
Tim,
On my boat, the battery box had four small nails in the top edge, two in the front and two in the back. I was able to use a small pry bar and work under the edge to lift the heads. I was then able to pull them out. The foam has a pretty strong hold on the battery box. I had to dig a fair amount of it out, around the box, to free it up enough to pull the box out. I mostly worked on the left side, digging down to the bottom of the box, then was able to rotate the box toward the left to pull it away from the foam on the right. In the process of removing the foam, I destroyed the vent hoses. I am not sure if there is any way to do it without damaging the hoses. They are very thin and brittle, and they run right next to the battery box. Your getting into the same situation that I was in. I ended up removing most of the foam in the bow, digging a tunnel up to where the vent inlets are, so that I could replace the vent hoses. I also cut an access hole next to the vent inlets so that I could work from the top. If your careful, you may be able to splice in new sections of hose and not have to go to the same extreme that I did. Hope this helps, Mark |
Posted By: TRBenj
Date Posted: July-13-2006 at 10:07am
|
A soft spot under the observer seat will likely require the same attention as my boat. Once that wood gets wet, the rot spreads to all the wood it touches. Removing the motor may make it easier to move around in the boat while youre working, but its not really necessary.
I decided not to pull my battery box. There was no foam directly underneath it (where the standing water was) and all the foam I can reach is dry. I stuck a hairdryer down there for a while just in case. My bulkhead was cracked, so I will repair and seal it well with 3M-5200. Im also replacing the battery box drain hose. ------------- |
Posted By: marks
Date Posted: July-13-2006 at 2:25pm
|
I kind of wish I wouldn't have pull mine out. But I did have a lot of water in the bow that extended to about a foot in front of the battery box. Also, one of the vent hoses was in the wet foam and it had deteriorated to nothing more than black dust and rust.
I am doing the same with my bulkhead plus I am going to use a thru-hull fitting in the bulkhead for the drain hose. I think the fitting will maintain a better seal. |
Posted By: TRBenj
Date Posted: July-14-2006 at 8:26am
|
I broke 2 hoses trying to remove the battery box as well. I reattached one to the bulkhead, but the other broke too far up. I dont trust that I can get a good seal back to the bulkhead so Im going to seal the hole.
As I plan to glass in the stringer, I thought of some questions: - How long do I have to wait to pour foam around the stringer? Can I pour while the resin is still tacky? Or do I wait until its dry to the touch, or until its fully cured? - How many layers of glass should be used on the stringer? Is 3 enough (mat/cloth/mat)? - What is the proper method for piecing the fiberglass section of the floor together? The section I am replacing is large and irregularly shaped, so I would like to do it in pieces. Do I just overlap the edges by a few inches and stagger the joint on the next layer? - How much resin should I be using with the glass? Do I want it fully saturated and dripping off? Or just coated? Should I be soaking the cloth/mat in resin or can I put it on with a paintbrush? Any tips would be appreciated! ------------- |
Posted By: David F
Date Posted: July-14-2006 at 9:20am
|
Three layers at the stringers is probably plenty depending on the weight of material used. Remember, the first should be narrow and each subsequent layer wider so each layer is getting glued to the hull and not just the first layer. You should start with mat, but it does not really matter what you end up with since you are not apply a final finish coat.
Yes, overlap the butt joints slightly and stagger joints on subsequent layers. Since you are doing a large area, you might consider using a paint roller to apply the resin. First coat the foam, then lay the dry glass then saturate with resin until soaked. Apply second layer dry, roll on the resin until saturated. Use your grooved resin roller to force out air bubbles. Do not press so hard that you force out the resin or air will get back in. Repeat for each layer, rolling each second layer. You need a minimum of 1/8" thickness of the floor over foam. I would go a bit thicker, especially at high traffic areas. Do not worry too much if the floor is not very level, you can always mix up some thicken resin as a fairing compound to level it out. Simply trowel it on. Don't worry about getting it perfect as the carpet will hide a lot of imperfections. Don't forget to taper the edges of the existing (old) floor on a 12:1 taper to receive the new fiberglass. Walk the layers up the taper or up the sides of the boat. ------------- |
Posted By: TRBenj
Date Posted: July-15-2006 at 12:39pm
|
Thanks DavidF!
Ive got the stringer glassed in and Im ready to pour the foam. I have a question: The US Composites pourable foam I have says I have 45 seconds of working time. I assume I mix parts A and B very quickly and pour... is it alright to do the foam in layers? Will the foam stick to itself if its not all poured at once? Or should I try and get everything in one shot? ------------- |
Posted By: marks
Date Posted: July-15-2006 at 10:33pm
|
Tim,
US Composites has a FAQ that answers your question. Yes, you can do multiple layers but need to wait 15 to 20 minutes between them. http://www.shopmaninc.com/faq_foam.html#7 |
Posted By: TRBenj
Date Posted: July-15-2006 at 10:44pm
|
marks, thanks for pointing me in the right direction. I should have known to check their FAQ. Now I have a good plan for tomorrow! ------------- |
Posted By: TRBenj
Date Posted: July-17-2006 at 9:46am
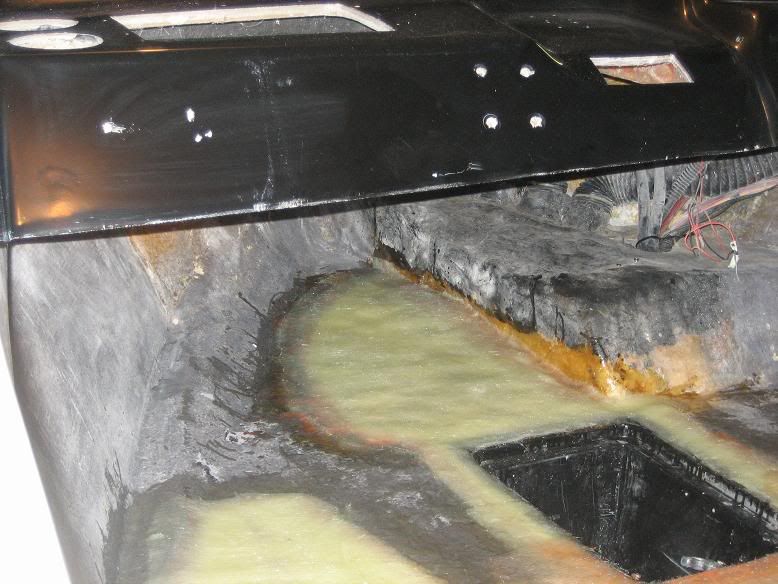
Update: This weekend I made a little bit of progress. I coated the stringer and flooring with epoxy resin prior to installing. I dried out the area underneath the battery box, made a new drain for it, then sealed up the bulkhead with 3M-5200. I then fiberglassed the new stringer in with 3 layers of glass (mat/cloth/mat). I also glassed the bulhead in place. I then poured the foam and trimmed it flat with an angle grinder. Its starting to look like a floor again! All that is left is to glass everything down. Many thanks to DavidF and marks for all the great tips and advice! Pics:

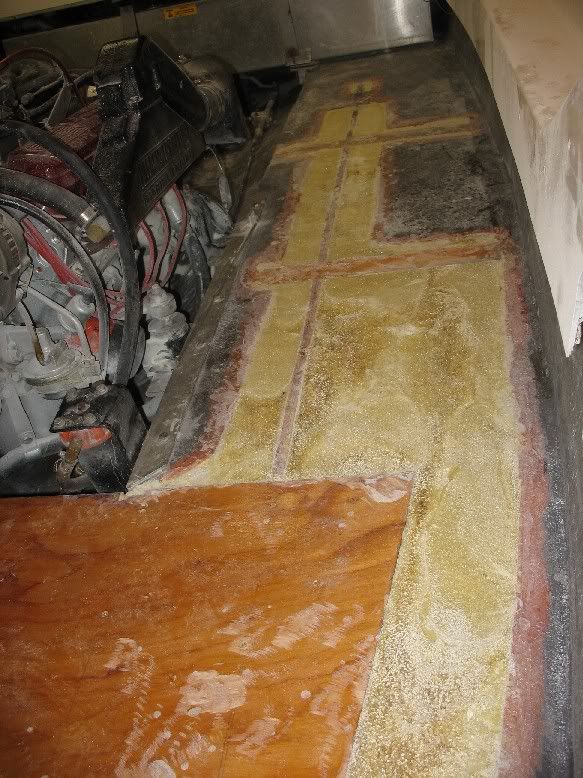 ------------- |
Posted By: David F
Date Posted: July-17-2006 at 10:12am
|
Your work looks very good and you are making incredible progress! I was going to suggest you glass in the bulkhead and forget the sealant, then I scrolled down and saw you did just that. It is precisely these 90 degree corners that crack and let the water in (in many instances). So, a good fillet is helpful to turn the 90 degree bend into an easier transition. It looks like the sealant is acting as a fillet, so you should be good to go. Check other critical areas around the bilge for cracking. Also, make sure that any hole created in teh plywood for fastening is again sealed with epoxy resin...simply pour a bit over the fastener before you lay the first layer of fiberglass mat.
Keep up the good work! ------------- |
Posted By: TRBenj
Date Posted: July-17-2006 at 10:50am
|
Thanks DavidF! Youre right- the 5200 makes a nice fillet for the glass on the bulkhead. Its secured in there a lot better than it was from the factory, so I think its good to go. The only other critical area in the bilge that I can think of is where the main stringers meet the hull- thats really the only other joint, right? Good call on the fasteners. On the screws in the rear, I predrilled the holes, filled them with epoxy, screwed everything down and then coated the top. I plan on doing the same for the screws on the front floor section (1 at a time).
This project is taking me a little longer than I would have liked, but its coming out pretty decent, I think. I sure dont want to be doing this repair again any time soon! ------------- |
Posted By: mgswed
Date Posted: July-17-2006 at 11:02am
|
Good work TRBenj. Everything looks perfect so far. Cant wait to go for a ride!!! -MG ------------- http://www.correctcraftfan.com/diaries/details.asp?ID=1158 - 1994 Ski Nautique |
Posted By: M3Fan
Date Posted: July-17-2006 at 1:20pm
| Absolutely amazing. All the more reason to fly out there for a ride one of these days! |
Posted By: TRBenj
Date Posted: July-17-2006 at 1:53pm
Unfortunately, Ill be in Japan for most of August for work. September can be a little chilly, but fall is a beautiful season in New England... come on out! ------------- |
 M3Fan wrote:
Posted By: 79nautique
Date Posted: July-17-2006 at 1:57pm
|
not sure if I would have used the 5200 to glue that piece in, the resin isn't going to bond to the 5200 so now you have created a pocket that is flexable and over time it will crack the resin covering it then you'll have a path for the water to rot out the wood you installed, You should have left out the 5200 roughed up the old fiberglass to get a good bond then glassed it in like you did.
Other than that it looks pretty good. One otherthing I hope you are going to put some wood over that foam before you glass over it. Otherwise you wont have a good anchor point for the seats and over a very short period of time the floor will get soft unless you are going to add 3/4" of fiberglass over it. ------------- http://www.correctcraftfan.com/diaries/details.asp?ID=756&sort=&pagenum=1&yrstart=1979&yrend=1979 - 79 nautique |
Posted By: TRBenj
Date Posted: July-17-2006 at 2:13pm
|
I wasnt aware the 5200 wouldnt bond to the resin... thats news to me. Either way, it created a nice fillet to prevent the glass from being attached at 90 degree angles. The glass extends far beyond the sealant on both the bulhead and stringer/bilge side, so I know I have a good strong seal either way.
No wood will be installed over the foam- I am glassing right over it just like it came from the factory. The foam is very dense (8lb density) and will be plenty strong with 1/4" of glass on top- the factory glass is 1/8-1/4" thick. The only seat that is anchored to the floor is the driver's seat. All but 3 or 4 screws attach to the wood in the front. I think I will predrill the mounting holes that dont catch the wood, inject them with resin, and then screw them down. I think that should keep water from getting into the floor. ------------- |
Posted By: David F
Date Posted: July-17-2006 at 2:17pm
|
Yep, I agree with you on this 79N..., but since it is already done, I think the epoxy/fiberglass composite will perform ok even spanning the 5200. The Composite is flexible and strong enough to handle any potential tendency for movement.
TRBenj: Just keep an eye out on this area. If you are up to it, I would grind off the glass work, remove the 5200 and reglass after creating a fillet of thickened epoxy resin. You can thicken epoxy resin with saw dust, chopped glass, talc powder, micro spheres, etc...should be consistency of peanut butter. Again, I do not think there is much stress on the bulkhead, so you are probably ok as is. ------------- |
Posted By: 79nautique
Date Posted: July-17-2006 at 2:18pm
|
hope so, but I have my doubts, the foam is not a structual member and over a period of time will compress more as it is walked on. Good luck with it hope it last for you. ------------- http://www.correctcraftfan.com/diaries/details.asp?ID=756&sort=&pagenum=1&yrstart=1979&yrend=1979 - 79 nautique |
Posted By: David F
Date Posted: July-17-2006 at 2:29pm
|
TRBeng:
I simply use Life Boat Caulk on screws when screwing in the fiberglass only floor. I coat the screw liberally with sealant and install. Personally, I would avoid glueing the screw in with epoxy resin as sure enough, you will need to get it out one day. 79Nautique: CC has been laying the fiberglass floor directly over the foam for many years...still do it that way. It works fine. However, I have seen impact fatique on several boats. Basically, the floor gets soft where people repeating jump in the boat on the same spot of the floor. Doing quick and dirty math, 8lb foam will support about 285 lbs from a size 12 foot. People that weigh more than 285 usually have an even bigger foot. Like I said quick and dirty, could be way off. But, jumping in the boat on one foot can exceed this weight calculation. ------------- |
Posted By: TRBenj
Date Posted: July-17-2006 at 2:32pm
|
Hmmm... I figured the 5200 would be OK since it says it bonds well to fiberglass. Too bad I didnt know this before- I have talc and plenty of resin! I still think its a lot stronger and sealed much better than it was from the factory. There's 2-3 layers of glass holding it and it shouldnt see much stress. Now that the wood is in, its not coming back out.
DavidF, when you use the caulk (Boat Life?), I assume the holes are predrilled? 79, the foam is 8lb density structural foam (the 2nd densest that US Composites sells). US Composites says, "Higher densities are used for architectural castings, support applications and has virtually an unlimited number of potential uses." Its noticeably harder than the foam used from the factory, so I think it will hold up well. ------------- |
Posted By: marks
Date Posted: July-17-2006 at 2:39pm
|
Tim,
Looks good. I didn't get nearly as far on mine this weekend as I had planned. I wasted my entire Saturday skiing  . .
I wouldn't worry about that 8-lb foam compressing. I contacted MWCC and they told me the factory used 2-lb foam. |
Posted By: 79nautique
Date Posted: July-18-2006 at 9:00am
|
If your just going to use glass over the foam you should be using woven instead mat or cloth to give it strength and pay attaintion to the direction of the weave and alternate the direction of the weave. ------------- http://www.correctcraftfan.com/diaries/details.asp?ID=756&sort=&pagenum=1&yrstart=1979&yrend=1979 - 79 nautique |
Posted By: David F
Date Posted: July-18-2006 at 9:16am
|
Cloth and woven roving are basically the same thing. Cloth term being used when describing light weight material.
Either is fine, you will just need to more layers when using cloth, but the final thickness is what determines strength, not the weight of individual layers. Definatley use mat between each layer of cloth (or woven roving). The mat adds strength in the direction/planes that the woven is weakest. the mat also helps gaurd against the woven delaminating from each other. The only caveat I have not mentioned in awhile is that when using epoxy resin, you must use mat designed for epoxy (it is sewn together, not bonded together). Epoxy will not dislove the bonding agent used in regular mat. ------------- |
Posted By: 79nautique
Date Posted: July-18-2006 at 9:46am
They are not the same and cloth will produce a much weaker structure and the mat adds very little strength at all and is more of a filler than anything. The type of fiber used in the woven and the directional layout of the weave pattern as is laid down has more effect on it's overall strength than the thickness does. ------------- http://www.correctcraftfan.com/diaries/details.asp?ID=756&sort=&pagenum=1&yrstart=1979&yrend=1979 - 79 nautique |
Posted By: David F
Date Posted: July-18-2006 at 10:38am
|
79...
You are just wrong this time. Woven Roving is a fiberglass cloth. Woven Roving is generally used when describing heavy weight cloth. Here is a typical description (not mine): "Woven Roving cloth is a collection of specific numbers of untwisted continuous filaments. Fiberglass woven roving is basically a heavier version of fiberglass cloth. Due to higher fiber content, woven roving's lamination has excellent tensile strength and impact-resistant property. As woven roving easily wets out, provides great tensile and flexural strength, it is often used between layers of fiberglass mat in laminates. It can also be used with chopped strand mat to fabricate large size objects, such as boat, vehicle components, pressure tank, house, etc." Woven Roving will yeild a lighter weight than "cloth" due to less resin being used to wet it out. However, this ligher weight makes it also more flexible...not good for the floor of our boats. CC does not use Woven Roving for the floor construction (they do for the hull) because they want stiffness and less thickness than woven roving can provide. basically the mat/cloth alternating layers will provide greater stiffness and more strength in a 1/8" to 3-16" laminate than can be had with woven roving. Of course, how can I possibly know what I am talking about...oh wait, I spent 9 months working with the stuff! TRBenj: Take my advice and stay away from the heavier woven rovings when intalling your floor. And alternate between mat and cloth for the best bending and shear strength. ------------- |
Posted By: 79nautique
Date Posted: July-18-2006 at 10:58am
you kinda counterdict your self on your statements above. Don't see how a 18 or 24oz woven cloth will use less resin than 6 or 8oz cloth, And I don't think that they want a thinner haul either, then again maybe that's why you only did it for nine months. ------------- http://www.correctcraftfan.com/diaries/details.asp?ID=756&sort=&pagenum=1&yrstart=1979&yrend=1979 - 79 nautique |
Posted By: 79nautique
Date Posted: July-18-2006 at 11:06am
|
CC's site doesn't support your argument either, I would suggest you read their section under craftsmanship and notice they state bi-directional and woven not cloth and make specific reference about how the material is layed down to provide strength. ------------- http://www.correctcraftfan.com/diaries/details.asp?ID=756&sort=&pagenum=1&yrstart=1979&yrend=1979 - 79 nautique |
Posted By: David F
Date Posted: July-18-2006 at 11:07am
|
You answered your own question...you do not understand! Nuf said. ------------- |
Posted By: Kylecraft
Date Posted: July-18-2006 at 11:09am
Nice work Tim. That thing will be mint in no time... wanna trade? (when you're done) ------------- |
Posted By: 79nautique
Date Posted: July-18-2006 at 11:14am
|
I understand composites quit well actually and have many designs using composite materials in very advanced rotor designs using kelvar and carbon based materials very simular to what you would find in F1 or Indycar chassis. ------------- http://www.correctcraftfan.com/diaries/details.asp?ID=756&sort=&pagenum=1&yrstart=1979&yrend=1979 - 79 nautique |
Posted By: David F
Date Posted: July-18-2006 at 11:18am
|
Ok 79, you will notice that I said CC uses woven roving in the hulls. Yes, it is bi-directional, so is cloth! However, in my '93 SN, woven roving was not used in the floor due to the thin cross section of the floor. You cannot get 1/8 to 3/16 thickness of any real strength by using heavy woven roving. You need a laminated composite system that builds thickness. Thus with thin sections/laminates you need to use light weight materials. What part of this is not making sense? Remember, TRBenj was asking about his floor, NOT his hull.
Oh, and by the way, the hull on my '93 had altenating layers of woven roving and mat. Always starting and finishing with mat (or it could have been chopped via a gun). If you start with cloth of woven roving, the pattern will telegraph through the gelcoat. ------------- |
Posted By: TRBenj
Date Posted: July-18-2006 at 11:20am
DavidF, Ive re-read your email many times and I think I have a decent plan. I am using 1.5 oz Epoxy Mat and 4 oz. E-glass cloth. Ill alternate layers (~7 total), starting and finishing with the mat. I expect it to be thicker than the original floor. Ive ground a taper on the existing floor about 2" wide and will walk the layers up it. I am certainly no expert, but what DavidF says makes sense. The only Woven Roving that USComposites sells is 18oz and is "used for fast buildup in applications where cost savings are a factor." It would seem that more layers of thinner cloth and mat would provide a stronger support than fewer layers of the woven roving. The tech from US Composites thought I had a good approach. ------------- |
Posted By: 79nautique
Date Posted: July-18-2006 at 11:27am
|
the strength is gained in how it is laided down and the directions that the weave is when laid down in relation to each layer, So if the cloth or direction of it is always laid down in the same direction then you are going to have a very weak cross-section and have strength in one direction only, and the type of cloth, fiberglass, kelvar, carbon, greatly effects the overal strength as well. ------------- http://www.correctcraftfan.com/diaries/details.asp?ID=756&sort=&pagenum=1&yrstart=1979&yrend=1979 - 79 nautique |
Posted By: David F
Date Posted: July-18-2006 at 11:43am
|
Wrong again. Woven roving has the same strenght in two directions (at least), not just one. CC orients the woven roving in the same direction throughout the laminate of the hull. The mat provides strength in the directions that the woven roving is deficient. The mat also helps the layers of woven roving from delaminating from each other, but they will still delaminate with excessive bending or impact...I know from seeing it first hand. Light weight cloths are less suseptible to this delamination from impact and/or bending.
Agreed, the type of material effects strength (i.e. glass vs carbon vs kevlar). But, the type of material does not effect delamination albeit at higher forces. Here is my take on what CC does: They use heavy woven roving to facilitate layup time and save labor. The plus side is that it also saves weight which is good. The negative side is that it is a weaker laminate thickness for thickness to a light cloth laminate. CC gets back the strength by using epoxy resin. Overall, the hull on CC boats are generally stronger than the rest of the industry for two reasons: Thicker cross section and the use of epoxy resin. Woven Roving yeilds a lighter laminate because woven roving is usually a tighter weave than lighter cloths and thus "holds" less resin (or has fewer voids for the resin to fill). ------------- |
Posted By: 79nautique
Date Posted: July-18-2006 at 11:51am
it has strength in two directions only the direction of the weave so anything at an angle to the weave is significantly weaker, that's why most are layed at a 45 degree angle to each layer as it's built up to give strength in all directions not just axilly to the weave. ------------- http://www.correctcraftfan.com/diaries/details.asp?ID=756&sort=&pagenum=1&yrstart=1979&yrend=1979 - 79 nautique |
Posted By: JoeinNY
Date Posted: July-18-2006 at 11:52am
|
I think you guys are mostly arguing over terminology and not really substance, whats refered to as woven roving is the 18 oz stuff that most people sell, its almost impossible to get flat for a floor application and I would shy away from it in that application. However I don't think what TRbenj is using will be adequate either the layering is fine although I would probably orient the cloth layers 45 degrees off each time. My main issue is that he doesnt have enough weight in there for a glass over foam app. It takes about 10 layers of 10 oz cloth to get up to an 1/8 inch thickness. I have a dynacell core glass sandwhich floor in my mustang its got three layers of 10oz cloth on the top and two on the bottom its exceptionally strong but the fiberglass is nowhere near the thickness you are talking about achieveing and your total combo is adding up to about 18 oz. I might be missing something here but I think you might need some heavier cloth/mat or some more layers, even with the fairly high density foam you are using?
What have other people used over poured in foam? ------------- http://www.correctcraftfan.com/diaries/details.asp?ID=1477 - 1983 Ski Nautique 2001 1967 Mustang 302 "Decoy" http://www.youtube.com/watch?v=cO5MkcBXBBs - Holeshot Video |
Posted By: David F
Date Posted: July-18-2006 at 12:02pm
|
The minimum overall thickness should be 1/8" in my oppinion. I agree, it will take 8-10 layers depending on the mat being used. The mat overcomes the diagonal weakness inherent in the cloth (or woven roving). CC does NOT (at least in my boat) orient the woven roving at a 45 degree angle in their hulls.
A test layup should be done to determine the number of alternating layers required to achieve 1/8" thickness. ------------- |
Posted By: 79nautique
Date Posted: July-18-2006 at 12:10pm
|
joe did you vaccum bag the sandwich layup or just brush/spray on the resin to wet out the cloth layers? ------------- http://www.correctcraftfan.com/diaries/details.asp?ID=756&sort=&pagenum=1&yrstart=1979&yrend=1979 - 79 nautique |
Posted By: TRBenj
Date Posted: July-18-2006 at 1:10pm
|
Now you guys have me thinking. I thought that 7 layers of the lighter weight stuff would still be plenty thick. Would it be better to replace 1 or 2 layers of the cloth with some 18oz woven roving to get some more strength/thickness, rather than doing 10+ layers? ------------- |
Posted By: David F
Date Posted: July-18-2006 at 1:31pm
|
You can, but the floor with be much thicker than you need in order to get the flexural strenght that you need.
If I were you, I would glass on side of the floor at a time. Do one side full thickness and let it cure. Once it cures, grind the edge where the other side of the floor will join it to a 12:1 taper. This way, you can work inside the boat and not worry about stepping in your work. The easiest way to spread resin on a large area is with a foam paint roller. Roll out air each third layer at a minimum. After overall thickness achieved, fill in low spots with scrap mat. Turn down each layer onto the side of the main stringer going further down each layer (make sure to grind off the bilge paint first. The mat will not want to make the 90 degree bend, so you may consider easing (1/2" radius or so) the corner. If you want the corner nice a sharp when you are done, cut narrow strips of mat (or cloth) and and build up the corner. Then when cured, you can grind the corner square again. You will have to modify this aproach in the area of the aluminum engine frame, but hopefully, yoiu get the idea. Remember, CC did not use woven roving (18oz.) in the construction of the floor (at least not in my boat). Depending on the material you purchased, you may need only 6-8 layers. Do a quick test to find out. How many gallons of resin did you purchase. I would guess you need to start with 2.66 gallons, especially since you are doing the entire floor. ------------- |
Posted By: JoeinNY
Date Posted: July-18-2006 at 1:47pm
|
TRBenj,
I think you will be surprised at how little it builds up. I would use more or thicker layers for your application. The foam support provides a lot of strength but you are going to need enough impact resistance to not have a ski fin drop or something of the like to start a delamination effect that will produce an eventual soft spot. 79, I have vacuum bagged bike frames and racing canoes before but that floor was done with a mohair roller standing in the center of the engine cutout and smoothing my way out, it involved a lot of bending over and reaching and it sucked, and it wouldnt work if the boat was a little bigger as I would not have been able to reach far enough. I did the bottom two layers out of the boat, used thicken expoxy to attach it to the stingers and the sides and create the fillet at the sides then did the 3layers (with some staggered overlaps) in progressively larger overlaps up the sidewalls of the boat. It is very light and stiff and should last forever but incredibly expensive. The foam for the floor alone was easily 300 dollars for a very small boat. The Mohair rolling process definitely used a bit more epoxy than vacumm bagging would have, but there were only on or two fairly inconsequential bubbles. -Joe. ------------- http://www.correctcraftfan.com/diaries/details.asp?ID=1477 - 1983 Ski Nautique 2001 1967 Mustang 302 "Decoy" http://www.youtube.com/watch?v=cO5MkcBXBBs - Holeshot Video |
Posted By: TRBenj
Date Posted: July-18-2006 at 2:14pm
|
Joe, youre right- the cloth Im using is fairly light and didnt add a lot of thickness. The mat seems to have more weight to it, though its only supposed to be 1.5oz. The glass seemed to be fairly thick when I did the stringer, and I only used 3 layers. It also seemed quite strong and very hard. Just by eyeballing it, I thought 7 layers would be thicker than 1/8". When I spoke to the US Composites rep, he talked me out of going with the 6oz S-glass (saying it was overkill) and that the 4oz E-glass was plenty thick and strong for my application.
David, I have just over 2 gallons of resin left (plus the associated hardener). As you can see in the pics, I am not going the full width of the floor- there is only 3" of foam on either side of the stringer for the most part. The section that is close to full width is about 30" long. Only the one perpendicular support spans all the way to the main stringer, so I should only have to wrap into the bilge over a 3-6" section. I think I will proceed with the repair as planned and hope I get the thickness I need from the materials I have. Thanks to everyone for their input! ------------- |
Posted By: marks
Date Posted: July-18-2006 at 2:36pm
|
Guys,
According to one of my books on boat repair, it says that 1.5oz mat will yield about 1/32 inch thickness and 6oz cloth about 1/100 inch. Does this sound correct or is it way off? Thanks, Mark |
Posted By: JoeinNY
Date Posted: July-18-2006 at 2:58pm
|
sounds like from both of your sources the mat is giving you more thickness than I would have guessed and that will help out. I am not guessing on the cloth though I have used all kinds extensively, and the 6oz 1/100th inch is about right. Don't know how 1.5 oz mat gives more thickness than that but I have never used mat in a project except as a thin finishing layer before painting and it seems to be the case based on the info presented.
-Joe. ------------- http://www.correctcraftfan.com/diaries/details.asp?ID=1477 - 1983 Ski Nautique 2001 1967 Mustang 302 "Decoy" http://www.youtube.com/watch?v=cO5MkcBXBBs - Holeshot Video |
Posted By: TRBenj
Date Posted: July-18-2006 at 3:07pm
|
Mark, I am certainly no expert, but judging from my stringer install I'd say those numbers are correct. The mat added a lot more thickness than the cloth, which was very thin. With the 3 layers on the stringer (mat/cloth/mat), Id say total thickness was ~1/16".
Scaling that up to 7 or 9 layers would put me somewhere around 1/8"-3/16" thickness, which is what I want. Too bad you had to ski all day saturday. This fiberglass work is much more fun!  Id love to see pics of your project if you have any, btw. Id love to see pics of your project if you have any, btw.------------- |
Posted By: marks
Date Posted: July-18-2006 at 4:01pm
|
Tim,
I've been taking pictures, but I'm old school and still use a film camera. When I get them developed, I will post a few of them. I need to figure out how to do the photobucket thing. As far as skiing verses fiberglass work, I guess my priorities were a little messed up. The 95+ degree weather would have been perfect for curing epoxy resin. |
Posted By: TRBenj
Date Posted: July-18-2006 at 4:24pm
Mark, photobucket is very easy. Once theyre scanned in, you just upload the images. The 95 degree weather we're having is plenty warm for curing resin, but Im not sure the excessive humidity helps. Either way it was perfect weather to be working on the boat rather than at the lake!  Where are you located? Where are you located?------------- |
Posted By: marks
Date Posted: July-18-2006 at 5:08pm
|
I'm in Champaign Illinois, about 100 miles south of Chicago. There are not a lot of lakes around here, so we actually ski in the cooling lake for a nuke.
I was worried about the high temps and humidity we have here during the summer, so when I bought my supplies from US composites, I opted for the slow hardener for the layup work and bought a small amount of the 1:1 stuff for gluing and patching. I haven't used any of the slow stuff yet, but on Sunday in the 95 degree temps the 1:1 epoxy had only 1/2 the pot life indicated at 80 degrees. |
Posted By: TRBenj
Date Posted: August-01-2006 at 12:01am
|
Update: the floor is now done. I had it 95% complete last weekend but ran out of resin. Today I put the last 2 layers of glass on the front wood section and then faired everything out with thickened resin (talc).
Over the stringer, I put down a total of 7 layers. On the front section (under the bow) I put down 5 layers since it wont be a high traffic area (this area was repaired previously with only 1 layer of mat). Over the wood, I put down 3. Seems to be at least as thick as the factory floor and plenty strong. Now that its faired, it should be at least as level as it was- though thats not saying much! Its now ready for carpet- it would be nice if I was sent the 13 yards of carpet that I ordered instead of 11 feet, but this may just give everyone attending the CCFan NE reunion a chance to see my glass work first hand! Pics: 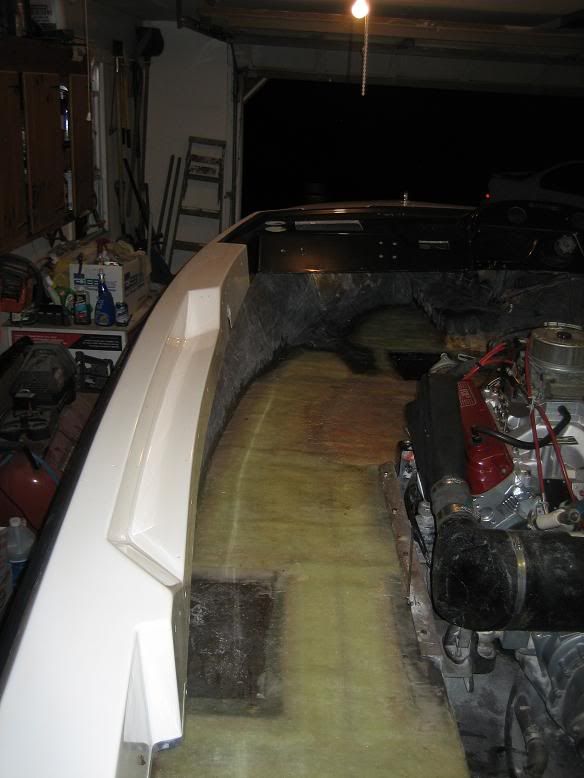
------------- |
Posted By: David F
Date Posted: August-01-2006 at 5:07pm
|
Looks like you did a good job. Isn't it fun to fiberglass? I can see that you have good overlap onto the existing fiberglass, so your repairs should be plenty strong.
It looks like you still need to grind on the edges a bit (otherwise you will cut yourself eventually). Also, it looks my assessment of 6-8 layers and 2.66 gallons of resin was pretty close. Again, great job. ------------- |
Posted By: TRBenj
Date Posted: August-01-2006 at 11:45pm
|
Thanks David. I am very tired of this floor project- no more fiberglass please! It came out pretty well and should be plenty strong. I will probably grind the edges on the battery box and motorbox before installing the carpet.
Perhaps there will be another project boat in my future... but I will enjoy being on the water for the time being! ------------- |
Posted By: marks
Date Posted: August-02-2006 at 2:13pm
|
Looks good. How much resin and how many yards of fiberglass did you end up using?
|
Posted By: TRBenj
Date Posted: August-02-2006 at 2:46pm
|
In total I used 3.5 gallons of resin (plus the associated amount of hardener). I went through about 6 yards of mat, and 4-5 yards of cloth. This includes the stringer repair as well as the floor.
You done with your floor yet Mark? ------------- |
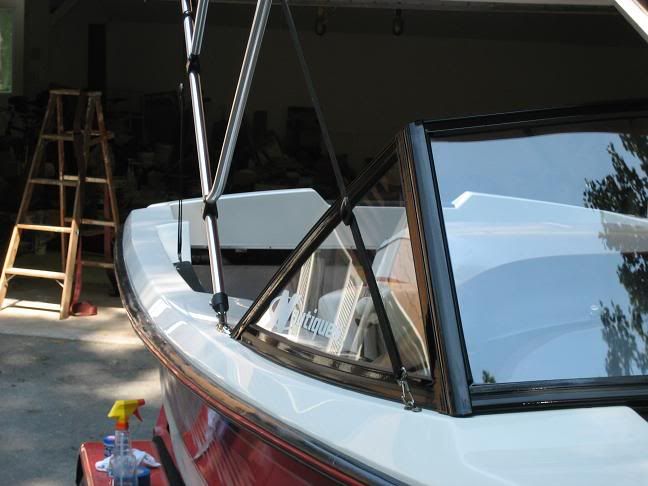
Posted By: M3Fan
Date Posted: August-02-2006 at 7:32pm
| Did you get the windshield back together? |
Posted By: TRBenj
Date Posted: August-02-2006 at 8:00pm
Funny you should ask! My dad and I just finished wrestling it back together. Not a fun job- the powdercoating adds some thickness to the metal so all the tolerances are much tighter. Of course, struggling with it in 100 degree heat makes it that much more enjoyable! Ill post some pics once I get it cleaned up. ------------- |
Posted By: TRBenj
Date Posted: August-02-2006 at 10:08pm
I took a few pics but they all came out crappy. Ill snap some more tomorrow in natural light. Proof that its actually together:
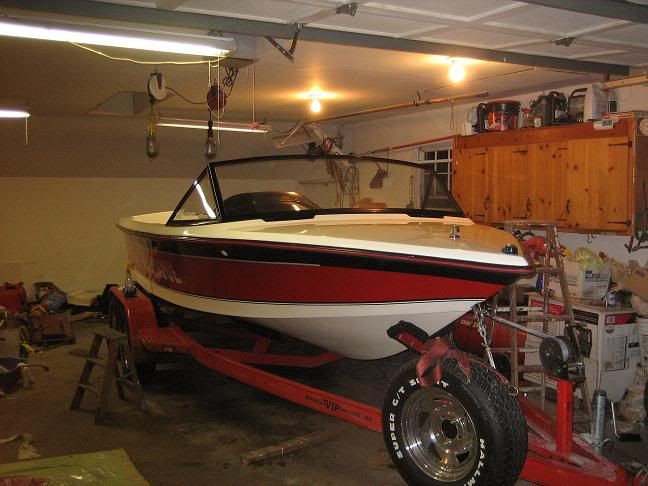
I hope it still feels as fast as it did without a windshield! ------------- |
Posted By: Hollywood
Date Posted: August-02-2006 at 10:30pm
Which is why I was expecting to see beer cans scattered all over the garage... |
Posted By: marks
Date Posted: August-03-2006 at 12:28am
|
Tim,
I am still not done yet. This whole process sure has taken more time than I originally thought. Of course, at first I though I was fixing about 2 square feet of area. I have all of the foam in and plan to start laying fiberglass on Friday. I have plenty of mat and cloth, but I am worried that I am going to run short of resin. I only have 3 gallons, but based on your pics, I think I am replacing a little more floor area. I think I will order another gallon just to be safe. That's a bummer about the carpet. I have read a number of posts where someone has ordered yards of carpet, but received only a few feet. I bet you will be glad to get your boat back in the water. You have done a great job. I have been following the thread on your motor upgrade and I am looking forward to hearing how it performs. |
Posted By: M3Fan
Date Posted: August-03-2006 at 12:38am
| You moved the spare to the side of the trailer- smart move. That thing drove me NUTS in the old spot. Such a simple fix. |
Posted By: TRBenj
Date Posted: August-03-2006 at 8:27am
|
Mark, I also expected all of my work to be done in a week- 5 weeks later, here I am. Laying down the glass on the floor took the most time due to all the layers and having to measure and cut so many pieces. I busted most of it out in 14 hrs though.
Joel, I like the spare there too. My real motivation to move it was to gain access to the ring welded on the trailer to attach the turnbuckle. I wanted something holding the front of the boat down, rather than just forward- its solid as a rock now. Hollywood, its all about product placement. Im expecting my sponsorship from A/B to come through any day now. 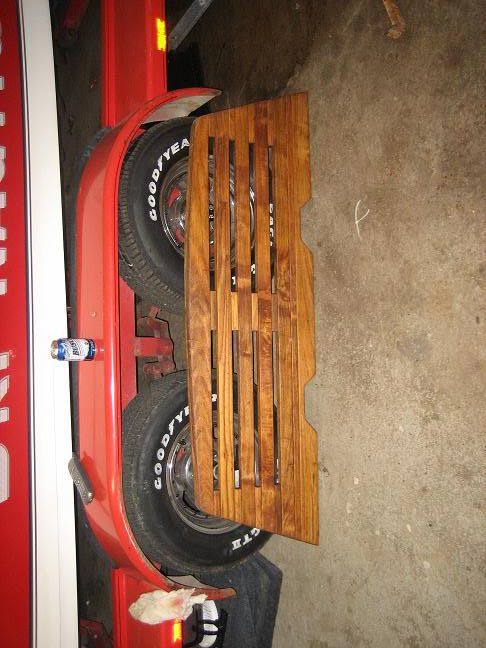 ------------- |
Posted By: TRBenj
Date Posted: August-03-2006 at 12:03pm
A little better shot of the powdercoated windshield:
 ------------- |
Posted By: Friday
Date Posted: November-22-2006 at 10:19pm
| I'm planning on using this same process on my 83', looks like you did a great job. I'm putting together a web page to post all the pics of the project. I have a couple of questions. Its been awhile since it looks like you've completed the project, how are the floors holding up? Would you recommend the same process for others, if not what would you do differently? Thanks for the help!! |
Posted By: Friday
Date Posted: November-22-2006 at 11:49pm
| Sorry, I'm trying to decide between using the fibergla$$ over foam technique or replacing the whole floor with plywood. Thanks |
Posted By: TRBenj
Date Posted: November-23-2006 at 1:34am
|
Friday, it has only been a few months since I completed my floor, so I cant tell you you how well it will hold up. It appears to be at least as strong as the original floor, though- it is very hard and about the same thickness. The foam I poured is also more dense than it was from the factory- I dont doubt it was originally 2 lb density.
If I were to go it again, I dont know if I would use the 5200 on the bulkhead. Otherwise, I think my approach was very well thought out. If you plan on replacing the entire floor, I would do it with plywood over light density foam (2 lb). If you only have a spot repair or a single stringer to replace, its worth considering my method. Its no small task to put down 7 layers of fibergla$$- its time intensive and a rather unpleasant project. I certainly dont doubt its strength though. ------------- |
Posted By: Friday
Date Posted: November-23-2006 at 10:16am
| Thanks for the reply, I only have a small 1.5' x 3' area so I'm going to try your method. I'll post and let you know how it turns out. |
Posted By: duckfamily
Date Posted: December-27-2006 at 8:43pm
|
I need help. I have pulled everything out of my 77 Ski Nautique. I have drilled into the stringers in several areas and have yet to find good wood. I do not have the time or expertize to redo the floor. I am in North Dakota but willing to travel. Please let me know.
ducky@gondtc.com. Thanks. ------------- Correct Craft owner for 13 years. |