 Boats For Sale:


79 Nautique rebuild? |
Post Reply 
|
Page 123 6> |
| Author | |
79TiqueRebuild 
Senior Member 
Joined: January-21-2009 Location: Kansas City, Mo Status: Offline Points: 238 |
 Post Options Post Options
") Thanks(0) Thanks(0)
 Quote Reply Quote Reply
 Topic: 79 Nautique rebuild? Topic: 79 Nautique rebuild?Posted: January-21-2009 at 2:24am |
|
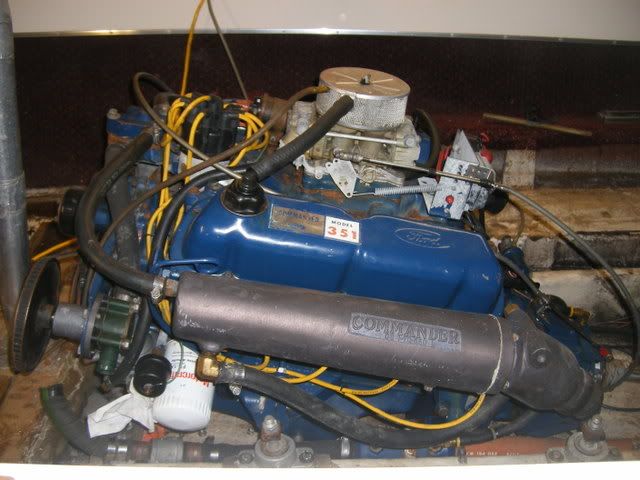
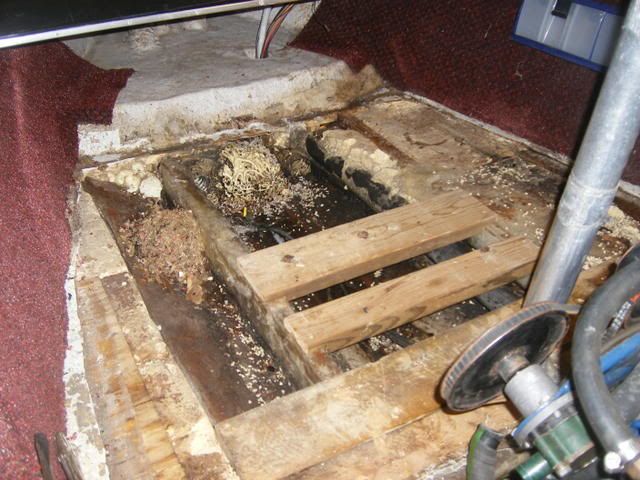
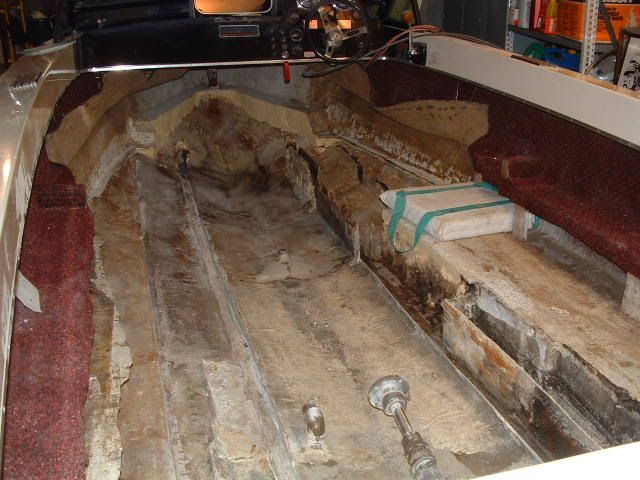
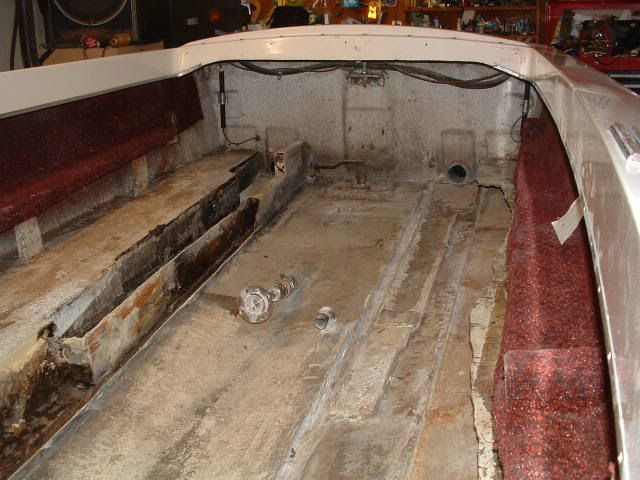
I recently purchased my first inboard ski boat, a 1979 ski nautique with a 351 ford commander. When I was purchasing it I noticed cracking under the carpet near the back end of the boat and so I knew I had a project boat on my hands. However, it was only after I got home and started ripping up the carpeting that I saw what I was getting myself into. Most of the original fiberglass floor has been replaced, but instead of being replaced level with the old floor, the previous owner had just put a thick piece of plywood over the previous floor and put a thin layer of fiberglass over that. The 2 (I think) original stringers that he did not replace are just about all rotted through at this point, so they most likely will need to be replaced.
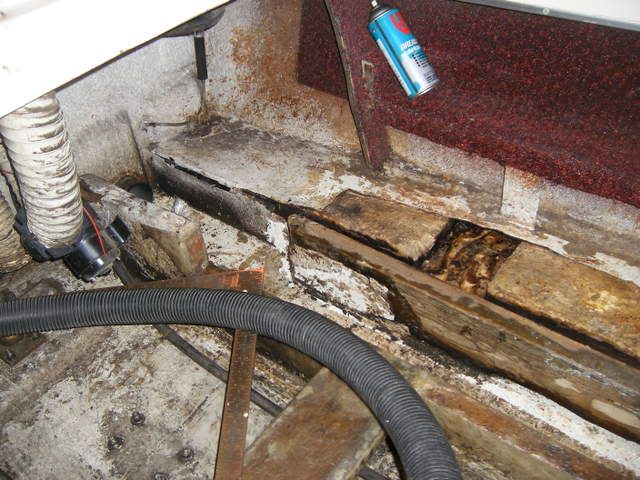
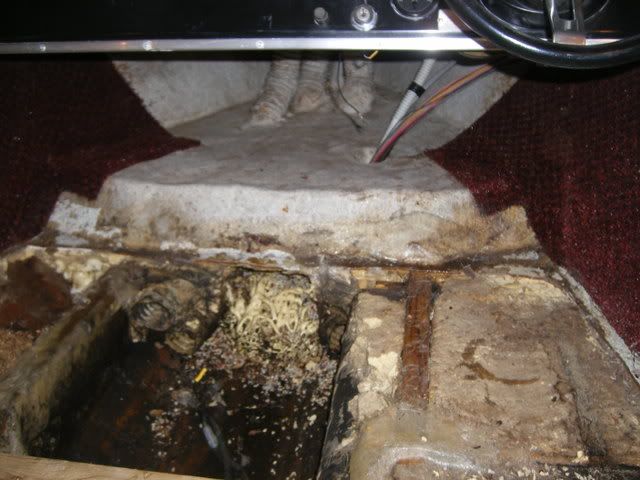
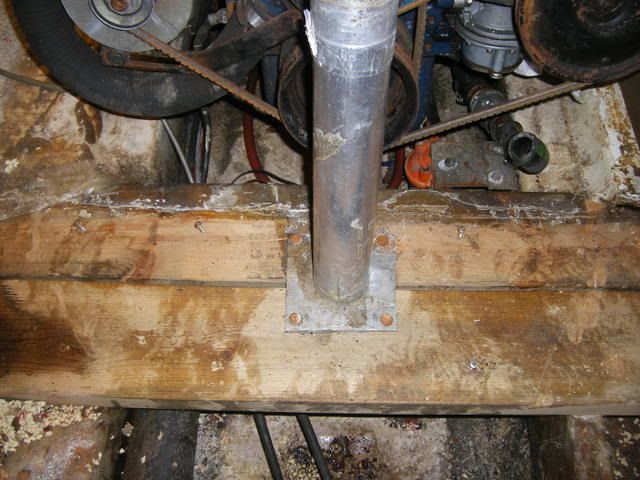
Once I got past the fiberglass and the plywood I saw just what poor shape this boat is in. Most of the stringers had been replaced, but instead of being replaced in whole, the previous owner just cut out the stringers not directly around the engine and poorly spliced in other pieces of wood. Needless to say, the boat is in sore shape, but I'm hoping to restore it. I finished up tonight working on removing the pylon, but was unable to do so. I'm not sure where it is supposed to detach from the hull of the boat. When I shake it, the whole pylon moves, including the part attached to the floor, which can't be a good sign. Any advice? Here is a picture of the pylon, the red arrow points to the part that moves with the pylon. 
The hull and rub-rail are in very good shape, and the motor starts and runs. The worst part of the boat is the flooring. Anyway, I'll include some pictures. I'm also looking for any diagrams of the original stringers for a 79 ski nautique as these are completely torn up and spliced in at random intervals which makes me worried that I'll be able to put it all together like it's supposed to look like. I was only able to get the engine started thanks to this website as the previous owner had put the distributor shaft on 180 degrees out which causes it to s hoot fire! But I was able to correct the mistake and get it started with your help. Thanks. 

|
|
 |
|
|
jbear
Grand Poobah 

Joined: January-21-2005 Location: Lake Wales FL. Status: Offline Points: 8193 |
Post Options
Thanks(0)
Quote Reply
Posted: January-21-2009 at 2:59am |
|
Welcome to the site Monty. Looks like you have yourself a job there. But you have found the site that will help you get it under control. Many good threads here. Lots o luck.
john |
|
|
"Loud pipes save lives"
AdamT sez "I'm Canadian and a beaver lover myself"... |
|
|
|
|
storm34
Grand Poobah

Joined: November-03-2008 Location: Dexter Iowa Status: Offline Points: 4492 |
Post Options
Thanks(0)
Quote Reply
Posted: January-21-2009 at 4:09am |
|
Welcome! Great looking boat!
|
|
|
|
|
uk1979
Platinum Member 
Joined: June-13-2007 Location: United Kingdom Status: Offline Points: 1410 |
Post Options
Thanks(0)
Quote Reply
Posted: January-21-2009 at 9:18am |
|
This is off my 1977/78 which has no engine cradle I think 1979 is when they started to fit them but yours looks like its before this so should be the same others will confirm this
the hull should be the same ,good luck and welcome to the site. 


sub stringer add on 


|
|
|
Lets have a go
56 Starflite 77 SN 78 SN 80 BFN |
|
|
|
|
BuffaloBFN
Grand Poobah

Joined: June-24-2007 Location: Gainesville,GA Status: Offline Points: 6094 |
Post Options
Thanks(0)
Quote Reply
Posted: January-21-2009 at 9:48am |
|
Welcome aboard...heck of a project you have there!
Take lots of pics from any and every angle you can think of. It will be a good reference down the road. This was my first stringer job and so it has a lot of first timer questions answered. |
|
|
|
|
8122pbrainard
Grand Poobah

Joined: September-14-2006 Location: Three Lakes Wi. Status: Offline Points: 41040 |
Post Options
Thanks(0)
Quote Reply
Posted: January-21-2009 at 10:10am |
|
Monty,
Your pylon is only bolted at the floor level. The bottom is just a pin into a socket that's glassed into the bilge/keel. I'm sure it's rusted in. Try some penetrating oil and soak it for a couple days. If still stuck, you'll need to cut the socket out of the glass. Not the worst because it sure looks like you'll be doing quite alot of glass work elsewhere! We''l certainly help you through it and it looks like the guys have already given you a good start. Welcome |
|
|
|
|
79nautique
Grand Poobah

Joined: January-27-2004 Location: United States Status: Offline Points: 7872 |
Post Options
Thanks(0)
Quote Reply
Posted: January-21-2009 at 10:54am |
|
80 was when they went to the engine cradle not 79
|
|
|
|
|
WakeSlayer
Grand Poobah

Joined: March-15-2006 Location: United States Status: Offline Points: 2138 |
Post Options
Thanks(0)
Quote Reply
Posted: January-21-2009 at 1:37pm |
|
Welcome to the site!
It looks like you have quite the project ahead of you there. You will get through it with the help from everyone here. Mike |
|
|
Mike N
1968 Mustang |
|
|
|
|
79TiqueRebuild
Senior Member
Joined: January-21-2009 Location: Kansas City, Mo Status: Offline Points: 238 |
Post Options
Thanks(0)
Quote Reply
Posted: January-24-2009 at 12:12am |
|
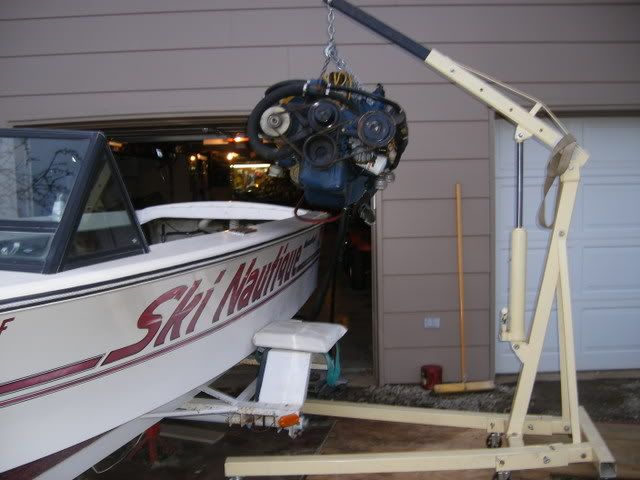
Thanks for the pictures UK1979, those should come in handy when I actually get to building the new stringers. Last night I got the engine pulled out and tonight I've been working on cutting all of the old stringers and fiberglass out. I've been using a DeWalt saws-all which has been working fairly well.
I still can't get the pylon out, which is troubling. I've been soaking it with oil for the last few days or so and have tried using a ball joint separator with no luck. Is there any special trick to getting it out? Does anyone have a material list compiled? I know basically what it is going to take, but specifics are always better than just the basics. Thanks again for everyone's help, I've got some pictures of the engine pull for your enjoyment. Will keep you posted.. 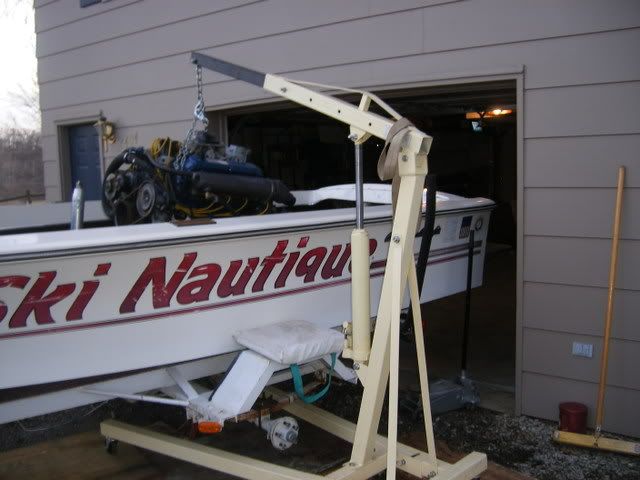
|
|
|
|
|
critter
Platinum Member

Joined: January-11-2008 Location: New Hill, NC Status: Offline Points: 1227 |
Post Options
Thanks(0)
Quote Reply
Posted: January-24-2009 at 12:51am |
|
Monty, I really like the throw cushion protecting the trailer fender in case the motor falls. Yeah.. that should do it.
Here is a close to accurate list of what I used for my stringer job in a 66 Barracuda.. List of materials to replace the stringers: Quanty Item Cat# Price 5 gal Epoxy resin 635 thin 3:1 ratio EPOX-635316 $243.00 2 gal Epoxy resin 635 thin 3:1 ratio EPOX-635315 $109.00 1 (2)Pumps EPX-P31 $6.25 1 roll 50 yds 2" E-glass tape FG-C02R $15.85 1 roll 50 yds 4" E-glass tape FG-C04R $26.05 1 roll 50 yds 8" E-glass tape FG-C08R $52.00 20yds Epoxy mat FG-EM10550 $5.35/yd x 20 = $107.00 5qts 1/32 milled fiber filler SM-MF050 $16.25 - (used in filets) 4" 3/8" Fiberglass Rollers FR-1314A $5.35 x 3 = $16.05 5qts Phenolic Microballoons FL-PH025 $12.50 2 boxes 2" wood paintbrushes qty-24 BR-TA20B $12.25 x 2 = $24.50 5 ea 1qt mixing containers CON-MM032 $.55/ea x 5 = $2.75 5 lb tub of talc SM-TAL01 $5.25 15yds 6oz cloth FG-C0638 $4.30/yd x 15 = $64.50 13yds #1708 biaxial FG-170838 $6.40/yd x 13 = $83.20 3 boxes 1" brushes BR-TA10B $14.45 x 3 = $43.35 ------- $916.64 2 gal Epoxy resin 635 thin 3:1 ratio EPOX-635315 $109.00 (Additional needed for floor) 2 galkit CEPS Jamestown Distributers SMI-CPESWGL $198.00 (Clear Penetrating Epoxy Sealer) Stringers- 2ea 2"x8"x16' 2ea 1"x6"x12' === All 4 were $220.80 Each stringer consumes about one gallon of epoxy resin from start to finish. Use the epoxy to laminate both sides of the stringers. Seat the stringers with a layer of epoxy mat and use weights to set. Fill gaps with filler and epoxy. Make a bead on each side of the stringer where it meets the hull at least 1' up on the stringer and on the hull. Then use 2", 4", 8" strips along the joint to mate the stringer to the hull. Then cover with 6oz and then biaxial. I got my materials from US Composites. At least this is what I did for my stringers. Not saying that it is the best way but it is working for me. I have yet to install the floor as I am waiting for warm temps to pour the foam. Good luck. |
|
|
1980 Ski Nautique
1966 Barracuda |
|
|
|
|
WakeSlayer
Grand Poobah
Joined: March-15-2006 Location: United States Status: Offline Points: 2138 |
Post Options
Thanks(0)
Quote Reply
Posted: January-24-2009 at 3:12pm |
|
At some point I am going to need to add up my total cost. I am a little apprehensive to do so. These are close estimates
West epoxy 4x 1.2 gal kit$140ea $560 fir and plywood $250 glass cloth and fillers $300 carpet and adhesive $300 noodles / 2 cases $176 misc stainless stuff $50-75 brushes, pails and stuff $100 I have done a ton of other things that I decided to while in there, which is what really bangs the total up there. That is the stuff I don't want to add up yet... |
|
|
Mike N
1968 Mustang |
|
|
|
|
eric lavine
Grand Poobah
Joined: August-13-2006 Location: United States Status: Offline Points: 13413 |
Post Options
Thanks(0)
Quote Reply
Posted: January-24-2009 at 3:17pm |
|
you forgot one little thing, Beer cost
|
|
|
"the things you own will start to own you"
|
|
|
|
|
WakeSlayer
Grand Poobah
Joined: March-15-2006 Location: United States Status: Offline Points: 2138 |
Post Options
Thanks(0)
Quote Reply
Posted: January-24-2009 at 4:06pm |
|
Again, hesitant to add it up, Eric.
I am getting closer to done, and a lot closer to your previously stated estimate. Incredible, I say. |
|
|
Mike N
1968 Mustang |
|
|
|
|
uk1979
Platinum Member
Joined: June-13-2007 Location: United Kingdom Status: Offline Points: 1410 |
Post Options
Thanks(0)
Quote Reply
Posted: January-24-2009 at 11:03pm |
|
Monty
Good work keep the pictures coming,here are some shots of my pylon apart. 

I found a Dremel a good tool to use on the cutting out with a diamond wheels on it,there cheap as chips and one big wheel in a pack of 6 cut a main stringer out,also low dust so thin and small. 
|
|
|
Lets have a go
56 Starflite 77 SN 78 SN 80 BFN |
|
|
|
|
79TiqueRebuild
Senior Member
Joined: January-21-2009 Location: Kansas City, Mo Status: Offline Points: 238 |
Post Options
Thanks(0)
Quote Reply
Posted: February-04-2009 at 1:04am |
I finally got the stubborn pylon out. I used a 3 foot cheater bar and a pipe wrench and worked it loose. The pictures above show my progress so far. A PO had replaced engine stringers at some point, and did a bad job of it. sure would be nice if there were templates or stringer dimensions available. |
|
|
|
|
8122pbrainard
Grand Poobah
Joined: September-14-2006 Location: Three Lakes Wi. Status: Offline Points: 41040 |
Post Options
Thanks(0)
Quote Reply
Posted: February-04-2009 at 10:54am |
|
Monty,
Don't forget to check the condition of the wood blocking that's glassed into the transom. Drill some holes into the blocks close to the bottom and see what comes out. So, what did the PO do to screw up his stringer "repair". Some details will help others here on what NOT to do!!! |
|
|
|
|
79TiqueRebuild
Senior Member
Joined: January-21-2009 Location: Kansas City, Mo Status: Offline Points: 238 |
Post Options
Thanks(0)
Quote Reply
Posted: February-13-2009 at 6:27pm |
|
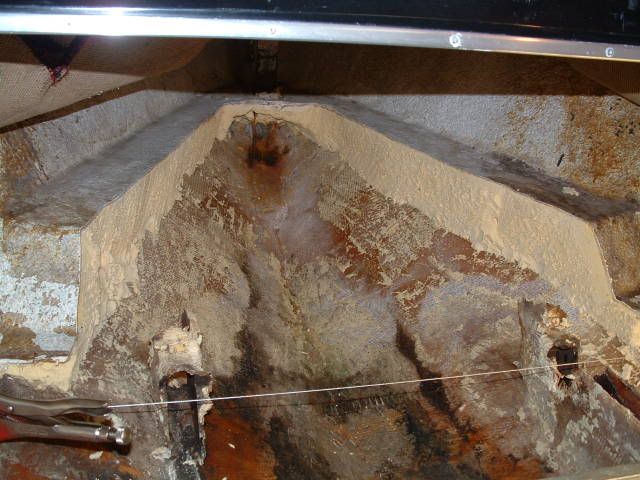
Thanks for the advice on the wood-backing blocks on transom. I've drilled a couple holes and have gotten good wood, I still need to check on the sides. While I was back looking around I noticed a crack on the rudder block. Maybe somebody hit something? I'm not sure but I decided to check it out. You can see that it was damaged and that the board was wet but it was nice to get a complete piece of wood out of the boat for a template. (it's probably the first whole piece of wood that I've taken out of the boat so far!!) I'm curious about a build-up under the main stringers that almost looks like bondo? was this from the factory or could it have been something a previous owner put in? Should I grind it all out and try to get to level glass or should I leave it and build up around it? The picture didn't turn out as well as I would have liked. CPES is on order and stringers came in once but it was splintered so they reordered it. I have been reading many threads on this site and refers to "scribing" the stringers to the hull. Is there a link to a site that might describe that process in specific detail? Most of my woodworking has been done with a chainsaw and a log splitter..
Build-up under stringers and along bilge: 
Rudder plate (w/o fiberglass top): 
Oh, and to answer the question about some of the things the previous owner did that were messed up: the main stringers were pieced out in 5 different pieces. the fiberglass that was put in didn't seem to adhere to the old fiberglass, not sure if it was because it wasn't cleaned properly or what. Nothing was fit properly, for instance, a large piece of plywood fit over the top of the flooring at the front of the boat, but instead of being cut in correctly, it was just screwed on top of everything so that the floor was uneven. You can see from the original pictures that the way the pylon was attached and mounted there were two crossboards cut to support it, but neither were held down with anything other than fiberglass. It did allow for a mouse to build a large nest however. |
|
|
|
|
uk1979
Platinum Member
Joined: June-13-2007 Location: United Kingdom Status: Offline Points: 1410 |
Post Options
Thanks(0)
Quote Reply
Posted: February-14-2009 at 12:16pm |
|
Hi Monty
Looks like its moving on well,as for the lump of bondo you show could well have been done by PO I found that the stringers had been fitted in the hull with foam dabs along it in the factory before they were glassed in, so a small gap around 2mm would be there, so a repaired job at some point would fill it, but if its glass/poly then just filled when the factory glassed in, just check it out with the old original glass/poly. Now let see if we can work out the new stringers, I have some Dwgs of the Stringers off my boat 1977/78 I think there the same as yours, have put them in DXF file full size, so if you have a friend with a plotter type printer you should be able to print off actual size and use as a template to lay on your new wood (remember Dwg's is of the deepest side or facing to the middle of the hull and are handed) If you know someone with a CNC router you should be able to put the tool paths to each Dwg and put a small off set on the Hull Side ( bigger ) to scribe in. Scribing in I have know doubt there will be many schools of thought on how too, all with there own merit. Give this a go, Cut to length the new wood, cut out the Dwg along the hull side only lay on new and mark along the new wood, keeping the rest of the paper on the other side will help to keep it straight, then you can cut to the shape of template, Keep more wood than you need along the top of the stringer. Scribing now lay the stringer in the boat where it needs to go and just mark cut/plane until your happy with the fit so its in and out allot on the boat,or put some wood each end right across the top of the sides and clamp say 2x4, then an upright down next to the stringer position, screw or clamp must be plum (upright) now stringer is the ruff shape lay in and clamp the front only, now cut a small piece of 1/8 ply or hardboard 1/16 longer than the biggest gap you have at the front (would think it should be just over 1 inch in height and can be 3/4 wide) now with it go to the back of the boat lift the stringer up and clamp when you have the same gap as the front. Now with your scribe piece run along the hull down each side of the stringer with a pencil on the top of the scribe which gives you the shape of you hull.Now depending on how you prep the hull before fitting this can be tricky, if you grind off all old flush in the hull no problem but harder to set back in the right place,or the leave base channels in gives you the place to re fit in which case would need to off set stringer to scribe by it thickness so it can run in the channel then repeat to do the other side easy to do by unclamping and moving the cross bars. Now you have a line on each side you can saw/plane/sand up to it, I would leave a touch more say 2mm off the line from the front to nothing where it flattens out as its a steep curve and will fit better, should there be a cock up you can just redo until your happy, when your happy with the fit then cut the other side of paper template lay on your hull shaped stringer mark and cut to right size,this way you have a few chances on the scribing, some on here can do it first time its what you are happy doing. When you have finished one then repeat for the other side (remember its a mirror of it ) and then lay the first one on to it and mark the top and you should have a pair. I have tried to post the DXF files but will not load so if you post a E mail I will ping over unless someone can help me with this. Have fun and keep us posted on how it going and you might think its a bit slow on here but many are at a reunion the weekend and beer is involved too but will be back soon. As for me I'm off to take my youngest daughter out for the first time teaching her to drive and she thinks the rear view mirror is to check her makeup so could be gone a while. |
|
|
Lets have a go
56 Starflite 77 SN 78 SN 80 BFN |
|
|
|
|
8122pbrainard
Grand Poobah
Joined: September-14-2006 Location: Three Lakes Wi. Status: Offline Points: 41040 |
Post Options
Thanks(0)
Quote Reply
Posted: February-14-2009 at 12:38pm |
|
Monty,
I see in Rogers that he mentioned a "scribe" but didn't go farther. Just in case you are wondering about it, I find the easiest scribing tool to use is a child's grade school compass. Set the distance between the pencil and the point to the width of material you want to cut off. Drag the point end on the hulls profile leaving the pencil mark on the stringer. |
|
|
|
|
JDiggs
Groupie 
Joined: November-06-2008 Status: Offline Points: 51 |
Post Options
Thanks(0)
Quote Reply
Posted: February-14-2009 at 12:56pm |
|
Hey Uk, you mention dxf file which is a file format usually produced from an autocad drawing. If you are using autocad, depending on the version (06 or better?) you can plot it to a jpg or a pdf.
If you cant do it, send it to me and I'll put it into both formats. Also, I might be able to print it full size on several 24x36 sheets and send it to you. Then you just cut it out and have a paper template to use |
|
|
|
|
uk1979
Platinum Member
Joined: June-13-2007 Location: United Kingdom Status: Offline Points: 1410 |
Post Options
Thanks(0)
Quote Reply
Posted: February-14-2009 at 1:21pm |
|
Pete
Yes that is a way too, just trying to do it as a one size fits all,if your working with channels you may need put a bend at 90 over the depth of channel on the compass. JDiggs post a mail adress and I ping over cheers. |
|
|
Lets have a go
56 Starflite 77 SN 78 SN 80 BFN |
|
|
|
|
79TiqueRebuild
Senior Member
Joined: January-21-2009 Location: Kansas City, Mo Status: Offline Points: 238 |
Post Options
Thanks(0)
Quote Reply
Posted: February-14-2009 at 5:31pm |
|
Thanks for the help. I would of never even attempted this project without this great site and the knowledgeable people on it. I don't know anyone with that type of printer or cnc equipment but will do some checking around.
Now I get to put a set of struts on my son's honda he is going for his drivers license on Wed. Thanks Monty |
|
|
|
|
JDiggs
Groupie
Joined: November-06-2008 Status: Offline Points: 51 |
Post Options
Thanks(0)
Quote Reply
Posted: February-14-2009 at 8:23pm |
|
I can print it off for you & send you 4 sheets. Then you just cut it out, tape them together, tape them to your 2x8, draw around it and cut it. I think that would work.
danieljdeal@gmail.com, fire it over to me uk, I'll see what I can do with it |
|
|
|
|
uk1979
Platinum Member
Joined: June-13-2007 Location: United Kingdom Status: Offline Points: 1410 |
Post Options
Thanks(0)
Quote Reply
Posted: February-15-2009 at 2:01pm |
|
Hi Guys
Monty/Daniel just pinged them over let me know if its not come through. |
|
|
Lets have a go
56 Starflite 77 SN 78 SN 80 BFN |
|
|
|
|
79TiqueRebuild
Senior Member
Joined: January-21-2009 Location: Kansas City, Mo Status: Offline Points: 238 |
Post Options
Thanks(0)
Quote Reply
Posted: February-17-2009 at 10:45pm |
|
I had some progress this weekend. Got boat supported on stands as suggested. I got your cad files Roger,hopefully Daniel or somebody can convert them and possibly print them for me.
Did some grinding wow that area in the bilge is tough.Where's Mike Rowe when you need him? I kept thinking how somebody said he felt like a powdered doughnut. lol somehow they wont taste the same. Looks from the pics some of you had a great time in Fl.... Hopefully someday 

|
|
|
|
|
BuffaloBFN
Grand Poobah
Joined: June-24-2007 Location: Gainesville,GA Status: Offline Points: 6094 |
Post Options
Thanks(0)
Quote Reply
Posted: February-18-2009 at 9:26am |
|
Looks good Monty! You may want to cut the glass top off of the wood in the stern like you did on the steering port. They took a while to dry in my case and I replaced 2 of 5 pieces in mine. Of course soak them in CPES after they dry...and the dryer they are, the more they'll soak up almost plasticizing the wood. Cool stuff!
Edit-That glass around the edges of the steering port could be holding water. |
|
|
|
|
79TiqueRebuild
Senior Member
Joined: January-21-2009 Location: Kansas City, Mo Status: Offline Points: 238 |
Post Options
Thanks(0)
Quote Reply
Posted: February-20-2009 at 12:45am |
|
Got a couple hours on boat tonight. I bought a pack of 16 grit pads for grinder @ Harbor freight not bad 6 for 3.98. Was cutting out floor closer to hull using a diamond wheel on the grinder got in pretty close.
While I was scraping the still soggy foam in back I hit the corner transom block. I could tell it was wet from the sound. I drilled a hole half expecting water to run out but got wet wood. 


I thought you guys would get a good laugh at my hull supports. It seems like I spend as much time cleaning my shop vac filter as I do working on the boat. Also - what is the purpose of the black tubes attached to the speedo lines? |
|
|
|
|
critter
Platinum Member
Joined: January-11-2008 Location: New Hill, NC Status: Offline Points: 1227 |
Post Options
Thanks(0)
Quote Reply
Posted: February-20-2009 at 1:21am |
|
1980 Ski Nautique
1966 Barracuda |
|
|
|
|
79TiqueRebuild
Senior Member
Joined: January-21-2009 Location: Kansas City, Mo Status: Offline Points: 238 |
Post Options
Thanks(0)
Quote Reply
Posted: February-21-2009 at 12:20am |
|
Thanks for the link on dampners. I worked on drivers side floor a little tonight.

This worked well for me I used a fillet glove because I removed guard.and running shop vac helped keep dust down a little. 
|
|
|
|
|
the grinch
Senior Member

Joined: November-25-2008 Location: Lexington, NC Status: Offline Points: 150 |
Post Options
Thanks(0)
Quote Reply
Posted: February-25-2009 at 2:19am |
|
I notice that Monty's boat has the ski shelfs btwn the gunnels and floor. Was this a CC interior option? I've seen them on other boats, but not most. Doesn't look like they'd be to hard to add on my BF, but what's the general opinion on them? Do they get in the way or are they beneficial?
|
|
|
It takes a big hole to bury an elephant.
Kirk Miller [URL=http://www.correctcraftfan.com/forum/register.asp?FID=7]KIRKS79/URL] |
|
|
|
|
Post Reply
|
Page 123 6> |
 Tweet
Tweet
|
| Forum Jump | Forum Permissions You cannot post new topics in this forum You cannot reply to topics in this forum You cannot delete your posts in this forum You cannot edit your posts in this forum You cannot create polls in this forum You cannot vote in polls in this forum |


 Topic Options