 Boats For Sale:


No Super Sucker needed |
Post Reply 
|
Page <1 23456 7> |
| Author | |
bkhallpass 
Grand Poobah 

Joined: March-29-2005 Location: United States Status: Offline Points: 4723 |
 Post Options Post Options
") Thanks(0) Thanks(0)
 Quote Reply Quote Reply
 Posted: March-21-2010 at 2:02am Posted: March-21-2010 at 2:02am |
|
My brothers and I have a valve grinder and seat set Pete. Unlikely I will ever use it, but it belonged to my grandfather and then my dad, so we can't get rid of it. Would be great if I knew how to do these things, but my job was always cleaning. Oh well. BKH
|
|
|
Livin' the Dream
|
|
 |
|
|
Gary S
Grand Poobah

Joined: November-30-2006 Location: Illinois Status: Offline Points: 14096 |
Post Options
Thanks(0)
Quote Reply
Posted: March-21-2010 at 2:30am |
|
Oh you say that now Brian, you probably thought you'd never be changing stringers either.
|
|
|
|
|
8122pbrainard
Grand Poobah

Joined: September-14-2006 Location: Three Lakes Wi. Status: Offline Points: 41040 |
Post Options
Thanks(0)
Quote Reply
Posted: March-21-2010 at 9:31am |
 Hang onto that thing Brian!! Yes, just as Mark mentioned they used to be in every repair garage in the country (Australia too Hang onto that thing Brian!! Yes, just as Mark mentioned they used to be in every repair garage in the country (Australia too  ) but not anymore. I'm sure most have gone to the scrap yard and have since been melted down in some foundry in China! ) but not anymore. I'm sure most have gone to the scrap yard and have since been melted down in some foundry in China!
This borrowed one my friend doesn't even use and he's rebuilding Hercules and Continentals all the time! He just lets the machine shop grind the seats when the block goes out for cylinder boring. Engine shops have even become rare. It's easier to get a reman! If you do find one, they are usually doing high end custom engines. There are a couple shops doing old/rare marines but watch out for the big $$$$. Lots of restorers out there that think a old marine rebuild is something special. Gary, Your a old fan of J.C. Witney/Warshawsky. Remember the cheapo seat grinder they used to sell? It was like a V shaped sanding drum that you would put a disk of abrasive paper in and spin with your electric drill. For the valves, they had this metal stamped fixture with a stone that the valve would fit into and you'd spin it with your drill too!! And yes, the good old sand blaster/spark plug cleaner!! |
|
|
|
|
eric lavine
Grand Poobah
Joined: August-13-2006 Location: United States Status: Offline Points: 13413 |
Post Options
Thanks(0)
Quote Reply
Posted: March-21-2010 at 1:12pm |
|
Ha, Pete, at times i will zip tie my die grinder to the the ways of the lathe and grind that way too
|
|
|
"the things you own will start to own you"
|
|
|
|
|
8122pbrainard
Grand Poobah
Joined: September-14-2006 Location: Three Lakes Wi. Status: Offline Points: 41040 |
Post Options
Thanks(0)
Quote Reply
Posted: March-21-2010 at 8:47pm |
|
I mentioned my daughter was going to stop at a rural Napa because it was in the same town where she goes to school and this Napa had the old W series plugs in stock. She just came home for a couple days with the plugs. These things are huge so I thought I post a picture. I went and took a "normal" plug out of my 5HP walk behind blower and set it next to this old Champion for a size comparison.
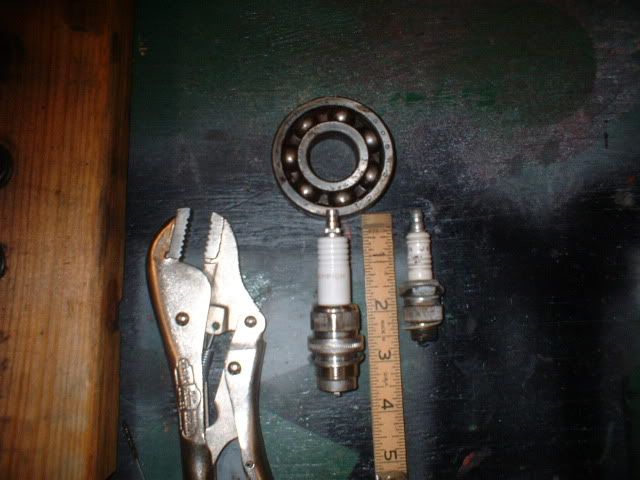
Marty, Do you stock any of the W Champions? |
|
|
|
|
Gary S
Grand Poobah
Joined: November-30-2006 Location: Illinois Status: Offline Points: 14096 |
Post Options
Thanks(0)
Quote Reply
Posted: March-24-2010 at 10:53pm |
|
I do remember them Pete and I had the plug sand blaster too! Did you ever make the trip down to them? What an experence that was also.
|
|
|
|
|
8122pbrainard
Grand Poobah
Joined: September-14-2006 Location: Three Lakes Wi. Status: Offline Points: 41040 |
Post Options
Thanks(0)
Quote Reply
Posted: March-24-2010 at 11:25pm |
Yes it was a experience to say the least!! I remember my mom being real worried too due to the neighborhood I was driving into! Were you ever a woodworker? Craftsman Wood Service was in a real great location too. |
|
|
|
|
Gary S
Grand Poobah
Joined: November-30-2006 Location: Illinois Status: Offline Points: 14096 |
Post Options
Thanks(0)
Quote Reply
Posted: March-24-2010 at 11:34pm |
|
No Pete I was not,but I remember my Dad telling me to be careful.Some of the stuff in those windows looked like it had been there since they opened.
|
|
|
|
|
8122pbrainard
Grand Poobah
Joined: September-14-2006 Location: Three Lakes Wi. Status: Offline Points: 41040 |
Post Options
Thanks(0)
Quote Reply
Posted: March-27-2010 at 11:20pm |
|
Moving on to more surprises! It's like opening up a wood boat!
I mentioned a problem with the cam. Actually it's the bevel gear set on the end of the cam that drives the water pump. They sit in a cavity of the block and this must have held water. Rust and pitting. You can still see some of the pits on the end of the cam. 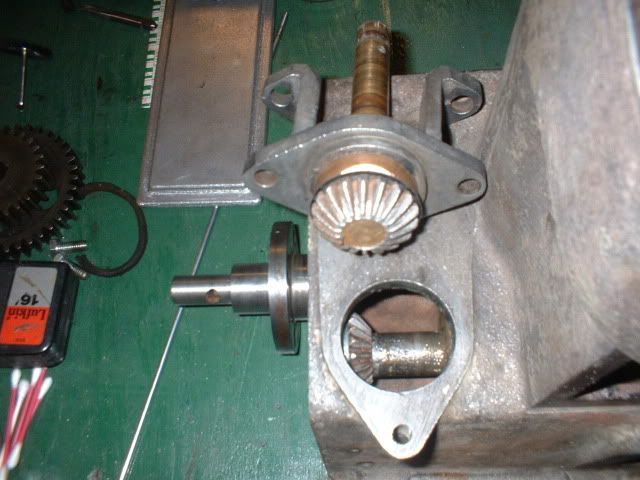
I went and ordered a off the shelf bevel gear set from my power transmission distributor in hopes of just doing some reboring, facing of hubs and keyways. Got 2 gears with the same pitch diameter and number of teeth but found out they would need major rework. Sent them back and decided to do some work on the existing. Measuring the backlash which I had to do anyway because the pump shaft gear controls the cam end play, I decided the gears could be moved closer by .010" I faced the one on the cam and made a shim for the one on the pump shaft. Used valve grind compound on the teeth and lapped the gear teeth. They are hardened so it took a couple tries but now I have about a 60% contact area on the gear faces. The water pump is shot!!! 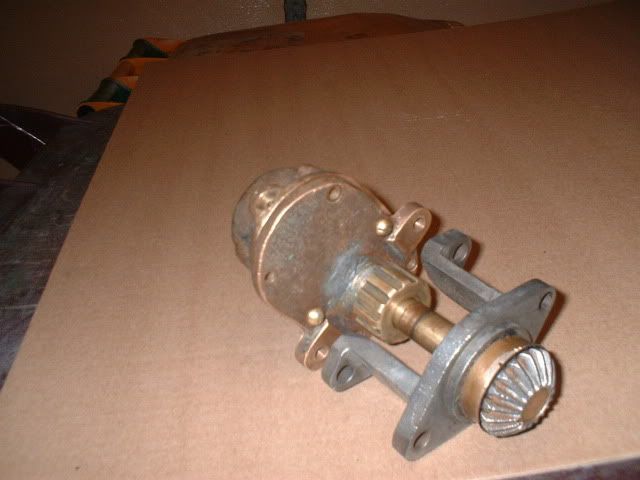
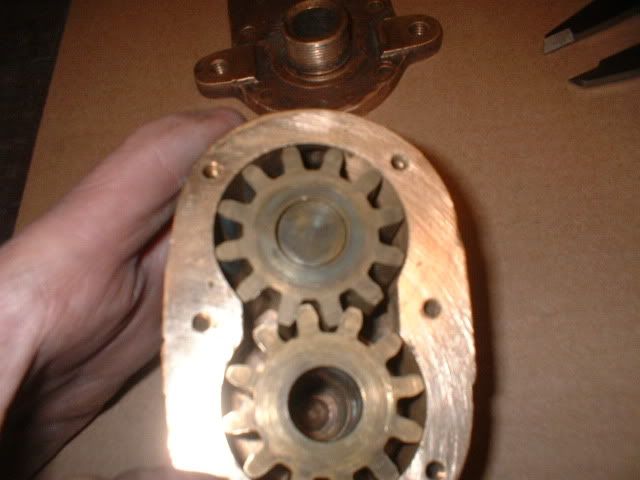
The only way a gear type pump will work is tight tolerances between the gear teeth and housing. .0005" on a side is new - I have .020!!! Between teeth new is .004" - I have .040"!!! I emailed Depco with pictures. No name or numbers on the pump. I'm crossing my fingers on this one hoping they may have a housing and gears. If not, it's major machining time for rebuilding it. In preparation to cutting a new exhaust/intake manifold gasket, I set the manifold up against the block and felt a distinct rock/wobble. Got the straight edge out and found that the manifold is warped. I'll have to take it to work on Monday and set it up on the Bridgeport!! At least the valves are in. I'll adjust them tomorrow. 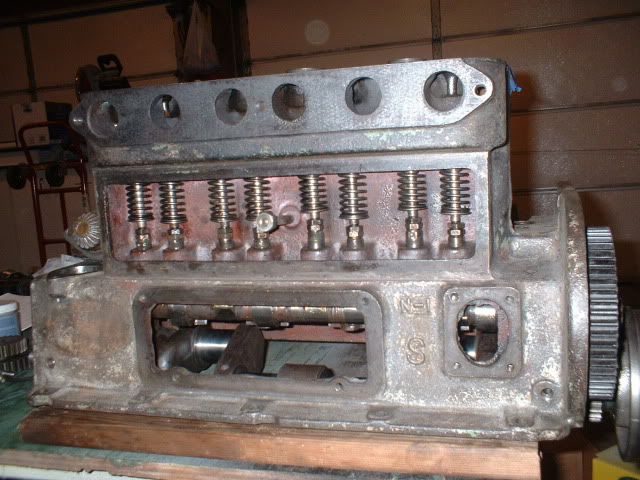
|
|
|
|
|
SNobsessed
Grand Poobah
Joined: October-21-2007 Location: IA Status: Offline Points: 7102 |
Post Options
Thanks(0)
Quote Reply
Posted: March-27-2010 at 11:27pm |
|
Looking good Pete! I hope it sounds a great as Boat Dr.'s dart when you fire it up.
Have you thought of converting the water pump to a rubber impeller? Maybe insert a curved plate to compress the vanes. The judges will never know - unless they read ccf! |
|
|
“Beer is proof that God loves us and wants us to be happy.”
Ben Franklin |
|
|
|
|
MartyMabe
Grand Poobah

Joined: February-21-2006 Location: High Point,NC Status: Offline Points: 3974 |
Post Options
Thanks(0)
Quote Reply
Posted: March-28-2010 at 12:42am |
|
No, Pete on the W Champions, but Charlie,the guy next to us that American Pickers came to see: He has about 20 of those. Still in the OE blister packs and cardboard boxes. Man those thangs are HUGE and neat to see!
But I'll look at all CarQuest inventory's Monday to see if any stores have them. |
|
|
|
|
8122pbrainard
Grand Poobah
Joined: September-14-2006 Location: Three Lakes Wi. Status: Offline Points: 41040 |
Post Options
Thanks(0)
Quote Reply
Posted: March-28-2010 at 9:59am |
|
Chris,
The idea with the rubber impeller has crossed my mind!! It sure would be fairly easy compared to all the machine work needed to rebuild the gears/housing and shafts. I am going to look for a rubber impeller that would fit on the drive gear side and then machine a "plug" with the wear plate/hump that will drop into the driven gear side. I don't want to do anything to change to original pump that would be hard to reverse. The big unknown is the engineering/profile and then of course would it work/how much water would it pump? |
|
|
|
|
SNobsessed
Grand Poobah
Joined: October-21-2007 Location: IA Status: Offline Points: 7102 |
Post Options
Thanks(0)
Quote Reply
Posted: March-28-2010 at 11:00am |
|
Pete - You could try the rubber impeller idea for low cost & effort. Make a wood plug (copy the hump profile from your tique). Put in a used impeller (maybe have to trim the vanes) hook it up to a drill & do the 5 gallon bucket test. If it passes that then you harden up the guts.
Sounds like a fun project to me! |
|
|
“Beer is proof that God loves us and wants us to be happy.”
Ben Franklin |
|
|
|
|
8122pbrainard
Grand Poobah
Joined: September-14-2006 Location: Three Lakes Wi. Status: Offline Points: 41040 |
Post Options
Thanks(0)
Quote Reply
Posted: March-28-2010 at 7:49pm |
|
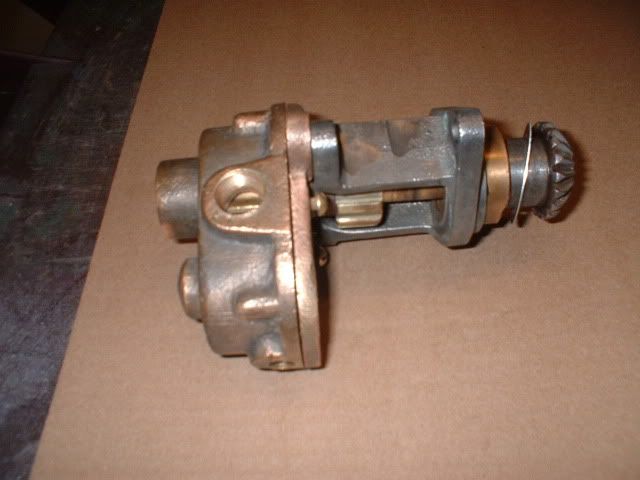
Can't find a rubber impeller that will fit. Looking over some rubber impeller pump, it looks like the cavity ID. is about 1/8" smaller than the impeller that goes in it. The existing gear pump cavity is 1&3/4" so I've been looking for a 1&7/8" impeller. Thickness (depth of cavity) is 1". I'll keep looking because I feel the conversion to rubber is a great idea. Besides, I don't have much hope in Depco coming up with parts. Another alternate is to take a newer style Jabsco gear and modify the mounting to fit. Of course that wouldn't even look original!!!

|
|
|
|
|
hotboat
Gold Member 

Joined: March-28-2009 Location: Conn Lake Pa Status: Offline Points: 814 |
Post Options
Thanks(0)
Quote Reply
Posted: March-28-2010 at 8:18pm |
|
Pete, do you have wire edms at your disposal? If not and I get a slow spot at work I could whip up some new ones. What material and thickness are they and how do they attach to the shaft? I cant tell exactly what I am looking at in the pictures.
|
|
|
Brian
|
|
|
|
|
8122pbrainard
Grand Poobah
Joined: September-14-2006 Location: Three Lakes Wi. Status: Offline Points: 41040 |
Post Options
Thanks(0)
Quote Reply
Posted: March-28-2010 at 9:04pm |
|
Brian,
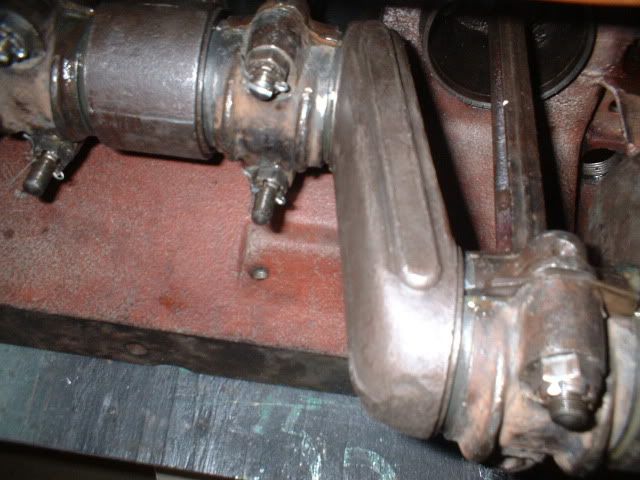
Yes we have wire machines as well as machining centers. Thanks for the offer The problem is really how much time do I really what to spend on the old pump. The old housing could be rebored for the gears and bored/bushed for the shafts but then it's the gears! We do not have the gear hob so we're talking having a set of custom oversize ones made or I go out and buy a hob!!$$$ If I can't find the rubber impeller to fit and see if I can get the original housing to work, then I have a friend who has already offer to give me a NOS Jabsco gear pump of the next generation. Mounting would be the only project as they were foot mounted whereas you'll notice in the pictures the existing was face mounted. It will be interesting to see if Depco comes up with anything. I've got several choices/options!! |
|
|
|
|
8122pbrainard
Grand Poobah
Joined: September-14-2006 Location: Three Lakes Wi. Status: Offline Points: 41040 |
Post Options
Thanks(0)
Quote Reply
Posted: March-29-2010 at 7:58pm |
|
Did some machining at lunch today. As mentioned, Saturday I set the exhaust/intake manifold up against it's mating surface on the block and it wobbled/rocked! I got the straight edge out and I guessed the middle surface to have a belly of .030 in it. Maybe they didn't season this casting long enough! There's no indication of it being overheated. Dial indicated it in to the mills table and sure enough it was .028 low in the middle!
On the left is the flywheel. Last week I was looking at the rust pitting on one side of both the faces and the outside. I figured I could Bondo it or chuck it up in the lathe. I ended up in the lathe taking about .020" off to clean it up. Now I've got the high speed version of the Flexi with the light weight flywheel. 
The brass leaning against the cork gasketing is the front main seal housing!! Inside of it's center is a groove for rope packing. Since everyone including myself has had such good luck with the GFO packing for a prop shaft gland, I figured I'd give it a try. High lubricity and a very high FPM rating (not that it's needed on a 2500 WOT engine!!) The spool to it's left is 5' of 3/16 Gortex GFO I purchased from McMaster for $26. Sure cheaper than Skidim! I price compared and Skidim's package claimed to be 24" but I sure didn't get that much when I bought it it. I think I was lucky to get 5 rings cut for the 1" prop shaft! The engine didn't come with a hand crank and figuring I'm going to have to turn it over soon, here's the forged crank I purchased that's very appropriate looking. I got the center of the hub drilled out and now I do have to mill the slot in it's end for the pin engagement to the cranks shaft. 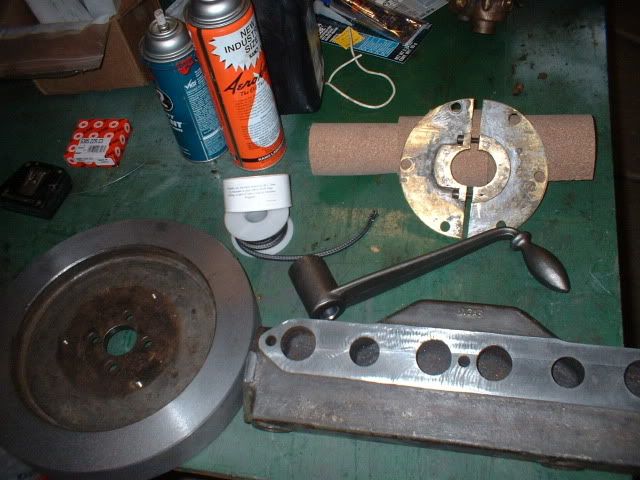
|
|
|
|
|
8122pbrainard
Grand Poobah
Joined: September-14-2006 Location: Three Lakes Wi. Status: Offline Points: 41040 |
Post Options
Thanks(0)
Quote Reply
Posted: March-31-2010 at 10:19am |
|
Eric,
The trans isn't a Paragon but rather a Joes! 
I sure wish I had found this cross section view BEFORE I put the crank and planetary in the press and broke the housing!! BTW, I had asked you if you knew how far back Paragon went. I found this picture from 1917 showing a Paragon in one of their adds. This was in the early days when the trans's were "add-ons", not cased and were simply put in line with the prop shaft. Even more alignment with the good old wood wedges!! 
|
|
|
|
|
8122pbrainard
Grand Poobah
Joined: September-14-2006 Location: Three Lakes Wi. Status: Offline Points: 41040 |
Post Options
Thanks(0)
Quote Reply
Posted: April-03-2010 at 7:13pm |
|
I need some help with connecting rod nuts/bolts. I'm pulling threads on the old ones. A couple of the nuts let loose and one of the bolts. I figure I had better replace all of them. The bolts are specific due to their heads. They simply have one flat ground on a round head mating with a flat on the rod. I can make them by grinding one of the flats larger on a grade 8 hex head but am wondering about the nuts. It's been awhile since I've seen the bottom side of a modern engine so wears the question. What means of locking or what type of nuts are used?? The originals are castlated with cotter pins. I'm thinking about a "flex top" or a "distorted thread" nut. Even though the specs say up to 250 degrees, I have a feeling a Nyloc may not like the heat but I'm open to suggestions.
|
|
|
|
|
SNobsessed
Grand Poobah
Joined: October-21-2007 Location: IA Status: Offline Points: 7102 |
Post Options
Thanks(0)
Quote Reply
Posted: April-04-2010 at 12:48am |
|
High temp locktite?
|
|
|
“Beer is proof that God loves us and wants us to be happy.”
Ben Franklin |
|
|
|
|
Gary S
Grand Poobah
Joined: November-30-2006 Location: Illinois Status: Offline Points: 14096 |
Post Options
Thanks(0)
Quote Reply
Posted: April-04-2010 at 2:23am |
|
Pictures? sizes? Distorted threads would be out,no way to tell torque setting. Maybe ARP has something you can use.
|
|
|
|
|
eric lavine
Grand Poobah
Joined: August-13-2006 Location: United States Status: Offline Points: 13413 |
Post Options
Thanks(0)
Quote Reply
Posted: April-04-2010 at 11:29am |
|
normally a standard nut torqued shouldnt loosen, on rods I always loctite, thats me though, never loctite on mains because they are stationary. i think some of the loctites are good to 350 degrees.
damn Pete, i do see the basic similarities between Joe's and Paragon's. I did not know Paragon went back that far |
|
|
"the things you own will start to own you"
|
|
|
|
|
8122pbrainard
Grand Poobah
Joined: September-14-2006 Location: Three Lakes Wi. Status: Offline Points: 41040 |
Post Options
Thanks(0)
Quote Reply
Posted: April-04-2010 at 12:26pm |
|
Gary,
I did look at the ARP but couldn't find a rod bolt smaller than 3/8. These are 5/16 x 1&3/4" and 2&1/8" (fine thread 24 pitch). The different lengths must have something to do with the splash lube as the rod revolves through the oil splash tray in the oil pan. 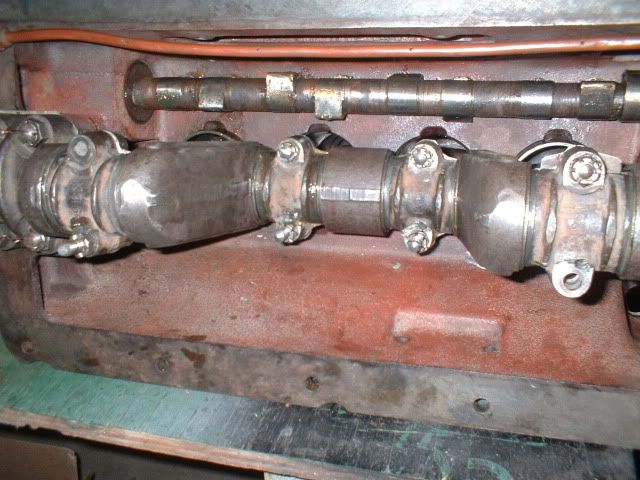
They do have what appears to be the type "A" head which is just the flat on one side. 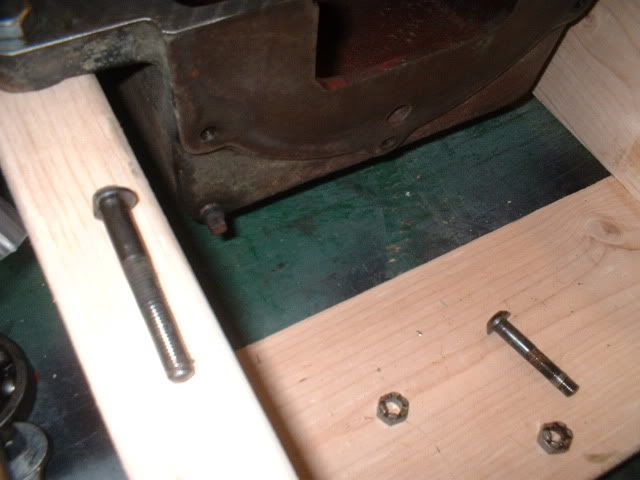
The original bolt shanks are not tight fitting in the rod or the cap so it looks like I'll be just going with partially threaded grade 8 bolts and nuts. Chris and Eric, I looked up the temp limit on the locktite. I'm leaning towards it now. I could go with the self wicking/after assembly so it wouldn't affect the torque reading or just go with the regular??? Interesting on the torque - due to the fact that I don't have any for this engine, I've been using the torque specs for a later model flat head. Torquing to 40 Ft. Lbs. !!! I've been over torquing  because those are 3/8 and not 5/16"!! I may have done the same to the mains?? I should have gone directly to the SAE spec book and not this other engine manual. because those are 3/8 and not 5/16"!! I may have done the same to the mains?? I should have gone directly to the SAE spec book and not this other engine manual.
|
|
|
|
|
8122pbrainard
Grand Poobah
Joined: September-14-2006 Location: Three Lakes Wi. Status: Offline Points: 41040 |
Post Options
Thanks(0)
Quote Reply
Posted: April-05-2010 at 12:27pm |
Eric, Do you use the loctite that is designed to wick in after assembly so it doesn't affect the torque reading or do you pre loctite and use the torque multiplier for lubricated/coated threads? The self wicking (apply after assembly) is considered a "medium" strength. I have it at home but along with the grade 8 bolts I'm ordering, I'm also getting the 262 loctite. It's considered "high" strength, 300 degree and states it's resistant to oils. All of the loctite brand thread lockers have a temp range up to 300 except 1 which is 450 but it seems to be for large bolts. |
|
|
|
|
8122pbrainard
Grand Poobah
Joined: September-14-2006 Location: Three Lakes Wi. Status: Offline Points: 41040 |
Post Options
Thanks(0)
Quote Reply
Posted: April-08-2010 at 1:15pm |
|
I got my new rod bolts made. I bought grade 8 bolts and nuts, cut the bolts to the two different lengths needed and ground the flats on the heads to match the type A rod bolt head. This time, I'm not going to over torque them!!
One thing I just lucked out with is the thread length on these grade 8 partially threaded bolts. It's one spec that you have no control over. The manufacturing tolerance for the actual length of thread is real sloppy. On a 5/16" x 2&1/4" bolt it's anywhere from 7/8" to 1&1/8". On one rod I have .010" thread left over!!! The other 3 I have .050" or better. I sure didn't want to have to put any flat washers under the nuts if at all possible. I haven't decided which Loctite to use yet. The self wicking after assemble medium strength or the high strength before assembly? |
|
|
|
|
79nautique
Grand Poobah

Joined: January-27-2004 Location: United States Status: Offline Points: 7872 |
Post Options
Thanks(0)
Quote Reply
Posted: April-08-2010 at 2:14pm |
|
apply it before, don't use the wicking stuff very thin, you might as well not use any if your going to use the wicking version.
|
|
|
|
|
8122pbrainard
Grand Poobah
Joined: September-14-2006 Location: Three Lakes Wi. Status: Offline Points: 41040 |
Post Options
Thanks(0)
Quote Reply
Posted: April-08-2010 at 4:00pm |
|
Chris,
Thanks for the advice. It was enough to "kick" me over the edge on going with the higher strength plus it also claims to be better with oil resistance. Now I just need to use the multiplier for the correct torque. BTW, I've used alot of the wicking type on smaller finer threads and it does really work great. |
|
|
|
|
79nautique
Grand Poobah
Joined: January-27-2004 Location: United States Status: Offline Points: 7872 |
Post Options
Thanks(0)
Quote Reply
Posted: April-08-2010 at 4:09pm |
|
Here's one for you,
What is better when dealing with a blind thread, appling loctite to the holes threads or the screws threads? |
|
|
|
|
8122pbrainard
Grand Poobah
Joined: September-14-2006 Location: Three Lakes Wi. Status: Offline Points: 41040 |
Post Options
Thanks(0)
Quote Reply
Posted: April-08-2010 at 4:14pm |
|
Chris,
I never really knew there was a recommended procedure. I usually put it on both and then run the screw in and out a couple times to make sure the thread locker is on all the treads!! Did I flunk threadlocking 101?
|
|
|
|
|
79nautique
Grand Poobah
Joined: January-27-2004 Location: United States Status: Offline Points: 7872 |
Post Options
Thanks(0)
Quote Reply
Posted: April-08-2010 at 4:28pm |
well yea you did, kinda waisting the product, but on a blind hole let it drip on one side of the threaded hole in a straight line so to say, then insert the bolt, the air forces it back up around the thread as you screw in the bolt. On a thru hole just apply a line of the product starting a couple threads up from the end of the bolt and your good to go. No need to run it in then back out again and re-inserting, you've basically wiped it clean and have decreased the effectiveness of the loctite. It cures by the lack of air so it needs to fill the space between the threads for it to cure, by inserting removing and reinserting the product is thinned out and creates gaps so there is always air present so it doesn't cure. FYI if you plan on ever dis-assembling the rod caps you don't want to use the red stuff aka 262 it is perminate. |
|
|
|
|
Post Reply
|
Page <1 23456 7> |
 Tweet
Tweet
|
| Forum Jump | Forum Permissions You cannot post new topics in this forum You cannot reply to topics in this forum You cannot delete your posts in this forum You cannot edit your posts in this forum You cannot create polls in this forum You cannot vote in polls in this forum |


 Topic Options
 Gary S wrote: