 Boats For Sale:


Another BFN Rebuild |
Post Reply 
|
Page <1 2122232425 31> |
| Author | |
TRBenj 
Grand Poobah 

Joined: June-29-2005 Location: NWCT Status: Offline Points: 21138 |
 Post Options Post Options
") Thanks(0) Thanks(0)
 Quote Reply Quote Reply
 Posted: April-26-2010 at 3:43pm Posted: April-26-2010 at 3:43pm |
|
Chris, Pete is correct- the coosa will not hold a screw like wood does. The stringers are laminated with glass on both sides, which helps- but it still makes me nervous.
Pete, what do you think about securing the angle with a bunch of 1-1/4" #10 screws? They would extend all the way through the 3/4" support, but not through the 1/2" thick stringer. Or should I go with something larger, and possibly drill/tap the epoxy as you mention? |
|
 |
|
|
8122pbrainard
Grand Poobah

Joined: September-14-2006 Location: Three Lakes Wi. Status: Offline Points: 41040 |
Post Options
Thanks(0)
Quote Reply
Posted: April-26-2010 at 3:08pm |
|
Chris,
The screws stripping out of the Coosa I believe is Tim's concern. I had never seen the material before Joe brought some drop offs to GL. Interesting stuff but not much to screw into. The center core is a higher density polyurethane foam and the skin is glass reinforced. Tim, The old West system method of creating threaded holes is to drill 3 to 4 times the diameter needed, fill the hole with filled epoxy, then drill and tap. Not a bad method but I wouldn't do it on only 1 layer of Coosa. At least 2 to get the needed bearing surface on the fastener. |
|
|
|
|
79nautique
Grand Poobah

Joined: January-27-2004 Location: United States Status: Offline Points: 7872 |
Post Options
Thanks(0)
Quote Reply
Posted: April-26-2010 at 2:56pm |
|
is there an issue with screws biting into the corsa material? worried about striping out later? That is what I'm thinking your worried about if not then maybe your over engineering too much into this and making it more complicated than it needs to be.
|
|
|
|
|
TRBenj
Grand Poobah
Joined: June-29-2005 Location: NWCT Status: Offline Points: 21138 |
Post Options
Thanks(0)
Quote Reply
Posted: April-26-2010 at 2:39pm |
|
Eric, the Edelbrock Performer RPM has a good reputation, as does the Weiand Stealth. We're going with the RPM on ours.
Chris, the ribs arent in yet, but Im not crazy about embedding aluminum into them. Will glass even stick to aluminum? Remember that the secondaries are only 1/2" thick. |
|
|
|
|
79nautique
Grand Poobah
Joined: January-27-2004 Location: United States Status: Offline Points: 7872 |
Post Options
Thanks(0)
Quote Reply
Posted: April-26-2010 at 12:20pm |
if the ribs are in then you have to break it up but if not notch the ribs and glass over every thing. Also you could just embead a piece of strip stock in between the corsa and then just drill and tap after it's cured. |
|
|
|
|
eric lavine
Grand Poobah
Joined: August-13-2006 Location: United States Status: Offline Points: 13413 |
Post Options
Thanks(0)
Quote Reply
Posted: April-24-2010 at 2:11pm |
|
Tim, you do any research on a good intake? im almost ready to assemble these 370's, the currents are factory Merc aluminums, but 1990 technology, I may opt to put these edel 750's on them since i have them in the box...not a big fan though, good baseline engines but i have to vee block the cams and see what i have and where i can go..im leaning towards hydromotive props, 4 blades,
I really think with whats there getting to the 425 mark wont be so hard...it has the guts, and i just need to be careful with the cams. |
|
|
"the things you own will start to own you"
|
|
|
|
|
Keeganino
Grand Poobah

Joined: October-27-2009 Location: North Carolina Status: Offline Points: 2063 |
Post Options
Thanks(0)
Quote Reply
Posted: April-24-2010 at 1:36pm |
|
Interesting stuff going on over here! Looks great.
|
|
|
"working on these old boats may not be cost effective but as it shows its what it brings into your life that matters" -Roger
1973 Skier |
|
|
|
|
TRBenj
Grand Poobah
Joined: June-29-2005 Location: NWCT Status: Offline Points: 21138 |
Post Options
Thanks(0)
Quote Reply
Posted: April-24-2010 at 12:52pm |
|
Chris, that thought had occured to me, but I wouldnt be able to make one big backer for the angle. There are ribs spaced at every foot between the secondary and the outside of the hull.
Phil, where would I put that insert? On the back side of the secondary stringer (outside) or the front (inside)? Do you think the barbs would hold it in the coosa? Im not so sure. Pete, you mean 2 layers of coosa (1.5" lip) instead of one (3/4")? I wouldnt extend the second piece all the way, as it would make it pretty tight with the exhaust hose. Thats also quite a bit more material ($$$)... do you not like the idea of screwing the angle in with a series of smaller screws? Eric, good looking out on the ratchet straps for the gas tank- why didnt I think of that? |
|
|
|
|
79nautique
Grand Poobah
Joined: January-27-2004 Location: United States Status: Offline Points: 7872 |
Post Options
Thanks(0)
Quote Reply
Posted: April-23-2010 at 11:28am |
|
Ok I was thinking you where talking about the vertical pannel that covers the tank and the backrest that the rear seat covers. Your talking about the horz pannel that is removable. In that case I like the angle plate idea better. For fastneing it, I would get a 1" strip of flat stock, drill some holes in it, if you have access to a arbor press, punch square holes into it use carrage bolts welded in place or just plain old bolts welded to it would work too, then I would drill holes through the secondary stringer and then use lock washers and nuts to attach the angle to the inside. I would drill the strip and angle at the same time just clamp the two piece together and drill away they'll be lined up and go together pretty easily.
basicly the stringer would be between the stud strip and the angle stock with the threads being horz. maybe 6-8 1/4" diameter studs per strip should be enough. |
|
|
|
|
eric lavine
Grand Poobah
Joined: August-13-2006 Location: United States Status: Offline Points: 13413 |
Post Options
Thanks(0)
Quote Reply
Posted: April-23-2010 at 10:00am |
|
whats wrong with some brunstucky rachet straps?, thats how you hold in a cars gas tank up here....works just fine lol...believe me, Ive seen it more than once
|
|
|
"the things you own will start to own you"
|
|
|
|
|
lfskizzer
Senior Member 

Joined: July-26-2007 Location: Wilton, CT Status: Offline Points: 290 |
Post Options
Thanks(0)
Quote Reply
Posted: April-22-2010 at 11:14pm |
|
Tim
what about putting t-nuts in on the outside that the aluminum angle bolt into? 
T-Nut in Stainless Steel Would that work? |
|
|
|
|
8122pbrainard
Grand Poobah
Joined: September-14-2006 Location: Three Lakes Wi. Status: Offline Points: 41040 |
Post Options
Thanks(0)
Quote Reply
Posted: April-22-2010 at 9:52pm |
|
Tim,
I like the idea of the extra support area the angle would provide. Yes, 3/4" isn't very much! Instead of the angle, how about Coosa and glass? |
|
|
|
|
TRBenj
Grand Poobah
Joined: June-29-2005 Location: NWCT Status: Offline Points: 21138 |
Post Options
Thanks(0)
Quote Reply
Posted: April-22-2010 at 9:08pm |
|
Youre killing me Pete- yes the scale is a *little* off... but its close. Here it is in Autocad.
Lots of room on the outside of the hose... in fact, the hose will barely catch the mains at all. I would add coosa exclusively, but it gets expensive! Im also not sure how much I will have left, and these 6" tall x 46" long support pieces arent small. Do you think a 3/4" lip at either side is enough? Or should I go with some 2" aluminum angle in addition to it? |
|
|
|
|
TRBenj
Grand Poobah
Joined: June-29-2005 Location: NWCT Status: Offline Points: 21138 |
Post Options
Thanks(0)
Quote Reply
Posted: April-22-2010 at 9:01pm |
|
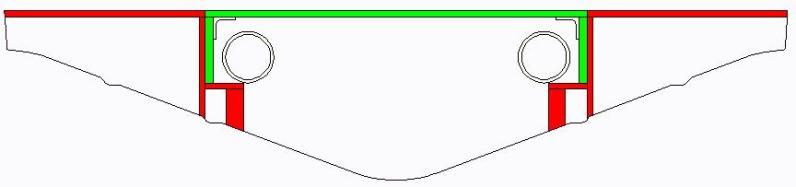
Joel, I see where youre coming from... but Ill tell you why I like sistering to the inside better.
1)Cutting the secondaries down 1/2" in a section would be a PITA since theyre already in place and glassed down. 2)The secondaries are already covered in 4 layers of glass. They have this much glass to make them strong in order to support the (permanant) floor. The sistered piece that would be supporting the floor in your set up would not have this same strength. 3)Glass does not like to make 90 degree corners, and your approach would add a doozy when taping the floor down. See below (red). 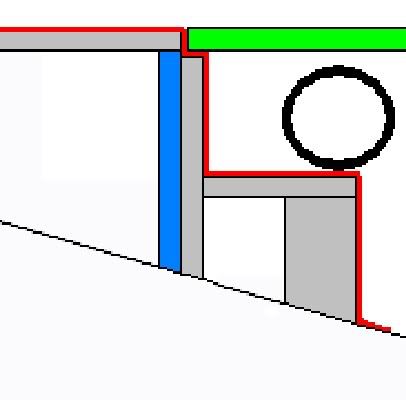
While I appreciate clean lines, strength and functionality come first... besides- its just the bilge! Not to worry though, if I add it to the inside it wont look "scabbed"... it will be filleted, glassed, smoothed and painted and will blend in nicely. |
|
|
|
|
8122pbrainard
Grand Poobah
Joined: September-14-2006 Location: Three Lakes Wi. Status: Offline Points: 41040 |
Post Options
Thanks(0)
Quote Reply
Posted: April-22-2010 at 8:52pm |
|
My vote is to go with glassing on strips of Coosa. Tim, in that last sketch you did, it looks like you have plenty of room next to the exhaust. Is it out of scale?
|
|
|
|
|
M3Fan
Grand Poobah

Joined: October-22-2005 Location: United States Status: Offline Points: 3185 |
Post Options
Thanks(0)
Quote Reply
Posted: April-22-2010 at 8:31pm |
|
FWIW what I like about my idea is that with the section removed you get a really clean looking rear-bilge-area because there is nothing visibly sistered onto the secondaries.
|
|
|
2000 SN GT40 w/99 Graphics/Gel
2016 SN 200 OB 5.3L DI https://forum.fifteenoff.com |
|
|
|
|
TRBenj
Grand Poobah
Joined: June-29-2005 Location: NWCT Status: Offline Points: 21138 |
Post Options
Thanks(0)
Quote Reply
Posted: April-22-2010 at 8:03pm |
|
Good stuff Joe.
I cant run supports down to the mains because the exhaust hoses will be sitting directly over them- mainly towards the inside edge. The only place I can grab some room is all the way out towards the secondaries. My concern with the lags was the screw retention- obviously not rot. The thought of using a bunch of smaller screws had crossed my mind... maybe Ill add a 3/4" strip of coosa along the inside of the secondary for the panel to sit on, and add a 2" angle to that, held on by a bunch of 1-1/4" screws. That would give me 2-3/4" of surface for the panel to sit on. The shorter, smaller screws wouldnt extend all the way into the sealed cavities either. Is that what youre saying BJ? 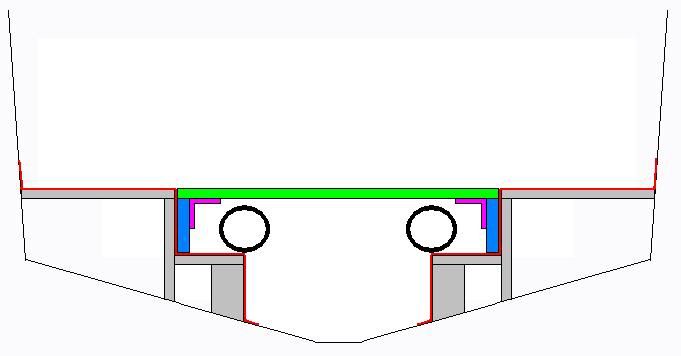
Regarding the gas tank, my '90 has a strap system with threaded rods that fasten down to some angles attached to the stringers... Im just not sure how I would go about building these. |
|
|
|
|
hasbeenskier
Platinum Member 

Joined: May-23-2005 Location: United States Status: Offline Points: 1116 |
Post Options
Thanks(0)
Quote Reply
Posted: April-22-2010 at 7:56pm |
|
My two cents worth is Joe's idea with the added concept of glassing the coosa strips to the secondaries taking into account the thickness of the glass layup. There will not be enough weight on the deck to shear off the strips.
bj |
|
|
hasbeenskier
|
|
|
|
|
JoeinNY
Grand Poobah

Joined: October-19-2005 Location: United States Status: Offline Points: 5697 |
Post Options
Thanks(0)
Quote Reply
Posted: April-22-2010 at 7:20pm |
|
Well I went real low rent on this fix, I ran 1x3/4 strips of untreated coose along the side of my secondaries held in by some stainless screws. My floor also sits directly on the primarys though, so it was just to keep the floor from popping up when one steps near the seam. Could you get more elaborate with the floor piece, with relatively deep legs on the bottom that drops down to the main stringers?
If you do the angle iron bit you would be a lot better off with 24 stainless screws and some 5200 than with a few lags. It is coosa after all you dont need to treat it like wood. I am heading down south for the weekend but when I get back I will take pictures of the tank strapping system in the 95 I believe it will be similar to what you are proposing. |
|
|
|
|
TRBenj
Grand Poobah
Joined: June-29-2005 Location: NWCT Status: Offline Points: 21138 |
Post Options
Thanks(0)
Quote Reply
Posted: April-22-2010 at 6:31pm |
|
Thanks for the input guys- now we're cooking!
Chris, Im having a hard time visualizing what youre saying. To make sure we're talking about the same thing, here's a quick sketch of my original plan. Hopefully you can check it out later tonight at home. 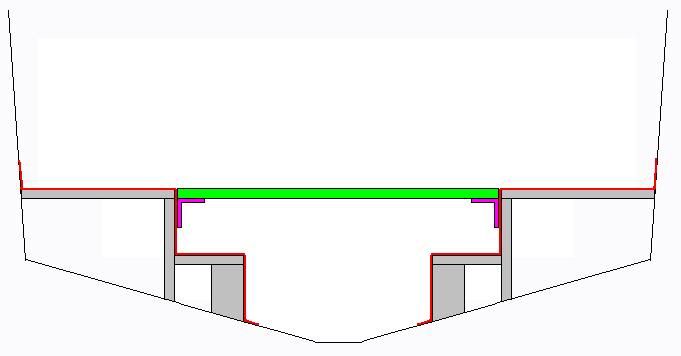
This is the cross section of the rear part of the boat. The stringers and floor pieces (coosa) are in gray. The red line shows how I plan to glass everything together once its installed. The question is how to fasten the angle (purple) that will hold up the removable panel (green). In reading Chris's last comment, I had an idea that very closely mirrored Joel's. Instead of cutting the secondaries shorter and adding nailors to the outsides to support the permanant floor, Im thinking it would be better to add nailors (blue) for support on the inside to support the removable floor. I checked and I should have almost 1.5" to spare between the inside of the secondary and the exhaust hose, so even a doubled up piece of coosa (1-1.25") could be snuck in here. 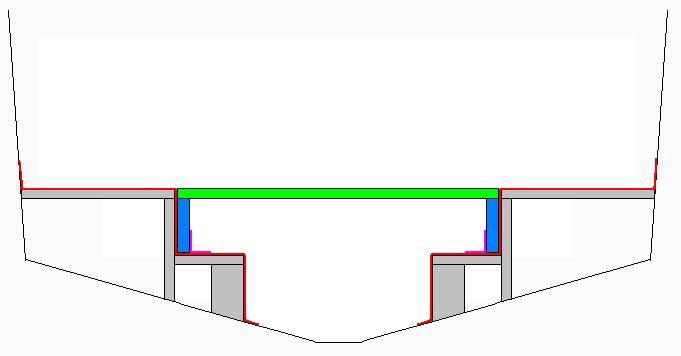
The question is, will a 3/4"-1-1/4" lip on either side be strong enough to support the panel? The panel is 34" wide. It will be built out of 1/2" coosa, with a few additional 1/2" strips on the underside running width-wise for support. |
|
|
|
|
M3Fan
Grand Poobah
Joined: October-22-2005 Location: United States Status: Offline Points: 3185 |
Post Options
Thanks(0)
Quote Reply
Posted: April-22-2010 at 6:07pm |
|
Could you double up the 2ndary stringers on the inboard sides, and cut the floor to lap over that doubled up piece, falling short of the 2ndary stringer and essentially exposing your 2ndary stringers as the "shelf" on each side for the floor piece to rest on? The doubled up pieces are in red below.

|
|
|
2000 SN GT40 w/99 Graphics/Gel
2016 SN 200 OB 5.3L DI https://forum.fifteenoff.com |
|
|
|
|
79nautique
Grand Poobah
Joined: January-27-2004 Location: United States Status: Offline Points: 7872 |
Post Options
Thanks(0)
Quote Reply
Posted: April-22-2010 at 5:50pm |
|
another thought is building up on top of the floor's level behind the vertical pannel with a block/strip of corsa say 1" high or so you could use wood if you wanted to use screws but you really don't need to screw the bottom it can only go back if someone is leaning against it so you don't really need them, the top is going to be secure to start with, I'm assuming your tucking the top portion behind the cap and not in front like the late 70's boat's where done.
sorry just realized it's a 79 makes it even easier since it is in front of the cap if it is like the SN's |
|
|
|
|
79nautique
Grand Poobah
Joined: January-27-2004 Location: United States Status: Offline Points: 7872 |
Post Options
Thanks(0)
Quote Reply
Posted: April-22-2010 at 5:34pm |
|
do you have acess to a lathe? I have an idea that will work if you do, but you'll have to lay it all out to locate the insert before you permanatelly mount the pannel. I don't see a problem thru bolting the angle for the center removable pannel should be easy, but if your wanting a mostly continuous stop for the bottom of the pannel the two outter sections will be the tough ones to get layed out but I would think glassing in a post/stud wouldn't be an issue, it's not like you going to be removing it anyway once it's down its down and there shouldn't be a reason to have to removed it, you really only need about 1/2" lip maybe 3/4" to keep it in place at the floor.
another option is using studs that have a hex on the end or square that is smaller than the minor diameter of the thread, then all you have to do is double nut it on the underside using an oversized flat washer too and stick it through the pannel glass it in on the bottom, tape the threads off on the exposed side, glass that side and call it a day if it breaks free you have the hex feature to hold the stud while you turn the nut with and open end wrench. Instead of double nutting the underside weld the nut to the stud will work better it's just a stop anyway. This might be a little easier though why do you have to use angle? Why not just create a channel in the floor for the lower section of the pannel to rest in say 1/2"-1" deep for the entire width of the boat, you could even stop the removable pannel flush with the vertical pannel and then just use a small strip of corsa to support it from sliding backwards. |
|
|
|
|
TRBenj
Grand Poobah
Joined: June-29-2005 Location: NWCT Status: Offline Points: 21138 |
Post Options
Thanks(0)
Quote Reply
Posted: April-22-2010 at 4:52pm |
|
OK a few questions.
I am trying to figure out how to support the rear removable panel, and how to mount the gas tank. I could use some input. Right now I am planning to support the rear panel with angle alumium, which will attach to the secondary stringers. This is how CC supports the panel in all of the 89+ boats. The only thing I dont like about that is how they attach- CC lagged them into the stringers. I would rather not lag into the coosa. I cant through bolt from the inside, as the floor will be installed and glassed down to the stringer, so no access to get a nut on. I could potentially install the bolt (somehow secured from spinning) before dropping the floor on. My only fears in this scenario is 1)keeping the bolt's threads clean while glassing the floor down, 2)if I ever cross thread a nut and bugger up the bolt, Im screwed because it cant be replaced, and 3)if it ever breaks free and spins, I cant remove the angle. In regards to the gas tank, I plan on attaching some 2"x2" angle aluminum to each of side of both secondary stringers- so it will essentially sit on two T's. Probably put some rubber between the angle and tank. Im not sure how Im going to secure it down though... the original configuration had the tank sitting on some 1x's that spanned the whole length of the tank, and the tabs at each end screwed down to those. Some sort of straps? Any thoughts? 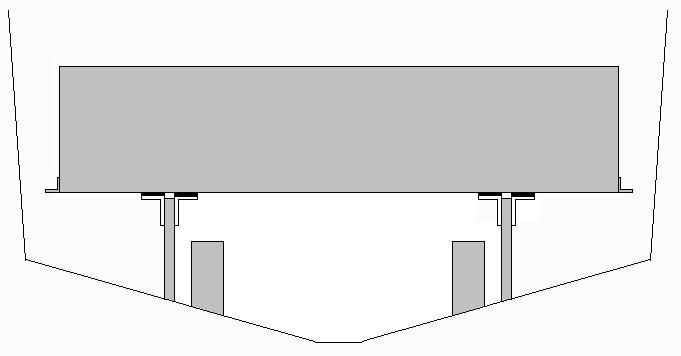
|
|
|
|
|
8122pbrainard
Grand Poobah
Joined: September-14-2006 Location: Three Lakes Wi. Status: Offline Points: 41040 |
Post Options
Thanks(0)
Quote Reply
Posted: April-19-2010 at 5:19pm |
Chris, You forgot that he's getting the good weights out of his dads frig!! The good SA summer stuff! His dad has better tastes!! 
|
|
|
|
|
TRBenj
Grand Poobah
Joined: June-29-2005 Location: NWCT Status: Offline Points: 21138 |
Post Options
Thanks(0)
Quote Reply
Posted: April-19-2010 at 4:41pm |
|
Greg, good point- I do expect the boat to be solid! Ive had a few conversations with Joe regarding glass schedules... we're bedding and filleting 2 of the bulkheads shown, plus the narrower one that we've yet to build that will form the front of the bilge. Everything else will just be taped with 2/4/8.
Our keel board only runs as far forward as the original one did. We did bring it further back (and the mains further forward) though. Thanks for the comments- thats high praise coming from you! Phil, yes the front 2 and a half cavities are getting foamed. Basically the front 3, minus the area under the battery box in that 3rd cavity. That will be the forward most drain point. The foam will hold all of the pipes in place, give a little bit of sound deadending in chop, and hopefully keep the boat off the bottom of the lake... or at least slow the rate of sinking. The foamed cavities will be glassed on top. Not sure what our schedule is this weekend- probably still splitting time between the boat and the cottage, so give me a call. |
|
|
|
|
BuffaloBFN
Grand Poobah

Joined: June-24-2007 Location: Gainesville,GA Status: Offline Points: 6094 |
Post Options
Thanks(0)
Quote Reply
Posted: April-19-2010 at 4:03pm |
|
So you'll have 7 bulkheads including the front of the bilge? You know if it can't bend, it'll break.
How far forward did you run the keel? I like the floor tabs you left for reference, sweet. Yall are doing some super nice work; clean and clearly well planned out. |
|
|
|
|
lfskizzer
Senior Member
Joined: July-26-2007 Location: Wilton, CT Status: Offline Points: 290 |
Post Options
Thanks(0)
Quote Reply
Posted: April-19-2010 at 3:56pm |
|
So Tim you foaming any of the front area? I just finished up the stereo re-install on the 85 now its got some good tunes. and alittle bit of bass. Thanks to Morfoot's speaker boxes they worked out great. I built a customer 8" sub box and mounted it in front of the vent lines. and put my amp rack hanging from the deck under the bow. I will post some pics later after I clean out the boat of the mess i made lol. I am off this weekend the 24th if i have time would love to stop by to see the progress myself lol.
-Phil |
|
|
|
|
storm34
Grand Poobah

Joined: November-03-2008 Location: Dexter Iowa Status: Offline Points: 4492 |
Post Options
Thanks(0)
Quote Reply
Posted: April-19-2010 at 3:30pm |
Don't drink too many weights Tim! Progress looks great! |
|
|
|
|
TRBenj
Grand Poobah
Joined: June-29-2005 Location: NWCT Status: Offline Points: 21138 |
Post Options
Thanks(0)
Quote Reply
Posted: April-19-2010 at 3:15pm |
|
Brian- you bet, Ill give you a buzz tonight. I remember seeing your missed call now that you mention it... this weekend was a blur!
|
|
|
|
|
Post Reply
|
Page <1 2122232425 31> |
 Tweet
Tweet
|
| Forum Jump | Forum Permissions You cannot post new topics in this forum You cannot reply to topics in this forum You cannot delete your posts in this forum You cannot edit your posts in this forum You cannot create polls in this forum You cannot vote in polls in this forum |


 Topic Options
 TRBenj wrote: