1992 Sport Floor Replacement |
Post Reply 
|
Page <1 234 |
| Author | |
MechGaT 
Senior Member 

Joined: March-09-2015 Location: Chattanooga Status: Offline Points: 271 |
 Post Options Post Options
 Thanks(0) Thanks(0)
 Quote Quote  Reply Reply
 Posted: March-26-2018 at 11:03pm Posted: March-26-2018 at 11:03pm |
|
Thanks. Wish I had more time to work on it and it wasn’t so far away.
|
|
|
'92 Sport Nautique
|
|
 |
|
MechGaT 
Senior Member 

Joined: March-09-2015 Location: Chattanooga Status: Offline Points: 271 |
 Post Options Post Options
 Thanks(0) Thanks(0)
 Quote Quote  Reply Reply
 Posted: July-09-2018 at 12:31am Posted: July-09-2018 at 12:31am |
|
I have been making progress. I have gotten fiberglass over the floor. I put down a layer of the 10 oz cloth and a layer of chopped strand mat. The chopped strand is thirsty, I used over a half gallon of resin per side on the mat alone.
 I have gotten the boards in the back epoxied down that support the gas tank. 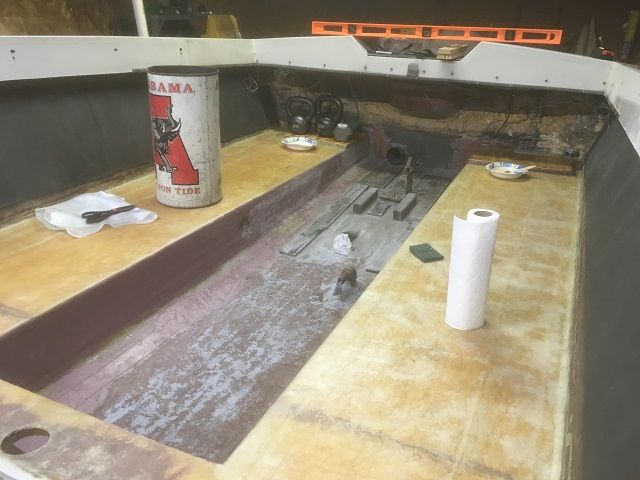 I have also started the process of putting fairing on the bilge. I started sanding it with my palm sander and 80 grit paper. If I continue with that plan it appears I will be here for a few months trying to get the bilge smooth. Does anyone have any tips for sanding the bilge smooth? What is the best tool? Any tips for spreading the fairing compound? |
|
|
'92 Sport Nautique
|
|
 |
|
MechGaT 
Senior Member 

Joined: March-09-2015 Location: Chattanooga Status: Offline Points: 271 |
 Post Options Post Options
 Thanks(0) Thanks(0)
 Quote Quote  Reply Reply
 Posted: July-17-2018 at 11:15pm Posted: July-17-2018 at 11:15pm |
|
I learned a valuable lesson about fairing compound, don't mix it like peanut butter to smooth out areas. I watched a video on boatworkstoday.com that shows the process after the fact. I should have been doing more sanding before applying the fairing compound. Now I have a lot of work ahead of me. Any tips for smoothing out fairing that has been built up too much and is rough?

|
|
|
'92 Sport Nautique
|
|
 |
|
8122pbrainard 
Grand Poobah 

Joined: September-14-2006 Location: Three Lakes Wi. Status: Offline Points: 41045 |
 Post Options Post Options
 Thanks(0) Thanks(0)
 Quote Quote  Reply Reply
 Posted: July-17-2018 at 11:27pm Posted: July-17-2018 at 11:27pm |
|
Brent,
With a big area like a bilge, I've found a small amount at a time is best. A good parallel example would be mudding drywall. They put on a small amount at a time and barely need to sand. |
|
 |
|
MechGaT 
Senior Member 

Joined: March-09-2015 Location: Chattanooga Status: Offline Points: 271 |
 Post Options Post Options
 Thanks(0) Thanks(0)
 Quote Quote  Reply Reply
 Posted: July-18-2018 at 7:40am Posted: July-18-2018 at 7:40am |
|
Yeah, I was bad at finishing drywall as well. My plan is to try the belt sander next and see how it does. I spent 2.5 hours on a section a few feet long this past weekend with my random orbit sander and 40 grit. US Composite’s website says the SM fairing is easy sanding. If so, I would hate to sand whatever is not easy in their book. After getting the high spots down I plan to put on a thin coat to fill in the stubborn voids.
|
|
|
'92 Sport Nautique
|
|
 |
|
MechGaT 
Senior Member 

Joined: March-09-2015 Location: Chattanooga Status: Offline Points: 271 |
 Post Options Post Options
 Thanks(0) Thanks(0)
 Quote Quote  Reply Reply
 Posted: January-04-2019 at 3:47pm Posted: January-04-2019 at 3:47pm |
|
I'm still working on it. First I put the primer on the bilge,
 then I put the top coats on.  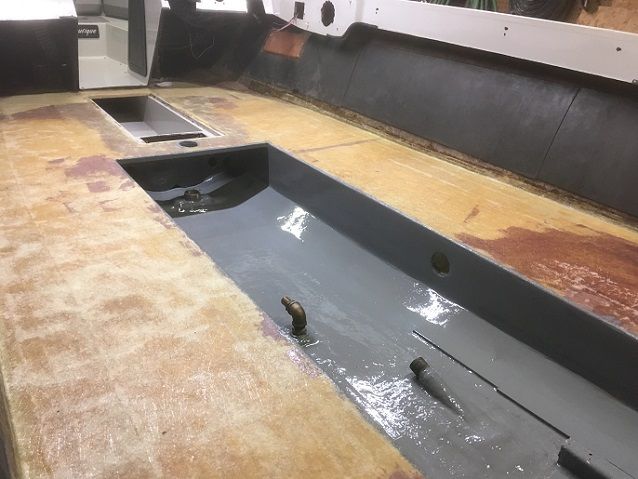 Now I am ready to start mounting brackets, running wires and cables, and I am still working on replacing the cutlass bushing. I have cut it, but can't seem to get it to come out of the strut. I am going to try more persuasive means, next chance I get. |
|
|
'92 Sport Nautique
|
|
 |
|
8122pbrainard 
Grand Poobah 

Joined: September-14-2006 Location: Three Lakes Wi. Status: Offline Points: 41045 |
 Post Options Post Options
 Thanks(0) Thanks(0)
 Quote Quote  Reply Reply
 Posted: January-04-2019 at 4:28pm Posted: January-04-2019 at 4:28pm |
|
Brent,
Looking great.  From the pictures, it looks like you faired it very nice. What are you using for the primer and finish coat in the bilge? From the pictures, it looks like you faired it very nice. What are you using for the primer and finish coat in the bilge?
|
|
 |
|
MechGaT 
Senior Member 

Joined: March-09-2015 Location: Chattanooga Status: Offline Points: 271 |
 Post Options Post Options
 Thanks(0) Thanks(0)
 Quote Quote  Reply Reply
 Posted: April-20-2019 at 5:52pm Posted: April-20-2019 at 5:52pm |
|
Sorry Pete, I did not see this message. At some point I stopped getting email notifications. I used the Interlux Epoxy Primekote and Bilgekote. I read it on SkiBum's thread and it looked good. Thanks for the complement. I think it turned out pretty well. I learned a couple of lessons. First is to pay attention to the thinner used. The Primekote needs thinning a bit. I tried using the stuff that was meant to thin the Bilgekote and it didn't mix. I wasted a cup full. I only bought a quart of each and I barely had enough Primekote to put on the second coat.
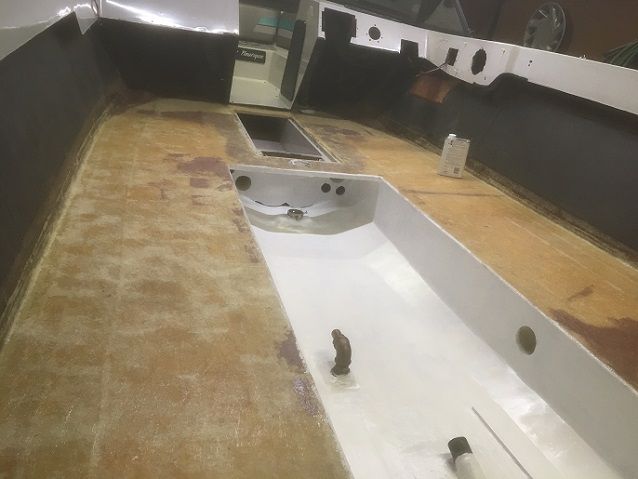 Since then I have put in the cradle. Drilled holes, put in some CPES, put in some 5200, and cinched them down.  I also put in some of the carpet. I used the TEC skill indoor/outdoor carpet glue from Lowes. I saw some others had used it and it says it is good for marine carpet. I bought 2 gallons and have already gone through one and a little more. 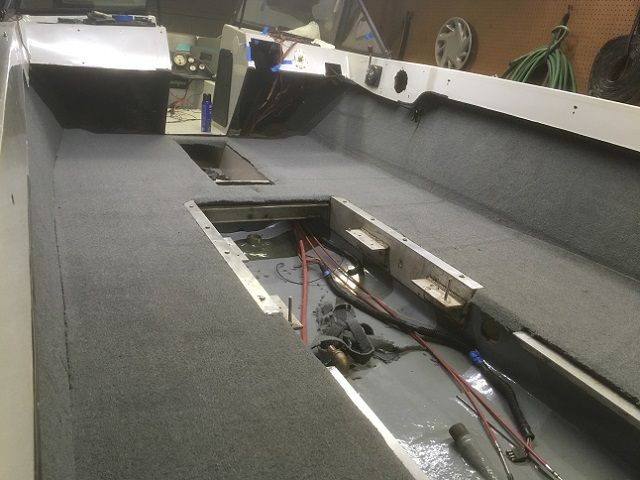 I should have waited to run the wires and cables until the carpet was in, but it wasn't the worst thing working around them. I also changed out the cutlass bushing while I had the chance. |
|
|
'92 Sport Nautique
|
|
 |
|
MechGaT 
Senior Member 

Joined: March-09-2015 Location: Chattanooga Status: Offline Points: 271 |
 Post Options Post Options
 Thanks(0) Thanks(0)
 Quote Quote  Reply Reply
 Posted: June-01-2019 at 1:05am Posted: June-01-2019 at 1:05am |
|
I have made some progress. I got the trim glued in
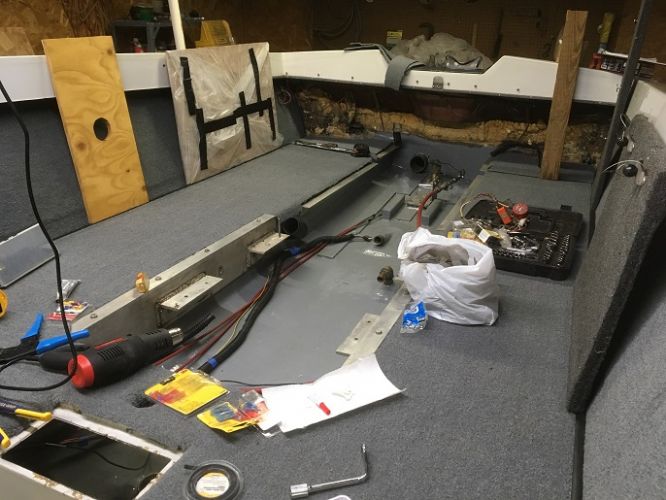 Then I took a small step back when trying to make sure the motor mounts would move freely. Three of the four moved freely, but the rear starboard mount would not rotate or move in and out. The pin was frozen no matter how much persuasion, PB Blaster, and heat we used. Then we used too much persuasion 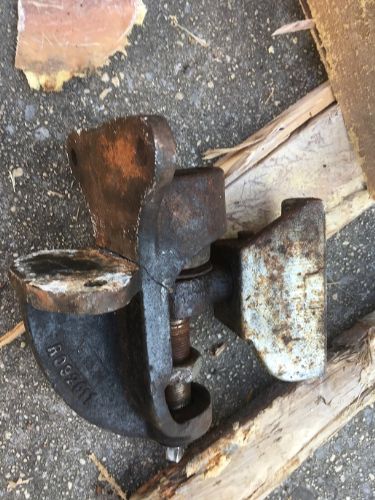  That ended all hopes of getting the boat in the water over Memorial Day weekend, but we pressed on thinking that if the motor was in the boat, the fourth motor mount could be bolted on after the fact Then we took a huge step back.. We got in too much of a hurry and due to using a hand winch we knew already had one broken tooth, we ended up breaking a second tooth and when we went to start letting the motor down it free fell into the bilge.   The two front motor mounts were damaged and the drain connection on the oil pan came loose, draining all of the oil I had just put in it, but otherwise it seems OK. We were able to borrow a 2 ton engine hoist, take off one wheel, do some maneuvering, and get the engine back out. What a sick feeling. I relay the story so that anyone who reads this knows never to use defective equipment and don't use a hand winch to lift your motor. Thank the Lord my brother and I weren't hurt, but a few inches and it could have been a really bad story. There was a sick feeling in my stomach and bad night of sleep that night for sure. I still need to check the drive shaft at the coupling for run-out. I checked it near the prop and it was 0.003" or less, but I didn't check it near the coupling, where it might have gotten hit. Any other recommendations on what to look for? The bilge has a couple of scratches and the aluminum frame took a hit, but both are in serviceable condition. The only check we could think of on the engine was to rotate it by hand and make sure it was still getting compression. It was. The transmission output shaft spun freely no matter if it was in gear or not. Is this normal? |
|
|
'92 Sport Nautique
|
|
 |
|
MechGaT 
Senior Member 

Joined: March-09-2015 Location: Chattanooga Status: Offline Points: 271 |
 Post Options Post Options
 Thanks(0) Thanks(0)
 Quote Quote  Reply Reply
 Posted: June-02-2019 at 9:13am Posted: June-02-2019 at 9:13am |
|
I checked the coupling end of the shaft yesterday and it was right at .003” so it seems to straight.
|
|
|
'92 Sport Nautique
|
|
 |
|
camron18 
Senior Member 
Joined: March-05-2015 Location: Michigan Status: Offline Points: 164 |
 Post Options Post Options
 Thanks(0) Thanks(0)
 Quote Quote  Reply Reply
 Posted: June-03-2019 at 12:31pm Posted: June-03-2019 at 12:31pm |
|
oh that really sucks!! I did the same thing a couple months ago! with a hand winch... thankfully only on the concrete, not in the boat! i cant imagine how sick of a feeling that was after alllll that hard work doing the stringers and floor. That was my biggest fear last week dropping my engine back in.
I found an oil pan for 20 bucks and that was it, started up and ran fine. Im sure yours will be the same they are pretty tough blocks of steel. Glad no one was hurt!! But you should have read my post about not using crappy hand winches to lift the motor! |
|
 |
|
sport1999 
Senior Member 
Joined: May-10-2015 Location: Florida Status: Offline Points: 313 |
 Post Options Post Options
 Thanks(0) Thanks(0)
 Quote Quote  Reply Reply
 Posted: June-03-2019 at 5:33pm Posted: June-03-2019 at 5:33pm |
|
Wow. Really hate to see such a setback on your project. I've been watching this thread and really appreciate your quality of work. Thanks for sharing and hope to see you get back on track.
|
|
 |
|
MechGaT 
Senior Member 

Joined: March-09-2015 Location: Chattanooga Status: Offline Points: 271 |
 Post Options Post Options
 Thanks(0) Thanks(0)
 Quote Quote  Reply Reply
 Posted: June-04-2019 at 3:08pm Posted: June-04-2019 at 3:08pm |
|
Thanks for the encouragement. I should have known better, but I always think it won’t happen to me.
|
|
|
'92 Sport Nautique
|
|
 |
|
MechGaT 
Senior Member 

Joined: March-09-2015 Location: Chattanooga Status: Offline Points: 271 |
 Post Options Post Options
 Thanks(0) Thanks(0)
 Quote Quote  Reply Reply
 Posted: July-06-2019 at 3:40am Posted: July-06-2019 at 3:40am |
|
Got everything back on track today. Engine is back in and everything aligned. Went to start the first time and got a little back fire when trying to start. Figured out that #1 cylinder shifted, I guess when I primed the oil pump. Anyway, when I got it started the engine started racing up to 2500 rpm and I had enough time to look down the throat of the carb to see one barrel dumping gas with no visible gas on the other 3. I started with 2 turns on each of the idle screws. Tried to lean it out a half turn by screw-in with little to know response. I rebuilt the carb a while back. It was my first time rebuilding one, so take that for what it is worth. Any ideas?
|
|
|
'92 Sport Nautique
|
|
 |
|
MechGaT 
Senior Member 

Joined: March-09-2015 Location: Chattanooga Status: Offline Points: 271 |
 Post Options Post Options
 Thanks(0) Thanks(0)
 Quote Quote  Reply Reply
 Posted: July-07-2019 at 1:44am Posted: July-07-2019 at 1:44am |
|
It was a very successful day. I figured out that the high idle was caused by an incorrectly placed spring opening the throttle some. The fuel dribbling was an incorrectly set float. I dropped it down a little and everything ran well from there. After working through a few other issues and setting timing and tuning the carb I went on a water test. Success! I got in a couple of slalom runs and my brother skied a couple of times and tried to deep water start on one. That will take a few more tries. Tomorrow the plan is to get the kids out there to enjoy the fruits of the labor God has blessed us with.
|
|
|
'92 Sport Nautique
|
|
 |
|
Mpost 
Senior Member 

Joined: July-05-2018 Location: Monticello, MN Status: Offline Points: 329 |
 Post Options Post Options
 Thanks(0) Thanks(0)
 Quote Quote  Reply Reply
 Posted: July-07-2019 at 11:56am Posted: July-07-2019 at 11:56am |
|
Brent, congratulations on getting it back in the water. Quite a project. I just reread the whole thread. Did you ever think it would take you 3 years to complete

|
|
|
84 SN Sold 98 SN Lund Pro V 1975 Alumacraft
|
|
 |
|
MechGaT 
Senior Member 

Joined: March-09-2015 Location: Chattanooga Status: Offline Points: 271 |
 Post Options Post Options
 Thanks(0) Thanks(0)
 Quote Quote  Reply Reply
 Posted: July-08-2019 at 3:11pm Posted: July-08-2019 at 3:11pm |
|
I definitely didn’t think it would take this long. Three seasons plus the first part of this one was a lot. I was so excited to get out there and get a couple of pulls. The boat ran the best it has since I bought it. It was great that my Dad was able to go along on the first trip. We had a blast yesterday giving everyone a pull. I will have to get pictures up later.
|
|
|
'92 Sport Nautique
|
|
 |
|
MechGaT 
Senior Member 

Joined: March-09-2015 Location: Chattanooga Status: Offline Points: 271 |
 Post Options Post Options
 Thanks(0) Thanks(0)
 Quote Quote  Reply Reply
 Posted: August-18-2019 at 6:01pm Posted: August-18-2019 at 6:01pm |
|
Back with some pictures. Taking the boat for a test drive with my Dad. 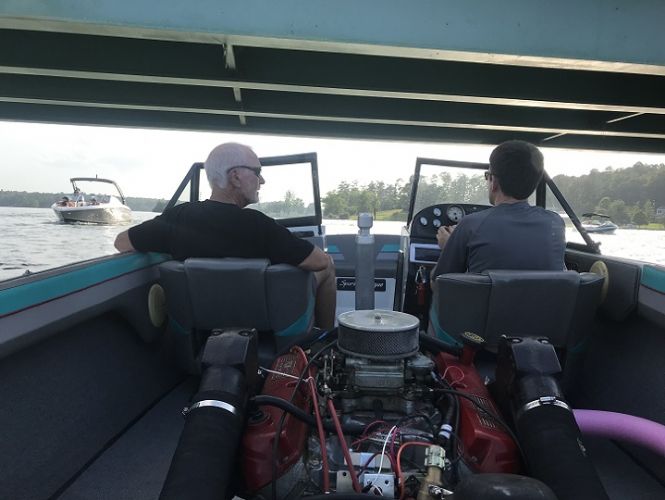 We have taken the boat out a few times and it runs better than it did before I started this process. My daughter has learned to kneeboard  and my oldest son learned to ski a couple of days ago.  I don't have any great pictures of the boat finished as we have been having fun and putting it away late. |
|
|
'92 Sport Nautique
|
|
 |
|
8122pbrainard 
Grand Poobah 

Joined: September-14-2006 Location: Three Lakes Wi. Status: Offline Points: 41045 |
 Post Options Post Options
 Thanks(1) Thanks(1)
 Quote Quote  Reply Reply
 Posted: August-18-2019 at 6:20pm Posted: August-18-2019 at 6:20pm |
   
|
|
 |
|
Post Reply 
|
Page <1 234 |
|
Tweet
|
| Forum Jump | Forum Permissions  You cannot post new topics in this forum You cannot reply to topics in this forum You cannot delete your posts in this forum You cannot edit your posts in this forum You cannot create polls in this forum You cannot vote in polls in this forum |