1992 Sport Floor Replacement
Printed From: CorrectCraftFan.com
Category: Repairs and Maintenance
Forum Name: Boat Maintenance
Forum Discription: Discuss maintenance of your Correct Craft
URL: http://www.CorrectCraftFan.com/forum/forum_posts.asp?TID=37914
Printed Date: April-29-2024 at 6:56am
Topic: 1992 Sport Floor Replacement
Posted By: MechGaT
Subject: 1992 Sport Floor Replacement
Date Posted: January-03-2016 at 12:07am
Unfortunately, it's that time. I bought this boat last spring and got to use it this past summer, but I quickly realized the small spot that felt somewhat spongy, was really a large area that was in need of replacement. Time to replace those stringers. I have done some reading on here and with the size of the job, I originally contacted some local fiberglass shops to do the job. I couldn't find anyone who would contact me back after an initial conversation and none of them wanted to do it to the standards that I wanted it done. All wanted to use polyester resin and plywood. After reading others threads, I think I can get this done myself, the only question is how long it will take and how much help I am going to need from you good folks. I haven't found a thread specifically on replacing a Sport Nautique's stringers, so I figured I would start one. I started a few weeks ago pulling out the interior. The rear seat came out easier than I dreamed it would. Gravity and that one clip is all that was holding it in, just like I had read somewhere on here.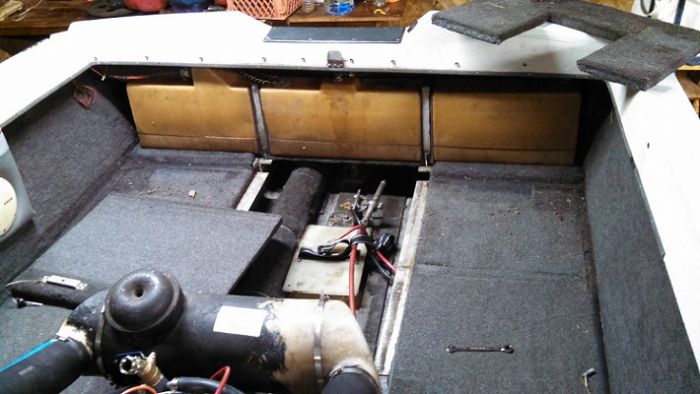  When I removed the passenger seat, where the spongy feeling started, I noticed that the carpet had been cut and when I pulled it back I saw some poorly laid fiberglass. Looks like someone was trying to strengthen the floor at best and possibly hide something. 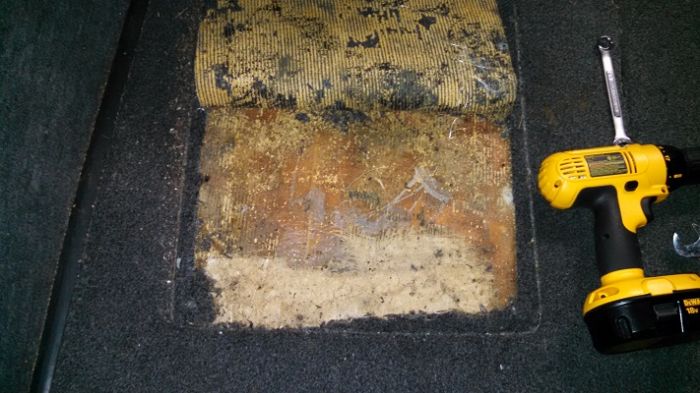 This past week I did some more work on it and got the motor out. Then I started cutting the floor up and digging out foam. I am all for the sawzall for this job. We tried one little section with an angle grinder and metal cutting disc. The dust was unbearable. With the sawzall though, no issues. I first cut out the section under the passenger seat and found bits of black stuff that I am sure at one time resembled plywood. 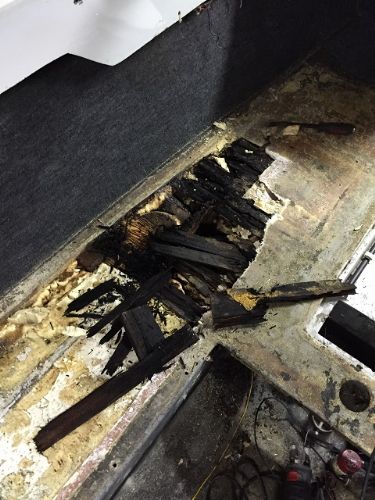 I worked down the passenger side and removed a section on the drivers side. Water, wet foam, and rotted wood throughout. Here is a picture of the standing water at the aft starboard side.  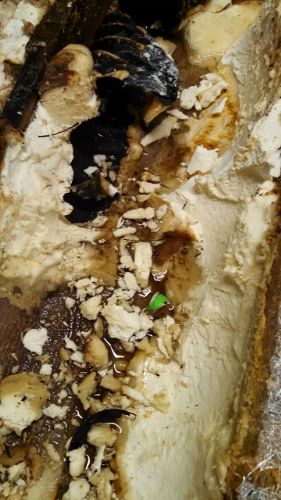 Here's a picture of the floor structure.  I still have demolition to do, but it is going to be a while as the boat it just over 2 hours away in my Mom's garage since I don't have one that will even fit it with the trailer. I am going to spend the next few weeks buying materials. I figure I need to get some CPES, 3M 5200, resin, fiberglass, and rollers, etc. shipped. Is this http://www.rotdoctor.com/products/cpes.html" rel="nofollow - this the CPES everyone is referring to or is http://www.smithandcompany.org/CPES/" rel="nofollow - this ? I am planning on getting the 635 3:1 epoxy resin from US Composites, sound right? What rollers will I need? Oh, I have so much to learn. 
------------- '92 Sport Nautique |
Replies:
Posted By: SNobsessed
Date Posted: January-03-2016 at 10:41am
|
Either CPES will work, you can also mix your own from epoxy resin & Xylol. The 635 is good stuff, get the medium speed hardener. The hard part of your project will be working around the open bow walk thru. Other guys have removed the entire upper deck (aka cap) see Okie Boarders project thread. Not sure if there is a way to do this without removing the cap. ------------- “Beer is proof that God loves us and wants us to be happy.” Ben Franklin |
Posted By: 8122pbrainard
Date Posted: January-03-2016 at 11:22am
|
Brent, You mentioned polyester resin. I suggest going epoxy after the CPES. Yes, as Chris mentioned, you can mix your own by thinning with a solvent. ------------- /diaries/details.asp?ID=1622" rel="nofollow - 54 Atom /diaries/details.asp?ID=2179" rel="nofollow - 77 Tique 64 X55 Dunphy Keep it original, Pete < |
Posted By: MechGaT
Date Posted: January-05-2016 at 1:37am
The open bow is what worries me the most. I have cut far enough to find the end of the secondary stringer, but I haven't found the end of the primary yet. While I had willing help we started cutting and removing floor and foam. I will have to check out Okie Boarders thread. Thanks for the help.
 ------------- '92 Sport Nautique |
Posted By: MechGaT
Date Posted: January-07-2016 at 12:59am
|
I looked for Okie Boarders thread. I looked for all the threads started by Okie Boarders in the Boat Maintenance and General Discussion forums. All I found was a http://www.correctcraftfan.com/forum/forum_posts.asp?TID=16958" rel="nofollow - thread someone else started with some pictures of the cap being removed. I was not picturing going to those lengths when I started. Can anyone point me to his thread? More links for reference later: http://www.correctcraftfan.com/forum/forum_posts.asp?TID=9543&PN=1&title=weeding-the-pumpkin-patch" rel="nofollow - BuffaloBFN thread http://www.correctcraftfan.com/forum/forum_posts.asp?TID=16014" rel="nofollow - Another BFN Rebuild http://www.correctcraftfan.com/forum/forum_posts.asp?TID=29032&PN=1&title=stringer-repair-1985-2001-ski-nautique" rel="nofollow - 1985 2001 Ski Nautique rebuild http://www.correctcraftfan.com/forum/forum_posts.asp?TID=5409" rel="nofollow - '87 Ski Nautique Floor/Stringer Replacement http://www.correctcraftfan.com/forum/forum_posts.asp?TID=12666&PN=1&title=my-new-2001-and-my-first" rel="nofollow - '83 2001 Ski Nautique http://www.correctcraftfan.com/forum/forum_posts.asp?TID=24791&PN=1&title=custom-1965-correct-craft-mustang-build" rel="nofollow - Custom 1965 Mustang ------------- '92 Sport Nautique |
Posted By: MechGaT
Date Posted: January-21-2016 at 8:11pm
Did some more work on the floor this past weekend. I found the end of the primary stringer. I wasn't sure how far I would have to go. The foam is dry in front of it, just have to figure out what I am going to do with bilge vents. The hose is coming out as I remove the foam, so I am going to have to remove it until I get back to where it comes through the floor. I also have one small section of rotten floor just before the gel coated section up front. Right now I am planning to cut that out and see exactly what condition the wood is in. It sounds solid once I get past the short section not covered by the front floor. I am still hoping I can get the vents and floor sections replaced without resorting to splitting the boat. It would save so much time and effort. I am hoping I can cut back to good wood, then put CPES on it and join a replacement section to it. Sound like a reasonable plan? How should I join it? ------------- '92 Sport Nautique |
Posted By: SNobsessed
Date Posted: January-23-2016 at 1:52pm
|
Looks like you can pull it off (not removing cap). I would dig out foam under the good wood ledge that you are trying to tie into. Somehow clamp a slat of plywood under the lip, glue with epoxy. Then your new wood has some good surface area for bonding. Some guys use PVC pipe for vent ways. Maybe just leave the old hose in the foam & make a new path. ------------- “Beer is proof that God loves us and wants us to be happy.” Ben Franklin |
Posted By: MechGaT
Date Posted: January-23-2016 at 5:45pm
|
Thanks for the advice. I will to take a look at fitting the PVC pipe inside the hose. I can see where that would save me a lot of trouble. I still have to cut out the rotten spot in the floor and see what I have left. It is right over the ski locker. ------------- '92 Sport Nautique |
Posted By: Duane in Indy
Date Posted: January-23-2016 at 5:52pm
 This is what I did on the Mustang. 3" thin wall pvc for airways and 1 1/2 for wireway and for control cables. Looking forward. ------------- Keep it as original as YOU want it 1978 Mustang (modified) |
Posted By: 8122pbrainard
Date Posted: January-23-2016 at 7:13pm
|
[QUOTE=Duane in Indy] 3" thin wall pvc for airways and 1 1/2 for wireway QUOTE] Duane, What scd. is the "thin wall" you used? ------------- /diaries/details.asp?ID=1622" rel="nofollow - 54 Atom /diaries/details.asp?ID=2179" rel="nofollow - 77 Tique 64 X55 Dunphy Keep it original, Pete < |
Posted By: Watauga
Date Posted: January-23-2016 at 8:12pm
Brent, this is how I did mine.    ------------- http://goo.gl/t8gAkI" rel="nofollow - 1980 Rebuild http://goo.gl/TFsgCy" rel="nofollow - Diary Signpainter, Disaster Responder, Longline Barefooter |
Posted By: Duane in Indy
Date Posted: January-23-2016 at 9:10pm
Pete, I'm not sure. Can look Sunday. Got it at Lowes. The cheap stuff. Only about a 1/16" thick, light weight. ------------- Keep it as original as YOU want it 1978 Mustang (modified) |
 8122pbrainard wrote:
Posted By: MechGaT
Date Posted: January-24-2016 at 8:07pm
I was originally planning on running new pipe through the floor similar to what you have done, but because of how close the pipe is to the inside wall of the storage area I am not sure I can cut them out. I am thinking about just cutting the hose where I can get the foam out of the way of the stringer, then putting the pvc pipe inside the hose that is still encased in foam. ------------- '92 Sport Nautique |
Posted By: Duane in Indy
Date Posted: February-11-2016 at 6:42am
 Pete, Sorry for the delay in getting back to your question of "what scd" Sewer and drain Lowes $9.97 for 10 feet of 3" ------------- Keep it as original as YOU want it 1978 Mustang (modified) |
Posted By: 8122pbrainard
Date Posted: February-11-2016 at 7:09am
|
Duane, Thanks for getting back. Just so everyone knows, the common scd. 40 PVC pipe used for plumbing drain waste and venting uses different fittings than the very thin walled underground drainage PVC pipe. Tell me how I know!  I got stung years ago piping a gravity return line off a roof cooling tower. Unlike sch. 40 and sch. 80 having common OD's, the underground drainage PVC has a different OD. I got stung years ago piping a gravity return line off a roof cooling tower. Unlike sch. 40 and sch. 80 having common OD's, the underground drainage PVC has a different OD.------------- /diaries/details.asp?ID=1622" rel="nofollow - 54 Atom /diaries/details.asp?ID=2179" rel="nofollow - 77 Tique 64 X55 Dunphy Keep it original, Pete < |
Posted By: MechGaT
Date Posted: March-18-2016 at 7:16pm
|
I am trying to source my stringer material. I have found a mill that has the lumber in the sizes I need and dressed, but they say it is green wood, not dried. I have read on another post that ideally it should be around 8% moisture content. Anybody had experience with green douglas fir and getting the moisture content down to an acceptable level? Is it even feasible in a reasonable amount of time if I lay it out in the garage? Short of buying a meter, is there a way I can tell whether it has the proper moisture content? ------------- '92 Sport Nautique |
Posted By: 8122pbrainard
Date Posted: March-18-2016 at 7:50pm
|
Brent, If you have better than a year, the Doug can be air dried. Ask the mill if they have anyone who kiln dries for them. 8% I consider to be max. Get a moisture meter. They aren't expensive. Don't forget that LVL is an alternate material for stringers. There's a complete thread on it. I believe there's a link in the FAQ thread. I currently have 500 board feet of Red Pine stickered out in the wood shed. It was cut and sawn about 19 months ago. It's now down to around 5% and ready for my project. ------------- /diaries/details.asp?ID=1622" rel="nofollow - 54 Atom /diaries/details.asp?ID=2179" rel="nofollow - 77 Tique 64 X55 Dunphy Keep it original, Pete < |
Posted By: 8122pbrainard
Date Posted: March-19-2016 at 9:50am
|
Brett, http://www.correctcraftfan.com/forum/forum_posts.asp?TID=9503&PN=3&title=85-2001-lvl-stringer-project" rel="nofollow - Here's Kris's LVL stringer thread Another alternate to the Doug Fir is going composite. It's certainly a good choice but it does take more work and the expense is more.   ------------- /diaries/details.asp?ID=1622" rel="nofollow - 54 Atom /diaries/details.asp?ID=2179" rel="nofollow - 77 Tique 64 X55 Dunphy Keep it original, Pete < |
Posted By: MechGaT
Date Posted: March-19-2016 at 10:37am
|
Thanks for the link. The composite is tempting, I have a supplier of Coosa board near me, but the time and expense are too much for me. Based on everything you all have posted, it should last longer than the 23 years it lasted this time if I do it right. I already have the CPES, and am planning on using epoxy, so it should. I found a moisture meter on Amazon with +/-1% accuracy for $24. I didn't realize they were that cheap. I have a few other things I could use that for, so I bought one. The mill has a kiln, but they didn't offer to dry it. I think I'll call them back on Monday and see if they can't include the four boards they were sourcing for me with some of the heart pine they typically sell. ------------- '92 Sport Nautique |
Posted By: 8122pbrainard
Date Posted: March-19-2016 at 10:46am
Brett, Sounds like the mill deals with the higher end lumber! $$$ How much looking around have you done for the Doug Fir? ------------- /diaries/details.asp?ID=1622" rel="nofollow - 54 Atom /diaries/details.asp?ID=2179" rel="nofollow - 77 Tique 64 X55 Dunphy Keep it original, Pete < |
Posted By: MechGaT
Date Posted: March-23-2016 at 1:08am
I searched some more and found a place to supply it.  They were a wholesaler so I am going to have to buy it through a local hardware store, but I should be able to pick it up Monday. For anyone in North Alabama, Gobble Fite in Decatur can get Douglas fir from Russell Lumber. It is kiln dried. I am planning to get a couple of 1x6x12s & 2x8x14s. Prices quoted were 27.56 for 1x6 & 87.50 for 2x8. They were a wholesaler so I am going to have to buy it through a local hardware store, but I should be able to pick it up Monday. For anyone in North Alabama, Gobble Fite in Decatur can get Douglas fir from Russell Lumber. It is kiln dried. I am planning to get a couple of 1x6x12s & 2x8x14s. Prices quoted were 27.56 for 1x6 & 87.50 for 2x8.------------- '92 Sport Nautique |
Posted By: 8122pbrainard
Date Posted: March-23-2016 at 6:36am
|
Bret, Great to hear you found the Doug Fir. ------------- /diaries/details.asp?ID=1622" rel="nofollow - 54 Atom /diaries/details.asp?ID=2179" rel="nofollow - 77 Tique 64 X55 Dunphy Keep it original, Pete < |
Posted By: MechGaT
Date Posted: April-09-2016 at 7:20pm
|
I am looking at my layup schedule to make my first fiberglass purchase. Here is what I am thinking: Primary stringers: 2" 8.7oz E cloth, 4" 8.7oz E cloth, with each of these running the length with half on the hull and half on the stringer then 8" 8.7 oz E cloth overlapping 1" on the hull and up the stringer ~5". Over this lay 12" wide 1708 tape that starts at the top of the stringer and runs down onto the hull. That should make it overlap 1" past the 8" cloth. Same on both sides. Secondary stringers: same application of 2", 4", and 8" cloth and 12" biaxial. Then drape 7.5oz cloth over the top of the stringers to give them some protection. For the bulkhead behind the ski locker I plant to use plywood and use the 2", 4", and 8" on the seams to the stringers and hull then drape it in the 7.5oz cloth also. I am using plywood for the floor and plan to wrap it in 1.5oz mat. Thoughts? Am I missing something? ------------- '92 Sport Nautique |
Posted By: TRBenj
Date Posted: April-09-2016 at 8:01pm
| I would double the 2/4/8 on the mains and wrap the tops with biax instead of cloth. |
Posted By: PKB1023
Date Posted: June-04-2016 at 12:56pm
| Thanks for laying it out on your plans. I was considering paying someone to replace all the wood. After seeing threads on how it should be, I know the price I was qouted would not be to the standards shown on this web site. This weekend, I am plan on getting the floor pulled out on my 1980 sn. Please keep up the post. |
Posted By: Watauga
Date Posted: June-04-2016 at 6:42pm
|
I like what TRBeng says about the using Biax to wrap the tops rather than cloth. Just know that there is a learning curve in learning to make the Biax lay flat and not pucker where it transitions from the top and then down the sides of the stringers. Puckering = air pockets which means less adhesion, which means less strength. You can alleviate the tendency of puckering by slightly routing the top edges when you fabricate the stringers, ribs, etc. Biax willI also require more resin, obviously, better technique and more patience. There are plenty of pictures of old stringers on this site that show breaches in the fiberglass mat at the top edges of the stringers resulting in a water entry point and resulting rot of the stringer. ------------- http://goo.gl/t8gAkI" rel="nofollow - 1980 Rebuild http://goo.gl/TFsgCy" rel="nofollow - Diary Signpainter, Disaster Responder, Longline Barefooter |
Posted By: rolleronariver
Date Posted: June-09-2016 at 6:00pm
|
MechGat, your last post was April 9th. I'm just curious how it all came out. I just picked up a 92 sport nautique a couple months ago. The floor seems very solid except for right in front of the engine. I hope this is just a floor problem and not a stringer problem. It's not bad but I do want to address it this coming winter and I'm curious what all I'm getting into. I'm pretty handy mechanically and I'm not scared to jump in and rebuild something but I don't like surprises. So, I guess my question is, what would you have done differently, and what did you do that would be good advise for someone with the same boat? ------------- 92 Sport nautique |
Posted By: MechGaT
Date Posted: June-18-2016 at 11:46am
Since April 9 I have only been able to do 1 weekends work. I was able to cut the port secondary stringer out.  I used an oscillating tool to cut it out. I am pretty sure that was a mistake. I couldn't figure out how to get my grinder in there to the bottom of the stringer without the possibility of cutting into the hull. Afterward I realized that I cut rotate the guard to get in there. I will definitely be doing that next time. The oscillating tool was ridiculously slow and wore out blades fast. I would say that without some exploration it is hard to say how bad the floor or stringers are. I would recommend poking at the wood in the floor and at the stringers where that section of floor meets them. I would say that if everything seems solid elsewhere, you probably have some time before having to replace more. My stringers probably could have made it a few more seasons. They are pretty solid in the area of the engine, but there was not a way to know that without taking it apart. The section you are looking at will require removing the engine cradle and the pylon. Once the cradle is out of the way, you can see the damage much better. Remember also that there is a lip around the edge of the ski locker so don't cut that off. ------------- '92 Sport Nautique |
Posted By: MechGaT
Date Posted: November-07-2016 at 11:56am
I am working this week on this project. So far I have the secondary stringer shaped and ready for CPES. I also shaped a bulkhead and a piece I needed to replace in front of the ski locker. Question for plywood floor: is it better to leave the primary stringers full depth and scab a piece on the inside to support the plywood or once I wrap glass over will it become a strong system that losing that top 1/2" won't matter at all. When I think more about it being 1/2" I think that tells me it probably won't matter. ------------- '92 Sport Nautique |
Posted By: rolleronariver
Date Posted: November-07-2016 at 12:14pm
|
My plan is to use 3/4 in plywood for the floor simply because we're always putting in ballast bags for wake boarding. I'm going to make the primary stringer 7/8 shorter to make up for the plywood and extra fiberglass and actually have the plywood on top of the primary stringer. This will mean less boards and less to rot in 25 years when it starts rotting again. I also think this will make the floor stronger. I plan on starting all of that this evening. I need to get this done before it gets to cold to lay fiberglass. ------------- 92 Sport nautique |
Posted By: MechGaT
Date Posted: November-08-2016 at 12:23pm
|
Thanks for the input. I wasn't thinking about the fiberglass thickness. I haven't started cutting the primary yet. I used some house jacks I had to support the side of the boat. Can't lift it off the trailer, but it feels much stiffer.   I used some clamps and a compass to mark the secondary stringer and fit it in the boat.  I got some CPES on the parts I have made so far. 
------------- '92 Sport Nautique |
Posted By: Hollywood
Date Posted: November-09-2016 at 11:15am
| Nice jack post! Don't need to be so precise with locating the X & Y of the secondaries. They just hold up the floor. |
Posted By: MechGaT
Date Posted: November-09-2016 at 12:45pm
|
That's good to know. I am still at the beginning of the learning curve. My "peanut butter" wasn't quite the right consistency. Too thin, then probably a little too thick. ------------- '92 Sport Nautique |
Posted By: MechGaT
Date Posted: November-10-2016 at 3:46am
I finished up my third layer of cloth (2", 4", 8") on the port secondary today. Here it is with two layers on.  I know it is best to add the next layer before 24 hours has passed to avoid the amine blush and get a chemical bond rather than physical, but is there an easiest time? I have been waiting until the layer below gets pretty firm before adding the next. Is that the way to go or is it acceptable to throw the next layer on while the one below is still wet to make wetting the new layer easier. Wetting out the layers, especially the 8", took some effort. I was wondering if there are some best practices someone else has already figured out. Also, how long after the final layer is on should I wait before I start making dust cutting out the next one? Does it have to be greater than 24 hours or as long as it not tacky is it OK? Your help is very much appreciated! ------------- '92 Sport Nautique |
Posted By: TRBenj
Date Posted: November-10-2016 at 8:03am
| You can lay up multiple layers wet. |
Posted By: 8122pbrainard
Date Posted: November-10-2016 at 8:43am
|
Brent, I agree with Tim that you can just keep going with the layups and not waiting for the resin to kick (get firm as you describe). The only issue that may come up is keeping air out between the layers. There are times when in tight corners I find that waiting for the resin to just start to kick comes in handy since you can roll out some air. What oz. cloth are you using? I wouldn't worry about the dust too much since your final coating is decorative ------------- /diaries/details.asp?ID=1622" rel="nofollow - 54 Atom /diaries/details.asp?ID=2179" rel="nofollow - 77 Tique 64 X55 Dunphy Keep it original, Pete < |
Posted By: Hollywood
Date Posted: November-10-2016 at 11:11am
|
He's only at the taping stage so he's far from the final coating. A little dust won't kill you since you'll want to lightly sand before glassing over again anyway. I did like you are, did all the taping in one stage. With too many layers it makes keeping everything in place a nightmare. I don't know how anyone could take and cap a stringer in one shot. |
Posted By: TRBenj
Date Posted: November-10-2016 at 11:16am
| Tape can be the final glass step (depends on the planned schedule) and the bilge coating normally doesn't extend to the secondaries on this type of stringer configuration... Otherwise I agree with Pete and HW. |
Posted By: Hollywood
Date Posted: November-10-2016 at 11:32am
|
More coffee.....my comments were towards primaries and he's on secondaries. I'm having flashbacks of the crappy taping and resin blobs on my secondaries. They came out with my foot and a vacuum. |
Posted By: MechGaT
Date Posted: November-10-2016 at 2:00pm
|
Thanks for the help. I am using 10 oz. cloth. I thought I had read enough to have the steps down, but there is no teacher like experience. The 8" is particularly tough. ------------- '92 Sport Nautique |
Posted By: MechGaT
Date Posted: November-14-2016 at 4:21pm
|
I got one stringer in and started cutting the primary on the port side out. A 4.5" angle grinder just isn't big enough. With the angle of the hull I couldn't get much of a cut on the back side and it doesn't go all the way through in the bilge. Looks like I will have to go back to the oscillating tool to get it out. That is for another time. Having a garage big enough to fit it would help tremendously. ------------- '92 Sport Nautique |
Posted By: TRBenj
Date Posted: November-14-2016 at 4:36pm
| The bottom of the stringer is unlikely to be bonded to the hull (at least in large scale). You do not need to cut all the way through. Cutting through the glass on each side will be enough. |
Posted By: rolleronariver
Date Posted: November-14-2016 at 5:57pm
|
I had to cut to the very bottom of the stringers in mine and then use a crow bar and pry it up carefully without damaging the hull. ------------- 92 Sport nautique |
Posted By: MechGaT
Date Posted: November-15-2016 at 1:16am
|
The secondary was pretty well bonded most of the length. I got through most of the glass on one side and it felt like it was still pretty attached. I will have to see how it goes next time. ------------- '92 Sport Nautique |
Posted By: Dreaming
Date Posted: November-15-2016 at 4:04pm
| Eric Lavine used to swear by the sawzall, he said the blade would follow the curve of the hull. might be worth a try if your stringers are well bonded |
Posted By: MechGaT
Date Posted: November-15-2016 at 8:29pm
|
The sawzall worked well for the floor. I might have to give it a shot. ------------- '92 Sport Nautique |
Posted By: rolleronariver
Date Posted: November-28-2016 at 8:45pm
|
I cut the glass with a cutting blade on my grinder then used a crow bar and a hammer and carefully pried the floor up a few inches at a time. I got the starboard side up in one piece doing this. The port side didn't come up as good as it was a lot more rotted. I've learned a lot of lessons through this but I finished putting the last glass down on the new floor this past weekend. Motor mount is in and hopefully I'll be putting the engine back in this week. ------------- 92 Sport nautique |
Posted By: MechGaT
Date Posted: December-03-2016 at 8:58am
|
You blew through that job. I checked out your thread as well. I wish I was that far along. I tried a little bit of prying, but that thing didn't budge. I am not sure I have made a deep enough cut yet. Won't be able to work on it again for a few more weeks. ------------- '92 Sport Nautique |
Posted By: rolleronariver
Date Posted: December-03-2016 at 12:07pm
|
I spent a ton of hours on it but I'm fortunate enough to be able to do it at my house so I was able to work on it a couple hours every day after work. I did get the engine installed two days ago and I got it aligned and everything hooked up yesterday. I even took the belts off and fired it up for a few seconds before I fogged it and shut it down again for the winter. Thankfully everything was fairly easy considering some of the horror stories I've read. I still have to lay carpet and reinstall the interior but that's not too bad of a job. As far as prying, you can go a lot lower on cutting those stringers then you would think without cutting a hole in the boat. Again, I ended up recutting once I realized that and then used a two pound hammer and beat a crow bar under the stinger to pry it up. I was scared I was going to damage the hull but I was so frustrated by that point that I didn't care. Fortunately these boats are way stronger then I thought. No damage and I eventually got the stringer on out. I wish I was closer to you, I'd gladly come help. ------------- 92 Sport nautique |
Posted By: MechGaT
Date Posted: December-04-2016 at 6:00pm
|
Thanks for the offer. I have been working on scheduling some time to work on it the week after Christmas and in January and February. Good luck with the duck hunting. ------------- '92 Sport Nautique |
Posted By: MechGaT
Date Posted: January-04-2017 at 12:14am
I got some more work done on the stringers last week. I decided that since I had some support under the boat cutting one primary and one secondary out on opposite sides would be OK. I figured out after 1 day of trying to cut the primary out with a sawzall that the area around the ski locker was still going to be impossible to get with just that. I decided to get a 7" grinder and a couple of cutting discs from Harbor Freight. Best $50 I have spent. I had the port primary the rest of the way out in no time. Then I went to work on the starboard secondary and I looked at the time and it took less than an hour to get it out. I still had a lot of clean up to do, but to anyone else starting on your job, get a large grinder as well as a 4.5" one. It would have saved me a lot of time. Thanks to some reading on the forum here I picked up a diamond wheel for grinding as well. That made the grinding a lot easier. Once I had the main part of the stringers out I could see that I still had more cutting I could do, which saved grinding time as well.. Once I was ready for it, the diamond wheel was aggressive and got the main stuff out of the way so I was mainly just cleaning up with the 36 grit flap discs. With family stuff and still getting the right methods down, below is how far I got.   I also saw some interesting things. First, I noticed these holes before, but never took much time to examine them. They are where the floor meets the side of the boat. No wonder the foam was wet. Anyone else noticed these on their boat? I assume this is factory...  The other thing was that I cut out part of the plywood under the driver seat base and found this.   There were two pieces of plywood screwed together. Some of the screws dug into the hull a little bit because of how it slopes up. Maybe someone has done some partial work on the floor before? Oh well, it is all part of the process. ------------- '92 Sport Nautique |
Posted By: rolleronariver
Date Posted: January-04-2017 at 12:32am
|
I would definitely say that someone did a shabby floor repair under your captain s seat. As far as the other holes, mine had those too. In fact the factory fiberglass on the secondaries was pretty rough. When you're sanding the rest of the fiberglass down I would suggest leaving a little lip to guide the new stringers as you lay them. I was very thankful that I did that when I started laying the new stringers. ------------- 92 Sport nautique |
Posted By: MechGaT
Date Posted: January-04-2017 at 1:01am
|
I wanted to make sure I got to good fiberglass. Maybe I went a little overboard. ------------- '92 Sport Nautique |
Posted By: rolleronariver
Date Posted: January-05-2017 at 4:38pm
|
I kind of came to the conclusion that you can't go overboard. I worked hard to make sure mine was solid and appeared to be factory. I'm sure you're doing the same. ------------- 92 Sport nautique |
Posted By: MechGaT
Date Posted: January-17-2017 at 2:41am
|
Another weekend and a few more lessons learned. First, 2x10s would have been better than 2x8s. Since I am going with a plywood floor they will work for the main stringers, but I had to be extra careful shaping the bottom. Second lesson is I should have measured the distance between the bolts on the back of the cradle before I removed it. Actually building a spacer that will maintain that distance like I am planning to do now would have been better. Live and learn. Finally, I found some stuff at Home Depot called EZ Strip that is doing a better job of removing carpet glue. Still a lot of elbow grease required, but the Goof Off evaporated too fast. ------------- '92 Sport Nautique |
Posted By: rolleronariver
Date Posted: January-17-2017 at 10:35am
|
Which measurement are you needing exactly. I still have all of my measurements written down. ------------- 92 Sport nautique |
Posted By: MechGaT
Date Posted: January-19-2017 at 5:50pm
|
It is the distance between the studs on the cradle that support the transmission. To keep everything parallel, it appears the dimension should be 22-1/8". I took a picture of what I am talking about, but I haven't had time to download it and from my phone, through the website doesn't seem to work. ------------- '92 Sport Nautique |
Posted By: TRBenj
Date Posted: January-19-2017 at 6:00pm
| Just get the stringer height close under the cradle... you can locate fore/aft placement using the pylon receptacle in the hull. Can't think of anything else you'd need. |
Posted By: MechGaT
Date Posted: January-19-2017 at 10:51pm
|
The cradle is not straight when unbolted. I briefly looked at the mount on the transmission and didn't immediately see a way to adjust the width so that if these two studs are too close or too far apart then that could create some difficulty. ------------- '92 Sport Nautique |
Posted By: 8122pbrainard
Date Posted: January-19-2017 at 11:44pm
|
Brent, Take a look at your mounts. They are adjustable so don't worry about the studs. ------------- /diaries/details.asp?ID=1622" rel="nofollow - 54 Atom /diaries/details.asp?ID=2179" rel="nofollow - 77 Tique 64 X55 Dunphy Keep it original, Pete < |
Posted By: SNobsessed
Date Posted: January-20-2017 at 9:38am
|
Maybe take a 2x4 & drill holes for those studs. Then screw it down tight before you remove the cradle. Then it won't flex if you have to persuade it. ------------- “Beer is proof that God loves us and wants us to be happy.” Ben Franklin |
Posted By: TRBenj
Date Posted: January-20-2017 at 9:50am
| Like Pete said, the cradle will flex a little when unbolted but it doesn't matter. It might actually aid you in reinstalling if snug. Get the stringers the right height and in the same spot and it'll align again. Locate stringer location based on pylon cup, PCM mounts are adjustable up/down and left/right. |
Posted By: MechGaT
Date Posted: January-20-2017 at 6:08pm
|
I will have to take a closer look. At least I know it isn't anything to worry about too much. Thanks guys. ------------- '92 Sport Nautique |
Posted By: rolleronariver
Date Posted: January-22-2017 at 1:02am
|
Sorry I'm just now getting back to you. The front measurements on the engine should be 22 1/2 between the bolts and the rear should be 22. Btw, my number is 5014542317 if you need any more measurements of I if you get stuck and I can help you out any ------------- 92 Sport nautique |
Posted By: JReisch09
Date Posted: February-07-2017 at 10:56pm
|
I am literally about to start floor in my 1990 Sport, After reading this Im super nervous about the front cap. Have you finished the project? Thank God for this thread, I can really see what Im getting into. ------------- Jon R 1987 Fish Nautique |
Posted By: MechGaT
Date Posted: February-07-2017 at 11:20pm
|
I am still working on it. I am working on getting stringers in still. I have estimated that I still have 11 weekends of work until it is ready to hit the water. I can probably do some stuff faster, but I am sure some stuff will be slower than I think. I just don't have the ability to work on it any other time. ------------- '92 Sport Nautique |
Posted By: rolleronariver
Date Posted: February-08-2017 at 5:45pm
I did my 92 sport this winter. Don't be nervous, just do your research and plan out how you want to do it and then execute the plan. Take your time and do it right though. It's not super hard but it is very time consuming. I had probably 20-30 hours into mine. Maybe more, who knows. Also, plan on spending around $1,500. ------------- 92 Sport nautique |
Posted By: JReisch09
Date Posted: February-08-2017 at 6:22pm
|
How could you tell if the main stringers needed replacement? Is there a chance mine might still be good? I had soft spots all over, under passenger seat, driver seat, in front of engine, port side by engine rear seat etc. Ive read about drilling and checking but if the engine bolts and tranny mount bolts grip am I home free ? Ive purchases Coosa board already and 5 gallons of poly resin for the floor, what type if resin should I use for sub and main stringers if it comes to it. There is a ton of talk about this on the forums but there is a lot of opinions and info that differ. ------------- Jon R 1987 Fish Nautique |
Posted By: rolleronariver
Date Posted: February-08-2017 at 6:27pm
|
Personally I used epoxy resin as I had several guys on here tell me it was easier to use. I had no issues using it at all. I had a soft spot in front of my engine and behind my drivers seat. My original plan was to simple replace the floor. I had checked my engine mount bolts and they still torqued good for some reason. However, one day I stuck my hand through the ski locker hole and touched the string and my finger when through the stringer. When I tore into it I realized that my stringers were actually getting pretty bad. I might could've made it a couple more seasons but I don't like things not being in good shape so I went a head and replaced them. If you have soft spots I would guess your stringers are bad too. ------------- 92 Sport nautique |
Posted By: JReisch09
Date Posted: February-08-2017 at 6:29pm
|
Thanks for the advice, ill start pricing the wood here in Orlando just in case. Rolleronariver what was your procedure with dealing with the stringers under the cap? ------------- Jon R 1987 Fish Nautique |
Posted By: 8122pbrainard
Date Posted: February-08-2017 at 6:38pm
|
Jon, Engine and trans bolts tightening is only one indicator of a problem and in my opinion not a good one. The real indicator is all the soft spots in the sole you mention. I'd say you may be surprised at what you find under the sole. I also recommend epoxy resin and not the poly. Epoxy is stronger, has better bonding plus it's not hygroscopic like the poly is. ------------- /diaries/details.asp?ID=1622" rel="nofollow - 54 Atom /diaries/details.asp?ID=2179" rel="nofollow - 77 Tique 64 X55 Dunphy Keep it original, Pete < |
Posted By: rolleronariver
Date Posted: February-10-2017 at 12:07am
I didn't replace the stringers under the cap. It was still solid and dry as far ask could see. ------------- 92 Sport nautique |
Posted By: MechGaT
Date Posted: February-25-2017 at 2:31pm
Made a little more progress the last two weekends. 3 stringers are now glassed in. Decided not to cap the last 2 with 1708 until I get everything set to the right height. I am going to have to grind down the first one due to not fully laying out my plan and getting the correct main stringer material.  I got the last bit of floor cut out of the way so that I can get at the last stringer. It feels good to be able to say last. Having that section of floor in made working in the boat slightly more comfortable when working on my hands and knees, though.  The pipe for pulling the cables and wires through the floor was different than I expected. To turn it up someone cut a fish mouth in the side and then wrapped masking tape around it. Did anyone else find something like this in their floor? As stated before, someone probably replaced the plywood under the driver seat so this may have been replaced at the same time.  ------------- '92 Sport Nautique |
Posted By: rolleronariver
Date Posted: February-26-2017 at 9:47pm
|
My pipe for my controls had a 45 degree angle on it and then it was cut. I'm pretty sure no one had done any work on my floor before me though. I actually left that pipe in the boat and worked around it but I later regretted that. It's looking good. You're going to be be putting that thing together before you know it! ------------- 92 Sport nautique |
Posted By: MechGaT
Date Posted: March-27-2017 at 12:49am
|
Got the last stringer out of a boat that I own. It took all day. Not something I plan to do ever again. I have done most of the grinding to get things cleaned up. Still have more to go. I am ready to be finished with deconstruction and move on to getting it back together. Timeline is much longer than I originally thought. ------------- '92 Sport Nautique |
Posted By: KRoundy
Date Posted: March-27-2017 at 2:16pm
|
"Timeline is much longer than I originally thought." Ha ha ha... that about sums up everything I do with my boat. ------------- Previous: 1993 Electric Blue/Charcoal Ski Nautique Current: 2016 Ski Nautique 200 Open Bow |
Posted By: 8122pbrainard
Date Posted: March-27-2017 at 3:38pm
That sums up not only my boat projects but any project I undertake!!  ------------- /diaries/details.asp?ID=1622" rel="nofollow - 54 Atom /diaries/details.asp?ID=2179" rel="nofollow - 77 Tique 64 X55 Dunphy Keep it original, Pete < |
Posted By: rolleronariver
Date Posted: March-28-2017 at 12:30pm
That means you're doing it right! LOL It does move quickly one you start getting it back together. Or, at least it feels quicker. ------------- 92 Sport nautique |
Posted By: MechGaT
Date Posted: July-11-2017 at 9:30pm
It has been a while since I have posted. Lots of boring progress. Grind, shape, layer of peanut butter, weigh down, and layer after layer of fiberglass. The starboard secondary stringer is just a bit higher than the primary so I chose to cap it with the cloth tape rather than the 1708 I used for the others. This should protect and still have plenty of strength since it only supports the floor. I want it to be perfect, but that flew out the window when I started because I am not perfect. I learned as I went how to wet out the fiberglass. I was trying to put down resin then lay the 1708 on top then put more resin on top. This was frustrating and not as effective as flipping it over, wetting several feet, then flipping that over into place and wetting the outside. I would then roll a section back, wet the back, put that section in place, and wet the top of it. Walking down the stringers this way seemed much easier. Maybe it was the difference in how tired I was. Next up is putting in the bulkhead behind the ski locker. I have shaped and CPES'ed it. Just got to wrap it in fiberglass and then used my milled glass mix to glue it in and put a couple of layers of tape on the edges. Should be much easier than the long stringers. After that it will be finishing up the pipe for conduit and air duct and I will be ready to foam. Since I couldn't get all of the foam out, I figured it was best to replace it. Hopefully next update will be quicker and with better looking progress. ------------- '92 Sport Nautique |
Posted By: MechGaT
Date Posted: August-05-2017 at 6:46pm
|
I made some more progress. I test fit the plywood floor. I also got the pipe for the air and the conduit for the cables installed in the bulkhead behind the ski locker.  I am in the middle of putting cloth fiberglass on all sides of the plywood pieces. I have gotten them all coated in CPES since the picture was taken. From previous research I have already decided I am going to go with the Interlux Bilgekote. I know the Primekote is required prior to putting on the Bilgekote. How much of each do I need? Is a quart enough or do I need a gallon? I also plan to get the Fiberglass Solvent Wash to make sure I get good adhesion. I plan to roll it on. Unlike some others, I am not trying to make a bilge that is good enough to show, At this point I just want one that is clean and waterproof. ------------- '92 Sport Nautique |
Posted By: gun-driver
Date Posted: August-05-2017 at 8:52pm
|
The smoother you get the bilge before painting the easier it is to clean and keep it clean later down the road, also looks a little more professional. JMO and experience as I already did a stringer job on my '85. Nice looking job by the way. 
|
Posted By: MechGaT
Date Posted: August-06-2017 at 9:44am
|
I am getting that finish line fever, but I know I still have a lot to do. I have some fairing compound so I might as well use it. I will see how it looks once it is completely assembled. ------------- '92 Sport Nautique |
Posted By: MechGaT
Date Posted: January-20-2018 at 6:18pm
|
Been a while since I have posted any progress. That is mainly because it has been slow progress. I have been putting the foam in and finishing coating the plywood for the floor (sole) with fiberglass. I have learned a lot of lessons. I used 3 kits of foam and still need another to finish it due to wasting because of over pouring it. I realize now I should have poured smaller batches as I got close to being finished. Lesson learned, don't get in a hurry. Also, I recommend not wearing a suit when mixing and pouring the foam, but shaping the foam creates a mess that is best done with a Tyvek suit on. It is almost as bad grinding fiberglass. ------------- '92 Sport Nautique |
Posted By: MechGaT
Date Posted: March-04-2018 at 10:52pm
|
I got the rest of the foam in and just need to do some more shaping. I have been using an oscillating tool to cut it. Seems to work shaving off a little at a time. I am working on cleaning up the aluminum pylon. Any suggestions on the best way to do it? ------------- '92 Sport Nautique |
Posted By: Timr71
Date Posted: March-05-2018 at 9:49pm
| Looking good. I love that trash can. Roll Tide! |
Posted By: MechGaT
Date Posted: March-05-2018 at 10:32pm
|
Thanks. Roll Tide! ------------- '92 Sport Nautique |
Posted By: MechGaT
Date Posted: March-10-2018 at 8:51pm
|
Shaping foam stinks! ------------- '92 Sport Nautique |
Posted By: MechGaT
Date Posted: March-25-2018 at 3:46pm
I did some reading and found a tool called a surform. I got one that is 6" long. It worked really well smoothing out the foam. Wish I had a week earlier. I made good progress and now have the foam to the proper level and the plywood epoxied in. Now I am trying to get the floor level with fairing compound.  Once it gets level and smoothed out I can start putting the fiberglass over it and getting the fairing on the bilge. ------------- '92 Sport Nautique |
Posted By: gt40KS
Date Posted: March-25-2018 at 3:49pm
|
Looking good, great progress! ------------- JCCI 1995 Ski Nautique GT40 |
Posted By: samudj01
Date Posted: March-26-2018 at 11:40am
|
Looking good. Enjoying watching your work ------------- 78 Ski Tique, 72 Skier w/302's, 93 SN w/351 & 17 GS22 w/zr409 Previous - 99 Sport Nautique w/GT40 and 87 Martinique w/351 |
Posted By: MechGaT
Date Posted: March-26-2018 at 11:03pm
|
Thanks. Wish I had more time to work on it and it wasn’t so far away. ------------- '92 Sport Nautique |
Posted By: MechGaT
Date Posted: July-09-2018 at 12:31am
I have been making progress. I have gotten fiberglass over the floor. I put down a layer of the 10 oz cloth and a layer of chopped strand mat. The chopped strand is thirsty, I used over a half gallon of resin per side on the mat alone. I have gotten the boards in the back epoxied down that support the gas tank.  I have also started the process of putting fairing on the bilge. I started sanding it with my palm sander and 80 grit paper. If I continue with that plan it appears I will be here for a few months trying to get the bilge smooth. Does anyone have any tips for sanding the bilge smooth? What is the best tool? Any tips for spreading the fairing compound? ------------- '92 Sport Nautique |
Posted By: MechGaT
Date Posted: July-17-2018 at 11:15pm
I learned a valuable lesson about fairing compound, don't mix it like peanut butter to smooth out areas. I watched a https://www.boatworkstoday.com/videos/laying-fiberglass-and-fairing-the-repairs/" rel="nofollow - video on boatworkstoday.com that shows the process after the fact. I should have been doing more sanding before applying the fairing compound. Now I have a lot of work ahead of me. Any tips for smoothing out fairing that has been built up too much and is rough?  ------------- '92 Sport Nautique |
Posted By: 8122pbrainard
Date Posted: July-17-2018 at 11:27pm
|
Brent, With a big area like a bilge, I've found a small amount at a time is best. A good parallel example would be mudding drywall. They put on a small amount at a time and barely need to sand. ------------- /diaries/details.asp?ID=1622" rel="nofollow - 54 Atom /diaries/details.asp?ID=2179" rel="nofollow - 77 Tique 64 X55 Dunphy Keep it original, Pete < |
Posted By: MechGaT
Date Posted: July-18-2018 at 7:40am
|
Yeah, I was bad at finishing drywall as well. My plan is to try the belt sander next and see how it does. I spent 2.5 hours on a section a few feet long this past weekend with my random orbit sander and 40 grit. US Composite’s website says the SM fairing is easy sanding. If so, I would hate to sand whatever is not easy in their book. After getting the high spots down I plan to put on a thin coat to fill in the stubborn voids. ------------- '92 Sport Nautique |
Posted By: MechGaT
Date Posted: January-04-2019 at 3:47pm
I'm still working on it. First I put the primer on the bilge, then I put the top coats on.  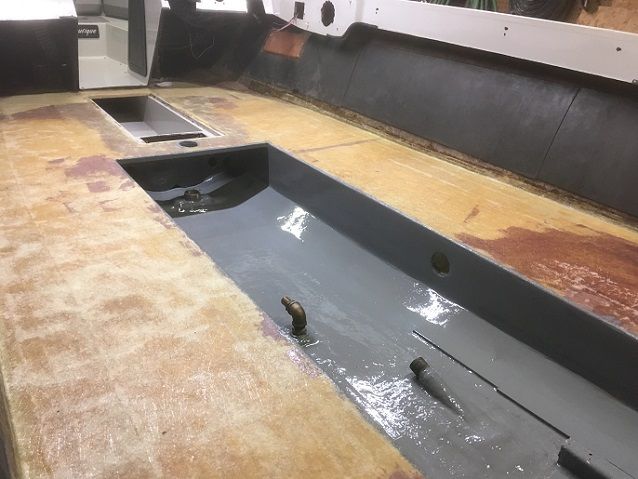 Now I am ready to start mounting brackets, running wires and cables, and I am still working on replacing the cutlass bushing. I have cut it, but can't seem to get it to come out of the strut. I am going to try more persuasive means, next chance I get. ------------- '92 Sport Nautique |
Posted By: 8122pbrainard
Date Posted: January-04-2019 at 4:28pm
|
Brent, Looking great.  From the pictures, it looks like you faired it very nice. What are you using for the primer and finish coat in the bilge? From the pictures, it looks like you faired it very nice. What are you using for the primer and finish coat in the bilge? ------------- /diaries/details.asp?ID=1622" rel="nofollow - 54 Atom /diaries/details.asp?ID=2179" rel="nofollow - 77 Tique 64 X55 Dunphy Keep it original, Pete < |
Posted By: MechGaT
Date Posted: April-20-2019 at 5:52pm
Sorry Pete, I did not see this message. At some point I stopped getting email notifications. I used the Interlux Epoxy Primekote and Bilgekote. I read it on SkiBum's thread and it looked good. Thanks for the complement. I think it turned out pretty well. I learned a couple of lessons. First is to pay attention to the thinner used. The Primekote needs thinning a bit. I tried using the stuff that was meant to thin the Bilgekote and it didn't mix. I wasted a cup full. I only bought a quart of each and I barely had enough Primekote to put on the second coat.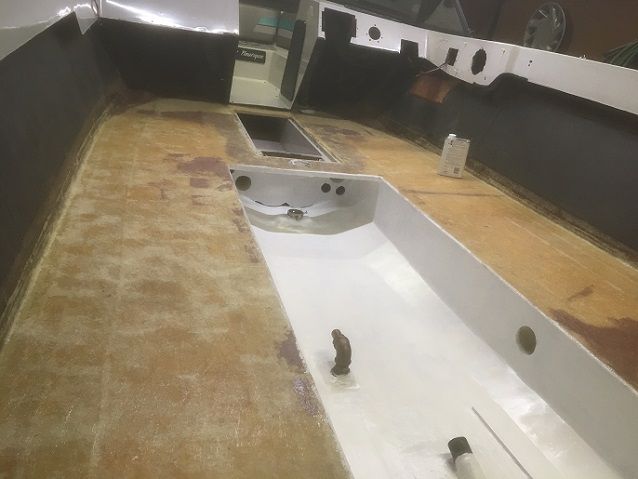 Since then I have put in the cradle. Drilled holes, put in some CPES, put in some 5200, and cinched them down.  I also put in some of the carpet. I used the TEC skill indoor/outdoor carpet glue from Lowes. I saw some others had used it and it says it is good for marine carpet. I bought 2 gallons and have already gone through one and a little more. 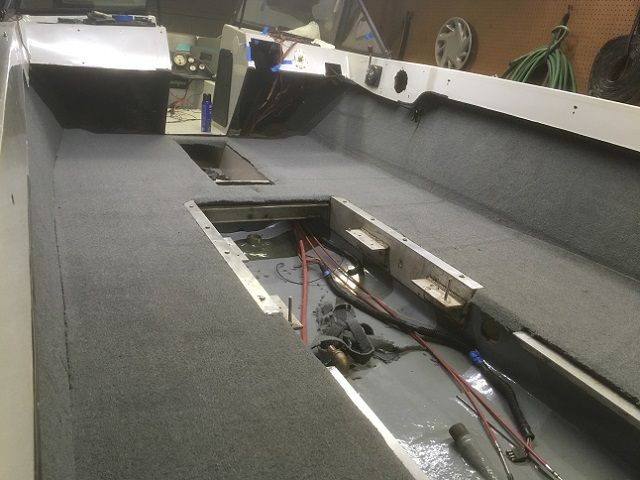 I should have waited to run the wires and cables until the carpet was in, but it wasn't the worst thing working around them. I also changed out the cutlass bushing while I had the chance. ------------- '92 Sport Nautique |
Posted By: MechGaT
Date Posted: June-01-2019 at 1:05am
I have made some progress. I got the trim glued in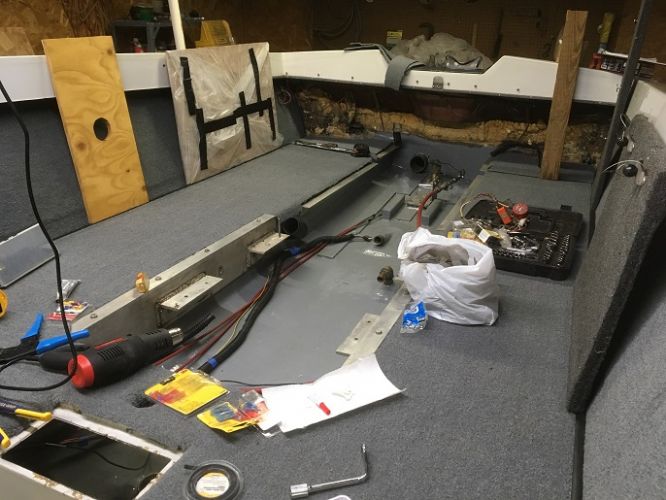 Then I took a small step back when trying to make sure the motor mounts would move freely. Three of the four moved freely, but the rear starboard mount would not rotate or move in and out. The pin was frozen no matter how much persuasion, PB Blaster, and heat we used. Then we used too much persuasion That ended all hopes of getting the boat in the water over Memorial Day weekend, but we pressed on thinking that if the motor was in the boat, the fourth motor mount could be bolted on after the fact Then we took a huge step back.. We got in too much of a hurry and due to using a hand winch we knew already had one broken tooth, we ended up breaking a second tooth and when we went to start letting the motor down it free fell into the bilge.   The two front motor mounts were damaged and the drain connection on the oil pan came loose, draining all of the oil I had just put in it, but otherwise it seems OK. We were able to borrow a 2 ton engine hoist, take off one wheel, do some maneuvering, and get the engine back out. What a sick feeling. I relay the story so that anyone who reads this knows never to use defective equipment and don't use a hand winch to lift your motor. Thank the Lord my brother and I weren't hurt, but a few inches and it could have been a really bad story. There was a sick feeling in my stomach and bad night of sleep that night for sure. I still need to check the drive shaft at the coupling for run-out. I checked it near the prop and it was 0.003" or less, but I didn't check it near the coupling, where it might have gotten hit. Any other recommendations on what to look for? The bilge has a couple of scratches and the aluminum frame took a hit, but both are in serviceable condition. The only check we could think of on the engine was to rotate it by hand and make sure it was still getting compression. It was. The transmission output shaft spun freely no matter if it was in gear or not. Is this normal? ------------- '92 Sport Nautique |
Posted By: MechGaT
Date Posted: June-02-2019 at 9:13am
|
I checked the coupling end of the shaft yesterday and it was right at .003” so it seems to straight. ------------- '92 Sport Nautique |