 Boats For Sale:


93 Sport Coaming pads |
Post Reply 
|
| Author | ||
93Sport 
Newbie 
Joined: September-22-2010 Location: Concord, NC Status: Offline Points: 18 |
 Post Options Post Options
") Thanks(0) Thanks(0)
 Quote Reply Quote Reply
 Topic: 93 Sport Coaming pads Topic: 93 Sport Coaming padsPosted: October-12-2011 at 8:15pm |
|
|
The bow lifting ring on my 1993 Sport Nautique is loose. I need to remove the coaming pads\bow seat backs to access the bolt/nut. I do not see how the pads are attached. I called CC and the discription I recieved from them does not match my boat. Does anyone have experience with removing them?
Phillip |
||
 |
||
|
MIskier
Senior Member 

Joined: July-29-2011 Location: Gulfcoast Status: Offline Points: 144 |
Post Options
Thanks(0)
Quote Reply
Posted: October-12-2011 at 10:11pm |
|
|
I dont have any specific experience with that boat but I would guess there are several studs on the upper part that you will have to reach and undo. They may also use a few plastic christmas trees, I would advise getting a bag of those to keep handy.
|
||
|
2006 MasterCraft PS 190
1986 CC Ski Nautique 2001 |
||
|
||
|
areford
Newbie
Joined: April-01-2010 Location: Fayetteville, G Status: Offline Points: 9 |
Post Options
Thanks(0)
Quote Reply
Posted: October-13-2011 at 2:11am |
|
|
Do you have any pics? My 93 sport doesn't seem to have these pads? I would say just remove the bow seats and there is an access port to get to the lift ring.
|
||
|
1993 Sport Nautique
- New Interior - Copycat Covers - Ramlin Trailer overhaul - Buff and polish oxidated gel coat - Exhaust repair - Holley rebuild Previous: 1980 Mastercraft - Lake Lanier. GA |
||
|
||
|
lewy2001
Grand Poobah 

Joined: March-19-2008 Location: NSW Australia Status: Offline Points: 2234 |
Post Options
Thanks(0)
Quote Reply
Posted: October-13-2011 at 2:46am |
|
|
I have the bow seating out of my 98 Sport at the moment. Should be similar to your 93 hopefully. There is some screws accessible from behind the observers seat and behind divers side kick panel. There is also some screws up the front behind the middle small cushion at the very point of the bow. You can see the screw holes in the pictures in both the fibreglass deck and the bow seating insert. The sides of the bow insert are held in by the alloy plates attached to deck that slide up in the cutouts in the insert.
Hope this helps hard to explain but the pictures will tell the story better. 

|
||
|
If you're going through hell, keep going
89 Ski <a href="http://www.correctcraftfan.com/diaries/details.asp?ID=5685" ta |
||
|
||
|
93Sport
Newbie
Joined: September-22-2010 Location: Concord, NC Status: Offline Points: 18 |
Post Options
Thanks(0)
Quote Reply
Posted: October-13-2011 at 1:20pm |
|
|
Lewy2001,
Thanks for the response. Those pictures were exactly what I needed. The pictures showed what the CC Tech was describing, but I could not picture. It came out with no problem, not sure how I am going to start the screws in the bow when putting it back. Thanks again, Phillip |
||
|
||
|
Randy_in_Ohio
Platinum Member 

Joined: September-13-2006 Location: N. Canton, OH. Status: Offline Points: 1891 |
Post Options
Thanks(0)
Quote Reply
Posted: October-13-2011 at 1:33pm |
|
|
I have the same problem with the loose front lifting ring. Have had the issue since I owned the boat and have never been able to figure out how to get to the bolt underneath to tighten it. I know for sure that I do not have that big access hole that Lewy shows in his pic! I have put my hand up behind that cushion and there is no hole!
Lewy, was their some sort of cover over that hole? I guess if the hole wasn't there, I could always use a hole saw and make one... 93Sport- Will you please take some pics when you do this and report back on what you find. I am really interested to see if you have this hole that lewy does on his '98. |
||
|
||
|
93Sport
Newbie
Joined: September-22-2010 Location: Concord, NC Status: Offline Points: 18 |
Post Options
Thanks(0)
Quote Reply
Posted: October-13-2011 at 3:08pm |
|
|
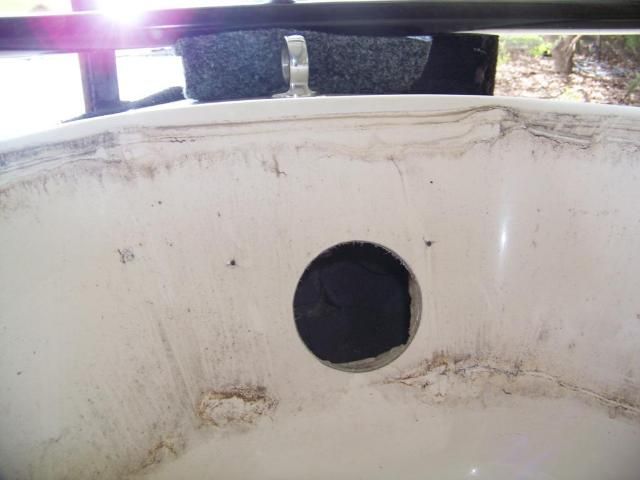
Randy,
My 93 had the hole in the glass, as you see it. The pictures show the hole, internal structural member, the bow eye itself, and the cushion. The screws were located underneath the vinyl strip right in the middle of the bow. I had to push the vinayl aside and stick the screwdriver through the foam. I don't know how I will get them started back again. The nuts on my eye were backed completely off and were not even touching the deck. I don't know if this was a manufacturing oversight or a result of vibration, or a possible previous repair. Sorry, I can't seem to post the pictures. When I tried to upload them to server, it said I did not have proper priviledges. I will try again later. If there is a secret to posting, let me know. I don't do enough of it to remember how. Phillip |
||
|
||
|
93Sport
Newbie
Joined: September-22-2010 Location: Concord, NC Status: Offline Points: 18 |
Post Options
Thanks(0)
Quote Reply
Posted: October-13-2011 at 7:01pm |
|
|
Randy,
I got the photo below to load. I hope this helps. I will try the others later. Phillip 
|
||
|
||
|
93Sport
Newbie
Joined: September-22-2010 Location: Concord, NC Status: Offline Points: 18 |
Post Options
Thanks(0)
Quote Reply
Posted: October-13-2011 at 7:59pm |
|
|
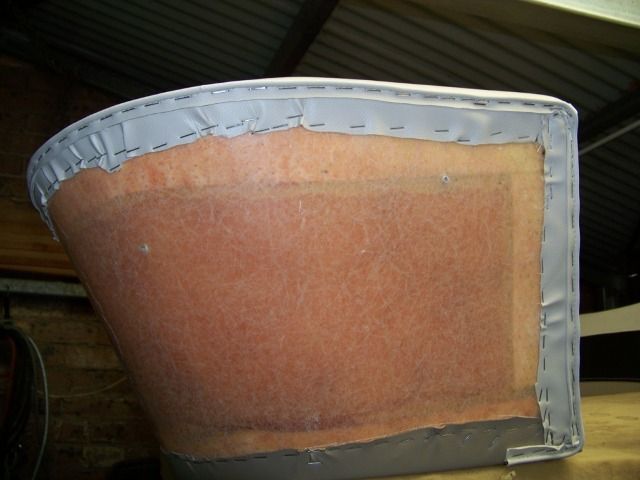
Wow, that last picture was large. Sorry about that.

This shows the Vinyl strip which I had to push aside to reach the screws. 
I hope these help. The pictures made all the difference for me. Phillip |
||
|
||
|
lewy2001
Grand Poobah
Joined: March-19-2008 Location: NSW Australia Status: Offline Points: 2234 |
Post Options
Thanks(0)
Quote Reply
Posted: October-13-2011 at 9:21pm |
|
Randy you have to remove the fibreglass seat insert as it covers that hole. You could always come over while mine is out and have a look. Plenty of cold beer in the fridge and a nice BBQ area for you to conjure up one of those roast racks I have seen. 
|
||
|
If you're going through hell, keep going
89 Ski <a href="http://www.correctcraftfan.com/diaries/details.asp?ID=5685" ta |
||
|
||
|
Randy_in_Ohio
Platinum Member
Joined: September-13-2006 Location: N. Canton, OH. Status: Offline Points: 1891 |
Post Options
Thanks(0)
Quote Reply
Posted: October-14-2011 at 1:21pm |
|
|
I think I understand now. I must have been feeling the back of the seat insert, like lewy said, when I put my hand up behind that vinyl strip with the logo on it. I'm going to get this apart this winter and tighten that thing down, it's been driving me crazy for years! the funny thing is I have asked this question more than once here and even call CC and could not figure this out until Lewy posted the pics! I even tried to send one of my boys up there under the bow seat with a wrench to try to tighten it! I knew there had to be an access hole up there!
Philip, Why did you have to remove the entire lifting ring to tighten it? couldn't you have just stuck a wrench through the hole and tighten it down? Thanks for clearing this up for us Lewy. You know I would love to get over there and enjoy some cold beer and BBQ with ya mate! |
||
|
||
|
93Sport
Newbie
Joined: September-22-2010 Location: Concord, NC Status: Offline Points: 18 |
Post Options
Thanks(0)
Quote Reply
Posted: October-14-2011 at 1:25pm |
|
|
Randy,
Just me being anal. I took it out and cleaned the threads. I also used 5200 to attached the 3/4" plywood spacer to the underside of the deck. Phillip |
||
|
||
|
Hollywood
Moderator Group

Joined: February-04-2004 Location: Twin Lakes, WI Status: Offline Points: 13510 |
Post Options
Thanks(0)
Quote Reply
Posted: October-14-2011 at 1:44pm |
|
|
Based on the random location and gel craacking of the screw holes, I'll bet they just jammed a screw through the foam and drove it home, no pilot hole. These are only to keep the cushion from popping up?
|
||
|
||
|
ny_nautique
Platinum Member
Joined: June-01-2011 Location: Albany NY Status: Offline Points: 1215 |
Post Options
Thanks(0)
Quote Reply
Posted: October-14-2011 at 2:01pm |
|
Yeah that is pretty lame. Maybe for re-install they should put a stud through the back of the glass sticking towards the cushion. Then slide the cushion over it and cap it with a t-nut or something like that. It will take some measuring and a few fit tests to get the stud the right length so it isn't poking someone in the back. |
||
|
||
|
Randy_in_Ohio
Platinum Member
Joined: September-13-2006 Location: N. Canton, OH. Status: Offline Points: 1891 |
Post Options
Thanks(0)
Quote Reply
Posted: October-14-2011 at 2:16pm |
|
Being anal myself, I'm sure I'll do the same. Good Idea on the 5200 to attach the plywood to the underside of the deck 
|
||
|
||
|
Randy_in_Ohio
Platinum Member
Joined: September-13-2006 Location: N. Canton, OH. Status: Offline Points: 1891 |
Post Options
Thanks(0)
Quote Reply
Posted: October-14-2011 at 2:20pm |
|
I agree. I wouldn't worry too much about trying to find the holes again, and would probably just drill new pilot holes and screw them in. |
||
|
||
|
MartyMabe
Grand Poobah
Joined: February-21-2006 Location: High Point,NC Status: Offline Points: 3974 |
Post Options
Thanks(0)
Quote Reply
Posted: October-14-2011 at 4:24pm |
|

|
||
|
||
|
Randy_in_Ohio
Platinum Member
Joined: September-13-2006 Location: N. Canton, OH. Status: Offline Points: 1891 |
Post Options
Thanks(0)
Quote Reply
Posted: February-29-2012 at 4:40pm |
|
|
I finally got this done. It wasn't too bad after I finally found the screws up front. Big thanks to Lewy and Philip for figuring this out.
One thing I can add. If I were to pull the coaming pad out again I would try to leave the front screws in the coaming pad, just about a 1/4 inch or so... I did this on one of the screws and was able to re-use the original hole. I tried to put the screw back in the second hole but couldn't get it back in there so I had to drill a new one. stripped a screw head in the process then burnt my finger on it!  But it's all back together and tight now! Thanks! But it's all back together and tight now! Thanks!
|
||
|
||
|
Jllogan
Platinum Member

Joined: May-18-2011 Location: canton, OH Status: Offline Points: 1728 |
Post Options
Thanks(0)
Quote Reply
Posted: February-29-2012 at 5:47pm |
|
|
I thought you would be too busy starting up north canton customs to finish that job.
|
||
|
||
|
Chopper
Gold Member

Joined: June-15-2006 Location: Australia Status: Offline Points: 821 |
Post Options
Thanks(0)
Quote Reply
Posted: March-01-2012 at 2:41am |
|
My 03 SAN has a thru bolt through the back rest secureed by nut & washer from behind the glass. Those screws look like a PITA.! |
||
|
||
|
Donald80SN
Grand Poobah
Joined: January-12-2009 Location: Denver, NC Status: Offline Points: 3887 |
Post Options
Thanks(0)
Quote Reply
Posted: June-16-2016 at 11:52pm |
|
|
Bump,
For one year I have been trying to figure out how to get too the two speakers that are in my play-pin to upgrade them. I was directed to this post from Planet Nautique.  Donald |
||
|
1980 Ski Nautique SOLD Back to Cypress Gardens
2002 Sport Nautique, GT-40, FCT2, Cover Sports, Tower Bimini, Inc., Wet Sounds Audio System, Star Gazer Wake Edition S. 1968 Ski Nautique, Project. |
||
|
||
|
Post Reply
|
|
 Tweet
Tweet
|
| Forum Jump | Forum Permissions You cannot post new topics in this forum You cannot reply to topics in this forum You cannot delete your posts in this forum You cannot edit your posts in this forum You cannot create polls in this forum You cannot vote in polls in this forum |


 Topic Options
 Randy_in_Ohio wrote: