 Boats For Sale:


68 Chris Craft |
Post Reply 
|
Page <1 23456 8> |
| Author | |
75 stang 
Senior Member 

Joined: August-11-2008 Location: northwest ohio Status: Offline Points: 475 |
 Post Options Post Options
") Thanks(0) Thanks(0)
 Quote Reply Quote Reply
 Posted: January-08-2010 at 12:30pm Posted: January-08-2010 at 12:30pm |
|
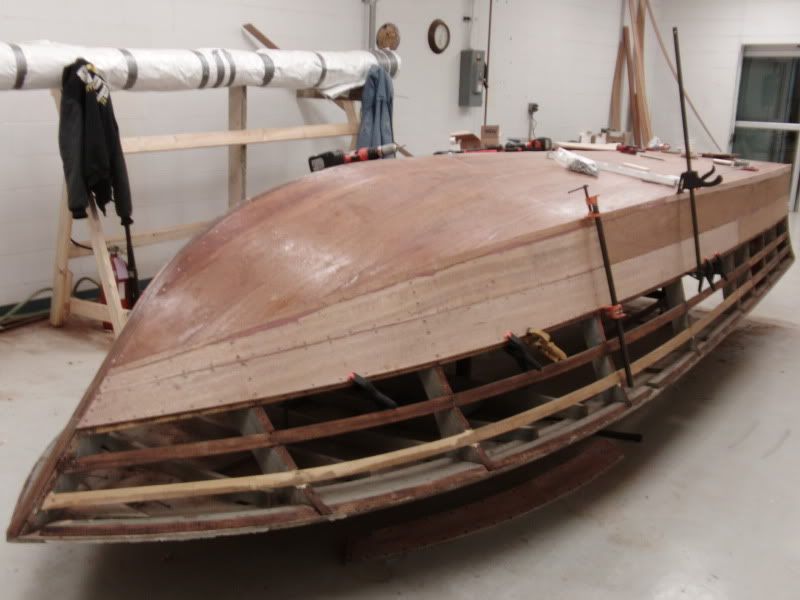
Pulled all the sides back off last night and CPES coated the backs and but seams. Now that the snow is plowed, I think i am boing to go down to the shop with a case of 5200 and get thoses sides on for the last time. I really want to get this thing flipped so i can start on the home stretch.
I took the wifes camera/video setup this morning so we ought to have some fresh progress pics up this weekend. Hop eit goes well , cause this part shows! |
|
 |
|
|
75 stang
Senior Member
Joined: August-11-2008 Location: northwest ohio Status: Offline Points: 475 |
Post Options
Thanks(0)
Quote Reply
Posted: January-08-2010 at 8:51pm |

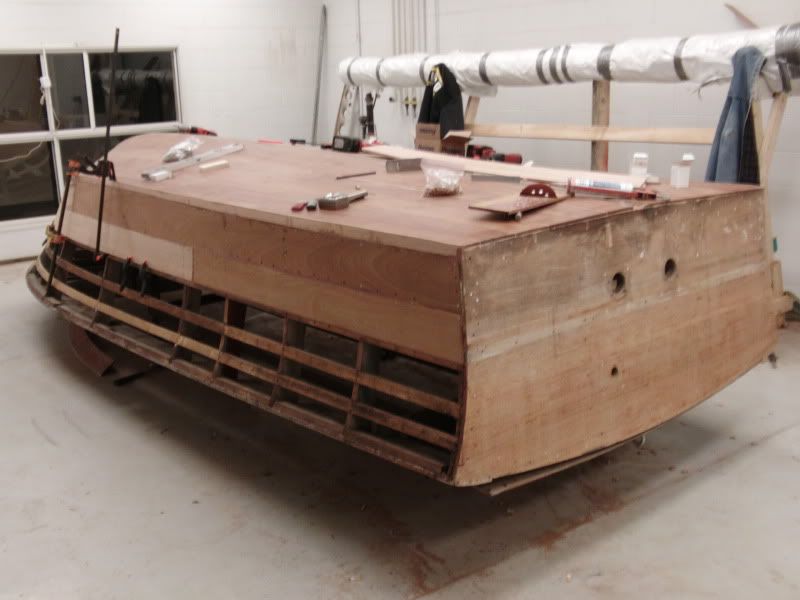

A full day in but its almost done. I need to make a couple more boards for the front, they cracked onthe pre fit but everything else went well today and its all bedded in mahogony 5200 and should be as water tight as a glass boat and a lot stronger than it was before. we have to go back and remove the screws and countersink them and install the plugs before starting the sanding. then it will be on to stain and bottom paint i hope so we can flip this sucker! |
|
|
|
|
8122pbrainard
Grand Poobah 

Joined: September-14-2006 Location: Three Lakes Wi. Status: Offline Points: 41040 |
Post Options
Thanks(0)
Quote Reply
Posted: January-09-2010 at 10:07am |
|
Sean,
Have you been wiping down the planks with a solvent as they are set in the 5200? I'm asking because of the large color difference between planks. Be careful if you are using a solvent as it will dilute the 5200 and allow it to penetrate deeper into the wood which will affect the wood ability to take a stain. I know you will be sanding but you may not be able to sand deep enough. BTW, I highly recommend Dannenburg's method of using CPES after the filler stain to seal and stabilize the surface. It's a fantastic primer for the varnish too. Skip the first coat of 50/50 reduced varnish and go with a 25/75 reduction for the first coat. Then no reduction. |
|
|
|
|
75 stang
Senior Member
Joined: August-11-2008 Location: northwest ohio Status: Offline Points: 475 |
Post Options
Thanks(0)
Quote Reply
Posted: January-09-2010 at 11:49am |
|
No solvents, and there is no cCPES on the out board sides. I sealed the inner and the butt joints and left the face bare as per Danenbergs recommendations. The color difference is due to a screw up I made early on in the project. When i ordered the mahogany i measured the boards and counted them. when we started figuring out how it went together we discovered we needed wider boards to cut the highly curved boards out of. The wider boards had to come from a different supplier and thus are a different shade, the lighter ones.
It looks like we are going to have to bleach the darkest ones above the water line to lighten them up then stain them to match. Not ideal but its what i have to work with. Hopefully it all works out, because i dont really want to do this again. I plan to CPES over the stain and I try the 27/75 thanks for the tip. Got a lot more countersinking and plugging to do but im looking forward to painting the bottom and getting the varnish on. Then we can flip it and decide what to do with the top side. The grand prix model was so much prettier with the white interior and wood deck, its very tempting to upgrade and loose the vinyl deck... Thanks for the tips Pete |
|
|
|
|
75 stang
Senior Member
Joined: August-11-2008 Location: northwest ohio Status: Offline Points: 475 |
Post Options
Thanks(0)
Quote Reply
Posted: January-09-2010 at 1:06pm |
just playing around with the camera, did a walk around in video mode and leaned how to post it to photobucket. I learn something new about the internet everytime i try something new. I did not even have to call the kids in to help... |
|
|
|
|
8122pbrainard
Grand Poobah
Joined: September-14-2006 Location: Three Lakes Wi. Status: Offline Points: 41040 |
Post Options
Thanks(0)
Quote Reply
Posted: January-09-2010 at 2:50pm |
|
Sean,
Now I remember you having to go with two batches of wood. Always seems to be something comming up when tearing into a wood boat!!! It's going to be tough to match all the planks even with bleaching. Use one of the two part bleaches first and hopefully you won't need to go all the way with Clorox. I have had to when the wood bleach didn't remove all the color. The darker planks may need several treatments. It will be hard to keep the bleach from migrating to the lighter planks so after the darks, you'll need to do the whole boat several times. Then, cross your fingers that the filler stain will take to the different wood evenly. Don't try to "paint" the boat to even the color out with the filler stain as it's worse than some mismatched plank colors. A "painted" hull with the filler stain is one of the first things the judges including myself look at. |
|
|
|
|
75 stang
Senior Member
Joined: August-11-2008 Location: northwest ohio Status: Offline Points: 475 |
Post Options
Thanks(0)
Quote Reply
Posted: January-09-2010 at 4:19pm |
|
Judges?! Thats optimistic! I need to mark out the water line, the bottom board should be pretty much covered in paint, the upper ones are going to be much more difficult. Probably should have bleached the boards before installing them i guess but im a welder not a woodworker, never thought much about color. I think i saved the tails of the darker boards to do some testing. Hopefully it does not end up looking like a zebra or a pinstripe suit with the 5200 in the seams showing to badly
|
|
|
|
|
75 stang
Senior Member
Joined: August-11-2008 Location: northwest ohio Status: Offline Points: 475 |
Post Options
Thanks(0)
Quote Reply
Posted: January-25-2010 at 12:31pm |
|
I spent the entire afternoon yesterday screwing, I finally got around to pulling the temporary screws and countersinking and final screwing the boards. We got one side done yesterday and hope to do the other one this week. Then we can start ont he plugging, sanding and bleaching.
Progress is kind of slow this winter, mostly lacking ambition this winter. I need to get myself motivated before spring gets here. |
|
|
|
|
8122pbrainard
Grand Poobah
Joined: September-14-2006 Location: Three Lakes Wi. Status: Offline Points: 41040 |
Post Options
Thanks(0)
Quote Reply
Posted: January-25-2010 at 12:42pm |
|
Sean,
Do you have a plug cutter and does it match (same manufacturer) the counter bore/sink you're using? Have you tried the fit yet. I'm asking because they aren't the most precise things around. I've found that different makes don't always match!! What are you planning to use to secure the plugs? The old method was to dip them in varnish. 5200 is the current method. Don't use epoxy as it will seal the area around the plug preventing the wood from taking a stain there. A small dab of 5200 inside the hole to hold it is best. If there are any gaps in the hole/plug the filler stain will take care of them. |
|
|
|
|
75 stang
Senior Member
Joined: August-11-2008 Location: northwest ohio Status: Offline Points: 475 |
Post Options
Thanks(0)
Quote Reply
Posted: January-25-2010 at 12:51pm |
|
I have not picked up a plug cutter yet, Jack sent me up a bag of plugs to play around with but so far everything i did is famowood below the waterline. we have been debating on buyinh more plugs or cutting them here.
we were debatin the glue yesterday. Titebond was the thought though we really have not dug into the options to deeply yet. Did not think about the 5200 there... |
|
|
|
|
75 stang
Senior Member
Joined: August-11-2008 Location: northwest ohio Status: Offline Points: 475 |
Post Options
Thanks(0)
Quote Reply
Posted: January-28-2010 at 11:33am |
|
Pete,
I finished screwing the bottom last night...ordered my plug cutter this morning and some more screws for the top side. I had a local wood refinishing guy over this week working on my new door for the house and we were talking about the bleaching and his ability to match stains. Have you ever tride using two different shades of stain to match boards? Dan believes that if i get him the tails of the boards he can mix two stains one for the dark and another for the lighter boards that will match once applied. We are going to set the waterline this eek and make sure the darkest board is completely covered, bleach the darker ones down and do some testing. Any thoughts? |
|
|
|
|
8122pbrainard
Grand Poobah
Joined: September-14-2006 Location: Three Lakes Wi. Status: Offline Points: 41040 |
Post Options
Thanks(0)
Quote Reply
Posted: January-28-2010 at 12:07pm |
|
Sean,
Yes I've played with stain matching. It's not easy and sort of like trying to match gel color but with a added complication. When you put the finish (varnish) on it will change the color again. The last match I tried was on my X55 dunphy. I made up 18 different blends of stain on test samples and then varnished. Never did get the color correct. I'm glad he's using the tails of the different wood you used. That's a BIG difference as different wood will "take" a stain differently. Is he going to bleach first or just go after the difference with stain? When I did my Atom, I ordered the deck ply from the east coast. I didn't spec that it needed to be color matched. 1 of the 4 sheets was a different color. Big mistake as I proceeded with the project. Tried stain matching without success and have to get quite agressive with the bleach (Clorox). Way back when I was refinishing at the marina, many of the projects had gone to the point where they had water stains in the wood. These too needed bleaching. I'm not saying bleaching is absolutely needed if he can do it with just stain. It's just not easy! |
|
|
|
|
75 stang
Senior Member
Joined: August-11-2008 Location: northwest ohio Status: Offline Points: 475 |
Post Options
Thanks(0)
Quote Reply
Posted: January-28-2010 at 12:28pm |
|
we are planning to bleach first, i thought i would give him a couple tails to play with and if he saves us a step great but the plan is to bleach first. Top side will be a mix of old and new so im certain we will need to do some bleach work there as well.
I'm really on a push to get this flipped right now. I need to see this from a new angle. I also have someone interested in the building I have it in so I may need to move it soon, great motivation to get something done and rent the building out. Better get my eldest son trained on the plug cutter and drill press, maybe it will help him with his woodworking project for Boy scouts as well. |
|
|
|
|
8122pbrainard
Grand Poobah
Joined: September-14-2006 Location: Three Lakes Wi. Status: Offline Points: 41040 |
Post Options
Thanks(0)
Quote Reply
Posted: January-28-2010 at 1:08pm |
|
Sean,
Paint the bottom and get at least the base coats of varnish on the hull sides now before flipping. It's alot easier upside down!! If your refinisher has some tricks to keep the stain from migrating to a plank you don't want stained, listen too him. I'd be interested too as I've never had much luck with it. Always seems to bleed to the next plank. On a two tone deck it's not so much of a problem because you always have the deck seams between the colors. |
|
|
|
|
75 stang
Senior Member
Joined: August-11-2008 Location: northwest ohio Status: Offline Points: 475 |
Post Options
Thanks(0)
Quote Reply
Posted: January-28-2010 at 1:58pm |
|
agreed, once we get it stained and soaked in CPES we will spray the bottom and lacquer coats and be done with the everything below the deck.
|
|
|
|
|
DrCC
Grand Poobah

Joined: April-12-2004 Location: at home Status: Offline Points: 2867 |
Post Options
Thanks(0)
Quote Reply
Posted: February-05-2010 at 8:21pm |
|
75 stang, You are correct about Titebond for the plugs. They will stay in and you can get them back out if need be.
5200 for plugs? Come on! I can imagine what kind of a mess that would be! And, you wouldn't be able to shave them off for at least 4 days. Hey, If you find 2part Wood Bleach, let me know. We always used KleanStrip other alternative is Oxalic Acid. |
|
|
|
|
75 stang
Senior Member
Joined: August-11-2008 Location: northwest ohio Status: Offline Points: 475 |
Post Options
Thanks(0)
Quote Reply
Posted: February-09-2010 at 11:33am |
|
Thanks, we are going to dig into the plugs tonight and get the first batch cut and glued in. With all the snow falling today i may have a little time between plowing duties to make plugs and put a few in this week.
|
|
|
|
|
eric lavine
Grand Poobah
Joined: August-13-2006 Location: United States Status: Offline Points: 13413 |
Post Options
Thanks(0)
Quote Reply
Posted: February-09-2010 at 2:34pm |
|
you had to be tired of screwing all afternoon...look at it this way i usually read every post, always looking to learn, and i just couldnt pass on that one
|
|
|
"the things you own will start to own you"
|
|
|
|
|
75 stang
Senior Member
Joined: August-11-2008 Location: northwest ohio Status: Offline Points: 475 |
Post Options
Thanks(0)
Quote Reply
Posted: February-09-2010 at 2:43pm |
|
I wondered how long it would take someone to jump on that... Im headed back over to pound on my woody now

|
|
|
|
|
eric lavine
Grand Poobah
Joined: August-13-2006 Location: United States Status: Offline Points: 13413 |
Post Options
Thanks(0)
Quote Reply
Posted: February-09-2010 at 2:52pm |
|
im catching up, spending the day at home, watching the snow. dont pound to hard, you'll go blind
|
|
|
"the things you own will start to own you"
|
|
|
|
|
75 stang
Senior Member
Joined: August-11-2008 Location: northwest ohio Status: Offline Points: 475 |
Post Options
Thanks(0)
Quote Reply
Posted: February-09-2010 at 8:47pm |
|
Its not snowing that much, dont be a sissy! Hey I do have a question for you Eric. I rebuilt the 283 in the chris with 950 hours on it but i have not done anything to the trans yet. I believe those were velvetdrive units in these. Other than change the oil and filter is there anything else i should do while its out? Worked fine 13 years ago but i have been wondering what i should do to it if anything while its out.
|
|
|
|
|
75 stang
Senior Member
Joined: August-11-2008 Location: northwest ohio Status: Offline Points: 475 |
Post Options
Thanks(0)
Quote Reply
Posted: February-18-2010 at 11:06am |
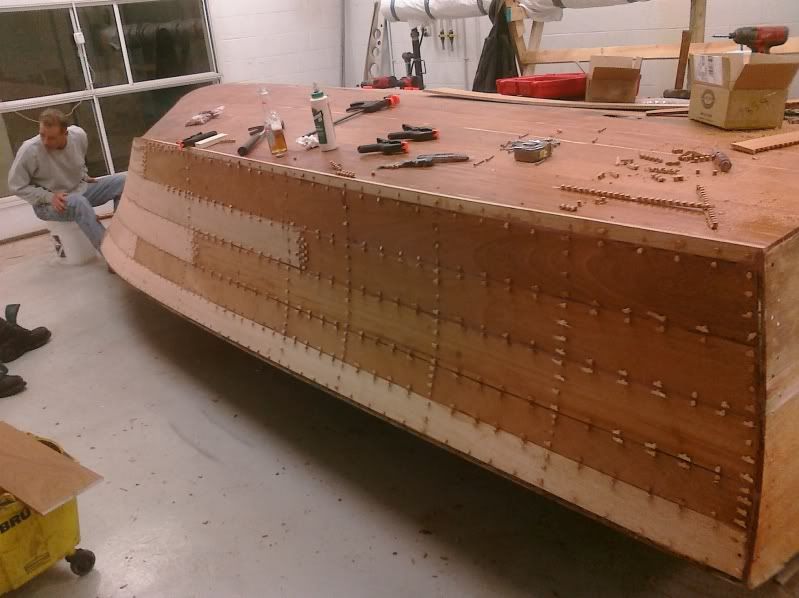
Plugging away... |
|
|
|
|
75 stang
Senior Member
Joined: August-11-2008 Location: northwest ohio Status: Offline Points: 475 |
Post Options
Thanks(0)
Quote Reply
Posted: March-07-2010 at 11:31pm |
|
We got all the plugs trimmed today and started the fairing process. I even got the long board out for a while to see how long it will take to make it straight. Definatly going to be a couple weeks... 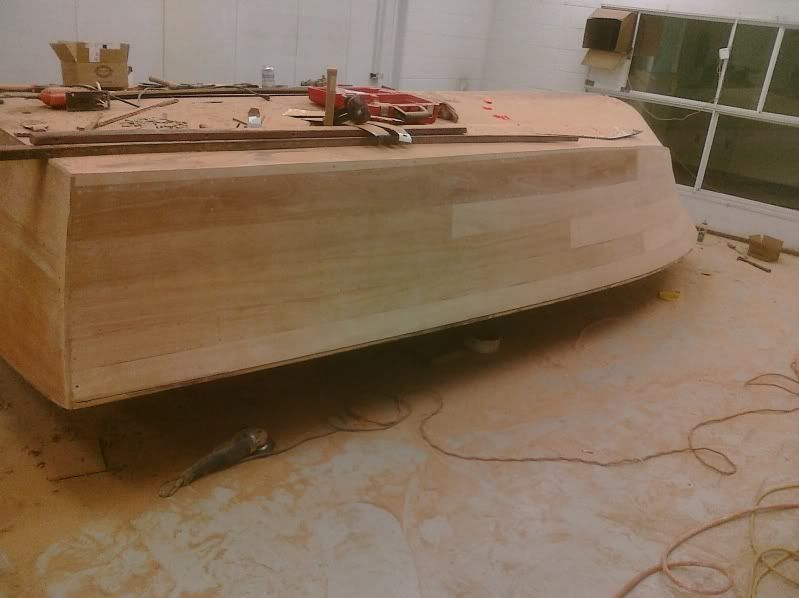
|
|
|
|
|
75 stang
Senior Member
Joined: August-11-2008 Location: northwest ohio Status: Offline Points: 475 |
Post Options
Thanks(0)
Quote Reply
Posted: March-08-2010 at 10:39pm |
|
Pete, DRCC,
we did what we could fitting up the boards but there are still a few gaps between the boards here and there. we bedded them all in 5200 and most of the seams have a little 5200 between them. The question is this, the couple gaps that are left, should i fill them with 5200? I would think they would be better off with flexable 5200 in them than varnish or famowood filler. the couple of split outs from the plugging and screwing would probably be best taken care of with the famowood that will take some stain I think. The book is great but it does not really address imperfections and i am an imperfect carpenter. Im starting to get a bit nervous about the finish, I dont know what to expect... |
|
|
|
|
8122pbrainard
Grand Poobah
Joined: September-14-2006 Location: Three Lakes Wi. Status: Offline Points: 41040 |
Post Options
Thanks(0)
Quote Reply
Posted: March-08-2010 at 11:02pm |
|
Sean,
Filler stain first, then CPES coat (per Dannenbergs method) and then at least 1 coat of varnish. Now use the 5200 for the seams that are still open. Solvent wipe off the excess. If you do the 5200 now, you'll get it all over the place next to the seam. Then the wood won't "take" a stain. |
|
|
|
|
DrCC
Grand Poobah
Joined: April-12-2004 Location: at home Status: Offline Points: 2867 |
Post Options
Thanks(0)
Quote Reply
Posted: March-09-2010 at 1:03am |
|
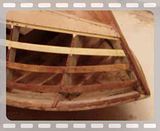
Gaps? where? From the upper pics, looks like you already hit em with 5200. But, you're right, on the Famowood, never in seams, good for plugging woops. I'd do all the 5200 first, if you're worried about getting it in the grain, mask it off.
Did you ever find 2 part bleach? Clorox won't do much to wood. I've never used CPES over Paste wood filer stain. Are you spraying the CPES? You should have an equal gap the full length of the plank. |
|
|
|
|
8122pbrainard
Grand Poobah
Joined: September-14-2006 Location: Three Lakes Wi. Status: Offline Points: 41040 |
Post Options
Thanks(0)
Quote Reply
Posted: March-09-2010 at 10:11am |
Al, I've always had a grain "suck back" problem with my bright work. Looks fantastic with all the coats of varnish out of the shop but then by the end of the season after full curing the grain shows up. I had the pleasure of meeting Don Dannanberg and sitting down with him for a little talk. Knowing he uses the method of sealing the wood and paste filler with the CPES, I asked him what the reason for the CPES treatment was. He said curing the "suck back"!!! Turns out he fought the issue for years before he tried the CPES. It's brushed on very lightly/carefully and only after the filler stain has cured for at least a week preferably two. The stong solvent in the CPES does attack the filler slightly but it also is a very quick evaporator. No aggresive "over" brushing. |
|
|
|
|
75 stang
Senior Member
Joined: August-11-2008 Location: northwest ohio Status: Offline Points: 475 |
Post Options
Thanks(0)
Quote Reply
Posted: March-09-2010 at 11:52am |
The gaps that are left are small ones that i did not get enough 5200 in when we set the boards, not very deep but the 5200 did not make it all the way to the top. I was trying so hard to not make a huge mess i probably went just a little light on the goo. We did find a bleach product, I dont have it here yet my wood finish guy hs it at his shop experimenting/practicing on the tails right now. I have been rolling on the cpes so far. I have only donr the bottom and frames that way and the back side of the side boards. we are discussing spraying the stain and varnish but have not come to a final decision there yet. A few test pieces are inthe works to determine how we go. I appreciate the input. |
|
|
|
|
8122pbrainard
Grand Poobah
Joined: September-14-2006 Location: Three Lakes Wi. Status: Offline Points: 41040 |
Post Options
Thanks(0)
Quote Reply
Posted: March-09-2010 at 12:59pm |
|
Sean,
Very few have perfected a method of spraying spar varnish. Attempts have been made to reduce the viscosity by heating but as the varnish cools, viscosity changes. Reduction to reduce the viscosity results in a very thin mill build. Going to a large fluid tip/air cap and pressure feed gun has some success but you will end up with quite a orange peel surface. If you find a method, I sure would like to hear about it! Buy the best $40 to $50 brush you can find, never let the brush dry out and start practicing. I highly recommend you stick with a high grade marine spar varnish and not looking at one of the automotive "clear coats". |
|
|
|
|
75 stang
Senior Member
Joined: August-11-2008 Location: northwest ohio Status: Offline Points: 475 |
Post Options
Thanks(0)
Quote Reply
Posted: March-09-2010 at 1:12pm |
|
I am not looking to reinvent the wheel, just get through this. I really suck at brush painting though. I wonder how the airless sprayer would work, its great for heavy materials but probably has the same finish problems at the HVLP gun.
The other question we have been pondering is weather or not to varnish the sides before we flip it or wait untill the topside is all done and stained then varnish it all at once. any thoughts? |
|
|
|
|
Post Reply
|
Page <1 23456 8> |
 Tweet
Tweet
|
| Forum Jump | Forum Permissions You cannot post new topics in this forum You cannot reply to topics in this forum You cannot delete your posts in this forum You cannot edit your posts in this forum You cannot create polls in this forum You cannot vote in polls in this forum |


 Topic Options
 DrCC wrote: