68 Chris Craft
Printed From: CorrectCraftFan.com
Category: General Correct Craft Discussion
Forum Name: Off Topic
Forum Discription: Anything non-Correct Craft
URL: http://www.CorrectCraftFan.com/forum/forum_posts.asp?TID=12380
Printed Date: May-21-2024 at 3:47am
Topic: 68 Chris Craft
Posted By: 75 stang
Subject: 68 Chris Craft
Date Posted: November-14-2008 at 10:49am
|
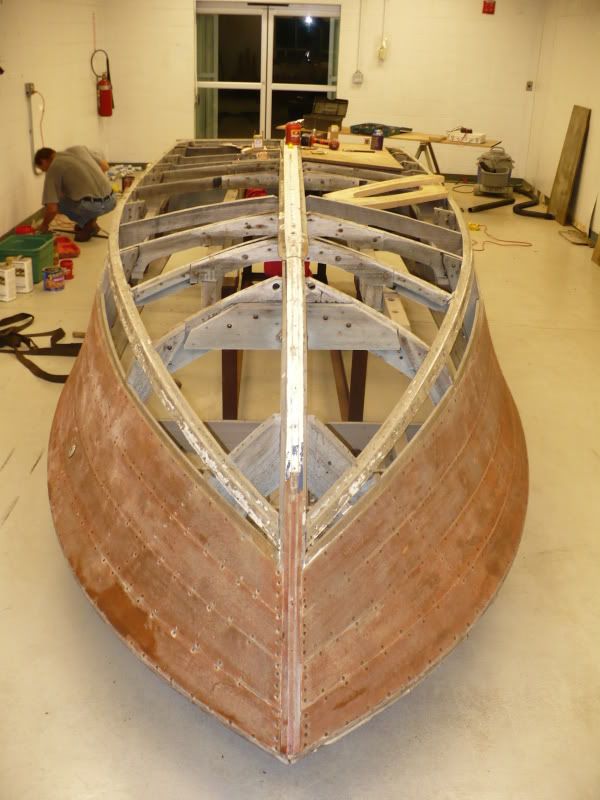
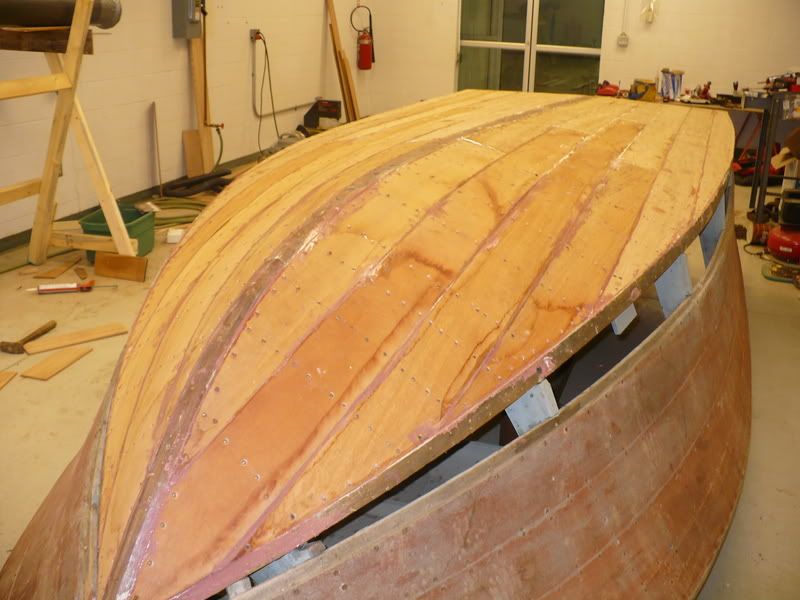
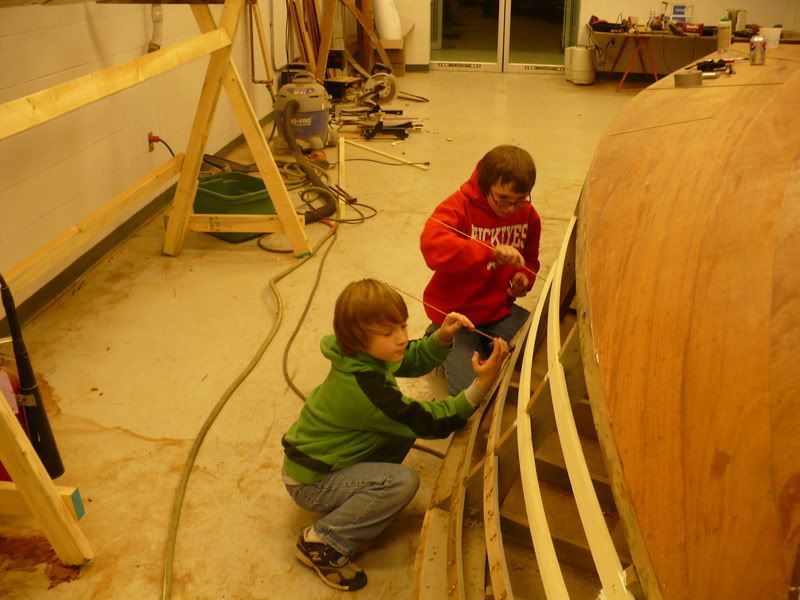
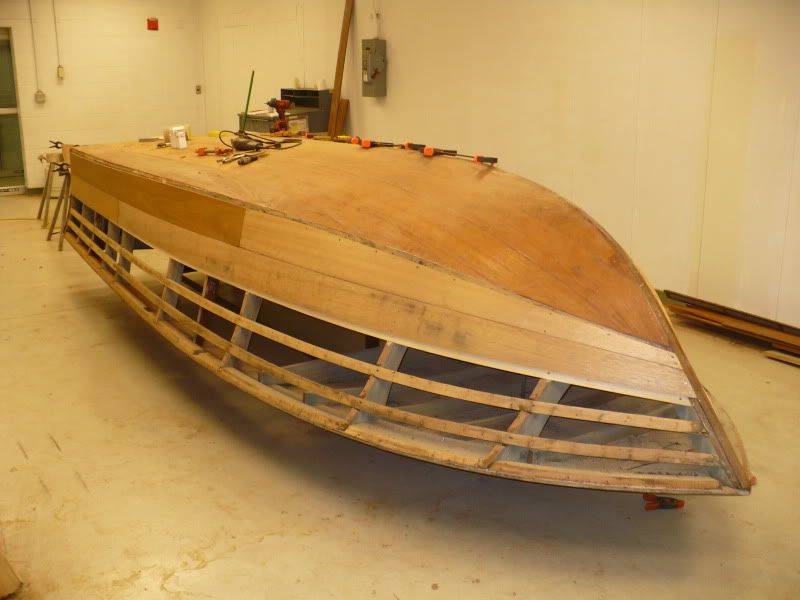
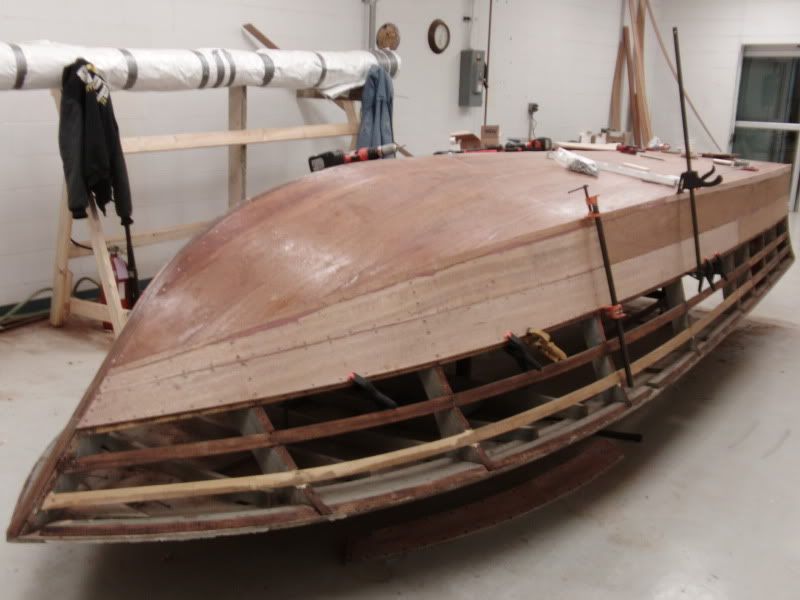
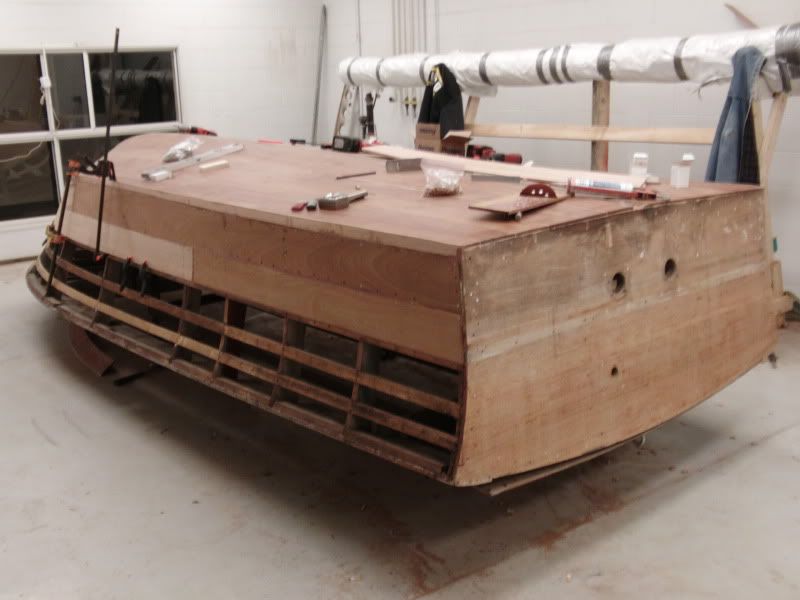
We pulled my Wifes old chris into the building to get started on the rebuild finally. Last night Beau and I dug out all the plugs left in the hull and worked on straigihtning and securing the replacement white oak ribs. I snapped a couple pics just to start off the album of where we took over this project.
I already rebuilt the 283 and its sets in the shop awaiting a boat. The rest of this is all new for me as I build metal buildings and Hot Rods, we dont even use wood trim in buildings... Hopefully working a couple nights a week with Beau, dannenburgs book and a carpenter friend we can make this look like a boat again. I did a lot of work at the cottage this fall to make room for a second boat next summer... it would look nice sitting next to the Mustang. And so begins yet another journey... 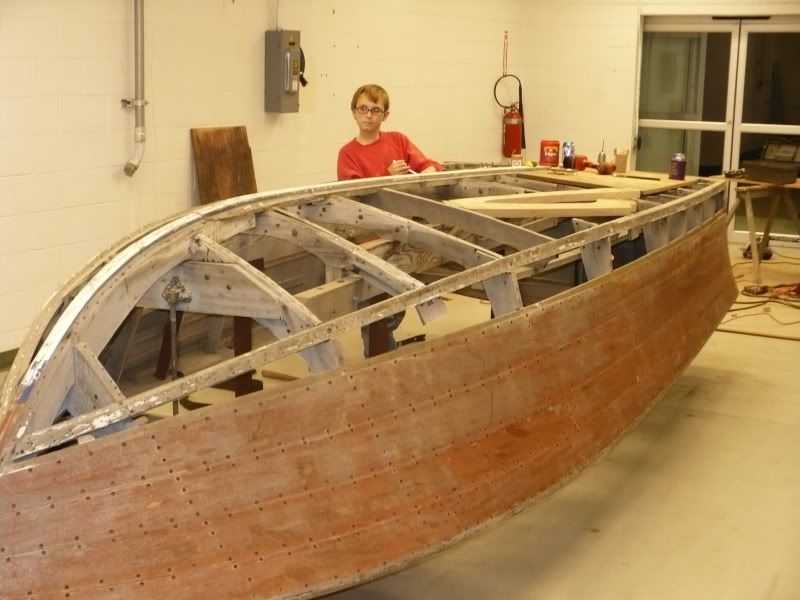
|
Replies:
Posted By: 75 stang
Date Posted: November-14-2008 at 11:12am
I moved all the boat pics to a new photobucket album and if i get a chance today ill figure out the link thing and add it to my sig... Later |
Posted By: 75 Tique
Date Posted: November-14-2008 at 11:37am
|
Nice work space. You guys with those kinds of shops are lucky. I guess I can't complain too loud though, at least I have an extra, tho very small, garage that the boat is in so at least I can putter in the winter.
Funny you mention dannenburgs book, I was killing time at Barnes and Noble in the mall last night and picked it up and was flipping through it. Was thinking it would make a nice Christmas give for Alan, but I'm guessing he already has it. Good luck with the Chris. Looking forward to seeing pictures of it on the water next spring. Nice that you've got a helper. You will both remember the project for a long time. ------------- _____________ “So, how was your weekend?” “Well, let me see…sun burn, stiff neck, screwed up back, assorted aches and pains….yup, my weekend was great, thanks for asking.” |
Posted By: 81nautique
Date Posted: November-14-2008 at 12:02pm
Well I do already have it Larry, thanks for thinking about me. If it helps you out I was thinking of signing up for skidim's and Overton's christmas registry!!! 
Good start Sean, and Yes we are jealous of your workspace. ------------- You can’t change the wind but you can adjust your sails |
 75 Tique wrote:
Posted By: 75 Tique
Date Posted: November-14-2008 at 12:11pm
That's very helpful Alan, I appreciate the thought, but I think I've already settled on 2 gross of "flathead, wood type bronze or hot dipped galvanized screws" for you and Dana this year. ------------- _____________ “So, how was your weekend?” “Well, let me see…sun burn, stiff neck, screwed up back, assorted aches and pains….yup, my weekend was great, thanks for asking.” |
Posted By: 8122pbrainard
Date Posted: November-14-2008 at 12:46pm
|
Sean,
Great start and I'm glad to see you have help. The ACBS does have a youth program and even scholarships. However, I don't know how involved your local chaper is in the program. Get a humidifier going in the shop and try to keep it as high as possible. A couple years back, our chapter had a winter tech seminar at the shop of one of our members. He was restoring a 24' Shepard. The first thing alot of us noticed was his precise and close plank joints. He was a very high end cabinet maker and this being his first boat was just doing what he normally did but not thinking ahead. The following summer I ran into him without his boat and of course had to ask where it was. Yup, he was pulling all the side planking off the boat!!! ------------- /diaries/details.asp?ID=1622" rel="nofollow - 54 Atom /diaries/details.asp?ID=2179" rel="nofollow - 77 Tique 64 X55 Dunphy Keep it original, Pete < |
Posted By: 75 Tique
Date Posted: November-14-2008 at 1:00pm
|
Sorry - momentary threadjack.
Pete, It is on my to do list to build a wooden boat in the next 5ish years. I have a lot to learn and read,(I've read a lot already, but got a long way to go) but I am starting simple, a plywood boat (like this)(not quite so high performance, but this theme) 
I have my reasons for wanting to do a bright finish. What I was wondering is how do you make the thousands of screw holes disappear. As I look at pictures of Sean's boat and Alans, there are a lot to make disappear. I dont want my boat looking like this. 
Whats the secret? Plugs over every screw, of comparable wood type as the planking (plywood) sanded down and finished so that it looks the same as the planking? I realize I got a lot to think about before I get to that point, but I'm curious. (Glen-L has a book on building I hope to get and has on their website a several page step by step procedure, which I have studied already) ------------- _____________ “So, how was your weekend?” “Well, let me see…sun burn, stiff neck, screwed up back, assorted aches and pains….yup, my weekend was great, thanks for asking.” |
Posted By: 8122pbrainard
Date Posted: November-14-2008 at 1:17pm
|
Larry,
Using Correct Craft as a example, on the "low end" ply boats wood filler is used. When filler/stain is applied, the wood filler takes on the color close to the deck/hull sides. With a "high end" planked boat each screw is covered with a wood bung. This are cut using a bung (plug) cutter out of the same wood (scrap). They are set over the screw high and then with a wood chisel cut off as flush as possible. This requires "reading" the wood grain on each plug. You want to chisel from the low side of the grain so if the bung cuts off at a angle you will still have wood above the planking! ------------- /diaries/details.asp?ID=1622" rel="nofollow - 54 Atom /diaries/details.asp?ID=2179" rel="nofollow - 77 Tique 64 X55 Dunphy Keep it original, Pete < |
Posted By: 75 Tique
Date Posted: November-14-2008 at 1:27pm
|
WOW!! Tedious. I guess that's what makes a wooden boat a labor of love. Not much depth to work with, with a 1/4-inch plywood skin, is there? I would love to get started on this now, but the usual hurdles (time, space and mostly money) are prevailing right now. So far I've got hardware, just missed a great deal on a craigslist motor, a lead on a trannie...but I've got nothin' but time right now. ------------- _____________ “So, how was your weekend?” “Well, let me see…sun burn, stiff neck, screwed up back, assorted aches and pains….yup, my weekend was great, thanks for asking.” |
Posted By: 8122pbrainard
Date Posted: November-14-2008 at 1:35pm
Depth stops on the combination drill/countersinks is a must!! I drilled lots of 1/4" on my Atom. ------------- /diaries/details.asp?ID=1622" rel="nofollow - 54 Atom /diaries/details.asp?ID=2179" rel="nofollow - 77 Tique 64 X55 Dunphy Keep it original, Pete < |
Posted By: 8122pbrainard
Date Posted: November-14-2008 at 1:57pm
Plug cutter:
 ------------- /diaries/details.asp?ID=1622" rel="nofollow - 54 Atom /diaries/details.asp?ID=2179" rel="nofollow - 77 Tique 64 X55 Dunphy Keep it original, Pete < |
Posted By: 75 stang
Date Posted: November-14-2008 at 2:04pm
|
Beau and I are reviewing plans for a small plywood boat. We are looking for something easy to build for the boys and using a 10hp motor, a minimax maybe? the Indiana rules are under 10hp if you are under 14 or so. Thought it would make a good project for us and give him something to do when we get more into the finishing stages of the chris.
I found under the cottage an old town mahogany canoe and a 12' home built wooden boat that Larry used to run on the lake with a 30hp merc, kinda what sparked Beau's interest in the little boat program... |
Posted By: 8122pbrainard
Date Posted: November-14-2008 at 2:12pm
|
Sean,
If you haven't already, look at the Glen-L ply "stitch and glue" plans. Very good for a first boat. Easy and quite forgiving on the joinery. https://www.boatdesigns.com/departments.asp?dept=16 - Glen-L stitch and glue ------------- /diaries/details.asp?ID=1622" rel="nofollow - 54 Atom /diaries/details.asp?ID=2179" rel="nofollow - 77 Tique 64 X55 Dunphy Keep it original, Pete < |
Posted By: nates78ski
Date Posted: November-14-2008 at 3:38pm
|
wait wait wait... you just 'found' an old mahogany canoe under your cottage?! how sweet is that?! All we've found at ours is re-rod & glass...
Nate ------------- Nathan http://correctcraftfan.com/diaries/details.asp?ID=1463&sort=&pagenum=3&yrstart=1978&yrend=1978" rel="nofollow - My '78 Ski Nautique <a href="http://photobucket.com/Nates78ski" rel="nofoll |
Posted By: nates78ski
Date Posted: November-14-2008 at 3:40pm
|
also, you sure it was Mahogany? That's an odd choice for a canoe...
Nate ------------- Nathan http://correctcraftfan.com/diaries/details.asp?ID=1463&sort=&pagenum=3&yrstart=1978&yrend=1978" rel="nofollow - My '78 Ski Nautique <a href="http://photobucket.com/Nates78ski" rel="nofoll |
Posted By: 75 stang
Date Posted: November-14-2008 at 4:21pm
|
Its about a 16' Old Town canoe. the interior appears to be all mahogany with a painted fiber coating on the exterior. We knew there was a couple things under there last fall when we bought it but just got around to pulling them out and cleaning them up. Im really a 'glass boat kinda guy but I'm trying to get into the retro wood thing here. The remodel last winter kind of went cottage retro in the face of the megadollar homes being built around us.
|
Posted By: 8122pbrainard
Date Posted: November-14-2008 at 7:18pm
|
Sean,
It's cedar ------------- /diaries/details.asp?ID=1622" rel="nofollow - 54 Atom /diaries/details.asp?ID=2179" rel="nofollow - 77 Tique 64 X55 Dunphy Keep it original, Pete < |
Posted By: nates78ski
Date Posted: November-15-2008 at 3:30am
|
that's what I was thinking Pete. Lift it...how heavy is it? If it's real easy to pick up, it's Cedar. Cedar's pretty much the standard wood for canoes & kayaks, with mahogany being used just for trim work. My kayak I built a couple years back is all cedar with Ash & Mahogany trim.
Nate ------------- Nathan http://correctcraftfan.com/diaries/details.asp?ID=1463&sort=&pagenum=3&yrstart=1978&yrend=1978" rel="nofollow - My '78 Ski Nautique <a href="http://photobucket.com/Nates78ski" rel="nofoll |
Posted By: 75 stang
Date Posted: November-15-2008 at 4:01pm
| I will sand it a little and give it a sniff but its brutally heavy and very dark in color, but as I said earlier, Im a welder... |
Posted By: 8122pbrainard
Date Posted: November-15-2008 at 6:59pm
|
Sean,
Is there a name plate on it that states it's a Old Town? Is it canvas covered? Is there a model # on it? It will not be aromatic cedar. Most likely eastern white cedar. Very little smell unless you are doing some heavy planing/sawing. ------------- /diaries/details.asp?ID=1622" rel="nofollow - 54 Atom /diaries/details.asp?ID=2179" rel="nofollow - 77 Tique 64 X55 Dunphy Keep it original, Pete < |
Posted By: 75 stang
Date Posted: November-16-2008 at 2:05pm
| There is an "old towne" brand name on it and I believe a "Scout" model. Not sure what the covering is yet, maybe canvas and "dope" like we used to use on model airplanes but it did not look quite like that. I hope to bring it home after thanksgiving and look it over a little more. |
Posted By: 8122pbrainard
Date Posted: November-16-2008 at 6:35pm
|
Canoes as well as small row/fishing boats made with the canvas covering a wood hull are referred to as "baggies". The coating on the canvas was specifically designed for these boats. It was more like a thinned down bedding compound. The first coat was troweled on and then second and third thinned down coats were brushed on. Light sanding and then paint.
I was working at Watercraft Sales when a customer brought in a small 12' baggie row boat he wanted me to restore. This was about 1969 and we looked for a source of the canvas and the coating without success. One of our mechanics at the time was also into airplanes and he suggested putting on airplane fabric and doping it. Well, after much work with the hull, I did use the airplane fabric. That thing was beautiful and was the lightest 12' row boat I'd ever seen! One stroke of the oars and it seemed to move like 30 feet. The customer was overjoyed! He picked it up, took it home and that very night, the boat was stolen! Someone was watching!!! ------------- /diaries/details.asp?ID=1622" rel="nofollow - 54 Atom /diaries/details.asp?ID=2179" rel="nofollow - 77 Tique 64 X55 Dunphy Keep it original, Pete < |
Posted By: Brady
Date Posted: November-17-2008 at 9:48am
|
Pete
Was it Tom Bins who recommended the airplane fabric and dope? can't remember if he was there then. ------------- Charlie Three Lakes, Wisconsin 69 Barracuda |
Posted By: 75 stang
Date Posted: November-24-2008 at 1:06pm
|
Im getting ready to start treating the stringers and such with the ceps before we lay in the first layers of plywood. I want to paint the hard to reach places gray while i have the bottom open. What are you using for bildge paint? ------------- Take your work seriously, not yourself. http://s133.photobucket.com/albums/q70/Bigblockbandit/Lake%20and%20boats/ - Boat Pics |
Posted By: Behl
Date Posted: November-25-2008 at 2:00am
|
I used Interlux Bildge paint ------------- Steve in Indy http://correctcraftfan.com/diaries/details.asp?ID=1702&sort=&pagenum=1&yrstart=1976&yrend=1980" rel="nofollow - Redone 1977 Ski Tique |
Posted By: 8122pbrainard
Date Posted: November-25-2008 at 8:15am
|
Sean,
No on the Interlux Bilgecoat. It's a gloss finish designed primarily for fiberglass. Most of the Chris's used the burgandy color. Some odd models and pre WWII used the gray. It's a low gloss penetrating finish. Take a look at http://www.woodenboatshop.com/wbs/products.asp?cID=110 - private lable bilge paint Chris's were at least consistent and actually used a bilge paint like most wood boat bilders did. Now, with wood Correct Crafts, I've seen enough of them to know they would through all their left over paints and solvent washes in a bucket and call it "bilge" paint!!! My Atom is a mix of green and gray!! Are you hard glueing (epoxy) or using 5200 on the new bottom? ------------- /diaries/details.asp?ID=1622" rel="nofollow - 54 Atom /diaries/details.asp?ID=2179" rel="nofollow - 77 Tique 64 X55 Dunphy Keep it original, Pete < |
Posted By: 75 stang
Date Posted: November-25-2008 at 10:16am
|
The chris is grey below the floor and some burgandy above the floor.
The bottom is going to be bedded in the 5200. If we get sealer and some paint on, i hope to lay the plywood next week. I'm really looking forward to turning the corner on this project and starting to make noticeable progress. I need to read the next chapter in the book this week to make sure i'm headed in the right direction. Thanks ------------- Take your work seriously, not yourself. http://s133.photobucket.com/albums/q70/Bigblockbandit/Lake%20and%20boats/ - Boat Pics |
Posted By: 8122pbrainard
Date Posted: November-25-2008 at 10:24am
That's real odd!! Well, maybe because it was one of the very last boats out the door, they were running low on bilge paint and used both colors! ------------- /diaries/details.asp?ID=1622" rel="nofollow - 54 Atom /diaries/details.asp?ID=2179" rel="nofollow - 77 Tique 64 X55 Dunphy Keep it original, Pete < |
Posted By: 75 stang
Date Posted: November-25-2008 at 12:00pm
|
The seats were a variety of burgandy, it may have been to match in those areas, its not complete from the water line up sort of painting.
Thanks for the tip on the the wooden boat shop, they were very helpful onthe paint and some other concerns I had. ------------- Take your work seriously, not yourself. http://s133.photobucket.com/albums/q70/Bigblockbandit/Lake%20and%20boats/ - Boat Pics |
Posted By: 8122pbrainard
Date Posted: November-25-2008 at 12:39pm
Some of the hull sides show? Aren't the cockpit sides covered with upholstered panels? ------------- /diaries/details.asp?ID=1622" rel="nofollow - 54 Atom /diaries/details.asp?ID=2179" rel="nofollow - 77 Tique 64 X55 Dunphy Keep it original, Pete < |
Posted By: 75 stang
Date Posted: November-25-2008 at 4:42pm
|
A lot of it is covered, after looking at the pics again it appears most is gray but a couple of the upright frames were painted burgandy, probably where the pannels stopped. i would have a much better idea how it went together, if I were the one who took it apart... ------------- Take your work seriously, not yourself. http://s133.photobucket.com/albums/q70/Bigblockbandit/Lake%20and%20boats/ - Boat Pics |
Posted By: 75 stang
Date Posted: December-01-2008 at 10:43am
|
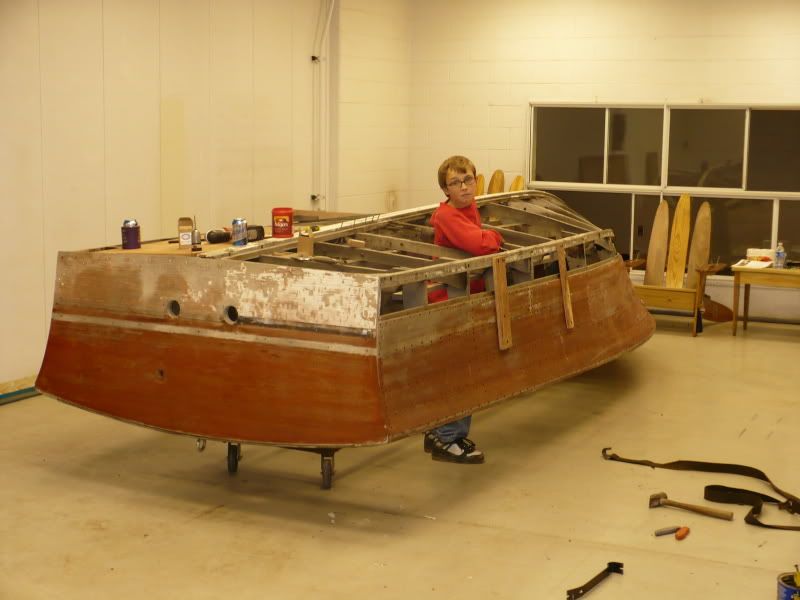
After spending a while at thanksgiving talking to my wifes Dad about the old Chris it appears it is a "skier" model. That is why the deck was covered in vinyl instead of finished wood. If it had been ordered as a super sport it would have had a better looking wood and interior package. I need to find some sales literature from 68 and do some more research.
On the correct craft side, he also told me quite a few stories about the Meloon boys and some of the overpowered wood boats they used to bring out to the lake and test flog. Sounded like quite an interesting period... ------------- Take your work seriously, not yourself. http://s133.photobucket.com/albums/q70/Bigblockbandit/Lake%20and%20boats/ - Boat Pics |
Posted By: 75 stang
Date Posted: December-10-2008 at 12:52pm
|
Since I started this project there has been much debate at to the year of this boat. Everyone I talk to starts with they quite making those in 67. Enough so that I have been seeking more info about the production that year. After talking with Jack at the Wooden Boat Shop, he was able to confirm that it was in fact a 68. I got the following from him this morning...
Hi Sean, In 1968 Chris Craft made three models They where a 17ft. (your boat) SS Ski Boat, a 17ft. Grand Prix of which they made 50, and a 20ft. Grand Prix of which they made 35. The two Grand Prix models had mahogany decks. They made the Super Sport models from 1963 thru 1967 in 17, 18, 20 and 21 ft. models. Jack He also said they only made 10 of the ski boats that year. with a little luck we will start putting on the plywood bottom layer tonight and start planking over that next week. ------------- Take your work seriously, not yourself. http://s133.photobucket.com/albums/q70/Bigblockbandit/Lake%20and%20boats/ - Boat Pics |
Posted By: 8122pbrainard
Date Posted: December-10-2008 at 1:31pm
|
Sean,
Make sure you get some pictures posted when you get some of the ply down. I'm sure it will be of interest to many here that have never seen the process of doing a bottom on a wood boat. Have you requested the build sheet copy from the Chris registry? Usually very detailed in exactly how the boat was built. Interesting on the 68 model year. In my previous post and using Speltz's book as a reference I mentioned that 68's were all glass. I wonder if your hull was made in 67, held over in inventory and sold as a 68. Ether way, you have one of the very last!! The buid sheet will tell all. ------------- /diaries/details.asp?ID=1622" rel="nofollow - 54 Atom /diaries/details.asp?ID=2179" rel="nofollow - 77 Tique 64 X55 Dunphy Keep it original, Pete < |
Posted By: 75 stang
Date Posted: December-10-2008 at 5:40pm
|
As of this point in time, I have only seen it in pictures! After tonight I should have some valuable experience and few less tubes of 5200 lying around...
I have not contacted the registry yet, every time i dive into the chris site it wants a membership that i just have not been in the mood to give yet. ------------- Take your work seriously, not yourself. http://s133.photobucket.com/albums/q70/Bigblockbandit/Lake%20and%20boats/ - Boat Pics |
Posted By: 75 stang
Date Posted: December-12-2008 at 10:36am
|
Pete, I have run into a quandary of sorts as I get ready to plank.
reading Danenburgs book I need to soak the planks for 2 weeks then steam and apply. Talking with Jack Mccarthy, you should steam and install them without soaking. The CEPS is supposed to keep the boards from swelling once installed. Both of these guys seem pretty well informed but have a pretty fundamental difference in the approach. What is your take? Ive been reading other forums all morning and am not finding a consensus yet... ------------- Take your work seriously, not yourself. http://s133.photobucket.com/albums/q70/Bigblockbandit/Lake%20and%20boats/ - Boat Pics |
Posted By: 8122pbrainard
Date Posted: December-12-2008 at 11:04am
|
Sean,
I've never soaked and just steamed. I don't see the logic in soaking ether. The steam is simply a means of heat transfer. It's really the heat that softens the lignums in the wood allowing it to flex. It's the reason you need to bend before it cools. Of course getting the plank on before cooling is always a problem. Maybe soaking will allow for more time. You are using the old planks correct? They should be pretty much pre bent. Steam only the end with the bend and fasten that end first. Have you been to Don's web site? Ask him the direct question in his forum. ------------- /diaries/details.asp?ID=1622" rel="nofollow - 54 Atom /diaries/details.asp?ID=2179" rel="nofollow - 77 Tique 64 X55 Dunphy Keep it original, Pete < |
Posted By: 75 stang
Date Posted: December-12-2008 at 11:14am
|
I'm using all new wood on the bottom and sides. The sides are splitting with the grain probably from sitting dry for so long.
I have not spent much time on Dons site, for whatever reason I feel a little intimidated there as a novice. I fully expect the response, "you bought the book right? Read it again." I found a rather interesting article from a Boat club in southern ohio that had Don and Jack as guests debating methods, did not sound like they came to any agreement... Maybe im just getting into one of those areas where everyone has a different opinion. Having not done this before, and not wanting to do it again i'm spending more time researching than doing... ------------- Take your work seriously, not yourself. http://s133.photobucket.com/albums/q70/Bigblockbandit/Lake%20and%20boats/ - Boat Pics |
Posted By: 8122pbrainard
Date Posted: December-12-2008 at 11:24am
That's funny you mentioned this - I was just comming back to post a warning to you. If posting the question to Don, you should include the fact that you do have his book and have read it!!! I too have noticed that he does get pissed at times. He doesn't like to hear someone doesn't have the book! I hope you do have some extra wood. Bending wood really is a process that has a large "learning curve". Start with the simple bends it get comfortable. ------------- /diaries/details.asp?ID=1622" rel="nofollow - 54 Atom /diaries/details.asp?ID=2179" rel="nofollow - 77 Tique 64 X55 Dunphy Keep it original, Pete < |
Posted By: Terp
Date Posted: December-12-2008 at 2:35pm
Yes, please do! Also guys, a couple of questions... What website are you speaking of? Would Danenburg's book be of help for me restoring the '64 Atom? |
Posted By: 75 stang
Date Posted: December-12-2008 at 2:41pm
|
The book is not specific to one brand of boat so yes it would be worth the read. I picked it up on Amizon. I think i read the bottom on the Atom is done differently but most types of construction are addressed somewhere in the book. ------------- Take your work seriously, not yourself. http://s133.photobucket.com/albums/q70/Bigblockbandit/Lake%20and%20boats/ - Boat Pics |
Posted By: 75 stang
Date Posted: December-13-2008 at 2:55pm
|
I went a pulled out the boxes of guages this morning so i could send them out for refacing. Thats going to be the wifes birthday/valentines day present. Gotta love a gal that appriciates a good present!
Anyway she was giving me hell about rebuilding her 283 and how i better not have done anything to change the sound of the motor... The hour meter reads 957 hours. It was in nice shape yet but it was definatly time to freshen it up while it was out. ------------- Take your work seriously, not yourself. http://s133.photobucket.com/albums/q70/Bigblockbandit/Lake%20and%20boats/ - Boat Pics |
Posted By: SNobsessed
Date Posted: December-13-2008 at 7:33pm
|
[QUOTE=75 stang]
Anyway she was giving me hell about rebuilding her 283 and how i better not have done anything to change the sound of the motor... QUOTE] Now there's a CCFemale! ------------- “Beer is proof that God loves us and wants us to be happy.” Ben Franklin |
Posted By: 8122pbrainard
Date Posted: December-13-2008 at 7:58pm
Sean, Watch out! Jbear will want pictures of her next or has he already asked you!!! ------------- /diaries/details.asp?ID=1622" rel="nofollow - 54 Atom /diaries/details.asp?ID=2179" rel="nofollow - 77 Tique 64 X55 Dunphy Keep it original, Pete < |
Posted By: 75 stang
Date Posted: December-14-2008 at 1:56pm
Asked and answered... She does like them to talk! I even put flowmasters and an H pipe on her Mustang GT ------------- Take your work seriously, not yourself. http://s133.photobucket.com/albums/q70/Bigblockbandit/Lake%20and%20boats/ - Boat Pics |
Posted By: 75 stang
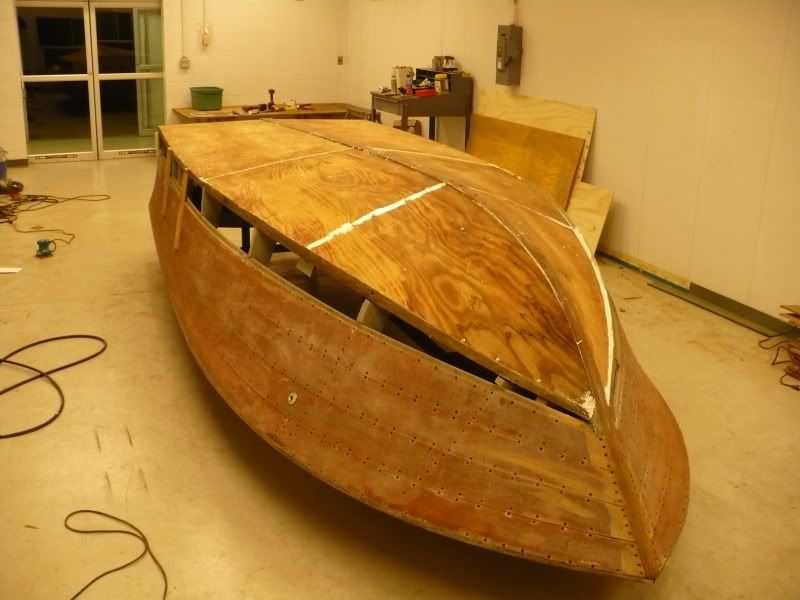
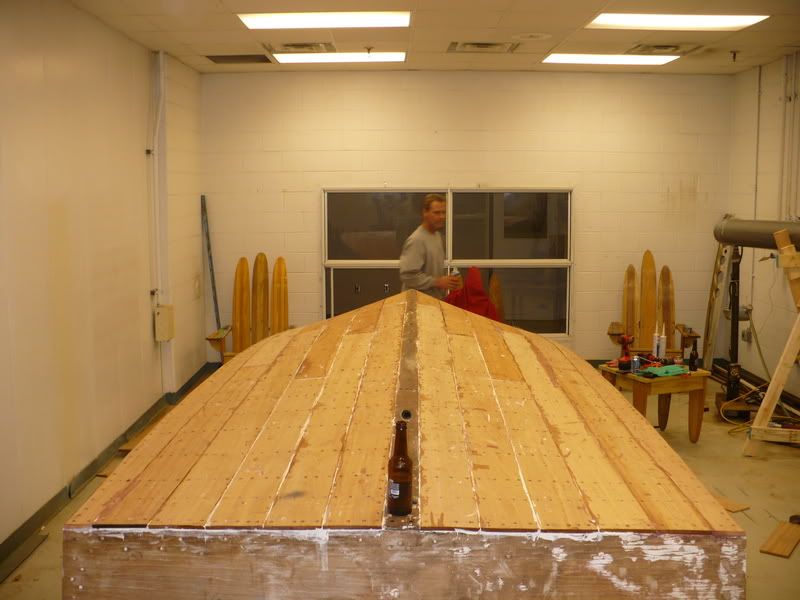
Date Posted: December-15-2008 at 10:53am
I put the ply on last night, first experiance with the white 5200. Looks a little like Sunday morning at the Brothel but it should not leak and from what ive read ought to strengthen it a bunch. With a little luck i should start steaming planks tomorrow and dry fitting the bottom. ill stop in today and catch up the pics since i forgot the camera yesterday... ------------- Take your work seriously, not yourself. http://s133.photobucket.com/albums/q70/Bigblockbandit/Lake%20and%20boats/ - Boat Pics |
Posted By: 75 stang
Date Posted: December-15-2008 at 12:29pm

 ------------- Take your work seriously, not yourself. http://s133.photobucket.com/albums/q70/Bigblockbandit/Lake%20and%20boats/ - Boat Pics |
Posted By: 75 stang
Date Posted: December-22-2008 at 11:23am
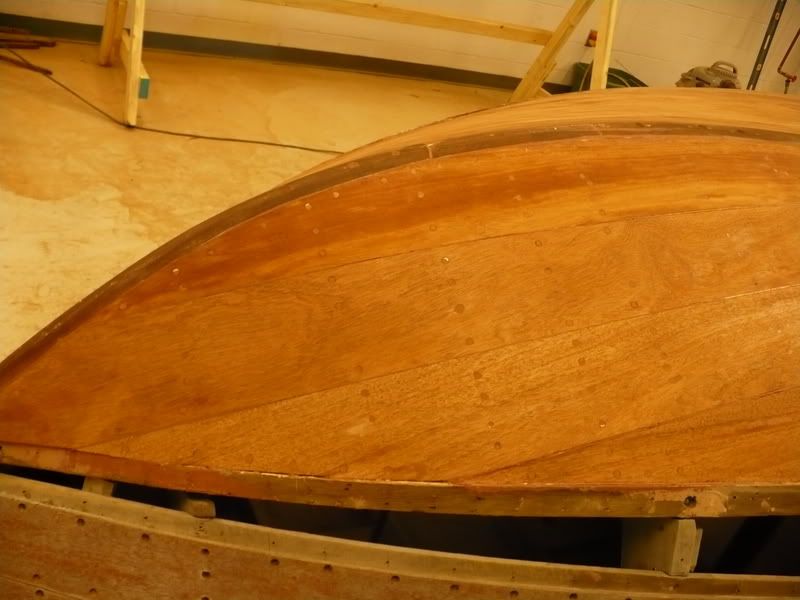
I spent the miserably cold Sunday in the warm shop learning how to fit and steam boards. I was able to get all but the outside row fit and fastened, dry fit, last night. With a little luck next weekend i will remove them, bed them in the 5200 and attach the bottom planking for the final time.

 ------------- Take your work seriously, not yourself. http://s133.photobucket.com/albums/q70/Bigblockbandit/Lake%20and%20boats/ - Boat Pics |
Posted By: h20loo
Date Posted: December-23-2008 at 1:28pm
|
I don't know which I like more- the nice clean work area or the craftmanship on the boat. The guys around me with clean shops never seem to produce. You're making progress AND have a clean shop.
Keep the pictures coming, I'm enjoying them. ------------- 70 Mustang project |
Posted By: 8122pbrainard
Date Posted: December-24-2008 at 8:56am
|
Sean,
Looking good!! I see you got the steam bending figured out. I'm glad to see you're not fitting the bottom planking tight. Did you go with Danenbergs soaking method before steaming? Without directly asking him, the only advantage I can think of with soaking is it would add some moisture to the wood so the steaming doesn't dry it out as much. It also may swell the wood slightly in dry conditions giving you truer to usage fit between the planking but that's a crap shoot. I'd rather go with a moisture meter. ------------- /diaries/details.asp?ID=1622" rel="nofollow - 54 Atom /diaries/details.asp?ID=2179" rel="nofollow - 77 Tique 64 X55 Dunphy Keep it original, Pete < |
Posted By: eric lavine
Date Posted: December-25-2008 at 12:47pm
|
Pete, I think I cursed myself last week, I ended up stranded on the freeway the otherday and i thought about the comments i made.....its one of those i shouldve done it myself cause the knucklehead that works for us broke the plastic clip on the throttle body and didnt tell me....thank god for zipties the problem was i had to call a friend for a flashlight...it was 10 frickin degrees ------------- "the things you own will start to own you" |
Posted By: SNobsessed
Date Posted: December-25-2008 at 4:02pm
Eric - show your employee (or Ex-employee) this saying, author unknown: It's easier to do the job right than to explain to your boss why you didn't . . . ------------- “Beer is proof that God loves us and wants us to be happy.” Ben Franklin |
Posted By: eric lavine
Date Posted: December-26-2008 at 10:04am
|
nature of the beast snob, they come back from lunch with the red eye syndrome and giggling, I told them the other day if you ever get hurt here Ill make em piss test you and workers comp wont cover your a-s ------------- "the things you own will start to own you" |
Posted By: 75 stang
Date Posted: December-30-2008 at 1:00am
|
The soaking is to add the moisture back into the boards. I did not do it on the bottom given the gap between boards and the 5200 between them. I may decide to soak the side boards a little once i establish the moisture content in them prior to the cpes.
We took the bottom all off again tonight and will seal them tomorrow and start the final install wed morning. Hopefully by the end of thursday it will start looking like a finished bottom...minus the paint. ------------- Take your work seriously, not yourself. http://s133.photobucket.com/albums/q70/Bigblockbandit/Lake%20and%20boats/ - Boat Pics |
Posted By: eric lavine
Date Posted: December-30-2008 at 10:22am
|
Sean, besides all the whacky comments I post, I read every word and look at every picture and I have to say that your a soldier, and your project is coming along and I am learning as you go. Im still trying to figure out that contraption on the horses ------------- "the things you own will start to own you" |
Posted By: SNobsessed
Date Posted: December-30-2008 at 10:56am
|
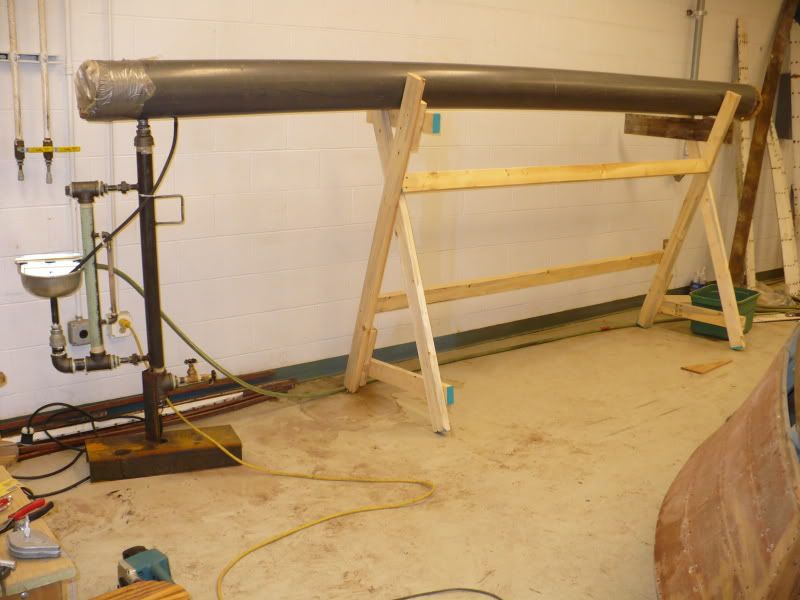
Sean - Me too on the contraption - what are you using as a steam source? ------------- “Beer is proof that God loves us and wants us to be happy.” Ben Franklin |
Posted By: 75 stang
Date Posted: December-30-2008 at 12:10pm
|
I built a steam generator out of a piece of 2" pipe with a 220 volt water heater element in it. That is a Danenburg design, i added a livestock self filling watering device to keep the water level up. I took a 12" pvc pipe and fit it over the top of the generator to trap the steam. You put the boards in the tube to keep them warm, it also doubles as a humidifier and heater inthe shop...
I think i can use the wood pipe stand for an old skool wakeboard tower when I'm done!
Im getting the beer and 5200 around today while I seal everything with the CPES so we can install the bottom tomorrow. More pictures coming. I'm learing to tig weld this morning, building a custom dry sump oil tank for another project then back to the wood. Id still rather weld any day than work with wood... ------------- Take your work seriously, not yourself. http://s133.photobucket.com/albums/q70/Bigblockbandit/Lake%20and%20boats/ - Boat Pics |
Posted By: 86BFN
Date Posted: December-30-2008 at 8:45pm
Sean that's awesome. Looks like a great hobby.  You'll be the envey of the lake when finished! You'll be the envey of the lake when finished!------------- 👣 Steve http://www.correctcraftfan.com/diaries/details.asp?ID=4057&sort=&pagenum=1&yrstart=1986&yrend=1986" rel="nofollow - 86 Barefoot Nautique 89 Martinique Former Owner: 93 Hydrodyne 350 MAG |
Posted By: 75 stang
Date Posted: December-31-2008 at 11:32am
|
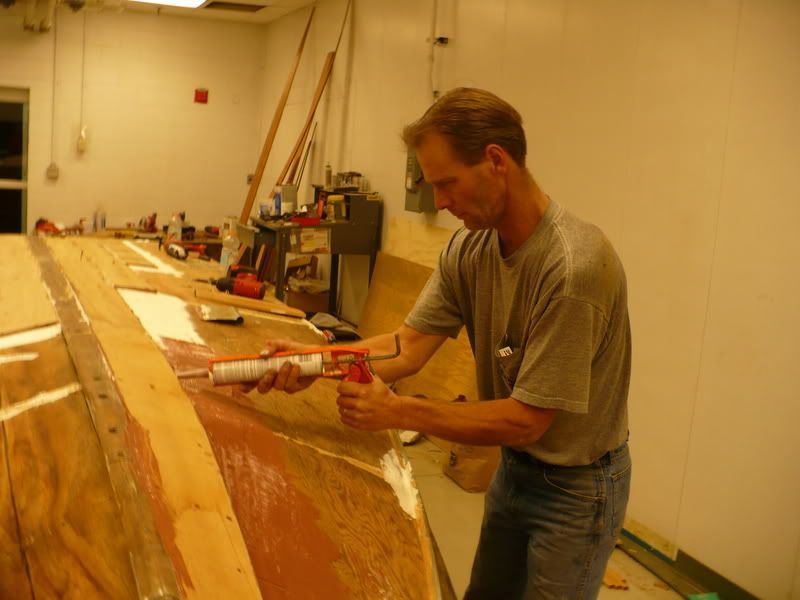
Im off to caulk the bottom, pictures will follow tonight or tomorrow if its late...
made me think of this skit from SNL...http://www.youtube.com/watch?v=Ag6ZLSW_dD8 ------------- Take your work seriously, not yourself. http://s133.photobucket.com/albums/q70/Bigblockbandit/Lake%20and%20boats/ - Boat Pics |
Posted By: 75 stang
Date Posted: December-31-2008 at 9:02pm

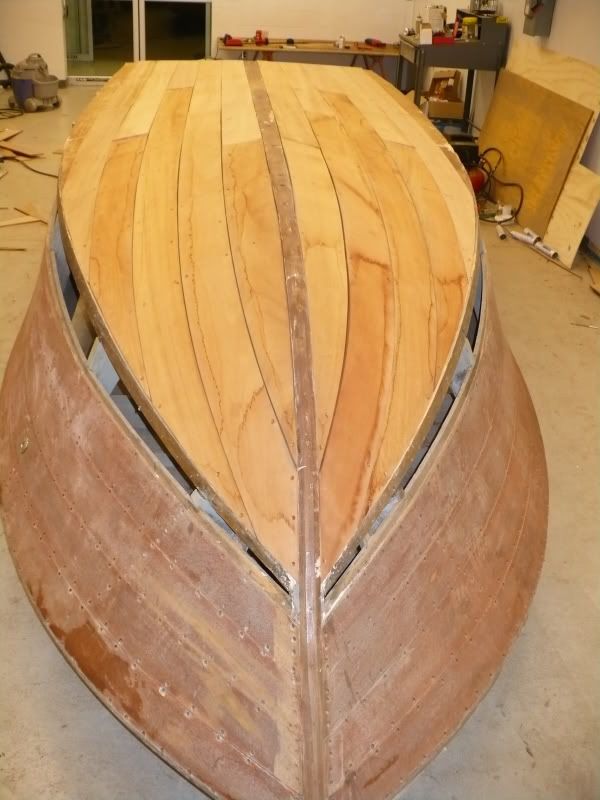
I got the bottom on before the end of the year, that was the goal. I need to start filling screw holes with famowood friday and get it ready to sand and paint but the worst should be behind us now. the sides look much easier. its 6pm and I am headed home for a shower and out to ring in the new year. There are a few more pics on the photobucket site in the sig, but not much more. Later ------------- Take your work seriously, not yourself. http://s133.photobucket.com/albums/q70/Bigblockbandit/Lake%20and%20boats/ - Boat Pics |
Posted By: 75 stang
Date Posted: January-01-2009 at 2:12pm
|
Morning and a happy 08 to ya! I did one more thing last night after the pics, in dannenburgs book he recomends wetting the bottom before leaving to swell the boards a little and set them into the 5200. I went back this morning to look and was amazed at how much they swelled and oozed 5200 out of all the seams. up to 1/2" in some spots! Ill leave it covered today and wet to help the process then uncover and start the triming and fairing this weekend.
It was a solid 8 hours to put the bottom on and screw it off with 2 and sometimes 3 of us working on it. I really hope 09 sees the completion of this project... ------------- Take your work seriously, not yourself. http://s133.photobucket.com/albums/q70/Bigblockbandit/Lake%20and%20boats/ - Boat Pics |
Posted By: SNobsessed
Date Posted: January-01-2009 at 3:43pm
|
75 - What Craftsmanship! Just imagine what it would cost to pay someone to do this for you. They probably wouldn't do as good of job either.
No offense Eric! ------------- “Beer is proof that God loves us and wants us to be happy.” Ben Franklin |
Posted By: eric lavine
Date Posted: January-01-2009 at 4:46pm
|
your not hurting my feelings, when its a hobby the hours dont matter. I qouted a guy 7000.00 to do a complete transom job, I qouted high cause the rot was going around the corners and to try to avoid the job...the guy said OK, the boat finished wasnt worth 7k and I gulped and backed out politely. ends up through the marine repair place that had me qoute it told me the guy did finally have it repaired from a guy in his backyard at his leisure and said he did a beautiful job, charged him 800.00.
I guess the point is time is money and when its a hobby time doesnt matter. ------------- "the things you own will start to own you" |
Posted By: 75 stang
Date Posted: January-01-2009 at 4:57pm
|
Dannenburg wanted $7500 to put the bottom on to the point it is right now plus materials, Jack at the wooden boat shop said probably 60k to finish the whole boat. Its a terrible investment in a boat that wont bring 12k in top shape, but its family... ------------- Take your work seriously, not yourself. http://s133.photobucket.com/albums/q70/Bigblockbandit/Lake%20and%20boats/ - Boat Pics |
Posted By: eric lavine
Date Posted: January-01-2009 at 9:27pm
|
I completely understand Sean, dont look at it as a poor investment, look at it as therapy and the end result of something that you did with your hands. Im sitting here thinking of my hobbies and the hobbies i use to like doing turned into work....maybe thats why i babble so much on the computer. ------------- "the things you own will start to own you" |
Posted By: 86BFN
Date Posted: January-01-2009 at 10:17pm
|
Eric, old saying "find a job you like and you'll never have to work a day in you life".
Now, I think that's getting a little carried away, but you know what I mean. I like my job but there a some days I'd rather be elsewhere. ------------- 👣 Steve http://www.correctcraftfan.com/diaries/details.asp?ID=4057&sort=&pagenum=1&yrstart=1986&yrend=1986" rel="nofollow - 86 Barefoot Nautique 89 Martinique Former Owner: 93 Hydrodyne 350 MAG |
Posted By: jbear
Date Posted: January-01-2009 at 11:56pm
|
What do you do Steve, if ya don't mind me asking...
Sean; I am always so impressed by the work some of you guys on here take on. So interesting watching the progress thru the pictures..thanks for taking the time and trouble to share with us guys. john ------------- "Loud pipes save lives" AdamT sez "I'm Canadian and a beaver lover myself"... |
Posted By: 81nautique
Date Posted: January-02-2009 at 1:41am
|
Sean, I've been following your progress and so far it looks textbook perfect. I was about to ask if you wet it down and covered in plastic overnite and you beat me to it.
FYI, In the packet of info I got with the Hurricane was a quote from a Kentucky boat restorer for $28,000 for LABOR only to remove and refasten the bottom and refinish the sides of the boat. That included zip for materials, 5200, screws, cpes, varnish or any wood that was found that needed replacement. Then throw in rechrome, rebuilding the engine, interior,assembly,etc. Thats why these things are only feasible if you can do the work yourself. ------------- You can’t change the wind but you can adjust your sails |
Posted By: eric lavine
Date Posted: January-02-2009 at 3:21pm
|
Alan, the guy might of said go ahead and fix, I always use the old addage, if you do 9 dollar oil changes you'll get 9 dollar people, if you do 100 dollar oil changes....
nice to see you got it first, its in the right hands ------------- "the things you own will start to own you" |
Posted By: 86BFN
Date Posted: January-02-2009 at 3:43pm
|
75 the project looks Awesome.
Jbear, I'm a manf. engineer for an Automotive supplier in NW Ohio. Lucky for me we don't supply to the big3. They stopped buying domestic parts long ago. LOL 
Steve ------------- 👣 Steve http://www.correctcraftfan.com/diaries/details.asp?ID=4057&sort=&pagenum=1&yrstart=1986&yrend=1986" rel="nofollow - 86 Barefoot Nautique 89 Martinique Former Owner: 93 Hydrodyne 350 MAG |
Posted By: 75 stang
Date Posted: January-02-2009 at 4:29pm
|
Steve,
There are not very many Honda suppliers over in this corner of Ohio, do you work for Kamco? ------------- Take your work seriously, not yourself. http://s133.photobucket.com/albums/q70/Bigblockbandit/Lake%20and%20boats/ - Boat Pics |
Posted By: 86BFN
Date Posted: January-02-2009 at 6:53pm
|
No Sean, I work in Paulding, OH. @ Orr Co.
Steve ------------- 👣 Steve http://www.correctcraftfan.com/diaries/details.asp?ID=4057&sort=&pagenum=1&yrstart=1986&yrend=1986" rel="nofollow - 86 Barefoot Nautique 89 Martinique Former Owner: 93 Hydrodyne 350 MAG |
Posted By: 75 stang
Date Posted: January-02-2009 at 7:13pm
|
Gotcha, I'm not as familiar with the industry down in the Paulding area. ------------- Take your work seriously, not yourself. http://s133.photobucket.com/albums/q70/Bigblockbandit/Lake%20and%20boats/ - Boat Pics |
Posted By: 75 stang
Date Posted: January-08-2009 at 6:45pm
|
I just got the gauges back from Kocian Instruments. I had Dale restore them and they look incredible! Im a long way from that end of the boat right now but I like to think ahead. ------------- Take your work seriously, not yourself. http://s133.photobucket.com/albums/q70/Bigblockbandit/Lake%20and%20boats/ - Boat Pics |
Posted By: 75 stang
Date Posted: February-03-2009 at 11:28pm
|
30 days since we finished laying the bottom, its nearly ready to paint. With another burst of energy the sanding and filling should be done this weekend. Ive been slowly collecting more screws, 5200 and mahogany to start the blitz on the sides this month. The goal at this point is to finish the bottom and sides by the end of March and flip this thing back over and move on to the easier parts. Should have a few new pics next week once the bottom is CPES coated and there is a noticeable difference in the look. ------------- Take your work seriously, not yourself. http://s133.photobucket.com/albums/q70/Bigblockbandit/Lake%20and%20boats/ - Boat Pics |
Posted By: 86BFN
Date Posted: February-04-2009 at 12:03am
|
Sean, Looking forward to the pictures!
Steve ------------- 👣 Steve http://www.correctcraftfan.com/diaries/details.asp?ID=4057&sort=&pagenum=1&yrstart=1986&yrend=1986" rel="nofollow - 86 Barefoot Nautique 89 Martinique Former Owner: 93 Hydrodyne 350 MAG |
Posted By: 75 stang
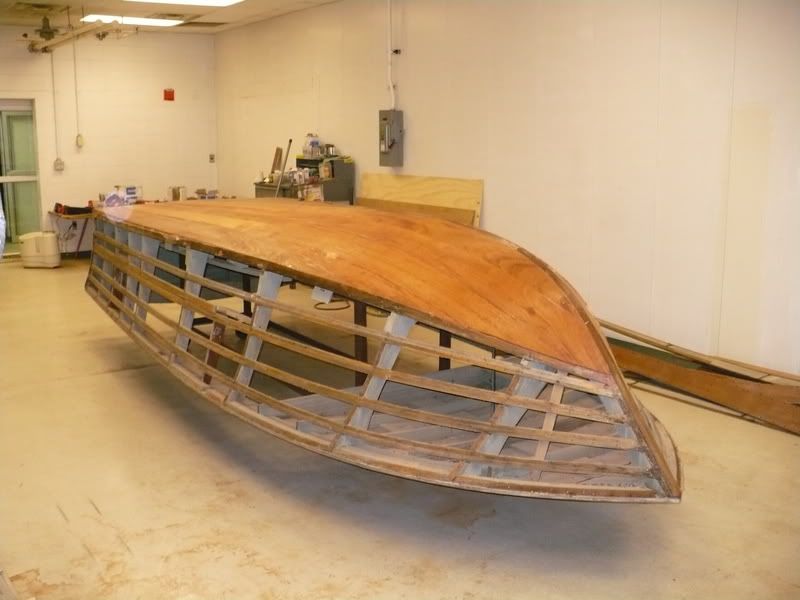
Date Posted: February-08-2009 at 11:33pm


This weekends work. Bottom sanded, holes plugged and sealed with CPES. Its almost a shame to paint the bottom. We start on the sides this week ------------- Take your work seriously, not yourself. http://s133.photobucket.com/albums/q70/Bigblockbandit/Lake%20and%20boats/ - Boat Pics |
Posted By: 75 stang
Date Posted: February-12-2009 at 5:03pm
 ------------- Take your work seriously, not yourself. http://s133.photobucket.com/albums/q70/Bigblockbandit/Lake%20and%20boats/ - Boat Pics |
Posted By: 86BFN
Date Posted: February-26-2009 at 9:32pm
Any updates  It's been a couple weeks. The weather is starting to break! It's been a couple weeks. The weather is starting to break! ------------- 👣 Steve http://www.correctcraftfan.com/diaries/details.asp?ID=4057&sort=&pagenum=1&yrstart=1986&yrend=1986" rel="nofollow - 86 Barefoot Nautique 89 Martinique Former Owner: 93 Hydrodyne 350 MAG |
Posted By: 75 stang
Date Posted: February-27-2009 at 11:28am
|
Nothing noteworthy, been replacing the cracked side strips, and generally procrastinating on starting the sides, the bends, and fit have to be better than the bottom and we have been trying to get comfortable starting on it. I had to go to Toledo 2 weeks ago and get more Mahogany, the first row of wood on the bottom was wider than the boards we have on hand.
We have looked, read and argued about it for a couple weeks now, its time to crack open a few beers and dig in again now that the pinewood derby and space race are over and I have my evenings and weekends opening up again. The goal is to have it flipped over by spring and be working the top side finally. If things don't pick up around the shop here I may have a lot of time to work on it during the day too... ------------- Take your work seriously, not yourself. http://s133.photobucket.com/albums/q70/Bigblockbandit/Lake%20and%20boats/ - Boat Pics |
Posted By: nates78ski
Date Posted: February-27-2009 at 11:31am
|
Sean, Where in Toledo did you go to get your mahogany? I live in Rossford (suburb of Toledo.
Nate ------------- Nathan http://correctcraftfan.com/diaries/details.asp?ID=1463&sort=&pagenum=3&yrstart=1978&yrend=1978" rel="nofollow - My '78 Ski Nautique <a href="http://photobucket.com/Nates78ski" rel="nofoll |
Posted By: 75 stang
Date Posted: February-27-2009 at 11:45am
|
Kencraft on N westwood ave. Has been my wood supplier for this project, I'm straight west of Toledo about 40 miles so its the closest supplier I could find.
------------- Take your work seriously, not yourself. http://s133.photobucket.com/albums/q70/Bigblockbandit/Lake%20and%20boats/ - Boat Pics |
Posted By: 75 stang
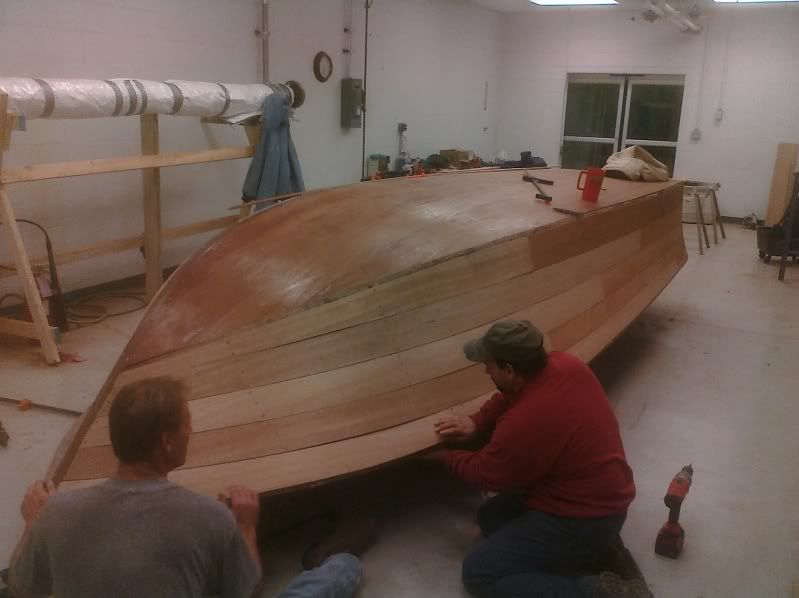
Date Posted: March-02-2009 at 12:06am
After replacing cracked strips and pluggin' holes we are ready to start fitting and steaming the side boards this week. ------------- Take your work seriously, not yourself. http://s133.photobucket.com/albums/q70/Bigblockbandit/Lake%20and%20boats/ - Boat Pics |
Posted By: 75 stang
Date Posted: March-19-2009 at 3:56pm
|
Lack of progress report, after learning that the side boards are 5-7 inches wide but cut from 9" boards to make the curve around the bow... just got back from Charlott michigan with $600 worth of new mahogany to try again at a restart on the sides. ------------- Take your work seriously, not yourself. http://s133.photobucket.com/albums/q70/Bigblockbandit/Lake%20and%20boats/ - Boat Pics |
Posted By: 75 stang
Date Posted: December-01-2009 at 11:46am
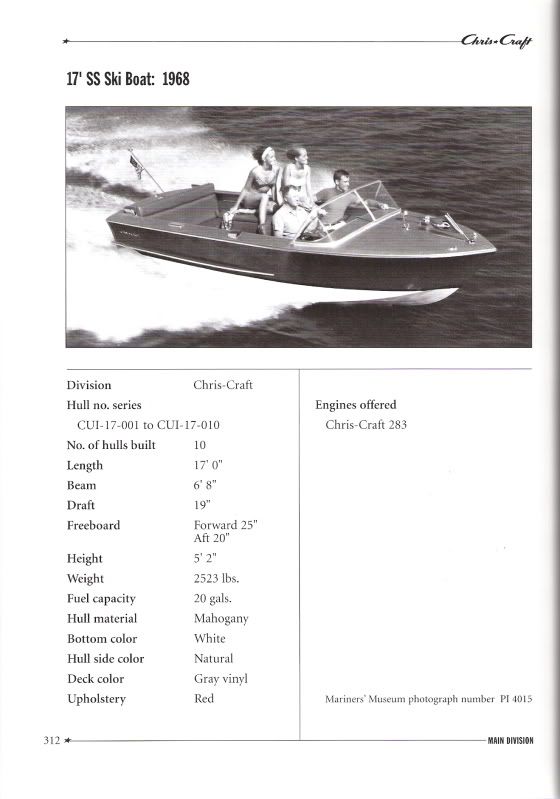
I scanned this from the essentials of Chris Craft. This is the exact model and year I have been working on. Says they only made 10 in 68 and 50 of the grand prix models, same boat but much nicer with a wood topside instead of the covered deck. Thanksgiving is over, the cottage is winterized and the bottom was finished last winter so tomorrow Im going to start on the sides and see if I cant get this thing flipped abck over and start on the more fun side before winter is over... ------------- Take your work seriously, not yourself. http://s133.photobucket.com/albums/q70/Bigblockbandit/Lake%20and%20boats/ - Boat Pics |
Posted By: Fl Inboards
Date Posted: December-01-2009 at 1:20pm
|
Nice!
When it is all finnished you can classify it as floating furniture,,,LOL!!! Wood boats are a lot of work however at the end, the satisfaction feeling is beyond description. ------------- Hobby Boats can be expensive when the hobbyist is limited on their own skill and expertise. 1993 Shamrock "fat" 20. 2008 Nautique 196 5.0 |
Posted By: 75 stang
Date Posted: December-04-2009 at 7:42pm
Busy week back to work prefitting the side boards before we start sealing them and bedding them in 5200, hopefully next weekend we can make a push to screw down the sides for the final time if all goes well this weekend and next week.

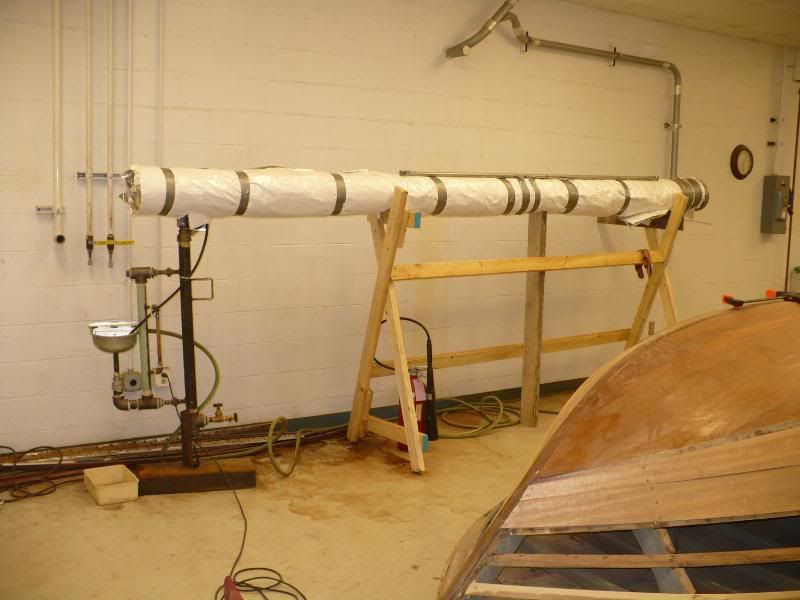
A full picture of the board steamer I concocted. ------------- Take your work seriously, not yourself. http://s133.photobucket.com/albums/q70/Bigblockbandit/Lake%20and%20boats/ - Boat Pics |
Posted By: 8122pbrainard
Date Posted: December-05-2009 at 7:40pm
|
Sean,
Looking great. I'm sure you'll be happy the day you get it back on the water. looks like the steamer is working out. Of course you're past the tough ones. The bottom planks are usually tighter bends. I too had to do some steaming today but they were just short pieces of molding (chair rail and fake raised paneling molding) on the outside curved wall on my staircase. I sure didn't need to go as elaborate and have used this method before. A capped off piece of pipe or in this case a piece of 3" conduit with a plate welded onto the end. Just tilting it so the water stays in the bottom 6" keeps it simple. There's a internal rack to keep the wood off the bottom and out of the water. I'd better go put the gas grill back together. My wife wants me to put something on the grill tomorrow!!  ------------- /diaries/details.asp?ID=1622" rel="nofollow - 54 Atom /diaries/details.asp?ID=2179" rel="nofollow - 77 Tique 64 X55 Dunphy Keep it original, Pete < |
Posted By: 75 stang
Date Posted: December-06-2009 at 6:16pm
|
That looks more like a steam powered potato cannon sort of thing youd see on myth busters. neat idea. ------------- Take your work seriously, not yourself. http://s133.photobucket.com/albums/q70/Bigblockbandit/Lake%20and%20boats/ - Boat Pics |
Posted By: 75 stang
Date Posted: December-08-2009 at 5:26pm
 ------------- Take your work seriously, not yourself. http://s133.photobucket.com/albums/q70/Bigblockbandit/Lake%20and%20boats/ - Boat Pics |
Posted By: 75 stang
Date Posted: January-08-2010 at 12:30pm
|
Pulled all the sides back off last night and CPES coated the backs and but seams. Now that the snow is plowed, I think i am boing to go down to the shop with a case of 5200 and get thoses sides on for the last time. I really want to get this thing flipped so i can start on the home stretch.
I took the wifes camera/video setup this morning so we ought to have some fresh progress pics up this weekend. Hop eit goes well , cause this part shows! ------------- Take your work seriously, not yourself. http://s133.photobucket.com/albums/q70/Bigblockbandit/Lake%20and%20boats/ - Boat Pics |
Posted By: 75 stang
Date Posted: January-08-2010 at 8:51pm


A full day in but its almost done. I need to make a couple more boards for the front, they cracked onthe pre fit but everything else went well today and its all bedded in mahogony 5200 and should be as water tight as a glass boat and a lot stronger than it was before. we have to go back and remove the screws and countersink them and install the plugs before starting the sanding. then it will be on to stain and bottom paint i hope so we can flip this sucker! ------------- Take your work seriously, not yourself. http://s133.photobucket.com/albums/q70/Bigblockbandit/Lake%20and%20boats/ - Boat Pics |
Posted By: 8122pbrainard
Date Posted: January-09-2010 at 10:07am
|
Sean,
Have you been wiping down the planks with a solvent as they are set in the 5200? I'm asking because of the large color difference between planks. Be careful if you are using a solvent as it will dilute the 5200 and allow it to penetrate deeper into the wood which will affect the wood ability to take a stain. I know you will be sanding but you may not be able to sand deep enough. BTW, I highly recommend Dannenburg's method of using CPES after the filler stain to seal and stabilize the surface. It's a fantastic primer for the varnish too. Skip the first coat of 50/50 reduced varnish and go with a 25/75 reduction for the first coat. Then no reduction. ------------- /diaries/details.asp?ID=1622" rel="nofollow - 54 Atom /diaries/details.asp?ID=2179" rel="nofollow - 77 Tique 64 X55 Dunphy Keep it original, Pete < |
Posted By: 75 stang
Date Posted: January-09-2010 at 11:49am
|
No solvents, and there is no cCPES on the out board sides. I sealed the inner and the butt joints and left the face bare as per Danenbergs recommendations. The color difference is due to a screw up I made early on in the project. When i ordered the mahogany i measured the boards and counted them. when we started figuring out how it went together we discovered we needed wider boards to cut the highly curved boards out of. The wider boards had to come from a different supplier and thus are a different shade, the lighter ones.
It looks like we are going to have to bleach the darkest ones above the water line to lighten them up then stain them to match. Not ideal but its what i have to work with. Hopefully it all works out, because i dont really want to do this again. I plan to CPES over the stain and I try the 27/75 thanks for the tip. Got a lot more countersinking and plugging to do but im looking forward to painting the bottom and getting the varnish on. Then we can flip it and decide what to do with the top side. The grand prix model was so much prettier with the white interior and wood deck, its very tempting to upgrade and loose the vinyl deck... Thanks for the tips Pete ------------- Take your work seriously, not yourself. http://s133.photobucket.com/albums/q70/Bigblockbandit/Lake%20and%20boats/ - Boat Pics |
Posted By: 75 stang
Date Posted: January-09-2010 at 1:06pm
http://s133.photobucket.com/albums/q70/Bigblockbandit/Lake%20and%20boats/?action=view¤t=SANY0140.flv">
just playing around with the camera, did a walk around in video mode and leaned how to post it to photobucket. I learn something new about the internet everytime i try something new. I did not even have to call the kids in to help... ------------- Take your work seriously, not yourself. http://s133.photobucket.com/albums/q70/Bigblockbandit/Lake%20and%20boats/ - Boat Pics |
Posted By: 8122pbrainard
Date Posted: January-09-2010 at 2:50pm
|
Sean,
Now I remember you having to go with two batches of wood. Always seems to be something comming up when tearing into a wood boat!!! It's going to be tough to match all the planks even with bleaching. Use one of the two part bleaches first and hopefully you won't need to go all the way with Clorox. I have had to when the wood bleach didn't remove all the color. The darker planks may need several treatments. It will be hard to keep the bleach from migrating to the lighter planks so after the darks, you'll need to do the whole boat several times. Then, cross your fingers that the filler stain will take to the different wood evenly. Don't try to "paint" the boat to even the color out with the filler stain as it's worse than some mismatched plank colors. A "painted" hull with the filler stain is one of the first things the judges including myself look at. ------------- /diaries/details.asp?ID=1622" rel="nofollow - 54 Atom /diaries/details.asp?ID=2179" rel="nofollow - 77 Tique 64 X55 Dunphy Keep it original, Pete < |
Posted By: 75 stang
Date Posted: January-09-2010 at 4:19pm
|
Judges?! Thats optimistic! I need to mark out the water line, the bottom board should be pretty much covered in paint, the upper ones are going to be much more difficult. Probably should have bleached the boards before installing them i guess but im a welder not a woodworker, never thought much about color. I think i saved the tails of the darker boards to do some testing. Hopefully it does not end up looking like a zebra or a pinstripe suit with the 5200 in the seams showing to badly ------------- Take your work seriously, not yourself. http://s133.photobucket.com/albums/q70/Bigblockbandit/Lake%20and%20boats/ - Boat Pics |
Posted By: 75 stang
Date Posted: January-25-2010 at 12:31pm
|
I spent the entire afternoon yesterday screwing, I finally got around to pulling the temporary screws and countersinking and final screwing the boards. We got one side done yesterday and hope to do the other one this week. Then we can start ont he plugging, sanding and bleaching.
Progress is kind of slow this winter, mostly lacking ambition this winter. I need to get myself motivated before spring gets here. ------------- Take your work seriously, not yourself. http://s133.photobucket.com/albums/q70/Bigblockbandit/Lake%20and%20boats/ - Boat Pics |
Posted By: 8122pbrainard
Date Posted: January-25-2010 at 12:42pm
|
Sean,
Do you have a plug cutter and does it match (same manufacturer) the counter bore/sink you're using? Have you tried the fit yet. I'm asking because they aren't the most precise things around. I've found that different makes don't always match!! What are you planning to use to secure the plugs? The old method was to dip them in varnish. 5200 is the current method. Don't use epoxy as it will seal the area around the plug preventing the wood from taking a stain there. A small dab of 5200 inside the hole to hold it is best. If there are any gaps in the hole/plug the filler stain will take care of them. ------------- /diaries/details.asp?ID=1622" rel="nofollow - 54 Atom /diaries/details.asp?ID=2179" rel="nofollow - 77 Tique 64 X55 Dunphy Keep it original, Pete < |
Posted By: 75 stang
Date Posted: January-25-2010 at 12:51pm
|
I have not picked up a plug cutter yet, Jack sent me up a bag of plugs to play around with but so far everything i did is famowood below the waterline. we have been debating on buyinh more plugs or cutting them here.
we were debatin the glue yesterday. Titebond was the thought though we really have not dug into the options to deeply yet. Did not think about the 5200 there... ------------- Take your work seriously, not yourself. http://s133.photobucket.com/albums/q70/Bigblockbandit/Lake%20and%20boats/ - Boat Pics |