 Boats For Sale:


My "New" Project Boat |
Post Reply 
|
Page <1 456 |
| Author | |||
TRBenj 
Grand Poobah 

Joined: June-29-2005 Location: NWCT Status: Offline Points: 21136 |
 Post Options Post Options
") Thanks(0) Thanks(0)
 Quote Reply Quote Reply
 Posted: February-05-2010 at 12:45pm Posted: February-05-2010 at 12:45pm |
||
Brian, you probably caught this, but for anyone else reading- the secondaries need to be built out at the front end of the exhaust pockets. This narrows the pockets up and allows for the motorbox to cover the pockets completely. Ive seen boats that did not build the pockets up and had visible gaps with the box closed. I would definitely leave the last foot in back unfloored... no need for it back there and that will give you complete access to all transom hardware (notably the platform bracket bolts). If youre considering drains, I assume youre not refoaming? Looks like youre doing a bang up job! |
|||
 |
|||
|
akabulla
Gold Member 

Joined: November-15-2008 Location: United States Status: Offline Points: 649 |
Post Options
Thanks(0)
Quote Reply
Posted: February-05-2010 at 1:48pm |
||
|
I agree with Tim!
I would leave the back open. I didn't and wish I did! When I mounted my platform brackets I used bolts all the way through. I had to raise the bracket just a touch so I could get to the nuts for the bolts for the top of my outside brackets so it would be above the floor. I still had to use lags on the bottom which if I would have left my floor open I could have used bolts on the top and bottom. I also replaced all the wood in my transom so I won't have to worry about it for a while but if I ever have to replace that wood for the outside brackets, I will have to cut my floor out to get to it. I covered everything in CPES and Epoxy so it should last 20+ years but you never know! |
|||
|
|||
|
bkhallpass
Grand Poobah

Joined: March-29-2005 Location: United States Status: Offline Points: 4723 |
Post Options
Thanks(0)
Quote Reply
Posted: February-05-2010 at 1:55pm |
||
|
On mine, there is insufficient room to use through bolts on the bottom of the platform brackets. However, inthe original construction, the lags came through the backing and into the foam. This was yest another possible source of water intrusion into the foam. There is a more significant obstacle in that the Through bolts will be very close to the stringer. I can make it work but need to be careful. I am replacing the wood in the transom witht he exception of the large lifting ring block, and the two small blocks which merely provided a place to mount the speedo tubes (whatever they are called). I will probably leave the back foot or so open. I've seen an early matercraft witth the platform sheered of, and it was a real pain to cut up the floor to get access to fix it. BKH
|
|||
|
Livin' the Dream
|
|||
|
|||
|
akabulla
Gold Member
Joined: November-15-2008 Location: United States Status: Offline Points: 649 |
Post Options
Thanks(0)
Quote Reply
Posted: February-05-2010 at 2:11pm |
||
|
I filled in my old bracket holes on the outside and moved them a little so they weren't so close to the stringers. I also replaced my brackets with removable brackets so I could fit the boat in the garage. I replaced all the wood in the back except the smaller blocks in the top. Not sure what they were for. I also didn't use pitots for the speedo. I replaced my speedo with an electronic GPS driven one. It was two less holes going through my transom. This is what mine looked like right before I painted it. You can see the floor goes all the way to the back which if I did it again it wouldn't.

Are you foaming? |
|||
|
|||
|
akabulla
Gold Member
Joined: November-15-2008 Location: United States Status: Offline Points: 649 |
Post Options
Thanks(0)
Quote Reply
Posted: February-05-2010 at 2:20pm |
||
|
Another thing I did was build a battery box that holds two batteries. While you have the floor out you should consider doing it. It fits pretty well. You have to move the forward bulk head a little but two will fit and building the box out of a mold and glass isn't to hard. Let me know if you want to see some pictures of how to build it and see the fit in the bow and I will post them. It is a nice to have feature! I also ran a tube from the box up to the foam box under the bow so I could wire future amps right off the batteries to under the bow.
|
|||
|
|||
|
TRBenj
Grand Poobah
Joined: June-29-2005 Location: NWCT Status: Offline Points: 21136 |
Post Options
Thanks(0)
Quote Reply
Posted: February-05-2010 at 2:33pm |
||
Brian, insufficient room in which direction? |
|||
|
|||
|
bkhallpass
Grand Poobah
Joined: March-29-2005 Location: United States Status: Offline Points: 4723 |
Post Options
Thanks(0)
Quote Reply
Posted: February-05-2010 at 4:30pm |
||
|
AKA,
I've been tossing around idea of dual batteries. With beefed up structure, two batteries, possible amp, possible sub, possible heater, that's a lot of weight getting to bow of boat. Have not decided yet. Yes, I will foam. Tim, the lowest screw on the platform brackets come through the hull too close the bottom of the boat. Insufficient room to get a nut and washer there. BKH |
|||
|
Livin' the Dream
|
|||
|
|||
|
akabulla
Gold Member
Joined: November-15-2008 Location: United States Status: Offline Points: 649 |
Post Options
Thanks(0)
Quote Reply
Posted: February-05-2010 at 5:06pm |
||
|
that was why I raised my platform a touch. So I could get bolts on the bottom bracket. IT only puts the platform about 1" off the water.
Here are some pictures of my battery setup: mold covered in wax paper: 
First layer of mat: 
Removing it from the mold: 
test fit: 
Final look 
All glassed in right before bilge paint: 
Finally carpeted and wired with one battery ready for number two: 
"IF" I ever sell the boat I think it is a big selling point to show you have two batteries. just my 2 cents! |
|||
|
|||
|
nautique frk
Platinum Member

Joined: February-16-2004 Location: United States Status: Offline Points: 1784 |
Post Options
Thanks(0)
Quote Reply
Posted: February-05-2010 at 5:23pm |
||
|
Wow that is really a good idea !! nice work !!
|
|||
|
|||
|
TRBenj
Grand Poobah
Joined: June-29-2005 Location: NWCT Status: Offline Points: 21136 |
Post Options
Thanks(0)
Quote Reply
Posted: February-05-2010 at 11:22pm |
||
Too close to get just a nut on there? If not, Id recommend grinding a fender washer flat on the bottom side. Anything through bolted would be superior to a lag. |
|||
|
|||
|
akabulla
Gold Member
Joined: November-15-2008 Location: United States Status: Offline Points: 649 |
Post Options
Thanks(0)
Quote Reply
Posted: February-06-2010 at 12:47am |
||
|
I saw someone took a piece of steel and tapped it out in the locations of the bolts. Then they epoxied it to the inside of the transom and then when they needed to remove the brackets they just removed the bolts from the outside and never needed to put a wrench on the inside to hold the nuts.
I also saw someone do something simliar but instead of tapping the steel they welded the nuts to the steel. I guess either way it accomplishes the same thing. I guess the nuts welded to the steel would give you more threads than tapping a piece of steel. |
|||
|
|||
|
8122pbrainard
Grand Poobah

Joined: September-14-2006 Location: Three Lakes Wi. Status: Offline Points: 41040 |
Post Options
Thanks(0)
Quote Reply
Posted: February-06-2010 at 11:17am |
||
Nice idea but I'd recommend stainless however not glassing it in for corrosion issues just incase water does get to it. Create a flat surface with glassed in ply and then the plate would just sit on top of it. Location of the plate can be maintained with a couple emall screws from the inside. |
|||
|
|||
|
bkhallpass
Grand Poobah
Joined: March-29-2005 Location: United States Status: Offline Points: 4723 |
Post Options
Thanks(0)
Quote Reply
Posted: May-14-2010 at 3:25pm |
||
|
Continuing on the longest stringer job ever recorded here at CCfan (now almost 3.5 years
 ) I bedded the main stringers, filleted, and have applied 2, 4, and 8" tape to each side. Pictures aren't too exciting at this point, but I'll post some this weekend. ) I bedded the main stringers, filleted, and have applied 2, 4, and 8" tape to each side. Pictures aren't too exciting at this point, but I'll post some this weekend.
Last night I saw my first example of amine blush. All surfaces just feel a bit damp and slippery. More viscous than water, but not really oily. I didn't see any white spots or blotches as is sometimes reported. Lots of people have asked how you will know amine blush. I can now answer from first hand experience, you'll know it if you have it. It's pretty obvious to the touch. BKH |
|||
|
Livin' the Dream
|
|||
|
|||
|
jbenbri
Groupie 
Joined: November-11-2004 Location: United States Status: Offline Points: 54 |
Post Options
Thanks(0)
Quote Reply
Posted: May-14-2010 at 7:13pm |
||
|
Hey BKH,
If you terminate the floor short of the transom, how will you terminate it? Piece of wood and glass? Very interested in doing this to mine. |
|||
|
|||
|
bkhallpass
Grand Poobah
Joined: March-29-2005 Location: United States Status: Offline Points: 4723 |
Post Options
Thanks(0)
Quote Reply
Posted: May-14-2010 at 7:24pm |
||
|
I am putting foam back in the floor of my boat. I will just stop the foam a foot or so short of the transom. I will probably just use a piece of cardboard taped in place to hold the foam back when pouring, and then just glass over the foam to the floor.
I debated putting in a wooden rib - it would not be that hard. I think I've decided against it. One, it's not necessary. Two, ribs, particularly ribs with go to the outside gunnel on these boats are not the best idea. The boats flex a bit. This is ok for the stringers which run the length of the boat. However, if a rib is butted up against the outside wall of the boat, it's a source of gel cracking under flexion. Joe in NY is fairly experienced with this and talked me through pros and cons of adding a rib. BKH |
|||
|
Livin' the Dream
|
|||
|
|||
|
Okie Boarder
Gold Member
Joined: August-31-2009 Location: OK Status: Offline Points: 779 |
Post Options
Thanks(0)
Quote Reply
Posted: May-14-2010 at 7:26pm |
||
|
Looks good! I just browsed through the pages kinda scanning the write ups and the pictures. I didn't realize you've been at this so long.
|
|||
|
|||
|
bkhallpass
Grand Poobah
Joined: March-29-2005 Location: United States Status: Offline Points: 4723 |
Post Options
Thanks(0)
Quote Reply
Posted: May-14-2010 at 8:11pm |
||
|
Okie, bought this when my daughter was two months old. Had lots of time when all she did was sleep 20 hours per day. Then, next thing you know she's running around, "daddy, daddy, daddy" and poof, there goes your time. Add in a job, and the rest of life and you know how it goes.
Luckily this is just a hobby for me. I have a perfectly good boat sitting at the dock. I've learned a lot about boats by taking this one apart. It doesn't matter if it's perfect, and it does not matter when it is done. Some day I want to rebuild a classic from the 60s. Thought I'd practice on something a little less rare. BKH |
|||
|
Livin' the Dream
|
|||
|
|||
|
Okie Boarder
Gold Member
Joined: August-31-2009 Location: OK Status: Offline Points: 779 |
Post Options
Thanks(0)
Quote Reply
Posted: May-14-2010 at 8:32pm |
||
|
You know, after doing mine, I'm thinking the same thing. Something older might be fun sometime down the road.
|
|||
|
|||
|
akabulla
Gold Member
Joined: November-15-2008 Location: United States Status: Offline Points: 649 |
Post Options
Thanks(0)
Quote Reply
Posted: May-14-2010 at 8:47pm |
||
|
Just wrap a board in plastic and then after the foam sets it will come out easy cause the foam won't stick to the plastic.
|
|||
|
|||
|
Big Pappa
Senior Member 

Joined: March-08-2006 Location: United States Status: Offline Points: 322 |
Post Options
Thanks(0)
Quote Reply
Posted: May-20-2010 at 7:16pm |
||
|
Nice to see I am not the only one with a drawn out stringer build.
 Granted I do not have another boat though. Not that I have had time to go to the lake anyway. I have been several times with friends when I could go so I have not been totally dry. Granted I do not have another boat though. Not that I have had time to go to the lake anyway. I have been several times with friends when I could go so I have not been totally dry.
How old is your little girl? Mine is 5 and wants to help daddy as well. It is tough when dealing with fiberglass though, do not want to deal with her itching from the glass!! 
|
|||
|
|||
|
bkhallpass
Grand Poobah
Joined: March-29-2005 Location: United States Status: Offline Points: 4723 |
Post Options
Thanks(0)
Quote Reply
Posted: May-20-2010 at 7:26pm |
||
|
Well pappa, we don't use the other boat enough, and there is no excuse. I live on the water. Boat is on a lift in the backyard. And I haven't been working for 4 months. Go Figure. I guess I'll use the excuse it's still raining here in CA.
My girl is 3 and a half. Yes, she follows me around everywhere, and seems particularly interested in my attention when I'm under the bow or transom covered in epoxy resin 
I finished glassing in all six transom pieces this morning. Kills my back and knees to lean over while under the transom to apply the glass. Got the first wrap on one main stringer. Goal is to have both mains wrapped by Saturday, and bed the secondaries on Sunday. We shall see. I could do the job more quickly, but I generally let one section dry before doing another otherwise I find myself stepping or laying in wet resin. |
|||
|
Livin' the Dream
|
|||
|
|||
|
BuffaloBFN
Grand Poobah

Joined: June-24-2007 Location: Gainesville,GA Status: Offline Points: 6094 |
Post Options
Thanks(0)
Quote Reply
Posted: May-20-2010 at 10:04pm |
||
Brian, I trashed my favorite pair of firehose pants like that. Got some new ones for Christmas, but they still aren't the same.
FWIW-When you're all set up to lay a layer of glass, you're 3/4's of the way to laying 3 or more. I found that the resin to 'wet out' 1 piece/layer would almost do the next. You'll save some epoxy by soaking potential runs into the next AND you'll maintain the chemical bond. |
|||
|
|||
|
bkhallpass
Grand Poobah
Joined: March-29-2005 Location: United States Status: Offline Points: 4723 |
Post Options
Thanks(0)
Quote Reply
Posted: May-20-2010 at 10:22pm |
||
|
Thanks Greg,
Trying to get a couple layers applied where I can. It was pretty easy when applying the 2, 4, 8 tape at the base. Finding it a bit more difficult over the top of the stringers. As you know, a learning experience. I get better as I continue, and I think if I were to do another stringer job, it would go much better than the first. I'll get some pictures up this weekend. What are firehose pants? BKH |
|||
|
Livin' the Dream
|
|||
|
|||
|
BuffaloBFN
Grand Poobah
Joined: June-24-2007 Location: Gainesville,GA Status: Offline Points: 6094 |
Post Options
Thanks(0)
Quote Reply
Posted: May-20-2010 at 11:04pm |
||
Yep, that's the toughest part. On heavier materials that didn't want to act right I had to result to harsh language. Once the first layer is down though, let it start to get sticky and the rest will cooperate better.
I can't agree more on both points. I only have one stringer job under my belt and am by no means an expert. 2 or 3 more...  If I had another 88 BFN to do I could almost pre-cut the whole job. I'm hoping I can share something I learned towards the end of my curve before you get there. If I had another 88 BFN to do I could almost pre-cut the whole job. I'm hoping I can share something I learned towards the end of my curve before you get there.
Ahh...ancient American secret! Comfortable, tough as nails, and warm! For the Bay area...maybe not so much?
Duluth Trading |
|||
|
|||
|
bkhallpass
Grand Poobah
Joined: March-29-2005 Location: United States Status: Offline Points: 4723 |
Post Options
Thanks(0)
Quote Reply
Posted: May-20-2010 at 11:34pm |
||
|
Those pants are pretty cool. I may have to buy a pair of those. By the time I'm done with this project, my "work jeans" will all be toast. BKH
|
|||
|
Livin' the Dream
|
|||
|
|||
|
bkhallpass
Grand Poobah
Joined: March-29-2005 Location: United States Status: Offline Points: 4723 |
Post Options
Thanks(0)
Quote Reply
Posted: May-24-2010 at 8:48pm |
||
|
Made some progress over the weekend and this morning.
6 transom block in with 2 layers. Mains wrapped twice. Secondaries bedded, and 2" and 4" tape in. Need to wrap secondaries. 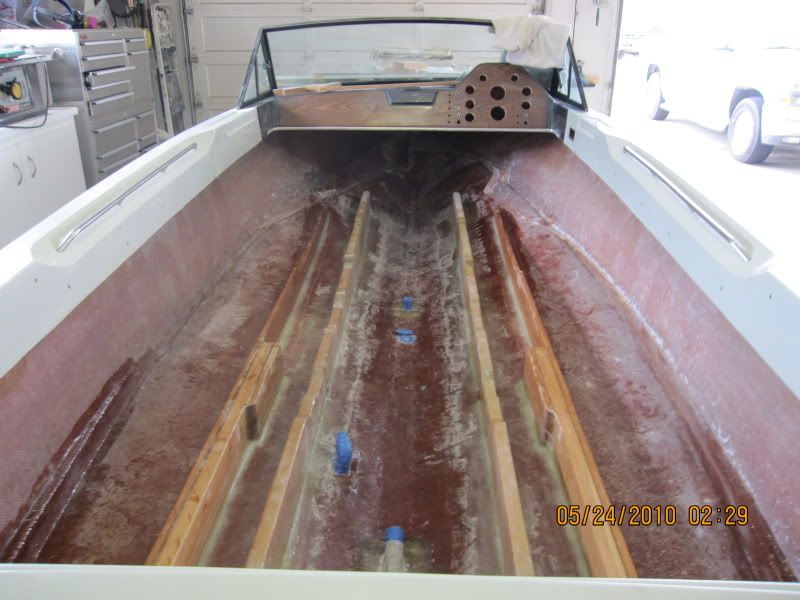
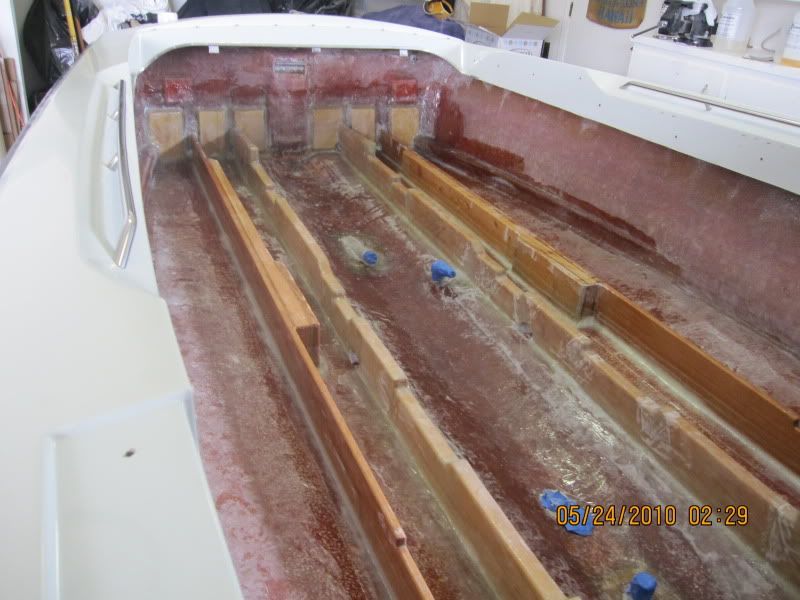
Details of the transom blocks. The orginals were so narrow that the swim platform lags were practically outside the blocking. I decided to do some shapping to the transom in order to get a wider block and a more solid piece of wood to mount the platform. I will use through bolts and washers. Hard to see from this photo. I drilled a 1.5" hole in the main and plugged it with chopped mat and resin. If I decide to mount the steering in the stringer, as original, I can drill the hole through the fiberglass plug instead of through wood. 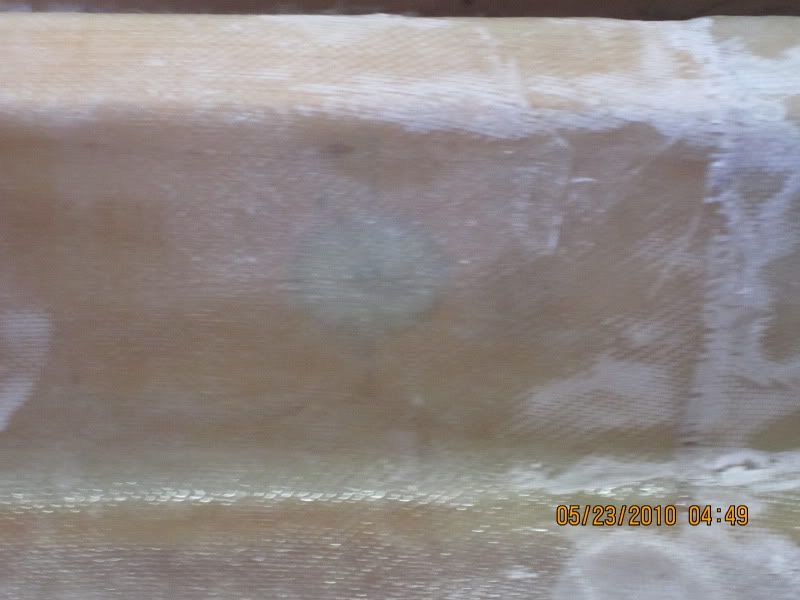
BKH |
|||
|
Livin' the Dream
|
|||
|
|||
|
8122pbrainard
Grand Poobah
Joined: September-14-2006 Location: Three Lakes Wi. Status: Offline Points: 41040 |
Post Options
Thanks(0)
Quote Reply
Posted: May-24-2010 at 10:45pm |
||
|
Brian,
Look'n good! Do you have any planned completion date - roughly? |
|||
|
|||
|
bkhallpass
Grand Poobah
Joined: March-29-2005 Location: United States Status: Offline Points: 4723 |
Post Options
Thanks(0)
Quote Reply
Posted: May-24-2010 at 11:11pm |
||
|
No planned completion date. Have a lot of time on my hands now, so making progress. When I go back to work, probably not so much. I have a lot of cosmetic work to do on the gel and paint. Have to make all the seats and coaming pads. Complete upholster. Engine ran three years ago when I took it out, but who knows. Trailer needs paint, wheels, and a crash pad. How about before my kid is old enough to drive. That gives me 12.5 years. BKH
|
|||
|
Livin' the Dream
|
|||
|
|||
|
RainDog
Platinum Member

Joined: February-21-2007 Location: Mke/Grn Lake WI Status: Offline Points: 1387 |
Post Options
Thanks(0)
Quote Reply
Posted: May-25-2010 at 1:04am |
||
|
Really nice work, Brian. Slow and steady will win many, many races.
I hope you are enjoying the process. |
|||
|
|||
|
Post Reply
|
Page <1 456 |
 Tweet
Tweet
|
| Forum Jump | Forum Permissions You cannot post new topics in this forum You cannot reply to topics in this forum You cannot delete your posts in this forum You cannot edit your posts in this forum You cannot create polls in this forum You cannot vote in polls in this forum |


 Topic Options
 bkhallpass wrote: