 Boats For Sale:


No stringer and boat pancakes |
Post Reply 
|
| Author | |
Fook_U 
Groupie 
Joined: May-31-2006 Location: United States Status: Offline Points: 49 |
 Post Options Post Options
") Thanks(0) Thanks(0)
 Quote Reply Quote Reply
 Topic: No stringer and boat pancakes Topic: No stringer and boat pancakesPosted: January-14-2008 at 12:30am |
|
I'm in the process of replaceing the stringers in my 87 2001. I currently have all of the stringers out and the floor is preped but the boats hull changes shape (pancakes). How can I support the boat so that I keep the orginal shape of the hull?
|
|
 |
|
|
TRBenj
Grand Poobah 

Joined: June-29-2005 Location: NWCT Status: Offline Points: 21109 |
Post Options
Thanks(0)
Quote Reply
Posted: January-14-2008 at 12:35am |
|
The best bet would have been to replace one stringer at a time so the hull never lost its shape... probably a little late for that now. Im sure you could put several strategically placed supports under the hull to push it back into position. As far as how you determine what the correct shape is, I have no idea.
Pete? |
|
|
|
|
Fook_U
Groupie
Joined: May-31-2006 Location: United States Status: Offline Points: 49 |
Post Options
Thanks(0)
Quote Reply
Posted: January-14-2008 at 1:19am |
|
If I pick up the stern the shape comes back. I can make a form for the stern but i'm not sure how to secure the bow with stands?
|
|
|
|
|
hasbeenskier
Platinum Member 

Joined: May-23-2005 Location: United States Status: Offline Points: 1116 |
Post Options
Thanks(0)
Quote Reply
Posted: January-14-2008 at 6:33am |
|
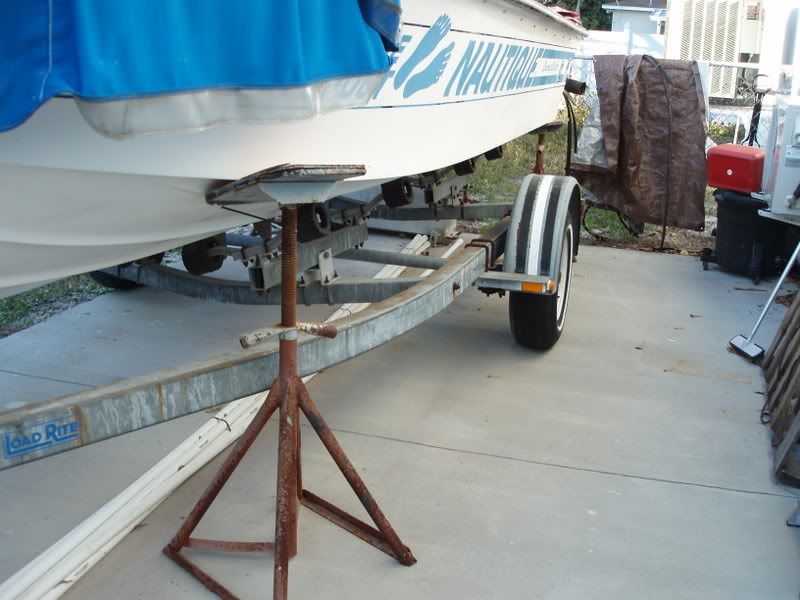
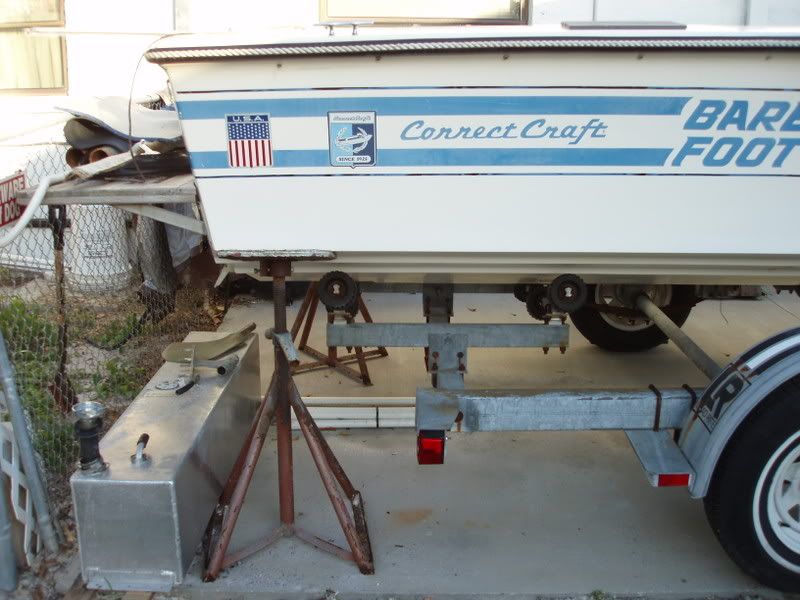
Boat stands or jack stands placed at the chines both forward and at the stern will allow the hull to take the intended shape.
bj |
|
|
hasbeenskier
|
|
|
|
|
8122pbrainard
Grand Poobah

Joined: September-14-2006 Location: Three Lakes Wi. Status: Offline Points: 41040 |
Post Options
Thanks(0)
Quote Reply
Posted: January-14-2008 at 7:31am |
|
Andy, How is the boat supported now? Do you have it laying on it's hull side bottom directly on the floor? I feel BJ's on the correct track. Support the rear bottom at the corners (2 spots at the transom). Then a single point under the keel about 3/4's of the way forward. Use a level to check the floor (garage) and then use the level again to check accross the gunnels to make sure there isn't a twist in the hull. The hull should "pop" back to its original shape. This 3 point support is also the recommended method for storage on any boat. Were the stringers and foam real wet? The hull really shouldn't be "oil canning" even when walking inside. Pictures?
|
|
|
|
|
eric lavine
Grand Poobah
Joined: August-13-2006 Location: United States Status: Offline Points: 13413 |
Post Options
Thanks(0)
Quote Reply
Posted: January-14-2008 at 10:16am |
|
he's fooked, this one is going to take some thought to get it straight, the boat real shouldnt have moved, i would think the best place other than the water would be on its trailer to try to regain its shape
|
|
|
"the things you own will start to own you"
|
|
|
|
|
8122pbrainard
Grand Poobah
Joined: September-14-2006 Location: Three Lakes Wi. Status: Offline Points: 41040 |
Post Options
Thanks(0)
Quote Reply
Posted: January-14-2008 at 11:53am |
|
Eric, The trailer may not be a good idea. The wishbone bunks on a trailer may be putting too much pressure on the bottom near where the engine sits. They like to support this spot on the trailer because of the weight of the engine. Without the stringers in place, this may be the problem. Andy did state that when he lifts the boats aft, the hulls shape changes.
|
|
|
|
|
eric lavine
Grand Poobah
Joined: August-13-2006 Location: United States Status: Offline Points: 13413 |
Post Options
Thanks(0)
Quote Reply
Posted: January-14-2008 at 11:56am |
|
i wonder if he sets it directly on the keel and balances the sides? of course with no pressure on the sides...
|
|
|
"the things you own will start to own you"
|
|
|
|
|
JoeinNY
Grand Poobah

Joined: October-19-2005 Location: United States Status: Offline Points: 5693 |
Post Options
Thanks(0)
Quote Reply
Posted: January-14-2008 at 12:05pm |
|
Lifting Hooks and Cables from above would be my solution
|
|
|
|
|
eric lavine
Grand Poobah
Joined: August-13-2006 Location: United States Status: Offline Points: 13413 |
Post Options
Thanks(0)
Quote Reply
Posted: January-14-2008 at 2:19pm |
|
i wonder how many spiders are coming to visit him
|
|
|
"the things you own will start to own you"
|
|
|
|
|
Fook_U
Groupie
Joined: May-31-2006 Location: United States Status: Offline Points: 49 |
Post Options
Thanks(0)
Quote Reply
Posted: January-17-2008 at 8:20pm |
|
I was thinking the boat stands would be the way to go. The "pancaking" is not that bad but I do not want this happening while I put the stringers in. As far as the spiders go, I do not see any new ones because of the stringers.
|
|
|
|
|
hasbeenskier
Platinum Member
Joined: May-23-2005 Location: United States Status: Offline Points: 1116 |
Post Options
Thanks(0)
Quote Reply
Posted: January-30-2008 at 9:51pm |
|
|
|
hasbeenskier
|
|
|
|
|
hasbeenskier
Platinum Member
Joined: May-23-2005 Location: United States Status: Offline Points: 1116 |
Post Options
Thanks(0)
Quote Reply
Posted: January-30-2008 at 9:52pm |
|
|
|
hasbeenskier
|
|
|
|
|
jbear
Grand Poobah

Joined: January-21-2005 Location: Lake Wales FL. Status: Offline Points: 8193 |
Post Options
Thanks(0)
Quote Reply
Posted: January-31-2008 at 12:21am |
|
Nice pictures BJ...but I don't see any blood drops in the area.
john |
|
|
"Loud pipes save lives"
AdamT sez "I'm Canadian and a beaver lover myself"... |
|
|
|
|
Fook_U
Groupie
Joined: May-31-2006 Location: United States Status: Offline Points: 49 |
Post Options
Thanks(0)
Quote Reply
Posted: July-13-2009 at 1:24am |
|
So, I have the boat on the stands finally (being a new dad and owning your own business cuts into boat repair time.) Hasbeen, I see that you have half of the forward stands plate off the boat? is this necessary or the location of the my forward stands okay?
Pete (well anyone), where on the boat do I check for level? (fore and aft, port to starboard) I tried using the old floor outline as a reference? Would this be a good reference? And finally, how can I verify that there is no twist in the boat? As for the spiders, yes I have a lot where the boat was resting on the trailer. I believe a new gel coat discussion will be in my future (after the floor is finally in.) 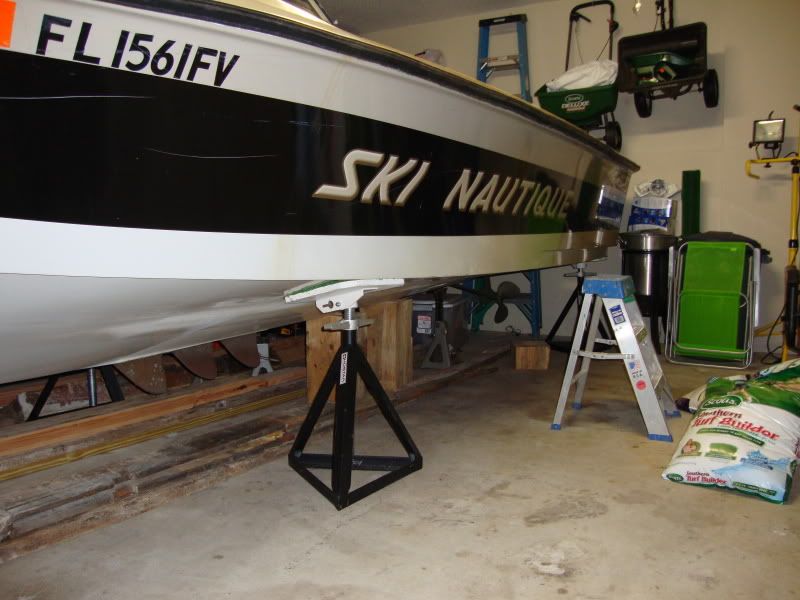
|
|
|
|
|
8122pbrainard
Grand Poobah
Joined: September-14-2006 Location: Three Lakes Wi. Status: Offline Points: 41040 |
Post Options
Thanks(0)
Quote Reply
Posted: July-13-2009 at 9:27am |
|
Andy,
For your stringers, it really doen't matter if the boat is level. Just follow the old floor/stringer height from the hull. For twist, you'll need to measure the four corners of the boat port to starboard. If your floor is level, you can measure to the aft chine side to side and the forward chine side to side about where the winshield is. If your floor isn't level you'll need to use a straight edge and level to determine the difference. I have heard of some using a water level which is tubing filled with water with a site glass on each end. |
|
|
|
|
hasbeenskier
Platinum Member
Joined: May-23-2005 Location: United States Status: Offline Points: 1116 |
Post Options
Thanks(0)
Quote Reply
Posted: July-13-2009 at 11:19am |
|
Stands look fine, the point is no buckleing on the inside. Have fun.
P.S. Good morning Pete. |
|
|
hasbeenskier
|
|
|
|
|
Fook_U
Groupie
Joined: May-31-2006 Location: United States Status: Offline Points: 49 |
Post Options
Thanks(0)
Quote Reply
Posted: July-13-2009 at 8:59pm |
|
I called a local lumber supplier and got a quote for 1.9" x 7.25" x 14' glue lam beams (LVL). The supplier priced me $2.15 lf, I think doug fir was going for $7.00+.
So, other than not being orginal and maybe alittle bit heavier; is there any draw backs to using LVL beams? |
|
|
|
|
akabulla
Gold Member

Joined: November-15-2008 Location: United States Status: Offline Points: 649 |
Post Options
Thanks(0)
Quote Reply
Posted: July-13-2009 at 11:08pm |
|
You already have all the stringers removed and the channels ground down? I don't see any dust on anything

How did you pull that off? I don't know much about wood. I just went with Fir because that is what everyone recommended! Good luck! |
|
|
|
|
Fook_U
Groupie
Joined: May-31-2006 Location: United States Status: Offline Points: 49 |
Post Options
Thanks(0)
Quote Reply
Posted: July-13-2009 at 11:13pm |
|
I removed the stringers over a year ago, and I'm just now getting back into this project. I might win the award for longest stringer repair.

|
|
|
|
|
akabulla
Gold Member
Joined: November-15-2008 Location: United States Status: Offline Points: 649 |
Post Options
Thanks(0)
Quote Reply
Posted: July-13-2009 at 11:24pm |
|
Well good luck! I see the boat is registered in Florida? If anything that will help because I did mine in NC during the winter and the epoxy took YEARS to dry. It was always hurry up and wait! Would have gone twice as fast if it was above 50!
Keep us posted! |
|
|
|
|
bkhallpass
Grand Poobah

Joined: March-29-2005 Location: United States Status: Offline Points: 4723 |
Post Options
Thanks(0)
Quote Reply
Posted: July-13-2009 at 11:49pm |
I don't think so. I cut the stringers out mine in February of 08, and looking at the calendar, I don't expect to do much on it this summer.  BKH BKH
|
|
|
Livin' the Dream
|
|
|
|
|
Fook_U
Groupie
Joined: May-31-2006 Location: United States Status: Offline Points: 49 |
Post Options
Thanks(0)
Quote Reply
Posted: July-14-2009 at 5:26am |
|
This is the method I plan on using to get the boat level and straight. could any check it over to see if I have any errors in my process.
Items needed 2 – 48” bubble level sticks. 2 – 84” bubble level stick. NOTE: it is not necessary to have a 7’ stick but the longer the better. 2 – Straight edged 2x4 cut to 60” in length. NOTE: these two sticks must be exactly the same size in height and length. 2 – Straight edged 2x4 cut to 120” in length. 1 – Laser measuring device. NOTE: I use the bosh one, but if you do not have a laser then a good tape measure will work. (I prefer metric) 1 – Grease pencil or pen. 1 – Plum bob. 1 – 3” wide masking tape. (optional) 1. Place a straight edged 2”x3”x60” stick (running port to starboard) as far back towards the stern on the inside of the boat. This stick should be resting on what appears to be a ledge in the hull shape at the gas tank area. The floor in this area is not built up. 2. Place a straight edged 2”x3”x60” stick (running port to starboard) as far forward towards the bow on the inside of the boat. 3. Place a straight edged 2”x3”x120” stick on top of the bow and stern stick running bow to stern on the port side and the other on the starboard side. 4. Place a 48” level stick on the stern stick then adjust the boat stands placed on each end of the transom till the boat is level running from port to starboard. 5. Place another level stick on the bow stick then adjust the boat stands placed on each end of the bow till the boat is level running from port to starboard. 6. Place the other level sticks on the 10’ sticks that are running bow to stern. Raise/lower the bow or stern stands as necessary to level the boat from bow to stern. 7. Very that all level sticks are reading dead level. 8. On the port and starboard side of the boat, starting from the transom, make a tick mark with the grease pencil every 12” and stop at the 13’ mark. I put a masking tape the length of the chine and the floor marked on the tape and not the boat or floor. 9. At every tick mark, mark the floor with the grease pencil using the plum bob for the location marker. 10. At the transom area, verify that each chine on the port and starboard sides are measuring the same distance from chine to floor, tick mark to tick mark. 11. Tick #1’s (the closest mark to the transom) port and starboard should return the same measurements; if not, then you will need to adjust the boat stand accordingly till equal measurements are achieved. 12. Tick #2 should be a little bit taller than tick mark #1, but both port and starboard sides should return equal measurements at the same tick mark. 13. Repeat step 12 till all tick marks are checked, each progressive tick mark will be taller than the previous at about the same slope, but should always measure equal on the port and starboard sides. These steps should have the boat level and without wind in the hull. If one tick mark slope is less than the previous then there is a wind in the hull at that location. To remove the wind in this location brace the hull at that mark till the correct slope returns. Slope = rise over run, while our run is not flat and level it will do for our purpose. |
|
|
|
|
Fook_U
Groupie
Joined: May-31-2006 Location: United States Status: Offline Points: 49 |
Post Options
Thanks(0)
Quote Reply
Posted: July-14-2009 at 5:27am |
|
you do not have to have that many levels, but it does make it easier.
|
|
|
|
|
kapla
Grand Poobah

Joined: March-27-2008 Location: BA, Argentina Status: Offline Points: 6148 |
Post Options
Thanks(0)
Quote Reply
Posted: July-14-2009 at 5:39pm |
|
F U
I´m having my stringer done in multi laminated wood.... I let you know how it turns out once finisheed... And for the subject well firts I had one stringer removed replaced, and then the other.. yeap to prevent flexing.... The boat sits on a trailer but some support was added on the hull edges were it doesn´t sit on the bunks.. Now the trailer needs to go so the boat will sit on stands.. one on the bow area and 2 on the stern on each side... |
|
|
<a href="">1992 ski nautique
|
|
|
|
|
Fook_U
Groupie
Joined: May-31-2006 Location: United States Status: Offline Points: 49 |
Post Options
Thanks(0)
Quote Reply
Posted: July-18-2009 at 11:11pm |
|
Well, I think I have the boat level now. listed below are my measurement results. At the 138-162 mark there seems to be more difference from the port to starboard than a variation in the concrete floor dip.
Measurement Dist Port Starboard 0 - - 6 646 645 12 645 644 18 644 644 24 645 644 30 644 644 36 645 644 42 644 644 48 644 645 54 643 644 60 644 645 66 645 643 72 645 642 78 645 645 84 644 642 90 644 642 96 644 644 102 646 647 108 649 650 114 655 652 120 - 657 126 - - 132 669 668 138 679 673 144 689 682 150 698 695 156 711 707 162 721 723 Change Dist Port Starboard 0 6 -1 12 -1 18 24 -1 30 36 -1 42 48 -1 54 -1 60 -1 66 -2 72 -3 78 84 -2 90 -2 96 102 -1 108 -1 114 -3 120 126 132 -1 138 -6 144 -7 150 -3 156 -4 162 -2 |
|
|
|
|
Post Reply
|
|
 Tweet
Tweet
|
| Forum Jump | Forum Permissions You cannot post new topics in this forum You cannot reply to topics in this forum You cannot delete your posts in this forum You cannot edit your posts in this forum You cannot create polls in this forum You cannot vote in polls in this forum |


 Topic Options
 Fook_U wrote: