 Boats For Sale:


I couldn’t resist one of my own!!! |
Post Reply 
|
| Author | |
buddysproject 
Newbie 
Joined: October-23-2007 Location: United States Status: Offline Points: 17 |
 Post Options Post Options
") Thanks(0) Thanks(0)
 Quote Reply Quote Reply
 Topic: I couldn’t resist one of my own!!! Topic: I couldn’t resist one of my own!!!Posted: November-30-2007 at 3:30pm |
|
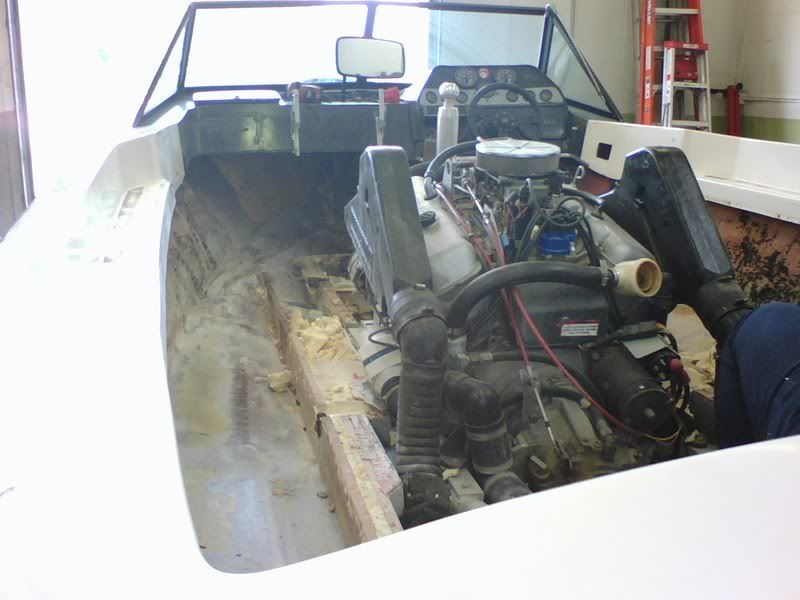
Ok well this whole thing started as restoring a friends 1986 SN. Of course I couldn't resist finding my own to restore. I found an '87 SN that is still virgin. So far I have the interior out, the fiberglass up, and half of the foam out. I still can't stand up straight. Does anyone know where I can get new foam and what density do I need if I'm not going to put plywood down first. The stringers look perfect, but the wood to either side is wet. Once I dry the wood what do I need to resolidify that wood.
|
|
 |
|
|
87BFN owner
Grand Poobah 

Joined: August-25-2006 Location: Ypsilanti, MI Status: Offline Points: 2194 |
Post Options
Thanks(0)
Quote Reply
Posted: November-30-2007 at 3:50pm |
|
Try reading through these threads and you might find your answers and then some. If not I am sure someone will chime in with a better idea then me.
81BFN stringers 87SN stringers foam removal |
|
|
|
|
8122pbrainard
Grand Poobah

Joined: September-14-2006 Location: Three Lakes Wi. Status: Offline Points: 41040 |
Post Options
Thanks(0)
Quote Reply
Posted: November-30-2007 at 8:16pm |
Greg, How do you know the main stringers are OK? Have you removed them from the boat? Do not try to "resolidify" wood. Just replace it with new. Are you using epoxy resin rather than polyester for re glassing? |
|
|
|
|
MaddMarxx
Platinum Member 

Joined: June-29-2006 Location: United States Status: Offline Points: 1741 |
Post Options
Thanks(0)
Quote Reply
Posted: November-30-2007 at 9:52pm |
|
Its called A/B foam, because you add part-A to part-B and it expands, so you would not want to put the floors down first, it will expand and lift the ply wood!!
|
|
|
|
|
FINS
Senior Member 

Joined: August-04-2007 Location: United States Status: Offline Points: 170 |
Post Options
Thanks(0)
Quote Reply
Posted: December-01-2007 at 12:40am |
|
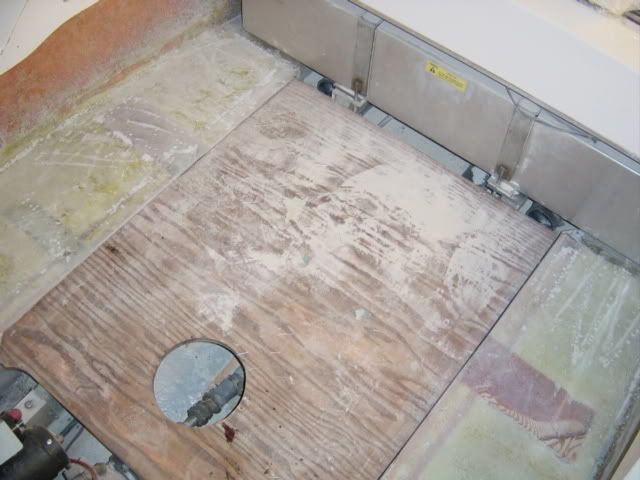
Check out this months issue of Boating World for a great article regarding floor and foam replacement. It was written by a friend here in the Northwest and details how we have been replacing floors in our vintage glass boats. Basically, remove all old foam, water, and rotted wood. Replace any structural wood (stringers, frames, motor bed, etc) and then attach a new plywood floor bedded in 3M5200 and screwed to the structure. This new floor should have 1.5-2" holes drilled about 18" on center in each cavity below. Tilt the boat slightly and start at the lowest hole. Fill with the two part foam (A-B as noted above. Mix in small batches (it kicks quick!) and move forward. The holes allow the excess to "mushroom" out instead of blowing the floor or hull apart. Do not try and trap this product, it will destroy even solid fiberglass trying to expand. About 30 minutes later, use a flat blade saw and trim the "mushrooms" flush with the floor surface and sand smooth. At this point, you can either overlay a thin plywood, or glass over the subfloor to seal it. Epoxy paint over and you are good to go. You can also try searching the forums at Fiberglassics.com for pictures of this process. By doing it this way, every last nook and crany is filled and solid.

|
|
|
|
|
behindpropeller
Platinum Member
Joined: July-31-2006 Status: Offline Points: 1810 |
Post Options
Thanks(0)
Quote Reply
Posted: December-01-2007 at 3:10am |
Sounds like a good idea until your stringers are rotten again because you are NEVER going to get that floor out if its glued with 5200. Tim |
|
|
|
|
|
|
|
farmer
Senior Member

Joined: July-23-2006 Location: United States Status: Offline Points: 442 |
Post Options
Thanks(0)
Quote Reply
Posted: December-01-2007 at 11:32am |
|
Tim , you won't get it out in one piece but the floor can be removed without a lot of trouble. First, locate the screws and remove.(That is probably the hardest part)Then take a router and set the depth to the thickness of the floor plus the 5200. Using the screw holes as a guide, you remove the flooring above the stringers and supports .This will give you a nice even surface on the tops of the framing. Once you have done every frame the remainder of the floor will fall out. If you have any questions,it is explained in one of Don Danenbergs books. It's called "How to Restore Your Wooden Boat" or something like that, I can't find it right now but if I do I'll give you the roght title. |
|
|
|
|
8122pbrainard
Grand Poobah
Joined: September-14-2006 Location: Three Lakes Wi. Status: Offline Points: 41040 |
Post Options
Thanks(0)
Quote Reply
Posted: December-01-2007 at 1:13pm |
|
Injecting the foam into a cavity is actually the preferred method that I use if I do any foaming. I like it because the foam will form a hard skin on all outside surfaces that will not allow any water penetration. If done the open method then the cut surface (extra foam) that is cut off will absorb water even though it it a closed cell. If you use the pour foam, you must do some very careful calculations as to the volume needed so you do not over fill the area causing extra pressure.
The two part spray foam kits I feel are a more economical way to go. There is very little waste and with the dual purpose tips for the gun, you can spray or inject. This is a post from a earlier thread about the 2 part kits: Posted: 22 November 2007 at 1:47pm | IP Logged Quote 8122pbrainard "I haven't used the pourable foam in years. It always seems to be a big mess and hard to calculate needed amounts. I have used a fair amount of this spray 2 component. It comes with 2 types of disposable nozzles. A fan spray and a cavity injection. The cavity injection nozzle is made so a extension tube (poly 1/4" ID) can be put on the end for real deep and hard to reach areas." If used with a extension tube, you will need about half of the holes than shown in the picture that FINS posted and about half the diameter. spray foam BTP, The Farmers method of removal is right on correct. You should never say "NEVER" if you haven't tried to do something. |
|
|
|
|
jbear
Grand Poobah

Joined: January-21-2005 Location: Lake Wales FL. Status: Offline Points: 8193 |
Post Options
Thanks(0)
Quote Reply
Posted: December-01-2007 at 4:49pm |
|
I love reading your threads and links Pete...is there anything you haven't tried?!
john |
|
|
"Loud pipes save lives"
AdamT sez "I'm Canadian and a beaver lover myself"... |
|
|
|
|
ultrahots
Gold Member

Joined: September-08-2004 Location: United States Status: Offline Points: 618 |
Post Options
Thanks(0)
Quote Reply
Posted: December-01-2007 at 10:32pm |
|
In the picture above I am interested to know how they kept the outside edge level when the foam was expanding.This may be the preferred method but I found a problem when foaming my own boat not to long ago.In the rear of my 87 an also in my 89 there is floor supports I left in place and thought the foam would simply expand around them.This was incorrect as it pushed them up almost a full half inch as you will see in the pic at the outside edge.Here is the supports I am talking about.As you will see there was some grinding involved with making them flat even after the 4 coats of Glass and Resin were in.
When I did the 89 I left these pieces out and cut into the foam with a saw much like the one in the thread listed above. As far as taking out the old foam...... 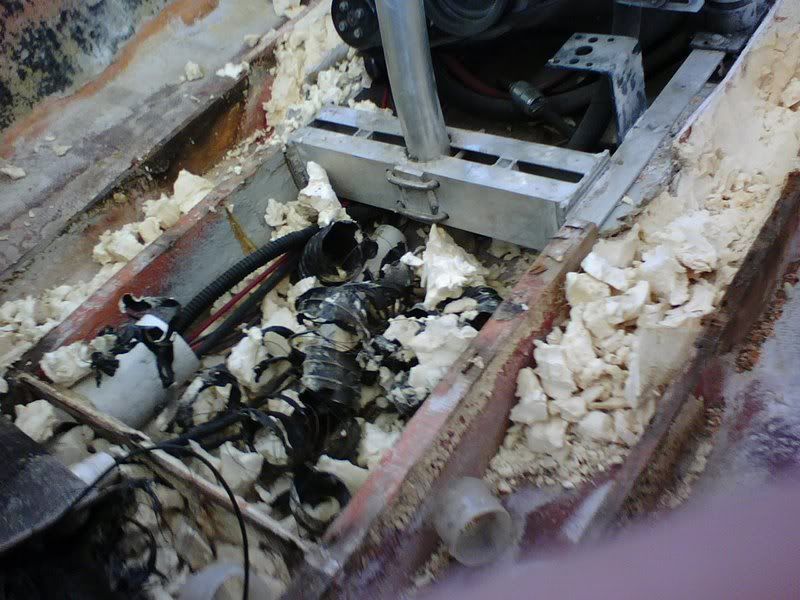

|
|
|
|
|
8122pbrainard
Grand Poobah
Joined: September-14-2006 Location: Three Lakes Wi. Status: Offline Points: 41040 |
Post Options
Thanks(0)
Quote Reply
Posted: December-02-2007 at 10:56am |
|
Terry, I've done quite a lot of closed cavity foaming. Lot's of non boat too and have learned there are a couple principles that must be understood. Foam comes in different weights per cu. ft. but for flotation the typical is 2 lbs so we'll use it as a example. If you what to fill a space that is 1 cu. ft., then in theory you will want to put 2 lbs of liquid in that space. If however you put say 4 lbs in that space then you will be making 4 lb. foam with a chemical mix designed to make 2 lb. This 4lbs of foam will try to fill a 2 cu. ft. area but in a 1 cu. ft. space will build some fairly high pressures that in some cases can cause quite a lot of damage. Two things that must be done are, strong containment and careful injection (amount) of liquid foam. One project I had was filling some double sided stainless panels. I had to make a holding fixture to contain the panels while filling and curing. These panels where about 3' x 10' and the pressure with that large of a surface was quite amazing! In your case, it sounds like you didn't screw down the plywood floor or glass it to the hull sides plus may have put to much foam in the cavity. When I inject foam, ideally I like to have multiple cavities to fill. This way, I can partially fill one and let it expand while I'm filling another. By going back and forth between cavities lessens the chances of a over fill.
|
|
|
|
|
ultrahots
Gold Member
Joined: September-08-2004 Location: United States Status: Offline Points: 618 |
Post Options
Thanks(0)
Quote Reply
Posted: December-02-2007 at 3:06pm |
|
The qustion posted was as a "Restoration" and wood on top of foam is not a restoration but a modification.Looking back at the thread on the other 87 that was done he had the same issue.Problem is back in that corner you have a 2 1X's to screw down to and nothing else.This will simply not give you enough stability as you have stated.I can completely understand measuring the area and pouring accordingly.If you put the floors back the way they were made when new or close to it cutting out the foam after pouring simply works the best from my findings.My floor is as solid as concrete with no wood added(except in the front under the seats).In the picture shown below I would bet my bottom dollar there is a lot of air trapped in that cavity in the top corners.Fiberglass over the foam if used properly will seal off the top of any cut foam.

The way mine was poured I am sure that the entire floor is free of air pockets of any real size. |
|
|
|
|
8122pbrainard
Grand Poobah
Joined: September-14-2006 Location: Three Lakes Wi. Status: Offline Points: 41040 |
Post Options
Thanks(0)
Quote Reply
Posted: December-02-2007 at 3:33pm |
I doubt it. cavity foaming - click and run wall cavity |
|
|
|
|
8122pbrainard
Grand Poobah
Joined: September-14-2006 Location: Three Lakes Wi. Status: Offline Points: 41040 |
Post Options
Thanks(0)
Quote Reply
Posted: December-02-2007 at 3:43pm |
Terry, You're correct that if the original stringers weren't designed for the plywood floor, then more than just 2 1x's should have been added. Or at the very least some temporary removable blocking to handle the before cure pressure. |
|
|
|
|
ultrahots
Gold Member
Joined: September-08-2004 Location: United States Status: Offline Points: 618 |
Post Options
Thanks(0)
Quote Reply
Posted: December-02-2007 at 4:34pm |
|
I would agree with that as far as the blocking as that is what I did on the stern side when foaming.I also saw how the foam rose when poured and if thet stuff in that pic was poured it must be measured absolutely perfect to keep any air out of the cavity.I think a better way of releasing would have been 4 holes,One in each corner of the cavity instead of 1 in the middle.Just the same apparently both ways are feesible.I went back to the "original style" of the floor and it turned out great.
|
|
|
|
|
FINS
Senior Member
Joined: August-04-2007 Location: United States Status: Offline Points: 170 |
Post Options
Thanks(0)
Quote Reply
Posted: December-02-2007 at 5:12pm |
|
We have done quite a few sample tests with this foam including building a sample floor section, foaming, and then pulling the framework all apart after curing to test for voids. It was a solid chunk of foam, no voids at all. We then left the "bare" foam chunk out in the weather (we get a little rain here in the Northwest) for over a year weighing it before and after. It soaked up virtually no water. It had a little green growing on the surface, but so does gelcoat up here if left out. I am not sure when the industry changed from open cell to closed cell foam, but I think the older foam is responsible for a lot of the horror stories with older boats. I have personally pulled the foam out of a '59 Hydro-Swift runabout that easily weighed 400 pounds and saturated everything, rotting all it touched.
No matter how the floor and bilge area is rebuilt, it is important to know that water will get in. The shaft and rudder mounts, waves, and even wet skiers all get water in the boat. Systems must be designed to get the water out easliy. What is not showing in the foamed floor picture is all the work that went in prior to putting down the plywood and foam. PVC tubing runs fore to aft and a small bilge up front connected to a larger bilge at the stern, equipt with a bilge pump, are all installed prior to foaming. The way these boats are maintained is also an issue that comes into play. The majority of the water damage to a runabout size boat comes from sitting out in the weather with little or no cover. After doing a restoration on a boat (doesn't matter if it's a '50's fin boat or a '80's CC) I bet that most are garage kept, or at least under a good quality cover. We simply take better care of the boats after pouring time and money into them. I am not real familiar with the bilge and floor construction in the 70-80's Correct Craft boats, but seems that even building a temporary plywood subfloor that you can attach seat mounts to would work well. Use screws and skip the 3M5200. Foam it and then pull the top plywood off and glass over the foam. |
|
|
|
|
8122pbrainard
Grand Poobah
Joined: September-14-2006 Location: Three Lakes Wi. Status: Offline Points: 41040 |
Post Options
Thanks(0)
Quote Reply
Posted: December-02-2007 at 6:11pm |
|
Terry, You are "reading" too much into this problem with out any experience besides bad because you didn't do enough planning. Brian (fins) even went to the extent of making up some test sections and experimented. If you don't know what you are doing and are needing to do something the first time then do some test runs. I'll bet you didn't make any attempt to even weigh parts A and B of the pour foam. You can't guess! Injection is a lot easier.
I'll solve this whole problem in this thread! Don't re foam. There are plenty who don't. My 77 Tique is a good example. Foam under the decks and gunnels is enough to keep it floating. 1 cu. ft. of foam is worth 60 lbs of flotation. |
|
|
|
|
JoeinNY
Grand Poobah

Joined: October-19-2005 Location: United States Status: Offline Points: 5693 |
Post Options
Thanks(0)
Quote Reply
Posted: December-02-2007 at 6:52pm |
|
I think the most important thing Terry was advocating was not using plywood to replace what was originally a fiberglass over foam floor, and I couldnt agree more. When I redid my mustang I was not going for original and I didnt use any wood or any A B foam it was however exceedingly expensive. I am considering for the 83 fiberglass over foam with high density foam coreing in place of the plywood under the seats.. but plywood on top of foam seems like the worst of both worlds designed to fail.
|
|
|
|
|
ultrahots
Gold Member
Joined: September-08-2004 Location: United States Status: Offline Points: 618 |
Post Options
Thanks(0)
Quote Reply
Posted: December-02-2007 at 9:42pm |
|
"Terry, You are "reading" too much into this problem with out any experience besides bad because you didn't do enough planning."
This sounds like a problem you had from a statement in your earlier post not mine. "It always seems to be a big mess and hard to calculate needed amounts." Planning and reading is what I did for quite a while before starting this project.My boat did not make the second Reunion in Green Lake as my Planning went to far out.I do not post often as it seems every time you try to help someone out you get bagged on like this.I am speaking from a personal experience which was great lesson with a few hiccups along the way.I would have never done another if I thought it was a "Bad" Experience as you stated above on my behalf.I never stated it was a bad experience but figured I would help make someone elses experience a little easier like the thead posted above on the 87 Restoration.My project turned out great and I will enjoy it for a long time to come.The research done above by others is great as it may help out others who chose to take on this project. "I'll bet you didn't make any attempt to even weigh parts A and B of the pour foam. You can't guess! Injection is a lot easier. " I'll take that bet and your wager as well.I did all of my pouring in a body shop where I had all the great little toys to play with that I would have never known about if I did it at home.I never said anything about Injection being better or worse just what small hiccup I had along the way.It was more posed as a question but was turned into a debate.Here is what was asked "In the picture above I am interested to know how they kept the outside edge level when the foam was expanding.This may be the preferred method but I found a problem when foaming my own boat not to long ago" Personally Glass over Foam is what I would do again as well.Great results and a lot safer In My Opinion. |
|
|
|
|
8122pbrainard
Grand Poobah
Joined: September-14-2006 Location: Three Lakes Wi. Status: Offline Points: 41040 |
Post Options
Thanks(0)
Quote Reply
Posted: December-03-2007 at 7:45am |
|
Terry, Please accept my apology as after rereading my post, it did sound like I was being harsh. I'm sorry as that wasn't my intent.
Yes, I must have read too much into your post. I only thought that because you mentioned the ply lifting from the foam pressure and thought you didn't understand the pressures that foam can produce. I hope that in some way I have helped, Pete |
|
|
|
|
backfoot100
Platinum Member
Joined: January-03-2007 Location: United States Status: Offline Points: 1897 |
Post Options
Thanks(0)
Quote Reply
Posted: December-04-2007 at 12:25pm |
I know that there have been numerous arguments about foaming or not to foam. The construction of a CC is different than most other ski boats. This article was written, in my own opinion for those other boats. The construction of my boat was exactly as the article was designed and I redid my floor this same way. I however took a number of steps above that. First off, both sides of the floor was treated with CPES (Clear Penetrating Epoxy Sealer) from Rot Doctor before it was installed. The floor was layed on the stringers with a bead of epoxy sealer (also from Rot Doctor) then all the joints and edges around the hull were sealed with epoxy putty from . . . . you guessed it, Rot Doctor. After the floor was screwed down on the stringers, each screw was removed one at a time and the hole was filled with CPES and reinstalled. After I used the AB foam (which was really easy to work with and did exactly as it says) I dug out the mushrooms about an inch below floor level and then filled them level with that same epoxy putty. Then three coats of glass and epoxy resin on top. After the carpet was installed, any screw that was put in the floor (for the seat peds) was screwed in and then removed one at a time, CPES squirted down the screw hole and the screw reinstalled. After the old floor and foam was removed and I was ready to put the new floor in, I took the boat to a launch and let it sit in the water for over an hour to ensure that there were no leaks of any kind anywhere. Especially with any thru-hull fittings like the swim platform. I know that there are many of you who have put in drain holes throughout your stringer system for water to escape. My thinking was that there shouldn't be water getting in there in the first place. My installation hopefully made the outboard compartments of the main stringers completely watertight. The only place for water to go is into the main bilge and out the drain holes in the hull. I'm anticipating that I will never have to do this crap again. The floor has been in for eight years now and is solid as the day I installed it. The original floor was soft in two spots (under the seat peds) after only seven years so I have to believe I did something right. The boat doesn't list so I know that one side isn't getting wet and the waterline on the hull hasn't moved at all since I redid it so I know that it can't be getting heavier. As I said, a CC is a bit different construction than what other boats are, but this process sure worked for how my boat was constructed. Now, let the flaming begin!!!! LOL. |
|
|
When people run down to the lake to see what's making that noise, you've succeeded.
Eddie |
|
|
|
|
8122pbrainard
Grand Poobah
Joined: September-14-2006 Location: Three Lakes Wi. Status: Offline Points: 41040 |
Post Options
Thanks(0)
Quote Reply
Posted: December-04-2007 at 12:41pm |
|
Eddie, I'm not going to "flame" at you but rather compliment you on the job well done. With a ply floor with foam, you did it the same way I would have with every effort made to keep the water from getting to the wood. The CPES is a great product. The Rot Doc however is a product that you pay a lot for the name. There are plenty other epoxy products and filler that do the same.
|
|
|
|
|
backfoot100
Platinum Member
Joined: January-03-2007 Location: United States Status: Offline Points: 1897 |
Post Options
Thanks(0)
Quote Reply
Posted: December-04-2007 at 1:42pm |
You can say that again, Pete. I had never tackled anything like this. I just found out all my info on-line and I was scared to death of not being able to mix epoxy properly to account for temp/humidity and having it set up too fast or take days to cure out. I was really concerned about it not adhering to the hull as it should because of me mixing it wrong. Rot Doctors stuff, although expensive is extremely easy to work with eliminating guess work and my inexperience. It was definitely worth it to me in the long run and I would not hesitate to use it again after the results that I got with it. |
|
|
When people run down to the lake to see what's making that noise, you've succeeded.
Eddie |
|
|
|
|
8122pbrainard
Grand Poobah
Joined: September-14-2006 Location: Three Lakes Wi. Status: Offline Points: 41040 |
Post Options
Thanks(0)
Quote Reply
Posted: December-04-2007 at 2:40pm |
|
Eddie, I started with West because way back it was the first system on the block that would allow you to mix base resin with different fillers for different results. Then I feel they got "fat and happy" and priced themselves out of the market. I've had great luck with the Mas product. They have all the different fillers plus a low viscocity that West doesn't and are resonable in price. Ether way, the important key to mixing is the inexpensive metering pumps. One pump resin to one pump hardener gives you the correct volumes.
Keep it in mind if you ever have to do it again! |
|
|
|
|
farmer
Senior Member
Joined: July-23-2006 Location: United States Status: Offline Points: 442 |
Post Options
Thanks(0)
Quote Reply
Posted: December-04-2007 at 8:37pm |
|
Eddie, I like what you did with the floor.Especially treating the plywood with CPES and then sealing only the top side.This allows the wood to "breath" a little so the moisture can evaporate. I cringe when I here someone say they completely sealed the wood parts with epoxy.If the water gets in through the screw holes (and it will)there is no place for the water to go and the fun begins again. Farmer |
|
|
|
|
Post Reply
|
|
 Tweet
Tweet
|
| Forum Jump | Forum Permissions You cannot post new topics in this forum You cannot reply to topics in this forum You cannot delete your posts in this forum You cannot edit your posts in this forum You cannot create polls in this forum You cannot vote in polls in this forum |


 Topic Options
 buddysproject wrote: