 Boats For Sale:


Starting 87 SN Floor/Stinger Repair |
Post Reply 
|
Page <12345 11> |
| Author | |
SkiBum 
Gold Member 

Joined: November-17-2006 Location: United States Status: Offline Points: 587 |
 Post Options Post Options
") Thanks(0) Thanks(0)
 Quote Reply Quote Reply
 Posted: January-14-2007 at 8:32pm Posted: January-14-2007 at 8:32pm |

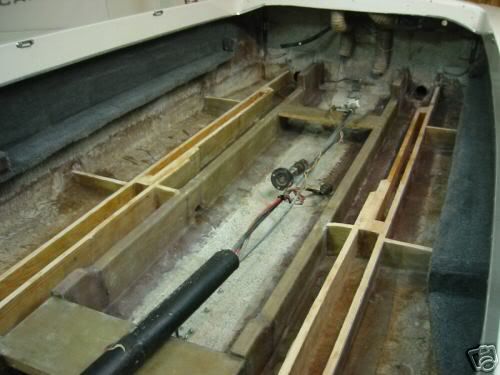
These are the new blocks that will attach to the secondary stringers. Applied epoxy resin and 10oz gla$$ to the both sides. Also to bond two pieces together for the blocks in the back. That was the easy work for the day. 
This is the bottom of the old floor. I pulled it back out to make sure I was placing the blocks in the right place on the stringers and using the correct size of blocks. Took a look at the thickness of the floor. On the edge closest to the hull it is consistently 1/4" thick. Most of the time closest to the stringers it is 1/8" or less. The rest varies. 
Each night after I clean up I review the days work and plan the next day. I have become very good at under estimating tasks. I figured I would spend an hour or two sanding the stringers, bilge, and between stringers. It took four hours just to do the inside of the stringers and the bilge. Between the stringers will be even harder to work so it should be another couple hours. The photo above, that's after vacuuming the dust. The dark spots are low spots that will have to be filled with more fairing compound and yet another total sanding. |
|
 |
|
|
SkiBum
Gold Member
Joined: November-17-2006 Location: United States Status: Offline Points: 587 |
Post Options
Thanks(0)
Quote Reply
Posted: January-15-2007 at 2:49pm |

I removed only one stringer at a time to prevent the boat from losing its shape and to have a correctly sized stringer in place for reference. I was careful with my measurements. Even took some ribbing because I was using a dial caliper and hand plane to get things as close as possible. The stringers have been in place for some time. Everything fit - BEFORE! Today I set the engine cradle in place to make sure I was good. 
This is what I found. The pylon would not sit in the base on the hull. It was centered properly but was almost 1/8" too far to the stern. The reason? I think it is all the epoxy, gla$$, and fairing I have been using. The lesson? Remove a little extra material where the front of the cradle connects to the stringer to allow for the buildup of gla$$ and resin. 
No big deal to fix it at this point. Just removed some material toward the bow. This time I left a little extra space so when I go back over it with resin and gla$$ it will still fit. Maybe you can learn from my mistakes. |
|
|
|
|
SkiBum
Gold Member
Joined: November-17-2006 Location: United States Status: Offline Points: 587 |
Post Options
Thanks(0)
Quote Reply
Posted: January-15-2007 at 3:13pm |

I know what you are saying "why didn't he take that stuff off sooner?" Yeah I should have. It is all off now. Makes it much easier to sand and generally to work in the bilge area. There is another lesson learned. Spent two hours sanding between the stringers. Still haven't finished. The floor braces have cured so I'll install them next. |
|
|
|
|
SkiBum
Gold Member
Joined: November-17-2006 Location: United States Status: Offline Points: 587 |
Post Options
Thanks(0)
Quote Reply
Posted: January-15-2007 at 7:38pm |

Used epoxy resin with enough 403 filler to make it milky to saturate 3 layers of 10oz cloth at each connection. The blocks were already laminated with 10oz gla$$ and epoxy resin. Held them down with weights and used small sticks cut to size to keep the proper slight upward angle toward the hull. When I removed the floor the only place these blocks were saturated with water was at the stringer connections. Working on the stringers toward the bow to fine tune the height. I know, I have said that a billion times. This time I am adjusting the height where the origional floor was several planks of wood connected to the stringers with large staples. |
|
|
|
|
SkiBum
Gold Member
Joined: November-17-2006 Location: United States Status: Offline Points: 587 |
Post Options
Thanks(0)
Quote Reply
Posted: January-16-2007 at 8:25pm |
Glad somebody likes working with this stuff. I certianly don't. 

If anybody is still paying attention to this string, or if you happen upon it sometime because you are planning to do something similar I have a few foam tips for you: First, do not install the floor blocks onto the stringers before you pour the foam. I wasted an hour with a level trimming little sticks to set the blocks at just the right height. The foam just raises the blocks upward and messes up the entire floor alignment. I was only working with a quart of part A and a quart of part B at a time. When pouring a small bucket of foam the end sloped downward. With the next pour I made sure to pour foam onto the sloping end at the start of each new pour but it still left low spots that have to be backfilled to get the right level. To avoid this either use sacraficial blocks that can be used as temporary dams and removed before the next pour or use enough (maybe 4qts of each A & B) and pour the length of the floor. In the front of the boat there will be a 1/2" thick plywood floor laminated and saturated with epoxy and gla$$. I did not have that in place when I poured the foam. Now, I have to go back and trim the foam around that spot then pour and blend more foam to match the height. All that planning and piss poor execution created more work. A long hand saw works good for removing large overfill of foam quickly. I tried to keep an upward bow in the saw so it would not make the end closest to the hull low. I didn't always do so good. An orbital sander works well for providing the final shaping of the foam. |
|
|
|
|
jbear
Grand Poobah 

Joined: January-21-2005 Location: Lake Wales FL. Status: Offline Points: 8193 |
Post Options
Thanks(0)
Quote Reply
Posted: January-16-2007 at 11:24pm |
|
Can I say how impressed I am with your work? It is awesome how you are taking to the time to record and post each step of the way for those guys that come along after you.
I am enjoying watching and reading. Makes me nervous tho, hope this job is not in my future! john |
|
|
"Loud pipes save lives"
AdamT sez "I'm Canadian and a beaver lover myself"... |
|
|
|
|
SkiBum
Gold Member
Joined: November-17-2006 Location: United States Status: Offline Points: 587 |
Post Options
Thanks(0)
Quote Reply
Posted: January-17-2007 at 9:09pm |

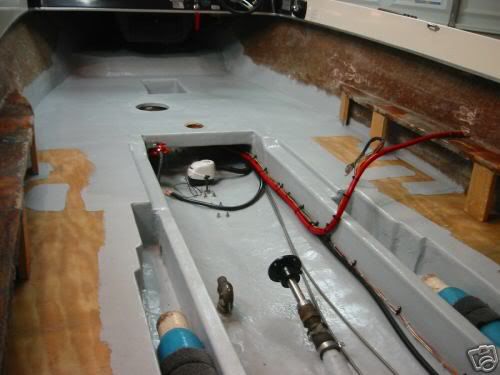
I have been spending far too much time at my day job. Keeps me up late at night to catch up. I used my trusty level and an orbital sander to adjust the correct height of the floor. I simply sanded around the floor blocks leaving them slightly elevated above the foam. Then I came back and sanded down the floor blocks to match the level of the floor. Left a slight downward slope from the hull to the bilge. Also made a sacrificial dam to keep the foam in place while I pured the area where the main stringer is carved out to allow access to the engine cradle. Need to shape this area. In the front, sanded the floor down 1/2" where the plywood floor will be installed. 
The driver side is looking a little better. Used a hand saw to take off the large spots of over fill. Need to sand the floor in the same manner. When using the hand saw make to remove excess foam make sure that you keep the blade angled upward or you may find the tip going a little deeper than you want. Another thing about the foam. It foams in about 45 seconds. You are supposed to stir like crazy for about 22 seconds. Who counts 22 seconds? Anyhow, if you stir too long the foam that comes out does not flow anyplace but is very solid. If you dont stir long enough it runs, foams over all kinds of surfaces but is less dense. Guess you need to count 22 seconds! Thanks for your support. I may be doing things all wrong but I believe anybody else who is interested in doing something like this will at least know what to really expect and can definately learn from my mistakes. |
|
|
|
|
SkiBum
Gold Member
Joined: November-17-2006 Location: United States Status: Offline Points: 587 |
Post Options
Thanks(0)
Quote Reply
Posted: January-17-2007 at 9:12pm |

This is the finished observer side. When I say finished I mean the foam is leveled properly with a slight down slope from the hull to the bilge and the blocks are sanded to match. This is ready for gla$$. |
|
|
|
|
Hollywood
Moderator Group

Joined: February-04-2004 Location: Twin Lakes, WI Status: Offline Points: 13510 |
Post Options
Thanks(0)
Quote Reply
Posted: January-17-2007 at 10:00pm |
|
I'm thoroughly impressed with the rate at which you're going. Just one question about the level, are you keeping the entire boat level to start? because if not...
|
|
|
|
|
Tomski
Senior Member 
Joined: October-19-2006 Location: United Kingdom Status: Offline Points: 227 |
Post Options
Thanks(0)
Quote Reply
Posted: January-18-2007 at 5:42am |
|
Hollywood's point occured to me, but then I thought that it's not that critical as the boat is unlikely to float dead level anyway.
This kind of thing used to be my job and I can say that Bill is doing a far more thorough job than most boatyards would, a more throrough job than Correct Craft did in fact. It's quality work, I am looking at doing the same thing shortly and the attention to detail here will put me to shame! |
|
|
Easily Parted From Money
|
|
|
|
|
Hollywood
Moderator Group
Joined: February-04-2004 Location: Twin Lakes, WI Status: Offline Points: 13510 |
Post Options
Thanks(0)
Quote Reply
Posted: January-18-2007 at 9:34am |
|
I'm thinking the stringers will keep you pretty "level" for the most part even if the boat was on a good tilt.

|
|
|
|
|
SkiBum
Gold Member
Joined: November-17-2006 Location: United States Status: Offline Points: 587 |
Post Options
Thanks(0)
Quote Reply
Posted: January-18-2007 at 9:31pm |
|
After removing the engine before cutting away the floor I braced the floor at four corners making it as close to level as possible. That was origionally intended to keep the hull shape from changing when I removed a stringer but serves a dual purpose of keeping the boat basically level. Also, when I installed the first stringer the other three were untouched. I used a straight edge, not a level, and dial caliper to set the height of stringer. When I cut the floor out I left between 1/4" and 1/2" perpendicular to the hull. I used this as a reference when setting the height on the stringers. I am not making the floor level from stringer to hull. I keep the bubble just over on the hull side to keep a slight downward angle into the hull. Hopefully, with all of these precautions, the boat won't look like one of the diagrams in Hollywood's post.
|
|
|
|
|
SkiBum
Gold Member
Joined: November-17-2006 Location: United States Status: Offline Points: 587 |
Post Options
Thanks(0)
Quote Reply
Posted: January-18-2007 at 9:42pm |


I am having trouble keeping my pace. Does not seem like much progress. From stern to the bow floor the foam is almost ready for gla$$. There are a few things. First, I ran out of foam again. I suck. That attention to detail thing is slowing me down as well. I need to carefully shape the foam next to the engine compartment so it will resemble the origional but provide better drainage. The drainage holes in the bottom of the stringers need to be reshaped as well. And there are those 1" x 3" braces that have to be saturated in resin then installed parallel to the hull in the foam. Then there is this problem with sequence. Once the floor piece for the bow is installed I will no longer be able to work in the bilge from the front of the engine cradle to the bulkhead. I have to establish a gla$$ like finish in the bilge before installing that floor piece and protect the work in the bilge. Gla$$ing the floor is going to result in runs in the channel between the stringers. But, would like to have the forward floor piece in place before starting to gla$$ the rest of the floor so I can tie it all together as I go. (probably one side at a time). These long days and nights are wearing at me. I don't want to rush things right now. So much time and money was spent getting me to this point. So if you don't see a lot of progress, I am a sissy. |
|
|
|
|
jbear
Grand Poobah
Joined: January-21-2005 Location: Lake Wales FL. Status: Offline Points: 8193 |
Post Options
Thanks(0)
Quote Reply
Posted: January-18-2007 at 11:49pm |
|
Bill: Really find it hard to believe you being a sissy!
john |
|
|
"Loud pipes save lives"
AdamT sez "I'm Canadian and a beaver lover myself"... |
|
|
|
|
dans
Senior Member
Joined: March-23-2006 Location: United States Status: Offline Points: 187 |
Post Options
Thanks(0)
Quote Reply
Posted: January-19-2007 at 1:07am |
|
Your work does look better than CC . Your doing a great job . I think it will out last everything else in the boat . Dan
|
|
|
|
|
SkiBum
Gold Member
Joined: November-17-2006 Location: United States Status: Offline Points: 587 |
Post Options
Thanks(0)
Quote Reply
Posted: January-19-2007 at 6:08pm |

Made plenty of progress so far today. Used a piece of the old floor to model the cut out at the motor box area. Instead of making a long gutter on the other side of the stringer I only made enough of a cut out to provide access to engine mounting bolts and water flow into the bilge. Also did a lot of sanding. Applied more fairing compound. I don't know how many times I am going to have to do that to finally get the gla$$ like finish I am searching for. After this cures I'll sand again and find out. 
Also carved out the foam where the floor braces are positioned. Placed them so they are just about flush with the floor. Another method would have been to carve out a larger channel then foam the braces in place, shave, and sand the excess foam. But, I am an idiot so I ran out of foam. 
This is the 1/2" plwood floor piece that installs near the bow. Saturated it in resin and one layer of 10oz gla$$. It will be gla$$ed onto the stringers and bulkhead then gla$$ed over with the rest of the floor. May install a brace just foreward of where the tow bar position because the origional floor was 1" x 3" strips of pine STAPLED onto the stringers. Thanks for the support. |
|
|
|
|
SkiBum
Gold Member
Joined: November-17-2006 Location: United States Status: Offline Points: 587 |
Post Options
Thanks(0)
Quote Reply
Posted: January-20-2007 at 12:39pm |

Spent three hours sanding the epoxy resin mixed with fairing compound. Finally figured out a way to keep from getting saturated in dust. Used a zip tie to attach a heavy sock around the vent where a dust collector is supposed to be on my sander. Probably rushing things but I moved on to using vinyl ester resin mixed with 3M gla$$ bubbles and thickened to reduce runs. I can tell already it will take more sanding and at least one more application of the vinyl ester resin. My goal is to produce a gla$$ like finish in the bilge so water does moves and doesn't pool. The current problem is the sequence of a$$embly of the floor. I must finish working in the bilge forward of the engine compartment before I can attach the plywood floor. Must have that piece of floor in place before doing the remainder of the floor to keep everything level. My job sucks. I have to work this weekenend. Getting close to finishing the floor but just not getting any time to do the work. |
|
|
|
|
Tim D
Grand Poobah
Joined: August-23-2004 Location: United States Status: Offline Points: 2635 |
Post Options
Thanks(0)
Quote Reply
Posted: January-20-2007 at 1:07pm |
|
Skibum, is there any disadvantage in leaving out the foam? Here are some pics someone else did that's impressive too. Looks like they used that grey epoxy used on garage floors.
|
|
|
Tim D
|
|
|
|
|
SkiBum
Gold Member
Joined: November-17-2006 Location: United States Status: Offline Points: 587 |
Post Options
Thanks(0)
Quote Reply
Posted: January-20-2007 at 2:14pm |
|
Yes, that is very good work. Looks like this boat has a plywood floor maybe 1/2". It would certainly work. Personally I put much more effort into water proofing but to each his own.
To Foam or not to Foam There were several pages of discussion about this topic in that string. I certainly don't want to restart that discussion. I will say that in my case I am making a "stand alone" floor that is gla$$ed over the foam. The foam must be in place to make the floor. Only the piece below the driver and observer seat is wood. That piece is set over foam as well. Here are some things I can share with you to help you make your decision: Cost of using foam for the entire floor is about $350.00. That is in my case. If you poured it more efficiently you would use less foam. I don't know how much the foam weighs. It was two five gallon buckets (and another two one gallon buckets). That weight in a stand alone floor would certainly be the same or less than a wood floor with gla$$ that does not have foam. When there was no foam in the boat but the stringers were bedded, gla$$ed, and cured the hull was "flimsy" for lack of a better description. When the foam was installed the floor and hull bonded and became "solid". If the hull were ever breached in a boat with foam in the floor water will get inside. The boat is likely to stay afloat. If there is no foam that void will be filled with nothing but water at 8lbs per gallon. I hope this helps answer your question. By no means to I profess to be an expert. I know there were a lot of smart guys discussing this subject at length in that string "foam or not to foam". |
|
|
|
|
copcraft
Senior Member
Joined: October-07-2006 Location: United States Status: Offline Points: 165 |
Post Options
Thanks(0)
Quote Reply
Posted: January-20-2007 at 5:07pm |
|
Bill
Thanks for your hard work so that others will learn. This morning I ripped off the top piece of fibrgla$$ on the floor in the '74 Mustang I'm redoing. The stringers are all still intact, I'm still removing wet foam. How big of a concern do you think it is to do the stringers one at a time to keep the boat shape? I hadn't given this a thought until you mentioned it. Should I stop here before it's too late if that will be a problem. Thanks David |
|
|
|
|
SkiBum
Gold Member
Joined: November-17-2006 Location: United States Status: Offline Points: 587 |
Post Options
Thanks(0)
Quote Reply
Posted: January-20-2007 at 10:32pm |
|
It is important to brace the boat on four corners (even though it is sitting on a trailer) to keep the shape of the boat. Also, make sure the boat is as close to level as possible. Remove only one stringer at a time to help keep the shape of the boat. One day when the driver side secondary stringer was removed on my boat I inadvertantly knocked out the support in the front driver side of the boat without realizing it. When I shifted inside the boat the driver side of the boat actually bounced up and down several inches like a raft on a wave.
The stringer that is not removed can be used as a baseline for fine tuning the measurements of the new stringer. Then, when you pull the other stringer there is an accurate duplicate of the origional to work from. If you were to remove them both at the same time the only thing you would have to work with is what you removed. Using the removed stringer as a pattern was only enough to get me close. I started with the main stringers. They dont like to be removed. I tried cutting the first one out down to the hull to keep the actual shape. That was a mistake. On the second stringer I just cut as straight as I could about one inch off the deck. Then, you can come back through and carefully cut out the remainder of the stringer. There is a "sweet spot" where the blade is cutting just below the wood from the stringer and the blade pulls right along. The best tool for this job is a small air powered saw available at most auto parts stores. Replace the blade when the saw stops pulling you through the cut. In my opinion, based on my recent experience I recommend that you remove only one stringer at a time after bracing the boat. |
|
|
|
|
copcraft
Senior Member
Joined: October-07-2006 Location: United States Status: Offline Points: 165 |
Post Options
Thanks(0)
Quote Reply
Posted: January-20-2007 at 10:56pm |
|
Bill
Thanks for your reply. I will folow your advise. Keep up the good work and hopefully you won't mind my questions as they keep popping up. David |
|
|
|
|
SkiBum
Gold Member
Joined: November-17-2006 Location: United States Status: Offline Points: 587 |
Post Options
Thanks(0)
Quote Reply
Posted: January-21-2007 at 3:43pm |
|
After spending hours sanding the bilge area of the boat I turned up the heat to 80 degrees. I carefully measured the vinyl ester resin, mixed in 3M Gla$$ bubbles, thickened, and added the prescribed amount of wax. Then I carefully measured the MEKP and stirred the mix. Anyhow, after I applied this stuff to the bilge I left for work. 24hrs later when I got off work I came back to a garage that smelled worse than when I was working with the stuff. It never cured or catalyzed. Now I am scraping and wiping off 1/2 gallon of vinyl ester resin and gla$$ bubbles. Yeah, I am angry.
I maintained the 80 deg temp before, during, and for 24 hrs after applying the vinyl ester resin. I used measuring cups and followed the US Composites guidelines to the number. Doesn't matter now. I estimate it will take two or three days to clean all of that sticky, smelly, expensive slime out of my boat. So in the progression of my project, I am now moving backwards! I suck. |
|
|
|
|
jbear
Grand Poobah
Joined: January-21-2005 Location: Lake Wales FL. Status: Offline Points: 8193 |
Post Options
Thanks(0)
Quote Reply
Posted: January-21-2007 at 8:47pm |
|
I, along with many others have been watching your very informative posts. I am sure you do not "suck"....looks to me like you are doing an awesome job.
john |
|
|
"Loud pipes save lives"
AdamT sez "I'm Canadian and a beaver lover myself"... |
|
|
|
|
copcraft
Senior Member
Joined: October-07-2006 Location: United States Status: Offline Points: 165 |
Post Options
Thanks(0)
Quote Reply
Posted: January-21-2007 at 10:56pm |
|
Keep the faith brother. Don't let the bastards get you down! Your project looks GREAT, and it will be awesome when it's done!
|
|
|
|
|
SkiBum
Gold Member
Joined: November-17-2006 Location: United States Status: Offline Points: 587 |
Post Options
Thanks(0)
Quote Reply
Posted: January-22-2007 at 4:15pm |
|
Spent some time scraping the gunk out of my bilge. Still very angry. The smart guy at US Composites is trying to help me. If all goes well I'll be wrapping it up soon. Thanks for the support. Things were going very well until the vinyl ester incident.
|
|
|
|
|
Waterdog
Grand Poobah

Joined: April-27-2006 Location: United States Status: Offline Points: 2020 |
Post Options
Thanks(0)
Quote Reply
Posted: January-22-2007 at 5:41pm |
|
SkiBum
Keep your head up man. So you've got a little set back. If it was easy it would'nt be worth it. Your doing a GREAT job! I'm no holy roller by any means - But - I know God would never put more on your shoulders than You can carry. |
|
|
|
|
farmer
Senior Member

Joined: July-23-2006 Location: United States Status: Offline Points: 442 |
Post Options
Thanks(0)
Quote Reply
Posted: January-22-2007 at 7:41pm |
|
SkiBum, I have to disagree with your last couple of posts. Every day I check on your progress and every day I'm amazed at how much you've accomplished. You seem to be able to stick to the project at hand much better than most,including myself.(especially myself)
Keep it up.Your posts are a great help to those of us who will be doing this in the future. Farmer 
|
|
|
|
|
88 Nautique
Senior Member

Joined: September-20-2006 Location: United States Status: Offline Points: 221 |
Post Options
Thanks(0)
Quote Reply
Posted: January-22-2007 at 11:10pm |
|
I agree... This is definitely a post that will be referred to a lot in the future. It will make SkiBum a legend.
|
|
|
|
|
SkiBum
Gold Member
Joined: November-17-2006 Location: United States Status: Offline Points: 587 |
Post Options
Thanks(0)
Quote Reply
Posted: January-23-2007 at 5:26pm |
|
Thanks for all the support. I believe the smart thing to do would be once this is all finished to put together some sort of summary backed by photos, lists of materials, tools, and tips. The smart guy at US Composites a$$ures me that the remaining vinyl ester resin will eventually "cook off". Have determined that because of the use of fillers and thickener I was supposed to have used as much as 3% catalyst instead of 1%. Next problem was that I was not using the resin with gla$$ but rather as a sort of fairing. That causes the resin to be applied very thin which slows the catalyzing process. Those little tid bits of information will be in my summary.
Sorry but there won't be any real progress for a few more days until the catalyst "cooks off". I cannot apply epoxy resin over unsettled vinyl ester resin. But thanks for the support. |
|
|
|
|
Post Reply
|
Page <12345 11> |
 Tweet
Tweet
|
| Forum Jump | Forum Permissions You cannot post new topics in this forum You cannot reply to topics in this forum You cannot delete your posts in this forum You cannot edit your posts in this forum You cannot create polls in this forum You cannot vote in polls in this forum |


 Topic Options
 TRBenj wrote: