Starting 87 SN Floor/Stinger Repair
Printed From: CorrectCraftFan.com
Category: Repairs and Maintenance
Forum Name: Boat Maintenance
Forum Discription: Discuss maintenance of your Correct Craft
URL: http://www.CorrectCraftFan.com/forum/forum_posts.asp?TID=5409
Printed Date: April-25-2024 at 5:05am
Topic: Starting 87 SN Floor/Stinger Repair
Posted By: SkiBum
Subject: Starting 87 SN Floor/Stinger Repair
Date Posted: December-22-2006 at 10:30pm
 
I just started my winter project. I cut away the floor of my 87 SN. I removed plenty of foam. Much of it was wet, but not as bad as I suspected. Today I pulled the engine. I hope to start with the observer side main stringer in the morning. I guess I didn't realize the floor was mostly fibergla$$ over foam. I haven't decided yet how I am going to put it back in place. I am thinking about cutting all of the stringers 1/2" shorter. Then, laminating a 3/8" plywood floor with one layer of epoxy and E-gla$$ on the bottom with two layers laminated on top. Pulling the engine was a treat. In the end, I had to deflate the observer side tire to get enough clearance with my crane. Tell me again, why did I start this project? ------------- Bill http://www.freewebs.com/billsboatworks - http://www.freewebs.com/billsboatworks www.freewebs.com/billsboatworks 1987 SN Rebuild Project |
Replies:
Posted By: bkhallpass
Date Posted: December-22-2006 at 10:44pm
Bill, that's pretty ambitious starting your project on Christmas weekend. I wish it were me Please post your progress picks. BKH Please post your progress picks. BKH------------- Livin' the Dream |
Posted By: SkiBum
Date Posted: December-23-2006 at 8:23am
|
A great military commander once told me that major victories are achieved through audacity tempered with good judgement. I have the audacity part figured out.
------------- Bill http://www.freewebs.com/billsboatworks - http://www.freewebs.com/billsboatworks www.freewebs.com/billsboatworks 1987 SN Rebuild Project |
Posted By: farmer
Date Posted: December-23-2006 at 8:01pm
| It looks like you're a little past the good judgement part. Join the club. Farmer |
Posted By: SkiBum
Date Posted: December-23-2006 at 9:09pm

You have to look hard. Everything in the garage has a light coating of fine white fibergla$$ dust. Turns out it is very difficult to remove a stringer. I remember somebody posted that theirs came out like "butta". No such luck here. I am now over budget and behind on this project and it is only day three. I managed to prep the hull for the new stringer. It took longer than expected to reproduce the stringer on a new 2"x8". I still have to create the bevel then fine tune the fit. ------------- Bill http://www.freewebs.com/billsboatworks - http://www.freewebs.com/billsboatworks www.freewebs.com/billsboatworks 1987 SN Rebuild Project |
Posted By: nuttyskier2002
Date Posted: December-23-2006 at 9:13pm
|
SkiBum, while you're in there this far I'd go ahead and re-anchor the main support that your ski pole is bolted to since your new stringers stop aft of that point. Here's what I did. Remove each lag bolt one by one. Mix up some epoxy and put it in a squeeze bottle or syringe. Squirt the epoxy in each whole and then quickly replace the lag bolt before the glue has a chance to leak out. I used a piece of cotton ball to put over the whole before replacing the bolt in harder to reach places. ------------- 95 Malibu Echelon w/Mercruiser 350 Magnum Skier Former boats: 88 Ski Centurion Tru Trac II 59 Chris Craft Capri (woody) |
Posted By: SkiBum
Date Posted: December-23-2006 at 9:18pm
|
The SN has an aluminum engine cradle that also holds the pylon. The pylon is wedged between two aluminum beams and secured at the hull inside a receiver and tightened using two "U" bolts. This cradle will be instrumental in the proper positioning and alignment of the new stringers. ------------- Bill http://www.freewebs.com/billsboatworks - http://www.freewebs.com/billsboatworks www.freewebs.com/billsboatworks 1987 SN Rebuild Project |
Posted By: nuttyskier2002
Date Posted: December-23-2006 at 10:07pm
|
Okay, I see in your pic what you are talking about. When I first looked at your pic at the top I thought I was seeing where your old stringer stopped and the new one begain. I realize now that that is the aluminum angle iron pieces of the cradle secured to the new stringers. That looks like a much better way to build a boat than the way that Ski Centurion does it. What does CC use to secure the cradle to the stringers? ------------- 95 Malibu Echelon w/Mercruiser 350 Magnum Skier Former boats: 88 Ski Centurion Tru Trac II 59 Chris Craft Capri (woody) |
Posted By: SkiBum
Date Posted: December-24-2006 at 1:09pm
 
The engine cradle is held on with lag bolts in the main stringers. Once I replace the stringers I will prep the engine cradle by cleaning and polishing it. Then, I will laminate it onto the stringers with epoxy resin and bolt it into place. I just finished fine tuning the observer side stringer. I will apply two layers of E-gla$$ with epoxy resin on each side tonight. ------------- Bill http://www.freewebs.com/billsboatworks - http://www.freewebs.com/billsboatworks www.freewebs.com/billsboatworks 1987 SN Rebuild Project |
Posted By: SkiBum
Date Posted: December-26-2006 at 11:15am

I set the observer side stringer this morning. Applied a thick layer of epoxy resin, then two layers of 9oz E-gla$$. I rolled out all the air, layered more epoxy, then set the stringer on the hull. I used the aluminum motor frame to make sure everything lined up properly. Then weighed it all down to hold it in place. ------------- Bill http://www.freewebs.com/billsboatworks - http://www.freewebs.com/billsboatworks www.freewebs.com/billsboatworks 1987 SN Rebuild Project |
Posted By: Hollywood
Date Posted: December-26-2006 at 11:19am
|
SkiBum, where are you going to get new combing pad clips? Those damn double-barb things are hard to find! ------------- |
Posted By: SkiBum
Date Posted: December-26-2006 at 11:25am
I plan to go with a more seamless appearance, like the newer models. Wasn't even going to use them again. I am also in the process of converting my motor box to a clamshell.
 ------------- Bill http://www.freewebs.com/billsboatworks - http://www.freewebs.com/billsboatworks www.freewebs.com/billsboatworks 1987 SN Rebuild Project |
Posted By: Hollywood
Date Posted: December-26-2006 at 11:30am
|
I have found them online, in gross quantities however. I drive by http://www.itw-fastex.com/catalog/015.php - ITW Fastex on my way to work, they apparently make these "double ended xmas tree" clips. Hopefully I can stop in one of these days and pick up a bunch.
Are you going to retain the original height of the motorbox? Might want to think about getting it up an inch or so to make room for some bolt-ons if you're going through the trouble. ------------- |
Posted By: SkiBum
Date Posted: December-26-2006 at 11:52am
|
Good idea. Not much trouble really...compared to replacing a main stringer. I planned on a stringer a day. What a joke. ------------- Bill http://www.freewebs.com/billsboatworks - http://www.freewebs.com/billsboatworks www.freewebs.com/billsboatworks 1987 SN Rebuild Project |
Posted By: hasbeenskier
Date Posted: December-26-2006 at 7:09pm
|
I do not think I will ever live down the "butta" comment and it will never happen again.
Oh yeah, forget the word budget and practice the acronym B.O.A.T. (Break out another thousand!) ------------- hasbeenskier |
Posted By: SkiBum
Date Posted: December-26-2006 at 8:09pm
|
Are you the one that said "butta"? Don't worry about it. Mine was more like pulling a twisted molar without anesthetic. It would have been nice to just pour a stringer. Cutting, shaping, and carving one is no fun at all. Just hope all this expense doesn't cut into my Perfect Pa$$ funds. ------------- Bill http://www.freewebs.com/billsboatworks - http://www.freewebs.com/billsboatworks www.freewebs.com/billsboatworks 1987 SN Rebuild Project |
Posted By: SkiBum
Date Posted: January-01-2007 at 6:27pm

I finished cutting and shaping the driver side main stringer today. I am laminating it tonight and hope to install it in the morning. The boat looks more like a boat with both of these installed. ------------- Bill http://www.freewebs.com/billsboatworks - http://www.freewebs.com/billsboatworks www.freewebs.com/billsboatworks 1987 SN Rebuild Project |
Posted By: Hollywood
Date Posted: January-02-2007 at 9:58am
|
SkiBum, please tell me you're keeping the templates/measurements you used to shape those stringers. ------------- |
Posted By: SkiBum
Date Posted: January-02-2007 at 6:11pm
Would you settle for a lie? I used the observer side stringer to make a "rough" cutout of the origional. Several problems: The origionals are covered in varying amounts of gla$$, they don't come out in a template friendly condition. Spent most of the time using a hand plane to shape the bottom of the stringer to ensure a good bond with the hull. Then, I used the untouched driver side stringer, a straight edge, and a dial caliper to make the fine adjustments to the new stringer. Then used a hand plane and belt sander to bring it to a very accurate match. Now that the observer side stringer was a very accurate duplicate of the origional I pulled the driver side stringer. Then, same process using the new observer side stringer for accurate measurements. Bottom line, I don't have any templates. ------------- Bill http://www.freewebs.com/billsboatworks - http://www.freewebs.com/billsboatworks www.freewebs.com/billsboatworks 1987 SN Rebuild Project |
 Hollywood wrote:
Posted By: SkiBum
Date Posted: January-03-2007 at 6:18pm

Now there are two new main stringers in the hull of my 87SN. They will get a little more sculpting before the final application of gla$$ and epoxy. Next step, remove and replace the secondary stringers. ------------- Bill http://www.freewebs.com/billsboatworks - http://www.freewebs.com/billsboatworks www.freewebs.com/billsboatworks 1987 SN Rebuild Project |
Posted By: SkiBum
Date Posted: January-04-2007 at 9:19pm

Removed the secondary stringer from the observer side today. It was much easier than the larger main stringers. Found plenty of rotten wood. Had enough to make a template. Cut out new pieces. Waiting for my shipment of epoxy to arrive so I can laminate the peices together and install them. Getting closer. ------------- Bill http://www.freewebs.com/billsboatworks - http://www.freewebs.com/billsboatworks www.freewebs.com/billsboatworks 1987 SN Rebuild Project |
Posted By: bkhallpass
Date Posted: January-04-2007 at 9:56pm
|
Taking notes. BKH ------------- Livin' the Dream |
Posted By: Nautique2001
Date Posted: January-05-2007 at 1:33pm
Because it's a Correct Craft! 
Ken ------------- http://www.correctcraftfan.com/diaries/details.asp?ID=1052&sort=&pagenum=4&yrstart=1986&yrend=1990" rel="nofollow - Nautique 2001 |
Posted By: SkiBum
Date Posted: January-05-2007 at 6:44pm
|
Just finished cutting out all of the pieces to make the secondary stringer for the observer side. UPS showed up with my resupply of resin and gla$$ with some West 403 Micro Fibers. Formed shallow channels where the water can pa$$ through at the engine area and the stern. Plan to bed the main stringer and laminate the sub stringer in the morning. Should have some pics then. ------------- Bill http://www.freewebs.com/billsboatworks - http://www.freewebs.com/billsboatworks www.freewebs.com/billsboatworks 1987 SN Rebuild Project |
Posted By: SkiBum
Date Posted: January-06-2007 at 5:06pm

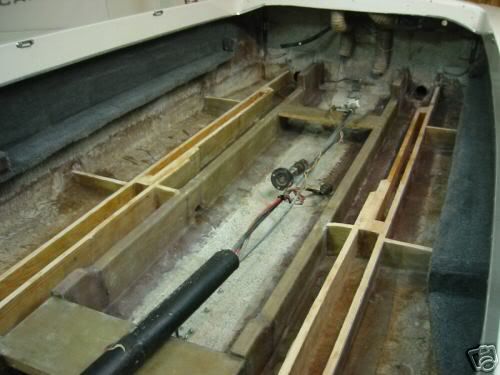
This is the observer side secondary stringer. This thing is made from no less than 12 pieces of wood. I laminated each piece with epoxy resin and 9oz fiber gla$$, then used epoxy resin and gla$$ to laminate all of the pieces together. The origional has two 1/2" plywood spacers at the end. The void between the two main pieces of wood is filled with foam. I laminated additional spacers in two places to prevent the stringer from bowing when I add foam. Even with all of this epoxy and gla$$ the new stringer is 10x lighter than the old soggy one. 
This photo shows all of the pieces that were eventually epoxied, gla$$ed, and laminated to make the stringer. In the background is the old, rotten stringer. ------------- Bill http://www.freewebs.com/billsboatworks - http://www.freewebs.com/billsboatworks www.freewebs.com/billsboatworks 1987 SN Rebuild Project |
Posted By: SkiBum
Date Posted: January-06-2007 at 5:17pm

I used the West 403 micro fibers to fillet the base of stringer onto the hull. You might be able to notice that where the hole is cut in the stringer to allow water to flow back into the hull I formed a shallow channel. On the final faring and sanding application I will be sure to leave free flowing channels so the water does not pool in the space between the stringers. Less exposure to water, less chance of water getting back into the wood and foam. ------------- Bill http://www.freewebs.com/billsboatworks - http://www.freewebs.com/billsboatworks www.freewebs.com/billsboatworks 1987 SN Rebuild Project |
Posted By: boat dr
Date Posted: January-06-2007 at 5:47pm
|
Bill, some people do drugs ,some people chase whores ,don't really matter we all have our vices.Mine has to do with old boats,it ain't any cheaper,just keeps me at home at nite,and the S.O. knows where i'm at, working on that old boat.
Your doing a great job,the biggest resto you can do on a boat ,and when finished nobody will see it. What a bummer,it's kinda like peeing in a dark suit;it gives you a warm feeling ,but nobody notices...............boat dr ------------- boat dr /diaries/details.asp?ID=4631 - 1949 Dart /diaries/details.asp?ID=1533 - 1964 American Skier |
Posted By: SkiBum
Date Posted: January-06-2007 at 7:56pm
You certainly have a way with words. Thanks...I think. ------------- Bill http://www.freewebs.com/billsboatworks - http://www.freewebs.com/billsboatworks www.freewebs.com/billsboatworks 1987 SN Rebuild Project |
Posted By: SkiBum
Date Posted: January-07-2007 at 4:36pm

This is the observer side stringer installed. It is seated in resin and 403 filler with 4" and 8" strips of 10oz gla$$ laminating it onto the hull. Once dry I'll fillet along the base of the stringer with the hull. Time to start cutting out the driver side secondary stringer. ------------- Bill http://www.freewebs.com/billsboatworks - http://www.freewebs.com/billsboatworks www.freewebs.com/billsboatworks 1987 SN Rebuild Project |
Posted By: SkiBum
Date Posted: January-07-2007 at 7:00pm

This is what I was able to remove from the boat that was large enough to not fit in the vacuum nozzle. Pretty much all soaked and rotten. This stuff would have laughed off the Rot Doctor. Only fix...replacement. ------------- Bill http://www.freewebs.com/billsboatworks - http://www.freewebs.com/billsboatworks www.freewebs.com/billsboatworks 1987 SN Rebuild Project |
Posted By: farmer
Date Posted: January-07-2007 at 9:33pm
| Skibum,are you using pine for the secondary stringers and doug fir for the main stringers? |
Posted By: SkiBum
Date Posted: January-08-2007 at 9:58am
I purchased the wood at a local lumber store. Used the fir 2"x8" for the main stringers. Using #2 pine for the secondaries. Perhaps the same as what came out. The big difference is that I have applied epoxy resin and multiple layers of gla$$ and resin to each individual piece comprising the secondary stringers, then a$$embled them with epoxy and gla$$. I just finished bedding the observer side with 403 filler. The final preparation step will be application of an epoxy resin with fairing compound to smooth out the lines and accentuate the water channels. ------------- Bill http://www.freewebs.com/billsboatworks - http://www.freewebs.com/billsboatworks www.freewebs.com/billsboatworks 1987 SN Rebuild Project |
Posted By: SkiBum
Date Posted: January-08-2007 at 5:26pm

This is the final stringer to be installed. Right now it is being weighed down to get a solid bond with the hull. I spent some time chipping, clawing, and scraping away the remaining foam under the bulkhead below the dash where the vents and cables are routed. Not fun. Hope to wrap up the stringer work in the next few days and start on the floor. ------------- Bill http://www.freewebs.com/billsboatworks - http://www.freewebs.com/billsboatworks www.freewebs.com/billsboatworks 1987 SN Rebuild Project |
Posted By: SkiBum
Date Posted: January-09-2007 at 10:12am
|
The last stringer is installed. It is bonded on a bed of resin and two layers of 10oz gla$$. I used resin and 4" then 8" wide strips along the seams with the hull this morning. Once cured, I'll come back and bead the seam with 403 filler and resin. The picture wont post, I'll try again.
------------- Bill http://www.freewebs.com/billsboatworks - http://www.freewebs.com/billsboatworks www.freewebs.com/billsboatworks 1987 SN Rebuild Project |
Posted By: SkiBum
Date Posted: January-09-2007 at 10:19am
|
Don't let the appearance deceive you. Although four new, epoxy and gla$$ coated stringers are in place, there is still pleny of work left on the stringers before I can start the floor. Missing lateral pieces, need to adjust height to better facilitate water moving toward the bilge, and some final gla$$ and fairing.  ------------- Bill http://www.freewebs.com/billsboatworks - http://www.freewebs.com/billsboatworks www.freewebs.com/billsboatworks 1987 SN Rebuild Project |
Posted By: SkiBum
Date Posted: January-09-2007 at 9:57pm

Used a level and a hand plane to adjust the height of the secondary stringer so that the stringer is 1/4" lower than the edge of the floor. This will allow water to move toward the bilge once the new floor is complete. The driver side stinger will be cured by morning so I can do the same on that side. ------------- Bill http://www.freewebs.com/billsboatworks - http://www.freewebs.com/billsboatworks www.freewebs.com/billsboatworks 1987 SN Rebuild Project |
Posted By: Waterdog
Date Posted: January-10-2007 at 9:59am
|
Hey Dudes -
The last few days we've been designing an aircraft repair with thickened resin. I've looked at some manufactures data sheets for fillers . The 403 filler IS cellulose cotton flock , it thickens the resin ,it fills voids ,it Wicks water like your bath towel. It does not add strength or rigidity. It works well for bonding the stiffeners to a fibergla$$ mold. Not suitable for any aircraft application. Mil fiber ( ground fibergla$$ ) is the way to go, adds strength, fills the gap when bedding the stringer to the hull. Use it 1 part resin to 1 part mill fiber by weight to make it like peanut butter. What's done is done - but maybe this will help in the future. - waterdog - |
Posted By: SkiBum
Date Posted: January-10-2007 at 8:57pm

Started by cutting a cardboard template to fit in the bilge. Used two pieces of 1/2" plywood. Applied epoxy resin and two layers of 10oz gla$$. When cured I laminated them together with resin and 10oz gla$$. Used a jig saw followed by a drill operated drum sander to make the holes. Set it into the hull on three layers of chopped strand and gla$$ed it into place. Cleaned up the battery box. Replaced the drain fitting. Used 5200 on the connections at the battery box. Installed new vent hoses. Cleaned the 4" pipe and set everything in place. Used cup holders as thru hull fittings for the vents. Just cut out the bottom. For each thru hull fitting (thru hull into the bilge) I used epoxy and chopped strand mat inside the holes with epoxy and gla$$ all around. When I removed the floor to begin construction I found major water saturation in this area. The new bulkhead is much thicker and totally encased in epoxy resin and gla$$. Each hose is clamped, each connection sealed, and every fitting gla$$ed to prevent future problems in this area. Poured 4lb foam. Started in the bilge area. After several pours I worked my way up into the bulkhead. ------------- Bill http://www.freewebs.com/billsboatworks - http://www.freewebs.com/billsboatworks www.freewebs.com/billsboatworks 1987 SN Rebuild Project |
Posted By: SkiBum
Date Posted: January-10-2007 at 9:08pm
Whoops! ------------- Bill http://www.freewebs.com/billsboatworks - http://www.freewebs.com/billsboatworks www.freewebs.com/billsboatworks 1987 SN Rebuild Project |
Posted By: Waterdog
Date Posted: January-11-2007 at 7:47am
|
SkiBum -
The 403 filler info is from the material data sheet.The pictures of the job you are doing ; speak for them selves. You're a craftsman! ------------- - waterdog - http://www.correctcraftfan.com/diaries/details.asp?ID=3896&sort=&pagenum=2&yrstart=1978&yrend=1978" rel="nofollow - 78 Ski Tique |
Posted By: TRBenj
Date Posted: January-11-2007 at 9:14am
I certainly wouldnt worry about it- all the strength comes from the gla$$ (mat/cloth + resin) anyways. The thickened resin is doing its job perfectly- bedding the stringers and providing a nice fillet to gla$$ over. Your work looks terrific. Cant wait to see the final results! ------------- |
Posted By: SkiBum
Date Posted: January-11-2007 at 1:59pm
|
Once I sanded the foam I applied a thick layer of resin. Used a layer of chopped strand mat followed by two layers of 10oz gla$$ to repair this area. On top I did the same where I cut two holes to facilitate removal of foam and application of the new stuff.
For the floor under the bow I added more foam and cut a gentle slope from bow toward the bilge to help prevent water from pooling. Also used the hand plane and level to trim the driver side secondary stringer to the right height. This is the concept I am using for the floor. The origional floor was several layers of gla$$ and resin over foam. I am using 3 ply, 1/4" floor under layment. The bottom of the 3 ply is laminated with 10oz gla$$ and resin. All of the edges are saturated with resin. The top of the 3 ply is epoxy resin with chopped strand mat followed by 10oz gla$$. Both the top and bottom are laminated and cured before application. The floor piece rests on the foam and is bonded to the secondary stringers on an epoxy resin mixed with 2-3 layers of chopped strand mat. Once cured, the edge next to the hull is bonded using 2", 4", then 8" strips of 10oz with epoxy resin. The same for where the floor and the stringer meet. This will provide a water tight, strong bond between the stringer, floor, and hull. The piece for under the bow is curing on the bottom right now. Hopefully I can apply the gla$$ to the top tonight and it will be ready for installation in the morning. 
------------- Bill http://www.freewebs.com/billsboatworks - http://www.freewebs.com/billsboatworks www.freewebs.com/billsboatworks 1987 SN Rebuild Project |
Posted By: SkiBum
Date Posted: January-11-2007 at 2:14pm
Here is the front where I sanded the foam then applied the layers of gla$$ and resin. There are two repairs on top as well. Also used small strips of gla$$ and resin to make the vents and main pipe that run through the bulkhead water tight. When I put it all back together I will install a rubber boot on the end of that big plastic pipe that will keep water out.
 ------------- Bill http://www.freewebs.com/billsboatworks - http://www.freewebs.com/billsboatworks www.freewebs.com/billsboatworks 1987 SN Rebuild Project |
Posted By: Waterdog
Date Posted: January-11-2007 at 2:49pm
|
SkiBum
You do pretty work ! No offence about the filler - just the facts. It�s very difficult to make change without a$$igning blame. I�ve got my motor & trans ready to go in (look under general � how fast is fast �) I ripped up the carpet & floor to replace the foam . Can�t wait to crank-it. In your profile your Army I was Navy now silly service w / USMC with all the hours your putting in the Marines would say Sleep is for the Weak. Keep at it !!! ------------- - waterdog - http://www.correctcraftfan.com/diaries/details.asp?ID=3896&sort=&pagenum=2&yrstart=1978&yrend=1978" rel="nofollow - 78 Ski Tique |
Posted By: Hollywood
Date Posted: January-11-2007 at 3:03pm
|
Bill, you got the double "s"-$$ thing going on with the file name. ------------- |
Posted By: SkiBum
Date Posted: January-11-2007 at 3:27pm

Thanks Hollywood. I would have beaten my head against the wall for hours on end and still never figured it out. This is just more of planing the secondary stringers to the correct height. Despite my best efforts I could not yield a precise pattern from the old ones. Anyhow, this is the best way to get the right height . ------------- Bill http://www.freewebs.com/billsboatworks - http://www.freewebs.com/billsboatworks www.freewebs.com/billsboatworks 1987 SN Rebuild Project |
Posted By: 81nautique
Date Posted: January-11-2007 at 5:36pm
|
Bill,
At the risk of being accused of sucking up, You do awesome work. There have been some really great stringer replacement jobs done here in the past but none documented as well as this. When your all done and rested up maybe you could put together a step by step including photos, materials list, suppliers, etc, I bet Keith would post it in the reference section. That would be invaluable to many that will be faced with your same situation in the future. ------------- |
Posted By: SkiBum
Date Posted: January-11-2007 at 6:58pm

Alan, This is what the boat looked like when I started. When she looks that good again I'll call this project complete. I try to post only useful photos. I would be happy to put together a summary of the project for others to use as a reference. I learned everything I know from this site. I'll put the photos from the blooper reel in the off topic forum. Waterdog, I wish I would have known earlier about the 403 filler. That is good information that people who look to this site need to know. Marines - Army, hell, when the bullets start flying it's all the same: set a base of fire and manuever. ------------- Bill http://www.freewebs.com/billsboatworks - http://www.freewebs.com/billsboatworks www.freewebs.com/billsboatworks 1987 SN Rebuild Project |
Posted By: SkiBum
Date Posted: January-11-2007 at 9:56pm

A few days ago I applied fairing compound to a mayonase consistency along the stringers. Tonight I spent a couple hours sanding. I did not try to get a finish quality sanding - only to knock down the major bumps for the final application of gla$$. Then, I layered 10oz gla$$ across the observer main stringer. I also laminated more gla$$ in the channel between stringers on the observer side and up the secondary stringer. I will follow this with a thicker consistency of resin and fairing compound so I'll be able to achieve a final sanding. The floor piece for under the bow is laminated on both sides. The top is curing. I have done a poor job of managing my materials. I find myself, once again, waiting for a shipment. Meanwhile there is always plenty to keep me busy. Very labor intensive projcet. ------------- Bill http://www.freewebs.com/billsboatworks - http://www.freewebs.com/billsboatworks www.freewebs.com/billsboatworks 1987 SN Rebuild Project |
Posted By: SkiBum
Date Posted: January-12-2007 at 2:03pm

This is the floor panel under the dash. Once again I under estimated the difficulty level of what appeared to be a simple operation. I intentionally left a sloping downward curve from the bow to the bilge. This meant I had to use weights on the floor panel while leaving enough room to gla$$ around the edges and do all of this under the bow. To make it funner, I keep the garage temp at 80 deg for the epoxy to cure properly. End state, the floor panel is installed. Alternated chopped strand 2" wide, 10oz 4" wide, and 10oz 8" wide for a good bond. Filleted the edges to keep water from standing at the edges. Also, right at the center of the bow the CC boys randomly sprayed chopped strand creating small humps that would be great for holding water. I removed these clusters, sanded the area, and filleted all the way down to the floor. My philosophy, if you can see it, it can get wet. ------------- Bill http://www.freewebs.com/billsboatworks - http://www.freewebs.com/billsboatworks www.freewebs.com/billsboatworks 1987 SN Rebuild Project |
Posted By: SkiBum
Date Posted: January-12-2007 at 2:22pm

Not much that could be done while the floor under the bow was curing. So I filleted around the bulkhead connections and corners to seal the connections and keep water from standing in 90 deg corners. Cannot continue on the floor until more foam arrives. Haven't done very good at forecasting my materials requirements. Use the down time to do the little jobs that I hate to do but must be done. For instance, the observer side vent on the bow has a large hole in the bottom of it that allows any water splashed over the bow to go directly to the floor. Another one is applying fairing compound and sanding so I can finish the stringers and bilge. Not very exciting pictures so I wont bore you. ------------- Bill http://www.freewebs.com/billsboatworks - http://www.freewebs.com/billsboatworks www.freewebs.com/billsboatworks 1987 SN Rebuild Project |
Posted By: SkiBum
Date Posted: January-12-2007 at 8:51pm

Besides obscene wakes at slower speeds another symptom the 87 SN displayed before I started this project was excessive vibration. When I removed the carpet I discovered that on the pa$$enger side from the front of the bow back to the front seat the floor was separated from the hull. Both secondary stringers were separated from the hull as well. When I removed the floor I cut it a safe distance from the hull. Today, I went back and trimmed along the edge of the hull to remove the lip from the floor. The pieces in the foreground are what I cut away. Some foam was still attached. If you look closely you can see the final cut along the hull. In some places the floor was separating away from the hull already. This is a delicate operation - not much suited for an infantryman. Anyway, I managed not to cut into the hull. I must still sand about a foot up the side of the hull and clean it in preparation of the new floor. ------------- Bill http://www.freewebs.com/billsboatworks - http://www.freewebs.com/billsboatworks www.freewebs.com/billsboatworks 1987 SN Rebuild Project |
Posted By: SkiBum
Date Posted: January-12-2007 at 9:01pm

This is a photo of the block that connects the main stringer and the secondary stringer. The origional configuration used 1" pine (3/4") that was NAILED onto the stringers. My recipe calls for a block cut from a 2"x8". The sides sport two layers of 10oz and epoxy. All of the edges are saturated in epoxy. I used multiple layers of chopped strand and epoxy to provide a good bond between the hull, both stringers, and the block. This is followed by 1", 2", 4", and 8" strips of 10oz. In a previous photo you can see how I used filler to eliminate the corners. The filler gets wider at the bottom. This will allow water to flow downward then out the relief holes in the stringer instead of pooling. One may argue that using a 2" (1-1/2") instead of the 1" (3/4") just means there is more wood to saturate with water. I submit that the 1" stuff fails catastophically whereas the 2" will die a slower death if water finds a way between the floor and hull in the future. Besides, I used up all the 1" stock I had on the secondary stringers. ------------- Bill http://www.freewebs.com/billsboatworks - http://www.freewebs.com/billsboatworks www.freewebs.com/billsboatworks 1987 SN Rebuild Project |
Posted By: farmer
Date Posted: January-13-2007 at 8:19am
|
SkiBum,You're making great progress.I'd like to thank you for all the great pictures. They will be a big help to any of us who will go through this process in the future. Farmer 
|
Posted By: SkiBum
Date Posted: January-13-2007 at 1:43pm

I know this is not the least bit interesting. I spent a few hours grinding the remainder of the floor off the hull. I followed by sanding the side of the hull for about 10". It will pay dividends when I laminate the new floor onto the hull. On that matter. I have reconsidered my plan to use the 3 ply sandwiched with gla$$. I spent some time, upside down, under the bow and noticed that the 3 layers of gla$$ on the bulkhead repair are very strong. I am now planning to go with something more like the origional lay up for the floor. I will start with a layer of chopped strand epoxy mat (stitched not glued). Then a layer of Biaxial with 3/4oz mat sandwhiched between two 17oz bias plies and stitched together. Followed by 10oz E gla$$. I would still add 2", 4", then 8" 10oz E gla$$ on the edge between the hull and the floor and the stringers and the floor. As for the piece under the bow with the 3 ply, it can stay as is. ------------- Bill http://www.freewebs.com/billsboatworks - http://www.freewebs.com/billsboatworks www.freewebs.com/billsboatworks 1987 SN Rebuild Project |
Posted By: TRBenj
Date Posted: January-13-2007 at 2:28pm
|
SkiBum, I know Im not the only one who finds this project interesting. Thanks again for contributing your project to this site.
I have performed a floor/string repair on a much smaller scale than yours, documented in http://www.correctcraftfan.com/forum/forum_posts.asp?TID=4002 - this thread, in case you havent seen it. It has a good discussion on my approach to the floor. I used a method that emulated the original floor construction of gla$$ over foam. Alternating epoxy mat and 6 oz gla$$, it took me 7 layers to build up to the original floor thickness of 1/8". This was by far the least enjoyable part of the whole miserable project. In comparison, the stringer repair and foam pouring were easy- almost enjoyable. I went through a lot of gla$$ and about 3 gallons of epoxy resin. I would imagine you would use closer to 8-10 gallons. I know if I were replacing the entire floor, I would stick with your original approach of using the wood. Hopefully someone with much more experience will share their opinion! ------------- |
Posted By: SkiBum
Date Posted: January-13-2007 at 4:22pm
|
I read that string before starting my own mess and I have reviewed it several times. It has been very useful in my own project.
Before I even realized the floor was only gla$$ I planned on using 1/2" ply saturated and gla$$ed like in my $20 book on floor replacement. The book, by the way, sucks. Each stringer consumed a gallon of epoxy resin and yards of gla$$. I shyed away from the all gla$$ floor because of cost. I saved for a year for this project AND an ACME 540 prop and Perfect Pa$$ Digital Pro. I am cutting into my prop and cruise funds already. The 3 ply wood is less than 1/4" thick and super light weight - as far as wood goes. It readily absorbs the resin and would certainly withstand being a boat floor. What has brought me full circle to the all gla$$ floor is the repair on the bulkhead. The 4lb foam is strong enough to support a gla$$ floor. Using mat, biaxial (4x thicker than the 10oz gla$$) and finishing with 10oz gla$$ is twice as thick as the bulkhead repair. For cost, in reality, there is not a lot of actual floor, most of it is all bilge. I still don't have the materials to do anything. Great planning, considering I have a four day weekend. ------------- Bill http://www.freewebs.com/billsboatworks - http://www.freewebs.com/billsboatworks www.freewebs.com/billsboatworks 1987 SN Rebuild Project |
Posted By: SkiBum
Date Posted: January-13-2007 at 4:29pm

I know, another boring photo, sorry. My focus has turned to working on the bilge in preparation of the new floor. I applied a thick layer of fairing compound to the stringers, channel between stringers, and bilge. I intend to eventually produce a smooth as gla$$ bilge where all of the water flows toward the drain plug. Again, an attempt to keep the new floor and stringers dry for more than 20 years this time. I had planned to hold off so I would not scuff up the bilge while I do the floor. I just can't stand having free time to work on the boat but not get anything done. No better way to use that time than sanding fibergla$$. ------------- Bill http://www.freewebs.com/billsboatworks - http://www.freewebs.com/billsboatworks www.freewebs.com/billsboatworks 1987 SN Rebuild Project |
Posted By: bkhallpass
Date Posted: January-13-2007 at 4:52pm
|
Bill, as a guy who'll be doing this project soon, I find it very interesting. Keep the pics coming. BKH ------------- Livin' the Dream |
Posted By: SkiBum
Date Posted: January-13-2007 at 10:46pm
|
I was staring aimlessly at the boat trying to think of what to do next. That is when I realized that I needed to make te braces that are perpendicular to the secondary stringers. I went back to the photos from deconstruction to remember how to put it back together. Thought these were more interesting than photos of sanding.
The floor is gla$$ed over this foam with 1"x2" supports that rest on the foam and are attached to the secondary stringers 
The entire front of the floor was no longer attached to the hull from the observer seat foreward. 
Remember in my installation I used two 1/2" pieces of plywood lamintated and saturated with resin. In this photo you can see that at the bottom of the hull the entire area is not connected to the hull. Water in the bilge can seep through into the foam below the battery box. And it did!  ------------- Bill http://www.freewebs.com/billsboatworks - http://www.freewebs.com/billsboatworks www.freewebs.com/billsboatworks 1987 SN Rebuild Project |
Posted By: SkiBum
Date Posted: January-14-2007 at 8:32pm

These are the new blocks that will attach to the secondary stringers. Applied epoxy resin and 10oz gla$$ to the both sides. Also to bond two pieces together for the blocks in the back. That was the easy work for the day. 
This is the bottom of the old floor. I pulled it back out to make sure I was placing the blocks in the right place on the stringers and using the correct size of blocks. Took a look at the thickness of the floor. On the edge closest to the hull it is consistently 1/4" thick. Most of the time closest to the stringers it is 1/8" or less. The rest varies. 
Each night after I clean up I review the days work and plan the next day. I have become very good at under estimating tasks. I figured I would spend an hour or two sanding the stringers, bilge, and between stringers. It took four hours just to do the inside of the stringers and the bilge. Between the stringers will be even harder to work so it should be another couple hours. The photo above, that's after vacuuming the dust. The dark spots are low spots that will have to be filled with more fairing compound and yet another total sanding. ------------- Bill http://www.freewebs.com/billsboatworks - http://www.freewebs.com/billsboatworks www.freewebs.com/billsboatworks 1987 SN Rebuild Project |
Posted By: SkiBum
Date Posted: January-15-2007 at 2:49pm

I removed only one stringer at a time to prevent the boat from losing its shape and to have a correctly sized stringer in place for reference. I was careful with my measurements. Even took some ribbing because I was using a dial caliper and hand plane to get things as close as possible. The stringers have been in place for some time. Everything fit - BEFORE! Today I set the engine cradle in place to make sure I was good. 
This is what I found. The pylon would not sit in the base on the hull. It was centered properly but was almost 1/8" too far to the stern. The reason? I think it is all the epoxy, gla$$, and fairing I have been using. The lesson? Remove a little extra material where the front of the cradle connects to the stringer to allow for the buildup of gla$$ and resin. 
No big deal to fix it at this point. Just removed some material toward the bow. This time I left a little extra space so when I go back over it with resin and gla$$ it will still fit. Maybe you can learn from my mistakes. ------------- Bill http://www.freewebs.com/billsboatworks - http://www.freewebs.com/billsboatworks www.freewebs.com/billsboatworks 1987 SN Rebuild Project |
Posted By: SkiBum
Date Posted: January-15-2007 at 3:13pm

I know what you are saying "why didn't he take that stuff off sooner?" Yeah I should have. It is all off now. Makes it much easier to sand and generally to work in the bilge area. There is another lesson learned. Spent two hours sanding between the stringers. Still haven't finished. The floor braces have cured so I'll install them next. ------------- Bill http://www.freewebs.com/billsboatworks - http://www.freewebs.com/billsboatworks www.freewebs.com/billsboatworks 1987 SN Rebuild Project |
Posted By: SkiBum
Date Posted: January-15-2007 at 7:38pm

Used epoxy resin with enough 403 filler to make it milky to saturate 3 layers of 10oz cloth at each connection. The blocks were already laminated with 10oz gla$$ and epoxy resin. Held them down with weights and used small sticks cut to size to keep the proper slight upward angle toward the hull. When I removed the floor the only place these blocks were saturated with water was at the stringer connections. Working on the stringers toward the bow to fine tune the height. I know, I have said that a billion times. This time I am adjusting the height where the origional floor was several planks of wood connected to the stringers with large staples. ------------- Bill http://www.freewebs.com/billsboatworks - http://www.freewebs.com/billsboatworks www.freewebs.com/billsboatworks 1987 SN Rebuild Project |
Posted By: SkiBum
Date Posted: January-16-2007 at 8:25pm
Glad somebody likes working with this stuff. I certianly don't. 

If anybody is still paying attention to this string, or if you happen upon it sometime because you are planning to do something similar I have a few foam tips for you: First, do not install the floor blocks onto the stringers before you pour the foam. I wasted an hour with a level trimming little sticks to set the blocks at just the right height. The foam just raises the blocks upward and messes up the entire floor alignment. I was only working with a quart of part A and a quart of part B at a time. When pouring a small bucket of foam the end sloped downward. With the next pour I made sure to pour foam onto the sloping end at the start of each new pour but it still left low spots that have to be backfilled to get the right level. To avoid this either use sacraficial blocks that can be used as temporary dams and removed before the next pour or use enough (maybe 4qts of each A & B) and pour the length of the floor. In the front of the boat there will be a 1/2" thick plywood floor laminated and saturated with epoxy and gla$$. I did not have that in place when I poured the foam. Now, I have to go back and trim the foam around that spot then pour and blend more foam to match the height. All that planning and piss poor execution created more work. A long hand saw works good for removing large overfill of foam quickly. I tried to keep an upward bow in the saw so it would not make the end closest to the hull low. I didn't always do so good. An orbital sander works well for providing the final shaping of the foam. ------------- Bill http://www.freewebs.com/billsboatworks - http://www.freewebs.com/billsboatworks www.freewebs.com/billsboatworks 1987 SN Rebuild Project |
Posted By: jbear
Date Posted: January-16-2007 at 11:24pm
|
Can I say how impressed I am with your work? It is awesome how you are taking to the time to record and post each step of the way for those guys that come along after you.
I am enjoying watching and reading. Makes me nervous tho, hope this job is not in my future! john ------------- "Loud pipes save lives" AdamT sez "I'm Canadian and a beaver lover myself"... |
Posted By: SkiBum
Date Posted: January-17-2007 at 9:09pm

I have been spending far too much time at my day job. Keeps me up late at night to catch up. I used my trusty level and an orbital sander to adjust the correct height of the floor. I simply sanded around the floor blocks leaving them slightly elevated above the foam. Then I came back and sanded down the floor blocks to match the level of the floor. Left a slight downward slope from the hull to the bilge. Also made a sacrificial dam to keep the foam in place while I pured the area where the main stringer is carved out to allow access to the engine cradle. Need to shape this area. In the front, sanded the floor down 1/2" where the plywood floor will be installed. 
The driver side is looking a little better. Used a hand saw to take off the large spots of over fill. Need to sand the floor in the same manner. When using the hand saw make to remove excess foam make sure that you keep the blade angled upward or you may find the tip going a little deeper than you want. Another thing about the foam. It foams in about 45 seconds. You are supposed to stir like crazy for about 22 seconds. Who counts 22 seconds? Anyhow, if you stir too long the foam that comes out does not flow anyplace but is very solid. If you dont stir long enough it runs, foams over all kinds of surfaces but is less dense. Guess you need to count 22 seconds! Thanks for your support. I may be doing things all wrong but I believe anybody else who is interested in doing something like this will at least know what to really expect and can definately learn from my mistakes. ------------- Bill http://www.freewebs.com/billsboatworks - http://www.freewebs.com/billsboatworks www.freewebs.com/billsboatworks 1987 SN Rebuild Project |
Posted By: SkiBum
Date Posted: January-17-2007 at 9:12pm

This is the finished observer side. When I say finished I mean the foam is leveled properly with a slight down slope from the hull to the bilge and the blocks are sanded to match. This is ready for gla$$. ------------- Bill http://www.freewebs.com/billsboatworks - http://www.freewebs.com/billsboatworks www.freewebs.com/billsboatworks 1987 SN Rebuild Project |
Posted By: Hollywood
Date Posted: January-17-2007 at 10:00pm
|
I'm thoroughly impressed with the rate at which you're going. Just one question about the level, are you keeping the entire boat level to start? because if not... ------------- |
Posted By: Tomski
Date Posted: January-18-2007 at 5:42am
|
Hollywood's point occured to me, but then I thought that it's not that critical as the boat is unlikely to float dead level anyway.
This kind of thing used to be my job and I can say that Bill is doing a far more thorough job than most boatyards would, a more throrough job than Correct Craft did in fact. It's quality work, I am looking at doing the same thing shortly and the attention to detail here will put me to shame! ------------- Easily Parted From Money |
Posted By: Hollywood
Date Posted: January-18-2007 at 9:34am
I'm thinking the stringers will keep you pretty "level" for the most part even if the boat was on a good tilt. ------------- |
Posted By: SkiBum
Date Posted: January-18-2007 at 9:31pm
|
After removing the engine before cutting away the floor I braced the floor at four corners making it as close to level as possible. That was origionally intended to keep the hull shape from changing when I removed a stringer but serves a dual purpose of keeping the boat basically level. Also, when I installed the first stringer the other three were untouched. I used a straight edge, not a level, and dial caliper to set the height of stringer. When I cut the floor out I left between 1/4" and 1/2" perpendicular to the hull. I used this as a reference when setting the height on the stringers. I am not making the floor level from stringer to hull. I keep the bubble just over on the hull side to keep a slight downward angle into the hull. Hopefully, with all of these precautions, the boat won't look like one of the diagrams in Hollywood's post. ------------- Bill http://www.freewebs.com/billsboatworks - http://www.freewebs.com/billsboatworks www.freewebs.com/billsboatworks 1987 SN Rebuild Project |
Posted By: SkiBum
Date Posted: January-18-2007 at 9:42pm


I am having trouble keeping my pace. Does not seem like much progress. From stern to the bow floor the foam is almost ready for gla$$. There are a few things. First, I ran out of foam again. I suck. That attention to detail thing is slowing me down as well. I need to carefully shape the foam next to the engine compartment so it will resemble the origional but provide better drainage. The drainage holes in the bottom of the stringers need to be reshaped as well. And there are those 1" x 3" braces that have to be saturated in resin then installed parallel to the hull in the foam. Then there is this problem with sequence. Once the floor piece for the bow is installed I will no longer be able to work in the bilge from the front of the engine cradle to the bulkhead. I have to establish a gla$$ like finish in the bilge before installing that floor piece and protect the work in the bilge. Gla$$ing the floor is going to result in runs in the channel between the stringers. But, would like to have the forward floor piece in place before starting to gla$$ the rest of the floor so I can tie it all together as I go. (probably one side at a time). These long days and nights are wearing at me. I don't want to rush things right now. So much time and money was spent getting me to this point. So if you don't see a lot of progress, I am a sissy. ------------- Bill http://www.freewebs.com/billsboatworks - http://www.freewebs.com/billsboatworks www.freewebs.com/billsboatworks 1987 SN Rebuild Project |
Posted By: jbear
Date Posted: January-18-2007 at 11:49pm
|
Bill: Really find it hard to believe you being a sissy!
john ------------- "Loud pipes save lives" AdamT sez "I'm Canadian and a beaver lover myself"... |
Posted By: dans
Date Posted: January-19-2007 at 1:07am
|
Your work does look better than CC . Your doing a great job . I think it will out last everything else in the boat . Dan ------------- http://www.correctcraftfan.com/diaries/details.asp?ID=1404&sort=&pagenum=1&yrstart=1981&yrend=198582 - 82 2001 |
Posted By: SkiBum
Date Posted: January-19-2007 at 6:08pm

Made plenty of progress so far today. Used a piece of the old floor to model the cut out at the motor box area. Instead of making a long gutter on the other side of the stringer I only made enough of a cut out to provide access to engine mounting bolts and water flow into the bilge. Also did a lot of sanding. Applied more fairing compound. I don't know how many times I am going to have to do that to finally get the gla$$ like finish I am searching for. After this cures I'll sand again and find out. 
Also carved out the foam where the floor braces are positioned. Placed them so they are just about flush with the floor. Another method would have been to carve out a larger channel then foam the braces in place, shave, and sand the excess foam. But, I am an idiot so I ran out of foam. 
This is the 1/2" plwood floor piece that installs near the bow. Saturated it in resin and one layer of 10oz gla$$. It will be gla$$ed onto the stringers and bulkhead then gla$$ed over with the rest of the floor. May install a brace just foreward of where the tow bar position because the origional floor was 1" x 3" strips of pine STAPLED onto the stringers. Thanks for the support. ------------- Bill http://www.freewebs.com/billsboatworks - http://www.freewebs.com/billsboatworks www.freewebs.com/billsboatworks 1987 SN Rebuild Project |
Posted By: SkiBum
Date Posted: January-20-2007 at 12:39pm

Spent three hours sanding the epoxy resin mixed with fairing compound. Finally figured out a way to keep from getting saturated in dust. Used a zip tie to attach a heavy sock around the vent where a dust collector is supposed to be on my sander. Probably rushing things but I moved on to using vinyl ester resin mixed with 3M gla$$ bubbles and thickened to reduce runs. I can tell already it will take more sanding and at least one more application of the vinyl ester resin. My goal is to produce a gla$$ like finish in the bilge so water does moves and doesn't pool. The current problem is the sequence of a$$embly of the floor. I must finish working in the bilge forward of the engine compartment before I can attach the plywood floor. Must have that piece of floor in place before doing the remainder of the floor to keep everything level. My job sucks. I have to work this weekenend. Getting close to finishing the floor but just not getting any time to do the work. ------------- Bill http://www.freewebs.com/billsboatworks - http://www.freewebs.com/billsboatworks www.freewebs.com/billsboatworks 1987 SN Rebuild Project |
Posted By: Tim D
Date Posted: January-20-2007 at 1:07pm
Skibum, is there any disadvantage in leaving out the foam? Here are some pics someone else did that's impressive too. Looks like they used that grey epoxy used on garage floors.
 ------------- Tim D |
Posted By: SkiBum
Date Posted: January-20-2007 at 2:14pm
|
Yes, that is very good work. Looks like this boat has a plywood floor maybe 1/2". It would certainly work. Personally I put much more effort into water proofing but to each his own.
http://www.correctcraftfan.com/forum/forum_posts.asp?TID=3511&KW=foam - To Foam or not to Foam There were several pages of discussion about this topic in that string. I certainly don't want to restart that discussion. I will say that in my case I am making a "stand alone" floor that is gla$$ed over the foam. The foam must be in place to make the floor. Only the piece below the driver and observer seat is wood. That piece is set over foam as well. Here are some things I can share with you to help you make your decision: Cost of using foam for the entire floor is about $350.00. That is in my case. If you poured it more efficiently you would use less foam. I don't know how much the foam weighs. It was two five gallon buckets (and another two one gallon buckets). That weight in a stand alone floor would certainly be the same or less than a wood floor with gla$$ that does not have foam. When there was no foam in the boat but the stringers were bedded, gla$$ed, and cured the hull was "flimsy" for lack of a better description. When the foam was installed the floor and hull bonded and became "solid". If the hull were ever breached in a boat with foam in the floor water will get inside. The boat is likely to stay afloat. If there is no foam that void will be filled with nothing but water at 8lbs per gallon. I hope this helps answer your question. By no means to I profess to be an expert. I know there were a lot of smart guys discussing this subject at length in that string "foam or not to foam". ------------- Bill http://www.freewebs.com/billsboatworks - http://www.freewebs.com/billsboatworks www.freewebs.com/billsboatworks 1987 SN Rebuild Project |
Posted By: copcraft
Date Posted: January-20-2007 at 5:07pm
|
Bill
Thanks for your hard work so that others will learn. This morning I ripped off the top piece of fibrgla$$ on the floor in the '74 Mustang I'm redoing. The stringers are all still intact, I'm still removing wet foam. How big of a concern do you think it is to do the stringers one at a time to keep the boat shape? I hadn't given this a thought until you mentioned it. Should I stop here before it's too late if that will be a problem. Thanks David |
Posted By: SkiBum
Date Posted: January-20-2007 at 10:32pm
|
It is important to brace the boat on four corners (even though it is sitting on a trailer) to keep the shape of the boat. Also, make sure the boat is as close to level as possible. Remove only one stringer at a time to help keep the shape of the boat. One day when the driver side secondary stringer was removed on my boat I inadvertantly knocked out the support in the front driver side of the boat without realizing it. When I shifted inside the boat the driver side of the boat actually bounced up and down several inches like a raft on a wave.
The stringer that is not removed can be used as a baseline for fine tuning the measurements of the new stringer. Then, when you pull the other stringer there is an accurate duplicate of the origional to work from. If you were to remove them both at the same time the only thing you would have to work with is what you removed. Using the removed stringer as a pattern was only enough to get me close. I started with the main stringers. They dont like to be removed. I tried cutting the first one out down to the hull to keep the actual shape. That was a mistake. On the second stringer I just cut as straight as I could about one inch off the deck. Then, you can come back through and carefully cut out the remainder of the stringer. There is a "sweet spot" where the blade is cutting just below the wood from the stringer and the blade pulls right along. The best tool for this job is a small air powered saw available at most auto parts stores. Replace the blade when the saw stops pulling you through the cut. In my opinion, based on my recent experience I recommend that you remove only one stringer at a time after bracing the boat. ------------- Bill http://www.freewebs.com/billsboatworks - http://www.freewebs.com/billsboatworks www.freewebs.com/billsboatworks 1987 SN Rebuild Project |
Posted By: copcraft
Date Posted: January-20-2007 at 10:56pm
|
Bill
Thanks for your reply. I will folow your advise. Keep up the good work and hopefully you won't mind my questions as they keep popping up. David |
Posted By: SkiBum
Date Posted: January-21-2007 at 3:43pm
|
After spending hours sanding the bilge area of the boat I turned up the heat to 80 degrees. I carefully measured the vinyl ester resin, mixed in 3M Gla$$ bubbles, thickened, and added the prescribed amount of wax. Then I carefully measured the MEKP and stirred the mix. Anyhow, after I applied this stuff to the bilge I left for work. 24hrs later when I got off work I came back to a garage that smelled worse than when I was working with the stuff. It never cured or catalyzed. Now I am scraping and wiping off 1/2 gallon of vinyl ester resin and gla$$ bubbles. Yeah, I am angry.
I maintained the 80 deg temp before, during, and for 24 hrs after applying the vinyl ester resin. I used measuring cups and followed the US Composites guidelines to the number. Doesn't matter now. I estimate it will take two or three days to clean all of that sticky, smelly, expensive slime out of my boat. So in the progression of my project, I am now moving backwards! I suck. ------------- Bill http://www.freewebs.com/billsboatworks - http://www.freewebs.com/billsboatworks www.freewebs.com/billsboatworks 1987 SN Rebuild Project |
Posted By: jbear
Date Posted: January-21-2007 at 8:47pm
|
I, along with many others have been watching your very informative posts. I am sure you do not "suck"....looks to me like you are doing an awesome job.
john ------------- "Loud pipes save lives" AdamT sez "I'm Canadian and a beaver lover myself"... |
Posted By: copcraft
Date Posted: January-21-2007 at 10:56pm
| Keep the faith brother. Don't let the bastards get you down! Your project looks GREAT, and it will be awesome when it's done! |
Posted By: SkiBum
Date Posted: January-22-2007 at 4:15pm
|
Spent some time scraping the gunk out of my bilge. Still very angry. The smart guy at US Composites is trying to help me. If all goes well I'll be wrapping it up soon. Thanks for the support. Things were going very well until the vinyl ester incident. ------------- Bill http://www.freewebs.com/billsboatworks - http://www.freewebs.com/billsboatworks www.freewebs.com/billsboatworks 1987 SN Rebuild Project |
Posted By: Waterdog
Date Posted: January-22-2007 at 5:41pm
|
SkiBum
Keep your head up man. So you've got a little set back. If it was easy it would'nt be worth it. Your doing a GREAT job! I'm no holy roller by any means - But - I know God would never put more on your shoulders than You can carry. ------------- - waterdog - http://www.correctcraftfan.com/diaries/details.asp?ID=3896&sort=&pagenum=2&yrstart=1978&yrend=1978" rel="nofollow - 78 Ski Tique |
Posted By: farmer
Date Posted: January-22-2007 at 7:41pm
|
SkiBum, I have to disagree with your last couple of posts. Every day I check on your progress and every day I'm amazed at how much you've accomplished. You seem to be able to stick to the project at hand much better than most,including myself.(especially myself)
Keep it up.Your posts are a great help to those of us who will be doing this in the future. Farmer
|
Posted By: 88 Nautique
Date Posted: January-22-2007 at 11:10pm
|
I agree... This is definitely a post that will be referred to a lot in the future. It will make SkiBum a legend. ------------- http://www.correctcraftfan.com/diaries/details.asp?ID=1657" rel="nofollow - My 88 Nautique |
Posted By: SkiBum
Date Posted: January-23-2007 at 5:26pm
|
Thanks for all the support. I believe the smart thing to do would be once this is all finished to put together some sort of summary backed by photos, lists of materials, tools, and tips. The smart guy at US Composites a$$ures me that the remaining vinyl ester resin will eventually "cook off". Have determined that because of the use of fillers and thickener I was supposed to have used as much as 3% catalyst instead of 1%. Next problem was that I was not using the resin with gla$$ but rather as a sort of fairing. That causes the resin to be applied very thin which slows the catalyzing process. Those little tid bits of information will be in my summary.
Sorry but there won't be any real progress for a few more days until the catalyst "cooks off". I cannot apply epoxy resin over unsettled vinyl ester resin. But thanks for the support. ------------- Bill http://www.freewebs.com/billsboatworks - http://www.freewebs.com/billsboatworks www.freewebs.com/billsboatworks 1987 SN Rebuild Project |
Posted By: Waterdog
Date Posted: January-23-2007 at 7:29pm
|
Skibum
Talked to a couple of engineers at work today. Here goes,the stuff that leaves the vinyl ester resin when it's curing is styrene it's heavier than air so it's kind of traped in the bottom of the boat. If you move the air with a fan that will move the styrene off the surface and help cure the resin. Also with epoxy resin sometimes,when the stars line up right there's something called Amine Blush on the surface of the cured epoxy. You my or may not be able to feel a greasy film . The Amine Blush may inhibit the cure of vinyl ester resin if its in close proximity. It happens for a lot of reasons high humidity, petroleum fueled heaters,temp swings ect... It will help if you're trying stick anything to epoxy,( more epoxy, paint ect..) to use an acetone wipe on the epoxy and a lite scuff with sandpaper, soap & water won't hurt either. If vinyl ester is used over epoxy all bets are off, if it cures ,it wont stick very well. Anyway glad to see your back on your feet. Our composite materials lab (where I work) has some pretty sharp guys. Here's my work # if you want to give a shout out 252-464-7167 We repair all Navy - Marine helo's AV-8b Harriers, V-22 Ospreys & more. ------------- - waterdog - http://www.correctcraftfan.com/diaries/details.asp?ID=3896&sort=&pagenum=2&yrstart=1978&yrend=1978" rel="nofollow - 78 Ski Tique |
Posted By: SkiBum
Date Posted: January-23-2007 at 8:20pm
|
I was warned about the "amine blush" before I applied the vinyl ester resin. I sanded the entire surface of the epoxy resin before I applied the vinyl. I will set a fan in the bilge to try to circulate the air. I use a kerosine heater for my primary heat source in the garage. You mentioned that petrolium fueled heaters may be a problem. I have the humidity and the heater.
No worries. The vinyl ester resin is almost cured completely from the engine compartment to the stern. Once the front catches up I'll be sanding sanding then applying a finish so I can set the floor. Just need a few days to let the chemicals work. Might just give you a call too. Thanks. ------------- Bill http://www.freewebs.com/billsboatworks - http://www.freewebs.com/billsboatworks www.freewebs.com/billsboatworks 1987 SN Rebuild Project |
Posted By: SkiBum
Date Posted: January-25-2007 at 8:45pm

Starting to recover from the vinyl ester disaster. The bilge cured enough that I could grind and sand it back to epoxy. Used epoxy resin, thickener, and 3M Gla$$ Balls applied in a thick coat over the front of the bilge. When this cures it can be sanded smooth. Probably one more application after that sanding and the front of the floor can be set in place. Then the rest of the floor. Once finished I'll deal with the rest of the bilge. ------------- Bill http://www.freewebs.com/billsboatworks - http://www.freewebs.com/billsboatworks www.freewebs.com/billsboatworks 1987 SN Rebuild Project |
Posted By: SkiBum
Date Posted: January-27-2007 at 9:25pm

I finished sanding the front portion of the bilge that would be covered by the plywood portion of the floor. Applied gla$$ and resin attaching the floor to the stringer where the plywood covers the bilge. Will come back with additional gla$$ and epoxy once the floor cures to make sure that the connection between the plywood floor and the stringers is totally water tight. Used Microfibers with the epoxy to help with bonding. The weights are just keeping downward pressure on the bonds until things cure. Starting the rest of the floor tomorrow. Will worry about cleaning the remaining vinyl ester gunk out of the bilge later. Checked out the Louisville, KY boat show today. Great inspiration to get this thing finished. ------------- Bill http://www.freewebs.com/billsboatworks - http://www.freewebs.com/billsboatworks www.freewebs.com/billsboatworks 1987 SN Rebuild Project |
Posted By: SkiBum
Date Posted: January-27-2007 at 9:39pm
|
Origional plan was to fill and sand the bilge until it was perfectly smooth, then apply vinyl ester resin so I could apply bright white gelcoat to the entire bilge. The vinyl ester resin would not cure, created a huge mess and spent days getting it cleaned up.
New plan. Ordered more gla$$ bubbles, epoxy resin, and some bright white tint for the epoxy. This should still give a smooth, shiny, water proof bilge. Time will tell. ------------- Bill http://www.freewebs.com/billsboatworks - http://www.freewebs.com/billsboatworks www.freewebs.com/billsboatworks 1987 SN Rebuild Project |
Posted By: SkiBum
Date Posted: January-28-2007 at 6:08pm


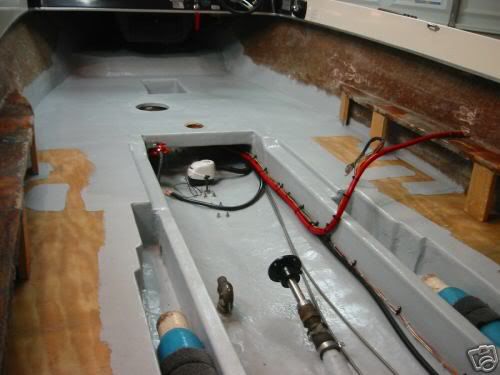
Gla$$ed the observer side of the floor today. Started with the biaxial mat. Stuff is very thick. Followed that with a layer of epoxy mat which was also quite thick. The final layer of gla$$ was 10oz cloth for a smooth finish. It took two gallons of epoxy resin. Extended each consecutive layer of gla$$ farther up the side of the hull at 2", 4", and 6". Same with the gla$$ that connected to the stringers where it eventually extended the height of the stringer. Spent a long time rolling out the air bubbles. Could feel the heat from the resin curing. The combination of the three gla$$es is quite thick and absorbs plenty of resin. Plan to do the other side of the floor tomorrow. Then, decide whether or not more layers will be needed. Probably base that decision on how much epoxy and gla$$ I have remaining. To finish the floor I'll have to use epoxy and fairing compound to fill in low spots. It should turn out just fine. No worries. The bilge is still a crime scene. Once the floor is finished I'll have to grind the remaining vinyl ester away. Then several applications of epoxy and 3M gla$$ bubbles followed by sanding. Looking better anyhow. ------------- Bill http://www.freewebs.com/billsboatworks - http://www.freewebs.com/billsboatworks www.freewebs.com/billsboatworks 1987 SN Rebuild Project |
Posted By: Waterdog
Date Posted: January-28-2007 at 7:17pm
|
Skibum
Good talkin to ya Friday, glad things are going your way now. " Not much of a hill for a climber" and Dude Your a Climber!!! Your doing a great job. ------------- - waterdog - http://www.correctcraftfan.com/diaries/details.asp?ID=3896&sort=&pagenum=2&yrstart=1978&yrend=1978" rel="nofollow - 78 Ski Tique |
Posted By: SkiBum
Date Posted: January-29-2007 at 6:35pm


Gla$$ed the driver side of the floor. Same layup as before: biaxial, mat, and cloth. The work from yesterday was cured and seems very sturdy. Probably don't need more gla$$ but have not decided yet. Need to climb under the plywood on the floor and attach strips to seal off the bilge from the floor. Probably install a brace then as well. Looking much more like a boat. The back half of the bilge looks like Baghdad. Plenty of work left. ------------- Bill http://www.freewebs.com/billsboatworks - http://www.freewebs.com/billsboatworks www.freewebs.com/billsboatworks 1987 SN Rebuild Project |
Posted By: SkiBum
Date Posted: January-29-2007 at 6:49pm


The top photo shows the layup used for the floor. The biaxial is quite thick and so is the mat. Each side absorbed two gallons of epoxy resin. The bottom photo shows the gla$$ required for one side. That is a lot of gla$$ saturated with epoxy. Even so, leaning toward adding more gla$$ to the floor before I use fairing compound to smooth out the bumps. ------------- Bill http://www.freewebs.com/billsboatworks - http://www.freewebs.com/billsboatworks www.freewebs.com/billsboatworks 1987 SN Rebuild Project |
Posted By: leo0648
Date Posted: January-30-2007 at 4:47pm
|
Hey Bill,
I am very impressed with your work. Owning a 1983 2001, I am thinking about taking on the same job myself this summer. I was wondering, what type of materials to use (such as fibergla$$ types and resins). Also if any special tools were needed. I have experience working with engines and fibergla$$ on boats, but never something of this extent. About how much money did you spend in material and how much time in labor? |