 Boats For Sale:


84 Ski Nautique 2001 - Upholstery |
Post Reply 
|
Page 12> |
| Author | |
dwcar 
Platinum Member 

Joined: February-11-2007 Location: Houston Texas Status: Offline Points: 1103 |
 Post Options Post Options
") Thanks(0) Thanks(0)
 Quote Reply Quote Reply
 Topic: 84 Ski Nautique 2001 - Upholstery Topic: 84 Ski Nautique 2001 - UpholsteryPosted: June-09-2013 at 11:54am |

|
|
|
83Ski
|
|
 |
|
|
GlassSeeker
Grand Poobah 

Joined: November-26-2008 Location: Elk Grove, CA. Status: Offline Points: 2421 |
Post Options
Thanks(0)
Quote Reply
Posted: June-08-2013 at 8:55pm |
|
looks very good
|
|
|
This is the life
|
|
|
|
|
OldSchoolBlue84
Gold Member

Joined: December-02-2012 Location: Valparaiso, IN Status: Offline Points: 814 |
Post Options
Thanks(0)
Quote Reply
Posted: June-08-2013 at 8:02pm |
|
We used contact cement but before we used it, we let it sit in the sun and stretch to dry fit were we wanted it. We did the sides first and then stretch front to back. It actually stretched a couple of inches! It was a real PITA.......
As for the trim piece, bought it from nautiqueskins. It came as a coil and then had to straighten it out along a flat edge such as plywood sheet and then mold it in place using our hands. Again a PITA.... We used the 1" foam to fill all voids, will smaller foam such as 1/2", the vinyl could reach but then you have wrinkles and voids. Good luck! |
|
|
Kostas
1984 Ski Nautique 2001 |
|
|
|
|
8122pbrainard
Grand Poobah

Joined: September-14-2006 Location: Three Lakes Wi. Status: Offline Points: 41040 |
Post Options
Thanks(0)
Quote Reply
Posted: June-08-2013 at 7:45pm |
|
Dan,
Is it the aluminum J molding you need? Yes on the contact adhesive. I still like the good old solvent base and not the water based stuff. Damn EPA!!   I feel the 1" foam on the dog house is too thick. That may be your problem? |
|
|
|
|
Dan in CT
Groupie 
Joined: November-12-2012 Location: East Hampton, C Status: Offline Points: 77 |
Post Options
Thanks(0)
Quote Reply
Posted: June-08-2013 at 7:23pm |
|
Very nice. Just finished driver and observers seat. As you know been working on the doghouse. Quite a challenge. Covered in 1 inch foam and plastic. Needs to be stretched more. I have it clamped up in the garage. Will set it in the sun tomorrow and give it another try. Looks pretty good right now, I just don't have enough overlap on all sides.
Questions....what did you use for glue? Contact cement? Also, the metal edge that was riveted is aluminum and not in great condition. Any options available? They really should have had a better base for the doghouse than a thin Al strip. There are some hard bends, I.e. by the pylon, so bending metals is likely not an option. Thanks. Dan |
|
|
|
|
OldSchoolBlue84
Gold Member
Joined: December-02-2012 Location: Valparaiso, IN Status: Offline Points: 814 |
Post Options
Thanks(0)
Quote Reply
Posted: June-08-2013 at 4:03pm |
|
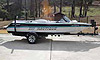
Finally summer is getting here and I was able to take & post some pics of the new interior in the boat! Came out pretty good for never doing upholstery before. I already had the lake patrol stop me to get a closer look, that felt good
       |
|
|
Kostas
1984 Ski Nautique 2001 |
|
|
|
|
OldSchoolBlue84
Gold Member
Joined: December-02-2012 Location: Valparaiso, IN Status: Offline Points: 814 |
Post Options
Thanks(0)
Quote Reply
Posted: June-04-2013 at 1:02am |
|
Sorry for the late response, been shopping for a new tow ride, deer totaled mine out
 Anyhow, I glued down the foam over the existing foam and took it all the to the bottom but then I cut a 45 degree angle at the bottom since I had to install the stainless steel motor box trim. My vinyl goes all the down and then wraps under the motor box, no carpet. Hope this helps, good luck. |
|
|
Kostas
1984 Ski Nautique 2001 |
|
|
|
|
Dan in CT
Groupie
Joined: November-12-2012 Location: East Hampton, C Status: Offline Points: 77 |
Post Options
Thanks(0)
Quote Reply
Posted: June-03-2013 at 8:49am |
|
Did you remove the old foam before adding the new 1 inch of foam? Also did you go all the way to the bottom of the DH with the foam? My DH is recessed with the foam stopping about 4 inches up. This is where the original upholstery transitioned to carpet. Thanks, Dan.
|
|
|
|
|
Dan in CT
Groupie
Joined: November-12-2012 Location: East Hampton, C Status: Offline Points: 77 |
Post Options
Thanks(0)
Quote Reply
Posted: June-02-2013 at 6:58pm |
|
Thanks guys, getting a couple of guys to help sounds like a good reason for pizza and beer! Thanks for the advice. I'm getting pretty excited about boating this year! Yes, this is my first boat. Will post pictures when I am done. Dan
|
|
|
|
|
ChristinesMarine
Senior Member 
Joined: December-01-2011 Location: Orlando, FL Status: Offline Points: 223 |
Post Options
Thanks(0)
Quote Reply
Posted: June-02-2013 at 12:25pm |
|
Kostas
Great! We will add your pics to our photo gallery on our web site. I appreciate you helping others with questions. Advice from the perspective of someone that has successfully re-skinned their first boat is often more relatable for the first timer than advise from us. We may tend to forget to mention things that are obvious to us but not to a first timer. |
|
|
|
|
OldSchoolBlue84
Gold Member
Joined: December-02-2012 Location: Valparaiso, IN Status: Offline Points: 814 |
Post Options
Thanks(0)
Quote Reply
Posted: June-02-2013 at 11:38am |
|
Very good point!
Finally have the interior installed. Will email you the pics soon. We just got the boat in the water yesterday and the family had a blast! The marina differently commenting on the interior! |
|
|
Kostas
1984 Ski Nautique 2001 |
|
|
|
|
ChristinesMarine
Senior Member
Joined: December-01-2011 Location: Orlando, FL Status: Offline Points: 223 |
Post Options
Thanks(0)
Quote Reply
Posted: June-02-2013 at 11:32am |
|
I couldn't have said it any better! We might need to hire you! It is best to mark where the stripes fall on the inside of the motor box where they wrap as not all stripe designs are in the center.
|
|
|
|
|
OldSchoolBlue84
Gold Member
Joined: December-02-2012 Location: Valparaiso, IN Status: Offline Points: 814 |
Post Options
Thanks(0)
Quote Reply
Posted: June-02-2013 at 11:25am |
+1  I bought the foam from a fabric store such as Jo-Ann Fabrics & Crafts. I would suggest having 1-2 additional help to glue and stretch around the motor box. If you could do this outside on a sunny day, it will make it easier. Make sure you wrap the motor box in plastic, makes it a easier install. Last thing, if you have strips, keep them straight and center on the motor box or your handle and hinges will be off. One of my oups.......  Good luck and if you need anything else, let me know. |
|
|
Kostas
1984 Ski Nautique 2001 |
|
|
|
|
ChristinesMarine
Senior Member
Joined: December-01-2011 Location: Orlando, FL Status: Offline Points: 223 |
Post Options
Thanks(0)
Quote Reply
Posted: June-02-2013 at 11:06am |
|
The motor box skin wraps under the bottom and glues with contact cement to the inside of the motor box. DO NOT trim it flush with the bottom.
|
|
|
|
|
Dan in CT
Groupie
Joined: November-12-2012 Location: East Hampton, C Status: Offline Points: 77 |
Post Options
Thanks(0)
Quote Reply
Posted: June-02-2013 at 10:54am |
|
I am staring at my "naked" doghouse in my garage. Got my skins from Christine's, could you describe your process? From your pictures, looks like I need to invest in a couple spring clamps. Did you glue the bottom? Or is everything held with the AL strip and rivits? Did you cut the skin flush or wrap it around?
Where did you get the 1 in foam, that you recommend? Sorry for all the questions, I hate reinventing the wheel. And love to benefit from others mistakes! I appreciate any assistance you can provide. Dan |
|
|
|
|
OldSchoolBlue84
Gold Member
Joined: December-02-2012 Location: Valparaiso, IN Status: Offline Points: 814 |
Post Options
Thanks(0)
Quote Reply
Posted: April-11-2013 at 12:06pm |
Will give everyone a tip, foam! I wrapped, cut and glued 1" foam roll on the entire motor box. That day happen to be nice and sunny (60*) which helped stretching out the vinyl. Thanks Matt |
|
|
Kostas
1984 Ski Nautique 2001 |
|
|
|
|
Tide
Newbie 
Joined: July-27-2011 Location: Georgia Status: Offline Points: 33 |
Post Options
Thanks(0)
Quote Reply
Posted: April-11-2013 at 11:32am |
|
I think it all looks great. It seems that most people have the hardest time on the dog house but yours looks like it was installed by a professional.
|
|
|
95 Ski GT - 40
|
|
|
|
|
OldSchoolBlue84
Gold Member
Joined: December-02-2012 Location: Valparaiso, IN Status: Offline Points: 814 |
Post Options
Thanks(0)
Quote Reply
Posted: April-11-2013 at 11:23am |
It was many discussions on the proper alignment, but after doing some research, we decided dark blue strips go inwards! Was actually worried I did it wrong. Thanks Dave. |
|
|
Kostas
1984 Ski Nautique 2001 |
|
|
|
|
OverMyHead
Grand Poobah

Joined: March-14-2008 Location: MN Status: Offline Points: 4861 |
Post Options
Thanks(0)
Quote Reply
Posted: April-11-2013 at 11:02am |
|
It also looks like your old drivers seat strips were backwards. It is good to see they fixed that!
|
|
|
For thousands of years men have felt the irresistible urge to go to sea, and many of them died. Things got better after they invented boats.
1987 Ski Nautique |
|
|
|
|
OverMyHead
Grand Poobah
Joined: March-14-2008 Location: MN Status: Offline Points: 4861 |
Post Options
Thanks(0)
Quote Reply
Posted: April-11-2013 at 10:57am |
|
Looks like a very nice job. Am I the only one bothered by the strips on the dog house not lining up with those on the seat in these boats? My upholstery training for furniture says strips always line up down the back, across the cushion. and down the front. The layout in the 2001's is anarchy I tell you.
|
|
|
For thousands of years men have felt the irresistible urge to go to sea, and many of them died. Things got better after they invented boats.
1987 Ski Nautique |
|
|
|
|
OldSchoolBlue84
Gold Member
Joined: December-02-2012 Location: Valparaiso, IN Status: Offline Points: 814 |
Post Options
Thanks(0)
Quote Reply
Posted: April-11-2013 at 4:11am |
Thanks! I could scratch that off my list. As soon as the weather stays a consistent 60 degrees and above, they will be installed in the boat and of course pictures will be posted. |
|
|
Kostas
1984 Ski Nautique 2001 |
|
|
|
|
OldSchoolBlue84
Gold Member
Joined: December-02-2012 Location: Valparaiso, IN Status: Offline Points: 814 |
Post Options
Thanks(0)
Quote Reply
Posted: April-11-2013 at 4:05am |
Thanks! They told me 6-10 weeks and I received them at about 9 weeks. They were great to work with! I send them an email over the weekend (closed on weekends) on the motor box install and they responded, great customer service. 
|
|
|
Kostas
1984 Ski Nautique 2001 |
|
|
|
|
storm34
Grand Poobah

Joined: November-03-2008 Location: Dexter Iowa Status: Offline Points: 4492 |
Post Options
Thanks(0)
Quote Reply
Posted: April-11-2013 at 3:43am |
|
Looks great!
What was their turn around time if you don't mind me asking? |
|
|
|
|
GlassSeeker
Grand Poobah
Joined: November-26-2008 Location: Elk Grove, CA. Status: Offline Points: 2421 |
Post Options
Thanks(0)
Quote Reply
Posted: April-11-2013 at 1:50am |
|
let's see it all in the boat!
looks great and looks like you did a very nice job installing. |
|
|
This is the life
|
|
|
|
|
OldSchoolBlue84
Gold Member
Joined: December-02-2012 Location: Valparaiso, IN Status: Offline Points: 814 |
Post Options
Thanks(0)
Quote Reply
Posted: April-11-2013 at 12:19am |
|
Thanks Wes, especially nervous of the white. Going to be a cleaning lunatic!
. Great chore for the kids!
|
|
|
Kostas
1984 Ski Nautique 2001 |
|
|
|
|
wwchevy
Senior Member

Joined: August-22-2011 Location: Michigan Status: Offline Points: 369 |
Post Options
Thanks(0)
Quote Reply
Posted: April-10-2013 at 10:18am |
|
The interior looks great. It is expensive, but one of the best investments in my opinion. Don't let people sit on it.
|
|
|
wwchevy
1989 Barefoot Nautique |
|
|
|
|
OldSchoolBlue84
Gold Member
Joined: December-02-2012 Location: Valparaiso, IN Status: Offline Points: 814 |
Post Options
Thanks(0)
Quote Reply
Posted: April-09-2013 at 11:44pm |
|
Received the interior from Nautique Skins last week and spend all weekend installing (about 14hours, but who's counting). Nautique Skins did a great job and they look great. As soon as the weather breaks, seats will be in the boat and additional pics will be posted. Its not original, but close.
               
|
|
|
Kostas
1984 Ski Nautique 2001 |
|
|
|
|
OldSchoolBlue84
Gold Member
Joined: December-02-2012 Location: Valparaiso, IN Status: Offline Points: 814 |
Post Options
Thanks(0)
Quote Reply
Posted: January-18-2013 at 1:47am |
|
TRBenj, attached is the new vinyl tri-blue stripes, looks pretty good. Have a good one.
New  |
|
|
Kostas
1984 Ski Nautique 2001 |
|
|
|
|
OldSchoolBlue84
Gold Member
Joined: December-02-2012 Location: Valparaiso, IN Status: Offline Points: 814 |
Post Options
Thanks(0)
Quote Reply
Posted: January-17-2013 at 11:48pm |
|
The base is a very very light blue with white, color is Misty Blue. Very unique color but unfortunately it's no longer made or even come close to it. 2 of the 3 stripes are exact, color and marbling. Middle blue lacks the marbling but its the closest color combo and texture. Not sure who is the manufacture, I will need to talk with George at nautique skins to find out. He is sending me the white samples and then will make a final decision.
|
|
|
Kostas
1984 Ski Nautique 2001 |
|
|
|
|
TRBenj
Grand Poobah

Joined: June-29-2005 Location: NWCT Status: Offline Points: 21133 |
Post Options
Thanks(0)
Quote Reply
Posted: January-17-2013 at 2:48pm |
|
What was the base color of your original seats? A very light blue to match the Dresdon? It looks white on my computer screen, but it can be tough to judge.
Did you go with the Dolphin Naugahyde on the stripes to get the marbling? |
|
|
|
|
Post Reply
|
Page 12> |
 Tweet
Tweet
|
| Forum Jump | Forum Permissions You cannot post new topics in this forum You cannot reply to topics in this forum You cannot delete your posts in this forum You cannot edit your posts in this forum You cannot create polls in this forum You cannot vote in polls in this forum |


 Topic Options
 GlassSeeker wrote: