 Boats For Sale:


Custom 1965 Correct Craft Mustang build |
Post Reply 
|
Page <1 1516171819 32> |
| Author | ||
Hussler 
Gold Member 
Joined: February-04-2012 Location: - Status: Offline Points: 895 |
 Post Options Post Options
") Thanks(0) Thanks(0)
 Quote Reply Quote Reply
 Posted: May-13-2013 at 1:53am Posted: May-13-2013 at 1:53am |
|
|
Yep, planning to add a taper to countersink the matt. The piece of wood on the other side should also be adding a lot of strength.
Only have to raise up the bottom an inch or so, not going to bother closing it off just to cut it out again. Appreciate the input Gary |
||
 |
||
|
Gary S
Grand Poobah 

Joined: November-30-2006 Location: Illinois Status: Offline Points: 14096 |
Post Options
Thanks(0)
Quote Reply
Posted: May-13-2013 at 1:02am |
|
|
I had a thick piece of biax,added the resin to it and let it harden. Then I put cardboard behind the hole and traced from the outside. Used the cardboard tracing to cut the filler plug from the hardned biax. Then I used mat and kept building it up,a little larger each time until I had the thickness needed. I used polyester for this part of the repair to compatable with the polyester gelcoat. When done I sanded the back side of the repair and used epoxy and mat to cover the whole repair to give it even more strength. Hope this helps-
|
||
|
||
|
Gary S
Grand Poobah
Joined: November-30-2006 Location: Illinois Status: Offline Points: 14096 |
Post Options
Thanks(0)
Quote Reply
Posted: May-13-2013 at 12:54am |
|
|
Before you go any further take a look at how I did mine. Get in there
and grind a taper on that cut out edge. It will help the bond,the 'glass fibers will lay out over the taper instead of butting up to the edge. the starting point much like yours- 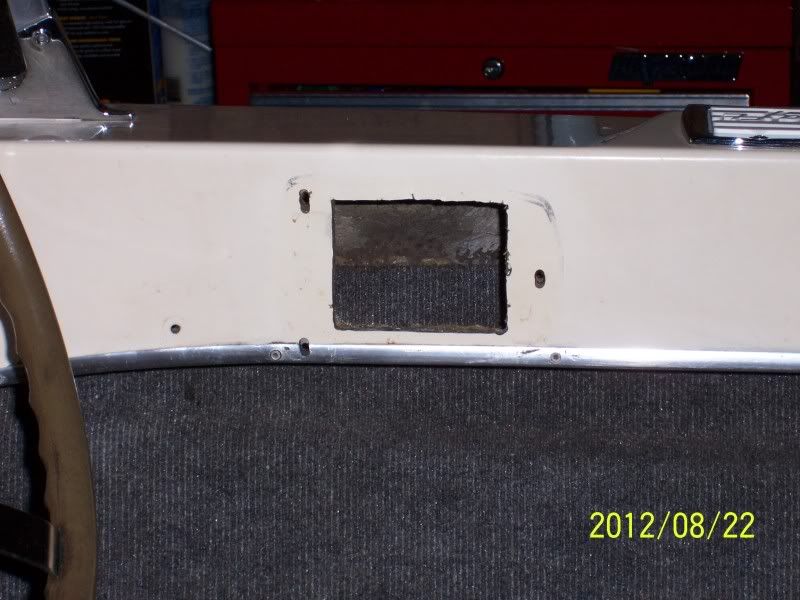 Here you can see the darker outline taper under the glass layer 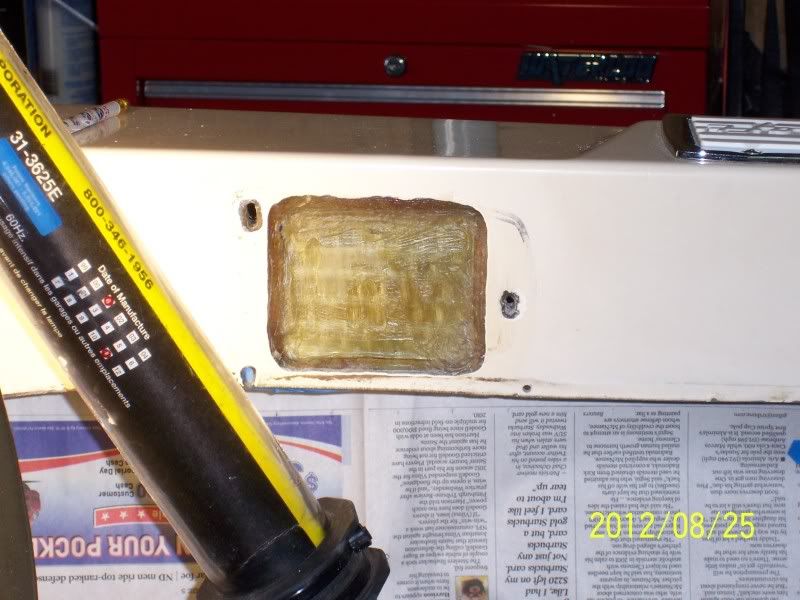 Here it is with the added glass layers to get to correct thickness and sanded. Now just the gel coat needs to be added 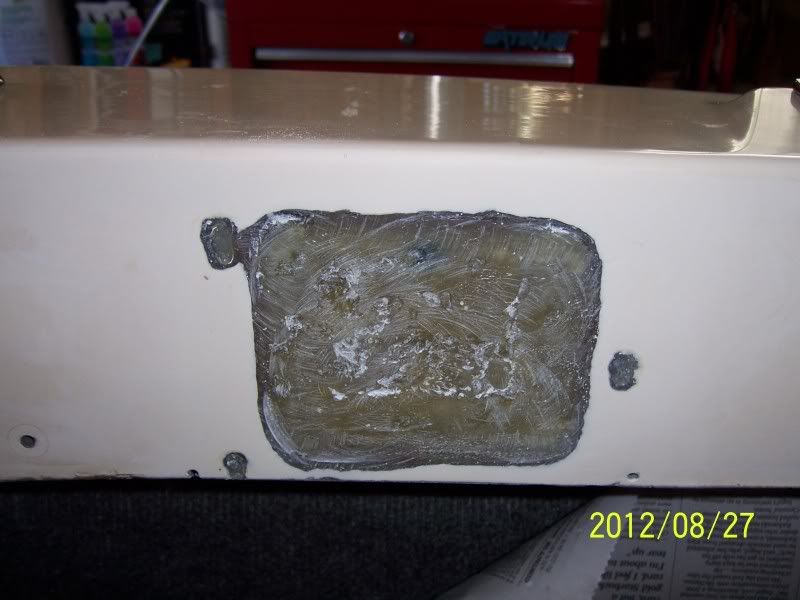 And now with the gel sprayed,sanded and buffed 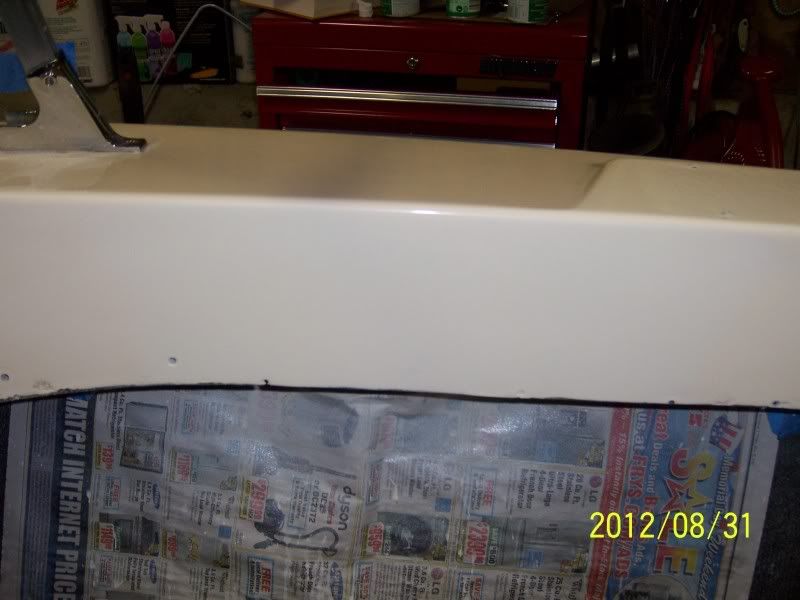
|
||
|
||
|
Hussler
Gold Member
Joined: February-04-2012 Location: - Status: Offline Points: 895 |
Post Options
Thanks(0)
Quote Reply
Posted: May-13-2013 at 12:29am |
|
|
Got a little more done, rained quite a bit today.
Floor all painted and loosly fitted. This should make working on the inside so much more comfortable, its the little things in life.  Also figured out how to build up the throttle area without taking a billion sheet to do it. Cut a sliver of wood, wrapped it in glass for a backer then a thin 6oz on the front to make a little bowl. Then packed the bowl with pulled apart stand matt soaked in epoxy. Once its cured ill just burn off the seaped out section and put 2-3 6oz matt coats over it.   Hope to get some sanding done tomorrow, then I have to start packing up my crap for camp for the summer. |
||
|
||
|
Hussler
Gold Member
Joined: February-04-2012 Location: - Status: Offline Points: 895 |
Post Options
Thanks(0)
Quote Reply
Posted: May-12-2013 at 12:41am |
|
Cutwater, forgot what it was called, whatever front of the boat. Didnt do much today, pretty lazy and terrible overcast. Finished painting the floors with bilgecoat. Its amazing how much the stuff soaks into the wood, took 3 coats until it was somewhat even |
||
|
||
|
8122pbrainard
Grand Poobah

Joined: September-14-2006 Location: Three Lakes Wi. Status: Offline Points: 41040 |
Post Options
Thanks(0)
Quote Reply
Posted: May-11-2013 at 9:42pm |
|
??? Please explain the "breakwater" |
||
|
||
|
Hussler
Gold Member
Joined: February-04-2012 Location: - Status: Offline Points: 895 |
Post Options
Thanks(0)
Quote Reply
Posted: May-11-2013 at 8:22pm |
|
Thanks, the tow ring actually serves two purposes, one for towing and the other is that it actually threads through to the rear eye bracket! Bracket is from a late 50's century, i think i covered it in the thread somewhere, solid bronze, much better than the steel that was originally grafted in. I appreciate the offer on the vent piece, but I have an extra as well! However... I was contemplating putting two headlights on the thing by using two of these vents on either side of the breakwater, then recesssing a box on either side and putting in some strong leds. So they would look like two little vents in the day, but be bright docking lights at night. But I have to finish this thing at some point. 
|
||
|
||
|
john b
Grand Poobah
Joined: July-06-2011 Location: lake Sweeny Status: Offline Points: 3238 |
Post Options
Thanks(0)
Quote Reply
Posted: May-11-2013 at 6:24pm |
|
|
I like the functionality of the tow ring and finger on the transom. It is very practical. I have considered doing the same thing so I can take a spin skiing with rear seat passengers and all return intact. I will have to give that some careful thought. I have drillaphobia.
BTW, do you have the vent grille for that sweet motor box? I have a spare or two laying around that I really have no use for. |
||
|
1970 Mustang "Theseus' paradox"
If everyone else is doing it, you're too late! |
||
|
||
|
OverMyHead
Grand Poobah

Joined: March-14-2008 Location: MN Status: Offline Points: 4861 |
Post Options
Thanks(0)
Quote Reply
Posted: May-11-2013 at 3:55pm |
|
|
How about concentrated!
|
||
|
For thousands of years men have felt the irresistible urge to go to sea, and many of them died. Things got better after they invented boats.
1987 Ski Nautique |
||
|
||
|
Hussler
Gold Member
Joined: February-04-2012 Location: - Status: Offline Points: 895 |
Post Options
Thanks(0)
Quote Reply
Posted: May-11-2013 at 3:53pm |
|
"I'm not tiny, I'm compact!" I love it, its essentially a motor with a little bit of fiberglass around it. If it was any smaller I'd probably make put a saddle on the doghouse and steer the thing with reins. Anywho I'll probably paint the floors today and build up the glass on the dash, maybe fix the control box housing. |
||
|
||
|
john b
Grand Poobah
Joined: July-06-2011 Location: lake Sweeny Status: Offline Points: 3238 |
Post Options
Thanks(0)
Quote Reply
Posted: May-11-2013 at 3:16pm |
|
|
Tiny is half the charm, in boats anyway!
|
||
|
1970 Mustang "Theseus' paradox"
If everyone else is doing it, you're too late! |
||
|
||
|
Hussler
Gold Member
Joined: February-04-2012 Location: - Status: Offline Points: 895 |
Post Options
Thanks(0)
Quote Reply
Posted: May-11-2013 at 3:05pm |
|
|
Bored, didnt feel like sanding so I cut out the floor boards so its easier to walk around.
   Playing pretend. What a tiny ass boat!!   
|
||
|
||
|
Hussler
Gold Member
Joined: February-04-2012 Location: - Status: Offline Points: 895 |
Post Options
Thanks(0)
Quote Reply
Posted: May-08-2013 at 11:49pm |
|
I cycled the control box before in the stock mount hole and after in the new hole, the throw was more than enough in the stock location and I still have plenty of adjustment available in the new mounting spot. Carb maxes close and WOT. The only difference is the lever goes down a few degrees more. Technically, I gained sensitivity in the throttle and it should let me adjust speed even better now. The throttle lever has to swing about 270 degrees so no flipping ect would have been a possibility. |
||
|
||
|
Gary S
Grand Poobah
Joined: November-30-2006 Location: Illinois Status: Offline Points: 14096 |
Post Options
Thanks(0)
Quote Reply
Posted: May-08-2013 at 4:40pm |
|
|
I hope your control works out for you Jim. I had nothing but trouble with mine,if you remember mine is an SS that originally had the console mounted controls and at some time been converted to a Morse single lever. The problem you might run into now is since you shortned the lever your carb will not fully open. What you might have to do is use the original length lever but turn it 180 on the lever mount,then run the cable from the front over the top of the engine and have it push the carb open rather than have the cable under the engine and coming over to pull the carb open. Not sure this will work either can't remember if the shift lever will be in the way. Anyway after dealing with this for a long time and having another member commenting on how hard the lever worked I started the project to find the original equiptment. Now it works so much nicer,settings stay where you want and it works so much smoother.
|
||
|
||
|
Hussler
Gold Member
Joined: February-04-2012 Location: - Status: Offline Points: 895 |
Post Options
Thanks(0)
Quote Reply
Posted: May-08-2013 at 12:25pm |
|
|
The bottom plate for the vent will have a horn mounted and a 3inch flex tube going into the bilge, there is also the two 3 inch tubes that will go from the engine to the vents in the stern
|
||
|
||
|
turningpoint84
Platinum Member

Joined: September-11-2008 Location: Cincinnati, OH Status: Offline Points: 1467 |
Post Options
Thanks(0)
Quote Reply
Posted: May-08-2013 at 12:14pm |
|
|
How are you going to do the vent box to the engine compartment?
|
||
|
Proud 1968 mustang owner and now
1970 Mustang |
||
|
||
|
Hussler
Gold Member
Joined: February-04-2012 Location: - Status: Offline Points: 895 |
Post Options
Thanks(0)
Quote Reply
Posted: May-08-2013 at 1:39am |
|
|
Oh and ill have to take more pics of this tomorrow. HUGE problem I was having, the throttle wouldn't fit under the deck! I considered glassing on a small lump downward to make more space but I felt that would look hacked. Needed about .5 off the throttle armature to clear the deck So instead with many measurements I ended up moving the throttle cable mounting spot inward and hacking off the rest. Forgot to take an after pic of the cut.
 
|
||
|
||
|
Hussler
Gold Member
Joined: February-04-2012 Location: - Status: Offline Points: 895 |
Post Options
Thanks(0)
Quote Reply
Posted: May-08-2013 at 1:33am |
|
Thank you, glad you appreciate what I'm trying to accomplish! They way things are going I think it will turn out quite pretty. Havent gotten much done, with final exams and the sun beating on the tent its been tough to concentrate. Got the hole cut for the little vent that some mustangs have.  From the backside of the dash, those black spots are paint that melted off the gloves into the epoxy :/ What a ***** to epoxy under there  Little recessed box ive been talking about, still needs glass reinforcing.  Forgot to take more relevant pics, those clamps are holding on supplemental bracing to reinforce the dash into the sides of the boat. The jack was just to preload the dash from sagging.  |
||
|
||
|
juniorwoody
Gold Member
Joined: August-09-2011 Location: Oak Hill, Fl Status: Offline Points: 937 |
Post Options
Thanks(0)
Quote Reply
Posted: May-07-2013 at 9:10pm |
|
|
Hussler I really like what you are doing. Take a walk on the wild side no body is going to get hurt. Though I tend to be a purist when I have a complete boat of an older vintage to resto I like the way you have taken this one as an open slate and let the boat become a part of your character and person. I hope you enjoy it when it is done. I have considered doing something similar with a wood hull. Cant imagine, and some folks get bored with life.
|
||
|
The value of money spent on new adventure far exceeds the value of money saved for the future
|
||
|
||
|
turningpoint84
Platinum Member
Joined: September-11-2008 Location: Cincinnati, OH Status: Offline Points: 1467 |
Post Options
Thanks(0)
Quote Reply
Posted: May-07-2013 at 6:15pm |
|
|
Hussler, i firmly believe you have a clamp fetish!!!
Looks awesome, look forward to the finished dash pics. |
||
|
Proud 1968 mustang owner and now
1970 Mustang |
||
|
||
|
john b
Grand Poobah
Joined: July-06-2011 Location: lake Sweeny Status: Offline Points: 3238 |
Post Options
Thanks(0)
Quote Reply
Posted: May-07-2013 at 4:52am |
|
|
Thanks for sharing!

|
||
|
1970 Mustang "Theseus' paradox"
If everyone else is doing it, you're too late! |
||
|
||
|
Hussler
Gold Member
Joined: February-04-2012 Location: - Status: Offline Points: 895 |
Post Options
Thanks(0)
Quote Reply
Posted: May-07-2013 at 12:33am |
|
|
News flash: It REALLY sucks trying to fiberglass under the bow! Wish I had done the dash ect. when the boat was flipped over. Got the boards clamped in and glassed under the vent, also just about done glassing in imperfections on the topside.
Forgot to take any meaningful pics so heres an arbitrary shot I took. You can kind of see the clamps at the bow holding the vent box up 
|
||
|
||
|
Hussler
Gold Member
Joined: February-04-2012 Location: - Status: Offline Points: 895 |
Post Options
Thanks(0)
Quote Reply
Posted: May-05-2013 at 2:04pm |
|
|
Also cut the hole for the front vent, im in the process of building the recessed box for the horn under the vent today. Its going to suck trying to fiberglass up under the bow like that.

|
||
|
||
|
Hussler
Gold Member
Joined: February-04-2012 Location: - Status: Offline Points: 895 |
Post Options
Thanks(0)
Quote Reply
Posted: May-05-2013 at 2:02pm |
|
|
Sorry forgot the last pic.

|
||
|
||
|
Hussler
Gold Member
Joined: February-04-2012 Location: - Status: Offline Points: 895 |
Post Options
Thanks(0)
Quote Reply
Posted: May-02-2013 at 12:13pm |
|
|
Alright rookies, the two boards clamped together were around the eyelet, enabled me to break it free without damaging the chrome.
So I replaced the dash board, heres a bad pic with the old board still in.  Removed.   Glassed the side and then sandwhiched it in |
||
|
||
|
jbear
Grand Poobah

Joined: January-21-2005 Location: Lake Wales FL. Status: Offline Points: 8193 |
Post Options
Thanks(0)
Quote Reply
Posted: May-02-2013 at 2:07am |
|
was roaming around in old threads looking at pictures and missed this shot accross my bow....I resemble this remark Gary.... john |
||
|
"Loud pipes save lives"
AdamT sez "I'm Canadian and a beaver lover myself"... |
||
|
||
|
Hussler
Gold Member
Joined: February-04-2012 Location: - Status: Offline Points: 895 |
Post Options
Thanks(0)
Quote Reply
Posted: May-02-2013 at 1:15am |
|
|
?
|
||
|
||
|
juniorwoody
Gold Member
Joined: August-09-2011 Location: Oak Hill, Fl Status: Offline Points: 937 |
Post Options
Thanks(0)
Quote Reply
Posted: May-01-2013 at 10:46pm |
|
|
My guess you are trying to crown the deck.
|
||
|
The value of money spent on new adventure far exceeds the value of money saved for the future
|
||
|
||
|
Hussler
Gold Member
Joined: February-04-2012 Location: - Status: Offline Points: 895 |
Post Options
Thanks(0)
Quote Reply
Posted: April-30-2013 at 1:39am |
|
|
Bender is built, truck is painted, just have to finish the axle swap on the jeep and the boat will have 100% of my attention. Anybody want to guess what this process is accomplishing?? BTW, boat is obviously back in its little tent at this point.

|
||
|
||
|
Hussler
Gold Member
Joined: February-04-2012 Location: - Status: Offline Points: 895 |
Post Options
Thanks(0)
Quote Reply
Posted: April-22-2013 at 1:06am |
|
XJ, its got disks, youre looking at the parking brake shoes  Just have to finish trussing, plating the pumpkin and run some brakelines and paint. Just have to finish trussing, plating the pumpkin and run some brakelines and paint.
|
||
|
||
|
Post Reply
|
Page <1 1516171819 32> |
 Tweet
Tweet
|
| Forum Jump | Forum Permissions You cannot post new topics in this forum You cannot reply to topics in this forum You cannot delete your posts in this forum You cannot edit your posts in this forum You cannot create polls in this forum You cannot vote in polls in this forum |


 Topic Options
 8122pbrainard wrote: