 Boats For Sale:


Carb Rebuild '88 2001 |
Post Reply 
|
Page <123> |
| Author | ||
watrski 
Senior Member 
Joined: December-01-2010 Location: Chippewa Lake Status: Offline Points: 393 |
 Post Options Post Options
") Thanks(0) Thanks(0)
 Quote Reply Quote Reply
 Posted: December-07-2011 at 4:00pm Posted: December-07-2011 at 4:00pm |
|
|
My local shop will boil it....
Just the part where you blew it out....not sure if you had soaked it or now. |
||
 |
||
|
Keeganino
Grand Poobah 

Joined: October-27-2009 Location: North Carolina Status: Offline Points: 2063 |
Post Options
Thanks(0)
Quote Reply
Posted: December-07-2011 at 5:08pm |
|
|
Ugg I hope I do not have to do this any time soon. Mine looks kinda grungy when I take the flame arrestor off.
|
||
|
"working on these old boats may not be cost effective but as it shows its what it brings into your life that matters" -Roger
1973 Skier |
||
|
||
|
MI-nick
Gold Member 

Joined: January-12-2009 Location: Ypsilanti, MI Status: Offline Points: 809 |
Post Options
Thanks(0)
Quote Reply
Posted: December-07-2011 at 6:00pm |
|
|
it's not that bad...the mass of information out there can be confusing though...
|
||
|
As far as I can tell, I'm not quite sure...
|
||
|
||
|
Hollywood
Moderator Group

Joined: February-04-2004 Location: Twin Lakes, WI Status: Offline Points: 13512 |
Post Options
Thanks(0)
Quote Reply
Posted: December-07-2011 at 6:25pm |
|
|
If you put it back together and there's a bunch of extra piece left over, that's ok.
|
||
|
||
|
P71_CrownVic
Gold Member

Joined: July-07-2008 Location: SD Status: Offline Points: 534 |
Post Options
Thanks(0)
Quote Reply
Posted: December-07-2011 at 8:57pm |
|
Don't take it the wrong way..I wasn't trying to be an ass. 
It just seems like a TON of people haven't a clue as to what macro mode is and I try and educate when I can. No harm, no foul. |
||
|
||
|
Luchog
Grand Poobah

Joined: April-17-2007 Location: Argentina Status: Offline Points: 2135 |
Post Options
Thanks(0)
Quote Reply
Posted: December-07-2011 at 10:52pm |
|
|
we use an ultrasonic washer for the carbs at the shop
|
||
|
||
|
Keeganino
Grand Poobah
Joined: October-27-2009 Location: North Carolina Status: Offline Points: 2063 |
Post Options
Thanks(0)
Quote Reply
Posted: December-07-2011 at 11:46pm |
|
Harbor freight has one that goes on sale every once in a while. Have been wanting to get one for a while. |
||
|
"working on these old boats may not be cost effective but as it shows its what it brings into your life that matters" -Roger
1973 Skier |
||
|
||
|
Mnboater
Newbie 
Joined: June-08-2011 Status: Offline Points: 3 |
Post Options
Thanks(0)
Quote Reply
Posted: December-08-2011 at 6:52am |
|
|
Boiling is an old term. It means to take the parts and put them in a parts washer which has very nasty chemicals like MEK inside. The little gooseneck tube pumps this fluid thorough whatever part you aim it at and hence boiling, for the constant movement of the fluid.
Most parts stores dont have this stuff anymore and new fuels are so mild, that they dont require its use. Check at your local airport. Those guys still have really strong stuff to do airplane parts with. Ask an old timer at the greasiest garage in town. He might know a guy who knows a guy. The technique really works and your parts will look like brand new after an overnight boil! |
||
|
Bruce
|
||
|
||
|
8122pbrainard
Grand Poobah

Joined: September-14-2006 Location: Three Lakes Wi. Status: Offline Points: 41040 |
Post Options
Thanks(0)
Quote Reply
Posted: December-08-2011 at 9:53am |
|
Bruce, I feel you are misinformed or are using the wrong terms. Boiling in a tank was commonly used (some shops still have them) for dropping an engine block into a heated tank filled with a caustic - typically sodium hydroxide. The parts washer is for just general degreasing and typically uses a stodard solvent and not MEK. The aerospace guys still use a vapor degreaser with TCE in it. We have one here at the plant and it is truely the best way to completely degrease a part since you are not recirculating dirty solvent back over the part like a parts washer does. Carb cleaning buckets of a solvent mix are available at all auto parts stores. This is what you want to soak your carb in. |
||
|
||
|
MI-nick
Gold Member
Joined: January-12-2009 Location: Ypsilanti, MI Status: Offline Points: 809 |
Post Options
Thanks(0)
Quote Reply
Posted: December-08-2011 at 12:32pm |
|
|
i used this
|
||
|
As far as I can tell, I'm not quite sure...
|
||
|
||
|
Mnboater
Newbie
Joined: June-08-2011 Status: Offline Points: 3 |
Post Options
Thanks(0)
Quote Reply
Posted: December-08-2011 at 1:23pm |
|
 I will take my whippin sir. I thought I had it right but will defer for a score of 50%. MEK is good stuff. Lethal of course but it works for cleaning stuff thats got goo on it. The parts washer might have lots of different stuff in it, but it certainly is WAY more effective than a spray can that some of these posts are eluding to. And Air can push a too big granule tight into an orifice, and there it will stay. Allowing amatuers the opportunity to improve on the time it took to rebuild the first time. How do I know? Yup been there. I can rebuild my snowmobile mikunis now on a hotel counter in about 20 minutes. I will take my whippin sir. I thought I had it right but will defer for a score of 50%. MEK is good stuff. Lethal of course but it works for cleaning stuff thats got goo on it. The parts washer might have lots of different stuff in it, but it certainly is WAY more effective than a spray can that some of these posts are eluding to. And Air can push a too big granule tight into an orifice, and there it will stay. Allowing amatuers the opportunity to improve on the time it took to rebuild the first time. How do I know? Yup been there. I can rebuild my snowmobile mikunis now on a hotel counter in about 20 minutes.
So what is the toughest stuff available for todays parts washer suitable for a carb? Is it worth it or just a waste of money and farm out the job to the guys at the local airport? |
||
|
Bruce
|
||
|
||
|
8122pbrainard
Grand Poobah
Joined: September-14-2006 Location: Three Lakes Wi. Status: Offline Points: 41040 |
Post Options
Thanks(0)
Quote Reply
Posted: December-08-2011 at 1:29pm |
|
Nick, That's good stuff according to Billy. I wish I had found it for my last carb rebuild. I ended up with a 5 gal. pail of Napa brand and it was pretty weak. |
||
|
||
|
TRBenj
Grand Poobah

Joined: June-29-2005 Location: NWCT Status: Offline Points: 21122 |
Post Options
Thanks(0)
Quote Reply
Posted: December-08-2011 at 1:31pm |
|
|
Thats the same stuff I used on mine... good enough to strip the dichromate finish off a Holley if you soak it too long! (Dont ask me how I know.)
|
||
|
||
|
watrski
Senior Member
Joined: December-01-2010 Location: Chippewa Lake Status: Offline Points: 393 |
Post Options
Thanks(0)
Quote Reply
Posted: December-08-2011 at 2:23pm |
|
I throw all of the small airplane parts in that stuff to strip the paint off. Works great! |
||
|
||
|
MI-nick
Gold Member
Joined: January-12-2009 Location: Ypsilanti, MI Status: Offline Points: 809 |
Post Options
Thanks(0)
Quote Reply
Posted: December-08-2011 at 3:17pm |
|
sure is... 
|
||
|
As far as I can tell, I'm not quite sure...
|
||
|
||
|
8122pbrainard
Grand Poobah
Joined: September-14-2006 Location: Three Lakes Wi. Status: Offline Points: 41040 |
Post Options
Thanks(0)
Quote Reply
Posted: December-08-2011 at 3:59pm |
|
The Napa stuff wouldn't even take the paint off my carbs and that was after days of soaking! 
|
||
|
||
|
Donald80SN
Grand Poobah
Joined: January-12-2009 Location: Denver, NC Status: Offline Points: 3888 |
Post Options
Thanks(0)
Quote Reply
Posted: December-08-2011 at 11:27pm |
|
|
Nick,
You are inspiring me to rebuild my carb. Was that 3/4 Gallon container large enough to submerge the carb? I was quessing that a larger container would be needed. Donald |
||
|
||
|
Gary S
Grand Poobah

Joined: November-30-2006 Location: Illinois Status: Offline Points: 14096 |
Post Options
Thanks(0)
Quote Reply
Posted: December-09-2011 at 12:34am |
|
|
Don,once it's apart the widest part is the base where the throttle plates are,but it is thin.You can find another container that it will fit into and just pour the carb cleaner into that.The next biggest part is the main block and you can do the same.
|
||
|
||
|
Gary S
Grand Poobah
Joined: November-30-2006 Location: Illinois Status: Offline Points: 14096 |
Post Options
Thanks(0)
Quote Reply
Posted: December-09-2011 at 1:36am |
|
|
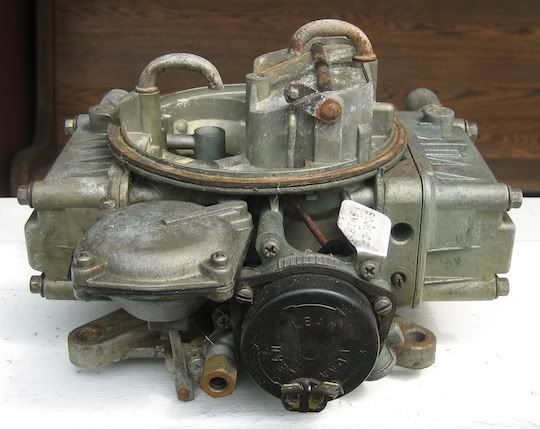
Here are some before and after pic's of a 600 I did this summer to try on my boat someday-


|
||
|
||
|
MI-nick
Gold Member
Joined: January-12-2009 Location: Ypsilanti, MI Status: Offline Points: 809 |
Post Options
Thanks(0)
Quote Reply
Posted: December-09-2011 at 9:20am |
|
i had to use a giant coffee can for the main body...the can I had was about the same size as a gallon paint can. |
||
|
As far as I can tell, I'm not quite sure...
|
||
|
||
|
Jllogan
Platinum Member

Joined: May-18-2011 Location: canton, OH Status: Offline Points: 1728 |
Post Options
Thanks(0)
Quote Reply
Posted: December-09-2011 at 12:41pm |
|
|
Gary, did you paint that with something?
|
||
|
||
|
Donald80SN
Grand Poobah
Joined: January-12-2009 Location: Denver, NC Status: Offline Points: 3888 |
Post Options
Thanks(0)
Quote Reply
Posted: December-09-2011 at 8:49pm |
|
|
Gary and Nick,
Thanks for explaining the size issue. So there are no hidden Nylon, Plastic or Rubber Parts that may get eaten up my the Carb Cleaner? Thanks, Donald |
||
|
||
|
Gary S
Grand Poobah
Joined: November-30-2006 Location: Illinois Status: Offline Points: 14096 |
Post Options
Thanks(0)
Quote Reply
Posted: December-09-2011 at 9:26pm |
|
|
Justin, I used this Eastwood plating kit on the hardware

Then I sprayed this carb renew on 
I don't know how it will hold up I have not put in on yet. |
||
|
||
|
MI-nick
Gold Member
Joined: January-12-2009 Location: Ypsilanti, MI Status: Offline Points: 809 |
Post Options
Thanks(0)
Quote Reply
Posted: December-09-2011 at 11:04pm |
|
there was one nylon spacer on the main body that could be removed if you can pry the vent tube off and then remove the choke butterfly...i didn't do that and soaked with it on...no issues. i read (maybe on this thread) that there are nylon bushings in the throttle body...i didn't soak the throttle body. |
||
|
As far as I can tell, I'm not quite sure...
|
||
|
||
|
MI-nick
Gold Member
Joined: January-12-2009 Location: Ypsilanti, MI Status: Offline Points: 809 |
Post Options
Thanks(0)
Quote Reply
Posted: December-09-2011 at 11:15pm |
|
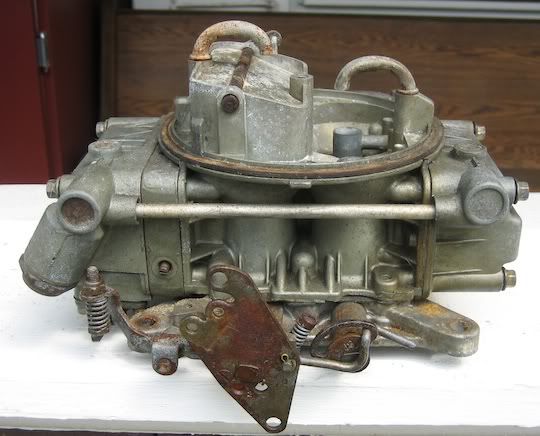
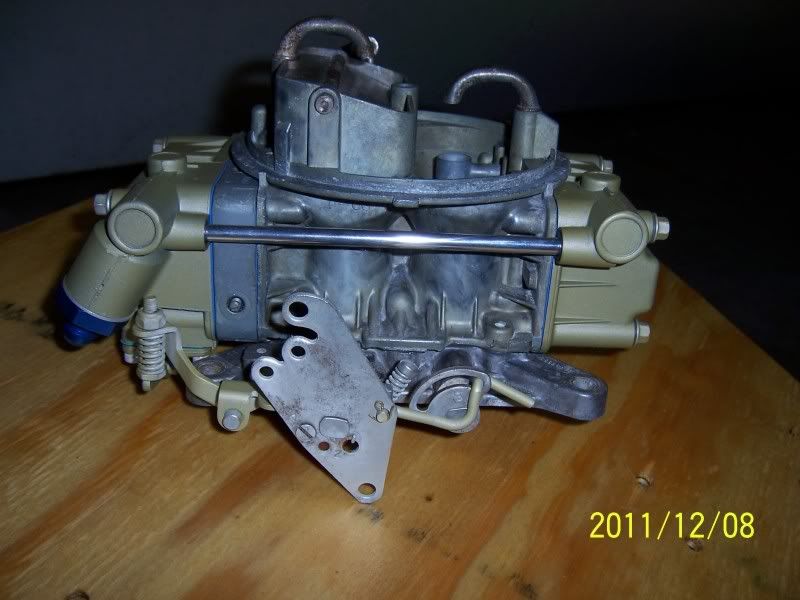
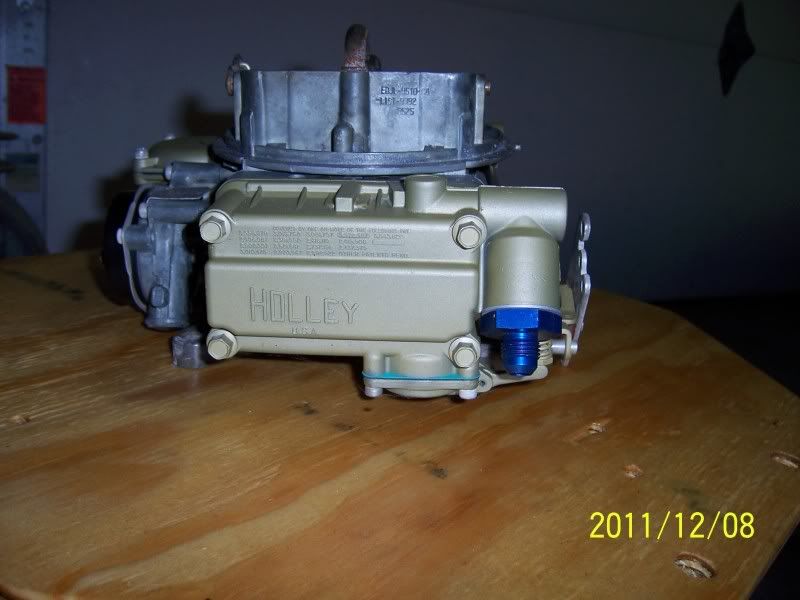
|
finished the rebuild the other day while i was home sick. i kept the vent baffle in the same orientation as one of the above photos (really there is no other reasonable way it could go on). i didn't monkey with the float levels either. the secondary bowl was dead nuts level. the primary was slightly less than level (i.e. higher fuel level)...some said level...some said it should have a higher fuel level...i left it alone.
i read that the float bowl bolts should be torqued to 40 inch pounds...my torque wrench doesn't go that low so i used the red neck method...the N on the wrench was 4" from the ctr of the socket...so i pulled with 10 pounds from that location with my fish scale...close enough. 
done 
and done. the balance tube was tricky to get installed and sealed properly in each bowl...just takes a little time and some twisting. 
these are all the old parts that were replaced 
leftover parts from the rebuild kit 
thanks for all the good advice 
|
||
|
As far as I can tell, I'm not quite sure...
|
||
|
||
|
Donald80SN
Grand Poobah
Joined: January-12-2009 Location: Denver, NC Status: Offline Points: 3888 |
Post Options
Thanks(0)
Quote Reply
Posted: December-10-2011 at 6:51pm |
|
|
Nick,
Thanks for sharing. I am going to try this over the winter. Do you anticipate having to dial it in or on your reassembly you put everything back to orginal settings? Mine runs great but my Power Valve will hesitate about 1 out of 5 times I pull up a skier. Thanks, Donald |
||
|
||
|
MI-nick
Gold Member
Joined: January-12-2009 Location: Ypsilanti, MI Status: Offline Points: 809 |
Post Options
Thanks(0)
Quote Reply
Posted: December-11-2011 at 12:21pm |
|
i did put everything back to original, but i do still anticipated some minor tuning (air/fuel screws and idle speed). one think i forgot to mention above is that i hopefully corrected a high idle after a hard run issue. the secondaries were hanging open a bit...there is a rod that controls this that i removed and re-bend to eliminate any slop in the secondary butterflies...hopefully that should do the trick. |
||
|
As far as I can tell, I'm not quite sure...
|
||
|
||
|
SNobsessed
Grand Poobah
Joined: October-21-2007 Location: IA Status: Offline Points: 7102 |
Post Options
Thanks(0)
Quote Reply
Posted: December-11-2011 at 3:16pm |
|
|
I has getting the high idle after a hard run too - I rebent the secondary link & it solved the problem.
|
||
|
“Beer is proof that God loves us and wants us to be happy.”
Ben Franklin |
||
|
||
|
gR@HaM
Platinum Member

Joined: May-01-2012 Location: UK Status: Offline Points: 1265 |
Post Options
Thanks(0)
Quote Reply
Posted: September-18-2014 at 7:50pm |
|
|
An old thread I know but just seen this in the FAQ section, these cork gaskets are interesting as my carb doesnt have them.
Although Im surprised they would fit as look to have a larger diameter than the screws? My tique has a tendency to stall when first dropping it in the water and shifting trans into gear, this problem goes away after the engine has warmed up but is an issue as it can take ages to first pull away. Maybe its due to not having these gaskets? The only way I can get around the issue at the moment is to crank up the idle screw, then once warmed up screwing it back down again. Although the PO has also removed the electronic choke, I suppose thats a more likely cause? Anyone else had a similar problem? Thanks
|
||
|
'82 Ski Tique
|
||
|
||
|
Nelson
Senior Member
Joined: September-02-2010 Location: Maine, Lewiston Status: Offline Points: 135 |
Post Options
Thanks(0)
Quote Reply
Posted: September-19-2014 at 3:37pm |
|
|
Thanks for sharing all this. I have an old 4160 apart on my bench right now. I took it apart a few weeks ago and said to myself I'll remember where that goes...famous last words....lol..... This is going to save me some time.
And I was wondering about the extra parts.... ;) |
||
|
1986 Ski Nautique 2001
|
||
|
||
|
Post Reply
|
Page <123> |
 Tweet
Tweet
|
| Forum Jump | Forum Permissions You cannot post new topics in this forum You cannot reply to topics in this forum You cannot delete your posts in this forum You cannot edit your posts in this forum You cannot create polls in this forum You cannot vote in polls in this forum |


 Topic Options
 MI-nick wrote: