 Boats For Sale:


the long road ahead - 67 Nautique resto/mod |
Post Reply 
|
Page <1 3456> |
| Author | ||
8122pbrainard 
Grand Poobah 

Joined: September-14-2006 Location: Three Lakes Wi. Status: Offline Points: 41040 |
 Post Options Post Options
") Thanks(0) Thanks(0)
 Quote Reply Quote Reply
 Posted: February-10-2010 at 1:39pm Posted: February-10-2010 at 1:39pm |
|
Mike, I'd leave the copper. If the factory got 3" on the 3&1/8" OD then I'm sure you can too. No matter what the size, the exhaust is always a fight! Besides, keeping the copper gives you more exhaust breathing room!! 
BTW, hole saws over 2&1/2" come sized in 1/8ths so finding the correct size won't be a problem. Below 2&1/2, they come in 1/16ths. |
||
 |
||
|
8122pbrainard
Grand Poobah
Joined: September-14-2006 Location: Three Lakes Wi. Status: Offline Points: 41040 |
Post Options
Thanks(0)
Quote Reply
Posted: February-10-2010 at 1:44pm |
|
Bruce, He must have run out of masking tape?? Really though, was he planning on painting the hull again? Sure doesn't look good!! |
||
|
||
|
WakeSlayer
Grand Poobah

Joined: March-15-2006 Location: United States Status: Offline Points: 2138 |
Post Options
Thanks(0)
Quote Reply
Posted: February-10-2010 at 1:47pm |
|
|
Bruce, Why would some one do that?!?!?!?!?
I have chrome rings that slide of the pipe and screw to the transom. I will polish them before I install and see if I can keep up with it. Pete, I like it! I have found the correct hole saws online, I am a bit more impatient than that and want to find one today. I thought I had a 3 at home, and was going to use that. Upon further review, it is a 3.5. |
||
|
Mike N
1968 Mustang |
||
|
||
|
8122pbrainard
Grand Poobah
Joined: September-14-2006 Location: Three Lakes Wi. Status: Offline Points: 41040 |
Post Options
Thanks(0)
Quote Reply
Posted: February-10-2010 at 1:52pm |
|
|
Mike,
The extra 1/8" gives the exhaust about 8.6% extra breathing room!! 
|
||
|
||
|
WakeSlayer
Grand Poobah
Joined: March-15-2006 Location: United States Status: Offline Points: 2138 |
Post Options
Thanks(0)
Quote Reply
Posted: February-10-2010 at 1:57pm |
|
|
My engine will love me.
|
||
|
Mike N
1968 Mustang |
||
|
||
|
Riley
Grand Poobah

Joined: January-19-2004 Location: Portland, ME Status: Offline Points: 7952 |
Post Options
Thanks(0)
Quote Reply
Posted: February-10-2010 at 1:57pm |
|
|
I don't know what he was thinking. The paint on the transom was perfect. The exhaust looks great, but not when you look at what he did to the transom. My guess is he was going to paint the boat and didn't care. We're going to touch it up for the short term. The copper and chrome does look good though.
|
||
|
||
|
Keeganino
Grand Poobah

Joined: October-27-2009 Location: North Carolina Status: Offline Points: 2063 |
Post Options
Thanks(0)
Quote Reply
Posted: February-10-2010 at 2:29pm |
|
|
I must be confused. My copper pipes are completely buried under the removable ply. My exhaust caps that screw into the transom seem to be chromed. I was going to have them re-chromed along with many other parts. I can't see the copper at all though and apart from removing the grime have no intentions of polishing something that I can't see. What am I missing or is this boat laid out differently?
|
||
|
"working on these old boats may not be cost effective but as it shows its what it brings into your life that matters" -Roger
1973 Skier |
||
|
||
|
WakeSlayer
Grand Poobah
Joined: March-15-2006 Location: United States Status: Offline Points: 2138 |
Post Options
Thanks(0)
Quote Reply
Posted: February-10-2010 at 2:36pm |
|
|
Like Bruce said, they were inconsistent in the 60's as to what they used. Whatever was laying around is kind of the way it worked. The pipes on our 68 mustang are totally different. These are just what this boat happens to have.
I am only polishing the outside, not the inside. |
||
|
Mike N
1968 Mustang |
||
|
||
|
8122pbrainard
Grand Poobah
Joined: September-14-2006 Location: Three Lakes Wi. Status: Offline Points: 41040 |
Post Options
Thanks(0)
Quote Reply
Posted: February-10-2010 at 3:12pm |
|
Keegan, The single ring around the copper exhaust pipe is a carry over from the wood boat era. If you look on the backside of the ring, there's a chamfer on the ID next to the pipe. Rope packing just like you use in the prop shaft and rudder stuffing box is wrapped around the pipe. When the flange is tightened, the packing is compressed sealing out the water. Some times it worked other times it didn't!! The design also allowed for thermal expansion of the exhaust pipe because the pipe would move in the packing slightly. This was important back when there wasn't any rubber in the exhaust. It was hard piped directly to the engine. Later like your boat along with better sealants, the exhaust "tip" became one piece. Don't go looking for copper on your tips. You'll grind through the chrome! 
|
||
|
||
|
WakeSlayer
Grand Poobah
Joined: March-15-2006 Location: United States Status: Offline Points: 2138 |
Post Options
Thanks(0)
Quote Reply
Posted: February-10-2010 at 8:08pm |
|
Any opinions on the above? Kinda got lost in the other discussions about exhuast. |
||
|
Mike N
1968 Mustang |
||
|
||
|
8122pbrainard
Grand Poobah
Joined: September-14-2006 Location: Three Lakes Wi. Status: Offline Points: 41040 |
Post Options
Thanks(0)
Quote Reply
Posted: February-11-2010 at 9:00am |
|
Mike, You've got plenty at the hull to stringer (4 layers at the fillet). Now if I'm reading this correctly the rest of the stringerover the top you have 3 layers correct and 1 biax to go? That's plenty too. You'll be able to be the last one on the lake (or first in spring). That thing will break ice!! |
||
|
||
|
Brady
Senior Member 
Joined: June-28-2008 Location: Lake Elmo, Mn. Status: Offline Points: 226 |
Post Options
Thanks(0)
Quote Reply
Posted: February-11-2010 at 9:07am |
|
|
Mike
you can get a 3-1/8 hole saw |
||
|
Charlie
Three Lakes, Wisconsin 69 Barracuda |
||
|
||
|
WakeSlayer
Grand Poobah
Joined: March-15-2006 Location: United States Status: Offline Points: 2138 |
Post Options
Thanks(0)
Quote Reply
Posted: February-11-2010 at 11:12am |
|
|
Pete, I just have one 8" layer over the top. I partly did this to break up the joint lines a bit. I actually have 5 layers at the fillet now.
Charlie, I got one at lunch yesterday. However, now after looking, I installed the boards and will drill them later. The angle they mount in there made it seem to me it would be easier that way to drill the hole straight oriented to the stringers. The transom has a pretty good curve to it. |
||
|
Mike N
1968 Mustang |
||
|
||
|
8122pbrainard
Grand Poobah
Joined: September-14-2006 Location: Three Lakes Wi. Status: Offline Points: 41040 |
Post Options
Thanks(0)
Quote Reply
Posted: February-11-2010 at 11:44am |
|
Got it! Yes on another layer over the top. Then, like I suggested to Andy, a additional layer around the engine/trans mount area especially since you're going original without a engine cradle.
|
||
|
||
|
FrankT
Senior Member

Joined: September-07-2006 Status: Offline Points: 245 |
Post Options
Thanks(0)
Quote Reply
Posted: February-11-2010 at 11:48am |
|
|
I have a 71SN and am a little behind you with my progress. Port stringers are out and I am test fitting the new currently. I have some questions and thoughts on one of your earlier posts:
"I did epoxy the floor down in the Mustang, but I also used some screws. Partly for the strength, and partly to hold down the ply as it had a couple twists in it from sitting around, despite being weighted. I pre-drilled, and epoxied the holes, countersunk slightly, and filled the tops. That floor is never coming out. The 3/4" does not have hardly any flex to it. I have a couple aluminum angles across between the stringers in the Mustang to support the removeable panel. It is just main stringer width. On this boat, I will have it go 7.5" wider on each side to the secondaries so I can access the exhaust if need be. This may require more support." I am likewise a no-foamer and was also considering to make my floor removable. Is that what you are also considering? For the floor battens I am planing on using 1x2 white oak starting at the rear valance and locating them on 16" centers. It lays out well in accommodating 4x8 plywood. For flooring I was thinking about using 1/2" concrete form ply but may have a problem getting the carpet glue to stick. One other thing I was going to do was not screw my floor battens directly into the main stringer but rather epoxy an oak cleat onto the side of the stringer and then screw into it. I plan to drill a small pilot hole through the oak cleat so on the event that water does find its way to these screws it can drain out the bottom. “With respect to my exhaust. I have copper pipes that go out the back. They are 3 1/8" OD. I need to put my boards in in the next day or so. Seeking opinions on whether to leave these or replace with 3" stainless. On one hand, the copper could be all shiny and pretty, but require constant cleaning. How hard will it be to force modern 3" wired hose over these? I am sure I can get it, but may be tough. Also, I imagine I will have a hard time getting a hole saw that size so I would have to likely drill 3", then sand round to the larger size.” I have a boat that has the copper through the transom. Works well and eliminates some subfloor maintenance. On mine I have a copper elbow up to the exhaust with a short piece of rubber connecting the two. Getting the rubber over the pipe was solved by taking the shot rubber pieces to my local muffler shop and having them stretch them a bit on one of the pipe expanding machines. You can buy a similar tool from Harbor Freight. I don’t polish them as you will never win the battle. I can post a picture if you would like. “I did two more runs of tape on the inside of the mains last night. I have currently, 2", 2", 4", 8" cap, 8", 4". I still have enough to do another 8" down the joint if need be. Opinions on adding or just leaving it? Then I plan to cap with biax, then do a wide strip of biax from hull to the top edge of the stringers. I am going to do some repair and buildup work around the strut, and I think this will tie into that well. Thoughts?” I am of the opinion that glassing wood in the thickness you are doing is done for abrasion resistance. Granted it does ad some strength but not significantly. If you think about it a stringer is actually acting like a beam/joist with its strength being largely a function of depth. I am considering to install the stingers with reinforced fillets as you did but just sealing above the cloth with several coats of brushed epoxy. Frank |
||
|
||
|
WakeSlayer
Grand Poobah
Joined: March-15-2006 Location: United States Status: Offline Points: 2138 |
Post Options
Thanks(0)
Quote Reply
Posted: February-11-2010 at 12:39pm |
|
|
Frank,
I plan to permanently install most of the floor. The removeable rear panel will be from engine to rear, and secondary to secondary. I want access to my exhaust in the unlikely event of a failure. I plan to just adhere to the stringers with epoxy, but will probably use a few sealed and filled screws. It works better than weights to flatten the floor down well. I was unable to prevent a couple small warps in my ply before. I weighted as soon as I got it home, and weighted and clamped while sealing. I have the same copper elbows below the actual manifolds. I like the idea of having it stretched slightly as I know it will be an absolute bear to get on the fittings. There are so many discussions about layup, it becomes hard to pick which route you will go with. I do like the idea of the biax over the top once and will do a fat strip up to the top after that. As Pete said, this thing will break ice when I am done. It may be overkill, but it will be bulletproof. |
||
|
Mike N
1968 Mustang |
||
|
||
|
8122pbrainard
Grand Poobah
Joined: September-14-2006 Location: Three Lakes Wi. Status: Offline Points: 41040 |
Post Options
Thanks(0)
Quote Reply
Posted: February-11-2010 at 1:15pm |
|
Frank, I feel you're getting into some "uncharted territory" with some of your ideas. Not that they are bad but allow me to make some comments. It's always good to think "outside of the box"!!! Everthing below the carpet should be CPES'd, glassed and epoxied. Epoxy alone although it's a good sealer it's brittle. You need the glass for strength preventing cracking at any stress point. Using only epoxy you will get cracking and water will get to the wood. This has been proven many times over on wood hulls that have had the "West epoxy bottom" jobs. It never worked. The White Oak for cleats/cross members is a nice idea but drilling a pilot hole for water to drain out isn't going to work. The water will just soak sideways into the wood. Concrete "form board" is made so nothing sticks to it so you will have a problem. A better choice would be "sign board" which is a weather proof board with a high pressure laminate on it's face. I however feel it's overkill. Exterior grade epoxied/glassed (4oz. glass) ply has proven itself. Any hole for removable flooring is a potential spot for water intrusion. Is there a reason you want to make the complete floor removable? With the exception of the lift off section behind the dog house, consider bedding/epoxying the rest of the floor down. Yes then just like Mike did, if screws must be used do CPES/epoxy them in. The glassing of the sides of the stringers does add strength in the same analogy you mentioned regarding "beam depth". However, it's not for abrasion but more for keeping the water out as mentioned above. BTW, my pulling a master mold off my Dunphy step pad was a disaster. The silicone casting compound outgassed severely between it and the step pan. No indication from the outside until I pulled the mold off. Back to the drawing board!! |
||
|
||
|
TRBenj
Grand Poobah

Joined: June-29-2005 Location: NWCT Status: Offline Points: 21133 |
Post Options
Thanks(0)
Quote Reply
Posted: February-11-2010 at 1:56pm |
|
|
I agree with Pete, he's the expert. In regards to a removable floor, while it would be nice to access the entire structure to inspect for damage or water intrusion, I think such a concept has too many problems to become viable. The incorporation of the floor into the structure of the boat (essentially tying the stringers together to the hull walls in all directions) really adds to the structural rigidity of the boat. That requires a good bond down to the stringers and several layers of glass to the walls. You also dont want any water intrusion points, so the structural joints also serve to seal the structure off.
I think that there are a lot of opportunities to improve on the factory stringer and floor design- even if going back with a similar methods (wood stringers and glass over foam floor). We now know the weak areas (batt box drains, air vents, weak bulkheads, seat screws, etc) and have improved methods and materials (epoxy resin, CPES, 5200, composites) to work with. I think this can be taken several steps beyond with no-foam approaches, all the way up to using composites. Allowing the structure to breathe is huge, as evidenced by the early glass CC's without foam that dont have any rot. Personally, Im taking the approach my next few jobs to 1)fully seal the structure so no water can get in, 2)no use of foam below the floor so it wont hold water, 3)providing drains for the under floor cavities to drain together, but 4)not draining the cavities to the bilge (as this would provide an intrusion point) and instead provide a few sealed access points to remove the water should it ever get in somehow. Just my take. |
||
|
||
|
FrankT
Senior Member
Joined: September-07-2006 Status: Offline Points: 245 |
Post Options
Thanks(0)
Quote Reply
Posted: February-11-2010 at 2:08pm |
|
|
Thanks for your comments. One thing to note about the epoxy flex is that the brittleness is a function of cure rate. Typically a 1:1 epoxy will be much more flexible than a 3:1. I used to have a link to one of the manufactures specifications but I can not find it anymore.
The other thing with the cleat concept is that it really becomes a sacrificial piece. If it rots, pop it off with a chisel and put a new one on. Same with the oak floor battens. Screw the flooring only to these members and not to the stringers. It's going to get wet eventually and if they rot just unscrew replace. In the 71SN the only wood that has survived is the oak under the tank and the oak piece at the base of the rear valance. These pieces where not even sealed. A removal floor is just a inspection and maintenance issue. I have a wood boat similar to yours and the floor is removable. Every winter I open it up to take a look and to also to let it dry out. For your mold I try bondo. Get a good release agent, this is key, and spray the original. Put the original on your bench on a piece of wax paper and then press the bondo onto it. Hopefully it will work into the details of the original. Another product that might work is epoxy but you will have to devise some method to contain it. Frank |
||
|
||
|
FrankT
Senior Member
Joined: September-07-2006 Status: Offline Points: 245 |
Post Options
Thanks(0)
Quote Reply
Posted: February-11-2010 at 4:20pm |
|
|
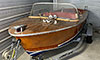
A couple of pics:
This is the exhaust noted. Brass trim with copper. 
Floor stringer cleat concept on a spruce stringer. This is behind the engine about where the prop shaft goes through the keel 

|
||
|
||
|
8122pbrainard
Grand Poobah
Joined: September-14-2006 Location: Three Lakes Wi. Status: Offline Points: 41040 |
Post Options
Thanks(0)
Quote Reply
Posted: February-11-2010 at 5:19pm |
|
|
Frank,
I'm assuming the stringer/cross member pictures are from your wooden boat? I was meaning to ask you about it when I saw a picture of it in the "vents" thread. Grandcraft reproduction? Hard to tell as it was off in the corner of the picture. I see where you're coming from with the cleat idea but I'd rather glass every thing in and then not have to worry about knocking one off later incase of rot. |
||
|
||
|
FrankT
Senior Member
Joined: September-07-2006 Status: Offline Points: 245 |
Post Options
Thanks(0)
Quote Reply
Posted: February-11-2010 at 5:43pm |
|
|
Your correct - these are from my wood boat.
|
||
|
||
|
Riley
Grand Poobah
Joined: January-19-2004 Location: Portland, ME Status: Offline Points: 7952 |
Post Options
Thanks(0)
Quote Reply
Posted: February-12-2010 at 10:53am |
|
|
So what is the purpose of so many layers of glass? To strengthen the stringer? Make them waterproof? Or adhere them to the hull? It doesn't appear to me that Correct Craft used resin to glue the stringers to the hull, but only the glass wrapping. As far as encasing them in so many layers of glass for water proofing, that seems to be over kill if you CPES them and coat them with epoxy. Wooden boats get along just fine without all that wrapping, maybe even better because they can breathe.
I am guessing that Tim is correct about the stringers being assembled in a jig and dropped into the boat and glassed. I bet Correct Craft didn't put layer upon layer to glass them in. It seems the oldest boats with the least glass and no foam lasted the longest. |
||
|
||
|
8122pbrainard
Grand Poobah
Joined: September-14-2006 Location: Three Lakes Wi. Status: Offline Points: 41040 |
Post Options
Thanks(0)
Quote Reply
Posted: February-12-2010 at 12:36pm |
|
|
Bruce,
I feel you have a valid point on the amount/layers of glass some use on a stringer job however we know the factory's wasn't the greatest. Also, with the factory resin splatter "decorative" coating it does give the impression of a heavier glass job. We all strive for a better than factory job so some have ended up pretty heavy on the glass!! With the bonding at the hull I don't feel more than 3 layers are needed especially when the stringers are bedded/bonded. Another layer is just adding weight but really not that much. Over the top I sure wouldn't want to see less that 2. One layer isn't enough and there's a good possibility for it to crack. A third layer under engine mounts is then best. That's were the stringer is going to see lots of stress plus the compression of bolting into the wood. The above really gets complicated when you mix in the use of biax or roving and the layer quantity is based on using cloth. The whole restringer job is based on both water proofing and strength. Just a CPES and epoxy coat isn't going to do the waterproofing job needed. I mentioned above about the "West bottom" jobs on wood that failed. Without any glass, small cracks show up is the resin due to stress of wood movement and that's where the water gets in. Yes the early wood factory stringers seemed to hold up with just the glass to the hull. The Tahoe in the other thread is a good example but take a look at the stringer height. Looks taller than later wood? I believe the wood height was doing all the work with strength and very little of the glass fillet. |
||
|
||
|
WakeSlayer
Grand Poobah
Joined: March-15-2006 Location: United States Status: Offline Points: 2138 |
Post Options
Thanks(0)
Quote Reply
Posted: February-12-2010 at 2:49pm |
|
|
I started layup on the rudder plate, and repairing the crack near the strut mount. I gournd out the crack a bit into to v shape, and filled with peanut butter. Sanded the edges a little, and put a couple strips of glass over them. I had nice fillets around the rudder plate, taped around it once, and then capped with 4 inch pieces. I then took on 2'x2' piece and covered the entire area from a couple inches up each stringer across, and from a couple inches up the transom to forward of the strut mounts. How much glass would you cap both the repair and the plate with? Similar to stinger layup? I also filleted around the exhuast plates, and will be capping those this weekend. I am going to try and get all this type of stuff done by the end of the weekend, and then start laying up biax, till I run out of epoxy. I had wanted to get this done by the time I left for the river, but will not quite make it.
|
||
|
Mike N
1968 Mustang |
||
|
||
|
SNobsessed
Grand Poobah
Joined: October-21-2007 Location: IA Status: Offline Points: 7102 |
Post Options
Thanks(0)
Quote Reply
Posted: February-12-2010 at 11:47pm |
|
|
Pete - What would be cool if an engineering student could model a hull/stringers & run a computer stress analysis on it. Then we would have data to figure out how many layers of glass is needed. Sounds like great research project for a Grad student!
|
||
|
“Beer is proof that God loves us and wants us to be happy.”
Ben Franklin |
||
|
||
|
WakeSlayer
Grand Poobah
Joined: March-15-2006 Location: United States Status: Offline Points: 2138 |
Post Options
Thanks(0)
Quote Reply
Posted: February-14-2010 at 12:52pm |
|
|
Yesterday I was able to start laying biaxial up on one stringer. I had hoped to be able to finish the entire stringer, but I am not sure I have enough epoxy left, so I am stopping here and glassing in little stuff at the transom until I get more. I really thought 5 gal. would get the stringers done. Wrong. I am doing approximately four foot sections as I am doing this with no help. I put one layer on the front section, two in the middle (engine mounts)and will add one on the rear section. After that, I will lay one long piece end to end from top of stringer to about the same width out on the hull. I have a 38inch roll. The widest piece to cap the stringers is 26.5" leaving a minimum of 11.5" strip on the roll. I will have a giant piece of biaxial tape left on the roll to use. I did have to slice a hole where the crossmember cut outs are to relieve the outgassing as it would bubble when the epoxy started to kick off. I did not use the roller early on as much as I should have on the tapes as there are a few bubbles here and there. Any really bad ones are getting ground off prior to the biax.
Couple pics. 


I am going to just focus on little stuff today, exhaust mounts, gas tank mounts, rudder plate, while i wait for more epoxy. Hopefully, I will at least have this main done before the river run. |
||
|
Mike N
1968 Mustang |
||
|
||
|
Keeganino
Grand Poobah
Joined: October-27-2009 Location: North Carolina Status: Offline Points: 2063 |
Post Options
Thanks(0)
Quote Reply
Posted: February-15-2010 at 2:16am |
|
|
Nice clean work Mike! I have heard that biax just drinks epoxy. You have probably already said several times in the post but how much epoxy have you gone through so far? Or what did you start with?
|
||
|
"working on these old boats may not be cost effective but as it shows its what it brings into your life that matters" -Roger
1973 Skier |
||
|
||
|
WakeSlayer
Grand Poobah
Joined: March-15-2006 Location: United States Status: Offline Points: 2138 |
Post Options
Thanks(0)
Quote Reply
Posted: February-15-2010 at 12:42pm |
|
|
I have gone through right around 5 gallons. Have more coming, but not until Wednesday. I would guess two more gallons to finish the stringers, and hopefully, the remaining three will get me through the longitudinals, and the floor. I will be pissed if I need more at the end.
|
||
|
Mike N
1968 Mustang |
||
|
||
|
8122pbrainard
Grand Poobah
Joined: September-14-2006 Location: Three Lakes Wi. Status: Offline Points: 41040 |
Post Options
Thanks(0)
Quote Reply
Posted: February-15-2010 at 1:03pm |
|
Yes but you're building the "Scandinavian ice breaker/ski boat"!!!!  Pretty soon you'l need to change the title of this thread! Pretty soon you'l need to change the title of this thread!
|
||
|
||
|
Post Reply
|
Page <1 3456> |
 Tweet
Tweet
|
| Forum Jump | Forum Permissions You cannot post new topics in this forum You cannot reply to topics in this forum You cannot delete your posts in this forum You cannot edit your posts in this forum You cannot create polls in this forum You cannot vote in polls in this forum |


 Topic Options
 WakeSlayer wrote: