 Boats For Sale:


Stringer Replacement 86 Silver Nautique. |
Post Reply 
|
Page 123 5> |
| Author | |
Kristof 
Grand Poobah 

Joined: October-08-2007 Location: Bree, Belgium Status: Offline Points: 3395 |
 Post Options Post Options
") Thanks(0) Thanks(0)
 Quote Reply Quote Reply
 Topic: Stringer Replacement 86 Silver Nautique. Topic: Stringer Replacement 86 Silver Nautique.Posted: July-03-2024 at 4:35am |
Never regretted installing the 'Gore-Tex' packing I got from Skidim in mine. It's been in there for about ten years now and is as stated, virtually dripless. Shaft and gland even stay nice and cool after running pyramids, barefooters and what not for two hours...
|
|
|
- Gun control means: using BOTH hands!
- Money doesn't make one happy, but when it rains cats and dogs, it's still better to cry in a Porsche than on a bicycle... |
|
 |
|
|
andrewmarani
Senior Member 
Joined: May-31-2005 Location: Baltimore, MD Status: Offline Points: 229 |
Post Options
Thanks(0)
Quote Reply
Posted: June-20-2024 at 6:24pm |
|
I decided to just stay with the old packing system though I did buy some type of graphite packing instead of the waxed cord.
Boat has been at the marine shop to have the engine installed for almost 2 weeks and it’s still sitting in their yard. I’ve dropped by and done some minor stuff while it’s sitting there but really want it back at my house so I can finish it up. Meanwhile I’ve been taking care of small items or not so small sometimes. Below is the windshield reassembled, which was a bit nerve-racking with worrying about cracking the curved main glass while fitting it into the frame, but all went well. I had pictures of everything together and labeled the and as it came apart and I labeled all the parts but it was still a bit of a jigsaw puzzle fitting everything together. End result is good, no scratches in the new powder coat, ready to screw down to the deck.  |
|
|
Builder
|
|
|
|
|
TRBenj
Grand Poobah

Joined: June-29-2005 Location: NWCT Status: Offline Points: 21153 |
Post Options
Thanks(0)
Quote Reply
Posted: June-10-2024 at 2:14pm |
|
Not hearing great things on those. Glide sounds like a safer bet for a few bucks more- and isn’t dry.
|
|
|
|
|
andrewmarani
Senior Member
Joined: May-31-2005 Location: Baltimore, MD Status: Offline Points: 229 |
Post Options
Thanks(0)
Quote Reply
Posted: June-10-2024 at 2:10pm |
|
Anyone install the Flex Gland dripless shaft seal system?
Looks simple, isn't outrageously expensive and doesn't require plumbing hookups. Thoughts? Thanks, Andrew
|
|
|
Builder
|
|
|
|
|
GottaSki
Grand Poobah
Joined: April-21-2005 Location: NE CT Status: Offline Points: 3348 |
Post Options
Thanks(0)
Quote Reply
Posted: June-03-2024 at 8:26am |
|
Outstanding
|
|
|
"There is nothing, absolutely nothing, half so much worthwhile as messing around with boats...simply messing."
River Rat to Mole |
|
|
|
|
63 Skier
Grand Poobah

Joined: October-06-2006 Location: Concord, NH Status: Offline Points: 4266 |
Post Options
Thanks(0)
Quote Reply
Posted: June-02-2024 at 11:29pm |
|
Getting closer now! Terrific work and attention to detail.
|
|
|
'63 American Skier - '98 Sport Nautique
|
|
|
|
|
andrewmarani
Senior Member
Joined: May-31-2005 Location: Baltimore, MD Status: Offline Points: 229 |
Post Options
Thanks(0)
Quote Reply
Posted: June-02-2024 at 7:05pm |
|
Glued the carpet down to the floor today after working into the night yesterday prepping by pouring the last of the foam, plugging holes, using faring compound to smooth the tabbing attaching the sides to the floor, faring the plugs and then sanding everything.
 I used most of one gallon of glue, Henry 663 and a plastic spreader I bought at West Marine, used the side with the second to largest V notches. As you can see in the photo, I didn’t cut the carpet to size, though I had previously put it in the boat and cut all the holes needed under the bow for all those pipes and a hole for the pylon. Glueing up under the bow was the hardest part due to all the pipes. After that I just worked toward the back of the boat gluing half of one side up near the front seats and then gluing one side then the other as I worked my way back. I held the glue back 2” around all the sides so I can install the corner trim later. I had a small 6” wide hand roller used for working epoxy into fiberglass and something like that is a must for working out the inevitable carpet bumps. Pushing them down by hand would have been a nightmare, working with the roller made it a piece of cake. After I had the carpet smooth, I used the roller over everything, pushing down hard to make sure I had solid contact with the glue.  I’m eager to get the engine installed so the next step is to install all the running hardware and wiring harness. Easy enough to install the side carpet with the engine in place. I plan to run everything back through bilge to roughly where it goes so the marine company that has the engine can hook stuff up for me when they drop in the engine. They agreed to do the shaft alignment with the engine install. That alignment is pretty critical so I may pull that back apart and double check with some feeler gauges. Ideally, I will drop the boat off late this week or this coming Saturday and have it back in a week. Today I also got the boat off the support system it’s been sitting on for two years and back onto the trailer. Only almost dropped it once. |
|
|
Builder
|
|
|
|
|
andrewmarani
Senior Member
Joined: May-31-2005 Location: Baltimore, MD Status: Offline Points: 229 |
Post Options
Thanks(0)
Quote Reply
Posted: June-02-2024 at 5:54pm |
|
Pouring Foam: Lessons Learned. I've made the following mistakes in multiple combinations: hull too cold, not stirring enough, liquids too cold. I'm usually pouring about a quart of mixed liquid. I mix with a wood paint mixer. I made a hot box to warm up the gallon metal containers, with a cheap digital thermometer that has the sensor on a flexible wire dangled into the box. Unfortunately, that only gets you close on temperature. You need one of those infrared temperature guns to get an instant read on the liquids AFTER you pour them into their two containers (see below on containers). If your temp is low, put the two containers in the hot box for a few minutes, if high just let them sit for a couple.  The hull temperature needs to be at least 75 degrees, 80 plus is better. The liquids need to be at least 85 degrees, 90 to 92 is better. 95 is ok but I would save that for a hull that's lower than 80 degrees because they react faster and you have less time for mixing and pouring.  Use three containers, one filled with part A, one filled with part B and a third to pour them into. You can reuse the first two, chuck the third after one use. Pour both parts into the third container at the same time. Mix as energetically as you can without spilling for 50 seconds. After that you have about 35 seconds to pour your mixture into the hull, unless your liquids are at 95 degrees, then you have maybe 25 seconds. Sounds short but I never had an issue getting the pour done before the reaction started. Good luck guessing how much to pour into each hole, it takes practice, and one boat's worth of practice is not enough! I used three US Composite 8 cubic foot kits. I bought four and ended up using about 4 cups from the fourth kit but that’s because of the mixing errors noted above. If you do a good mixing job at the right temps, three kits is plenty. |
|
|
Builder
|
|
|
|
|
MrMcD
Grand Poobah

Joined: January-28-2014 Location: Folsom, CA Status: Offline Points: 3691 |
Post Options
Thanks(0)
Quote Reply
Posted: May-28-2024 at 11:26am |
|
Wow, bringing that boat back to life. Looking good.
|
|
|
|
|
samudj01
Gold Member 

Joined: March-10-2009 Location: NC Status: Offline Points: 970 |
Post Options
Thanks(0)
Quote Reply
Posted: May-28-2024 at 9:43am |
|
Looking good!
|
|
|
78 Ski Tique, 72 Skier w/302's, 93 SN w/351 & 17 GS22 w/zr409
Previous - 99 Sport Nautique w/GT40 and 87 Martinique w/351 |
|
|
|
|
andrewmarani
Senior Member
Joined: May-31-2005 Location: Baltimore, MD Status: Offline Points: 229 |
Post Options
Thanks(0)
Quote Reply
Posted: May-27-2024 at 7:16pm |
|
After the epoxy setup I used a straight edge and a circular saw to cut right next to the secondary stringer. I plan to install a small angle to trap the carpet as it turns down the stringer and as a support for the removable center section. I noticed there was some flex in the center of the panel after I installed despite the heavy mesh on the back so I added a lighter fiberglass mesh to the top before I made the cuts. The blue dots are tape over the T-nuts to keep the epoxy out. I've also started sanding out any rough spots, prepping for carpet. Last two pieces of flooring in the back corners are installed with bricks holding them down till the epoxy sets.
 And this is were I am today. All flooring installed and three quarters of it foamed with the Coosa plugs installed in the holes bedded in epoxy. If all goes as planned, I will install the carpet this coming weekend.  |
|
|
Builder
|
|
|
|
|
andrewmarani
Senior Member
Joined: May-31-2005 Location: Baltimore, MD Status: Offline Points: 229 |
Post Options
Thanks(0)
Quote Reply
Posted: May-27-2024 at 6:56pm |
|
Picture shows the back floor panel with the fiberglass reinforcement on the underside, I used the heavier mesh for this. If you look close you can see the stainless T nuts installed to hold the hinges for the back seat and the engine cover.
 This shows the panel being installed.  |
|
|
Builder
|
|
|
|
|
andrewmarani
Senior Member
Joined: May-31-2005 Location: Baltimore, MD Status: Offline Points: 229 |
Post Options
Thanks(0)
Quote Reply
Posted: May-01-2024 at 2:36pm |
|
Ordered the Centek mufflers, should have them next week.
Spent some time researching carpet adhesive since that's coming up soon. Looks like Henry 263 is preferred but that's not available around here due to environmental regulations even through one of my carpet subcontractors. Henry 663 has good reviews as well so that's what I'm going to use. Picture below is the painted bilge. Next up install the engine frame, which will take hardly any time, then more flooring installation. 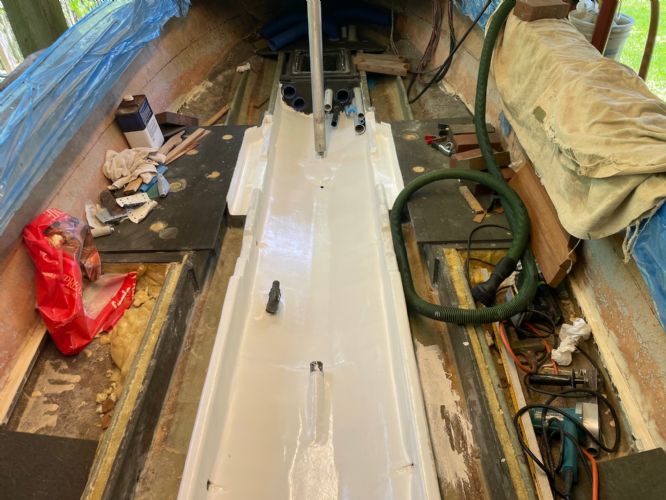 |
|
|
Builder
|
|
|
|
|
KENO
Grand Poobah
Joined: June-06-2004 Location: United States Status: Offline Points: 10932 |
Post Options
Thanks(0)
Quote Reply
Posted: April-30-2024 at 5:19pm |
|
The Amazon profile for Atlantic Boat Supply, the Amazon seller, says that they're located at 17 Peckham Drive, Bristol Rhode Island and Google says that's also the address for Jamestown Distributors, so I'd say you're dealing with a reputable outfit

|
|
|
|
|
andrewmarani
Senior Member
Joined: May-31-2005 Location: Baltimore, MD Status: Offline Points: 229 |
Post Options
Thanks(0)
Quote Reply
Posted: April-30-2024 at 4:40pm |
|
SKIDIM has double checked my order several times in the past and called me to fix my order mistake for my model boat or engine. Always liked them.
But I will go with Centek on amazon this time around and save the dollars. I'm good buying from Amazon as long as i'm sure I'm buying the right product. Thanks for the feedback. One more thing off that long but getting shorter list. One more coat of bilge paint tomorrow and I can bolt in the engine frame this weekend!!
|
|
|
Builder
|
|
|
|
|
KENO
Grand Poobah
Joined: June-06-2004 Location: United States Status: Offline Points: 10932 |
Post Options
Thanks(0)
Quote Reply
Posted: April-30-2024 at 4:33pm |
|
You've had experience with Centek mufflers all these years in your boat without knowing it. That's what it came with. I'd rather buy the Centek mufflers from the outfit on Amazon, than pay the big price differential for the Ultra Marine mufflers fron SkiDim Centec has been around almost as long as you've been around. They're 62 years old If you for whatever reason don't trust Amazon, google the same Centek part number (1000216) and you'll find a variety of places and prices
|
|
|
|
|
Jonny Quest
Grand Poobah

Joined: August-20-2013 Location: Utah--via Texas Status: Offline Points: 2924 |
Post Options
Thanks(0)
Quote Reply
Posted: April-30-2024 at 3:34pm |
|
Centek made the Inverta-Flow mufflers that were found on many of the "slant back" Nautiques. I would have no problem using a Centek product.
JQ
|
|
|
Current
2003 Ski Nautique 206 Limited Previous 2001 Ski Nautique Open Bow 1994 Ski Nautique Open Bow Aqua skiing, ergo sum |
|
|
|
|
andrewmarani
Senior Member
Joined: May-31-2005 Location: Baltimore, MD Status: Offline Points: 229 |
Post Options
Thanks(0)
Quote Reply
Posted: April-30-2024 at 1:37pm |
|
I'm planning to replace the original mufflers, I repaired one years ago for a small burn through hole and I think the other has a hole now. Not a hard fix but after 38 years probably time for new mufflers. I've found two options though I expect there are more out there. Thoughts on the choices below?
Centek Verna Ski-3 in 45 Degree Inlet. Dimensions work and it has a 45 degree inlet which will make life much easier with the exhaust piping. No need to force that hard bend into the heavy rubber pipe. Anyone have any experience with Centek?
Other option is from SKIDIM, whom I trust far more than Amazon. Basically the same design but 50% more in cost. Ultra Marine. |
|
|
Builder
|
|
|
|
|
TRBenj
Grand Poobah
Joined: June-29-2005 Location: NWCT Status: Offline Points: 21153 |
Post Options
Thanks(0)
Quote Reply
Posted: April-23-2024 at 11:03am |
|
The stringer notches under the motor mounts are larger on the engine side in order to accomodate either engine option (Chevy mounts are several inches further forward than Ford Windsor).
The gentle angles are easier to glass, and therefore stronger. The larger than needed notches also make it easier to get a hand or wrench on the back side of those motor mount bolts. |
|
|
|
|
KENO
Grand Poobah
Joined: June-06-2004 Location: United States Status: Offline Points: 10932 |
Post Options
Thanks(0)
Quote Reply
Posted: April-23-2024 at 8:16am |
|
Once upon a time you uploaded a picture of your boat using IMGBB (back in the "Elephant" thread).so I know you can do it
I guess for some reason you went back to the site process which isn't any better than it ever was and it was always a bit challenging just to put it in nice terms. Ever since using IMGBB, I haven't had any pictures rotate when posting And it's easier to do and works no matter what you're posting from. I could go on but you must have your reasons for wanting to use the site process and make everybody look at sideways pictures and get a sore neck . |
|
|
|
|
andrewmarani
Senior Member
Joined: May-31-2005 Location: Baltimore, MD Status: Offline Points: 229 |
Post Options
Thanks(0)
Quote Reply
Posted: April-23-2024 at 8:03am |
|
i'm using the forum picture uploader. Looking back at my pictures it looks like the forum wants them to be wider than they are tall. When I upload a picture taken from that aspect, it doesn't rotate. When I upload a picture that's more tall than wide, it rotates it. Not really a big deal, was just a puzzle.
|
|
|
Builder
|
|
|
|
|
KENO
Grand Poobah
Joined: June-06-2004 Location: United States Status: Offline Points: 10932 |
Post Options
Thanks(0)
Quote Reply
Posted: April-23-2024 at 7:16am |
How are you uploading pictures to the site? Are you using the CCF upload feature or something else?
|
|
|
|
|
andrewmarani
Senior Member
Joined: May-31-2005 Location: Baltimore, MD Status: Offline Points: 229 |
Post Options
Thanks(0)
Quote Reply
Posted: April-22-2024 at 10:00pm |

I cannot figure out why half the time the picture rotates 90 degrees when I upload it. Bow flooring is epoxied down and all the tubes/pipes/vents installed, which you can see in the photo. I’ve test fitted the engine frame. Needed some sanding on the stringers to get it in place, ending with a good snug fit. Leaving an 1/8” more between the main stringers would have made life easier. Originally the frame was lagged down from the top but I’m going to run bolts through the sides, seems more secure. As a side note: I put the notches in the stringers to match the original, including the locations of the notches for the engine mount bolts. This was a mistake, the front engine mount bolt notches are much longer than needed and the back notches too tight. I have way too much space on the front notches and I had to sand out and then re-glass the front part of the back notches to get a bit more clearance for those bolts. In addition, the front of all the notches are sloped, for no reason I can discern. Better plan is to make the notches run about 1 ½” past the bolt locations in the engine frame and make the ends of the notches vertical with rounded corners at the bottom and top of the vertical cuts. I will go back and edit my posting on the stringer layout. I’m using fairing compound (pale green stuff in picture) to smooth out the bilge prior to using a TotalBoat bilge paint on it. Doesn't show in the picture but i used west systems faring compound to make a flowable fill and filled in a weird ditch in the bilge right against the transom (roughly 3/4" deep, 8" long and 1" wide running along the transom, no idea why it was there) and a water puddling spot between the rudder post and the reinforced area for the shaft log. Once the bilge is painted, I will install the engine frame, then finish installing the floor, finish foaming and install the carpet. Then I can have the marine repair shop where the engine is stored drop it into place on the frame. Figure I’ve got 3 to 4 weeks before I can get the engine installed. I try not to think too much about all the stuff left to do before summer and concentrate just on the next couple of steps… |
|
|
Builder
|
|
|
|
|
1980SN2001
Senior Member
Joined: August-01-2022 Location: Rocklin, CA Status: Offline Points: 109 |
Post Options
Thanks(0)
Quote Reply
Posted: April-11-2024 at 4:02pm |
|
I also used something like what your holding in the picture at the transition from floor to wall. I got it from tools4flooring.com and it was called Burke 153.
https://www.tools4flooring.com/burke-153-3-8-black-cerco-bar-12-length.html |
|
|
|
|
Faceplant
Senior Member

Joined: July-27-2013 Location: Otter Lake , Mi Status: Offline Points: 411 |
Post Options
Thanks(0)
Quote Reply
Posted: March-29-2024 at 9:06pm |
|
Please keep us posted. I might be interested also.
|
|
|
Feels like I am hanging 10 but in reality - probably hanging 6.
|
|
|
|
|
andrewmarani
Senior Member
Joined: May-31-2005 Location: Baltimore, MD Status: Offline Points: 229 |
Post Options
Thanks(0)
Quote Reply
Posted: March-26-2024 at 11:27am |
|
Ordered a sample of this stuff by Trim-Lok. Might work a bit better plus I like the included 3M adhesive tape.
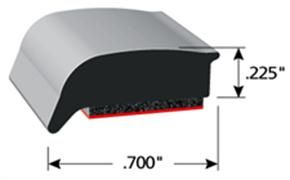 EDIT: OK, bought a foot of it and I'm not impressed. The vertical section will cover a bit under a 1/4" of the side carpet, which works fine. The floor side will catch about 1/16" of the floor carpet, which is never going to work, there's no way i'm going to be able to cut the floor carpet that neatly. So NOT using this stuff.
|
|
|
Builder
|
|
|
|
|
andrewmarani
Senior Member
Joined: May-31-2005 Location: Baltimore, MD Status: Offline Points: 229 |
Post Options
Thanks(0)
Quote Reply
Posted: March-26-2024 at 11:13am |
|
It's not difficult to solve, I can definitely make it work. it's just frustrating to me that something that's actually designed for this issue isn't available, I can be a bit ocd about details. I will turn the side carpet onto the floor a half inch to get it under that lip on the right side in the picture so it doesn't ravel.
The trim originally used on the boat and the one at Nautique Parts are designed for a carpet to VCT floor transition, flooring subcontractors we work with use it all the time. FYI a 12' length on Nautique Parts is $83. Same stuff in a choice of colors is $23 on line. |
|
|
Builder
|
|
|
|
|
TRBenj
Grand Poobah
Joined: June-29-2005 Location: NWCT Status: Offline Points: 21153 |
Post Options
Thanks(0)
Quote Reply
Posted: March-25-2024 at 9:55pm |
|
Nothing really tucks under from the wall carpet. Not sure why this is so confusing. It’s been several years since cc has been putting carpet in boats- not sure what you’d hope to learn. They used the trim in question at least ‘80-09, should still be available to buy from Nautique parts and others. Not exactly a mystery.
|
|
|
|
|
andrewmarani
Senior Member
Joined: May-31-2005 Location: Baltimore, MD Status: Offline Points: 229 |
Post Options
Thanks(0)
Quote Reply
Posted: March-25-2024 at 10:46am |
|
The trim that came with the boat is a 1/2" thick, maybe a touch more and sits flat on the floor. There's no spot to tuck the side carpet into it unless I turn the side carpet out onto the floor a half inch or so.
See the picture above. left side is where the floor carpet tucks into the trim. Right side goes against the side of the boat and tapers down to less than a 1/4" and is designed for carpet to tuck under it. I spent sometime on line looking at boat carpet trim and nothing is designed for a floor to side transition, don't really see boats with carpet on the sides much at all. I did find some trim that matches the old trim in the picture above, so if I need to go that route I will likely buy new stuff since it should be more flexible than the very stiff stuff I took off the boat. A picture of a relatively new Nautique showing how they currently handle that trim would be nice. Assuming CC still runs carpet up the sides of the boat. Thanks Andrew
|
|
|
Builder
|
|
|
|
|
TRBenj
Grand Poobah
Joined: June-29-2005 Location: NWCT Status: Offline Points: 21153 |
Post Options
Thanks(0)
Quote Reply
Posted: March-25-2024 at 10:32am |
|
Not following your thoughts on the carpet trim. Walls should be cut at the floor, the trim sits up almost 1/2” and will cover that edge no problem. Floor should be cut 1/2-1” away from the wall so it tucks cleanly into the trim channel.
|
|
|
|
|
Post Reply
|
Page 123 5> |
 Tweet
Tweet
|
| Forum Jump | Forum Permissions You cannot post new topics in this forum You cannot reply to topics in this forum You cannot delete your posts in this forum You cannot edit your posts in this forum You cannot create polls in this forum You cannot vote in polls in this forum |


 Topic Options
 andrewmarani wrote: