 Boats For Sale:


Strut Washer question |
Post Reply 
|
Page 12> |
| Author | ||
KENO 
Grand Poobah 
Joined: June-06-2004 Location: United States Status: Offline Points: 10652 |
 Post Options Post Options
") Thanks(0) Thanks(0)
 Quote Reply Quote Reply
 Topic: Strut Washer question Topic: Strut Washer questionPosted: August-25-2021 at 4:09pm |
|
|
If it looks like the sealant on your strut, it wouldn't hurt to do the rudder port now while you're working on things

|
||
 |
||
|
BigBM
Newbie 
Joined: October-13-2008 Location: United States Status: Offline Points: 29 |
Post Options
Thanks(0)
Quote Reply
Posted: August-24-2021 at 11:29pm |
|
Thank you! I will try and investigate further here too (at/around the rudder port). I'm sure the sealant around the hull/rudder port is the same old stuff I removed from my strut, although I don't remember seeing any obvious water coming in there except for the slowly leaking rudder packing. I still have a tube of 4200 and assume that it wouldn't hurt to pull the whole rudder port out, repack and clean it up and re-bed it with 4200 and reinstall.
|
||
|
||
|
BigBM
Newbie
Joined: October-13-2008 Location: United States Status: Offline Points: 29 |
Post Options
Thanks(0)
Quote Reply
Posted: August-24-2021 at 11:14pm |
|
Thanks, Pete! Will chip away a bit at the leak and see what I can find out.
|
||
|
||
|
KENO
Grand Poobah
Joined: June-06-2004 Location: United States Status: Offline Points: 10652 |
Post Options
Thanks(0)
Quote Reply
Posted: August-24-2021 at 8:26pm |
|
|
The only place wood was mentioned was the rudder port not the shaft log.
The rudder port isn't terribly far from the dripping spot and the water could be migrating from there under the gel coat. But if the port is sealed good now, it's probably not too likely. I'd probably agree with Pete about the shaft log
|
||
|
||
|
8122pbrainard
Grand Poobah

Joined: September-14-2006 Location: Three Lakes Wi. Status: Offline Points: 41040 |
Post Options
Thanks(0)
Quote Reply
Posted: August-24-2021 at 6:46pm |
|
I don't feel you will find any wood at the log. Logs are typically placed inside the hull and then glassed over to bond them to the hull. I suspect there's some disbonding of the glass over the top of the log and that's where the water is seeping in/out. Chip some of the decorative gel off the bilge at the leak to get a better idea.
|
||
|
||
|
BigBM
Newbie
Joined: October-13-2008 Location: United States Status: Offline Points: 29 |
Post Options
Thanks(0)
Quote Reply
Posted: August-24-2021 at 2:23pm |
|
Ah, okay. Good to know. Thank you! I'll hold on to the adapter. So, hopefully just a cable swap, an expensive one
 |
||
|
||
|
BigBM
Newbie
Joined: October-13-2008 Location: United States Status: Offline Points: 29 |
Post Options
Thanks(0)
Quote Reply
Posted: August-24-2021 at 2:03pm |
|
Thank you for the pics/link!  I'll take a look at the rudder port next time I'm at the lake. I did see some drips from the port itself - assuming packing needs to be changed so I'll tackle that at some point but haven't inspected much else around it - didn't see anything visually obvious, but will inspect more. That spot that is chipped in the bilge (see pic) just oozes water from it (when in the water) and is just 4-5 inches to the starboard side - about inline with the middle of the shaft log. I suppose it could leak underneath all of the wood reinforcement from the rudder port and then find it's way out there.  |
||
|
||
|
Gary S
Grand Poobah

Joined: November-30-2006 Location: Illinois Status: Offline Points: 14096 |
Post Options
Thanks(0)
Quote Reply
Posted: August-24-2021 at 1:55pm |
|
No you'll still need the adapter, the helm was changed a long time ago to a different style connection- all the newer cables are of that connection. The adapter lets the new cable connect to the old style helm
|
||
|
||
|
KENO
Grand Poobah
Joined: June-06-2004 Location: United States Status: Offline Points: 10652 |
Post Options
Thanks(0)
Quote Reply
Posted: August-24-2021 at 1:28pm |
|
|
You'll see a picture of the long and short tubes in the link below on page 24. Short one is 10.5 inches and long one is 13 inches (see page 23 of the same link) Hacksaw or angle grinder works fine. Water could have found it's way there through the leaking rudder port which has a wood reinforcement that maybe is delaminating some.
|
||
|
||
|
BigBM
Newbie
Joined: October-13-2008 Location: United States Status: Offline Points: 29 |
Post Options
Thanks(0)
Quote Reply
Posted: August-24-2021 at 11:58am |
|
Thank you! I'm thinking I'll probably just go with the Nautique cable. They mentioned putting in an adapter for the current cable when they installed it a while ago, which should have tipped me off but I didn't know as much then. I'm assuming that I can just remove that from the steering head and plug/thread the Nautique cable in without it? Also, what is involved in shortening the tube? Cut with hacksaw or cutting wheel and how much? I've pictured how they had it installed below...looks like they have it as far to the stern as it'll go. Now to figure out how water is getting through in the bilge - maybe some delamination or water leakage from beneath near the shaft log? 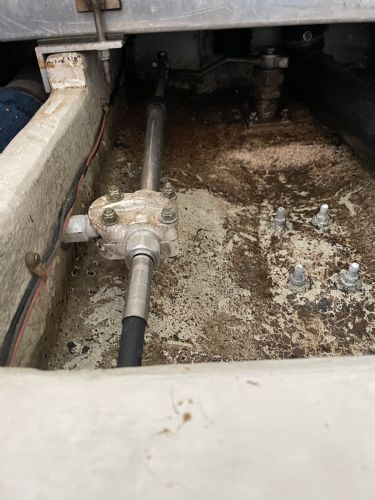 |
||
|
||
|
KENO
Grand Poobah
Joined: June-06-2004 Location: United States Status: Offline Points: 10652 |
Post Options
Thanks(0)
Quote Reply
Posted: August-24-2021 at 6:01am |
|
Since you have the "not exactly optimum cable" in there now, you can adjust your steering throw to be equal in both directions by loosening the clamp block and moving the guide tube to give you less steering angle to starboard and more to port, tighten things up and then take the boat for a ride. You'd have to shorten the guide tube to the same length as a 70's tube for this to work and use the full travel of the cable you have right now. The long tube and short throw cable you have right now limits things a bunch. With the shorter tube and the short throw cable, it won't turn quite as sharp at low speeds, but it's plenty drivable. You may like it, or you may decide to go for the longer throw high buck cable, but if you shorten the tube and don't like it,...... well you're screwed and need a new tube for the longer original cableEasiest solution is to pay more money and get the CC "special" cable
|
||
|
||
|
BigBM
Newbie
Joined: October-13-2008 Location: United States Status: Offline Points: 29 |
Post Options
Thanks(0)
Quote Reply
Posted: August-23-2021 at 8:05pm |
|
|
Just wanted to give an update. Put the new shaft in after shimming the strut on the starboard side with washers and letting it dry. Got the prop lapped on following Pete's process, put the rudder back in and got motor lined up and put it in the water. No leaks around the strut mounting bolts and the prop shaft spins pretty easily by hand when I grab the couplings and spin it.
Just wanted to say a big thank you for all of the expertise here. I really do appreciate it. I did notice water coming in the bilge but not from and expected area, unfortunately. Pic below. There's a leak in the starboard side of the bilge - 4-5 inches from the shaft log. I don't see any obvious areas on the hull below. Any ideas about what it is or the process to fix it? Water is seeping through where you can see a chip out in the pic and running down toward the shaft log. I also noticed from that picture that a steering cable that I had the local marina replace is incorrect - based off of the part number on it - Seastar cable SSC6217 - a 17 foot cable from what I can tell and not the 17.5 foot one I need from Nautique. I'm assuming that would explain why I can turn very aggressively to starboard but much less maneuverable to port? Going to try and have a chat with them and see if they can replace or work with me to sort something out. 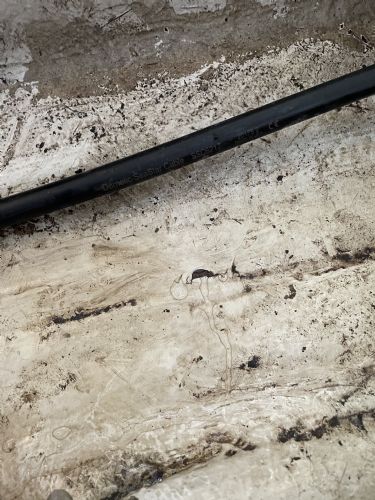 |
||
|
||
|
BigBM
Newbie
Joined: October-13-2008 Location: United States Status: Offline Points: 29 |
Post Options
Thanks(0)
Quote Reply
Posted: August-08-2021 at 5:11pm |
|
Perfect. Thank you! Yeah, the shaft spins easily without the set screws now and I got some medium strength loc tite when I bought my stainless steel washers. 2 washers (1 on each of the right side bolts between strut and hull) puts it pretty close to center in the log. Off to smear a bunch of 4200 on the strut base and a little on the bolts and get it set up.
|
||
|
||
|
KENO
Grand Poobah
Joined: June-06-2004 Location: United States Status: Offline Points: 10652 |
Post Options
Thanks(0)
Quote Reply
Posted: August-08-2021 at 5:03pm |
|
|
1........ a little on the threads also never hust anything
2......spend the money on something else.
no need to remove what's there, tighten the set screws less and if you're worried about them falling out a little loctite will help. I'd go with some medium strength stuff. |
||
|
||
|
BigBM
Newbie
Joined: October-13-2008 Location: United States Status: Offline Points: 29 |
Post Options
Thanks(0)
Quote Reply
Posted: August-08-2021 at 2:09pm |
|
|
Okay, back at the lake this weekend, just for the day unfortunately.
Got the strut off and in the process of cleaning it up and the hull. I got some stainless washers in case I need to add any and some 4200. Thought of 2 questions... 1. Do I put any 4200 on the bolts themselves that go through the hull and hold the strut or just count on the good bit of 4200 that I put on the base of the strut to work its way in there when I tighten them back up 2. I made a mistake and tightened the set screws on the strut too much and I think that was causing my drive shaft installation difficulty. With the set screws out, it move easily and without much effort. I can see a very slight inconsistency in the cutlass rubber where the set screws were. Does this mean that I need to take out the new cutlass bearings I installed an replace them? If so that's okay. I'm willing to eat the $70 - 80 to replace the new ones I messed up with newer ones
|
||
|
||
|
gun-driver
Grand Poobah
Joined: July-18-2008 Location: Pittsburgh, Pa Status: Offline Points: 4112 |
Post Options
Thanks(0)
Quote Reply
Posted: August-03-2021 at 7:15pm |
|
Getting the popcorn ready
🍿 |
||
|
||
|
MrMcD
Grand Poobah

Joined: January-28-2014 Location: Folsom, CA Status: Offline Points: 3592 |
Post Options
Thanks(0)
Quote Reply
Posted: August-03-2021 at 4:28pm |
|
|
The shaft logs were not that straight from the factory, as long as the shaft does not rub in the log and the shaft lines up with the tranny you are good.
|
||
|
||
|
BigBM
Newbie
Joined: October-13-2008 Location: United States Status: Offline Points: 29 |
Post Options
Thanks(0)
Quote Reply
Posted: August-03-2021 at 4:03pm |
|
I'll put that on my list to pick up when I go washer shopping.
|
||
|
||
|
BigBM
Newbie
Joined: October-13-2008 Location: United States Status: Offline Points: 29 |
Post Options
Thanks(0)
Quote Reply
Posted: August-03-2021 at 4:02pm |
|
Yes, thank you! Will do that. I wondered that as I got to thinking about the extra resistance I encountered when putting the shaft in. Will also recheck my installation on the cutlass to see if I see or feel any abnormalities inside.
|
||
|
||
|
MrMcD
Grand Poobah
Joined: January-28-2014 Location: Folsom, CA Status: Offline Points: 3592 |
Post Options
Thanks(0)
Quote Reply
Posted: August-03-2021 at 1:27pm |
|
|
I used Red Lock tite on my set screws so they would stay in place without being really tight. If they ever need to come out I will have to apply heat to release the locktite.
|
||
|
||
|
KENO
Grand Poobah
Joined: June-06-2004 Location: United States Status: Offline Points: 10652 |
Post Options
Thanks(0)
Quote Reply
Posted: August-03-2021 at 5:55am |
|
I'd be taking the set screws out and with the shaft out of the strut, checking to see if you bulged out the cutlass bearing just a tiny bit with the set screw tightening. Just enough for example to make the shaft hard to insert and hard to turn.
|
||
|
||
|
BigBM
Newbie
Joined: October-13-2008 Location: United States Status: Offline Points: 29 |
Post Options
Thanks(0)
Quote Reply
Posted: August-02-2021 at 11:15pm |
|
|
Got it. Thank you both!
|
||
|
||
|
Jonny Quest
Grand Poobah

Joined: August-20-2013 Location: Utah--via Texas Status: Offline Points: 2843 |
Post Options
Thanks(0)
Quote Reply
Posted: August-02-2021 at 11:13pm |
|
+1 stainless set screws with LocTite
|
||
|
Current
2003 Ski Nautique 206 Limited Previous 2001 Ski Nautique Open Bow 1994 Ski Nautique Open Bow Aqua skiing, ergo sum |
||
|
||
|
MrMcD
Grand Poobah
Joined: January-28-2014 Location: Folsom, CA Status: Offline Points: 3592 |
Post Options
Thanks(0)
Quote Reply
Posted: August-02-2021 at 10:16pm |
|
|
Stainless with lock nuts.
|
||
|
||
|
BigBM
Newbie
Joined: October-13-2008 Location: United States Status: Offline Points: 29 |
Post Options
Thanks(0)
Quote Reply
Posted: August-02-2021 at 9:27pm |
|
|
I'll give the dish soap a try. I put in 1" I.D. X 1-1/4" O.D. bearing/bushings. They were a little tough going in, as expected, but nothing crazy. Wiped out the inside of the strut without the bearings before installing the new ones. Didn't feel any burs or rough places and after install of the new ones, no obvious bulges or uneven spots. Put the set screws back in and snugged them up and everything looked clean looking through the strut with the new bearings. Hopefully the dish soap/water will help.
|
||
|
||
|
Jonny Quest
Grand Poobah
Joined: August-20-2013 Location: Utah--via Texas Status: Offline Points: 2843 |
Post Options
Thanks(0)
Quote Reply
Posted: August-02-2021 at 12:03am |
|
Squirt some water with dish soap onto the drive shaft and let it lube up the strut bearings. The shaft really should turn by hand -- if not, something is wrong. JQ
|
||
|
Current
2003 Ski Nautique 206 Limited Previous 2001 Ski Nautique Open Bow 1994 Ski Nautique Open Bow Aqua skiing, ergo sum |
||
|
||
|
BigBM
Newbie
Joined: October-13-2008 Location: United States Status: Offline Points: 29 |
Post Options
Thanks(0)
Quote Reply
Posted: August-01-2021 at 5:59pm |
|
|
Sounds good. Yeah I figured I'd be in for a couple of hours at least on the alignment and be happy with anything less or really anything more if I can get it where it's supposed to be. I've been watching some YouTube videos that cover it and all the mounts on my engine move freely and I've got a big pry bar to work with for the side to side adjustments
Got some 4200 today and now I just need to go hunt for some flat washers. Planning on going to the hardware store and getting an assortment to make it more likely that I get the right size. Got in a hurry with the fam while leaving the lake and didn't measure the bolts before coming back home. I'm assuming I should go with stainless steel ones. After the strut is off and cleaned up and the hull too, any tips/tricks for checking alignment of the strut when dry fitting or trying different washers? Assuming the shaft will have to come out again for strut removal then go back in when checking strut alignment and support it with wood block in front of shaft log. My new driveshaft was sort of a beast to get pushed through the new cutlass bearings. Maybe needed to lubricate them more.
|
||
|
||
|
Jonny Quest
Grand Poobah
Joined: August-20-2013 Location: Utah--via Texas Status: Offline Points: 2843 |
Post Options
Thanks(0)
Quote Reply
Posted: August-01-2021 at 9:38am |
|
|
I feel your pain. The first time I did an alignment, it felt like I was chasing my tail. I watched a couple of YouTube videos and that helped me out.
I would recommend that you have the engine mounts prepped with a 50/50 solution of acetone and ATF. You want the mounts to move freely. Make sure that the adjustable nuts are ready to be turned. The up / down movements with the nuts makes vertical adjustment easier in fine increments. The left / right movements can be a bit more of a challenge. I've used a big pry-bar on one side...then a tap or 2 on the opposite side with a small sledge hammer often helps the side-to-side movement. JQ
|
||
|
Current
2003 Ski Nautique 206 Limited Previous 2001 Ski Nautique Open Bow 1994 Ski Nautique Open Bow Aqua skiing, ergo sum |
||
|
||
|
MrMcD
Grand Poobah
Joined: January-28-2014 Location: Folsom, CA Status: Offline Points: 3592 |
Post Options
Thanks(0)
Quote Reply
Posted: July-30-2021 at 11:05pm |
|
|
There are tricks to make the stubborn mounts move for you. I’ve been lucky and able to get down to .0015 without too much effort when needed. Go in to it expecting 2 hours work and be happy if you do it any faster.
|
||
|
||
|
BigBM
Newbie
Joined: October-13-2008 Location: United States Status: Offline Points: 29 |
Post Options
Thanks(0)
Quote Reply
Posted: July-30-2021 at 7:15pm |
|
|
Perfect. Yeah, I've tried to do the engine alignment a couple of times in the past and I've been pretty terrible at it. I think my adjustments are usually too much and then I have to go back and forth a lot. Anyway, there was local guy that used to have a marina that was a big 2001 fan and owned one as well. He helped me get it straight the last time and had it at .003 or less. He moved and sold the marina so I may be saying a lot of expletives when the time comes for me to line it up.
|
||
|
||
|
Post Reply
|
Page 12> |
 Tweet
Tweet
|
| Forum Jump | Forum Permissions You cannot post new topics in this forum You cannot reply to topics in this forum You cannot delete your posts in this forum You cannot edit your posts in this forum You cannot create polls in this forum You cannot vote in polls in this forum |


 Topic Options
 KENO wrote: