 Boats For Sale:


Ticking noise from front of engine |
Post Reply 
|
Page 12> |
| Author | ||
td_in_nc 
Senior Member 
Joined: March-30-2012 Location: Clayton NC Status: Offline Points: 381 |
 Post Options Post Options
") Thanks(0) Thanks(0)
 Quote Reply Quote Reply
 Topic: Ticking noise from front of engine Topic: Ticking noise from front of enginePosted: January-01-2022 at 7:41am |
|
|
Went through the same thing sevyears ago and it was the belts
|
||
 |
||
|
Wilhelm Hertzog
Senior Member
Joined: June-14-2014 Location: Cape Town Status: Offline Points: 327 |
Post Options
Thanks(0)
Quote Reply
Posted: January-01-2022 at 3:20am |
|
No, haven't replaced any belts yet. I do have a spare set, guess I should try them. |
||
|
1982 Ski Nautique PCM351W RR II Velvet Drive 10-17-003 1:1 II PerfectPass Stargazer
Do not go gentle into that good night. Rage, rage against the dying of the light. |
||
|
||
|
td_in_nc
Senior Member
Joined: March-30-2012 Location: Clayton NC Status: Offline Points: 381 |
Post Options
Thanks(0)
Quote Reply
Posted: December-31-2021 at 6:54pm |
|
|
Did you put on a new alternator belt?
|
||
|
||
|
Wilhelm Hertzog
Senior Member
Joined: June-14-2014 Location: Cape Town Status: Offline Points: 327 |
Post Options
Thanks(0)
Quote Reply
Posted: December-31-2021 at 9:27am |
|
|
Status update: everything seems to have gone pretty smoothly with all the installations, with no signs of leaks anywhere after some good time on the water. However, I still have the ticking noise, and the new water pump did not make much difference to operating temperatures. Using a screwdriver as stethoscope, I can't get to the bottom of the ticking noise. Which to me suggests that it is either belts or exhaust leaks. At this stage I'll probably just live with the ticking noise and slightly high engine temps.
|
||
|
1982 Ski Nautique PCM351W RR II Velvet Drive 10-17-003 1:1 II PerfectPass Stargazer
Do not go gentle into that good night. Rage, rage against the dying of the light. |
||
|
||
|
KENO
Grand Poobah 
Joined: June-06-2004 Location: United States Status: Offline Points: 10650 |
Post Options
Thanks(1)
Quote Reply
Posted: May-23-2021 at 6:37am |
|
|
No harm in painting the area you want to paint behind the water pump.
The only thing in there is air or water leakage from the pump backing plate or the outlet ports where they meet the timing cover. That's probably why they weren't painted originally As far as RTV or gluing with something like Permatex 2 or something similar use whatever you feel more comfortable with. I've been known to trim a gasket or 2 in that area to make it fit better. That gasket isn't really any fun at all
 |
||
|
||
|
Wilhelm Hertzog
Senior Member
Joined: June-14-2014 Location: Cape Town Status: Offline Points: 327 |
Post Options
Thanks(0)
Quote Reply
Posted: May-22-2021 at 4:58pm |
|
|
After a good bit of spirited tapping with a punch and a chisel, and prying with a screwdriver, the key eventually came out. The key (not the crank) was causing the binding. A few gentle passes with a file (and cleaning up the 'tap' marks) got the sprocket sliding over it eventually. So that took care of the timing set. Installing the sleeve on the balancer (after leaving it in the freezer overnight) went smoothly using a bench vice and piece of wood to gradually press it on squarely.
After not planning to do so initially, I decided the timing cover really does need a new paint job. Took me a while to get it properly cleaned up, but I'm now ready to paint. Two questions:
And then a few questions as I'm approaching installing the cover:
 The automotive forums have various differing views on what the best plan of attack is to install the cover. I intend to proceed as follows:
Any comments/suggestions/criticisms on the above? Thanks a lot as always! |
||
|
1982 Ski Nautique PCM351W RR II Velvet Drive 10-17-003 1:1 II PerfectPass Stargazer
Do not go gentle into that good night. Rage, rage against the dying of the light. |
||
|
||
|
KENO
Grand Poobah
Joined: June-06-2004 Location: United States Status: Offline Points: 10650 |
Post Options
Thanks(0)
Quote Reply
Posted: May-07-2021 at 7:56pm |
|
if it's putting up too much of a fight, leave it alone so you don't end up mushrooming or otherwise damaging the key or the shaft. Sometimes they're a bear to get out and if you don't absolutely have to, just clean up the shaft and key as much as you can. Keep in mind that you're working right over the open sump so any dropped stuff ends up in the oil pan
 |
||
|
||
|
8122pbrainard
Grand Poobah

Joined: September-14-2006 Location: Three Lakes Wi. Status: Offline Points: 41040 |
Post Options
Thanks(0)
Quote Reply
Posted: May-07-2021 at 5:08pm |
|
|
Don't try to "seesaw" the key. Using a punch, just tap it on one end parallel to the shaft and it should come out.
|
||
|
||
|
Wilhelm Hertzog
Senior Member
Joined: June-14-2014 Location: Cape Town Status: Offline Points: 327 |
Post Options
Thanks(0)
Quote Reply
Posted: May-07-2021 at 4:46pm |
|
Said key doesn't want to come out without a fight. The parts manual diagram suggests it is a semi-circular woodruff key, so if I hit down on one end with a punch or such like, the other end should pop up and out, right? Or is there a better way to get the key out?
|
||
|
1982 Ski Nautique PCM351W RR II Velvet Drive 10-17-003 1:1 II PerfectPass Stargazer
Do not go gentle into that good night. Rage, rage against the dying of the light. |
||
|
||
|
Wilhelm Hertzog
Senior Member
Joined: June-14-2014 Location: Cape Town Status: Offline Points: 327 |
Post Options
Thanks(0)
Quote Reply
Posted: May-05-2021 at 5:37pm |
|
|
Combination of heat, peening and wire cutters got the old sleeve off. Balancer is sleeping in the freezer in preparation for installation of the new sleeve.
|
||
|
1982 Ski Nautique PCM351W RR II Velvet Drive 10-17-003 1:1 II PerfectPass Stargazer
Do not go gentle into that good night. Rage, rage against the dying of the light. |
||
|
||
|
KENO
Grand Poobah
Joined: June-06-2004 Location: United States Status: Offline Points: 10650 |
Post Options
Thanks(0)
Quote Reply
Posted: May-04-2021 at 5:38pm |
|
|
||
|
Wilhelm Hertzog
Senior Member
Joined: June-14-2014 Location: Cape Town Status: Offline Points: 327 |
Post Options
Thanks(0)
Quote Reply
Posted: May-04-2021 at 5:05pm |
|
Make that exactly 1.900 inches - at least in my case. So best way to remove the old sleeve? Heat it up an hope it slides off with some prying? Carefully cut through it with a hacksaw blade? Seeing that the balancer snout will again be sleeved, I don't imagine a few scuff marks on the snout itself from a wayward saw tooth or two will be the end of the world? |
||
|
1982 Ski Nautique PCM351W RR II Velvet Drive 10-17-003 1:1 II PerfectPass Stargazer
Do not go gentle into that good night. Rage, rage against the dying of the light. |
||
|
||
|
KENO
Grand Poobah
Joined: June-06-2004 Location: United States Status: Offline Points: 10650 |
Post Options
Thanks(0)
Quote Reply
Posted: May-04-2021 at 6:13am |
|
|
Have you taken the key out to see if the sprocket will slide all the way on?
You might need to clean up the key and the shaft a bit to let it go on easily
|
||
|
||
|
Wilhelm Hertzog
Senior Member
Joined: June-14-2014 Location: Cape Town Status: Offline Points: 327 |
Post Options
Thanks(0)
Quote Reply
Posted: May-04-2021 at 3:23am |
|
|
Another little hiccup: getting the new timing set sprockets on to the camshaft and crankshaft. The old sprockets came off easily enough (cam sprocket needed a bit of prying to get it sliding off, crank sprocket I could slide off by hand), but the new ones are very tight. The crank sprocket I can only get on by hand to this point (and yes, I did apply assembly lube to the sprocket and crank):
 The cam sprocket I reckon I'll be able to draw in by tightening down the cap screw that holds everything in place on the camshaft. I can't imagine that this will require so much force as to risk damaging the camshaft's internal threads. But it seems the crank sprocket will require either heat to expand it and allow it to slide all the way in, or some gentle tapping with a suitably sized piece of pipe to drive it all the way in. Any suggestions as to the best route to follow?
|
||
|
1982 Ski Nautique PCM351W RR II Velvet Drive 10-17-003 1:1 II PerfectPass Stargazer
Do not go gentle into that good night. Rage, rage against the dying of the light. |
||
|
||
|
KENO
Grand Poobah
Joined: June-06-2004 Location: United States Status: Offline Points: 10650 |
Post Options
Thanks(1)
Quote Reply
Posted: May-03-2021 at 8:02pm |
|
|
If you measure the diameter, you should know if it's the original shaft or has a speedi sleeve over it.
The original diameter is about 1.875 inches and with a National brand speedi sleeve, it's about 1.900 inches. I don't think it's a sleeve, but that's just me thinkin' If it is a sleeve, you'll have to take it off before putting a new one on. |
||
|
||
|
Wilhelm Hertzog
Senior Member
Joined: June-14-2014 Location: Cape Town Status: Offline Points: 327 |
Post Options
Thanks(0)
Quote Reply
Posted: May-03-2021 at 5:21pm |
|
|
I intended to fit the speedi sleeve included in the Fel-Pro gasket kit I'm using to the harmonic balancer, but I'm not sure if there is already a sleeve fitted to the balancer which should be removed first. The shiny snout (with black wear lines from the seal lip) certainly looks much newer than the rest of the balancer, and the new sleeve doesn't look like it will fit over the snout without a serious amount of heat and/or coaxing. Pictures of the balancer:
 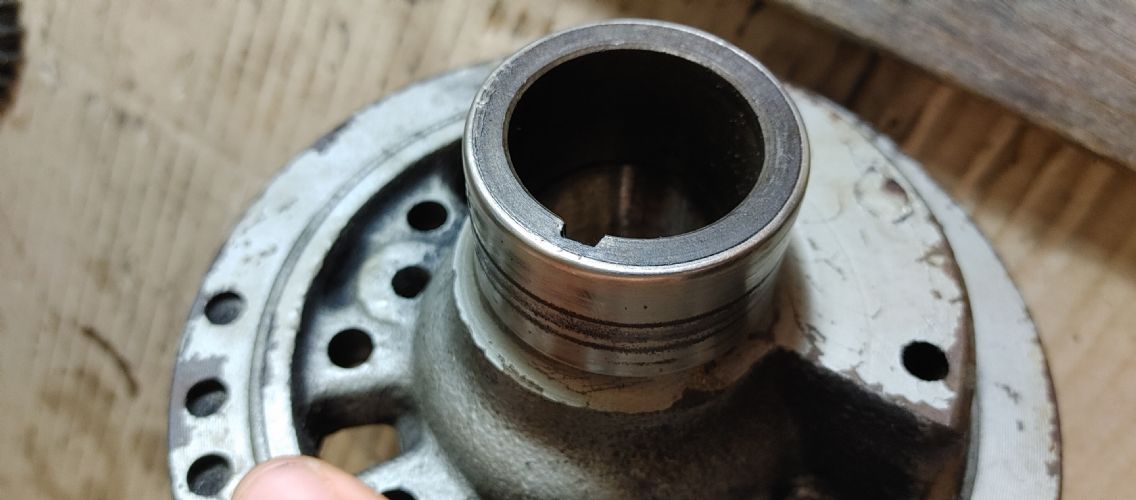 So can anyione advise me as to whether: 1. That is indeed an existing sleeve on the snout of the balancer, and 2. If it is, whether it should be removed before installing the new sleeve, or whether the new sleeve should be fitted over the old one. Thanks as always for any guidance! |
||
|
1982 Ski Nautique PCM351W RR II Velvet Drive 10-17-003 1:1 II PerfectPass Stargazer
Do not go gentle into that good night. Rage, rage against the dying of the light. |
||
|
||
|
KENO
Grand Poobah
Joined: June-06-2004 Location: United States Status: Offline Points: 10650 |
Post Options
Thanks(0)
Quote Reply
Posted: May-03-2021 at 7:44am |
|
|
I guess the 800 bucks in their price list must have included the obligatory PCM markup on the original Ford price
|
||
|
||
|
Gary S
Grand Poobah

Joined: November-30-2006 Location: Illinois Status: Offline Points: 14096 |
Post Options
Thanks(1)
Quote Reply
Posted: May-02-2021 at 9:09pm |
|
|
Michigan Motors has them new for 300,which is still to much for me and then shipping and customs yikes! They come up used every so often if you decide yours is unserviceable.
https://www.ebay.com/itm/352101911892?hash=item51fae8cd54:g:VE8AAOSwd4tTrc8f
|
||
|
||
|
KENO
Grand Poobah
Joined: June-06-2004 Location: United States Status: Offline Points: 10650 |
Post Options
Thanks(1)
Quote Reply
Posted: May-02-2021 at 8:39pm |
|
|
Considering that a new one probably isn't available and they cost 800 bucks years ago, I think it's serviceable as long as the gasket surfaces are good They look a little rough but workable in the pictures.
The helicoil............not required but couldn't hurt.
|
||
|
||
|
Wilhelm Hertzog
Senior Member
Joined: June-14-2014 Location: Cape Town Status: Offline Points: 327 |
Post Options
Thanks(0)
Quote Reply
Posted: May-02-2021 at 5:37pm |
|
|
Below are pictures of the timing cover water passages (before any cleaning up), as well as the front of the timing cover after a bit of cleaning up. The area circled in red has definitely had some repair done to it: it seems there was some epoxy or similar used to rebuild material that had corroded away. The hole in the red circle has a helicoil inside it, and there was a mounting bolt screwed into it (which is not really required, as per this thread). This suggests to me there was a leak/corrosion problem in that area in the past.
 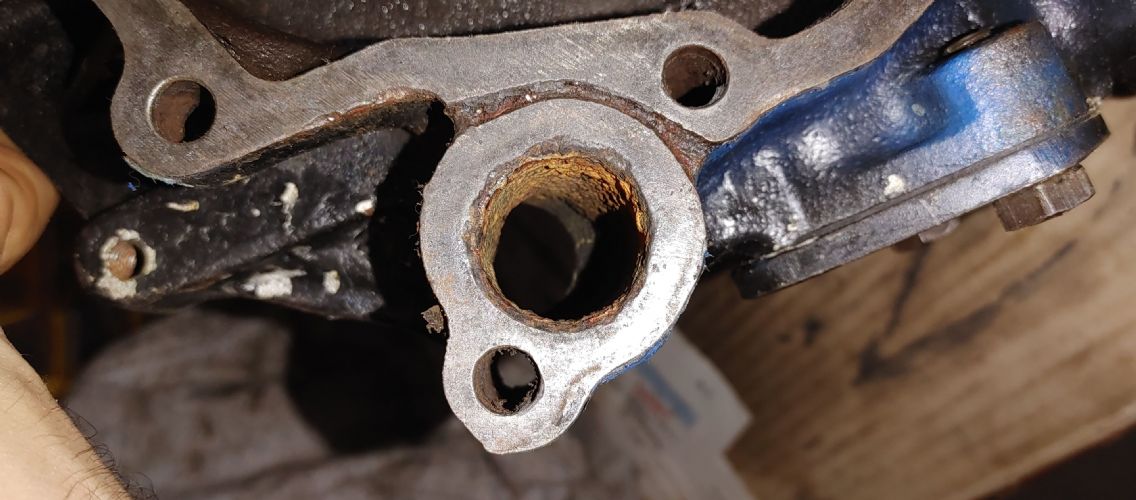  Questions: 1. Is the timing cover still serviceable, or should I replace? 2. Is a helicoil and mounting bolt in the other non-threaded hole a good idea to help avoid a leak, or is that just unnecessary effort?
|
||
|
1982 Ski Nautique PCM351W RR II Velvet Drive 10-17-003 1:1 II PerfectPass Stargazer
Do not go gentle into that good night. Rage, rage against the dying of the light. |
||
|
||
|
KENO
Grand Poobah
Joined: June-06-2004 Location: United States Status: Offline Points: 10650 |
Post Options
Thanks(1)
Quote Reply
Posted: May-01-2021 at 6:12pm |
|
|
They just snug up to the block and may take a little trimming to be just right, like you said.
Use your favorite sealer on the gaskets. Put it on heavy where the little pan corner gaskets butt up to the block and where they meet the neoprene seal. When it's time to put bolts in, put the 4 bolts from the oil pan to the bottom of the timing cover in just snug first, so that the pan's front neoprene seal goes in place correctly then put the rest in from the front, then tighten things up.. It's not as easy as doing it on an engine stand with the pan off, but it's not terrible either
|
||
|
||
|
Wilhelm Hertzog
Senior Member
Joined: June-14-2014 Location: Cape Town Status: Offline Points: 327 |
Post Options
Thanks(0)
Quote Reply
Posted: May-01-2021 at 5:04pm |
|
|
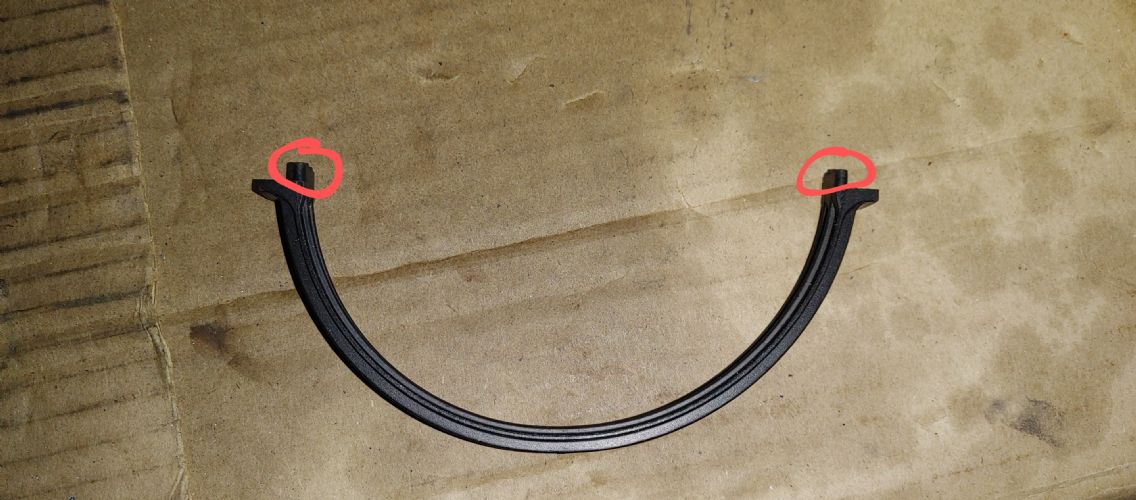
Question on installing the timing cover: are the cork corner gaskets supposed to fit in between the block and the oil pan at their back edge, or do they just snug up against the block? If they have to go in between the block and oil pan it seems to require lowering the pan some. If they just snug up against the block, then they require some trimming to align with the oil pan to timing cover bolt holes.
|
||
|
1982 Ski Nautique PCM351W RR II Velvet Drive 10-17-003 1:1 II PerfectPass Stargazer
Do not go gentle into that good night. Rage, rage against the dying of the light. |
||
|
||
|
OldSchoolBlue84
Gold Member 

Joined: December-02-2012 Location: Valparaiso, IN Status: Offline Points: 814 |
Post Options
Thanks(0)
Quote Reply
Posted: April-13-2021 at 12:44am |
|
Just replaced mine last week and purchased at www.myinboardmarine.com since they had it in stock and shipped it quick. $119 plus shipping. They have 1 remaining. SKIDIM was on back order at the time. Good luck. |
||
|
Kostas
1984 Ski Nautique 2001 |
||
|
||
|
KENO
Grand Poobah
Joined: June-06-2004 Location: United States Status: Offline Points: 10650 |
Post Options
Thanks(0)
Quote Reply
Posted: April-12-2021 at 6:13am |
|
|
The Summit ad does mention that it has a bi directional impeller so I think you'll be fine with that pump.
It's probably the same pump that SkiDim is selling I knew you had cooling issues in the past, didn't know if they had all been resolved though. Like you said, maybe this will help.
|
||
|
||
|
Wilhelm Hertzog
Senior Member
Joined: June-14-2014 Location: Cape Town Status: Offline Points: 327 |
Post Options
Thanks(0)
Quote Reply
Posted: April-12-2021 at 2:33am |
|
Well, now that you've mentioned it... I have of course been having cooling issues. Have been monitoring the situation carefully, and after doing more research on some of the car forums I concluded that my engine temps are probably on the upper limit of acceptable. But they have certainly been hotter than I was expecting with a 170 degree thermostat. Maybe this water pump is the root cause of that. I'll definitely be replacing. This one from Skidim is obviously the right one: link. Any other suppliers worth checking for the right pump at a good price? Nautiqueparts.com seems more expensive. I have a local reseller who can usually supply me with parts from Summit Racing at a decent price. This Sierra Marine pump looks like it is the same pump as the one Skidim sells, but at a slightly lower price: link. Any reason not to go with the Sierra Marine pump from Summit?
|
||
|
1982 Ski Nautique PCM351W RR II Velvet Drive 10-17-003 1:1 II PerfectPass Stargazer
Do not go gentle into that good night. Rage, rage against the dying of the light. |
||
|
||
|
KENO
Grand Poobah
Joined: June-06-2004 Location: United States Status: Offline Points: 10650 |
Post Options
Thanks(1)
Quote Reply
Posted: April-11-2021 at 7:45pm |
|
|
That's an automotive circulating pump with a stamped steel impeller that you're also turning the opposite way it would turn in a car.
Since you have a closed cooling system, presumably with anti freeze in it, it would probably be a good idea to replace it since it's pretty ugly looking. Looks like a lot of years without anti freeze to me The typical PCM pump sold these days is bi directional and has a much beefier cast bronze impeller and a stainless steel backing plate. Here's a picture of a well aged marine pump with the backing plate off. If what you have is working and you don't have cooling issues, it would be your choice of what to do. 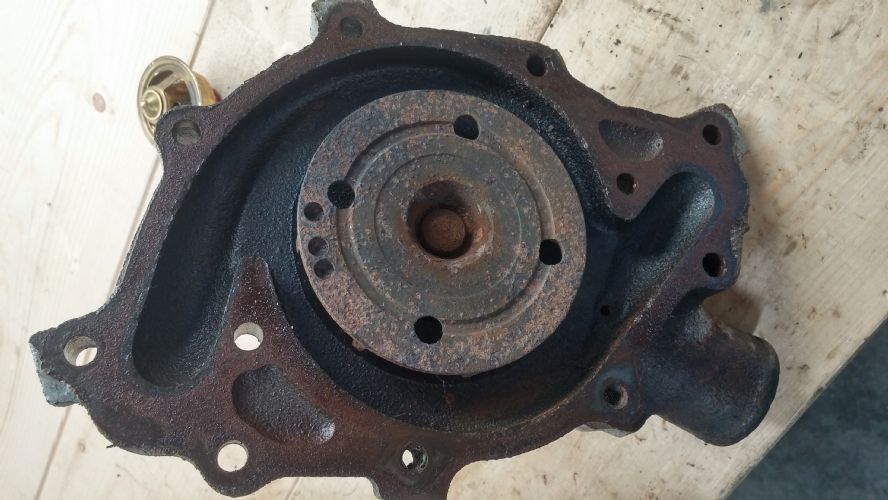 |
||
|
||
|
Wilhelm Hertzog
Senior Member
Joined: June-14-2014 Location: Cape Town Status: Offline Points: 327 |
Post Options
Thanks(0)
Quote Reply
Posted: April-11-2021 at 4:46pm |
|
|
I did in fact run the engine briefly again today, and could not hear the ticking noise with none of the accessories (raw water pump, circulation pump, alternator) connected. Which makes the circulation pump the prime suspect. I pulled off the pump (which I was intending to do in any case, as I need to fit a fuel pump eccentric to the camshaft - as per my thread here). Here are some pictures.
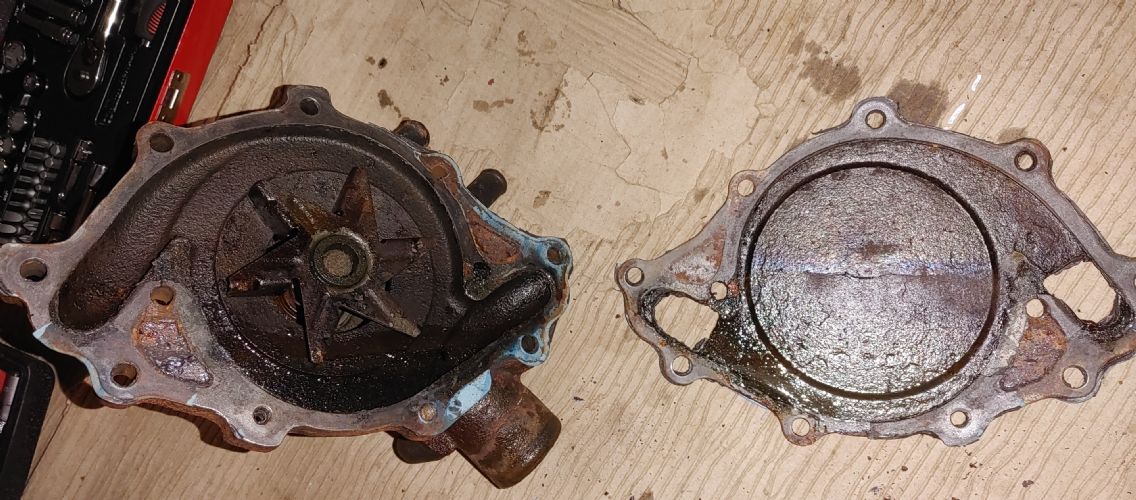 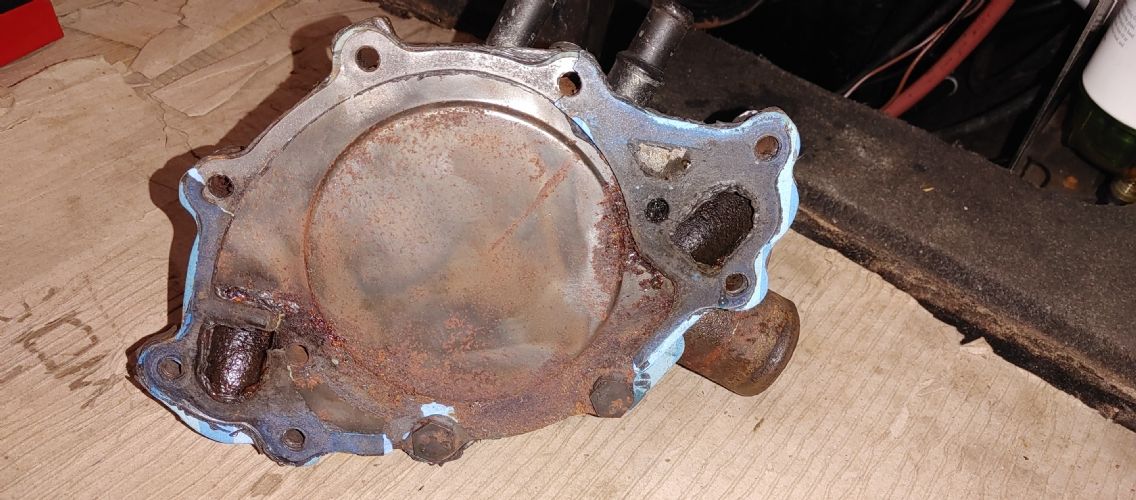  The front of the timing cover looks pretty nasty to me. So: 1. Does the corrosion on the front of the timing cover and back of the water pump cover plate suggest that the water pump has been leaking? Any way to check/confirm? 2. The circulation pump spins reasonably easily by hand when removed from the block, and there is no obvious free play in the bearing. But there is definitely a slight whining noise when the pump is rotated clockwise (i.e. the opposite direction of rotation to which it will normally be spinning on my reverse rotation engine). Does that noise suggest the bearing is bad, and potentially the source of the yet to be identified ticking noise? Any further tests/checks I can do on the pump bearing to confirm? 3. Anything else that looks odd or in need of attention in the water pump from the pictures? As always, thanks a lot for any help!
|
||
|
1982 Ski Nautique PCM351W RR II Velvet Drive 10-17-003 1:1 II PerfectPass Stargazer
Do not go gentle into that good night. Rage, rage against the dying of the light. |
||
|
||
|
Wilhelm Hertzog
Senior Member
Joined: June-14-2014 Location: Cape Town Status: Offline Points: 327 |
Post Options
Thanks(0)
Quote Reply
Posted: April-05-2021 at 2:32pm |
|
This will have to wait for a while. I've already pulled the transmission from the boat, and running the motor without the exhaust hoses connected to the risers is so loud there's little hope of listening carefully for presence/absence of the ticking noise. I'll get back to this when I have my transmission back in the boat.
|
||
|
1982 Ski Nautique PCM351W RR II Velvet Drive 10-17-003 1:1 II PerfectPass Stargazer
Do not go gentle into that good night. Rage, rage against the dying of the light. |
||
|
||
|
Wilhelm Hertzog
Senior Member
Joined: June-14-2014 Location: Cape Town Status: Offline Points: 327 |
Post Options
Thanks(0)
Quote Reply
Posted: April-01-2021 at 5:56am |
|
|
I did not in fact run it for a quick check with the belts removed. I just spun the circulation pump by hand. I'll report back.
|
||
|
1982 Ski Nautique PCM351W RR II Velvet Drive 10-17-003 1:1 II PerfectPass Stargazer
Do not go gentle into that good night. Rage, rage against the dying of the light. |
||
|
||
|
KENO
Grand Poobah
Joined: June-06-2004 Location: United States Status: Offline Points: 10650 |
Post Options
Thanks(0)
Quote Reply
Posted: April-01-2021 at 5:22am |
|
|
I'd say your "free play" is normal with a flexible impeller pump like that..
If the pulley is tight on the shaft and the key is a good fit in the keyway and the impeller is a good fit on the key, then that movement is the flexible impeller vanes. I don't think you ever mentioned whether the noise went away when you ran it for a quick check with the belts removed
|
||
|
||
|
Post Reply
|
Page 12> |
 Tweet
Tweet
|
| Forum Jump | Forum Permissions You cannot post new topics in this forum You cannot reply to topics in this forum You cannot delete your posts in this forum You cannot edit your posts in this forum You cannot create polls in this forum You cannot vote in polls in this forum |


 Topic Options
 td_in_nc wrote: