 Boats For Sale:


1991 Sport Nautique Open Bow Stringer |
Post Reply 
|
Page <1234> |
| Author | |
MechGaT 
Senior Member 

Joined: March-09-2015 Location: Chattanooga Status: Offline Points: 271 |
 Post Options Post Options
") Thanks(0) Thanks(0)
 Quote Reply Quote Reply
 Posted: January-23-2021 at 7:25am Posted: January-23-2021 at 7:25am |
|
Looking good.👍
|
|
|
'92 Sport Nautique
|
|
 |
|
|
Ian H
Groupie 
Joined: September-24-2020 Location: Hong Kong Status: Offline Points: 69 |
Post Options
Thanks(0)
Quote Reply
Posted: January-20-2021 at 7:14am |
|
Thanks for the feedback on the tank , I needed to decide now to put the tanks back in or not..... I plan to put it back in.
I continued and finished off the secondary stringers much easier after the cycle of learning on the primary's and I am looking ok level after some super thin cuts off the flat top of the stringers I have all my round head SS screws setting the spacing for the peanut butter and the stringer holding jigs hold each stringer in place with just two screws so I am quite confident I can get the positions right when I glass them in. I will now start lifting points and locker bulkhead. All the glass, fillers and epoxy are sourced out of China using TaoBao but I have had a lot of help from a Hong Kong Chinese friend. I have more than enough to keep me busy till it arrives in about a week.   |
|
|
|
|
ultrarunner
Platinum Member 

Joined: October-02-2005 Location: Ridgefield, Ct. Status: Offline Points: 1809 |
Post Options
Thanks(0)
Quote Reply
Posted: January-19-2021 at 11:49am |
|
Yep, Marty will hook you right up.
Now, I'm liking the gas tank in the locker. The Sports are always heavy in the back. Not as much on the slant-backs, but certainly on the round backs as so much 'stuff' gets put in the locker. And mine also had the ballast tanks and plumbing back there. I'd imagine a good change to the wake with no weight back there and fuel in the center of the boat....
|
|
|
|
|
jimsport93
Platinum Member

Joined: February-20-2008 Location: Alpharetta Ga Status: Offline Points: 1749 |
Post Options
Thanks(0)
Quote Reply
Posted: January-17-2021 at 12:00pm |
|
Marty Mabe, member of this site, may be able to hook you up with the engraved dash plaques.
|
|
|
|
|
Ian H
Groupie
Joined: September-24-2020 Location: Hong Kong Status: Offline Points: 69 |
Post Options
Thanks(0)
Quote Reply
Posted: January-17-2021 at 10:22am |
|
No helping hands so far I'm afraid but I am lining up some for the glassing part.
The advice on how to mark the stringer shape was good and together with my fixture jigs it went OK for the two primary stringers, the fit with the hull is good gaps of no moper than about 4 mm credit card cut to the offset worked really well But I will need to sort out the height but can do this on the flat top with a circular saw. I intend to put some stainless round head screws on to fix the distance of the stringer to the hull when I squish down on the peanut butter. I guess about 2 or 3mm bed of 1/4 chop and Cabosil will be ok. I worry that I will lose all my levels when I come to assemble. I am not an experience glassing guy so I am trying to fix as much as possible rather than last minute adjustments. I used a laser level to check and correct before I set in the stringers etc. Cost about 40 USD worth every penny able to check lots of different points outside and inside the hull. great fro checking the floor is going to line up with the stringer and floor stack all around.     Things to fill the dashboard holes have now all arrived, lots of changes to wiring harness to get it to connect up. Struggling to find anywhere that will engrave the laminated plastic packs.   |
|
|
|
|
8122pbrainard
Grand Poobah 

Joined: September-14-2006 Location: Three Lakes Wi. Status: Offline Points: 41040 |
Post Options
Thanks(0)
Quote Reply
Posted: January-12-2021 at 6:58am |
|
Ian,
I too am impressed especially with the progress you are making. Do you have any help or doing all this yourself? If yourself, are you getting any sleep?
 |
|
|
|
|
Ian H
Groupie
Joined: September-24-2020 Location: Hong Kong Status: Offline Points: 69 |
Post Options
Thanks(0)
Quote Reply
Posted: January-12-2021 at 6:49am |
|
This project is really testing my ingenuity and tenacity. I dream of a garage with a bench and vice .
 Main objective now is not to think myself into a standstill, and keep moving forward. Floor in with the engine frame in the right place will be a massive landmark. Wiring is coming along slowly. Engine is now waiting for the last parts to arrive hopefully just as the floor is finished. Thanks for the encouragement! Main objective now is not to think myself into a standstill, and keep moving forward. Floor in with the engine frame in the right place will be a massive landmark. Wiring is coming along slowly. Engine is now waiting for the last parts to arrive hopefully just as the floor is finished. Thanks for the encouragement!
|
|
|
|
|
MourningWood
Gold Member
Joined: June-13-2014 Location: NorCal Status: Offline Points: 889 |
Post Options
Thanks(0)
Quote Reply
Posted: January-11-2021 at 2:24pm |
|
Impressive work!!!
I have to say, this may be the most ambitious project I've seen here. As a collection of the work required, the challenging working conditions (no offense meant at all), parts and supplies availability, etc. Great job!!
|
|
|
1994 Ski Nautique "Riot"
1964 Dunphy X-55 "One 'N Dun" 'I measured twice, cut three times, and it's still too short!" |
|
|
|
|
MechGaT
Senior Member
Joined: March-09-2015 Location: Chattanooga Status: Offline Points: 271 |
Post Options
Thanks(0)
Quote Reply
Posted: January-10-2021 at 11:22am |
|
That looks like a good plan to help you get the right spacing. I would recommend trying to get a basic shape on the bottom so that one of the bottom edges is close to the right line, I used a circular saw for this. Then lay it in next to the spacers you have made and use a compass to measure from the top of the stringer down to the line that is the level of the stringer (assuming you have already subtracted for the plywood that goes on top). Check this at each spacer. Now use the compass to scribe the cut line on in the inside and outside of the stringer. This will give you a line to follow the curvature of the hull. Don't forget that the fiberglass does have some thickness so that if the stringers are right up against the engine frame, it could be difficult to drop it in. It is not a lot of thickness, but I have seen other threads where this has been an issue.
As far as your question about applying the fiberglass to the floor, yes, I draped the cloth down the sides of the stringers to the bilge and up the wall a little. I also put a layer of fiberglass on the plywood before installing, but that may not have been necessary, apparently. I looked at it as a layer of protection from moisture.
|
|
|
'92 Sport Nautique
|
|
|
|
|
Ian H
Groupie
Joined: September-24-2020 Location: Hong Kong Status: Offline Points: 69 |
Post Options
Thanks(0)
Quote Reply
Posted: January-10-2021 at 8:22am |
|
I invested time in setting up for stringer and positioning, I glued in some braces tot eh hull and then added form to them so that the primary and secondary stringers have a positive position to but up against when I peanut butter them in. I can make sure the height is correct as J have marked the top stinger height on each of the braces. I was concerned that I will be scrabbling round trying to get stuff in the right place against the clock with sticky hands when I wan to be smoothing the fillets on the bottom corners of the stringers..
I think it will work out it should also help me with marking and fitting the stringers. I set the levels and positions of the primary stingers by putting the engine frame back in place to the datum's and dimensions i took before breakdown and then using this as the base, seems to match up ok with the old floor level which was a relief! This all took me two days of graft but I think it was a good investment.   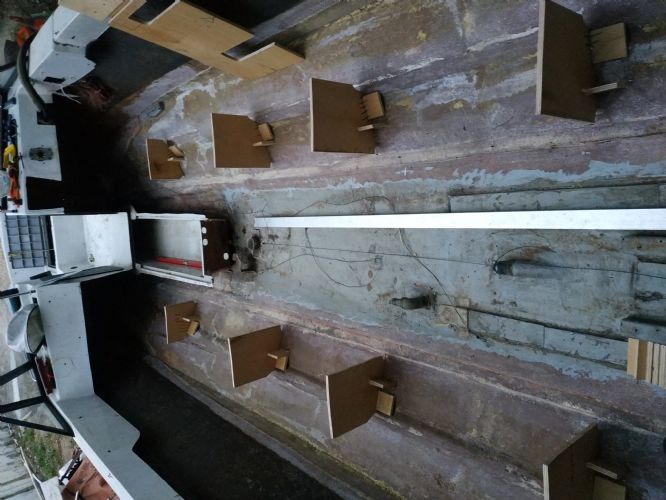 Marking out the hull shape on the stringers I guess I will just lift the stringer parallel to the level line on the guides and mark the the right offset to get the right depth? But its a big bit of wood so I think I will employ extra hands |
|
|
|
|
8122pbrainard
Grand Poobah
Joined: September-14-2006 Location: Three Lakes Wi. Status: Offline Points: 41040 |
Post Options
Thanks(0)
Quote Reply
Posted: January-08-2021 at 12:51pm |
|
Ian,
Coating the ply with CPES will do the job of keeping the water out. Wrapping the ply like a package with glass is to add strength typically if you are going no foam. If the cavities are foamed, then it adds support to the ply.
|
|
|
|
|
Ian H
Groupie
Joined: September-24-2020 Location: Hong Kong Status: Offline Points: 69 |
Post Options
Thanks(0)
Quote Reply
Posted: January-08-2021 at 9:19am |
|
I noticed the pads the fuel tank sits on is plastic honeycomb I guess this has something to do with not soaking the deck with fuel?
I have by change some aircraft floor a with aluminium honeycomb and a aluminium skin. I am planning to use this for those two pads. All my materials are listed out and I am now battling through Taobao to get the materials out of China. Looking at sourcing in the US tis is going to be a serious bill. I will post the cost direct from China when i get it all sorted. I have tied to source tapes as much as possible I expect i will need to substitute plan with whats available. One really useful tip is a cardboard copy of the floor shape, It made thinking trough sides and coverage much easier and should help me get the first approximation of the new plywood floor. Tomorrows job is mark and cut the stringers, really looking to adding rather than taking away  ???? still need a bit of help on floor glassing. I think I am clear on how to glass in the stringers but still a bit uncertain about plywood floor, I assume CEPS the plywood and then install on peanut butter and top with the 1.5oz woven fiberglass but should there be a drape down from the floor to the primary stringer / bilge and up to the hull around the sides? Or is the plywood wrapped like a parcel in the 1.5 oz? Cardboard memory jogger   |
|
|
|
|
Ian H
Groupie
Joined: September-24-2020 Location: Hong Kong Status: Offline Points: 69 |
Post Options
Thanks(0)
Quote Reply
Posted: January-08-2021 at 8:45am |
|
Tower was a long shot it's another problem to be solved, I am really looking for the biggest shade I can find to shade in the super hot Hong Kong sun. It would be good to find something that would fill up the holes where the tower was taken off. bigger issues to solve right now;
|
|
|
|
|
2001SAN
Senior Member

Joined: June-26-2012 Location: Ireland Status: Offline Points: 242 |
Post Options
Thanks(0)
Quote Reply
Posted: January-08-2021 at 2:23am |
Pass on the tower. It is fugly as hell. Enjoying your progress though. These deep projects are always impressive! Good luck! D
|
|
|
A little knowledge is a dangerous thing...
2001 Super Air Nautique 1989 Fairline Corniche 31 www.bannrivercruises.co.uk |
|
|
|
|
MechGaT
Senior Member
Joined: March-09-2015 Location: Chattanooga Status: Offline Points: 271 |
Post Options
Thanks(0)
Quote Reply
Posted: January-06-2021 at 4:47pm |
|
I am not an expert using fiberglass either. Including the work I did on my boat, I have done the fiberglass on one boat and nothing else. Epoxy made it easy. I bought the 1 gallon kit of CPES from Rot Doctor and I still have some left over after giving every piece of wood that went into it at least 2 good coats. For Epoxy I used US Composites and got about three orders. I think the first was like 5 gallons and then I had to get like 3 more gallons. It has been a few years since I made my first purchase so I don't remember exactly, but I would say 8 gallons would be the minimum you would need.
I used the fiberglass tape that was already made to 2", 4", and 8" widths and the 12" biax. I would use the same layup schedule. It worked well and the cloth was fairly easy to handle. Like I said, my experience is limited so there may be someone else who chimes in, but my research prior to doing this showed this was a pretty common layup schedule for tabbing the stringers into the hull. Like I said, I used a lot of milled fiber in my peanut butter mix. I read in one of the posts that it would make a strong bond. It does, but I would also say it is harder to work with. If I had to do it again I would probably search for something better to use in the joints where the spoon rounds out the transition. I had trouble in this area with the surface being rough. I haven't done any research since then so I don't know what to tell you to use that would be formed more easily. You are making great progress. Keep up the good work.
|
|
|
'92 Sport Nautique
|
|
|
|
|
Timr71
Groupie
Joined: March-28-2016 Location: Alabama Status: Offline Points: 80 |
Post Options
Thanks(0)
Quote Reply
Posted: January-06-2021 at 4:04pm |
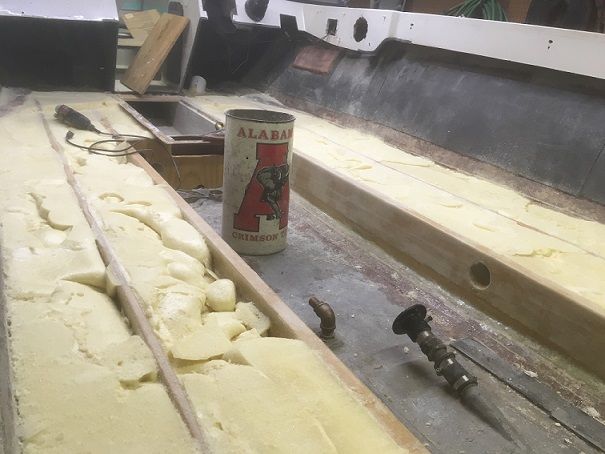
The key to this build is an Alabama trash can sporting a time period appropriate logo from the days when I was in school there. Just kidding. Good luck with your build. I like watching stringer jobs. You're doing a great job so far. Gonna be a great boat.
|
|
|
|
|
Ian H
Groupie
Joined: September-24-2020 Location: Hong Kong Status: Offline Points: 69 |
Post Options
Thanks(0)
Quote Reply
Posted: January-06-2021 at 9:01am |

Now looking if I can rob a tower off an abandoned boat in front of my house. Not looking promising  Alibaba time... Alibaba time... |
|
|
|
|
Ian H
Groupie
Joined: September-24-2020 Location: Hong Kong Status: Offline Points: 69 |
Post Options
Thanks(0)
Quote Reply
Posted: January-06-2021 at 8:54am |
|
I have very little fiberglass experience. I have been trawling lots of posts and videos ... wow people can get really angry about the method and choice of materials!! and in the process get me very confused. I have decided that Epoxy is the way to go I plan to paint the wood until it wont absorb more or about 4 coats of Clear Penetrating Epoxy Sealer or acetone and epoxy I plan to bed the stringers in with a bed of peanut butter epoxy and Cabosil (fumed silica) ( not sure if adding chip would be good too) piped in from the corner of a plastic bag then drop in the stringer on top and hold it in place with a jig at the right height and position and smooth the peanut butter into a desert spoon sized fillet each side of the stringer. Plan to follow your plan for the layup "" as below but is there anything you would change with hind sight? Primary stringers: 2" 8.7oz E cloth, 4" 8.7oz E cloth, with each of these running the length with half on the hull and half on the stringer then 8" 8.7 oz E cloth overlapping 1" on the hull and up the stringer ~5". Over this lay 12" wide 1708 tape that starts at the top of the stringer and runs down onto the hull. That should make it overlap 1" past the 8" cloth. Same on both sides. Secondary stringers: same application of 2", 4", and 8" cloth and 12" biaxial. Then drape 7.5oz cloth over the top of the stringers to give them some protection. For the bulkhead behind the ski locker I plant to use plywood and use the 2", 4", and 8" on the seams to the stringers and hull then drape it in the 7.5oz cloth also. I am using plywood for the floor and plan to wrap it in 1.5oz mat. The fiberglass material I can measure and work out how much to buy but I am clueless on how much resin and CPES to buy I can see the CSM uses about 2.5 times the weight of resin for every 1 of fiberglass and for woven stuff about 1 to 1 so I can calculate ..... But in reality roughly how much resin , cabosil and chop did you buy ? also acetone CPES rollers brushes ? I need to ship in all my materials from China in a big lot and not easy to pop out for a bit more if I am short. an rough idea would be very useful. Did you buy tape in the right widths or cut them to the right widths? I have got 600ml mixing cups , i guess this is about as much as can be worked in the time before it goes off ,Dis you do the same? Sorry fro so may questions fiber glassing is not my superpower I need to get the stuff shipped in from China so getting
|
|
|
|
|
Ian H
Groupie
Joined: September-24-2020 Location: Hong Kong Status: Offline Points: 69 |
Post Options
Thanks(0)
Quote Reply
Posted: January-06-2021 at 7:35am |
|
Thanks, lucky you have a good memory that post is really useful i could not turn anything up just searching or googleing
for the front mount i can see the bottom of the mount is really well glassed in and looks strong so I will just remove the u bolt ,and try to fill the void with epoxy re drill for the u bolt, ( cutting out and glassing in a small space is not my idea of fun!) This is what the fixing point looks like now. 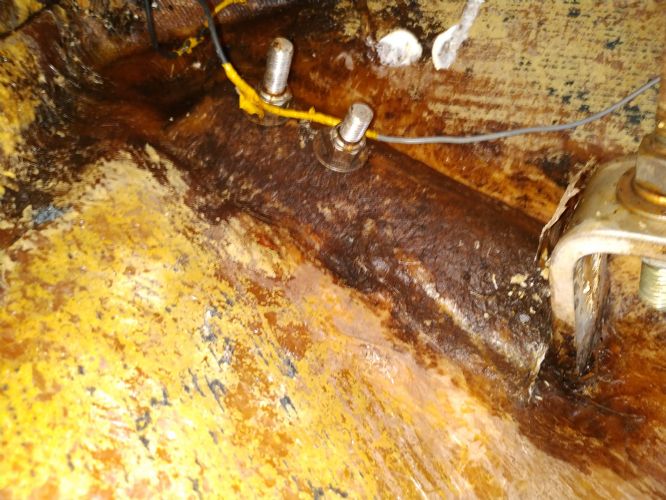  |
|
|
|
|
MechGaT
Senior Member
Joined: March-09-2015 Location: Chattanooga Status: Offline Points: 271 |
Post Options
Thanks(0)
Quote Reply
Posted: January-05-2021 at 4:13pm |
|
I found the thread I was looking for. In this one he rebuilt the rear lift points.
|
|
|
'92 Sport Nautique
|
|
|
|
|
MechGaT
Senior Member
Joined: March-09-2015 Location: Chattanooga Status: Offline Points: 271 |
Post Options
Thanks(0)
Quote Reply
Posted: January-05-2021 at 12:19pm |
|
On this thread there is a picture and sketch of the front lifting eye from a Barefoot Nautique. I have not seen the details on a Sport, but I imagine it to be similar, just tucked away behind the seats in the bow. I have seen another thread with details on how someone replaced the rear ones, but I can't seem to find it now.
|
|
|
'92 Sport Nautique
|
|
|
|
|
Ian H
Groupie
Joined: September-24-2020 Location: Hong Kong Status: Offline Points: 69 |
Post Options
Thanks(0)
Quote Reply
Posted: January-03-2021 at 10:23am |
|
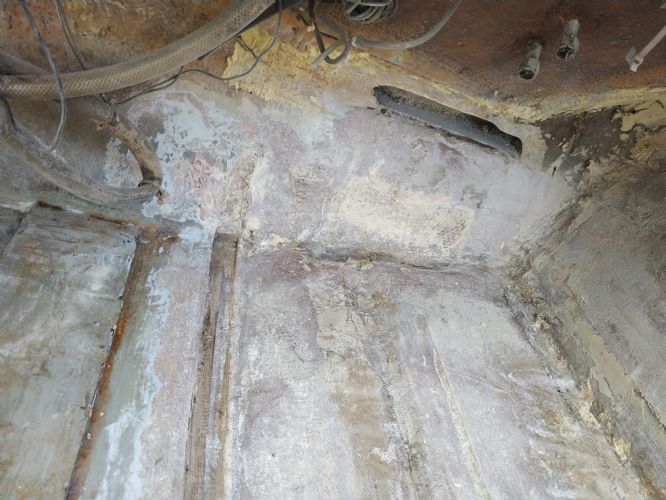
looks lie the construction of the lifting point anchors is two sheets of ply with a bed of chop strand with a chamber on the sides and two or three layers of weave on top . all cut out and prepped for the replacements. some overkill wont go amiss here to be sure they are strong. Still not able to find ant post for this . Working in this tight corner is really unpleasant to far to do at arms length so end up close to the swirling dust cramped up in the corner. Nasty. after this i could pressure wash, one of the few beefits of working outside! now all clean and the inching powder is gone for now.
|
|
|
|
|
Ian H
Groupie
Joined: September-24-2020 Location: Hong Kong Status: Offline Points: 69 |
Post Options
Thanks(0)
Quote Reply
Posted: January-02-2021 at 5:49pm |
|
Thanks
For the floor I will try to make life a bit easier and an L shape a bit like the original I found in a factory tour video below. I still have to do my homework on peanut butter mix of chop cobosil etc (but need to stick to one step at a time or my head may explode. Engine and wiring also all moving along and parts piling up, but most important is to get the hull done while the weather is dry. and cool. I may put up another post to see if I can get some pics of the rear mounting I have not had any luck searching good advice on how to get the pressure on I had not thought about this but can rig something if I think in advance, My guess is that lifting points are just big pad of plywood stuck to the aft of hull and lots of g;ass over the top. I will cut them our today and see if i can piece it together. I really want o grind all the surfaces for new glass so i can properly clean up the itchy dust.! I am hoping the front lift point is not the same construction i hope it connects with the front bow u bolt. without any rotting wood. Thanks again  Best pic i can find of the front mount i hope there is nothing woody holding it in  ! ! |
|
|
|
|
MechGaT
Senior Member
Joined: March-09-2015 Location: Chattanooga Status: Offline Points: 271 |
Post Options
Thanks(0)
Quote Reply
Posted: January-02-2021 at 9:11am |
|
I used the same mixture I used to bed the stringers to bed the plywood. I made the piece that goes under the seats out of one piece so it had to slide into place, making it a little tougher to bed down. The sections in the back were easy.
As far as the method to trace the stringers, get a little trimmed off in the front and rear so there’s not a huge gap in the middle and use a compass to transfer the shape of the hull to it. Be sure to do both sides of the stringers. Others have replaced the lifting points in their rebuilding threads. Not sure if pictures are on the site still. If you are searching for things on here the best way is go to Google, type “site:correct craft fan.com topic” and replace “topic” with what you are looking for. On the lift points, I assume the main question is how to get the studs sticking out through the plywood. Countersink and washers is all I can remember from another thread. Also, think about how to apply pressure until the bond to the hull is dry. |
|
|
'92 Sport Nautique
|
|
|
|
|
Ian H
Groupie
Joined: September-24-2020 Location: Hong Kong Status: Offline Points: 69 |
Post Options
Thanks(0)
Quote Reply
Posted: January-02-2021 at 8:09am |
|
Just as I was about to congratulate myself on finishing the surface prep for the floor and stringers in complete white out . I was hit with a curve ball.... the lifting points are mush. its a funny story I was really angry that when I acquired the boat it was lifted with strops without a spacer instead of the lifting points and the deck was damaged. If they has used the lifting points I think it would have been gave over.
Sanding the last awkward corner I grabbed the lifting point to get to my feet and it came off in my hand! .... pulled completely out of the mounting. Port and starboard the same. Seems the lifting points were plywood and in my boat they were wet. Anyone know what the construction of the fore and aft lifting points are? I need a beer or two and a re-group.       |
|
|
|
|
Ian H
Groupie
Joined: September-24-2020 Location: Hong Kong Status: Offline Points: 69 |
Post Options
Thanks(0)
Quote Reply
Posted: January-01-2021 at 6:17pm |
 8 scaffold jacks and a bunk trailer on bricks , shape is good and not moving while i work  Pylon out easy with sawsall and datum still there to put it back 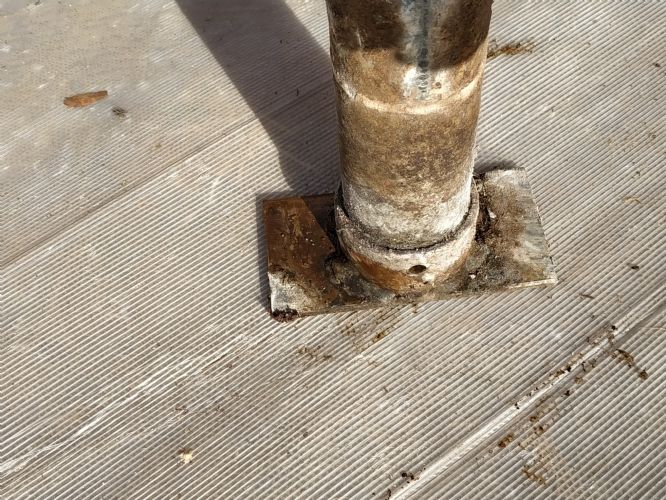  upside down ... floor in the driver side foam out  Tank build in the locker is finally out !!!  Big cleanup starting aft port |
|
|
|
|
Ian H
Groupie
Joined: September-24-2020 Location: Hong Kong Status: Offline Points: 69 |
Post Options
Thanks(0)
Quote Reply
Posted: January-01-2021 at 6:05pm |
|
Thanks the photo is really useful.
I plan the same construction as you I think but will fill with foam through 2 inch holes and glass over when on top after cutting off the extra foam. I hope this will save me tine but as you say there is the risk there could be voids. I have 15mm ply marine grace birch. its very tough, I was planning to reduce the stringers so the top of the ply is just below the lower surface of the old fiberglass floor, i hope this will solve the problem of how to attach the ski locker. i hope to put the ply under the lip for support and see if i can get some tabs in underneath in any case its going to be messy...How did you bond in the ski locker? After the stringers are in and how dis you fix the ply to the tops of the stringers and foam before you put in the top layer of glass on the plywood? I am planning to go forward tot he air vent with the ply so I can pre assemble the air vents so I can use a hole saw. I need to re foam the bow section floor as I had an old termite nest the size of Belgium in there which had to come out together with all the foam. This was an absolute BXXXXXD but saved me taking off the cap Cutting the corroded pylon out of the floor was really easy 5 mins with a sawsall thinking about it not knowing what was inside was long and difficult !! I am now starting to knock down all the stinger remnants and sand the surfaces where the fiberglass needs to bond to. Big belt sander gets this done well but very heavy work I hope a day will see this complete and then time for a full pressure wash out for a clean start. (still sunny here so drying out should be ok so much mud dirt and fiberglass dust to extract leaves no choice) Then its stringer time ( currently on our bedroom floor to stay dry) Is there a good way to measure the shape? I plan to put in a very tight string at the two top corners of the stringers and then at set distances measure down to the hull and transfer the shape to the stringers for each side to get the right shape marked on both sides to get it as close as possible first time . Any tried and tested method? Thanks for your time to help much appreciated. |
|
|
|
|
MechGaT
Senior Member
Joined: March-09-2015 Location: Chattanooga Status: Offline Points: 271 |
Post Options
Thanks(0)
Quote Reply
Posted: January-01-2021 at 11:27am |
|
One thing I didn't mention, if you choose to do the foam then put plywood over it, I had the most success by wrapping a scrap piece of plywood in plastic and placing it over the area where the foam was poured.
 This picture shows the first bit of fairing I put down. It also shows the end of the plywood up front and how the foam supports the transition to the old floor. 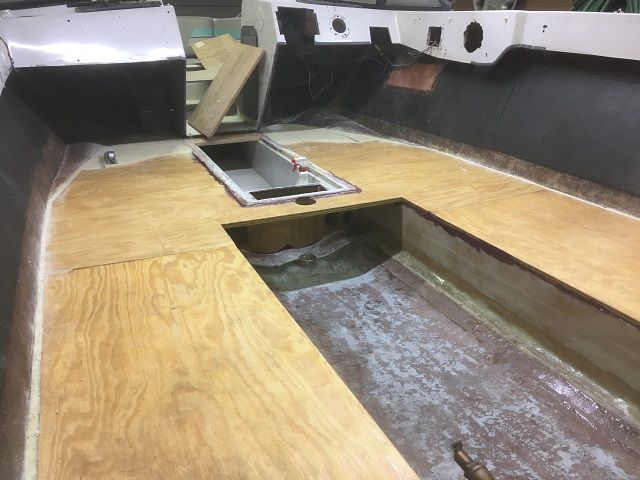 |
|
|
'92 Sport Nautique
|
|
|
|
|
MechGaT
Senior Member
Joined: March-09-2015 Location: Chattanooga Status: Offline Points: 271 |
Post Options
Thanks(0)
Quote Reply
Posted: January-01-2021 at 10:19am |
|
I used outdoor grade A/C plywood from my local building supply. I am pretty sure it was 1/2 inch (13 mm). I coated it with CPES and put a layer of fiberglass on it before putting it in the boat.
As they say, there are many ways to skin a cat, but I chose to reduce the height of both the primary and secondary stringers and put the plywood on top. I had seen the cut holes and pour foam method, but I chose to pour the foam, shave to the right height, and place the plywood on top. I believe that cutting holes will still leave voids and I was concerned about cutting holes in good plywood and trying to get it sealed and flush again. When joining to the original fiberglass I just laid the new stuff on it. The thickness is not that great so it isn’t an issue. The floor gets a lot of strength from the plywood and the epoxy fiberglass, I felt, was to give it a little protection from moisture and impact. I used some chopped strand and some cloth, but I don’t remember the details at this point. The fairing compound was to smooth out the joints. There were rib lines from the 1708, poorly shaped joints that weren’t nicely rounded, ends of cloth, etc. In the bilge these rough spots would make it harder to clean and drain. On the floor it makes it uneven. Fairing just makes these areas smoother. I would advise making sure you have a good formula. I think I used too much ground glass. It was strong, but when sanding was required and strength wasn’t, it was a pain. |
|
|
'92 Sport Nautique
|
|
|
|
|
Ian H
Groupie
Joined: September-24-2020 Location: Hong Kong Status: Offline Points: 69 |
Post Options
Thanks(0)
Quote Reply
Posted: December-31-2020 at 7:16pm |
|
Thanks, Yes it makes it clear that the tank must come out so i can see the condition of the top and if its still attached.
pylon is stuck fast in the cup with corrosion i will try a few more things but looks like the cup will have to be cut off the hull and re glassed in  I have my stingers now from a scrap yard close to the boarder with china and floor I have 15mm birch marine ply. I have a couple of things i cannot work out from your thread. I guess many of the pictures are not there ( sorry if they are obvious I am feeling very Newbie > Did you cut down the height of the stringers by the thickness of the floor and put it on top? What ply did you use? > If you used a plywood floor what is all the foam shaping? I was planning to put in the ply with some holes to put in the foam and just cut off the extra and smooth the holes. I think I am missing something fundamental.. > What did you do to join the old floor at the front under the dashboard and the new floor > Why is there a need to use faring compound ? I have now added l the supports using Scaffold Jacks to get the levels right I think have enough to make enough adjustments. now only a very small movement moving around inside the boat. I was considering step by step structure replacement but when I cut out the first rear primary stringer the boat did a twist which despite lots of support adjustments refused to be corrected. Cutting the second primary did the job and relieved the stress. With and lots of secondary jacks O now have an ok shape in the bottom of the hull and the width back to the size before the floor came out. Today is digging and deciding what to do in the front before the smooth down of all the stringer remnants with the the big belt sander to finally have a first big clean up. Happy new year!! |
|
|
|
|
Post Reply
|
Page <1234> |
 Tweet
Tweet
|
| Forum Jump | Forum Permissions You cannot post new topics in this forum You cannot reply to topics in this forum You cannot delete your posts in this forum You cannot edit your posts in this forum You cannot create polls in this forum You cannot vote in polls in this forum |


 Topic Options
 Ian H wrote: