 Boats For Sale:


DIY Sanford and Son Boat Lift |
Post Reply 
|
Page <12 |
| Author | |
shierh 
Gold Member 
Joined: April-29-2015 Location: Florida Status: Offline Points: 605 |
 Post Options Post Options
") Thanks(0) Thanks(0)
 Quote Reply Quote Reply
 Posted: April-05-2018 at 6:24pm Posted: April-05-2018 at 6:24pm |
|
that's so cool.
How much pressure is on the drum when there is air in it? what kind of fittings on the drum to keep them from blowing out? |
|
 |
|
|
jstainer
Newbie 
Joined: March-14-2018 Location: Ocean City, NJ Status: Offline Points: 4 |
Post Options
Thanks(0)
Quote Reply
Posted: April-05-2018 at 3:47pm |
|
Thanks for the reply! I will take all of your info into careful consideration! So you are saying you used the 3/4" center threaded area on the one bung? And just drilled out the flat area in the center of it? Will that or does that allow enough air in and out fast enough? Also.. are those Plastic bungs strong enough to withstand the pressure? Id assume so.. being they carry and contain heavier weights when full of liquids...
You said you used a 1" garden hose for air? How does that hold up? I was planning on using this rubberized poly hose the local hardware store has in stock.. I believe its one inch inside diameter.. but would be going down to a 3/4 inlet adapter into the bung.. sound ok? I was originally planning on 8, 55 gallon drums.. but may go with 10 to be safe.. finally my biggest question.. as my scientific mind is going nuts about it.. haha but What size hole did you drill in bottom of drums for water release/inlet? And did you drill holes in all drums? My thought was that if the air forced water out of the highest drums in the set, that they would just blow bubbles while the ones further back and down in the set would still be pretty laiden with water.. do i drill holes in all? Or just in back ones? Finally.. My brother in law is in Construction and says he would use Unistrut for ease if building the frame... sound sufficent enough? Its pretty strong stuff! Ill try and post pics when done! |
|
|
|
|
Watauga
Senior Member 

Joined: June-12-2009 Location: United States Status: Offline Points: 208 |
Post Options
Thanks(0)
Quote Reply
Posted: March-14-2018 at 1:39am |
|
Hi Joe,
Off the top of my head I believe my Ski Nautique probably weights 1700 lbs, but I am not sure. Stick around, and I am sure one of the older, and wiser, members will be around with that information. Before I restored the SN it was pretty waterlogged and the lift didn't have any trouble with lifting the ole girl. For your application you can simply do the arithmetic to calculate the volume of storage you need to make your lift function well. That is, if your barrels are 40 or 50 or 55 gallons each, as an example, simply calculate the weight each barrel would lift by multiplying the barrel gallon capacity by 8 pounds. So theoretically, a 50 gallon barrel would lift 400 pounds while it is totally submerged, minus the weight of the barrel and anything attached to it. You do not want your steel structure normally submerged except when launching the boat, therefore you need extra capacity to lift the heavy structure above the surface of the water. But when you do that you lose lifting capacity. The part of a particular barrel that is above the surface of the water is not providing lift, so you need to allow for that. Your lift would be wider and longer than mine and therefore would allow you to simply add more barrels to reach the volume needed to lift your pontoon out of the water. Remember that because your structure will also be larger and thus heavier, you will need to make an allowance for that as well. The same size blower would work, only take longer to fill the tanks. As for the bungs. I used the bungs that came with the barrels. They are plastic and had a threaded center indentation that was already threaded for standard pipe thread. All I did was drill out the center of the indentation. I used standard galvanized fittings with adaptors that are readily available at your local plumbing supply or box store. When you source your barrels, make sure the bungs come with them because I found out that almost every barrel manufacturer has it's own bung thread. More of those barrels are imported from across an ocean and many are not interchangeable with others. In fact, when you purchase your barrels I would recommend you get extra bungs while you are at it in case you have issues later on, like leaky bungs that are susceptible to UV caused degrading. Later on you may not be able to find them. One other thought. It's not a great idea to launch or retrieve the boat with people on board, but it happens occasionally. It you have a few people on board when doing so you will need the capacity to lift that much more weight. So, think about that, and fuel, gear, rain-water, beer, etc. |
|
|
|
|
jstainer
Newbie
Joined: March-14-2018 Location: Ocean City, NJ Status: Offline Points: 4 |
Post Options
Thanks(0)
Quote Reply
Posted: March-14-2018 at 12:43am |
|
can I ask how much your boat weighs that you use this DIY lift for? I'm about to try the same type thing and have a 2200Lb dry weight triple Pontoon! Any certain style fittings you used to fit the barrels bungholes? and any certain placement of the drums? Thanks so much for the help, and Looks Great! I hope mine works out the same!
|
|
|
|
|
fanofccfan
Platinum Member

Joined: December-13-2009 Location: North Bend NE Status: Offline Points: 1731 |
Post Options
Thanks(0)
Quote Reply
Posted: September-30-2015 at 2:10am |
|
I like it. Good work.
|
|
|
|
|
Watauga
Senior Member
Joined: June-12-2009 Location: United States Status: Offline Points: 208 |
Post Options
Thanks(0)
Quote Reply
Posted: September-29-2015 at 6:30pm |
|
The decent depth is controlled by the length of chains mounted on the rear corners. As far as the speed of the decent and ascent, it is purely controlled by the size of the gas valves. Speed could be further dialed in by enlarging the holes in the bottom of each barrel, e.g., larger holes may increase the speed up and down, since water and air could be displaced more quickly. I assume the speed of lifting could be increased by a stronger air pump.
As Craig mentions relative to his Hydro-Hoist, I also have 2 valves. One is placed immediately next to the air pump, between the air pump and the lift, the other is mounted on a tee between the first valve and the lift. I will take a picture of it next time I am at the lake. For now, see the caveman sketch below, apologies to union plumbers and real engineers. You can get a faster launch if both valves are open, but sometimes water can back-feed into the blower canister, which is not a good thing. Obviously, the valve mounted adjacent to the blower should only be opened when lifting. The other valve only opened for lowering. It only takes 3 or 4 minutes to launch or retrieve, I would like for it to be faster but the slower speed allows me more control in making sure the boat is centered. A faster speed might be more dangerous for inexperienced users. Typically the lift is lowered to launch the SN and if left in the down position all day and lifted at the end of the day when the fun is over. If the lift is raised without a boat on it, then yes, it will take much longer to lower the lift the next time since there is considerably less weight forcing it down. 
|
|
|
|
|
C-Bass
Platinum Member

Joined: November-18-2008 Location: Columbus, IN Status: Offline Points: 1248 |
Post Options
Thanks(0)
Quote Reply
Posted: September-29-2015 at 5:30pm |
|
Do you have a hard stop on yours that limits how far it sinks?
You have to be careful lowering ours without a boat on it. Once the floats dump enough air to lose buoyancy, the lift starts to fall and pick up momentum and can slam against the hard stop pretty hard. When the boat is on it, the boat's buoyancy helps slow the descent. |
|
|
|
|
C-Bass
Platinum Member
Joined: November-18-2008 Location: Columbus, IN Status: Offline Points: 1248 |
Post Options
Thanks(0)
Quote Reply
Posted: September-29-2015 at 5:25pm |
|
Nice work! This looks/works exactly like our Hydrohoist. Lift/lower times on ours is probably 2-3 minutes. I think early models lowered a lot slower but they started adding a bypass valve that lets air escape without running back through the blower.
|
|
|
|
|
Gary S
Grand Poobah 

Joined: November-30-2006 Location: Illinois Status: Offline Points: 14096 |
Post Options
Thanks(0)
Quote Reply
Posted: September-29-2015 at 5:04pm |
|
The air pump was made out of the guts of an Electrolux canister vacuum cleaner. The motor/fan was mounted in coffee can, and the entire contraption was secured in a cheap plastic tool box mounted vertically on the dock. The controls consist of a couple of typical 90* throw gas valves and a light switch to turn on the blower. Just about any shopvac can be used for a blower, think high volume-low pressure. Air compressors are not a good idea, since they take too long to get the volume that is needed
Pretty ingenious. Courious as how long to launch and how long to get back into storage posisition? |
|
|
|
|
8122pbrainard
Grand Poobah

Joined: September-14-2006 Location: Three Lakes Wi. Status: Offline Points: 41040 |
Post Options
Thanks(0)
Quote Reply
Posted: September-29-2015 at 4:52pm |
|
Arklie,
Nice work and engineering!  What did you use for a compressed air source? What did you use for a compressed air source?
|
|
|
|
|
Watauga
Senior Member
Joined: June-12-2009 Location: United States Status: Offline Points: 208 |
Post Options
Thanks(0)
Quote Reply
Posted: September-29-2015 at 4:14pm |
|
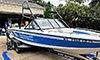
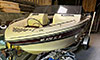
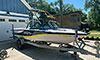
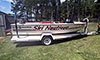
A couple of CCFs have made comments on my rebuild thread about my homemade boat lift, a few have sent me private messages. Here are a few pictures of my lift. I fabricated this lift in 1992, therefore it is now 23 years old and needs some updating.
I fabricated the lift out of structural channel and angle iron that I had left over from a project. I used what I had and therefore it is pretty stout. If I was building it today I would probably build it out of lighter materials and do more engineering than brawn. After fabrication I threw in on a trailer and took it to a galvanizer near Chattanooga to have it galvanized. The cradle was built to be exactly like my Correct Craft trailer cradle. The lift pivots on the front on homemade 2" pipe hinges that are also galvanized. It hinges in the front the rear drops to launch the SN. Chains on the rear prevent it from dropping lower than necessary to submerge the cradle to the depth necessary for loading and launching the SN. The cost to have it galvanized back then was around $100. I could have primed and painted it for around $50 back then. I think I made a good decision. The plastic barrels were purchased for a few dollars each, sourced from a local chemical company. They had been through a barrel wash before they were released for sale. They are piped together with a common water hose and each barrel has a 2" hole in the bottom rear. The air pump was made out of the guts of an Electrolux canister vacuum cleaner. The motor/fan was mounted in coffee can, and the entire contraption was secured in a cheap plastic tool box mounted vertically on the dock. The controls consist of a couple of typical 90* throw gas valves and a light switch to turn on the blower. Just about any shopvac can be used for a blower, think high volume-low pressure. Air compressors are not a good idea, since they take too long to get the volume that is needed. After 23 plus years the barrels have broken down from the UV rays and now will not hold pressure, so this winter I plan on sourcing new barrels. In the pictures you will see that I have placed an old I-beam under the boat cradle to support the lift over the winter in the case it loses its air and submerges. I think purchasing a boat lift from a manufacturer is the way to go if you can afford it, but when I built this I was young, pretty poor, and had more energy and skill than money. Overall it has served me well. There is also a picture of the SN sitting on it at the beginning of my rebuild threat. Next time I am up at the lake I will get a few more pictures to add to this thread. Hopefully it will help someone who might be contemplating a similar project.   
|
|
|
|
|
Post Reply
|
Page <12 |
 Tweet
Tweet
|
| Forum Jump | Forum Permissions You cannot post new topics in this forum You cannot reply to topics in this forum You cannot delete your posts in this forum You cannot edit your posts in this forum You cannot create polls in this forum You cannot vote in polls in this forum |


 Topic Options