Boats For Sale:


Rear Bench Seat |
Post Reply 
|
| Author | |
Dave 
Guest 
|
 Post Options Post Options
") Thanks(0) Thanks(0)
 Quote Reply Quote Reply
 Topic: Rear Bench Seat Topic: Rear Bench SeatPosted: March-24-2005 at 5:17pm |
|
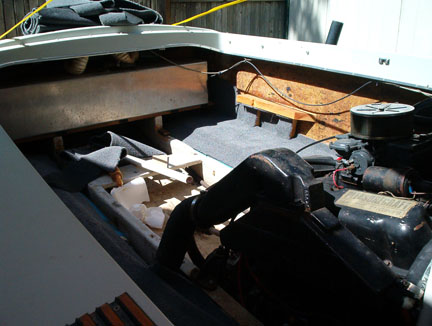
Recently acquired my first natique. 87 barefoot! Very exciting. Missing rear bench seat. Any suggestions on where to purchase one and any other accessories?
|
|
 |
|
|
80nauts
Guest
|
Post Options
Thanks(0)
Quote Reply
Posted: March-25-2005 at 9:03am |
|
Build your own... It should be easy
|
|
|
|
|
David F
Platinum Member 
Joined: June-11-2004 Location: United States Status: Offline Points: 1770 |
Post Options
Thanks(0)
Quote Reply
Posted: March-25-2005 at 1:16pm |
|
Ok, I was not going to respond, because I tought someone else with better knowledge of your specific boat would chime in. Since no one has responded so far...like 80nauts said, build your own. But, maybe I can give you some guidance on building it. My guidance is based on my '77 Martinique. My '93 SN is different.
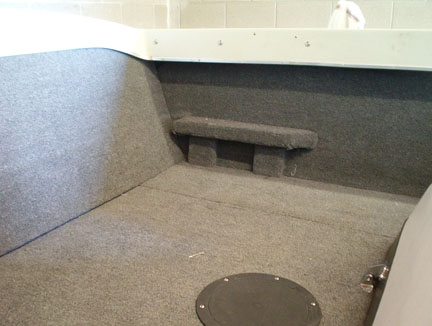
My '77M's rear bench is simply a large piece of foam rubber on top of a plywood platform. This assembly is covered in vinyl. The platform or box is about 3-4" tall and I am guessing about 18" deep (adjust to suit your preference). The foam cushion is rather thick (maybe 6") and tapered from front (higher) to back (lower). It is held in place by friction. The seat back is simply foam rubber (about 2" thick) on a piece of 3/4" plywood cut to shape. My seat back is held in place at the top with two screws through the backboard (tank cover) and into the seat back. Biggest piece of advice: Use treated plywood, but only after you have left it out in the sun for a couple weeks. If you use regular plywood, you will be rebuilding the seat in a few years EVEN if you paint it well. |
|
|
|
|
82tique
Senior Member 

Joined: June-04-2004 Location: United States Status: Offline Points: 339 |
Post Options
Thanks(0)
Quote Reply
Posted: March-25-2005 at 2:51pm |
|
I agree, definately use treated plywood.
If your using the boat for wakeboarding, you might want to think about making a rear sundeck to hide ballast bags. This also will help with the general lack of storage on your boat. I saw some pictures of how this was done on "the2001.com" check it out. |
|
|
|
|
Tate
Senior Member
Joined: October-08-2004 Location: United States Status: Offline Points: 134 |
Post Options
Thanks(0)
Quote Reply
Posted: March-29-2005 at 2:46am |
|
|
|
Tate
|
|
|
|
|
David F
Platinum Member
Joined: June-11-2004 Location: United States Status: Offline Points: 1770 |
Post Options
Thanks(0)
Quote Reply
Posted: March-29-2005 at 12:13pm |
|
No, they will not. But, the wood tends to shrink or in some cased delaminate. It also may stain the carpet. I would hate for you to build the base, then afte the wood dries out/offgases, it looks like rubish. To tell you the truth, the advise is a hold over for those using treated plywood for a floor underlayment. The poly or epoxy resin will not bond well to "uncured" treated plywood. Neither will paint.
|
|
|
|
|
80nauts
Guest
|
Post Options
Thanks(0)
Quote Reply
Posted: March-29-2005 at 7:27pm |
|
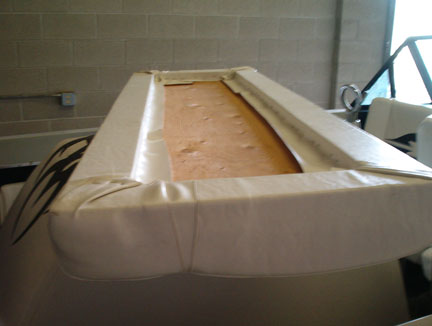
I will get some pics of the one that I built for my 80. It hides my fat sac too, and it kicks ass.
Advice is to build a 2x4 wood frame then screw decent thickness plywood down to the frame. Next get 3" foam and cut it to size with a bandsaw (best) or electric turkey carver. then wrap it in vinyl using staples to secure the underside. I'll elaborate better later, but you put the new bench on 2x4 frame that you epoxy to the side of the boat. Then carpet the little frame. The seat I made looks good, covers the fatsac, and can hold up to 3 fat asses at the same time (really I have only tested it with 2 fat asses and 1 thin one). |
|
|
|
|
80nauts
Guest
|
Post Options
Thanks(0)
Quote Reply
Posted: March-29-2005 at 7:28pm |
|
My last post is very confusing, I'll make up for it tonight.
|
|
|
|
|
jimbo
Senior Member
Joined: September-07-2004 Location: United States Status: Offline Points: 473 |
Post Options
Thanks(0)
Quote Reply
Posted: March-30-2005 at 4:54am |
|
I'm planing to rebuild the rear seats also. Do you really need to use 3/4" plywood? I know most of you wake board types don't mind a little extra weight in the back of the boat but I like to pass jet skies and lighter seats are just easier to move. The previous owner rebuilt the loveseat using 3/4" untreated plywood and it's really heavy. Not to mention the foam soaks up water and makes it even heavier.
I was thinking about 1/2" marine plywood, wrapped in a layer of epoxy and fiberglass. Has anybody tried this? |
|
|
|
|
David F
Platinum Member
Joined: June-11-2004 Location: United States Status: Offline Points: 1770 |
Post Options
Thanks(0)
Quote Reply
Posted: March-30-2005 at 12:16pm |
|
1/2" plywood will work fine, just be sure to have cross supports. You should use a closed cell foam rubber to avoid soaking up water. On a seat bottom, I would suggest foam that is thicker than 3" so you do not bottom out the foam. Forget the added expense of marine plywood. The only real difference between marine plywood and exterior grade plywood such as CDX is that marine plywood is structural (i.e. no internal voids). For a seat, a few voids will not be a problem. Marine plywood will rot just as fast as CDX plywood. Both plywoods use a waterproof glue. If you use treated plywood, you can forget the fiberglass effort and do not even have to worry about painting it at all.
|
|
|
|
|
79nautique
Grand Poobah 

Joined: January-27-2004 Location: United States Status: Offline Points: 7872 |
Post Options
Thanks(0)
Quote Reply
Posted: March-30-2005 at 2:01pm |
|
If you are going to epoxy and glass everything there is no need to use pressure treated wood and regular or cabnet grade plywood is fine.
|
|
|
|
|
new86owner
Groupie 

Joined: August-02-2004 Location: United States Status: Offline Points: 78 |
Post Options
Thanks(0)
Quote Reply
Posted: March-30-2005 at 3:03pm |
|
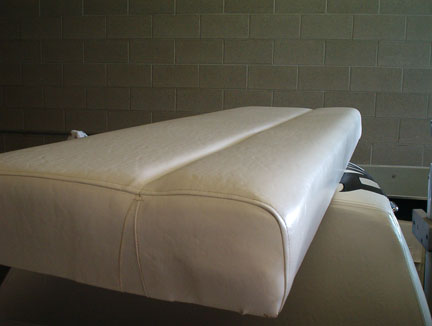
Here's some pics of what I built.
I'm gonna add a foam cushion and cover the top part with vinyl soon. I'll also carpet the front of the box. Full of gear: 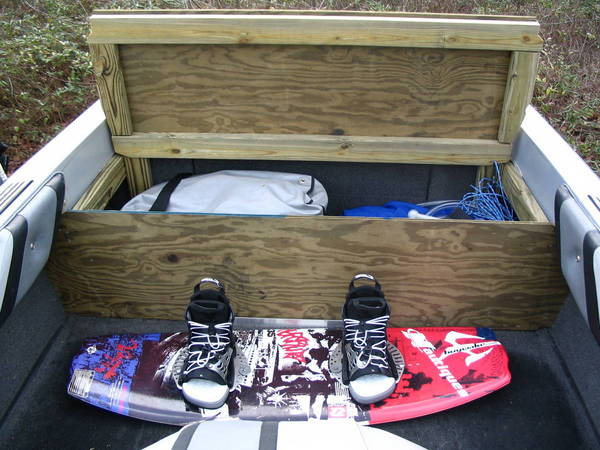
With the fat sac: 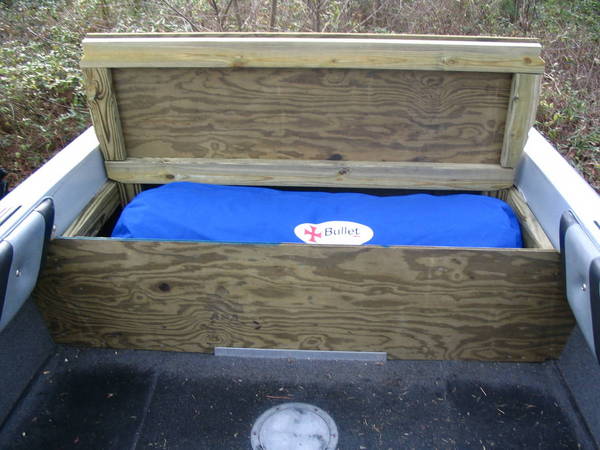
Covered: 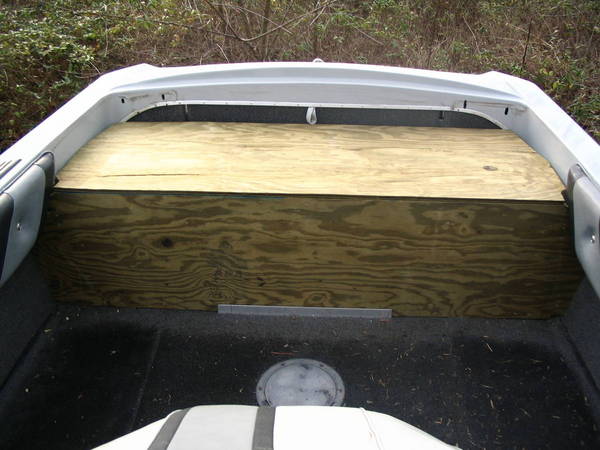
|
|
|
|
|
80nauts
Groupie
Joined: March-19-2005 Location: United States Status: Offline Points: 93 |
Post Options
Thanks(0)
Quote Reply
Posted: March-30-2005 at 9:41pm |
|
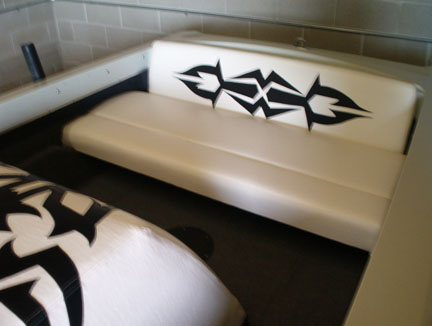
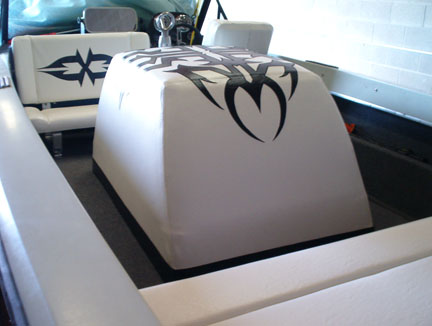
Hope this explains my previous post. Remember that it is 2.5 fat ass tested. Notice that there isn't a cross beam (by not having the beam it helps to fit the fat sack); I think that the beam isn't really needed unless you have 4 fat asses. It is nearly impossible to have 4 fat asses in the back of almost any nautique.
The last pic is my hot chick, She and I redid the interior and seating. We still have a lot more to do to the boat, but what can I say other than it is fun to do. 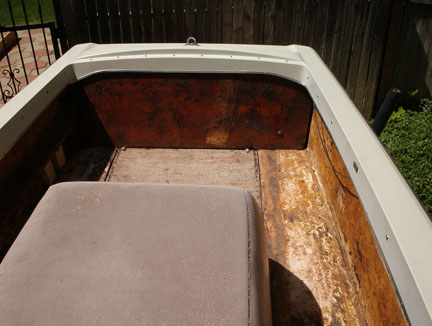

|
|
|
|
|
tdkosta
Guest
|
Post Options
Thanks(0)
Quote Reply
Posted: March-31-2005 at 4:34pm |
|
Nice job, how many hours did it take?
|
|
|
|
|
80nauts
Groupie
Joined: March-19-2005 Location: United States Status: Offline Points: 93 |
Post Options
Thanks(0)
Quote Reply
Posted: March-31-2005 at 8:17pm |
|
Too long (I would say 50+ hours)due to not having an industrial sewing machine, and due to the top design. We used a bernina home machine, and it had to sew slowly in order to keep a good regular stitch for the topstiching of the black vinyl onto the white. If you didn't do the top stitching it would take maybe 10+.
It should only take about 2+ to do a back seat without a design on top of the vinyl. These times don't include making the base or laying the carpet, but that took about 10 hours. |
|
|
|
|
NAUTI84
Senior Member
Joined: June-10-2004 Location: United States Status: Offline Points: 485 |
Post Options
Thanks(0)
Quote Reply
Posted: April-02-2005 at 12:19pm |
|
BYO the way to go!
Design to fit your storage needs (just storage, wakeboards, fatsacks etc.) Click my sig. to see mine. |
|
|
|
|
Bill336
Senior Member
Joined: October-12-2004 Location: United States Status: Offline Points: 106 |
Post Options
Thanks(0)
Quote Reply
Posted: April-02-2005 at 3:04pm |
|
NAUTI84 - I saw that before in the diaries and copied the pics because that's what I'd like to do with my 78 American Skier. Do you have more pics of the rear seat that you could email, or even the one that shows it open that's bigger than in the diaries?
|
|
|
|
|
80nauts
Groupie
Joined: March-19-2005 Location: United States Status: Offline Points: 93 |
Post Options
Thanks(0)
Quote Reply
Posted: April-02-2005 at 4:34pm |
|
NAUTI84- I like yours a lot. The older boats need as much storage as possible. I might try to put a cross beam in mine to hide the sac.
How do you get the drive line bay open? Does your cross beam pull out? |
|
|
|
|
80nauts
Groupie
Joined: March-19-2005 Location: United States Status: Offline Points: 93 |
Post Options
Thanks(0)
Quote Reply
Posted: April-02-2005 at 4:44pm |
|
I can see now, you've got clips and pins. Good Idea, just like the ones on the engine cover.
|
|
|
|
|
NAUTI84
Senior Member
Joined: June-10-2004 Location: United States Status: Offline Points: 485 |
Post Options
Thanks(0)
Quote Reply
Posted: April-10-2005 at 12:30am |
|
Yeah guys, I never moved the clips from the old 84' split seats. Made the box to fit and reuse them.
If just sking - Cushions come out and it makes a nice step to transom. Unclip and entire box comes out. I'll try to get a few more pics when I get a minute (working on our new (old) RV right now!) 
|
|
|
|
|
SeattleFordFan
Senior Member
Joined: April-18-2005 Location: United States Status: Offline Points: 190 |
Post Options
Thanks(0)
Quote Reply
Posted: April-18-2005 at 12:41am |
|
Sorry guys, I am a few days late....
New here, so very excited to find this. 80Nauts, I am very impressed with the work you did, and would be interested in more pics of your interior, if you dont mind. I just picked up an 80, and it has no interior, and I have already rebuilt the motor. I really like these boats, and am anxious to get this one out there. |
|
|
Travs
Where there is a will, there is a way, and where there is a way, it usually costs more money. 1980 Ski Nautique |
|
|
|
|
80nauts
Groupie
Joined: March-19-2005 Location: United States Status: Offline Points: 93 |
Post Options
Thanks(0)
Quote Reply
Posted: April-18-2005 at 4:19am |
|
I don't want to spoil your imagination. I was suprised how easy the interior is to do, and I realize now more then ever that you can get a lot more creative.
I don't really have any more pics of the unfinished boat. If you have any questions on how to do interior yourself then shoot; I was also suprised how cheap it was too. |
|
|
|
|
Jim_In_Houston
Platinum Member
Joined: September-06-2004 Location: United States Status: Offline Points: 1120 |
Post Options
Thanks(0)
Quote Reply
Posted: April-18-2005 at 5:00pm |
|
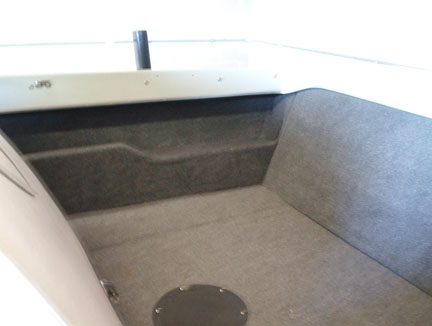
What is that round plate on the floor of New86owner's boat?
|
|
|
Happy owner of a '66 and a '68 Mustang
|
|
|
|
|
Bob's2001
Senior Member
Joined: March-28-2005 Location: Lake Jackson TX Status: Offline Points: 241 |
Post Options
Thanks(0)
Quote Reply
Posted: April-18-2005 at 7:43pm |
|
That is an inspection port. If you open it up you can see and get to the through hull packing on the drive shaft.
|
|
|
Bob Ed
83 2001 |
|
|
|
|
Jim_In_Houston
Platinum Member
Joined: September-06-2004 Location: United States Status: Offline Points: 1120 |
Post Options
Thanks(0)
Quote Reply
Posted: April-18-2005 at 9:42pm |
|
Man, I need one of those in my '68. Where do you get them?
|
|
|
Happy owner of a '66 and a '68 Mustang
|
|
|
|
|
80nauts
Groupie
Joined: March-19-2005 Location: United States Status: Offline Points: 93 |
Post Options
Thanks(0)
Quote Reply
Posted: April-19-2005 at 12:50am |
|
$20 at any boat store. Just cut a hole and then you can adjust or inspect your drive shaft.
|
|
|
|
|
Post Reply
|
|
 Tweet
Tweet
|
| Forum Jump | Forum Permissions You cannot post new topics in this forum You cannot reply to topics in this forum You cannot delete your posts in this forum You cannot edit your posts in this forum You cannot create polls in this forum You cannot vote in polls in this forum |


 Topic Options
 David F wrote: