 Boats For Sale:


1969 Mustang Stringer Rebuild |
Post Reply 
|
Page <1 23456 15> |
| Author | |
TRBenj 
Grand Poobah 

Joined: June-29-2005 Location: NWCT Status: Offline Points: 21213 |
 Post Options Post Options
") Thanks(0) Thanks(0)
 Quote Reply Quote Reply
 Posted: March-29-2011 at 5:48pm Posted: March-29-2011 at 5:48pm |
|
Those beers are coming to the next reunion I make it to!
The lower cost of the mat is easily offset by the amount of resin it soaks up. Mat is great for building thickness quickly for impact resistance, etc. Dont worry about getting tubes for thickened resin. We used ziplock bags. Get a LOT of cups. Get some stirrers too. |
|
 |
|
|
WakeSlayer
Grand Poobah

Joined: March-15-2006 Location: United States Status: Offline Points: 2138 |
Post Options
Thanks(0)
Quote Reply
Posted: March-29-2011 at 6:06pm |
|
Those tubes suck.
|
|
|
Mike N
1968 Mustang |
|
|
|
|
vondy
Platinum Member 

Joined: November-29-2007 Location: Dallas, Texas Status: Offline Points: 1116 |
Post Options
Thanks(0)
Quote Reply
Posted: March-29-2011 at 6:20pm |
|
We are never short on beer

Noted. So what's the verdict on the floor? Cloth on bottom, mat on top followed by cloth? Cloth on bottom mat only on top? Cloth on bottom and two layers of cloth on top? Once I figure that out I'll add some buckets and cups and place my order. Can I just get some paper drinking cups for small amounts or do I need to order anything special from USC? |
|
|
|
|
WakeSlayer
Grand Poobah
Joined: March-15-2006 Location: United States Status: Offline Points: 2138 |
Post Options
Thanks(0)
Quote Reply
Posted: March-29-2011 at 7:00pm |
|
Solo cups work fine, too.
|
|
|
Mike N
1968 Mustang |
|
|
|
|
8122pbrainard
Grand Poobah

Joined: September-14-2006 Location: Three Lakes Wi. Status: Offline Points: 41045 |
Post Options
Thanks(0)
Quote Reply
Posted: March-29-2011 at 7:21pm |
|
David,
A layer of cloth on both sides of the ply floor is fine. Just make sure you wrap the edges as well. |
|
|
|
|
vondy
Platinum Member
Joined: November-29-2007 Location: Dallas, Texas Status: Offline Points: 1116 |
Post Options
Thanks(0)
Quote Reply
Posted: March-29-2011 at 7:40pm |
So no mat for the floor. How about for the ribs and various other wood like the exhaust bracing, rudder mount, etc? Mat or cloth? I think that about covers it all. |
|
|
|
|
charger496
Senior Member 
Joined: August-06-2010 Location: atlanta, ga Status: Offline Points: 157 |
Post Options
Thanks(0)
Quote Reply
Posted: March-29-2011 at 7:43pm |
|
Is wrapping the edges just for abrasion resistance? Didn't do that to mine.
|
|
|
|
|
storm34
Grand Poobah

Joined: November-03-2008 Location: Dexter Iowa Status: Offline Points: 4496 |
Post Options
Thanks(0)
Quote Reply
Posted: March-29-2011 at 9:03pm |
And I would assume it helps in keeping out water. |
|
|
|
|
8122pbrainard
Grand Poobah
Joined: September-14-2006 Location: Three Lakes Wi. Status: Offline Points: 41045 |
Post Options
Thanks(0)
Quote Reply
Posted: March-29-2011 at 9:44pm |
|
David,
Any wood that isn't real structural, a layer of cloth is fine as well. Chris, You're correct that wrapping the edges is to prevent water absorption. You should have zero abrasion since the floor ply is set in thickened epoxy bonding it completely to the tops of the stringers. At the edge that bumps the hull sides, it glassed there preventing any movement as well. |
|
|
|
|
Keeganino
Grand Poobah

Joined: October-27-2009 Location: North Carolina Status: Offline Points: 2063 |
Post Options
Thanks(0)
Quote Reply
Posted: March-30-2011 at 12:09am |
|
The type of material you use on the floor does not matter much. I would not lose any sleep over it. By the time you get to that point you will be a glass master
 Just get one type and use that. The nice thing about glass is that you can always grind it to shape if you have to. Thats why I say it is a forgiving medium. Build it up grind it down. With a vinyl floor you will want it to be pretty smooth. Just get one type and use that. The nice thing about glass is that you can always grind it to shape if you have to. Thats why I say it is a forgiving medium. Build it up grind it down. With a vinyl floor you will want it to be pretty smooth.
I did what Tim suggested and used gallon freezer bags cut like a frosting bag to apply a bead for the fillet(then shaped it with a bondo spreader). Get good bags. Cheap ones will split, but you can reinforce them with tape before you cut the corner. Gotta work fast when its in the bag too cause it kicks fast in large batches. I went through a lot of different mixing cups and my favorites ended up being the 1.5 gallon for large batches and the 1 quart for smaller ones(Lowes or Home Depot had these for the best price). Anything smaller and the mixer can make a mess in a hurry(make sure you use a variable speed drill). As you get the hang of using the resin your batches will keep getting bigger. I used stirrers for the first few days PITA and then got the drill mixer and never looked back. You know you have a good mix when little bubbles start floating out of it. Ahhhhh I can almost smell it... Bit the bullet today and went and bought a 3/4 hp buffer from HF $75. Basically finished the rub rails this afternoon. SHould have done that 2 weeks ago. Cannot believe the difference in a 1/4 hp. Just another project that I got good at once the job was done! |
|
|
"working on these old boats may not be cost effective but as it shows its what it brings into your life that matters" -Roger
1973 Skier |
|
|
|
|
charger496
Senior Member
Joined: August-06-2010 Location: atlanta, ga Status: Offline Points: 157 |
Post Options
Thanks(0)
Quote Reply
Posted: March-30-2011 at 12:13am |
|
My plywood floor is CPESed, epoxied all over, cloth on both sides and more epoxy on all sides. The hull edge sides are bedded and fillet-ed with cabosil and then glassed to the hull. If water gets in there, its because the boat caught on fire, and I forgot to tell the firemen not to get the interior wet!
|
|
|
|
|
critter
Platinum Member

Joined: January-11-2008 Location: New Hill, NC Status: Offline Points: 1227 |
Post Options
Thanks(0)
Quote Reply
Posted: March-30-2011 at 12:28am |
I did the same thing I have no concerns with water
getting back under the floor outside of the bilge. I do watch my grandson when he picks up the drill while in the boat.... |
|
|
1980 Ski Nautique
1966 Barracuda |
|
|
|
|
8122pbrainard
Grand Poobah
Joined: September-14-2006 Location: Three Lakes Wi. Status: Offline Points: 41045 |
Post Options
Thanks(0)
Quote Reply
Posted: March-30-2011 at 9:26am |
|
It's tha glass in a FRP hull that gives it the strength. The resin simply holds it together. Resin is relatively brittle and does crack when flexed without reinforcement. It's the reason wood boats "restored" with epoxy fail - the epory cracks, wter gets in and the wood rots from the inside.
|
|
|
|
|
82Fineline
Newbie 
Joined: March-25-2011 Location: Va Status: Offline Points: 12 |
Post Options
Thanks(0)
Quote Reply
Posted: March-31-2011 at 12:12am |
|
Maybe Im missing something, but when you guys were discussing uscomposites no longer having the epoxy mat...How is the 1.5oz CSM a good replacement? I thought that the binder in the mat had to be dissolved by the resin? The 1.5oz mat from them states its for polyester and vinylester resins only which I take to mean epoxy doesn't dissolve it.
I dont know all that much about epoxy, just want to make sure Im getting the right stuff when I order. So the ones that used the uscomp 1.5oz mat with epoxy had no issues? Thanks |
|
|
|
|
vondy
Platinum Member
Joined: November-29-2007 Location: Dallas, Texas Status: Offline Points: 1116 |
Post Options
Thanks(0)
Quote Reply
Posted: March-31-2011 at 4:13am |
|
The USC order has been placed
 I think that was the hardest thing I have done so far. I think that was the hardest thing I have done so far.
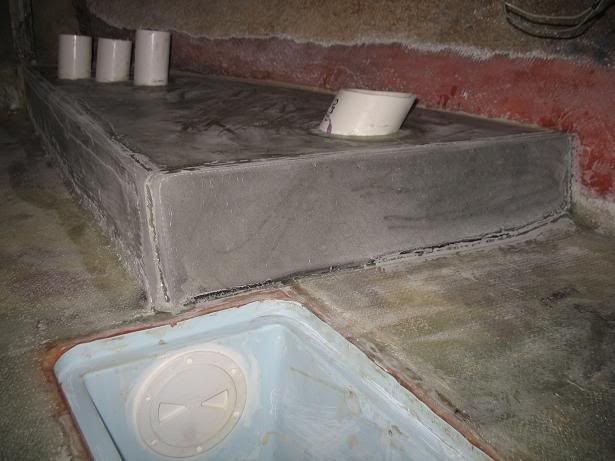
In the meantime, I am working on my secondary I pulled over the weekend. Here's my plan, and let me know if it's a good or bad plan. First I traced the old stringer and rough cut, leaving plenty of extra for scribing. Put it in the boat, making sure it is plumb. I have 3 2x4s cut exactly the same to use as spacers between that secondary and main. Next I will scribe the bottom on each side, remove from the boat and fine tune it with a jig saw and my new Harbor Freight power planer. I'll then set her back in the boat and fine tune some more if needed. Now I have to find the height off of the mains. Not 100% sure how I'll do that yet but I assume it will involve levels, calipers, etc. Once I figure that out, I'll rip her down and fine tune as needed with the planer. Then cpes and bed once the material gets here. That sound about right? 

Now questions. The rear of my secondary was notched at the bottom. I would assume I need to notch the new one as well. And how tight do I want it to the transom? Do I need to scribe it in or will epoxy filling the gaps be close enough? 

My measurements before I pulled that secondary revealed that it was not parallel to the main. I was going to make sure the new one was. Does anyone see a problem with that? I'm also starting to think about drainage. Seems like there are two schools of thought around here, one is to drain everything to the bilge and the other is to only drain the exhaust cavities into the bilge and let everything else drain into one spot that can be accessed by some other means, or just sealed off completely. I'm not sure how you could seal everything off completely. With this little boat and some of the rough water around here, there's always some wash making it's way into the boat. Do you run the floor all the way to the rear between the secondary and the hull like I have mocked up in the pic below? 
Well thanks for all the help on the epoxy order. I feel like I am making some progress again. |
|
|
|
|
SN206
Grand Poobah

Joined: February-25-2009 Location: Fort Worth, TX Status: Offline Points: 2339 |
Post Options
Thanks(0)
Quote Reply
Posted: March-31-2011 at 4:32am |
|
Looking good, looks like will see ya on Lewisville soon!
|
|
|
...those who have fallen and those who will.
|
|
|
|
|
TRBenj
Grand Poobah
Joined: June-29-2005 Location: NWCT Status: Offline Points: 21213 |
Post Options
Thanks(0)
Quote Reply
Posted: March-31-2011 at 11:54am |
|
If you can get that main more closely matched to the transom, you'd be better off. You can fill the gap with thickened epoxy, but thats a big gap and the orientation will be a real pain.
Im assuming those blocks are just there for bracing, right? I would put any ribs/supports vertical so they actually offer support between the hull and floor. Leave out any braces in the exhaust cavities, it makes it a real pain to route the exhaust hose. The later boats (1971+) didnt have any, unlike the earlier ones- so theyre definitely not necessary. Personally, Im of the school of thought that says any way for water to get out is a potential intrusion point. I only drain from the exhaust cavities to the bilge, the rest I drain together and access with a hidden port. There is no way water *should* get under there, but if it does, I can still get it out. Thats not the way CC did it on the early-mid 60's non-foamed boats (they drained everything together), so thats certainly an option too. I have encountered one boat with a clogged drain (leaves) though, and a large cavity ended up holding water for an extended period of time... not pretty. As far as where to end the floor, if you plan to keep the platform, then leaving access to the bolts/backing plates by ending the floor short of the transom isnt a bad idea. Diverting the water that might get into that cavity from the floor is one way to handle that. Or putting in a rib that blocks off the forward cavities (~12" from the transom) and draining those 2 rear pockets to the exhaust cavities (and bilge) would work too. 82Fineline, the regular mat that USC sells dissolves just fine in epoxy. I had a hard time telling the difference between it and the epoxy specific stuff I had used previously. |
|
|
|
|
8122pbrainard
Grand Poobah
Joined: September-14-2006 Location: Three Lakes Wi. Status: Offline Points: 41045 |
Post Options
Thanks(0)
Quote Reply
Posted: March-31-2011 at 12:07pm |
|
David,
Forgive me if it's already come up but have you checked out the wood in your transom? |
|
|
|
|
WakeSlayer
Grand Poobah
Joined: March-15-2006 Location: United States Status: Offline Points: 2138 |
Post Options
Thanks(0)
Quote Reply
Posted: March-31-2011 at 12:42pm |
|
That exhaust port looks borderline. As long as you are in there...
|
|
|
Mike N
1968 Mustang |
|
|
|
|
vondy
Platinum Member
Joined: November-29-2007 Location: Dallas, Texas Status: Offline Points: 1116 |
Post Options
Thanks(0)
Quote Reply
Posted: March-31-2011 at 1:07pm |
That's my thought, as long as I'm in there. It looks as if the wood is pretty solid but I don't want to have to do it again. And I"ll probably never use the lift rings but I like the idea of everything working as it should. I am questioning if I should touch the swim platform bracing. It would have been added probably in the 90's. I like the idea of blocking the cavity for swim platform hardware access and draining that into the bilge. Back on the subject of water getting into places. Are y'all sealing off the stringers cavities in the space under the bow somehow? Best I can tell the floor stops at the kick plate and past that it's still wide open to the cavities. I know it unlikely water can get under there assuming the bow is sealed up but under the right circumstances I'm sure it can find a way. Where are y'all putting these hidden access ports btw? I have this idea of draining all the closed off areas right in front of the pylon area between the seats where the new battery box will go. At the bottom of the battery box there could be a PVC style threaded cap that could be removed allowing a shop vac hose to go down there and suck out any water. Thoughts? |
|
|
|
|
TRBenj
Grand Poobah
Joined: June-29-2005 Location: NWCT Status: Offline Points: 21213 |
Post Options
Thanks(0)
Quote Reply
Posted: March-31-2011 at 1:23pm |
|
Oh yes, definitely seal up the under bow area. CC fixed that mistake in their second generation of fiberglass boats. The amount of exposed foam in my sister's '69 blows my mind! You'll want to bring the floor all the way to the nose. Creating an "air box" (like the 71+ Mustangs and Skiers) will give you somewhere to mount the kick panel.
I put an access port in the front facing wall of the battery box on our BFN. 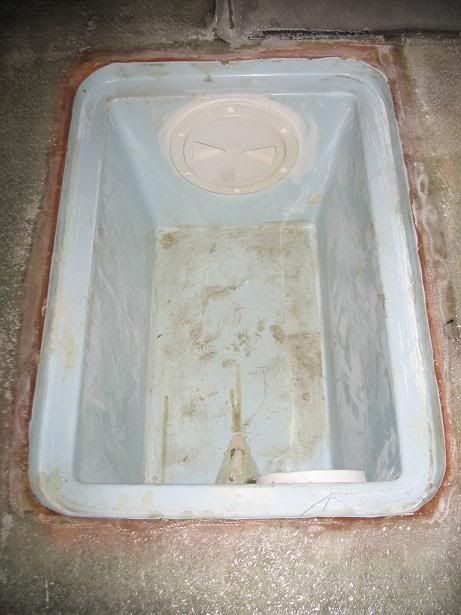
|
|
|
|
|
vondy
Platinum Member
Joined: November-29-2007 Location: Dallas, Texas Status: Offline Points: 1116 |
Post Options
Thanks(0)
Quote Reply
Posted: March-31-2011 at 1:41pm |
|
Ok.... now I see.
|
|
|
|
|
82Fineline
Newbie
Joined: March-25-2011 Location: Va Status: Offline Points: 12 |
Post Options
Thanks(0)
Quote Reply
Posted: March-31-2011 at 2:12pm |
|
Thanks TRbenj, like I said Im not educated on epoxy yet and was worried.
Awesome looking mustang vondy, good luck with the build. Ill stop hijacking your thread now |
|
|
|
|
WakeSlayer
Grand Poobah
Joined: March-15-2006 Location: United States Status: Offline Points: 2138 |
Post Options
Thanks(0)
Quote Reply
Posted: March-31-2011 at 2:33pm |
|
Jamestown just sent out an email with a 20% off CPES offer. Ain't going to get better than that. $179 for a 2gallon set.
|
|
|
Mike N
1968 Mustang |
|
|
|
|
Keeganino
Grand Poobah
Joined: October-27-2009 Location: North Carolina Status: Offline Points: 2063 |
Post Options
Thanks(0)
Quote Reply
Posted: March-31-2011 at 2:42pm |
They sent another one right before that for free shipping too. That does make it a deal. |
|
|
"working on these old boats may not be cost effective but as it shows its what it brings into your life that matters" -Roger
1973 Skier |
|
|
|
|
vondy
Platinum Member
Joined: November-29-2007 Location: Dallas, Texas Status: Offline Points: 1116 |
Post Options
Thanks(0)
Quote Reply
Posted: March-31-2011 at 3:19pm |
|
I paid $177 at Rot Doctor, that did not include the $25 shipping though.
|
|
|
|
|
charger496
Senior Member
Joined: August-06-2010 Location: atlanta, ga Status: Offline Points: 157 |
Post Options
Thanks(0)
Quote Reply
Posted: March-31-2011 at 5:55pm |
|
I like the idea of a pvc threaded cap to get water out of the bow area. I put a 3/4" pvc pipe at the lowest point in my bulkhead behind the battery box with the pipe extending to just past the pylon in the bilge with a pvc cap that I can unscrew to see if any water is getting trapped in there.
|
|
|
|
|
vondy
Platinum Member
Joined: November-29-2007 Location: Dallas, Texas Status: Offline Points: 1116 |
Post Options
Thanks(0)
Quote Reply
Posted: April-06-2011 at 11:35am |
|
Have not gotten near as much done as I had hoped by this point but at least I'm moving along.
Both secondaries are out and the area sanded smooth. Need to scribe and embed. My CPES is in and the USC order should be here tomorrow. Looking at all the transom wood, how are you guys getting that stuff out without plowing through the transom? I started working on the starboard exhaust bracing by sanding around the edges and the covering fiberglass. I'm afraid to put the diamond wheel on there with the tight access. Any tips? The wood actually looks good there. I hate to take it out. |
|
|
|
|
connorssons
Platinum Member
Joined: January-17-2009 Location: Michigan Status: Offline Points: 1414 |
Post Options
Thanks(0)
Quote Reply
Posted: April-11-2011 at 1:27am |
|
Hay Vondy! go to the home depot and get a cheep power hand planer
 its the sh%t. check out my sep thread and look at the transom pics? thats the only way to do it. you will be amazed at how well it works. Jeff its the sh%t. check out my sep thread and look at the transom pics? thats the only way to do it. you will be amazed at how well it works. Jeff
|
|
|
|
|
connorssons
Platinum Member
Joined: January-17-2009 Location: Michigan Status: Offline Points: 1414 |
Post Options
Thanks(0)
Quote Reply
Posted: April-11-2011 at 1:30am |
|
BTW take the transom wood out! it looks bad. dont wast your time later, while your in there take care of it.
|
|
|
|
|
Post Reply
|
Page <1 23456 15> |
 Tweet
Tweet
|
| Forum Jump | Forum Permissions You cannot post new topics in this forum You cannot reply to topics in this forum You cannot delete your posts in this forum You cannot edit your posts in this forum You cannot create polls in this forum You cannot vote in polls in this forum |


 Topic Options
 WakeSlayer wrote: