 Boats For Sale:


1969 Mustang Stringer Rebuild |
Post Reply 
|
Page <12345 15> |
| Author | ||
vondy 
Platinum Member 

Joined: November-29-2007 Location: Dallas, Texas Status: Offline Points: 1116 |
 Post Options Post Options
") Thanks(0) Thanks(0)
 Quote Reply Quote Reply
 Posted: June-27-2011 at 3:04pm Posted: June-27-2011 at 3:04pm |
|
|
That's just the Nautolex flooring. Love it. It has a nice grip to it, looks great, color is just right, exactly what we were looking for.
Sandstone color. http://www.garysupholstery.com/ntomarfloor.html |
||
 |
||
|
8122pbrainard
Grand Poobah 

Joined: September-14-2006 Location: Three Lakes Wi. Status: Offline Points: 41045 |
Post Options
Thanks(0)
Quote Reply
Posted: June-27-2011 at 2:52pm |
|
|
David,
Look'n great. I especially like the vinyl wall covering for the floor - Yes, keep it ORIGINAL!!!   Where did you find it? Where did you find it?
|
||
|
||
|
Keeganino
Grand Poobah

Joined: October-27-2009 Location: North Carolina Status: Offline Points: 2063 |
Post Options
Thanks(0)
Quote Reply
Posted: June-27-2011 at 2:15pm |
|
|
Looks great! You will be on the water in no time!
|
||
|
"working on these old boats may not be cost effective but as it shows its what it brings into your life that matters" -Roger
1973 Skier |
||
|
||
|
vondy
Platinum Member
Joined: November-29-2007 Location: Dallas, Texas Status: Offline Points: 1116 |
Post Options
Thanks(0)
Quote Reply
Posted: June-27-2011 at 2:00pm |
|
|
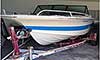
Here's a few.

Note the cast iron wedge. 

Vinyl Sample 
All painted up 


Pretty much at the assembly stage. Have to glass in my gas tank risers and glue the vinyl down. Still have some through-hull hardware to install. |
||
|
||
|
vondy
Platinum Member
Joined: November-29-2007 Location: Dallas, Texas Status: Offline Points: 1116 |
Post Options
Thanks(0)
Quote Reply
Posted: June-27-2011 at 12:44pm |
|
|
Pete nothing turns my wife on more than having her tighten the nuts on my strut in 98 degree weather. Then having to rub her down with acetone to get the 5200 off her hands. Let me tell you, she's in love.

|
||
|
||
|
8122pbrainard
Grand Poobah
Joined: September-14-2006 Location: Three Lakes Wi. Status: Offline Points: 41045 |
Post Options
Thanks(0)
Quote Reply
Posted: June-26-2011 at 9:03pm |
|
I sure hope you're taking time out to get laid!! 
|
||
|
||
|
vondy
Platinum Member
Joined: November-29-2007 Location: Dallas, Texas Status: Offline Points: 1116 |
Post Options
Thanks(0)
Quote Reply
Posted: June-26-2011 at 8:53pm |
|
|
I'll get some pics up soon, I'm pretty much working nonstop on the thing so hard to get pics uploaded. And work is busy so can't do it up there either. Should have some up tomorrow.
Thanks for the info guys, I figured it would surely be cured by 5 days. |
||
|
||
|
Keeganino
Grand Poobah
Joined: October-27-2009 Location: North Carolina Status: Offline Points: 2063 |
Post Options
Thanks(0)
Quote Reply
Posted: June-26-2011 at 6:47pm |
|
|
We need some new pics! Got to be exciting putting it back together!
|
||
|
"working on these old boats may not be cost effective but as it shows its what it brings into your life that matters" -Roger
1973 Skier |
||
|
||
|
8122pbrainard
Grand Poobah
Joined: September-14-2006 Location: Three Lakes Wi. Status: Offline Points: 41045 |
Post Options
Thanks(0)
Quote Reply
Posted: June-26-2011 at 5:51pm |
|
|
3M™ Marine Adhesive Sealant 5200 This high-performance polyurethane adhesive sealant becomes tack-free in 24-48 hours, and completely cures in 5-7 days with no shrinking. Al, Please don't tell me you use silicone!!! 
|
||
|
||
|
8122pbrainard
Grand Poobah
Joined: September-14-2006 Location: Three Lakes Wi. Status: Offline Points: 41045 |
Post Options
Thanks(0)
Quote Reply
Posted: June-26-2011 at 5:09pm |
|
Al, It's 7 days! You don't have some around to look at the instructions?
|
||
|
||
|
DrCC
Grand Poobah

Joined: April-12-2004 Location: at home Status: Offline Points: 2890 |
Post Options
Thanks(0)
Quote Reply
Posted: June-26-2011 at 4:30pm |
|
|
7 days? You sure it's not 72 hours?
3 days, you should be good to go. |
||
|
||
|
8122pbrainard
Grand Poobah
Joined: September-14-2006 Location: Three Lakes Wi. Status: Offline Points: 41045 |
Post Options
Thanks(0)
Quote Reply
Posted: June-26-2011 at 4:27pm |
|
|
David,
You'll be fine. The 7 days is for a full cure/full strength. Spray some water on it - it's a moisture cure and giving it some moisture will speed it up. |
||
|
||
|
vondy
Platinum Member
Joined: November-29-2007 Location: Dallas, Texas Status: Offline Points: 1116 |
Post Options
Thanks(0)
Quote Reply
Posted: June-26-2011 at 4:04pm |
|
|
I'm about to start assembling things. The 3m tube says 7 days to cure. My hope is to have her in the water next Saturday. Y'all thing that will be enough curing time?
|
||
|
||
|
8122pbrainard
Grand Poobah
Joined: September-14-2006 Location: Three Lakes Wi. Status: Offline Points: 41045 |
Post Options
Thanks(0)
Quote Reply
Posted: June-24-2011 at 9:36am |
|
|
David,
I knew Ted could help out. The last time I was at his house, borrowing his valve grinder for my Flexifour rebuild, I saw a box of the wedges. BTW, I've mentioned Ted several times. He's retired and now does engine rebuilds. Pretty much Chris/Hercules and Gray's but others too. I hope you said hello for me! |
||
|
||
|
uk1979
Platinum Member
Joined: June-13-2007 Location: United Kingdom Status: Offline Points: 1426 |
Post Options
Thanks(0)
Quote Reply
Posted: June-24-2011 at 8:03am |
|
I didn't know my old ones were OMC's but I do now
The PCM part number I used is there type look much the same as the picture showing the set up, the old OMC trunnions are 11/4 from over here I'm going for HM trunnions are 7/8 or 1'inch. Can you still get new rubbers for old OMC mounts? |
||
|
Lets have a go
56 Starflite 77 SN 78 SN 80 BFN |
||
|
||
|
TRBenj
Grand Poobah

Joined: June-29-2005 Location: NWCT Status: Offline Points: 21213 |
Post Options
Thanks(0)
Quote Reply
Posted: June-23-2011 at 6:35pm |
|
|
Roger, your absolutely right and you probably already know this, but the adjustable mounts in your picture look to be OMC's (not PCM's).
The reason CC was probably able to get away with wedges only in back was that they likely placed the engine down in the boat and did not drill the lag holes until everything was lined up. Having front/back adjustability as well as up/down in the back is probably enough to align it. You would have the same luxury since youre replacing the stringers. |
||
|
||
|
uk 1979 part2
Groupie 
Joined: April-30-2011 Location: UK Status: Offline Points: 71 |
Post Options
Thanks(0)
Quote Reply
Posted: June-23-2011 at 6:23pm |
|
|
If you don’t mind going none original I’m wondering if you could use PCM top mount only Trunnion Assembly part number RA092016 on all 4 mounts these have 1’ inch Trunnions if you have the same easy swap but if you have 7/8 as my Y block then I would get a local shop to spin them down, and if yours are 1’1/8 then a split collar over the PCM would work.
Failing that you could weld up the old lag holes and redrill to fit the trunnion boss that way if you need to gain height to fit onto the stringers just rotate the original trunnions 180’ no more wedges just nuts to set. This how CC fitted Chevy’s back in 78 in my SN would make adjustment easy but if original is your goal then this may be food for thought to others. Oh that fram filter was on it when I got it  I now know better. I now know better.

|
||
|
lets have a go 2
|
||
|
||
|
vondy
Platinum Member
Joined: November-29-2007 Location: Dallas, Texas Status: Offline Points: 1116 |
Post Options
Thanks(0)
Quote Reply
Posted: June-23-2011 at 5:46pm |
|
|
Thanks Pete!
I just got off the phone with Ted, he's sending me 4 of the small ones today. Hopefully I'll get them by Saturday. He suggest the longer ones but those are 9 inches long and I know I didn't leave that much of a notch in my floors for those. So getting the smaller 6 inch ones, pretty much the same length as my last ones. Originally I only had wedges in the back. Not sure how they ever thought you could align it perfectly without some for the front. |
||
|
||
|
8122pbrainard
Grand Poobah
Joined: September-14-2006 Location: Three Lakes Wi. Status: Offline Points: 41045 |
Post Options
Thanks(0)
Quote Reply
Posted: June-23-2011 at 4:08pm |
|
|
David,
Call: Ted Cartner @ 847 395 8902 or Jim Staib @ 815 344 WOOD There are two sizes of the cast iron wedges. You'll most liely want the smaller ones. Yes, when you make a height adjustment to ether the front or back, it's typical to have to adjust the other end as well. |
||
|
||
|
vondy
Platinum Member
Joined: November-29-2007 Location: Dallas, Texas Status: Offline Points: 1116 |
Post Options
Thanks(0)
Quote Reply
Posted: June-23-2011 at 2:59pm |
|
|
I would love anything that is easier to adjust. You say they basically have slots to slide the wedges up and down? That way you don't have to re drill if you have to make an adjustment. You think you could get me some? Before the stringer job I used 4 wedges, two for the front because I could not get the alignment right without adjusting the front.
|
||
|
||
|
8122pbrainard
Grand Poobah
Joined: September-14-2006 Location: Three Lakes Wi. Status: Offline Points: 41045 |
Post Options
Thanks(0)
Quote Reply
Posted: June-23-2011 at 2:53pm |
|
David, Go back with the same size. Before the days of the adjustable engine mount. most boat manufacturers used slotted cast iron wedges. You move them fore to aft for the height adjustment and then there's holes in them so you screw them to the stringer to keep their position. CC went the "less expensive" route with the wood scraps laying around the shop!! The cast irons are around but not made anymore. They usually come from parted out wood boats. I do know a couple people that still have them if that's a option you want to go with. For me, there's really nothing wrong with the wood. The cast ones are just a bit easier to use.
|
||
|
||
|
vondy
Platinum Member
Joined: November-29-2007 Location: Dallas, Texas Status: Offline Points: 1116 |
Post Options
Thanks(0)
Quote Reply
Posted: June-23-2011 at 12:53pm |
|
|
I measured my old lags and they are 1/2 inch diameter and 6 inches long. What do you think Pete? I know you got some wedges on your boat
|
||
|
||
|
TX Wind
Senior Member 

Joined: March-29-2011 Location: near Dallas Status: Offline Points: 335 |
Post Options
Thanks(0)
Quote Reply
Posted: June-22-2011 at 5:55pm |
|
Sure thing David. I just happen to have a spare 600 ton crane sitting around and an extra generator in my backyard. I know what you mean about the wind lately. I thought my Mastercraft was a submarine this weekend. The old S&S Mastercrafts sit extremely low as it is. The nose was constantly under water. I would think the down force on the wedges would be plenty myself. If you use stud bolts you could align first, mark and then drill the wedge. |
||
|
||
|
vondy
Platinum Member
Joined: November-29-2007 Location: Dallas, Texas Status: Offline Points: 1116 |
Post Options
Thanks(0)
Quote Reply
Posted: June-22-2011 at 5:38pm |
|
|
So I just got back from a shop down the street that specializes in screw, bolts, etc. They did not have any hanger bolts in stainless, neither did the hardware store I went to. Don't even see any on McMaster's. There are some here hangers they have 5 and 6 inchers. What size diameter is normal for the mounts? 3/8?
|
||
|
||
|
vondy
Platinum Member
Joined: November-29-2007 Location: Dallas, Texas Status: Offline Points: 1116 |
Post Options
Thanks(0)
Quote Reply
Posted: June-22-2011 at 12:52pm |
|
|
Jeff come put one of those beast in my back yard, with all the wind we have been getting around here I could power most of the area.
Thinking a little more about this idea, it would cause some adjustment issues in the future. You could not adjust the wedges with two anchor bolts sticking out. Unless you cut a slot in the wedges so you could slide them back and forth. But then your relying only on down force of the bolt to hold the wedges in place. Guess I'll stick with regular lags. Or if I could find hanger bolts long enough that would be a better idea. If I pull then engine I can put her right back in without messing the the lags. But if the alignment is off, the lags will still be removable. Thoughts? |
||
|
||
|
TX Wind
Senior Member
Joined: March-29-2011 Location: near Dallas Status: Offline Points: 335 |
Post Options
Thanks(0)
Quote Reply
Posted: June-21-2011 at 1:48pm |
|
|
So there you go David. Pete has just completely over engineered your mounting bolt issue on a reasonable budget. That's the way it should be.
Pete, we are so blessed to have you on this site. You are the rarest form of engineer; anally meticulous and yet practical. In my experience most engineers can't build a shoe box if their mother's life depended on it. But you could give it a helm an engine and a prop. God knew Jesus couldn't be here for a while so he gave us ski boats to walk on water with. Then he gave us Pete to keep us from screwing them up. |
||
|
||
|
TX Wind
Senior Member
Joined: March-29-2011 Location: near Dallas Status: Offline Points: 335 |
Post Options
Thanks(0)
Quote Reply
Posted: June-21-2011 at 1:30pm |
|
|
Some unique perspectives Pete. The little dot on top is a man. Compare the crane hook to him.

Now a close up of the man. 
Talk about balls.....this guy would lean out to the end of his harness and grab the rotor to help guide it in. Mostly so he could see alignment. At nearly 50 tons it's too heavy for him to really move it much. |
||
|
||
|
TX Wind
Senior Member
Joined: March-29-2011 Location: near Dallas Status: Offline Points: 335 |
Post Options
Thanks(0)
Quote Reply
Posted: June-21-2011 at 1:11pm |
|
|
Ahhh...the ones off 41 are on your left. I did not build those but if I remember correctly there were about 80 there. My direct responsibility was for Bluesky/ Greenfields which were actually two farms rolled into one representing 88 turbines off of 151 near Malone. In relative terms the Wisconsin turbines were actually some of the smaller turbines I installed. Only 1.67 MW compared to the more typical 2.1MW and some 2.5MW I had put up. My function was as the Civil Construction Manager which means I was responsible for coordination of all of the construction from the clearing of trees to the erection and final walkdowns excluding tower wiring and substation. I was also indirectly involved with Cedar Ridge which has another 50 turbines or so and is also in the same area.
They are literally beyond the imagination they are so large Pete. I was in constant amazement everyday. |
||
|
||
|
8122pbrainard
Grand Poobah
Joined: September-14-2006 Location: Three Lakes Wi. Status: Offline Points: 41045 |
Post Options
Thanks(0)
Quote Reply
Posted: June-21-2011 at 12:49pm |
|
Jeff, I drive by the farm all the time on my way up north. I'm always amazed at the size of it - from Hwy. 41, you can't see far enough west to even see how far they go. How many are in that farm? |
||
|
||
|
TX Wind
Senior Member
Joined: March-29-2011 Location: near Dallas Status: Offline Points: 335 |
Post Options
Thanks(0)
Quote Reply
Posted: June-21-2011 at 12:40pm |
|
Pete, I was overstating it a bit as a compliment to the fine job he has done on the stringers. I do know that stainless will rust. My father is a marine contractor remember?
However, your suggestion with epoxy setting the bolts is an excellent one. We used epoxy set in the wind industry to set foundation bolts into the bedrock. We tensioned the bolts to 620,000 pounds. I never calculated it but they told me that it would launch a 4.25" Nut about 5 miles if it broke. The thrust vector equivalent at the top is the same as a 757 so the foundation is under a dynamic torquing load in excess of 22,000,000 foot lbs. This often exceeds the compressive strength of even the best concrete, so epoxy bedding is also used to create the foot for the tower and spread the load across the concrete foundation to prevent pulverizing the concrete. Epoxy is some good *************** David. Our field break tests of our epoxy were around 18,000 psi for compressive strength compared to 3000 for the typical sidewalk. By the way Pete. Since you're a Wisconsin boy, I built a couple of the windfarms up by Fond du Lac. I worked for Alliant Energy and we built a windfarm for Wisconsin Energy. Talk about awkward since they are competitors. And cold? You guys have to be kidding me. I'm still defrosting. I'll take a TX 100 over a Wisconsin -20 any day of the week. Oh and for the record Pete, we used a different foundation in Wisconsin. |
||
|
||
|
Post Reply
|
Page <12345 15> |
 Tweet
Tweet
|
| Forum Jump | Forum Permissions You cannot post new topics in this forum You cannot reply to topics in this forum You cannot delete your posts in this forum You cannot edit your posts in this forum You cannot create polls in this forum You cannot vote in polls in this forum |


 Topic Options
 Keeganino wrote: