 Boats For Sale:


Red Check Engine Light |
Post Reply 
|
Page 12> |
| Author | ||||
Otto Throttle 
Senior Member 

Joined: October-02-2017 Location: Cleveland OH Status: Offline Points: 376 |
 Post Options Post Options
") Thanks(0) Thanks(0)
 Quote Reply Quote Reply
 Topic: Red Check Engine Light Topic: Red Check Engine LightPosted: August-13-2023 at 4:33pm |
|||
|
Good afternoon! My 1999, 285 hp normally aspirated powered Nautique pop the red engine light yesterday. I had good oil pressure and the temperature was fine, so I did some research and read on a prior list here that it could be the sensors. Can someone please tell me where those sensors are located so I can troubleshoot and see if that is the cause or if I need to dig deeper.
Yes, the oil is full…. The only thing that was odd was it seemed to take a little longer to come up to temperature. Thank you for your help in advance. I will disconnect one at a time to see if it stops the light from coming on. |
||||
|
Otto
|
||||
 |
||||
|
Air206
Grand Poobah 
Joined: September-28-2008 Location: Roanoke, VA Status: Offline Points: 3000 |
Post Options
Thanks(0)
Quote Reply
Posted: August-13-2023 at 5:03pm |
|||
|
I just had that happen on my 97, ski 176. If you have a carbureted 351 like I do, you will find the oil pressure switch on the front of the engine next to the fuel pump. The temperature switch is located on the top of the engine near the thermostat. The switches, not the senders for the gauges, are responsible for the trouble light.
Replacing the oil pressure switch and oil pressure sender along with cleaning the T fitting of sludge “gave” me 15 psi more oil pressure. YouTube is your friend. |
||||
|
||||
|
Otto Throttle
Senior Member
Joined: October-02-2017 Location: Cleveland OH Status: Offline Points: 376 |
Post Options
Thanks(0)
Quote Reply
Posted: August-14-2023 at 10:55am |
|||
|
Thank you very much, so you are saying replaced both the switch and the sending unit for the gauge? What did you search under YouTube? Thanks again for your help. I appreciate it.
|
||||
|
Otto
|
||||
|
||||
|
Otto Throttle
Senior Member
Joined: October-02-2017 Location: Cleveland OH Status: Offline Points: 376 |
Post Options
Thanks(0)
Quote Reply
Posted: August-14-2023 at 3:58pm |
|||
|
I also would like to know if I should use a loctite or thread sealer when changing out! Thanks for all help! |
||||
|
Otto
|
||||
|
||||
|
KENO
Grand Poobah
Joined: June-06-2004 Location: United States Status: Offline Points: 10680 |
Post Options
Thanks(0)
Quote Reply
Posted: August-14-2023 at 4:57pm |
|||

 Here are a couple of pictures from a recent thread. First one shows the location of the oil pressure sending unit with the blue wire attached and also the oil pressure switch with the red wire attached Second one shows the location of the high water temperature switch with the red wires. The oil sending unit has nothing to do with your check engine light, it feeds the gauge on the dash, so no need to mess with that as long as you have good oil pressure indication. If you unhook the wire from the oil switch and the light goes out, then you have a bad switch. If the light stays on, hook it back up and unhook the wire from the water temperature switch and the light should go out. It'll be one switch or the other causing the problem. Your wires may be a different color like green or some other color. Those in the pictures look like they've been redone at some point in time with the red wires and crimp connectors A little bit of thread sealer isn't a problem to prevent leaks. It's not some kind of super electrical insulator that will keep the pipe threads from making metal to metal contact with the female threads in the engine/manifold. Or in other words, it won't affect the operation of the switches  Lots of replacement sending units/switches come with a little sealer already applied. You also have a water temperature sending unit over on the right side of the engine, directly behind the thermostat housing near the coil. It'll have a tan wire attached to it. No need to mess with that either, it feeds the gauge on the dash and has nothing to do with the red alarm light. PS....you don't need the globs of RTV or whatever it is on those connections either
|
||||
|
||||
|
Air206
Grand Poobah
Joined: September-28-2008 Location: Roanoke, VA Status: Offline Points: 3000 |
Post Options
Thanks(0)
Quote Reply
Posted: August-14-2023 at 5:03pm |
|||
|
My 27-year-old oil pressure gauge sender was original (painted black by PCM). It was in my way for the oil pressure switch replacement and removing it meant that I got to clean the sludge out of the T fitting. It seemed to make sense to throw money at that part "while I'm there".
Not needed but... 40 bucks extra to do it up now and not do it again for a while. I was surprised at the amount of oil sludge in the T fitting and how a change of a "working" sender altered the observed oil pressure. Go figure.  Keno's write up and pics are PERFECT - BTW!
|
||||
|
||||
|
KENO
Grand Poobah
Joined: June-06-2004 Location: United States Status: Offline Points: 10680 |
Post Options
Thanks(0)
Quote Reply
Posted: August-14-2023 at 5:23pm |
|||
Maybe, maybe not On a gt40 which I'm more familiar with in those model years, the hi temperature switch is behind the thermostat housing That's what Air206 said in his post too. So what you should do is, look for the green wires, those go to the dash light |
||||
|
||||
|
Otto Throttle
Senior Member
Joined: October-02-2017 Location: Cleveland OH Status: Offline Points: 376 |
Post Options
Thanks(0)
Quote Reply
Posted: August-15-2023 at 6:28am |
|||
|
Awesome! I didn’t wanna have to do all that, but now I am very excited as I know what to do! Thank you everybody for your time and effort, it’s saved me a ton of time!!!!! I appreciate it!
|
||||
|
Otto
|
||||
|
||||
|
Mpost
Senior Member
Joined: July-05-2018 Location: Monticello, MN Status: Offline Points: 324 |
Post Options
Thanks(0)
Quote Reply
Posted: August-15-2023 at 8:19am |
|||
Not to be picky but with Kens steps it is not mentioned that the engine must be running when the wires are removed.  Ask me how I know!
|
||||
|
84 SN Sold 98 SN Lund Pro V 1975 Alumacraft
|
||||
|
||||
|
KENO
Grand Poobah
Joined: June-06-2004 Location: United States Status: Offline Points: 10680 |
Post Options
Thanks(0)
Quote Reply
Posted: August-15-2023 at 8:30am |
|||
Yeah........what Marty said And if somebody happens to have a gt40 and is looking for sensors, switches, sending units for oil pressure and water temperature, here's a link to a thread by Marty showing locations |
||||
|
||||
|
Air206
Grand Poobah
Joined: September-28-2008 Location: Roanoke, VA Status: Offline Points: 3000 |
Post Options
Thanks(0)
Quote Reply
Posted: August-15-2023 at 10:18am |
|||
Totally agree - I find most of my engine warning light troubles go away when the engine is off! Steve |
||||
|
||||
|
MrMcD
Grand Poobah

Joined: January-28-2014 Location: Folsom, CA Status: Offline Points: 3597 |
Post Options
Thanks(0)
Quote Reply
Posted: August-15-2023 at 2:21pm |
|||
|
When I bought my 1995 GT40 after it had been mostly parked for 19 years it popped the Red flashing light and the engine went into limp mode. Seemed like a big repair coming, I thought I had a major issue. This forum got me up and running right away. Replaced both sensors, Oil and Coolant at that time. No issue since in 9 years. I also did the thermostat while in there.
|
||||
|
||||
|
Otto Throttle
Senior Member
Joined: October-02-2017 Location: Cleveland OH Status: Offline Points: 376 |
Post Options
Thanks(0)
Quote Reply
Posted: August-16-2023 at 5:11am |
|||
|
Lots of great info here… couple of questions on “the job.” I appreciate the pictures!
1) do you have to disconnect the battery? 2) what is best method for removing the sensor? 3) should I spray some penetrating oil and let it sit before trying to remove? Hopefully my parts come by the weekend! Thank you! |
||||
|
Otto
|
||||
|
||||
|
KENO
Grand Poobah
Joined: June-06-2004 Location: United States Status: Offline Points: 10680 |
Post Options
Thanks(0)
Quote Reply
Posted: August-16-2023 at 7:01am |
|||
There's no need to disconnect the battery Quit calling it a sensor, It's an on-off switch For hi temperature it closes at about 200 to 210 degrees and opens when temperature drops to 190 to 200 or so and for oil pressure it closes when pressure drops about 5 psi and opens when pressure gets to 7 or so. They're normally open when the engine is running and either one closing completes the circuit for the check engine light to come on. You can spray some oil if you want but shouldn't really have to. You can use an open end wrench or the box end of the wrench or if you have some deep sockets they'll work good too. No special tools needed.
|
||||
|
||||
|
Otto Throttle
Senior Member
Joined: October-02-2017 Location: Cleveland OH Status: Offline Points: 376 |
Post Options
Thanks(0)
Quote Reply
Posted: August-16-2023 at 8:54pm |
|||
|
Air206…. What did you search for in YouTube to find videos on the switch replacement?
Thanks!!!! |
||||
|
Otto
|
||||
|
||||
|
KENO
Grand Poobah
Joined: June-06-2004 Location: United States Status: Offline Points: 10680 |
Post Options
Thanks(0)
Quote Reply
Posted: August-18-2023 at 7:52am |
|||
|
Umm..........i think you can handle this without a video Otto
|
||||
|
||||
|
Otto Throttle
Senior Member
Joined: October-02-2017 Location: Cleveland OH Status: Offline Points: 376 |
Post Options
Thanks(0)
Quote Reply
Posted: August-19-2023 at 5:25pm |
|||
|
Yup…. You’re probably right! In the “Ol” days I would just go for it and it would work out fine… I miss those days… I am always worried there is some “trick” to doing something… some hack code or secret I don’t know!
Anyhow Nautique parts wants pictures of the parts to make sure they fit |
||||
|
Otto
|
||||
|
||||
|
Air206
Grand Poobah
Joined: September-28-2008 Location: Roanoke, VA Status: Offline Points: 3000 |
Post Options
Thanks(0)
Quote Reply
Posted: August-19-2023 at 5:47pm |
|||
For sure the oil switch above - I just replaced on 97 PCM carbed non-GT 351. Have you figured out which switch is in error yet? BTW - You use a wrench
. I didn't want to say that above for fear of sounding like a jerk, but the oil pressure switch area is very tight to wrench, that's why I took off, cleaned and replaced the gauge sender and the T-fitting. I made it all a little easier and got it all done at once. You can do it, if I can... |
||||
|
||||
|
KENO
Grand Poobah
Joined: June-06-2004 Location: United States Status: Offline Points: 10680 |
Post Options
Thanks(0)
Quote Reply
Posted: August-19-2023 at 9:21pm |
|||
|
For the temperature switch, you have to know which hole it goes in Otto.
If it's in the hole by #5 cylinder (green arrow) it has 3/8 NPT threads and takes part number R020014 If it's in the hole by #1 cylinder right behind the thermostat housing (tan arrow) it has 1/2 inch NPT threads and takes part number R020014A  Switch in one hole, sending unit in the other And like Air206 said the oil switch is R020015A. It's the only one they sell these days, no other choice. I think the rest is up to you and Nautiqueparts |
||||
|
||||
|
1980SN2001
Groupie 
Joined: August-01-2022 Location: Rocklin, CA Status: Offline Points: 96 |
Post Options
Thanks(0)
Quote Reply
Posted: August-20-2023 at 9:40am |
|||
|
Is that some kind of caulking on the terminals for the temperature and oil pressure switch? Is this a common practice in the marine environment?
*EDIT* I just read this: "PS....you don't need the globs of RTV or whatever it is on those connections either" so that answers that question.  Do these switches kill the engine or just light up a warning/red light? I have a 1980 and am interested in installing a temp/oil pressure warning light for those who might be driving my boat on the rare occasion that I get to ski/board behind it lol.
|
||||
|
1980 SN Project
|
||||
|
||||
|
Otto Throttle
Senior Member
Joined: October-02-2017 Location: Cleveland OH Status: Offline Points: 376 |
Post Options
Thanks(0)
Quote Reply
Posted: August-20-2023 at 2:01pm |
|||
|
Hey I have two sensors/switches on the manifold… can I not post pictures from my apple phone????
|
||||
|
Otto
|
||||
|
||||
|
KENO
Grand Poobah
Joined: June-06-2004 Location: United States Status: Offline Points: 10680 |
Post Options
Thanks(0)
Quote Reply
Posted: August-20-2023 at 2:58pm |
|||
You're catching on here Otto, that's been mentioned more than once in this thread. One is the sending unit for your temperature gauge The other is the switch for the dash light. Now go back and read about the colors of the wires attached to each of those. The sending unit which has nothing to do with your problem will have a Tan wire The switch will have a different color wire. That's the one you care about Most anybody can post pictures these days even from a phone if they follow the directions below Steps 1-9 and watch the Youtube video in the link.
|
||||
|
||||
|
KENO
Grand Poobah
Joined: June-06-2004 Location: United States Status: Offline Points: 10680 |
Post Options
Thanks(0)
Quote Reply
Posted: August-20-2023 at 3:42pm |
|||
On a gt40 they turn on the dash light and at the same time, tell the computer to put the engine in SLOW mode often called limp mode, but they don't kill the engine. On the carbureted engines with the same switches, they'll turn on the dash light and nothing else. Then you look at your temperature gauge/oil pressure gauge to see if you have normal readings with a switch malfunction or an actual problem. For your 1980, with a little wire and a couple of switches, a tee for the oil switch, a light and some connectors and a horn if you were so inclined, you could make your own setup for a whole lot less than the cost of the PCM labeled switches at Nautiqueparts. |
||||
|
||||
|
Otto Throttle
Senior Member
Joined: October-02-2017 Location: Cleveland OH Status: Offline Points: 376 |
Post Options
Thanks(0)
Quote Reply
Posted: August-20-2023 at 8:05pm |
|||
|
Alright the slow guy figured it out! Here are pictures I took today....I am a preventative guy so would it be best just to replace them all? LOOKS like a quick job...I have had many of those...experienced comments? Also one last diagnostic to narrow down what switch...the light doesn't light up until the engine is warm than comes on intermittently at an idle, then on. As soon as I get above an idle it goes out...Amateur guess says oil pressure because water temp would increase at higher rpms???? So the green wires go to the Engine Light, and the other two are different colors because they go to different destinations...AKA different gages! Ok....baby steps! You ar very good with the colored arrows corresponding to the wire color! I am NOT worthy...but I am THANKFUL!        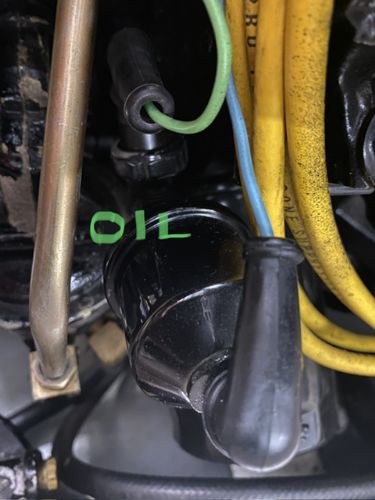
|
||||
|
Otto
|
||||
|
||||
|
KENO
Grand Poobah
Joined: June-06-2004 Location: United States Status: Offline Points: 10680 |
Post Options
Thanks(0)
Quote Reply
Posted: August-20-2023 at 9:49pm |
|||
|
Otto......you're on a roll here
It looks like #1 has a tan wire so it's the temperature sending unit and #5 has a green wire so it's the high temperature switch. It sounds like the oil switch would pretty definitely be the problem based on your description. The oil switch is part # R020015A like mentioned earlier. The temperature switch is part # R020014............there's no A on the end. The one with the A on the end would be for the gt40 switch location which is different than your location. I'd pull the wire from the oil switch, tape the end so it can't ground itself on the block and take the boat for a ride Your light won't come on when you turn the key to the Run position and it shouldn't come on at any time if the oil switch is the issue. If it does come on during the drive, that would point to the temperature switch. Then you can decide whether you want to replace both switches or just the bad one. I wouldn't mess with either sender if you have good, normal oil pressure and temperature readings on your gauges. PS.........if you hit the space bar between pictures, they won't all run together
|
||||
|
||||
|
Otto Throttle
Senior Member
Joined: October-02-2017 Location: Cleveland OH Status: Offline Points: 376 |
Post Options
Thanks(0)
Quote Reply
Posted: August-20-2023 at 10:01pm |
|||
|
Love this place….. really do!!!!!! I will try that… have friends coming this weekend just wanted to avoid looking bad!!!!!
Source for water pump impeller? I’m stocking up on spark plugs and oil filters for my wife’s jet ski, and I mine as well get an impeller! One can’t have too many projects!!! Lol Thx! |
||||
|
Otto
|
||||
|
||||
|
KENO
Grand Poobah
Joined: June-06-2004 Location: United States Status: Offline Points: 10680 |
Post Options
Thanks(0)
Quote Reply
Posted: August-21-2023 at 7:29am |
|||
|
Since you're getting the switch(s) from Nautiqueparts, why not just tack on a Sherwood 9959K impeller kit to your order.
And don't forget to use the not too well publicized PND discount code for a 10% discount on the order |
||||
|
||||
|
Otto Throttle
Senior Member
Joined: October-02-2017 Location: Cleveland OH Status: Offline Points: 376 |
Post Options
Thanks(0)
Quote Reply
Posted: August-23-2023 at 9:02am |
|||
|
Thank you, Keno! Is there a reference somewhere on the forums for the wiring diagram for my boat? I would like to print it out if there is and put it in my maintenance binder. Yes you heard correct a maintenance binder. I run all my stuff just like an airplane. I log all the maintenance hours parts and costs. The person that buys the boat after me Either be very impressed, or wonder how in the world it could be so much documentation for a boat!
|
||||
|
Otto
|
||||
|
||||
|
1980SN2001
Groupie
Joined: August-01-2022 Location: Rocklin, CA Status: Offline Points: 96 |
Post Options
Thanks(0)
Quote Reply
Posted: August-23-2023 at 11:14am |
|||
Thanks for the info KENO! I was on Nautique Parts website looking at the switches mentioned in this thread and I saw they sell a temp/oil pressure switch and buzzer kit for about the price of one of the other switches. I need to know the thread size on the temperature switch before I can order it but I'm thinking about going that way along with an alarm indicator light they sell. They also sell the oil pressure tee fitting, so conveniant! Any reason I shouldn't get the alarm kit and just stick with the parts you listed instead? Kit SKU# 6257 https://nautiqueparts.com/alarm-buzer-low-oil-overheat-system/
|
||||
|
1980 SN Project
|
||||
|
||||
|
KENO
Grand Poobah
Joined: June-06-2004 Location: United States Status: Offline Points: 10680 |
Post Options
Thanks(0)
Quote Reply
Posted: August-23-2023 at 12:05pm |
|||
|
In the picture below you'll have to figure out where your temperature sender is and use the other hole that would have a pipe plug in it. Your 80 probably has the sender in the hole with the Tan arrow, so you'll want a 3/8 NPT alarm switch to fit in the other hole with the Green arrow. The kit should work, you'll have to verify with Nautiqueparts the size of the temperature switch threads in the kit. You can also find the same kit from Sierra, SeaStar Solutions, Recmar and others for various different and of course lower prices Here's an example in the link  and the T is easy to find also and the T is easy to find alsoAnd a link to the T, you can find them locally too at an auto parts store, hardware store
|
||||
|
||||
|
Post Reply
|
Page 12> |
 Tweet
Tweet
|
| Forum Jump | Forum Permissions You cannot post new topics in this forum You cannot reply to topics in this forum You cannot delete your posts in this forum You cannot edit your posts in this forum You cannot create polls in this forum You cannot vote in polls in this forum |


 Topic Options
 Air206 wrote: