 Boats For Sale:


Acceleration issues. |
Post Reply 
|
Page <1 4567> |
| Author | |
KENO 
Grand Poobah 
Joined: June-06-2004 Location: United States Status: Online Points: 10651 |
 Post Options Post Options
") Thanks(0) Thanks(0)
 Quote Reply Quote Reply
 Posted: October-03-2023 at 7:49am Posted: October-03-2023 at 7:49am |
|
You're supposed to show up after all this time and say something like "the boat runs great, the GF is all smiles" but no, you have this news instead
 Since you've checked and/or replaced most everything including the carburetor and distributor and still have the same problem, going back to post #1 you mention a Holley wedge adapter. Is that on top of the stock 1 inch adapter or did it replace the stock adapter? I can't quite tell from the picture you had posted back then.  You also mentioned not using the wider PCM gaskets, did you ever go to the wider gaskets along the way?
|
|
 |
|
|
AZ86SKI
Senior Member 
Joined: July-05-2022 Location: Phoenix, AZ Status: Offline Points: 115 |
Post Options
Thanks(0)
Quote Reply
Posted: October-03-2023 at 8:50pm |
|
That was the plan KENO, I apologize, especially after such a long delay in getting it back on the water for a test. I did however catch a glimpse of a couple of grins from her after a number of restarts without issue. Not to mention a smooth return to the dock. We are close.
 Now to my homework. I will attach a close up photo of what is on there now. I replaced both the gasket on top of the wedge plate and the one under the wedge plate. I can't recall if I got the PCM gaskets or used what came with the new QF carb. I know we discussed it but I just can't recall. I do know that the gasket between the carb and the ge plate is a thick gasket. The one under the wedge plate is not as thick for sure. Under the wedge gasket may be another riser but I can't quite tell. It looks like it has more of a casting mark around it then it actually separates. I never removed it and if I recall correctly it was threaded where I mounted my new studs for the new QF. Maybe the photo will help. I know I spent a significant amount of time with carb cleaner and even some propane looking for a vacuum leak in those areas with no luck, but it doesn't mean I didn't miss one. Thanks again for the help and let me know what you think. The photo may come out sideways...we will see...but it should give you a better look.  |
|
|
|
|
AZ86SKI
Senior Member
Joined: July-05-2022 Location: Phoenix, AZ Status: Offline Points: 115 |
Post Options
Thanks(0)
Quote Reply
Posted: October-03-2023 at 8:57pm |
|
Sorry, I forgot to address a couple other questions as well. They did replace the Ignition Module when I sent it back to DUI since that was one of our primary concerns then as well. Regarding the tach gauge, it appears to be close at lower rpms and having prior boats it really doesn't feel like we are getting into the high 4000's or to 5000 but that is just based on my experience and nothing technical or tested.
|
|
|
|
|
MrMcD
Grand Poobah

Joined: January-28-2014 Location: Folsom, CA Status: Offline Points: 3592 |
Post Options
Thanks(0)
Quote Reply
Posted: October-04-2023 at 2:31am |
|
Glad it works well enough to at least go boating again. What MPH are you seeing, if the speedometers are working. If not GPS on your phone may get you a close measurement. 30 MPH usually is very close to 3,000 RPMs unless someone changed your prop for work in a short ski course.
FYI: when my wife first drove the 95 Nautique we have now we were buzzing down the lake fully loaded with camping gear. I asked her if she was in a hurry, she looked at me like I was asking a stupid question. I said you are spinning 4,200 RPM, she was shocked and backed it down a little. Water was smooth, boat ran smooth, she was hauling at high RPM and had no idea. Gave me a good laugh.
|
|
|
|
|
KENO
Grand Poobah
Joined: June-06-2004 Location: United States Status: Online Points: 10651 |
Post Options
Thanks(0)
Quote Reply
Posted: October-04-2023 at 7:39am |
|
I'd say you have a spacer o top of a spacer there.
This quote from the post on the QF installation kinda backs that up also, with the mention of 3 1/2 inch studs at the rear of the carburetor You'd only need 3 1/2 inch studs with 2 spacers.
Nothing terrible about using 2 spacers, but the picture sure looks like original paint not only on the original spacer but also the gasket edges..............like the gasket is original and never been off/replaced. That gasket between the spacer and the manifold can cause plenty of issues if it's bad and it won't show up as an external easy to find vacuum leak either I'd get 2 of the PCM RM0054B gaskets and remove the spacer and replace the gaskets above and below the spacer. I've had those spacers come off real hard at times and real easy at others, but you should get it off and replace the gasket. It may or may not cure your issue, but nothing else has either Here's a link to a recent thread with pretty similar issues that were fixed by replacing the old gasket under the spacer |
|
|
|
|
MourningWood
Gold Member 
Joined: June-13-2014 Location: NorCal Status: Offline Points: 886 |
Post Options
Thanks(0)
Quote Reply
Posted: October-04-2023 at 11:20am |
Agree, as it looks as though the PCV nipple is below the wedge, and on a spacer as was usual on Commanders of the day.
|
|
|
1994 Ski Nautique "Riot"
1964 Dunphy X-55 "One 'N Dun" 'I measured twice, cut three times, and it's still too short!" |
|
|
|
|
AZ86SKI
Senior Member
Joined: July-05-2022 Location: Phoenix, AZ Status: Offline Points: 115 |
Post Options
Thanks(0)
Quote Reply
Posted: October-04-2023 at 11:49am |
|
Well...that is something that definitely needs to be addressed. Especially since it is a 37 year old gasket with original paint. Great catch! What I documented regarding the stud threads versus what I recall definitely support that as well. I have spent so much time starring at this motor that I am beginning to second guess myself at this point. Whether it is ultimately the solution or not it needs to be addressed and gaskets are way cheaper than new carburetors and distributors.
Although this boat absolutely needed those as well. Thank you for the link as well. Very similar issues and hoping for similar results.I will get those ordered today and they are all getting replaced. I will also try to remember to take a few photos of the old ones for reference when replacing. Thanks again, I really appreciate it.
|
|
|
|
|
AZ86SKI
Senior Member
Joined: July-05-2022 Location: Phoenix, AZ Status: Offline Points: 115 |
Post Options
Thanks(0)
Quote Reply
Posted: October-11-2023 at 4:43pm |
|
The new gaskets arrived and I decided to tackle this latest project with the carb spacer and the original gasket. The bottom spacer came off relatively easily and mostly in one piece, which I was pretty surprised. There was some fuel moisture under the bottom spacer on top of the manifold. I can't imagine that is a good thing. I cleaned the spacer the best I could but noticed a small rock to it when I laid it on a flat surface. Even though the rock was very slight and it had what appeared to maybe be some rust, I decided to drop it off at a machine shop and let them do their thing to make it right. They just called and it's good to go. Here are a few photos for reference. This is something that absolutely needed to be addressed and I am hoping this will solve the remaining issue. Thanks again for all the help.
Bottom of spacer with original gasket attached. Manifold. On the bottom of the photo is where it was a little wet.  |
|
|
|
|
AZ86SKI
Senior Member
Joined: July-05-2022 Location: Phoenix, AZ Status: Offline Points: 115 |
Post Options
Thanks(0)
Quote Reply
Posted: October-11-2023 at 6:08pm |
|
Just a few quick photos of the spacer after the machine shop. Quite a difference and well worth the 60 bucks in my opinion.
. |
|
|
|
|
AZ86SKI
Senior Member
Joined: July-05-2022 Location: Phoenix, AZ Status: Offline Points: 115 |
Post Options
Thanks(0)
Quote Reply
Posted: October-13-2023 at 2:47pm |
|
I got the original spacer put back in with two new gaskets that KENO recommended. I deleted the additional wedge spacer on top. So just the carb and the original spacer now. When KENO stated that two spacers isn't terrible, I'm pretty sure he also meant it wasn't great either.
I hooked it up to the hose and fired it up. It definitely sounded different. It sounded like it was loping/stumbling a bit. So something changed with the new gaskets. I hooked up the vacuum gauge to the PCV line to the back of the carb and what used to be in the steady-ish 15 range was now bouncing around down to 11. Since the last person to mess with the air/fuel mixture screws was the one who provided the "jumped a tooth theory" I decided to return them both to 1 and 1/2 turns out. I apologize in advance KENO. I know this in not something a novice should be attempting. However, in keeping the vacuum gauge attached and working back and forth equally I was able to get a steady 15 and almost 16 on the gauge. This is with both turned out 3/4 of a turn. The best it has ever been. It idles much better and throttle response is great. I also re-checked timing and it is still steady at 10 BTDC. So here is my question. Is 3/4 of a turn out on both too lean to run or am I ok if that is where it idles best in neutral? I just want to make sure I am am still within the range of not causing anymore damage anywhere. Thanks
|
|
|
|
|
MrMcD
Grand Poobah
Joined: January-28-2014 Location: Folsom, CA Status: Offline Points: 3592 |
Post Options
Thanks(0)
Quote Reply
Posted: October-13-2023 at 8:22pm |
|
In the old days we always hooked up a vacuum gauge and adjusted the idle mix screws for max vacuum so I think you did great. One warning, boats like to be a little richer at idle which helps when you drop it in gear, if the idle is lean it will stall as it goes into gear on the water. The prop puts a pretty good load on the engine. I mention this because you might find you need to play with it on the water in gear to get it where you want it.
If it works fine as you already adjusted it relax and enjoy as is. If it is stalling tweak it a little. Edit: by removing the Wedge you might throw off your float adjustments in the carb, the wedge is there to help keep the carburetor more level so it works better on the water.
|
|
|
|
|
KENO
Grand Poobah
Joined: June-06-2004 Location: United States Status: Online Points: 10651 |
Post Options
Thanks(0)
Quote Reply
Posted: October-14-2023 at 8:18am |
Ford, Holley, PCM, Correct Craft didn't see any need for an angled spacer when his boat was built and there's still no need for it  Plenty of people have bolted on a new Quick Fuel or Holley without needing an angled spacer whether their engine was angled about 15 ish degrees or pretty level |
|
|
|
|
AZ86SKI
Senior Member
Joined: July-05-2022 Location: Phoenix, AZ Status: Offline Points: 115 |
Post Options
Thanks(0)
Quote Reply
Posted: October-14-2023 at 10:37am |
|
I did check the float levels when I re-installed the carb and they are both set to the halfway point in the sight windows.
Since I didn't hear any objections to the air/fuel mixture settings, I'm going to run it to WOT on the lake and come what may.
The plan is a lake test tomorrow and hopefully with good news to report. Thanks again for all the help. |
|
|
|
|
MrMcD
Grand Poobah
Joined: January-28-2014 Location: Folsom, CA Status: Offline Points: 3592 |
Post Options
Thanks(0)
Quote Reply
Posted: October-14-2023 at 12:52pm |
|
The Commander engine in the photo a couple posts back seems to be at more angle than most? Maybe I am just used to looking at the newer mountings with the 1.23 tranny that allows the engine to be mounted more level.
|
|
|
|
|
Gary S
Grand Poobah

Joined: November-30-2006 Location: Illinois Status: Offline Points: 14096 |
Post Options
Thanks(0)
Quote Reply
Posted: October-14-2023 at 1:46pm |
|
I think your getting used to looking at the newer engines and trans. I believe the older setups were all at 12 degrees across all makes but not positive. Here is an old picture of my HM they did use a wedge
 |
|
|
|
|
AZ86SKI
Senior Member
Joined: July-05-2022 Location: Phoenix, AZ Status: Offline Points: 115 |
Post Options
Thanks(0)
Quote Reply
Posted: October-16-2023 at 11:33am |
|
Well, I have some good news, some not so good news and have discovered a possible solution after a test run at the lake.
The good news is that it started up right away and after only a few small adjustments it was idling great. I know I reported last time that it idled out smoothly, but there was a significantly improved difference and it was even smoother this time. Changing those gaskets made a big difference. The not so good news is that when I throttled up the same problem showed up and it would not go over 2300 RPM range. It even felt like I may have lost a few RPM from the last time. So we decided to enjoy the day at the lake under 2300 RPM. After a number of easy re-starts, on the final start it turned over a bit slow but started and I heard a quick faint buzz of the alarm. I checked the gauges and the volt gauge was reading 11. So I assumed that was going to be that last time the boat was going to start and we headed back to the dock. It maintained a reading of 11 on the way back. I checked the battery when I returned home and it was reading 12.7 just FYI. So here is my thought on a possible solution. I don't recall really keeping an eye on the volt gauge during this process. So it is possible that the alternator has been failing all along. I have always given the battery a full charge before heading out. In giving it some thought, I recalled in the DUI distributor instructions some language about voltage. So I did some research and found in some DUI instructions that "**NOTE: These distributors require alternator voltage of approximately 14.5 volts for maximum RPM operation." So I reached out to DUI this am and they confirmed that is the case. Without the higher voltage the engine would experience backfire or "flatten out" at higher RPMs. I explained my symptoms and they thought that may explain my issues as well. Any thoughts? So time to repair/replace the alternator. Might as well...seems like we have repaired/replaced everything else. Can these alternators be rebuilt for these Commander packages? If so, any recommendations on who? I found that SKIDIM sells one #RA097006 that can be adapted with one inch spacers for the Commanders. Any thoughts either way?On a funny side note. After we had trailered the boat out and were squaring things away. A gentleman came over and was admiring the boat and saying how he really enjoyed these boats and that he had one just like it. The GF stated "Was this one yours?" to which he said "No". I was like... good answer my friend. |
|
|
|
|
KENO
Grand Poobah
Joined: June-06-2004 Location: United States Status: Online Points: 10651 |
Post Options
Thanks(0)
Quote Reply
Posted: October-16-2023 at 7:23pm |
|
I think that before you get too excited, you should check the voltage at the alternator output and at the battery with the engine running at a couple thousand RPM and see what you have for readings. Check voltage right at the distributor also
You can do this on the hose Fill in the blanks Alternator output volts ------------- Battery volts-------------- Distributor supply volts............. The dash gauge has a good chance of being inaccurate 12.7 at the battery when you got home sounds pretty good if the engine was off when you checked it at home. If you want to get a new alternator, punch that PCM number into Google and find the same thing for about half of the Discount? Inboard Marine price and spend the other half on something for the GF. .....or ask here for a link to one of these outfits.Either way, there'll be some wiring changes. They're just selling you an aftermarket version of the original Motorola/Mando from the 80's, 90's at a not exactly discount price unlike some places that actually give you a good deal.
|
|
|
|
|
AZ86SKI
Senior Member
Joined: July-05-2022 Location: Phoenix, AZ Status: Offline Points: 115 |
Post Options
Thanks(0)
Quote Reply
Posted: October-17-2023 at 10:05am |
|
Thank you KENO. Some additional homework definitely sounds like the wisest path forward. I will hold off on purchasing a new alternator until we know more. I will fill in the blanks and see what we get. It may take me a week or so to get to it but I will get it done. Thanks again for all the help.
|
|
|
|
|
63 Skier
Grand Poobah

Joined: October-06-2006 Location: Concord, NH Status: Offline Points: 4232 |
Post Options
Thanks(0)
Quote Reply
Posted: October-17-2023 at 12:08pm |
|
You mentioned you saw a reading of 11 on the way back while running. Did you happen to notice the voltage reading when you first started up when launched? Was it ever reading around 14, or at least 13 plus? I agree with Ken the gauge could be reading incorrectly, but if you were seeing the 14 plus you'd expect and then later it was down to 11 that would be a pretty strong indication the alternator isn't charging. Unless it's a wiring issue.
|
|
|
'63 American Skier - '98 Sport Nautique
|
|
|
|
|
AZ86SKI
Senior Member
Joined: July-05-2022 Location: Phoenix, AZ Status: Offline Points: 115 |
Post Options
Thanks(0)
Quote Reply
Posted: October-17-2023 at 7:36pm |
|
I don't recall checking the voltage meter at start up. I haven't really paid much attention to it since no alarms etc. Not to mention everything else that I have been focused on with this boat.
So I cant say if it has ever registered in the 13-14 range, I know it was working but just not the exact range. Definelty something I need to keep an eye on in the future. The battery did read 12.7 volts with the boat off when I returned home. I will start checking the different voltage readings and see what we get. Thanks.
|
|
|
|
|
KENO
Grand Poobah
Joined: June-06-2004 Location: United States Status: Online Points: 10651 |
Post Options
Thanks(0)
Quote Reply
Posted: October-18-2023 at 8:02am |
12.7 at the battery, engine off and back at home tells me that your alternator is working, but do those checks mentioned earlier anyways. Something else tells me that DUI is blowing smoke up a certain part of your anatomy
|
|
|
|
|
63 Skier
Grand Poobah
Joined: October-06-2006 Location: Concord, NH Status: Offline Points: 4232 |
Post Options
Thanks(0)
Quote Reply
Posted: October-18-2023 at 10:47am |
|
But was the 12.7 at home engine off on the dash gauge, or with a meter? I was assuming you were looking at the same gauge that read 11 volts while running. If you saw the 12.7 with a meter then I tend to agree with Ken (always a good strategy anyway  ) but if on the gauge I'd still suspect the charging system. ) but if on the gauge I'd still suspect the charging system.John, when the guy admiring your boat said "no" in answer to your gf, the only thing better would have been if he said "no, mine had a bunch of running problems I had trouble fixing so I dumped it".
|
|
|
'63 American Skier - '98 Sport Nautique
|
|
|
|
|
AZ86SKI
Senior Member
Joined: July-05-2022 Location: Phoenix, AZ Status: Offline Points: 115 |
Post Options
Thanks(0)
Quote Reply
Posted: November-15-2023 at 1:56pm |
|
My apologies for the delay in getting the blanks filled in, most of the blanks anyway
, regarding the electrical readings. The battery was charged overnight and read 12.79 volts with the boat off. The boat started quite easily and easy re-started as well. The throttle response was also excellent, so hopefully those issues are behind me/us. With the boat idling... the battery read 13.61 volts. The power supply line to the distributor read 12.5 volts. The voltage gauge on the dash read 12 volts and slowly climbed to 13 volts while idling. With the engine revved to about 2000 rpm, the battery showed 14.04 volts. I was unable to get a reading at the back of the alternator. There are three wires. Red, green and black coming off the back of the alternator. The black wire connection was located on the back side in a tight spot, and with the belts running, I decided to pass on trying to get voltmeter on that negative post wire. I did attach the to the red post wire connection and tried to ground onto something else with the negative lead but it was giving me some strange numbers, and electrical not being my best subject, I thought I would check with you guys with what we have so far. Open to any advice on getting a reading on the alternator if still needed. That negative wire on the alternator is in a pretty tight spot. I did notice that the voltage gauge on the dash would go from about 12.5 on the dash at idle down to 12 or so when I revved the engine. No a huge drop but it definitely a repeated drop when revved. I am not sure if that is normal. I am hoping it is a symptom of a drop of voltage at a higher rpm possible associated with larger problem of trying to get higher rpms on the water, but that is likely wishful thinking on my part. I am confused how I am getting different readings at home on the trailer than the last trip to the lake. Although, with this boat I guess nothing surprises me anymore. Any thoughts or suggestions would be greatly appreciated. Thanks again for all the help. |
|
|
|
|
KENO
Grand Poobah
Joined: June-06-2004 Location: United States Status: Online Points: 10651 |
Post Options
Thanks(0)
Quote Reply
Posted: November-15-2023 at 8:10pm |
|
The voltage drop on the dash gauge shouldn't be happening.
I'd check to see if the same drop is happening at the battery positive terminal when you rev it up above 2000 rpm. The negative terminal grounding the case to the block is kinda redundant since the case is grounded through it's mounting bolts and the bracket to the block. With the engine off hook up the meter and check for roughly zero ohms resistance between the ground terminal and a good clean ground point on the block. What kind of funny readings were you getting at the Red output terminal? Was it fluctuating up and down and not a steady reading? I looked for a picture in this thread where the alternator might have photobombed it's way into the picture, but didn't see one. Do you know what brand it is or maybe you can post a picture Kinda hard to get a picture of the back, but that would be real helpful.
|
|
|
|
|
MrMcD
Grand Poobah
Joined: January-28-2014 Location: Folsom, CA Status: Offline Points: 3592 |
Post Options
Thanks(0)
Quote Reply
Posted: November-16-2023 at 2:55am |
|
From your voltage readings it sounds like your alternator is putting out voltage perfectly and is getting that voltage to your battery. That tells you the battery positive and negative have good connections and cables to the engine and alternator. Starter gets full power and spins your engine normally. Sounds like your issue is the ground at the dash or positive feed wire to the dash. Maybe one of the dash components has a problem grounding internally? Maybe your Volt gauge is just bad? Check voltage with your Volt Meter at the volt gauge to verify. I can't say about your boat buy my 95 dash is a little odd in my way of thinking. They piggy back the grounds from gauge to gauge so if the one loses its ground every gauge after that in line loses its ground. Nautique used one small wire, maybe 16 gauge and all the gauges/accessories pull ground off that wire, It works fine most of the time, I just don't like the way they did it. Many have reported gauge issues due to the wiring method. I melted my cigarette lighter once using a Million candle power spot light for navigation. When I repaired that I added a much heavier back up ground and heavier hot wire to the lighter and tied it into the gauges so it no longer overheats when exposed to a heavy amp draw and the gauges all have a stronger back up ground. ( the spot light now works fine). Also added a couple USB charging plugs while in there, seems like everyone entering the boat has a phone that needs charged these days.
|
|
|
|
|
63 Skier
Grand Poobah
Joined: October-06-2006 Location: Concord, NH Status: Offline Points: 4232 |
Post Options
Thanks(0)
Quote Reply
Posted: November-16-2023 at 5:30am |
|
I wondered about dash wiring, and specifically grounds, as well. John, at this point the boat is starting and running and idling well, it's just a worry about voltage possibly dropping over time while running, and/or the ability to re-start after running for a while? Mark, where did you put your usb ports, did you add a socket next to the cigarette lighter or just leave pigtails under the dash? I really should add ports to mine as well.
|
|
|
'63 American Skier - '98 Sport Nautique
|
|
|
|
|
MrMcD
Grand Poobah
Joined: January-28-2014 Location: Folsom, CA Status: Offline Points: 3592 |
Post Options
Thanks(0)
Quote Reply
Posted: November-16-2023 at 12:04pm |
|
David, I use the center dash Ice Chest/ storage box for general storage. I plugged 2 USB ports inside this box on the upper right hand side looking in from the opening. They are out of the way and allow charging phones or iPads while all cables and the device are inside the storage box.
|
|
|
|
|
AZ86SKI
Senior Member
Joined: July-05-2022 Location: Phoenix, AZ Status: Offline Points: 115 |
Post Options
Thanks(0)
Quote Reply
Posted: November-16-2023 at 1:53pm |
|
Thank you for the quick replies, especially while I still had the boat pulled out and still hooked up on the hose.
First, I wanted to address 63 Skier's question. I know this is getting to be a long post to follow with all the past issues. The last trip to the lake was after replacing the original gasket under the carb which greatly improved starting, idling, re-starts and even better throttle response. This just left the last remaining issue of not being able to get the boat over about 2500 rpm under load. Then this electrical issue arose with the final start at the lake being weak and the voltage meter reading 11 volts all the way back to the dock. So the issue of not getting over 2500 rpm under load remains along with these new electrical questions. I hope that answers what you were asking and thanks again for the help. So here is what my homework revealed... With the boat off, the battery read 12.73 volts. I then ran an ohms check between the black wire post on the alternator and the main ground on the engine block. It read 0.00. I am assuming that's what we were looking for. With the boat running at idle, the voltage gauge on the dash read about 13 volts. The battery read about 14 at idle. When I revved the engine the voltage gauge on the dash dropped to about 12.5 but the battery jumped from 14 to 14.08 or so. So, something is not accurate here, my guess is the dash gauge but that is just a guess. I did not take any readings under the dash yet. Again with the engine running at idle, with the positive lead from the multimeter attached to the red wire connection at the back of the alternator and the negative lead to the main ground on the engine block the readings constantly fluctuated between 4.44 volts up to 5.64 volts. I have no idea if this is good or bad. Here are a few photos of the alternator for reference. I also failed to mention in my last post that there is also a light blue wire connected to the back of the alternator as well. It's a larger gauge and appears it may be the same wire that runs to the breaker. Just FYI.   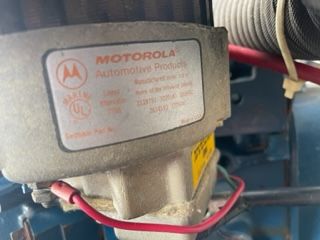 Hopefully this is helpful in determining whether we have an electrical issue or not. I did however learn how to test ohms on a multimeter, assuming I even did it correctly
. Any thoughts? Thanks again for the help. |
|
|
|
|
MrMcD
Grand Poobah
Joined: January-28-2014 Location: Folsom, CA Status: Offline Points: 3592 |
Post Options
Thanks(0)
Quote Reply
Posted: November-16-2023 at 3:09pm |
|
The main wire from your alternator to the battery should be a large wire. The alternator even on an old boat will probably put out 45 AMPs to charge your battery and maintain the system. That main wire has to be large enough to handle 45 amps, it might be a 6 foot long wire and the ability to carry amps drops based on how long the wire is, longer runs need a larger wire to produce the same results. I am thinking you might need a #10 wire from the alternator to the Battery. The other wires activate the alternator and do not carry large amp loads but the charging wire needs to be heavy.
You could make sure all the connections are clean and tight on the rear of the alternator but it seems to be working so far. First sign the wire is not large enough would be that wire getting warm or even hot while the alternator is charging the battery. The entire gauge cluster can be taken out for inspection and give access to those wires in the back of it.
|
|
|
|
|
KENO
Grand Poobah
Joined: June-06-2004 Location: United States Status: Online Points: 10651 |
Post Options
Thanks(0)
Quote Reply
Posted: November-16-2023 at 4:55pm |
|
I think that you might need to take the alternator off of the engine to tell what the terminals are labeled and which color wire goes where.
But in the meantime, take your multimeter and check the voltage at the light blue big wire. Pretty much guarantee you'll find about the same voltage as battery voltage, cuz it's the heavy output wire that goes from the alternator to the breaker as you mentioned and from there it goes to the solenoid on the back of the engine (near the breaker) and hooks to the same terminal as the battery cable that goes from the battery to the solenoid. That makes your charging path It also explains why you have some fluctuating readings on the Red wire since it's not the alternator output. That red wire may be on an AC tap and if you put your multimeter on AC volts and check your voltage on the Red wire with the engine running, it probably won't be fluctuating and you'll have a steady AC reading.. Where that red wire goes seems to be a mystery right now, so like mentioned earlier, the best thing you can do is mark what wires are where and take the alternator off for some good clear pictures of the back and follow the wires to the other end wherever it might be...especially the Red wire. That Red wire definitely has that "homegrown " look to it. (The crimp on the ring terminal isn't factory original.) There's no good wiring diagram floating around for a 1986 Commander 351, unless someone pops up in this thread with one. Why there's a big Blue wire on the alternator output instead of the industry standard Orange is another mystery PS........the picture below shows some fairly ugly wiring around the unused ballast resistor, maybe a picture of that wiring from above would be good too. |
|
|
|
|
Post Reply
|
Page <1 4567> |
 Tweet
Tweet
|
| Forum Jump | Forum Permissions You cannot post new topics in this forum You cannot reply to topics in this forum You cannot delete your posts in this forum You cannot edit your posts in this forum You cannot create polls in this forum You cannot vote in polls in this forum |


 Topic Options
 AZ86SKI wrote: