 Boats For Sale:


Steering Cable Replacement with Pictures |
Post Reply 
|
Page 12> |
| Author | |
Bri892001 
Grand Poobah 

Joined: September-27-2008 Location: Boston MA Status: Offline Points: 4947 |
 Post Options Post Options
") Thanks(1) Thanks(1)
 Quote Reply Quote Reply
 Topic: Steering Cable Replacement with Pictures Topic: Steering Cable Replacement with PicturesPosted: August-12-2013 at 12:51am |
|
I replaced the Steering Cable on my 1993 Ski Nautique. I tried to take as many pictures as possible as I did it.
1st, remove the back seat... unless you don't have one:  Then remove the engine cover. There are pull pins inside the cover that release the hinges, then you can slide it back. This is one of the main parts where you need a helper: 
|
|
 |
|
|
Bri892001
Grand Poobah
Joined: September-27-2008 Location: Boston MA Status: Offline Points: 4947 |
Post Options
Thanks(0)
Quote Reply
Posted: August-12-2013 at 12:53am |
|
Pins removed:
 Engine Cover removed:  Floor behind engine cover can come right up then:  |
|
|
|
|
Bri892001
Grand Poobah
Joined: September-27-2008 Location: Boston MA Status: Offline Points: 4947 |
Post Options
Thanks(0)
Quote Reply
Posted: August-12-2013 at 12:58am |
|
The clamp block holding the tube. The cable slides out of the tube upon removal. First you have to undo the big nut. The clamp holds the tube. Actually, do NOT loosen the clamp bolts, because they will hold the tube from moving while you undo the big nut.
Really, I never touched the clamp block. This is where you adjust how far left or right your rudder will turn. The tube moves within the block. I didn't wind up changing it at all:  The end of the cable acting on the rudder arm (tiller?). Just undo the bolt/nut that is facing horizontal, and the end of the steering cable will come free of the tiller: 
|
|
|
|
|
Bri892001
Grand Poobah
Joined: September-27-2008 Location: Boston MA Status: Offline Points: 4947 |
Post Options
Thanks(0)
Quote Reply
Posted: August-12-2013 at 1:00am |
|
The big nut is now un-done from the tube, which is held by the clamp block:
 Closer angle of same. "Macro" setting on camera: 
|
|
|
|
|
Bri892001
Grand Poobah
Joined: September-27-2008 Location: Boston MA Status: Offline Points: 4947 |
Post Options
Thanks(0)
Quote Reply
Posted: August-12-2013 at 1:02am |
|
The helm side. 4 bolts hold the rack onto the helm gear:
 The rack is now undone:  |
|
|
|
|
Bri892001
Grand Poobah
Joined: September-27-2008 Location: Boston MA Status: Offline Points: 4947 |
Post Options
Thanks(0)
Quote Reply
Posted: August-12-2013 at 1:07am |
|
I used an electrical wire snake instead of a rope to follow the rudder end of the cable through the bilge. I had it from doing wiring. The nice thing is that it kind of clipped into the bolt hole in the cable. Also, you can poke it through the bilge if you happen to pull it out to far... which I did.
   |
|
|
|
|
Bri892001
Grand Poobah
Joined: September-27-2008 Location: Boston MA Status: Offline Points: 4947 |
Post Options
Thanks(0)
Quote Reply
Posted: August-12-2013 at 1:11am |
|
At this point, you're ready to thread the new one back through. Another place where my girlfriend's help was greatly appreciated:
 This is the rudder end of the new cable coming through. You can see from the beat up electrical tape, it had a rough trip, but it really didn't fight us too much. I used the tape to try and cover over the hook end of the wiring snake so it wouldn't snag. It went through smoother than I expected all in all: 
|
|
|
|
|
Bri892001
Grand Poobah
Joined: September-27-2008 Location: Boston MA Status: Offline Points: 4947 |
Post Options
Thanks(0)
Quote Reply
Posted: August-12-2013 at 1:14am |
|
The new helm end came wrapped in a plastic bag. I left it on there so I wouldn't track grease all over the boat until I was ready to fasten it:
 It's nice to have someone holding the rack up to the helm for you while you catch/thread/tighten the bolts: 
|
|
|
|
|
Bri892001
Grand Poobah
Joined: September-27-2008 Location: Boston MA Status: Offline Points: 4947 |
Post Options
Thanks(0)
Quote Reply
Posted: August-12-2013 at 1:21am |
|
Figures my 7/16th Gearwrench decided to play hide and go seek with me at a critical moment. Only to turn up later when it was no longer needed. Fortunately, I had my 1/4th drive set for the bolt head. These aren't under a whole ton of torque anyway, so the little ratchet was enough for holding purposes. A 7/16th deep socket comes in super handy here for tightening the nut on the other side:
 |
|
|
|
|
Bri892001
Grand Poobah
Joined: September-27-2008 Location: Boston MA Status: Offline Points: 4947 |
Post Options
Thanks(0)
Quote Reply
Posted: August-12-2013 at 1:25am |
|
One final point. This big nut comes attached to the cable, but should be able to turn independently of it. Another words, you don't want the cable twisting as you tighten the nut.
It came from the box spinning frequently, but after its travels through the bilge, it was kind of hung up on the cable. I had to kind of nudge it free from the cable, then I could tighten it onto the tube: 
|
|
|
|
|
Bri892001
Grand Poobah
Joined: September-27-2008 Location: Boston MA Status: Offline Points: 4947 |
Post Options
Thanks(0)
Quote Reply
Posted: August-12-2013 at 1:29am |
|
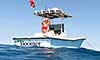
My girlfriend taking a turn at the wheel. Now it can be turned with relative ease:

|
|
|
|
|
Frankenotter
Platinum Member 

Joined: August-26-2012 Location: Milwaukee Status: Offline Points: 1072 |
Post Options
Thanks(0)
Quote Reply
Posted: August-12-2013 at 9:19am |
|
Nice write up Brian!
I was going to do the same tutorial........and then I didn't........because I suck. I think this will help anyone who searches the topic. Chris |
|
|
1999 Ski Nautique 196
|
|
|
|
|
SNobsessed
Grand Poobah
Joined: October-21-2007 Location: IA Status: Offline Points: 7102 |
Post Options
Thanks(0)
Quote Reply
Posted: August-12-2013 at 10:37am |
|
Brian, good looking GF you have there.
Clean bilge too! |
|
|
“Beer is proof that God loves us and wants us to be happy.”
Ben Franklin |
|
|
|
|
bhectus
Platinum Member

Joined: July-04-2010 Location: Gator Country! Status: Offline Points: 1809 |
Post Options
Thanks(0)
Quote Reply
Posted: August-12-2013 at 10:59am |
|
Thanks for taking the extra time to document/photo the process Brian! Great write-up.
|
|
|
'02 Ski Nautique 196 w/ 5.7 Apex bowtie - Sold
'87 Barefoot - sold '97 Super Sport Nautique - originally custom built for Walt Meloon '97 Ski Nautique '83 SN 2001 |
|
|
|
|
JPASS
Grand Poobah

Joined: June-17-2013 Location: Orlando Status: Offline Points: 2283 |
Post Options
Thanks(0)
Quote Reply
Posted: August-12-2013 at 11:03am |
|
Apparently my false wall behind the bench seat is missing. Any way you could give me the measurements of those panels and maybe some better pics of them removed?
Great write up BTW. I've saved this for later just in case I ever need to do this. |
|
|
'92 Correctcraft Ski Nautique
|
|
|
|
|
Bri892001
Grand Poobah
Joined: September-27-2008 Location: Boston MA Status: Offline Points: 4947 |
Post Options
Thanks(0)
Quote Reply
Posted: August-12-2013 at 11:10am |
|
JP, if your boat has a rear seat, it may not have come with those panels. Mine doesn't have a back seat, so those are there to cover the gas tank etc. I can take some measurements though. The only thing that is tricky is that they are angled on the outer sides.
You're welcome Brett. Thanks Chris & Chris. |
|
|
|
|
KRoundy
Platinum Member
Joined: August-23-2010 Location: Lake Stevens Status: Offline Points: 1704 |
Post Options
Thanks(0)
Quote Reply
Posted: August-12-2013 at 3:20pm |
|
Well done! I added this to the front page of the FAQ. It most definitely deserves a spot there. Interesting that your clamp looks quite different on your 1993 vs. my 1993. I wonder why? Note - this was an "as-is" photo that was taken before anything was cleaned up.

|
|
|
Previous: 1993 Electric Blue/Charcoal Ski Nautique
Current: 2016 Ski Nautique 200 Open Bow |
|
|
|
|
JPASS
Grand Poobah
Joined: June-17-2013 Location: Orlando Status: Offline Points: 2283 |
Post Options
Thanks(0)
Quote Reply
Posted: August-12-2013 at 3:58pm |
|
my rudder cable is attached to a bracket that's attached to those four bolts to the left of the bracket in your pic, but mine's a '92.
|
|
|
'92 Correctcraft Ski Nautique
|
|
|
|
|
Bri892001
Grand Poobah
Joined: September-27-2008 Location: Boston MA Status: Offline Points: 4947 |
Post Options
Thanks(0)
Quote Reply
Posted: August-12-2013 at 4:17pm |
|
Hmmmm. It also looks like your bracket is attached more on the Port side? Mine is definitely on the Starboard side of the rudder. That would be a really funny difference for the same model year. I have the 1:1 tranny, which is different, but not sure how that would change things in regard to steering set up though.
|
|
|
|
|
Morfoot
Grand Poobah

Joined: February-06-2004 Location: South Lanier Status: Offline Points: 5335 |
Post Options
Thanks(0)
Quote Reply
Posted: August-12-2013 at 5:45pm |
|
Good write up Brian, thanks for taking the time to take pics and writing it up for future reference. Nice looking GF too! Y'all coming to Benjamins in next week? If so, I hope you gave her fair warning.

|
|
|
"Morfoot; He can ski. He can wakeboard.He can cook chicken.He can create his own self-named beverage, & can also apparently fly. A man of many talents."72 Mustang "Kermit",88 SN Miss Scarlett, 99 SN "Sherman"
|
|
|
|
|
Bri892001
Grand Poobah
Joined: September-27-2008 Location: Boston MA Status: Offline Points: 4947 |
Post Options
Thanks(0)
Quote Reply
Posted: August-12-2013 at 6:12pm |
|
Thanks on both counts Tim!
I have to figure out on the CT really soon. This summer has gotten away from me. I haven't exactly covered it with her yet... |
|
|
|
|
KRoundy
Platinum Member
Joined: August-23-2010 Location: Lake Stevens Status: Offline Points: 1704 |
Post Options
Thanks(0)
Quote Reply
Posted: August-13-2013 at 3:01am |
That must mean the exhaust duct goes out the opposite side on your boat too. That's an odd thing to change mid-year. |
|
|
Previous: 1993 Electric Blue/Charcoal Ski Nautique
Current: 2016 Ski Nautique 200 Open Bow |
|
|
|
|
Bri892001
Grand Poobah
Joined: September-27-2008 Location: Boston MA Status: Offline Points: 4947 |
Post Options
Thanks(0)
Quote Reply
Posted: August-13-2013 at 9:42am |
|
Yup, my exhaust is on on the Port side of the rudder.
|
|
|
|
|
TRBenj
Grand Poobah

Joined: June-29-2005 Location: NWCT Status: Offline Points: 21212 |
Post Options
Thanks(0)
Quote Reply
Posted: August-13-2013 at 10:04am |
|
Brian, what size risers do you have on your '93? 3" or 3.5"? The 2 things that I can think of that would dictate exhaust routing would be the muffler and steering cable style.
|
|
|
|
|
Bri892001
Grand Poobah
Joined: September-27-2008 Location: Boston MA Status: Offline Points: 4947 |
Post Options
Thanks(0)
Quote Reply
Posted: August-13-2013 at 11:23am |
|
Hi Tim, my risers are the 3.5".
I recently noticed that Nautiqueparts is offering two muffler options. The first is for the regular 92-94, gear reduction style, but they just added this one: http://www.nautiqueparts.com/mufflerskinautiqueandsportnautique1993-1994with351fordand11transmission.aspx The pictures look the same, but it may not be true to form. I just assumed the difference would be the length of the down-tube. I had to replace my smooth straight riser to Invertaflow tubes with corrugated to deal with the slant of the engine on mine, because the old ones were kinking. |
|
|
|
|
dip
Senior Member 

Joined: August-29-2009 Location: Eastern PA Status: Offline Points: 392 |
Post Options
Thanks(0)
Quote Reply
Posted: August-13-2013 at 11:58am |
|
Nice write-up, Brian. Such a great looking boat. It looks like you replaced the cable with the original spec. If you find that it starts to go bad in a couple of years you might consider replacing the cable and helm with the newer version which is said to last longer. I replaced my cable several times (I forget the exact number) before I gave in and made the switch. Its only slightly more work and slightly more money as the newer cable is less expensive than the original. Of course I suck also so I didn't document it either.
BTW, I have both a back seat and the panels. If anyone needs measurements I can pull them, draw it up and send a cad file (or pdf) you could template from. |
|
|
|
|
JPASS
Grand Poobah
Joined: June-17-2013 Location: Orlando Status: Offline Points: 2283 |
Post Options
Thanks(0)
Quote Reply
Posted: August-13-2013 at 12:34pm |
I could use those measurements if it's not that much trouble. |
|
|
'92 Correctcraft Ski Nautique
|
|
|
|
|
Bri892001
Grand Poobah
Joined: September-27-2008 Location: Boston MA Status: Offline Points: 4947 |
Post Options
Thanks(0)
Quote Reply
Posted: August-13-2013 at 1:48pm |
Thanks Darren. I did think about that option. I went with the slightly longer version of the original spec cable, which saved me $100, and the extra length didn't get in the way at all. In fact, I was glad to have it because there didn't seem to be any extra. I guess the 20' version is mass produced and therefore cheaper than the typical 19.5, but everything else was the same. I was definitely curious about going with the newer version with the different helm. Because, the newer cable plus the helm would still be cheaper than the 19.5' original spec. I think the newer is called Teleflex Extreme. Did you find the newer version to be less friction? It's funny, because replacing the cable decreased the "at speed" effort quite a bit, but turning right to come out of a hard left turn still requires more than I thought it would. The at idle improved somewhat. I drove TRBenj's Skier at the 2012 CT Mini, and I remember the steering was zero effort all the way around, at all speeds and loads. I was hoping mine would be like that after the cable change. But, it definitely was an improvement anyway. |
|
|
|
|
dip
Senior Member
Joined: August-29-2009 Location: Eastern PA Status: Offline Points: 392 |
Post Options
Thanks(0)
Quote Reply
Posted: August-13-2013 at 2:04pm |
It's pretty easy in either direction. At speed I think pressure on rudder has more to do with the firmness, but it's still very fluid. I can turn the wheel using only my finger in the wheel spokes. At idle I can spin the wheel completely in either direction. This was the helm I used, with the cable noted. Helm |
|
|
|
|
Bri892001
Grand Poobah
Joined: September-27-2008 Location: Boston MA Status: Offline Points: 4947 |
Post Options
Thanks(0)
Quote Reply
Posted: August-13-2013 at 2:48pm |
|
Sounds similar. The pressure on the rudder is probably what I'm feeling then.
|
|
|
|
|
Post Reply
|
Page 12> |
 Tweet
Tweet
|
| Forum Jump | Forum Permissions You cannot post new topics in this forum You cannot reply to topics in this forum You cannot delete your posts in this forum You cannot edit your posts in this forum You cannot create polls in this forum You cannot vote in polls in this forum |


 Topic Options
 Bri892001 wrote: