 Boats For Sale:


1969 Mustang Stringer Rebuild |
Post Reply 
|
Page 123 15> |
| Author | |
vondy 
Platinum Member 

Joined: November-29-2007 Location: Dallas, Texas Status: Offline Points: 1116 |
 Post Options Post Options
") Thanks(0) Thanks(0)
 Quote Reply Quote Reply
 Topic: 1969 Mustang Stringer Rebuild Topic: 1969 Mustang Stringer RebuildPosted: February-10-2011 at 8:19pm |
|
(Edit 3-20-2012, since I somehow screwed up most of the photos linked to this post, I've made a set on my flickr account that should contain all of the ones used. Sorry.)
Photo Link Well it's time to get this done, been dreading it really, looks like a ton of work. I guess I have a small head start since I removed my foam a couple of years ago. My hope is to get this done no later than July 4th weekend. 3.5 months  I've been reading the major stringer post for 3 years now but will re-read and take notes before getting started. I do have a few questions for you experts first... Ideally I would remove the stringers and get all the grinding out of the way first. That gives me more time to save up money for supplies. I've heard It's OK to remove all the stringers in these small 16 footers without worrying about anything getting out of shape. Thoughts? Thinking ahead on other items to attend to when putting the engine back in... I want to add some adjustable engine mounts and do away with these  wedges. I assume that is doable? wedges. I assume that is doable?I think the rear starboard side clamp(?) that attaches to the engine mount is cracked along the top. Any chance that can be welded or something? It will be a few weeks before I get started so plenty of time to psych myself up  I know I'll get plenty of good advice here. I know I'll get plenty of good advice here.Thanks! |
|
 |
|
|
connorssons
Platinum Member
Joined: January-17-2009 Location: Michigan Status: Offline Points: 1414 |
Post Options
Thanks(0)
Quote Reply
Posted: February-10-2011 at 11:12pm |
|
Hello Vondy! hows it been? glad to see ya going to restring the stang. keep us posted, and yes you can remove all the innerds just make sure you have it braced up correctly. good luck jeff
|
|
|
|
|
Keeganino
Grand Poobah 

Joined: October-27-2009 Location: North Carolina Status: Offline Points: 2063 |
Post Options
Thanks(0)
Quote Reply
Posted: February-10-2011 at 11:27pm |
|
Congrats on taking the plunge. Just saw some pcm mounts on ebay go for like $30.
|
|
|
"working on these old boats may not be cost effective but as it shows its what it brings into your life that matters" -Roger
1973 Skier |
|
|
|
|
Keeganino
Grand Poobah
Joined: October-27-2009 Location: North Carolina Status: Offline Points: 2063 |
Post Options
Thanks(0)
Quote Reply
Posted: February-10-2011 at 11:27pm |
|
Lets see some pics!
|
|
|
"working on these old boats may not be cost effective but as it shows its what it brings into your life that matters" -Roger
1973 Skier |
|
|
|
|
vondy
Platinum Member
Joined: November-29-2007 Location: Dallas, Texas Status: Offline Points: 1116 |
Post Options
Thanks(0)
Quote Reply
Posted: February-11-2011 at 11:07am |
Hey Jeff! Been good. Thanks again for saving us last summer with the manifolds. Would the trailer be sufficient for bracing it or would I need to build some extra bracing? |
|
|
|
|
wingwrench
Senior Member 
Joined: December-11-2010 Location: Lakeland, FL Status: Offline Points: 155 |
Post Options
Thanks(0)
Quote Reply
Posted: February-11-2011 at 11:30am |
Depends on the trailer. On my 63 skier the aft end of my trailer bunks sit right at the corners of the transom, I made some wedges to fit between the trailer frame rails and the hull at about the windshield. With all the stringers out my hull is still pretty rigid but the wedges stabilize it when climbing in and out. Jack |
|
|
|
|
8122pbrainard
Grand Poobah

Joined: September-14-2006 Location: Three Lakes Wi. Status: Offline Points: 41040 |
Post Options
Thanks(0)
Quote Reply
Posted: February-11-2011 at 11:59am |
|
David,
I'd pull all the stringers and then see how it sits on the trailer. Yes, you have a hull that's considered real heavy and stiff. If you see and deflection, then you can always do some bracing. What's the matter with the wood wedges under the engine mounts? |
|
|
|
|
TRBenj
Grand Poobah

Joined: June-29-2005 Location: NWCT Status: Offline Points: 21141 |
Post Options
Thanks(0)
Quote Reply
Posted: February-11-2011 at 12:10pm |
|
Yes, you can remove all of the stringers in one shot to get all the grinding done first... but Im not sure I would recommend doing so for 2 reasons.
1. You will need to brace the boat as mentioned above. Without any structural members running the length of the hull, even the small hulls will deflect. The trailer is not sufficient- you will need additional braces front and rear at the chines at a minimum... and more is better. You could probably get away with just the trailer if you remove/replace one stringer at a time. 2. By removing/replacing one stringer at a time, it gives you a good reference point as you go along and shape and then install each stringer. It is very hard to take measurements once the boat is completely gutted. Even if you take 1000 measurements before disassembling, you will ALWAYS find something you failed to measure. Been there, done that. If your boat were anything but a Holman Moody, it would be pretty straightforward to replace your mounts with newer adjustable ones from PCM. The H-M uses different mounting provisions though (bellhousing and front cover), so it would not be easy to do away with yours. I would stick with the wedges. Of course, Id be willing to swap some PCM parts for those H-M nonadjustables if youre dead set on going that way.
|
|
|
|
|
Riley
Grand Poobah

Joined: January-19-2004 Location: Portland, ME Status: Offline Points: 7952 |
Post Options
Thanks(0)
Quote Reply
Posted: February-11-2011 at 12:35pm |
|
David, I've never aligned an engine with adjustable mounts, but found the wedges on our Mustang easy to work with. Adusting the wedges with a small sledge hammer and a block of wood was easy and it surprisingly came into alignment much easier than I thought it would.
|
|
|
|
|
vondy
Platinum Member
Joined: November-29-2007 Location: Dallas, Texas Status: Offline Points: 1116 |
Post Options
Thanks(0)
Quote Reply
Posted: February-11-2011 at 1:42pm |
|
Seemed to me as accurate as the alignment needs to be that adjustable engine mounts would be easier and more accurate than banging on wedges. One problem I had was that the front needed to be adjusted so I ended up adding wedges to those as well.
Would there not be a concern for loosening and tightening the lags once a year. Seems like it would weaken the connection and be another point at which water could get in. I'm not against the wedges, I just want to make sure if there is a better way I do it. Any thoughts on the crack in the rear starboard bellhousing mount clamp? |
|
|
|
|
Riley
Grand Poobah
Joined: January-19-2004 Location: Portland, ME Status: Offline Points: 7952 |
Post Options
Thanks(0)
Quote Reply
Posted: February-11-2011 at 3:02pm |
|
Vondy, I'm not familar with your mounts, but mine are fixed. No adjustment at all. They work much better than I thought they would. The only draw back I see to them is once your lag holes are drilled, there is no side to side adjustment, only up and down. You've got a Holman Moody set up, so I'd rather keep that and deal with it due to it being probably the most desirable power for you boat's age.
|
|
|
|
|
vondy
Platinum Member
Joined: November-29-2007 Location: Dallas, Texas Status: Offline Points: 1116 |
Post Options
Thanks(0)
Quote Reply
Posted: February-11-2011 at 4:47pm |
|
Riley, I dug up some old pics of the mounts, before I added new wedges.
I do have side-to-side movement by-the-way. 


|
|
|
|
|
Keeganino
Grand Poobah
Joined: October-27-2009 Location: North Carolina Status: Offline Points: 2063 |
Post Options
Thanks(0)
Quote Reply
Posted: February-11-2011 at 6:01pm |
|
Gotta love that engine! I would redo it just like that. Some Doug Fir wedges coated in CPES will contrast nicely with the new floor and bilge around it. If you are worried about wearing out the holes start with the shortest lags you can get away with. That way if you bore them out you can go deeper and get more bite.
|
|
|
"working on these old boats may not be cost effective but as it shows its what it brings into your life that matters" -Roger
1973 Skier |
|
|
|
|
Riley
Grand Poobah
Joined: January-19-2004 Location: Portland, ME Status: Offline Points: 7952 |
Post Options
Thanks(0)
Quote Reply
Posted: February-11-2011 at 9:30pm |
|
Vondy, that's a much better set up than mine. You've got your side to side with the mounts and a little tap either way on the wedges for height. I'd stay with that set up. Keep your wedges to make new ones out of. I think mine are oak.

|
|
|
|
|
Keeganino
Grand Poobah
Joined: October-27-2009 Location: North Carolina Status: Offline Points: 2063 |
Post Options
Thanks(0)
Quote Reply
Posted: February-11-2011 at 10:21pm |
|
Wow Bruce that sucker is clean! Does not look like there is much adjustment on that at all. I like the curves in the stringer. Very cool.
|
|
|
"working on these old boats may not be cost effective but as it shows its what it brings into your life that matters" -Roger
1973 Skier |
|
|
|
|
Riley
Grand Poobah
Joined: January-19-2004 Location: Portland, ME Status: Offline Points: 7952 |
Post Options
Thanks(0)
Quote Reply
Posted: February-12-2011 at 2:06pm |
|
Keegan, the curved wood is an oak mount that sits on top of the stringers. There is just up and down movement with the wedges. I don't know what can be done if you need a side to side adjustment, other than move the engine forward or backward a bit and drill new lag holes. Fortunately , we did not have to do that. That white bilge will be the last one I do! I see you did yours the same color.
Vondy, your mounts are really good. I like how H/M put the rear mount forward of the tranny so you can remove it easily. |
|
|
|
|
Keeganino
Grand Poobah
Joined: October-27-2009 Location: North Carolina Status: Offline Points: 2063 |
Post Options
Thanks(0)
Quote Reply
Posted: February-12-2011 at 2:14pm |
|
My white bilge was getting dirty before I ever got the engine back in. Grey is probably more practical.
|
|
|
"working on these old boats may not be cost effective but as it shows its what it brings into your life that matters" -Roger
1973 Skier |
|
|
|
|
Gary S
Grand Poobah

Joined: November-30-2006 Location: Illinois Status: Offline Points: 14096 |
Post Options
Thanks(0)
Quote Reply
Posted: February-12-2011 at 4:06pm |
David, you mean in that area right behind the bolts of the sideways clamp mount? This one was cracked on mine.I took it to a good welder and they fixxed me up fine. 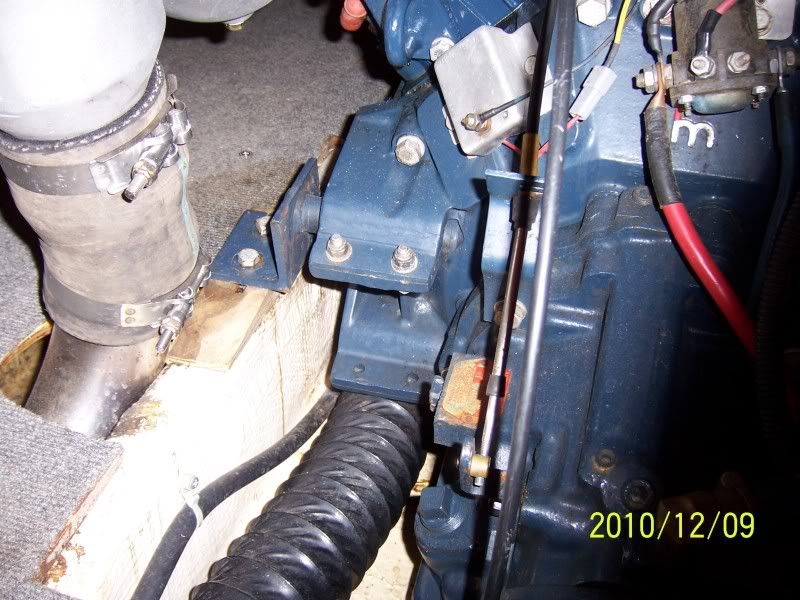
|
|
|
|
|
vondy
Platinum Member
Joined: November-29-2007 Location: Dallas, Texas Status: Offline Points: 1116 |
Post Options
Thanks(0)
Quote Reply
Posted: February-14-2011 at 11:14am |
|
That's it Gary.
I seem to recall the bell housing to be aluminum, is that right or am I imagining things? |
|
|
|
|
connorssons
Platinum Member
Joined: January-17-2009 Location: Michigan Status: Offline Points: 1414 |
Post Options
Thanks(0)
Quote Reply
Posted: February-14-2011 at 11:24pm |
|
Hay Vondy! you are correct Alum.
|
|
|
|
|
Gary S
Grand Poobah
Joined: November-30-2006 Location: Illinois Status: Offline Points: 14096 |
Post Options
Thanks(0)
Quote Reply
Posted: February-14-2011 at 11:28pm |
|
Your right David,it's aluminum.Ask around and get yourself a good welder.We have alot of truck repair places around,since we live in a gravel mining area. Most gravel trailers are aluminum so they have alot of pratice.If you look close you can see the weld in that picture,I didn't even have to clean it up. Must be a common thing for these to crack I'll bet.
|
|
|
|
|
vondy
Platinum Member
Joined: November-29-2007 Location: Dallas, Texas Status: Offline Points: 1116 |
Post Options
Thanks(0)
Quote Reply
Posted: February-15-2011 at 12:45pm |
|
Is it easy enough to separate the bell housing from the engine and transmission to take it to a welder? No major gaskets or seals to worry about?
|
|
|
|
|
Gary S
Grand Poobah
Joined: November-30-2006 Location: Illinois Status: Offline Points: 14096 |
Post Options
Thanks(0)
Quote Reply
Posted: February-15-2011 at 9:27pm |
|
Nothing there at all.Just a matter of unbolting it.
|
|
|
|
|
vondy
Platinum Member
Joined: November-29-2007 Location: Dallas, Texas Status: Offline Points: 1116 |
Post Options
Thanks(0)
Quote Reply
Posted: March-18-2011 at 8:39pm |
|
Gave the lumber yard a call today looking for Douglas Fir. I told him I needed the good stuff and he said they have #1, C and better, vertical grain. I'm not that versed in wood grades. Does that sound right to y'all?
I'm also not sure on sizes yet but a 2x8x14 is $113. Pulling to engine tomorrow to officially get started. |
|
|
|
|
8122pbrainard
Grand Poobah
Joined: September-14-2006 Location: Three Lakes Wi. Status: Offline Points: 41040 |
Post Options
Thanks(0)
Quote Reply
Posted: March-19-2011 at 9:38am |
|
David,
Go take a look at it. If the #1 looks nice, is straight and doesn't have a large loose knots in it, it will be cheaper. Don't worry about bad edges as they will be trimmed off when you scrib to the hull. Make sure you ask them about the moisture content. If it's a good yard, they should have a meter. Out of the kiln, you'll see about 13%. 10% is getting there and usable. 8% is great. |
|
|
|
|
Riley
Grand Poobah
Joined: January-19-2004 Location: Portland, ME Status: Offline Points: 7952 |
Post Options
Thanks(0)
Quote Reply
Posted: March-19-2011 at 10:59am |
|
Pete, if it's 13% out of the kiln, how do you get it to 8%? Should it be bought ahead of time and be stored so that it air dries some more?
|
|
|
|
|
8122pbrainard
Grand Poobah
Joined: September-14-2006 Location: Three Lakes Wi. Status: Offline Points: 41040 |
Post Options
Thanks(0)
Quote Reply
Posted: March-19-2011 at 11:56am |
Bruce, Yes, if at all possible, get it a couple months in advance. Sticker (1x2 spacers) it and put it in a cool spot with good air circulation. I suggested this to Tim along with a fan blowing on it. I believe he did do it. Rotating the wood top to bottom and end to end helps as well. I'm currently doing some green wood bowl turning on that 48 lathe I rebuilt. I've never done the green wood before and it's not fun! The selection of small blocks of unusual woods is fantastic plus real cheap but I don't feel the trouble you go through is worth it. First, you rough turn the blank figuring at least 10% shrinkage. Then you set the blocks to dry for 2 to 3 years!! If you don't have that time, you use the microwave method that I used. I almost started a couple of Beech blanks on fire!!  This green wood turning was really a experiment. I found a sample set of Beech, Sasafrass, Cherry and Walnut. This green wood turning was really a experiment. I found a sample set of Beech, Sasafrass, Cherry and Walnut.
|
|
|
|
|
vondy
Platinum Member
Joined: November-29-2007 Location: Dallas, Texas Status: Offline Points: 1116 |
Post Options
Thanks(0)
Quote Reply
Posted: March-19-2011 at 12:00pm |
Pete, he said his number 1 stuff was the c & better vertical grain. From the way I typed it, it might have looked like 3 options. He does have number 2 as well. |
|
|
|
|
8122pbrainard
Grand Poobah
Joined: September-14-2006 Location: Three Lakes Wi. Status: Offline Points: 41040 |
Post Options
Thanks(0)
Quote Reply
Posted: March-19-2011 at 12:04pm |
|
David,
Go look at it and if in doubt, report back. The "and better" is really a term open to interpretation!! |
|
|
|
|
vondy
Platinum Member
Joined: November-29-2007 Location: Dallas, Texas Status: Offline Points: 1116 |
Post Options
Thanks(0)
Quote Reply
Posted: March-20-2011 at 1:26pm |
I'll do that. Looks like I'll need 2x8x12s for the mains and 1x2x9s for the secondaries. Does that sound right? What do others use for the cross bracing? Fir or something cheaper? I don't have a lot in this boat. 
|
|
|
|
|
Post Reply
|
Page 123 15> |
 Tweet
Tweet
|
| Forum Jump | Forum Permissions You cannot post new topics in this forum You cannot reply to topics in this forum You cannot delete your posts in this forum You cannot edit your posts in this forum You cannot create polls in this forum You cannot vote in polls in this forum |


 Topic Options
 connorssons wrote: