 Boats For Sale:


86 SN rebuild |
Post Reply 
|
Page <1 678910 11> |
| Author | |
8122pbrainard 
Grand Poobah 

Joined: September-14-2006 Location: Three Lakes Wi. Status: Offline Points: 41040 |
 Post Options Post Options
") Thanks(0) Thanks(0)
 Quote Reply Quote Reply
 Posted: September-28-2010 at 3:39pm Posted: September-28-2010 at 3:39pm |
|
Tim,
You allowing debris to dirty up your bilge??? There must be someone else who is using your screen name! 
|
|
 |
|
|
storm34
Grand Poobah

Joined: November-03-2008 Location: Dexter Iowa Status: Offline Points: 4492 |
Post Options
Thanks(0)
Quote Reply
Posted: September-28-2010 at 3:28pm |
|
Tim, my skier didn't have any foam from the factory and has drains to the bilge at the transom. We also have a drain hole in the transom.
I haven't seen any problems with this set up and find it pretty convenient that everything would go into the bilge should some water get under the floor. As soon as the bow comes up (either on the trailer or in the water) everything flows back and the goes into the bilge. Once it's there, everything stays between the mains and you can either pump it out or pull the plug. Seems like a far better set up than having to check access panels in the floor for water....or worry about intrusion in the middle of the mains. |
|
|
|
|
Ranger
Senior Member 
Joined: August-23-2010 Location: San Diego Status: Offline Points: 151 |
Post Options
Thanks(0)
Quote Reply
Posted: September-28-2010 at 3:26pm |
|
Yes, I will have the corners cut on the bulkhead pieces. In fact they are already cut. I also will not be using foam in the rebuild.
In my experience with other boats that I have had, each compartment has drained to the bilge. However, these boats also had scuppers which shed the water off of the deck. That being said, I don't think I want to have smaller compartments for me to drain. I would rather make sure everything drains to the bilge so that I can pump if necessary. Water in, water out. Yes, I would agree if you let your bilge build up with leaves or other debris it could be a problem. But I would also suggest that if I become that negligent, I would have other larger problems at hand. In other words, one should take care of their equipment. However, I'm not closed minded (inspite of what my wife says) and I would certainly like to hear other view points. Thanks, Jeff |
|
|
|
|
TRBenj
Grand Poobah

Joined: June-29-2005 Location: NWCT Status: Offline Points: 21131 |
Post Options
Thanks(0)
Quote Reply
Posted: September-28-2010 at 3:07pm |
|
Yes, no need for lagging from the top if through bolting through the side, IMHO.
Your extra bracing and draining to form the pockets makes sense as well. From the sounds of it, you are not refoaming at all? I dont see any drains cut in your ribs- will you be adding some to allow all the water to get to the drains? I know many people who rebuild without foam simply allow all compartments to drain together and drain to the bilge. The first part (draining together) is fine by me, but the second part (draining to the bilge) worries me. Any drain point then becomes an intrusion point, which can let water in under your floor very easily. The pockets at the side of your motor would be a very big intrusion point as well- and as soon as the water gets down in there, it will run where it pleases. We built our BFN so that all of the compartments will drain together, but there are no obvious intrusion points, ie, they dont drain to the bilge. Instead, we chose a few low lying spots where water will collect if it somehow makes its way below the floor. We made a few access points ot these spots so we can pump water out if need be. Ive seen an early glass boat (no foam) with a free draining structure with a drain hole that became clogged with leaves, etc from the bilge... which ended up holding a ton of water under the floor. Yikes. |
|
|
|
|
Ranger
Senior Member
Joined: August-23-2010 Location: San Diego Status: Offline Points: 151 |
Post Options
Thanks(0)
Quote Reply
Posted: September-28-2010 at 2:57pm |
|
Keegan,
Yes, I used mostly 24 grit on the hull. I had the entire length done in about an hour and a half. Thanks again, Jeff |
|
|
|
|
Ranger
Senior Member
Joined: August-23-2010 Location: San Diego Status: Offline Points: 151 |
Post Options
Thanks(0)
Quote Reply
Posted: September-28-2010 at 2:56pm |
|
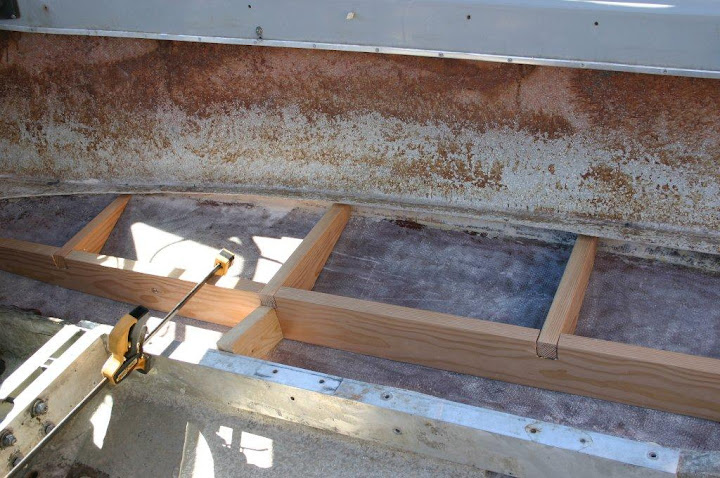
The deck is going to be the same, so the engine cover will remain as it is. The area that needs to be opened up is full of foam, so it's not structural. I am going to run another piece of fir, from the rear cross brace (by rear of engine) forward to another cross brace (forward cradle). It will leave me a 3 inch wide path between the stringer and deck support. I will also cut a 2 X 2 angle in the bottom of the cross braces for water to come and go as it pleases.
Hopefully this makes sense? Also, if I understand you correctly, you don't think I would need to bolt through the top, if I am through bolting on the sides. Correct? Jeff |
|
|
|
|
Keeganino
Grand Poobah

Joined: October-27-2009 Location: North Carolina Status: Offline Points: 2063 |
Post Options
Thanks(0)
Quote Reply
Posted: September-28-2010 at 2:29pm |
|
Jeff
You have made a lot of progress since I checked in last! Looks great. Did you use that 24 grit grinder disc yet. Those things eat up glass in a hurry! Peace Keegan |
|
|
"working on these old boats may not be cost effective but as it shows its what it brings into your life that matters" -Roger
1973 Skier |
|
|
|
|
TRBenj
Grand Poobah
Joined: June-29-2005 Location: NWCT Status: Offline Points: 21131 |
Post Options
Thanks(0)
Quote Reply
Posted: September-28-2010 at 2:07pm |
No reason to bolt through the top that I can think of if you sufficiently through bolt it. Keep in mind a few things when you build the pockets for the backing nuts. -Water will make its way into these pockets... how will it get out? -Is your motorbox wide enough to cover the new pockets? |
|
|
|
|
Ranger
Senior Member
Joined: August-23-2010 Location: San Diego Status: Offline Points: 151 |
Post Options
Thanks(0)
Quote Reply
Posted: September-28-2010 at 1:45pm |
|
Thanks TRBenj,
Yes, I'm going to reconfigure the stringers that allow me to have access to both sides of the main. The original confguration only had foam in that area, so I don't think it's a big deal. Do I really need to bolt it through the top? I completed a restore about 5 years ago, where I installed a 230 hp volvo diesel in an off shore fishing boat. From what I remember, I only bolted it through the sides and not through the top. Thanks again, Jeff |
|
|
|
|
TRBenj
Grand Poobah
Joined: June-29-2005 Location: NWCT Status: Offline Points: 21131 |
Post Options
Thanks(0)
Quote Reply
Posted: September-28-2010 at 1:19pm |
|
I was in your shoes not too long ago...
I decided to through bolt the cradle from the sides of the stringer. Remember, unless you want the cradle to be permanant, you need to be able to access the nuts on the back side- so this will affect your stringer/floor configuration around the motor. Cradles DO sometimes break, so I would resist the urge to make yours permanantly mounted! This is the approach we took on our BFN, but the main stringers on the v-hulls dont support the floor- so making a pocket to access the backing nuts was more straightforward. You could do the rod trick, but Im not sold on the idea. I would think it would make installing the cradle a real PITA... gotta be precise to align everything. If one rod isnt perfectly vertical, good luck! As far as the cradle sitting below the floor at the front goes, that is true... but the original '86 floor had a removeable wood panel that went around the pylon. If you built something similar, it would give you full access to the cradle should it need to come out later. I would give some strong consideration to simply lagging down from the top, just like it came from the factory. This is by far the simplest and most straightforward approach. I would think you could keep the 5200 around the top half of the lags (not the threads) which might make it a little easier to get the bolts out next time. |
|
|
|
|
Ranger
Senior Member
Joined: August-23-2010 Location: San Diego Status: Offline Points: 151 |
Post Options
Thanks(0)
Quote Reply
Posted: September-28-2010 at 1:06pm |
|
Thanks for the response.
I like the threaded rod idea, but my cradle slides under the forward deck and inch or two, which could pose a problem with regards of getting the cradle down over the rods? Has anyone ever tried drilling a hole to slide in a nut? I could drill an oversize hole, fill it with epoxy, and then redrill it the proper size. Slide a nut in the hole and tighten it up. Good idea or would you run with lags and 5200. I will use the 5200 if I have too, but really want to stay away from it. I have had more than one occasion where I had to remove it and trust me, it sticks! Jeff |
|
|
|
|
8122pbrainard
Grand Poobah
Joined: September-14-2006 Location: Three Lakes Wi. Status: Offline Points: 41040 |
Post Options
Thanks(0)
Quote Reply
Posted: September-28-2010 at 12:26pm |
|
Jeff,
I would bed the bulheads to the hull sides as long as there's prenty of glass to the sides to spread out the loads as you're thinking about. Some don't because of the fear of stress causing gel cracking in the hull sides. The 1&1/2" hole filled with filled epoxy is really the best means of bolting to wood in my opinion. The filled epoxy is stronger than the wood and will spread out the load. You can also do the from the top actually bedding in threaded rod. Overkill? Quite possible! Lags from the top with a CPES treatment and 5200 when running in the lags has been used with very good results - hell of alot better than factory!! 
|
|
|
|
|
Ranger
Senior Member
Joined: August-23-2010 Location: San Diego Status: Offline Points: 151 |
Post Options
Thanks(0)
Quote Reply
Posted: September-28-2010 at 11:48am |
|
Thanks for the help. But, as usually I have a couple additional questions.
First, I have read where some people do not bed the side bulkhead pieces to the hull. I really don't see why not; as long as you graduate the tape and cloth for a smooth transition, (no hard spots). Does anyone have any experience or suggestions with this? Second, I really do not want to lag the cradle to the stringer. As such, I'm going to use through bolts where possible. Are there any thoughts on drilling a 1 1/2 hole through the stringer and filling it with mill fiber/epoxy. Then redrilling the proper size hole for bolting the cradle to the stringer. I'm not sure if the epoxy will be strong enough. Another option would be to use an 1/8 aluminum plate as a backer, then the load will not be concentrated on the 1 1/2 hole, rather be distributed along the stringer. Are there any other options of bolting through the top of the cradle? If I through bolt the sides, maybe I can get away from them entirely? Any thoughts will be appreciated. Thanks, |
|
|
|
|
8122pbrainard
Grand Poobah
Joined: September-14-2006 Location: Three Lakes Wi. Status: Offline Points: 41040 |
Post Options
Thanks(0)
Quote Reply
Posted: September-28-2010 at 11:08am |
Jeff, The CPES works as great on ply as it does on solids. It penetrates the wood where the ply adhesive hasn't. |
|
|
|
|
BuffaloBFN
Grand Poobah

Joined: June-24-2007 Location: Gainesville,GA Status: Offline Points: 6094 |
Post Options
Thanks(0)
Quote Reply
Posted: September-28-2010 at 10:11am |
I only had 1 penny on me.
|
|
|
|
|
Fl Inboards
Grand Poobah

Joined: January-20-2008 Location: United States Status: Offline Points: 2066 |
Post Options
Thanks(0)
Quote Reply
Posted: September-27-2010 at 2:06pm |
|
With all that 2X that hull is going to be hell for stout! Nice job by the way!!
Thanks for the pictures... |
|
|
Hobby Boats can be expensive when the hobbyist is limited on their own skill and expertise.
1993 Shamrock "fat" 20. 2008 Nautique 196 5.0 |
|
|
|
|
Ranger
Senior Member
Joined: August-23-2010 Location: San Diego Status: Offline Points: 151 |
Post Options
Thanks(0)
Quote Reply
Posted: September-27-2010 at 1:43pm |
|
Thanks Pbrain, Makes sense to me. I will probably use 3/4 inch exterior ply. Does CPES work with ply, since it is a laminated product? I could probably read the data sheet, but thought I would ask.
Jeff |
|
|
|
|
8122pbrainard
Grand Poobah
Joined: September-14-2006 Location: Three Lakes Wi. Status: Offline Points: 41040 |
Post Options
Thanks(0)
Quote Reply
Posted: September-27-2010 at 12:43pm |
|
Jeff,
I'll through in my .02 cents before Greg does regarding the transom blocking. Ply is used because it spreads the load vertically and horizontally to the glass hull due to the alternating grain direction of the plys. A solid may under certain conditions split down the middle. |
|
|
|
|
Ranger
Senior Member
Joined: August-23-2010 Location: San Diego Status: Offline Points: 151 |
Post Options
Thanks(0)
Quote Reply
Posted: September-27-2010 at 11:47am |
|
Buffalo, I keep going back and forth regarding pulling the main first. I know that I would like to have it out of the way, before I start glassing in the secondary. But at the same time, I would like to keep it in for reference as long as possible.
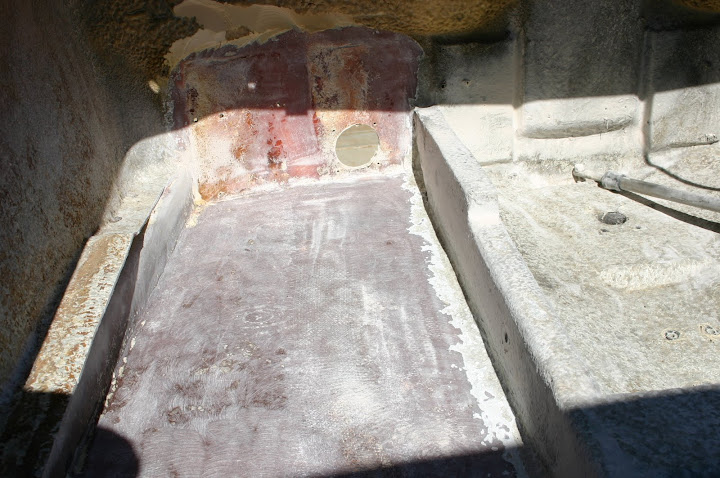
What I will probably do is bed the secondary stringer and then cut the main out. Then after I bed the main I can glass everything at the same time. I'm assuming that bedding the secondary will be strong enough to help keep the hull's shape while I work on the main (Thoughts?). As far as yesterday's work, I ended up working through the heat again and got the starboard side secondary dry fit to the hull. I also managed to get all of the bulkhead support cut and fit as well. I still need to do a few minor things like cut water drain holes through all of the pieces. So I am hoping that I can get this side finished by next weekend. I'm also hoping that I can pull the Starboard side main as well. I do have another question. It looks like most people use ply for the backing blocks on the stern. Why would ply be a better choice than something solid? I will most likely install these after the stringers are in, but want to hear from anyone who thinks otherwise. Thanks again for the help! Jeff 
|
|
|
|
|
BuffaloBFN
Grand Poobah
Joined: June-24-2007 Location: Gainesville,GA Status: Offline Points: 6094 |
Post Options
Thanks(0)
Quote Reply
Posted: September-26-2010 at 10:49am |
|
If I didn't already mention it, a 36 grit flapper disk on a grinder is great for final prep.
|
|
|
|
|
BuffaloBFN
Grand Poobah
Joined: June-24-2007 Location: Gainesville,GA Status: Offline Points: 6094 |
Post Options
Thanks(0)
Quote Reply
Posted: September-26-2010 at 10:47am |
|
Cool stands!
Are you going to put that secondary back in before you cut out that main? Makes sense to do it that way if you have room to work. I cut out, prepped, and replaced a side at a time(main & secondary). My V hull may have given more support for that though. Looking good! |
|
|
|
|
Ranger
Senior Member
Joined: August-23-2010 Location: San Diego Status: Offline Points: 151 |
Post Options
Thanks(0)
Quote Reply
Posted: September-26-2010 at 3:10am |
|
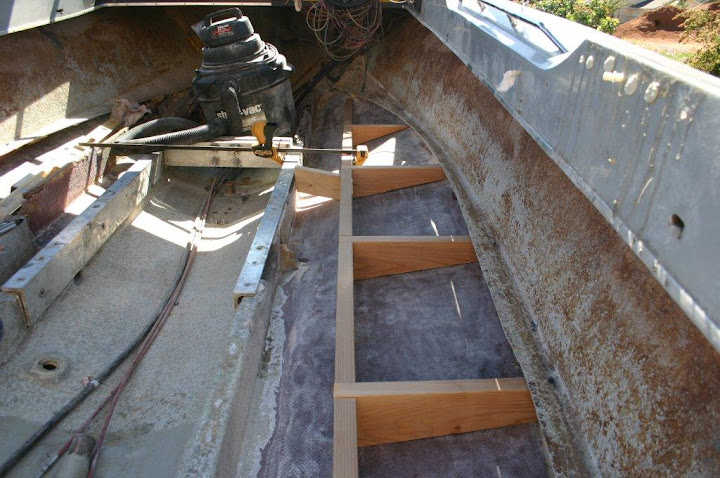
We made good progress today. Started at 7:00 and worked until 2:00. We finished the stands and leveled the boat. Then we cut the starboard secondary stringer out and completely grinded the hull and transom. Tomorrow, I am going to tackle the secondary stringer and get it fit to the hull. I think it's going to take me a while, since I want to build interlocking bulkheads, similar to the V drive rebuild, but I'm happy with what we accomplished today. Hopfully, I'll get something accomplished again tomorrow, but it's been hot. Today it was 104 in the shade. Good thing I wasn't working in the shade?
Jeff 


|
|
|
|
|
Ranger
Senior Member
Joined: August-23-2010 Location: San Diego Status: Offline Points: 151 |
Post Options
Thanks(0)
Quote Reply
Posted: September-20-2010 at 9:41pm |
|
Hey James, I hope you’re doing well. I just couldn't wait until winter. I tried, but just couldn't do it. I'm planning on having this project finished before next spring so I needed to get going.
All of my supplies for the stringers and deck should be here by Friday, so I am hoping that I make some progress this weekend. Thanks for everyone’s help and suggestions. Jeff |
|
|
|
|
37N122W
Groupie 

Joined: December-15-2008 Location: United States Status: Offline Points: 83 |
Post Options
Thanks(0)
Quote Reply
Posted: September-20-2010 at 9:04pm |
|
Holy Smokes! Jeff, what have you done to my boat!!

Hi all! I'm the PO of the '86 SN getting overhauled on this thread. I had originally planned to tackle the project but it didn't work out for me - my family wanted a sail boat instead. Now that I'm reading about it from afar, I'm VERY glad it is in someone else's more accomplished hands!! Jeff, I'm glad to see it's working out for you. I'm especially stoked that your son is into it. So cool! Thanks for posting your progress here on CCF. It's great to follow along. I'm happy for you and the boat. She's getting what she deserves! Keep up the good work. Looking forward to the next progress report... Take Care, JJ |
|
|
"It never gets easier, you just go faster." Greg LeMond
|
|
|
|
|
JoeinNY
Grand Poobah

Joined: October-19-2005 Location: United States Status: Offline Points: 5695 |
Post Options
Thanks(0)
Quote Reply
Posted: September-20-2010 at 6:27pm |
|
The hard notches and cuts aside from being a pain to glass create stress concentrations which can create failure points. Avoiding stress concentrations is at the fundamental art of very high quality boat building. You can always overbuild and be fine... but if you can avoid stress concentrations you get the most out of what materials you do put in you will be lighter, just as strong, and possibly more durable.. however it takes a lot more thought and usually more effort.
Do use curves to transition from the high to low areas where ever posible.. exceptions are where you are notching to add material back in.. those transitions are strenghtened by the additional materials. It is the same theory as to why you use multiple layers of overlapping tape building up widths.. you dont want an abrupt end to 6 layers of tape where the hull goes from somewhat flexible to rock solid. It is also why I would not run a layer of biax up the side of my hull, and generally stay away from biax it is significant enough that simply ending it creates a stress concentration. In summary.. sharp corners on stringers or abrupt changes in strength in places on the hull = bad. Any stringer attachement to the hull is an opportunity for an abrupt change in strength to the hull.. care should be taken to smooth that transition.. |
|
|
|
|
TRBenj
Grand Poobah
Joined: June-29-2005 Location: NWCT Status: Offline Points: 21131 |
Post Options
Thanks(0)
Quote Reply
Posted: September-20-2010 at 6:09pm |
There are no tricks... glass simply doesnt like to go around 90 degree corners- so avoid making them! Thats why the factory cut outs are rounded... much easier to glass over. I would keep the factory configuration. |
|
|
|
|
Keeganino
Grand Poobah
Joined: October-27-2009 Location: North Carolina Status: Offline Points: 2063 |
Post Options
Thanks(0)
Quote Reply
Posted: September-20-2010 at 6:05pm |
|
Jeff you are climbing the ranks quickly. A rebuild will do that to you! No luck on the lights. Marty came over yesterday and we worked on it to no avail. We had a Thomas Edison day- learned a lot but did not get anything to work. Started a thread on it hoping that somebody has been through the same thing. Wrong module is the only thing that makes any sense. The lights all worked when we hooked it up to Marty's truck.
Somebody will probably chime in about glassing around the cradle notches. I am sure there are some tricks out there for getting the glass around those notches. |
|
|
"working on these old boats may not be cost effective but as it shows its what it brings into your life that matters" -Roger
1973 Skier |
|
|
|
|
Ranger
Senior Member
Joined: August-23-2010 Location: San Diego Status: Offline Points: 151 |
Post Options
Thanks(0)
Quote Reply
Posted: September-20-2010 at 5:50pm |
|
Keegan, yes that answers most of it, but where the cradle sits, the stringer is not notched at a 90 degree angle, it slopes. I'm assuming that I will have to cut smaller pieces to lay in around the sloped area.
On another note, did you figure out your trailer light issue? Gun Driver, Thanks for the suggestions. Not only am I at 3 pages, I also have a groupie status 
Jeff |
|
|
|
|
gun-driver
Grand Poobah
Joined: July-18-2008 Location: Pittsburgh, Pa Status: Offline Points: 4112 |
Post Options
Thanks(0)
Quote Reply
Posted: September-20-2010 at 2:08pm |
WOW three pages already and you haven't even started yet. 
If you lose the mixing cups and stir sticks you can save about $115.00 I used sauce cans from my local pizza shop to mix in.(like 3lb. coffee cans) I found until you start pouring for the floor it was hard to use more than 18-20 pump mix at one time.(pot life) There will be plenty of wood ripping’s you can use as stir sticks. The glove's you can get at home dumpo (I liked the powered ones, easier to get on). The brushes you can also get at Lowes or Home Depot (chip brushes.99ea.) I used cabosil and milled fiber in everything. I ended up using 2-5qt containers of the fiber and 2-4 gal buckets of cabosil. I still have a little left of each. |
|
|
|
|
Keeganino
Grand Poobah
Joined: October-27-2009 Location: North Carolina Status: Offline Points: 2063 |
Post Options
Thanks(0)
Quote Reply
Posted: September-20-2010 at 1:42pm |
|
I used 2 layers of 3/4 ply from the pylon forward so I had that step down and notches for crossmembers to deal with. I cut my pieces as long as each section, and laid them that way. In the picture below you can see where I did not wrap the inside faces of the notches. I thought about wrapping those later but since I bedded everything with filled epoxy did not see the need for fabric there. Hope this answers your question.

|
|
|
"working on these old boats may not be cost effective but as it shows its what it brings into your life that matters" -Roger
1973 Skier |
|
|
|
|
Post Reply
|
Page <1 678910 11> |
 Tweet
Tweet
|
| Forum Jump | Forum Permissions You cannot post new topics in this forum You cannot reply to topics in this forum You cannot delete your posts in this forum You cannot edit your posts in this forum You cannot create polls in this forum You cannot vote in polls in this forum |


 Topic Options
 Ranger wrote: