 Boats For Sale:


79 nautique rebuild |
Post Reply 
|
Page <1 23456 12> |
| Author | |
wayoutthere 
Senior Member 
Joined: February-28-2020 Location: Florida Status: Offline Points: 391 |
 Post Options Post Options
") Thanks(0) Thanks(0)
 Quote Reply Quote Reply
 Posted: September-26-2021 at 11:52am Posted: September-26-2021 at 11:52am |
|
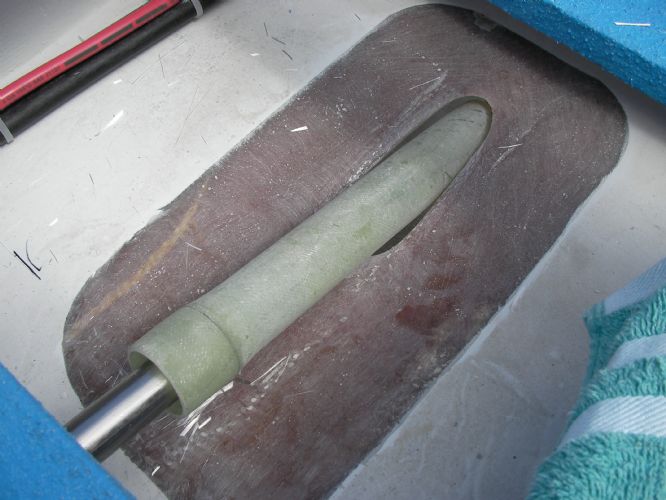
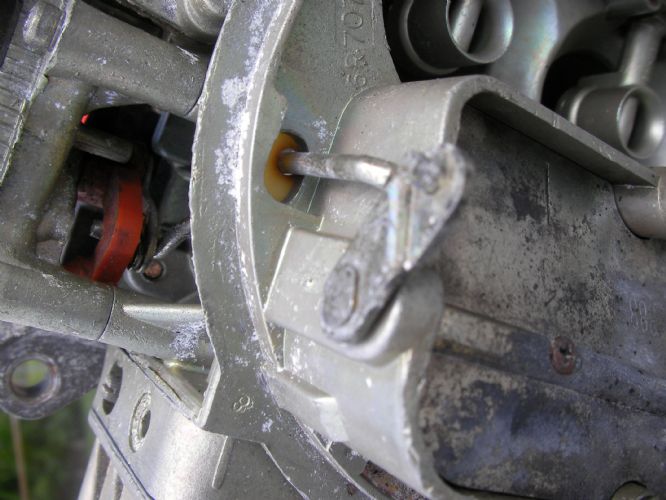
The tube is for the packing gland, it's a tube i made from epoxy and 1708 bi-axial fiberglass.
Originally the tube didn't stick out, just the shaft like you said. The original pocket molded into the hull required alot of build up in order to use the bronze piece. This one had room to get glassed over with the shaft intalled without much compound, maybe 4 oz. Thanks, should have asked last night.
|
|
 |
|
|
8122pbrainard
Grand Poobah 

Joined: September-14-2006 Location: Three Lakes Wi. Status: Offline Points: 41040 |
Post Options
Thanks(0)
Quote Reply
Posted: September-26-2021 at 11:44am |
I'd cut it off flush with the hull.
|
|
|
|
|
8122pbrainard
Grand Poobah
Joined: September-14-2006 Location: Three Lakes Wi. Status: Offline Points: 41040 |
Post Options
Thanks(0)
Quote Reply
Posted: September-26-2021 at 11:41am |
It's a fiberglass log. No bronze one here.
|
|
|
|
|
ultrarunner
Platinum Member 

Joined: October-02-2005 Location: Ridgefield, Ct. Status: Offline Points: 1810 |
Post Options
Thanks(0)
Quote Reply
Posted: September-26-2021 at 10:59am |
|
What's the tube for? Should be just shaft exiting the boat, or were the older boats setup differently. Are you installing a traditional log in the boat?
|
|
|
|
|
wayoutthere
Senior Member
Joined: February-28-2020 Location: Florida Status: Offline Points: 391 |
Post Options
Thanks(0)
Quote Reply
Posted: September-26-2021 at 10:53am |
 
More work to leave the tube and glass it in underneath, questions are will the shaft seal get lubricated and would it cause more/less disturbance to water for the prop (it could be streamlined somewhat)
|
|
|
|
|
wayoutthere
Senior Member
Joined: February-28-2020 Location: Florida Status: Offline Points: 391 |
Post Options
Thanks(0)
Quote Reply
Posted: September-25-2021 at 4:21pm |
4 layers on the front, 2 vertical, 2 horizontal that overlap and a cap, first time i wrapped 1708 like that without difficulty, i think the epoxy made a difference. 2 layers laid like shingles front to back, 2 layers the same way back to front with a cap mostly over the rear. Something like 640 sq inches total for 5 layers. Tomorrow i'll cut and oval out the tube underneath. Float test the boat tuesday/wednesday if it goes alright. Still waiting on floats from holley, they shipped everything individually.
|
|
|
|
|
wayoutthere
Senior Member
Joined: February-28-2020 Location: Florida Status: Offline Points: 391 |
Post Options
Thanks(0)
Quote Reply
Posted: September-20-2021 at 10:19pm |
|
Thanks keno,
That's good news, like to hear it run by next weekend.
|
|
|
|
|
KENO
Grand Poobah
Joined: June-06-2004 Location: United States Status: Online Points: 10745 |
Post Options
Thanks(0)
Quote Reply
Posted: September-20-2021 at 7:44pm |
|
That gives the same end result as the way the TRB diagram shows the wiring.
The choke, coil, distributor power lead, and alternator excitation are all in parallel your way and the diagram way. They are all hot whenever the key is in Run or Start
|
|
|
|
|
wayoutthere
Senior Member
Joined: February-28-2020 Location: Florida Status: Offline Points: 391 |
Post Options
Thanks(0)
Quote Reply
Posted: September-20-2021 at 7:21pm |

Hopefully the last stupid electrical question. I have to rebuild this carburetor, one of the new parts is the choke cap, when i was trying to get the engine running and during the electrical checks the choke was disconnected and the engine seemed better. Thinking it was bad is why the new one was ordered, now i'm wondering if it's wired wrong, (already had 1 wire goofed up) my buddy asked if it was hot all the time or only once per key cycle. I have no idea how it works. Looking at the trb diagram the choke gets hot from the ballast, but the purple ignition wire is on the ballast as well. since the ballast is gone i ran the purple wire and wired everything (that i think gets the purple wire in a line as the wire got to it. The purple wire starts at the key ign screw then goes to the choke, then to the coil, the purple wires from the distributor and alternator run to the coil. Should the choke get it's hot from another source, i don't want to burn up the ignition module, coil or new choke for that matter. Or is it o.k. how i have it. The choke is grounded to the block. Thanks
|
|
|
|
|
wayoutthere
Senior Member
Joined: February-28-2020 Location: Florida Status: Offline Points: 391 |
Post Options
Thanks(0)
Quote Reply
Posted: September-19-2021 at 6:41pm |
Yes, 4200. I hung the strut with the nuts at the top of the bolts for as much room as i could get (see picture) and sqeezed 4200 into the holes while turning the bolts, then oringed the bolts with 4200 on the strut with a grand finale of a bead troweled on with a tongue depressor all around and in about a 1/2 inch, it's squeezed out nice, it's all over my hands arms and hair from oozing on the driveway.
|
|
|
|
|
8122pbrainard
Grand Poobah
Joined: September-14-2006 Location: Three Lakes Wi. Status: Offline Points: 41040 |
Post Options
Thanks(0)
Quote Reply
Posted: September-19-2021 at 5:51pm |
|
Dan,
Are you using 4200 for bedding?
|
|
|
|
|
wayoutthere
Senior Member
Joined: February-28-2020 Location: Florida Status: Offline Points: 391 |
Post Options
Thanks(0)
Quote Reply
Posted: September-19-2021 at 5:43pm |
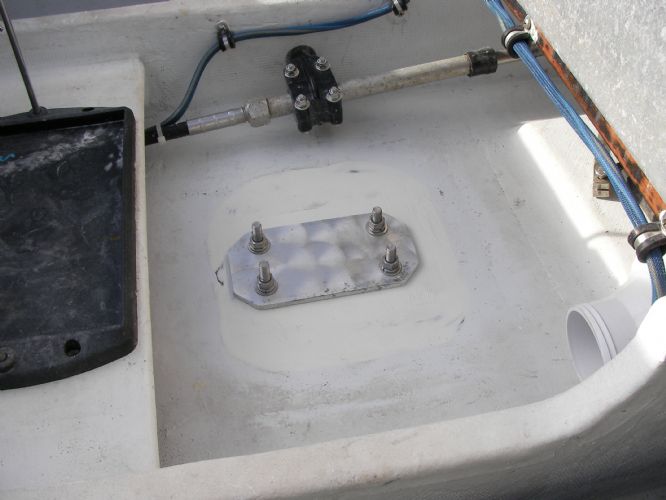
I had to grind flat the hull over the strut to keep the bolts plumb, the plate i hope adds clamping force because i could only get 120 inch pounds on the nuts before the bolts would start to turn.
|
|
|
|
|
8122pbrainard
Grand Poobah
Joined: September-14-2006 Location: Three Lakes Wi. Status: Offline Points: 41040 |
Post Options
Thanks(1)
Quote Reply
Posted: September-19-2021 at 5:41pm |
|
Dan,
The alignment is looking great.
 |
|
|
|
|
wayoutthere
Senior Member
Joined: February-28-2020 Location: Florida Status: Offline Points: 391 |
Post Options
Thanks(0)
Quote Reply
Posted: September-19-2021 at 5:33pm |
|
There will be at least 1 more double check of alignment, and theres a short list of button up items i have to get info/specs on,
Tightening the cutlass set screws coupler to coupler torque and the nut torque inside the coupler. That dual taper shaft is awesome, i had it in an out 8-9 times getting everything set. All things being equal,the shaft alignment is within a 1/16 inline with the center of the boat measuring from the corners to the shaft @ stern tube, and from prop shaft to corners, and coupler alignment is almost .0025 I used the fiberglass shim on the strut and think there is acceptable tolerances between prop strut and hull.        https://youtu.be/UXE-yF_hwU0
|
|
|
|
|
KENO
Grand Poobah
Joined: June-06-2004 Location: United States Status: Online Points: 10745 |
Post Options
Thanks(0)
Quote Reply
Posted: September-15-2021 at 4:50pm |
There's no way I know of to get the plugs out without doing some form of destruction. You could drill a hole and pry and twist them out, but that kinda defeats the purpose of the plug when it has a hole in it, that you then have to plug one way or another.  That's why people epoxy them or replace the complete bowl.
|
|
|
|
|
wayoutthere
Senior Member
Joined: February-28-2020 Location: Florida Status: Offline Points: 391 |
Post Options
Thanks(0)
Quote Reply
Posted: September-15-2021 at 2:35pm |
|
On the way, 2 floats, choke cap w/ coily spring and the secondary metering body plate,
(solid plate, no holes, original was iffy looking) goes beteen gaskets behind secondary metering circuit thing.
|
|
|
|
|
wayoutthere
Senior Member
Joined: February-28-2020 Location: Florida Status: Offline Points: 391 |
Post Options
Thanks(0)
Quote Reply
Posted: September-15-2021 at 1:51pm |
|
Thank you,
I'll order the floats and appropriate gasket(s) Is there a method to remove the old plugs scratch chip pry drill and so on ? What's underneath ? Anything i should include in the parts order ? Again thank you for going the extra mile and doing the research. I'll give it my best effort and pay special attention to the insructions and set up.
|
|
|
|
|
KENO
Grand Poobah
Joined: June-06-2004 Location: United States Status: Online Points: 10745 |
Post Options
Thanks(0)
Quote Reply
Posted: September-15-2021 at 12:17pm |
|
80551 is the list number and it takes a 2.5 power valve.
Those rusty bowl plugs look like they should get an application of epoxy sooner than later. 2 per bowl. Kinda a leak waiting to happen
|
|
|
|
|
wayoutthere
Senior Member
Joined: February-28-2020 Location: Florida Status: Offline Points: 391 |
Post Options
Thanks(0)
Quote Reply
Posted: September-15-2021 at 10:24am |
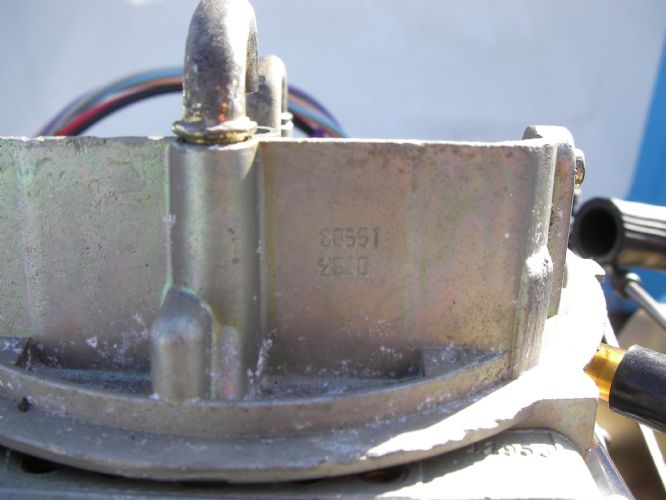 
Thanks Keno, really going out of your way to guide me thru this and i appreciate it. The numbers on the horn read 80551 & 2000, i double checked with the magnifying glass as it does look like 2600 in the pic. There words "list#" do not appear anywhere on the carb. The only other stamped number is on the meter block and it reads 11953 (pointing at it) |
|
|
|
|
KENO
Grand Poobah
Joined: June-06-2004 Location: United States Status: Online Points: 10745 |
Post Options
Thanks(0)
Quote Reply
Posted: September-15-2021 at 4:35am |
|
Here's an example of the list number, it's on the air horn. The Red pointer is pointing at it and it's 50419-1. Since you got a Holley kit by giving them the numbers on the air horn, one of the numbers was the list number. And those needle and seat assemblies on the bottom are what might have junk in them, at least on your primary bowl since the primaries are flooding. 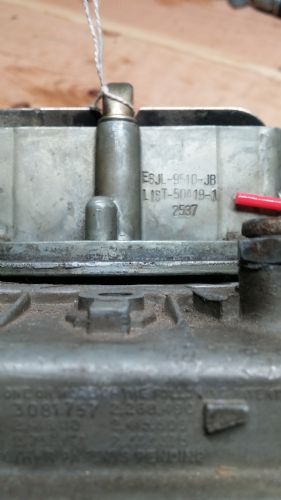 |
|
|
|
|
wayoutthere
Senior Member
Joined: February-28-2020 Location: Florida Status: Offline Points: 391 |
Post Options
Thanks(0)
Quote Reply
Posted: September-14-2021 at 9:03pm |
|
I don't know what the list number is or where to find it
So are those the needle and seat you mentioned earlier may be stuck or dirty ? Thanks for the fast response
|
|
|
|
|
KENO
Grand Poobah
Joined: June-06-2004 Location: United States Status: Online Points: 10745 |
Post Options
Thanks(0)
Quote Reply
Posted: September-14-2021 at 8:38pm |
|
What's your list number?
Post that and there's a good chance a power valve number can be posted for ya In your second picture the top 2 assemblies are the needle and seat for a carburetor with externally adjustable floats and the bottom 2 are the needle and seat for internally adjustable floats. Your video shows that you have internally adjustable floats, so the top 2 assemblies won't get used. That kit covers multiple list numbers and you'll have multiple leftover parts from the kit when you're done.
|
|
|
|
|
wayoutthere
Senior Member
Joined: February-28-2020 Location: Florida Status: Offline Points: 391 |
Post Options
Thanks(0)
Quote Reply
Posted: September-14-2021 at 8:23pm |
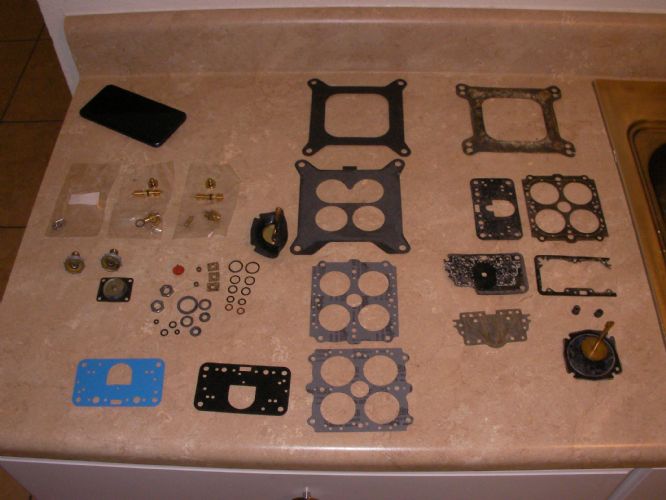 
This is what's left from the kit i have, guessing the 2nd picture is needle and seat/float stops ? The kit is #703-1 renew marine. The power valves are 2.5 and 7.5 the original is still in the carb as it's not numbered. Going to call holley tomorrow and order floats choke and power valve if i can determine which size to get. 1/2 a day reading and watching videos has my head spinning, i can probably get it close but i know theres a big difference between idling on the trailer vs running the boat. Anyone know which power valve would be a great help, Thanks guys. The new shaft arrived this evening.
|
|
|
|
|
wayoutthere
Senior Member
Joined: February-28-2020 Location: Florida Status: Offline Points: 391 |
Post Options
Thanks(0)
Quote Reply
Posted: September-14-2021 at 2:06pm |
Good tip, thank you, i was trying that (tho not while running) with a crescent wrench, no effect. It's covered up, no touch till the last of ignition parts are in. |
|
|
|
|
bwinn
Senior Member
Joined: July-13-2009 Location: ct Status: Offline Points: 391 |
Post Options
Thanks(0)
Quote Reply
Posted: September-14-2021 at 1:58pm |
|
I always keep a little “plastic” type hammer around when messing with that dripping fuel down the barrels situation. I’d tap it near the needle/seat while it’s dripping and see if it changes/stops. Just a tip
|
|
|
|
|
wayoutthere
Senior Member
Joined: February-28-2020 Location: Florida Status: Offline Points: 391 |
Post Options
Thanks(0)
Quote Reply
Posted: September-14-2021 at 1:33pm |
|
Heres todays videos
https://youtu.be/diLj_zDQVU8 https://youtu.be/vkGV9_FbTd0 https://youtu.be/8I4lC2Sd3V8
|
|
|
|
|
wayoutthere
Senior Member
Joined: February-28-2020 Location: Florida Status: Offline Points: 391 |
Post Options
Thanks(0)
Quote Reply
Posted: September-14-2021 at 1:30pm |
 Heres todays follies, took carb off, changed diaphram in the thing next to the choke, discovered choke arm wa s over red plastic lever and fixed (ha) that, put old gasket on thinking there was an air issue.
Choke is disconnected and has been, didnt retry it today. It actually fired immediately then stalled, once bowls filled it's back to running bad but it is starting and idling a touch better. Still a very long way off. Have a rebuild kit for the carb # on the horn direct from holley, but it may as well be astro physics. 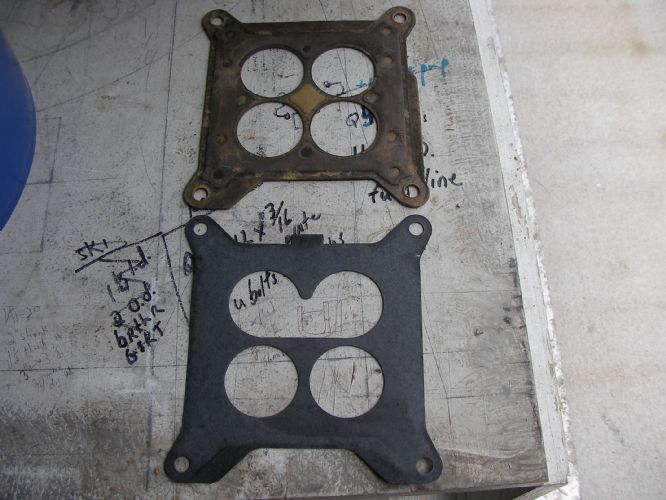  |
|
|
|
|
67 ski nat
Platinum Member
Joined: July-19-2018 Location: Santa rosa Status: Offline Points: 1187 |
Post Options
Thanks(1)
Quote Reply
Posted: September-14-2021 at 12:42pm |
|
Follow kens owner in-house remedies for now
If a carb Rebiuld is needed by others Try Recarbco Hope,AR. 870-777-8821. Lonn is great They did two original CARTER afb perfect |
|
|
|
|
KENO
Grand Poobah
Joined: June-06-2004 Location: United States Status: Online Points: 10745 |
Post Options
Thanks(0)
Quote Reply
Posted: September-14-2021 at 12:26pm |
|
Well, so far you've gotten through everything with a little help along the way, so it's time to tackle a carburetor rebuild/cleaning You can do it.
The list number on the choke horn is used to get the right kit. You probably have junk between the needle and seat for the primary bowl.
|
|
|
|
|
wayoutthere
Senior Member
Joined: February-28-2020 Location: Florida Status: Offline Points: 391 |
Post Options
Thanks(0)
Quote Reply
Posted: September-14-2021 at 10:01am |
|
It's pouring gas down the primaries, i'll wait for the new cap rotor and wires before another try.
Quite a bit of reading tells me it could be a handfull of issues with the carb Bottom line the only thing i know about a carb, it sits on top of the engine and makes a giant sucking sound. Where can i send for a rebuild? Or buy new ? Reading tells me new carb power valve will be too small for my boat.
|
|
|
|
|
Post Reply
|
Page <1 23456 12> |
 Tweet
Tweet
|
| Forum Jump | Forum Permissions You cannot post new topics in this forum You cannot reply to topics in this forum You cannot delete your posts in this forum You cannot edit your posts in this forum You cannot create polls in this forum You cannot vote in polls in this forum |


 Topic Options
 wayoutthere wrote: