Carpet Replacement
Printed From: CorrectCraftFan.com
Category: General Correct Craft Discussion
Forum Name: Common Questions
Forum Discription: Visit here first for common questions regarding your Correct Craft
URL: http://www.CorrectCraftFan.com/forum/forum_posts.asp?TID=9186
Printed Date: April-28-2024 at 3:48pm
Topic: Carpet Replacement
Posted By: anthonylizardi
Subject: Carpet Replacement
Date Posted: December-11-2007 at 7:20pm
|
This is a very common topic. I would to know what it takes to replace the carpet.
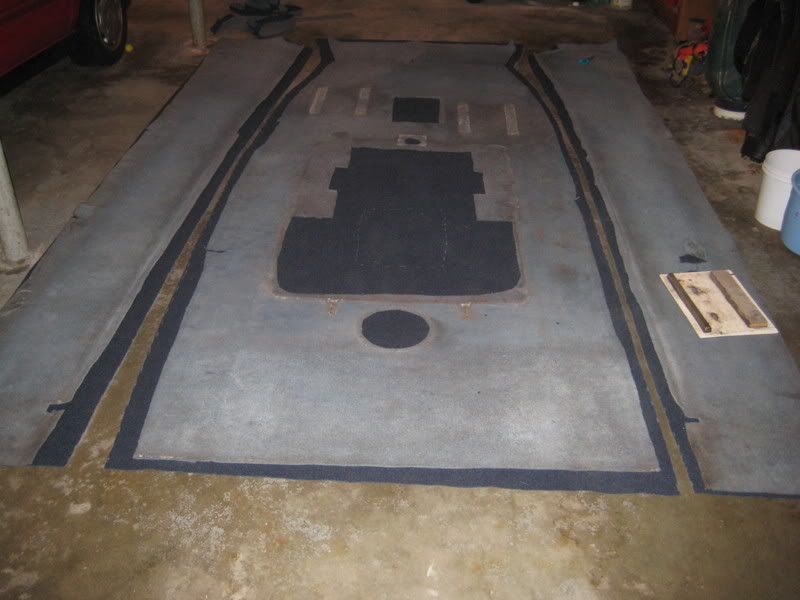
These are the steps I know: 1. Removed the carpet and use a a template. 2. Remove the glue. Any suggestion on how to do it? 3. Floor prep. Do I need to re-seal the floor? Which product should I use? 4. Put glue on floor. What kind of glue? 5. Put carpet. Any lesson learned on how to do it easier. Unrolling it? I am trying to record these steps? Maybe we should have an area of how to so we don't have to ask the same question multiple times. |
Replies:
Posted By: TRBenj
Date Posted: December-11-2007 at 7:41pm
|
1. Correct. Leave the new piece a little big in every direction.
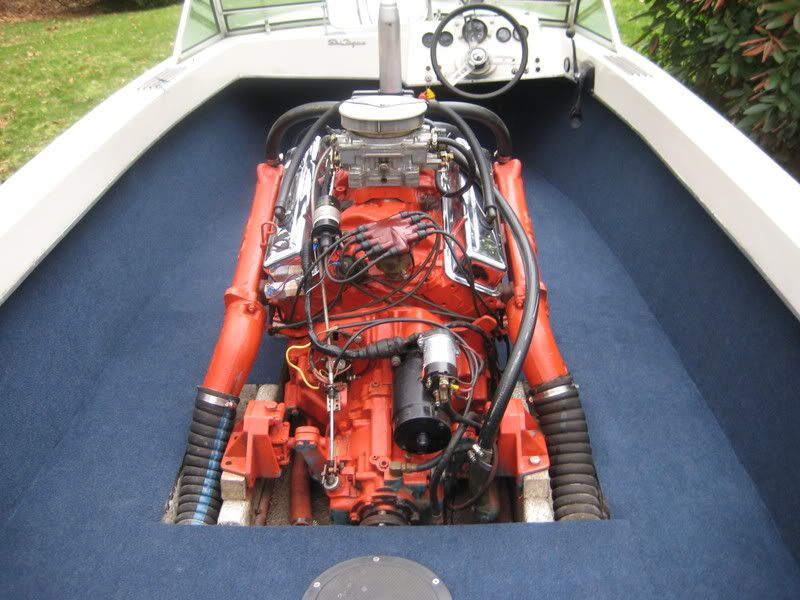
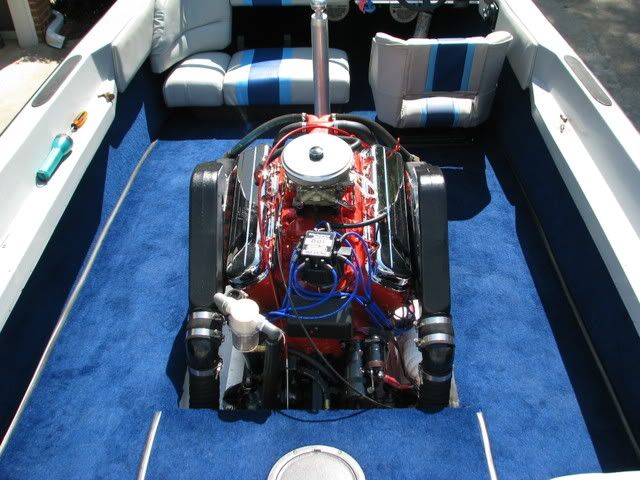
2. I scraped as much off as would come with a metal scraper. To get the last of the residue, I resorted to acetone and a wire brush. Talk about a PITA. 3. Not if the fiberglass is in good shape. If you see any cracks or weak spots, by all means fix/reinforce them with glass. Use epoxy resin and mat/cloth. 4. The indoor/outdoor carpet adhesive from Home Depot or Lowes worked fine for me. I tried spreading it with the ridged trowel, but I found a paint brush worked easier. Be careful not to get the glue on the soft side of the new carpet- this was the hardest part of the job. Have a rag and acetone at the ready for when you hit it by mistake (dont let it dry). 5. Dont try and do it all at once. Lay the carpet perfectly in place first. Then lift up a section and spread the glue. Unroll the carpet back down. Use a heavy duty roller to smooth it and eliminate any wrinkles. Move on to the next section. Do the sides first, followed by the floor. If youre replacing the plastic carpet trim, this complicates things. I found a method that worked OK. Glue the floor down with the exception of the last 12" on the outside. Once dry, trim the carpet so there is a 1/2" gap where you can see the fiberglass floor. Then install the trim by spreading some glue where the carpet will touch it, and forcing the carpet into it. Work small sections at a time until the entire side is done. Once that glue is dry, pull back the carpet with the trim attached (the outside 12" is still not glued down). Work from one end to the other until the entire thing is glued down. Roll it flat. Do the other side the same way. Last step is to do the final trimming around the motor mounts and battery box. Tools: -heavy roller -sharp blades (stanley knife) -paint brush -large regular screwdriver (helps to force the carpet into the plastic trim) -acetone and rag ------------- |
Posted By: anthonylizardi
Date Posted: December-11-2007 at 8:04pm
Excellent: 
I bet a lot of us would find this very helpful. 
Thanks for taking the time to write this up. |
Posted By: bflat53212
Date Posted: July-12-2008 at 11:47am
|
"Leave the new piece a little big in every direction."
No offense, but this really was a bad suggestion. This really screwed me over and cost me a lot of time. Trying to recut the carpet, just a little off in every direction is a pain in the ass. Just my suggestion, don't do this, the old carpet is already stretched from where it needs to be anyways. |
Posted By: 75 Tique
Date Posted: July-12-2008 at 12:35pm
Sorry it didnt work out for you b but I think I would have to support the recommendation. I redid carpet this spring using Tim's guidance above and it came out pretty good,
and I think most people that have redone carpet have cut larger and then trimmed down. To not do so assumes you are going to get it perfect first time laid out on the garage floor. That seems unlikey to me. Advice on this site is about 50% fact and about 50% experience or opinion, which certainly allows for some variety, so whatever works for you. Just my .02 on the recommendation to cut bigger. Anyway, hope the project ultimately came out ok for you (pictures??) and welcome to the site. ------------- _____________ “So, how was your weekend?” “Well, let me see…sun burn, stiff neck, screwed up back, assorted aches and pains….yup, my weekend was great, thanks for asking.” |
Posted By: BuffaloBFN
Date Posted: July-12-2008 at 1:36pm
I don't have a carpet stretcher so I also cut my carpet a little larger than needed. I followed Tim's proceedure almost to the letter(thanks again Sir!), and it came out pretty well. I think I would have tried to do the floor carpet and the trim at the same time without his idea...and that would have been a mess laced with harsh language?!!?
 ------------- http://correctcraftfan.com/diaries/details.asp?ID=2331&sort=&pagenum=12&yrstart=1986&yrend=1990" rel="nofollow - 1988 BFN-sold "It's a Livin' Thing...What a Terrible Thing to Lose" ELO |
Posted By: 88 Nautique
Date Posted: July-12-2008 at 4:36pm
|
Greg,
Did you buy new transition moulding or did your old stuff clean up pretty good? If so, what did use to clean it. I read that someone used 3M 5200 sealer in their moulding to glue the carpet in but that would pretty much guarantee you could never use the moulding again. Also did you just use the carpet glue to glue down the moulding to the floor or did you use something else? That turned out nice. Is that navy blue or a lighter blue and where did you buy it? I need to do my 88. Thanks Kurt ------------- http://www.correctcraftfan.com/diaries/details.asp?ID=1657" rel="nofollow - My 88 Nautique |
Posted By: BuffaloBFN
Date Posted: July-12-2008 at 8:31pm
|
LOL! I'm the one who used the 5200. Part of me wanted to use 4200, but the 5200 tacks up quick...that was a big help. It's a slow job anyway!
As for cleaning, I used soap and water and a small screwdriver on the original trim. There's still some paint overspray of some kind on 1 piece and another is crooked even after being out in the southern sun. It's glued down with the same carpet glue, but I also cut the edges long enough to pinch the outside edge to the side. If I ever do replace it or try to make it 'show', I'll make teak trim to go in its place. Amy wants the dash converted to teak as it is! LOL The carpet is pretty simple; indoor/outdoor from lowe's. I bought it few years ago when the interior was done to match the engine cover. It's a navy blue and very closely matches the original. The original had black fibers mixed in that this does not. I like the brighter change and it sure does feel good under foot. We're going back out after dinner...Whooo hoo! ------------- http://correctcraftfan.com/diaries/details.asp?ID=2331&sort=&pagenum=12&yrstart=1986&yrend=1990" rel="nofollow - 1988 BFN-sold "It's a Livin' Thing...What a Terrible Thing to Lose" ELO |
Posted By: turningpoint84
Date Posted: September-18-2008 at 2:57pm
|
Where did you guys buy the carpet? I'm trying to find some high quality enough that wont fall apart. ------------- Proud 1968 mustang owner and now http://www.correctcraftfan.com/diaries/details.asp?ID=6454&sort=&pagenum1" rel="nofollow - 1970 Mustang |
Posted By: 8122pbrainard
Date Posted: September-18-2008 at 3:50pm
|
Peter.
Have you been around for awhile or have you just found the site? Ether way, Welcome! Is the carpet for the Mustang? Is it carpet now? Do you have the original fiberglass floor pan? We're big on seeing pictures. Got to see some if you have some. ------------- /diaries/details.asp?ID=1622" rel="nofollow - 54 Atom /diaries/details.asp?ID=2179" rel="nofollow - 77 Tique 64 X55 Dunphy Keep it original, Pete < |
Posted By: 88 Nautique
Date Posted: September-18-2008 at 8:31pm
|
Greg, (or anyone else with an 80's hull)
Did you get the 6 foot or 8 foot wide carpet. How many linear feet did you buy? Kurt ------------- http://www.correctcraftfan.com/diaries/details.asp?ID=1657" rel="nofollow - My 88 Nautique |
Posted By: BuffaloBFN
Date Posted: September-19-2008 at 9:59am
I bought mine 2-3 years ago and don't remember the details. I did use 8' and I seem to remember getting 2.5 times the length of the boat...but don't hold me to it! Edit-Looking back at my own pics, it looks like 6 foot. The widest part of your floor is the widest you need. ------------- http://correctcraftfan.com/diaries/details.asp?ID=2331&sort=&pagenum=12&yrstart=1986&yrend=1990" rel="nofollow - 1988 BFN-sold "It's a Livin' Thing...What a Terrible Thing to Lose" ELO |
 88 Nautique wrote:
Posted By: TRBenj
Date Posted: September-19-2008 at 2:19pm
Like Greg said, you can get away with the 6' width. My piece was cut large (6'6") and was wide enough for my '90, which is a bit wider than the 2001. 2.5x the length of the boat will be plenty- 2x for the floor and sides, and an extra 9-10' for panels, etc. ------------- |
Posted By: 88 Nautique
Date Posted: September-19-2008 at 5:24pm
|
Yea, I haven't measured it yet but it doesn't look like a single 8' piece of carpet is enough to do the floor and up the sides to the gunwale. Especially after trimming the floor out. Thanks guys.
Kurt ------------- http://www.correctcraftfan.com/diaries/details.asp?ID=1657" rel="nofollow - My 88 Nautique |
Posted By: harddock
Date Posted: September-19-2008 at 6:55pm
As I only wanted to do the floor (sides were good) and being frugal I bought some 6 x 8 pieces of a outdoor carpet that kinda looks like corduroy. One piece from the kick panel up front to the sides by the motorbox and the second piece did the rear to the gas tank. The seams are almost invisable and the grey floor with blue sides has a nice contrast. Both pieces and 3 cans of 3M spray glue were about $60. |
Posted By: WakeSlayer
Date Posted: February-02-2009 at 6:27pm
|
I am in the middle of carpeting my wife's Mustang. I bought my carpet from pontoonstuff.com as I have had good luck with them before. I use a 6' x 30' piece of 20oz. and will have enough left for some dock bumpers. IIRC it was like $220, no tax, no shipping. ------------- Mike N 1968 Mustang |
Posted By: k9spd403
Date Posted: April-02-2009 at 9:43pm
| has anyone tried that new marine vynl carpeting yet? its a little bit more $$$ but they say its worth it. Just wondering how easy it is to install |
Posted By: SNobsessed
Date Posted: April-02-2009 at 10:52pm
|
K9 - do you have a link on the vinyl carpeting? I have never heard of it. ------------- “Beer is proof that God loves us and wants us to be happy.” Ben Franklin |
Posted By: turningpoint84
Date Posted: April-17-2009 at 3:59pm
Sorry I took so long to respond, i put this off over the winter and getting started on it again. i need to get this finished so i can get in some pulls! ANyways I'll take some pictures tom. morning and post them up for you. I'd appreciate any help. I'm totally frustrated with the wiring. once i knock that out I'll have the carpet to deal with then painting and putting it all back together again! ------------- Proud 1968 mustang owner and now http://www.correctcraftfan.com/diaries/details.asp?ID=6454&sort=&pagenum1" rel="nofollow - 1970 Mustang |
Posted By: turningpoint84
Date Posted: April-17-2009 at 4:08pm
WOW finally some great carpet, i bought the 28OZ I've been looking for the really nice thick stuff, I really appreciate it! I bought 25x8.6 , that has to be more then enough! once again thank you! i also bought their sealant i hope it works fine, seems like it should. ------------- Proud 1968 mustang owner and now http://www.correctcraftfan.com/diaries/details.asp?ID=6454&sort=&pagenum1" rel="nofollow - 1970 Mustang |
Posted By: k9spd403
Date Posted: April-20-2009 at 4:25pm
|
http://www.boatcarpetbuys.com
get them to send you a sample the material is kool and i bet its so much cooler on your feet than my black carpet is |
Posted By: Tomski
Date Posted: June-25-2009 at 10:19am
|
Replacing it like for like must be easy!! When I did mine I replaced it as one piece (like the one I took out) so the floor and the hull sides are all one bit of carpet - now that is a challenge I can tell you! To make it just that bit more difficult for myself i chose a carpet with a ribbed weave, so I had to get that to line up fore and aft as well. I am still pleased with the result a year on every time I look at it! There's just one little crease, but that's hidden by the obs seat base anyway.
Only after completing mine did I look at the 2001 that was stored next to mine and see that the original CC carpet was separate pieces - now that would have been easier! ------------- Easily Parted From Money |
Posted By: mr_beat
Date Posted: June-25-2009 at 2:40pm
We were able to get away with the 6 footer also. Folded in half at the bottom of the gunwale as shown and did wall, then the floor sides, then hit with a tucking tool in the crease and cleaned up the molding with laquer. This will give you an idea:


------------- http://www.correctcraftfan.com/diaries/details.asp?ID=4210 - 1985 SN 2001 |
Posted By: mr_beat
Date Posted: June-25-2009 at 2:45pm
|
Also be sure that since you are doing this in pieces, because I see this all the time..
Make sure you match the carpet "grain" or direction on both walls to the floor! ------------- http://www.correctcraftfan.com/diaries/details.asp?ID=4210 - 1985 SN 2001 |
Posted By: tbeard
Date Posted: February-08-2013 at 7:09pm
|
For my 1988 BFN I did not receive the black trim pieces that border the center panel behind the motor. Are they the same type of trim as the side trim pieces? If so I assume they attach to the sides of the panel and not the floor? ------------- Thanks.......Tom |
Posted By: Hollywood
Date Posted: February-08-2013 at 7:21pm
|
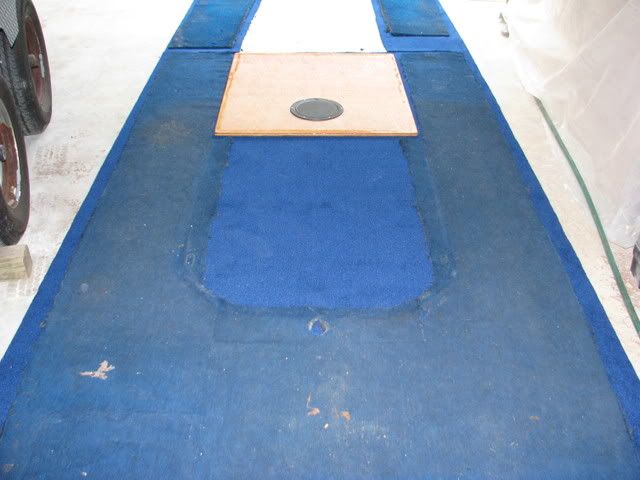
Yes and Yes Tom. Common practice is to omit the floor panel trim and wrap the carpet instead. ------------- |
Posted By: tbeard
Date Posted: February-09-2013 at 2:36am
|
Thanks Kevin, Yes that is what Ryan was saying. So we plan to extend the floor carpet over the 3/4 inch lip the panel sits in. And glue/staple it to the side. For the center panel just wrap around the edges and glue/staple on bottom??? ------------- Thanks.......Tom |
Posted By: TRBenj
Date Posted: February-09-2013 at 11:19am
|
I wouldn't say it's "common practice" to omit the trim on the removable panel. You certainly can do so, but it can be tricky on certain boats depending on how that panel is supported. Stringer/floor/support height may need to be altered to account for the extra height of the carpet (when wrapped around he bottom of the panel). A lot of times it's easier to just reinstall the trim... And that's probably what I'd recommend in this instance. ------------- |
Posted By: KRoundy
Date Posted: February-09-2013 at 1:11pm
Ryan - good photos! What is that air-powered tool you are using in those first couple of pictures? The carpet looks great. Well-done.  ------------- Previous: 1993 Electric Blue/Charcoal Ski Nautique Current: 2016 Ski Nautique 200 Open Bow |
Posted By: Waternut
Date Posted: March-20-2013 at 2:00am
|
I cut my carpet in the driveway and my old carpet got destroyed during removal so it was all measure and cut. I almost screwed this up a couple times... My one word of caution is be careful and pay attention. It makes perfect sense to cut the carpet a little longer than you need. However when cutting the middle, you may measure 30" across x 45" long. If you aren't paying attention you may make your cutout 32" across and 47" long because that's bigger but you'd end up with a bigger hole and now you'd have bare floor that isn't covered. As for laying it in the boat... I actually folded mine in half, put the glue down, and carefully unfolded the carpet. I don't own a CC and used the 8.5' wide carpet which is really a bear to work with. ------------- |
Posted By: andrewmarani
Date Posted: February-26-2024 at 9:44am
|
Resurrecting an old thread on carpet. I did some searching on correctcraftfan using google and turned up this thread and some others. This seemed to have the most info on installation but leaves a couple of questions. Measuring my boat I end up with the following largest dimensions. Carpeted floor is 16' x 5'-9" from up under the bow to the corners at the stern. Sides are 16'-4" x 18", the 18" gets me well up under the side's turn down at the highest location. Using those, a 33' x 6' piece would get the interior done. Figure I would order 35' x 6' just to be sure. Thoughts on the amount of carpet to order? I saw various discussions on handling the side to floor seam. Some use the existing trim, which I have and is in decent shape. Not real happy with how that looks in the boat. Some seem to use no trim, just cut the the sides to the floor and then cut the floor to the sides. I think this is my preferred method. Anyone that's done this, how did it turn out and hold up? The final method I saw was to run the floor and sides in one piece. Not sure how that is possible unless you split an 8'-6" piece in the middle and have a seam up front, starting at the pylon and going to the bow. Only a short section of the seam would really be exposed right there at the foot of the observers seat. You could buy an 8'-6" piece and put a seam across the boat somewhere around the front of the engine box. Another option would be to center the 8'-6" piece and run it up the sides as high as it goes, for my boat that would work out to about 16" up the sides, which I think is just enough to hide the edge under the side's turn down. Any way you install this method, getting it to neatly lay up the sides without a wrinkle seems tricky, especially at the tighter side curve as you get toward the dash area. I like this method since there's no side to floor seam to fail but I expect it's hard to do. Anyone installed floor and sides in one piece and how did you do it? My carpet came out in tiny pieces so no template to use. If I cut the sides separately, my thought is to rough out the carpet shape for the floor slightly large and glue it mostly down, trim to fit, then glue the edges. Thanks Andrew ------------- Builder |
Posted By: TRBenj
Date Posted: February-27-2024 at 6:24am
|
Your measurements leave no extra carpet for any of the panels- the most concerning is the rear removable floor panel. I would not count on the floor piece to have enough for that panel in the cut out piece between the sides. There is also the rear panel in front of the gas tank and the 2 panels enclosing the front air box area in front of the driver. I’ve always ordered about 50’ of 6’ wide carpet to account for it all. The only thing I’d consider deviating on from the factory job is the rear removable panel trim, it’s hard to get that fitting and looking right. Wrapping the edges on both the side floor and panel is easier and leaves you with a nice finished look (this is how cc did it from the mid 90’s forward). Those that leave the floor/wall transition untrimmed always looks unfinished to me, especially up close. I would imagine there are runs to contend with as well. |
Posted By: andrewmarani
Date Posted: February-27-2024 at 9:07am
|
I was planning to wrap the floor panel and had not really thought that through. The cut out carpet won't be large enough for sure, so that's an extra four feet or so. The back panel adds another 3'. I won't have an air box, so nothing needed there. I will also have to shim the floor that's epoxied to the stringers up a 1/8" or so to account for the additional thickness of the wrap on the removable floor panel because I can't actually wrap under the epoxied down floor panel before I install it, I can only turn the carpet down onto the edge. I could thin down the underside of the epoxied floor panel an 1/8" deep and a 1/2" back where it lands on the stringer top and then push the carpet under the panel and into that slot with a knife. This detail gets a bit complicated... ------------- Builder |
Posted By: TRBenj
Date Posted: February-27-2024 at 9:27am
|
It would help to remind us which boat you are talking about as it’s hard to keep things straight… Assuming this is for a 86SN, the panel is supported by the main stringers so it shouldn’t sit proud unless you wrapped the carpet 8”+ underneath. The same is not true for a BFN or any 89+ SN, where the panels sit on a ledge or angle aluminum on the secondary stringers- but even then, the amount the panel sits proud isn’t something I would worry about. |
Posted By: andrewmarani
Date Posted: February-27-2024 at 10:32am
|
My boat's a 86 Silver Nautique. Looking at a photo before I took up the floors, there was no ledge at the transition from floor panel to fixed floor on my boat, per your comment. I figured the old vinyl transition strip was doing some support work. Without it I was worried that someone could step on the outside edge of the panel and it would move or tilt since it had no support underneath, so I added a 1/2" ledge of Coosa to create a seat. Sounds like a ledge of some kind is what's done with newer boats. Wish I had thought of the aluminum angle, could run the carpet down the stringer and trap it between the stringer and the aluminum angle. Also would be easy to set the angle to the right height. I think I will just cut the 1/2" Coosa ledge off and use the aluminum angle idea. Probably only take a half hour to cut the ledge off and sand the area flat again. Issue solved, thanks for the discussion! 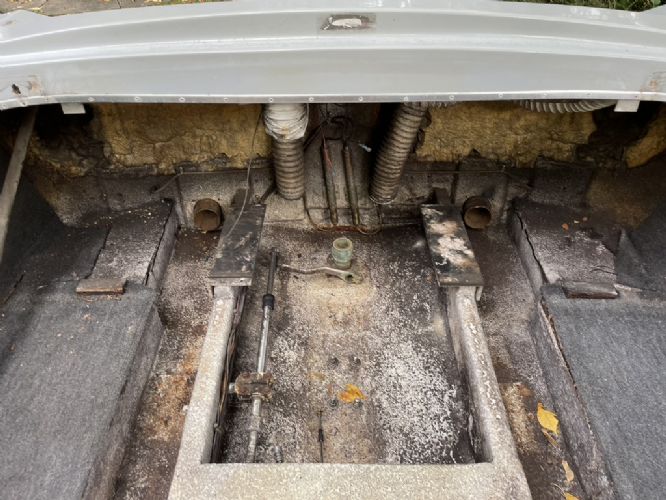 ------------- Builder |
Posted By: TRBenj
Date Posted: February-27-2024 at 10:50am
| I wouldn’t expect any meaningful deflection of the panel in that 6” wide overhang of the exhaust pockets. The carpet trim certainly wasn’t doing anything structurally to help. Any support you add for the panel (again, unnecessary IMO) will infringe on your exhaust (especially the widest point of the mufflers), so be careful. |