New starter | which to get??
Printed From: CorrectCraftFan.com
Category: General Correct Craft Discussion
Forum Name: Common Questions
Forum Discription: Visit here first for common questions regarding your Correct Craft
URL: http://www.CorrectCraftFan.com/forum/forum_posts.asp?TID=50285
Printed Date: April-29-2024 at 5:16am
Topic: New starter | which to get??
Posted By: Spotrep
Subject: New starter | which to get??
Date Posted: October-05-2021 at 9:33pm
|
Ive scoured this forum looking for this debate but havent found anything. If its already been discussed please link and ill delete! What are the pros/cons to a permanent magnet vs field winding starter? What did ya'll choose and why? The previous owner of my newly acquired 85 SN replaced the starter with a starter for LH engine. I have to replace with a RH so i figured i would seek advise from the wise as to which i should go. Skidim has them priced the same I believe. Many thanks fellas! T
|
Replies:
Posted By: Gary S
Date Posted: October-05-2021 at 10:27pm
|
Don't think there has been an actual debate. Here are my thoughts- All the newer Fords,95 I'm sure of and above come with them from the factory. They are much lighter and therefore easier to lift up and install.It also seems that the field winding type is not made anymore unless you buy an import one. Your looking at something like an Arco 70201. A quick web search you can find them for 139.00 ------------- http://www.correctcraftfan.com/diaries/details.asp?ID=1711&sort=&pagenum=1&yrstart=1966&yrend=1970" rel="nofollow - 69 Mustang HM SS 95 Nautique Super Sport |
Posted By: Nautiquehunter
Date Posted: October-06-2021 at 5:50am
| I update the starter and alternator in all my boat builds . That includes a new gear reduction GM style permanent magnet starter. I have been using DB Electric and never had an issue. |
Posted By: KENO
Date Posted: October-06-2021 at 6:47am
|
The biggest issue you'll have with DB Electrical is that they no longer sell a PMGR starter to fit a Reverse Rotating 351W. Once upon a time they did, but not anymore.  The Arco 70201 Gary mentions is a good choice for your Reverse Rotating engine and like he said around 140 or so at numerous places. Some places will nail ya' for about 200 for the same starter, so a little shopping around will save a fair amount of money. The PMGR starters also spin the engine faster and draw less current while doing it.
|
Posted By: KENO
Date Posted: October-06-2021 at 9:15am
|
That old DB electrical part number was SFD-0071. You can find that same starter from different outfits for around 80 bucks Here's an EBAY link to some  http://www.ebay.com/sch/i.html?_from=R40&_trksid=p2380057.m570.l1313&_nkw=sfd+0071&_sacat=0" rel="nofollow - link The starter rotates counter clockwise which is what you need for your reverse rotation engine
|
Posted By: Spotrep
Date Posted: October-06-2021 at 10:07am
|
I actually called DB electrical and told them that my engine is reverse. He gave me a part number. Got it and tested it and the thing rotates the wrong way  Its being refunded, hopefully.. Whats been confusing about all this for someone who is new to boats is the left/right, ccw/cw, terms. I understand now that I have a LH engine and the starter needs to be CCW. But my ignorance led to me ordering the wrong starter. As always ya'll have been fantastic help for me. I owe each of you beer! T |
Posted By: TRBenj
Date Posted: October-06-2021 at 10:28am
| Rotation convention can be tricky… automotive seems to reference things differently from marine. The latter views engine rotation from the rear. A reverse rotation marine engine = RH. Starter rotation is viewed from the business end of the starter itself (nose cone). Remember that starter and flywheel rotation will be complimentary. A front mounted (down low in front of the bellhousing) starter for a RH (reverse rotation) engine will be CCW. |
Posted By: Spotrep
Date Posted: October-06-2021 at 11:27am
|
yeah this is info that would have served me well about a week ago  I always try to operate independently and scour forums before purchasing anything. I think in the future though ill jump to the forum more quickly |
Posted By: desertskier
Date Posted: October-06-2021 at 12:30pm
|
I found this Arco diagram useful to determine rotation. https://cdn.shopify.com/s/files/1/0110/9521/2098/files/tech_determine_marine_starter_rotation.pdf?v=1614357375" rel="nofollow - https://cdn.shopify.com/s/files/1/0110/9521/2098/files/tech_determine_marine_starter_rotation.pdf?v=1614357375 ------------- 92 SN - Owned since 93 99 Pro Air 89 SN - Went to live on a lake in Texas 75 Donzi 16 - Sold in 93 |
Posted By: KENO
Date Posted: October-06-2021 at 1:06pm
|
Is it safe to assume that in your searches you found that a small, minor wiring change is needed when swapping to the PMGR starter. The Arco comes with the appropriate wire ( about 2ft or so of 10 gauge wire with the roght connectors on both ends) and a set of instructions. If you need help with the wiring, or a diagram, just ask here
|
Posted By: Spotrep
Date Posted: October-14-2021 at 7:31pm
|
Welp. Got my Arco starter. Was so excited to see this motor turn the correct direction for the first time. Got it wired and installed, attached the battery, and!!!! nothing. Absolutely nothing. No dash lights at all. No power. I wired according to included instructions i believe.. only other variable would be considerable rain in an uncovered boat. Any ideas?
|
Posted By: KENO
Date Posted: October-14-2021 at 8:01pm
|
You didn't ask for a wiring diagram, but here's one anyways Getting nothing at all sounds like either your 20 amp ignition breaker next to the key is tripped and needs to be reset or your main breaker at the back of the engine (near the solenoid you were changing wires on) is tripped and needs to be reset. Also, look at the solenoid and make sure you have the 2 big cables on the same terminal as the supply wire to the engine breaker to be sure you're getting power to the breaker. You should have 3 wires on one of the big terminals and only the new wire that came with the kit on the other one. The diagram shows it in Yellow but you probably got a Red wire with the kit. 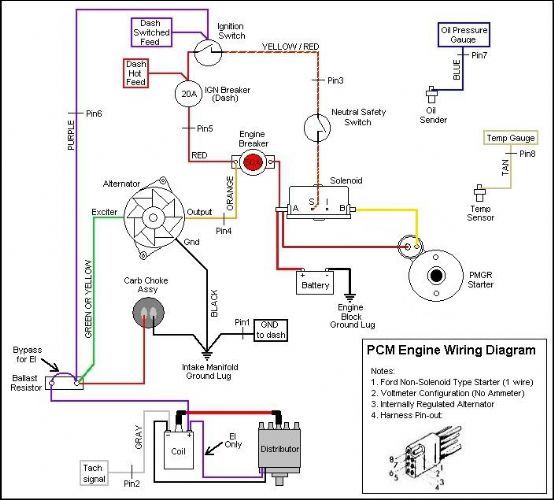 |
Posted By: KENO
Date Posted: October-15-2021 at 8:20am
|
And here are some "video instructions" to make sure you wired it right http://www.youtube.com/watch?v=fVXli0Yzgrk" rel="nofollow - link
|
Posted By: Spotrep
Date Posted: October-15-2021 at 10:52am
|
Keno you’re fantastic to have on this forum. You’ve been so helpful on all my posts. The way I have it wired now is correct for the wires on the diagram, but I have 2 additional wires on the “b” side of the solenoid..? I’ll take a picture when I get home. Idk if it’s relevant but I have a commander 351 and not a PCM. |
Posted By: KENO
Date Posted: October-15-2021 at 12:34pm
No fair saying that till the boat is running For the area you're concerned with, the diagram works good for your Commander, but there are differences elsewhere in the wiring When you mentioned no power at all, does your blower or bilge pump work? If they do, it means you're getting power to the dash hot feed. If not, check voltage at the places circled in the diagram below, with a multimeter to see where you have 12 ish volts and where you have zero. 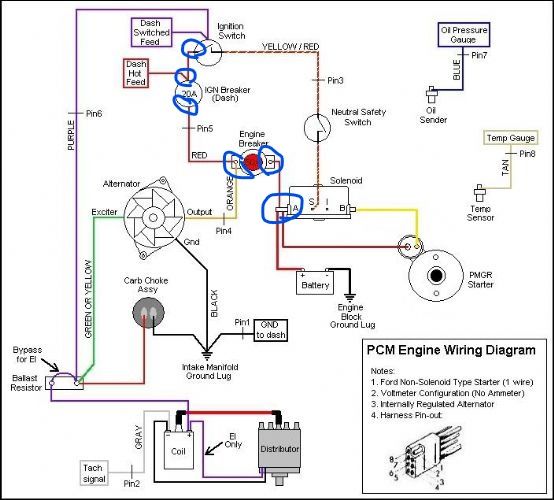 If you do have power to the dash hot feed (bilge pump, blower work), then check that your shifter is in neutral, you may have to wiggle it a little) since if it's not in neutral you'll just get deafening silence.
|
 Spotrep wrote:
Posted By: Spotrep
Date Posted: October-15-2021 at 2:04pm
|
Ill see what my efforts tonight accomplish and report back! |
Posted By: Spotrep
Date Posted: October-15-2021 at 8:29pm
| It’s running! Now to get it running well.. |
Posted By: KENO
Date Posted: October-16-2021 at 5:48am
This is normally the spot where you're supposed to say what your issue was and how you fixed it
|
Posted By: Spotrep
Date Posted: October-17-2021 at 12:49am
|
Oh yes! It seems the previous owner had it wired incorrectly. I moved the starter wire to the same post that the battery wire was on and added the additional included wire on the opposite post to run to the start in accordance with instructions. BUT the wire that runs to the engine breaker was on “B” post on the solenoid. So I swapped the wire to the engine breaker to the same side that the batter cable was on and it runs. Cant say for certain that it is correct the way it is though. I don’t know for sure that the wires are on the right side of the solenoid and there is an addition wire on b side that I unhooked from solenoid because it isn’t on the diagram and I have low confidence in how it’s been wired |
Posted By: KENO
Date Posted: October-17-2021 at 7:46am
|
The "A" and "B" posts on the solenoid just get connected internally when the solenoid is energized, so the battery, starter and supply to the breaker can all be ganged together on either post, with the wire going down to the starter solenoid on the other post. As a guess, your extra wire that you disconnected must either feed power somewhere or maybe it was used to send power from the alternator to the battery. Would it be something like an Orange 10 gauge wire? If so, that would be from the alternator for supplying the battery. Different than the diagram but it would accomplish the charging.
|
Posted By: Spotrep
Date Posted: October-17-2021 at 2:37pm
| Yes it is orange! You’re a wizard! Where is it supposed to go? |
Posted By: KENO
Date Posted: October-17-2021 at 2:58pm
I'm more of a whizzer , but it's probably the alternator output (you could verify that the other end hooks to the alternator output by tracing the wire or using an ohmmeter ) and it could go with the 3 Red wires on the solenoid (you'll have 4 wires on that post) and it will charge the battery.In the diagram for a PCM engine earlier, it's the Orange wire that hooks to the 50 amp breaker output. Different companies did it different ways. You can hook it to the breaker output or the input side like on the solenoid. Couple of different wiring philosophies but both work.
|
Posted By: Spotrep
Date Posted: October-18-2021 at 7:53pm
| Whelp. The new starter decided to shred the teeth in the ring gear. Currently in the process of pulling transmission so I can get to flywheel. We’ll see how damper plate looks. May be replacing it if it looks iffy at all since I’ll be in there already. Anything I need to know on ring gear? I know there are 2 different numbers of teeth but I know nothing other than that. Got a fake a lake today so once I get the ring gear on I can start making sure this thing runs reliably! |
Posted By: KENO
Date Posted: October-18-2021 at 8:23pm
|
Must be all that starter power or some bad teeth to begin with 157 teeth on the gear
It fits a 1967 Mustang with a 289 and a 4 speed , not an automotive 351 that uses a different flywheel and ring gear than the marine version. A couple of part numbers for cross reference if you can't get one of these part numbers. Your local parts store should be able to get one for somewhere in the 20 dollar range ATP-ZA-503 Pioneer FRG 157N You don't want to flip the old gear because the front and back aren't the same where it seats on the flywheel, and the installed depth will be different. Here's a thread in the link that tells why flipping the old gear isn't a good thing to do Read the whole thread because the original thought of flipping it turned out to be "not so good" http://www.correctcraftfan.com/forum/forum_posts.asp?TID=50089&KW=ring+gear&title=starter-and-ring-gear-replacement" rel="nofollow - link
|
Posted By: Spotrep
Date Posted: October-18-2021 at 9:12pm
| Haha you don’t need to convince me not to flip it. Seems silly to save $20 for it to just fail again and have to pull the transmission back out later |
Posted By: KENO
Date Posted: October-19-2021 at 6:24am
|
Ha ha right back, glad you're getting a new gear. Next you'll probably need some convincing to ditch the fake a lake assuming it looks like a toilet plunger with a hose fitting it'll work OK ish, but it's not on the CCF favorites list since as you move around in the boat, there's always that chance that it loses it's seal to the hull or falls over and you don't know it......and then you have no flow to the engine,,,,,,,,,,,and then things get worse from there. You can do a search here on CCF for "Timmy T" or the "hose in a bucket" method for a couple of alternatives.
|
Posted By: Spotrep
Date Posted: February-21-2022 at 10:49pm
Hello fellas! Apologies for the long wait. I got married in November and then we found out in December my wife is pregnant It’s warmed up a bit in Texas for me to resume my project. I got the transmission pulled and out of the boat. Should I do any work to it while it’s out? I pulled the bell housing and gained access to the damper plate and flywheel. Everything is vey rusty. I’ve got the front of the tranny soaking in evaporust. The flywheel was scaly as well. Should I replace the damper? I’ll post photos tomorrow when I can get to a computer. Failed to get ring gear off tonight. I’m gonna take the flywheel to a shop and ask them to change it for me. I got it to move but am feeling done for the night haha. |
Posted By: Wilhelm Hertzog
Date Posted: February-22-2022 at 1:03am
|
I recently had to https://www.correctcraftfan.com/forum/forum_posts.asp?TID=49692&PID=599586&title=transmission-toast#599586" rel="nofollow - pull my transmission , and took the opportunity to https://www.correctcraftfan.com/forum/forum_posts.asp?TID=50089" rel="nofollow - replace damper plate (which was shot), ring gear and starter . Ring gear removal and installation was far less of a problem than I anticipated (I'm a total newbie to all of this). General advice on the forum seems to be to replace the damper if in doubt. I definitely think the fact that my damper had not been replaced in almost forty years contributed to my transmission failure. ------------- 1982 Ski Nautique PCM351W RR II Velvet Drive 10-17-003 1:1 II PerfectPass Stargazer Do not go gentle into that good night. Rage, rage against the dying of the light. |
Posted By: Morfoot
Date Posted: February-22-2022 at 6:21am
|
Seeing as how you already have it apart....I'd replace it. Better to be safe than sorry. ------------- "Morfoot; He can ski. He can wakeboard.He can cook chicken.He can create his own self-named beverage, & can also apparently fly. A man of many talents."72 Mustang "Kermit",88 SN Miss Scarlett, 99 SN "Sherman" |
Posted By: Spotrep
Date Posted: February-22-2022 at 1:52pm
|
I agree just didn’t wanna spend $200 or so haha. Thinking about painting flywheel before I put ring gear on. I’ll tape off all mating surfaces first but do y’all see any harm in painting surface between damper plate and flywheel? |
Posted By: Spotrep
Date Posted: February-22-2022 at 1:53pm
| Last night was using a torch to get ring gear off. Got it to move a little bit. We have a press at my work got it off in 20 seconds haha |
Posted By: Wilhelm Hertzog
Date Posted: February-22-2022 at 3:52pm
I painted mine (carefully taped off mating surfaces) to prevent future corrosion (had quite a bit of rust when I took it off). No problems so far. ------------- 1982 Ski Nautique PCM351W RR II Velvet Drive 10-17-003 1:1 II PerfectPass Stargazer Do not go gentle into that good night. Rage, rage against the dying of the light. |
Posted By: Spotrep
Date Posted: February-22-2022 at 4:00pm
|
Took a picture yesterday. Please disregard state of bilge haha  here is front of trans  |
Posted By: Spotrep
Date Posted: February-22-2022 at 4:02pm
|
Is this the part number for the damper i need? Got a 1;1 Velvet drive. SKIDIM:
R140001 |
Posted By: KENO
Date Posted: February-22-2022 at 6:09pm
If you want to spend a lot, that'll work. What gets used a lot by CCF people with a Borg Warner is an Alto/Sachs damper, part number ALTDA-106 or 106A. The 106 is advertised a lot for a Chevy 14 inch flywheel and needs a trim to fit the Ford flywheel or if you find a 106A, it costs about 20 bucks more but it's already trimmed to fit. You only use 3 of the original 6 mounting bolts but it's , let's say CCF tested and proven" Here's a link to a thread with some pictures http://www.correctcraftfan.com/forum/forum_posts.asp?TID=49835&KW=&title=drive-damper-diameter" rel="nofollow - link And another link with plenty of reading http://www.google.com/search?q=correctcraftfan+ALTDA-106&oq=correctcraftfan+ALTDA-106&aqs=chrome..69i57j69i59.15137j0j4&sourceid=chrome&ie=UTF-8" rel="nofollow - http://www.google.com/search?q=correctcraftfan+ALTDA-106&oq=correctcraftfan+ALTDA-106&aqs=chrome..69i57j69i59.15137j0j4&sourceid=chrome&ie=UTF-8" rel="nofollow - link |
Posted By: TRBenj
Date Posted: February-22-2022 at 6:21pm
| https://skidim.com/damper-drive-plate-gm-small-block.html |
Posted By: Gary S
Date Posted: February-22-2022 at 6:22pm
|
Prices have shot up and many places are out of stock. All ready trimmed ones have gone up almost 50 bucks at the place many of us buy them. Already trimmed- http://bpi.ebasicpower.com/shop/marine-transmissions-and-parts-borg-warner-velvet-drive-zf-hurth-paragon/borg-warner-velvet-drive-parts/drive-damper-flex-plate-marine-triangular-for-volvo-io-ford-and-gm-120-8-1446" rel="nofollow - http://bpi.ebasicpower.com/shop/marine-transmissions-and-parts-borg-warner-velvet-drive-zf-hurth-paragon/borg-warner-velvet-drive-parts/drive-damper-flex-plate-marine-triangular-for-volvo-io-ford-and-gm-120-8-1446 Trim yourself- http://bpi.ebasicpower.com/shop/marine-transmissions-and-parts-borg-warner-velvet-drive-zf-hurth-paragon/borg-warner-velvet-drive-parts/drive-damper-flex-plate-for-velvet-drive-26-spline-1004-650-006-as4-k2c" rel="nofollow - http://bpi.ebasicpower.com/shop/marine-transmissions-and-parts-borg-warner-velvet-drive-zf-hurth-paragon/borg-warner-velvet-drive-parts/drive-damper-flex-plate-for-velvet-drive-26-spline-1004-650-006-as4-k2c ------------- http://www.correctcraftfan.com/diaries/details.asp?ID=1711&sort=&pagenum=1&yrstart=1966&yrend=1970" rel="nofollow - 69 Mustang HM SS 95 Nautique Super Sport |
Posted By: KENO
Date Posted: February-22-2022 at 6:25pm
|
Good price at Skidim like in TRB's link, but it looks like they don't have any
|
Posted By: Spotrep
Date Posted: February-22-2022 at 6:43pm
|
What would I do with y’all?! Thanks a bunch guys |
Posted By: Gary S
Date Posted: February-22-2022 at 6:43pm
|
I bought one here just last week- http://www.ebay.com/itm/263261551321?epid=1454654804&hash=item3d4b9c7ad9:g:g3AAAOSw9AtZ4P-U" rel="nofollow - http://www.ebay.com/itm/263261551321?epid=1454654804&hash=item3d4b9c7ad9:g:g3AAAOSw9AtZ4P-U ------------- http://www.correctcraftfan.com/diaries/details.asp?ID=1711&sort=&pagenum=1&yrstart=1966&yrend=1970" rel="nofollow - 69 Mustang HM SS 95 Nautique Super Sport |
Posted By: KENO
Date Posted: February-22-2022 at 7:31pm
|
I didn't buy one of these but I stumbled onto it on EBAY a few minutes ago, just cause I wanted to see if I could find a better price than Gary http://www.ebay.com/itm/281784488333?hash=item419baa118d:g:984AAOSwZexfEKWV" rel="nofollow - link It even says Sachs on it and free shipping too Hang in there Spot, he'll probably come up with a better deal. Edit PS ......... if you go to the Fred Warner website you'll save a little more, not much but a little bit
|
Posted By: Gary S
Date Posted: February-22-2022 at 8:57pm
|
I saw that one Ken but it scared me off since the description never mentioned Sachs or Alto. I'm concerned they used a generic picture. Here is the verbiage- HGE 4K2C Marine Drive Plate GM Chevy 305 350 26 Spline Velvet Drive 1004-650-006 In the description it says made in China  Here is the other listing,the one I bought- ALTO DAMPER PLATE DA-106 *NEW* It came in a Sachs box.... Made in America......Brazil in this instance  ------------- http://www.correctcraftfan.com/diaries/details.asp?ID=1711&sort=&pagenum=1&yrstart=1966&yrend=1970" rel="nofollow - 69 Mustang HM SS 95 Nautique Super Sport |
Posted By: Morfoot
Date Posted: February-23-2022 at 8:46am
 from the looks of that picture with all that rust.....I'd definitely replace it. from the looks of that picture with all that rust.....I'd definitely replace it. ------------- "Morfoot; He can ski. He can wakeboard.He can cook chicken.He can create his own self-named beverage, & can also apparently fly. A man of many talents."72 Mustang "Kermit",88 SN Miss Scarlett, 99 SN "Sherman" |
Posted By: Spotrep
Date Posted: February-23-2022 at 11:52am
|
Ill order it today. Fred Warner has them for $88 http://https://www.fredwarner.net/product/marine-drive-plate-gm-chevy-305-350-boat-damper-26-spline-1004-650-006-bbd0107ul/" rel="nofollow - http://https://www.fredwarner.net/product/marine-drive-plate-gm-chevy-305-350-boat-damper-26-spline-1004-650-006-bbd0107ul/ The PO of this boat struck the prop on the trailer. I need to replace or repair the prop. I am hoping shaft isn't bent, I don't even want to check. Im gonna replace the strut bearing and rope seal I think its called. any quick tips I should be aware of? Im gonna fix the trailer to work for the boat. I think im just gonna lift the trailer an inch or two with either shackles of maybe blocks and longer U-bolts and then lower the prop guard. The trailer is a really nice tandem axle aluminum. |
Posted By: Gary S
Date Posted: February-23-2022 at 12:08pm
|
So your alright putting in a Chinese sourced drive plate? To each his own. ------------- http://www.correctcraftfan.com/diaries/details.asp?ID=1711&sort=&pagenum=1&yrstart=1966&yrend=1970" rel="nofollow - 69 Mustang HM SS 95 Nautique Super Sport |
Posted By: Spotrep
Date Posted: February-23-2022 at 12:30pm
| Ah I didn’t even take notice of that. I’ll buy from your source |
Posted By: KENO
Date Posted: February-25-2022 at 9:01am
So just to make sure I got this right................you're OK with the Brazilian made damper plate since an American company is selling it? How about if an American company is selling something that was made in China or has Chinese parts in it?
|
Posted By: Spotrep
Date Posted: February-25-2022 at 12:58pm
|
Its likely the case that many "made in America" products have parts sourced from the same Chinese plants. My issue with Chinese parts really isn't the quality as Chinese quality has increased significantly (in many cases) but rather their labor practices and id rather not give my money to the CCP. Its possible that the one I ended up buying gets shipped from china in parts and they install the springs and call it Brazilian made |
Posted By: Gary S
Date Posted: February-25-2022 at 1:03pm
|
Brazil and Germany have always had a good working relationship. ------------- http://www.correctcraftfan.com/diaries/details.asp?ID=1711&sort=&pagenum=1&yrstart=1966&yrend=1970" rel="nofollow - 69 Mustang HM SS 95 Nautique Super Sport |
Posted By: KENO
Date Posted: February-25-2022 at 7:43pm
|
Well lucky for all of us, all these big Multinational companies with factories in cheap labor countries all over the world aren't using any of those cheap foreign parts in any of the things we buy and use over here. PS Gary.........................I don't think I'd worry about your Brazilian plate, Alto has gotten them from Sachs who have had them built in Brazil for a long time
|
Posted By: TRBenj
Date Posted: February-28-2022 at 12:35pm
I followed up with Fred Warner as the listing did seem possibly inconsistent… this was their reply: “These are manufactured by HGE and their part number is 4K2C. We used to get these through Alto (DA-106) but their quality was sliding, and the price was about three times higher. So we had them made by HGE for us. The picture is likely still the old one. Looking closely I do see it still says Sachs on it! I'll get the photo updated. The new ones looks identical but the metal is jslightly darker. Thank you, Fredwarner Marine Sales & Support” |
Posted By: Spotrep
Date Posted: March-01-2022 at 12:04pm
|
Soooooo.. According to fred warner I bought the lower quality damper for a higher price? |
Posted By: KENO
Date Posted: March-01-2022 at 1:08pm
|
Or you could just shrug your shoulders and say I got a "good damper at a good price" and make sure you know where to cut it so you don't have to buy another one.
|
Posted By: Spotrep
Date Posted: March-01-2022 at 1:27pm
|
Im pretty confident I can handle it. I was going through William777 thread last night titled "blown" ford 351. It was hilarious and quite the roller coaster. Props to him though for sticking in there Im super impressed. Anyways, you posted a picture in the thread with purple lines showing where to bolt up. Ill get it mounted and strike a line and remove it before I cut. Ive spent a lot of time behind an angle grinder. Sidenote: At what point do I just need to create a new thread for this project?
|
Posted By: KENO
Date Posted: March-01-2022 at 6:38pm
If you want all your info in one thread just keep this one going. Since you started the thread you have the "power" to change the title of the thread if you go back to the first post and select "edit" and then change the title to something catchy like "Spot's 85 SN project" There are lots of long project type threads on CCF.............although William's is pretty much a classic with a little of everything. |
Posted By: Spotrep
Date Posted: March-07-2022 at 7:03pm
|
Well boys I’m a bit perplexed. I (finally) received my damper plate. But the bolt holes aren’t lining up. I’m using my phone right now so can’t post photos but im using the same holes in this thread: https://www.correctcraftfan.com/forum/forum_posts.asp?TID=49835&OB=DESC 2 line up just fine. The third hole is maybe 1/32th of an inch off. Should I break out the die grinder and clearance the hole? Has anyone else experienced this? |
Posted By: KENO
Date Posted: March-07-2022 at 8:21pm
|
Don't even think about it, drop the grinder right now If you do the grinder routine you'll have the center hub off center and have problems getting the shaft thru the hub and if you do manage to get it thru. you'll tear up the damper plate and/or transmission in a short time. Assuming the damper isn't flipped upside down and you're using the right holes on the damper, make sure you're using the right holes on the flywheel. I'd pull the bolts back out and work your way around the flywheel with the damper till you get 3 holes that line up as they should. Maybe you've tried every position already, maybe not. Post a picture when you're at a computer if you still have a problem
|
Posted By: KENO
Date Posted: March-09-2022 at 11:33am
|
You find three holes that work yet ? Of the 6 original holes that the bolts went into, you use 3 of them.
|
Posted By: Spotrep
Date Posted: March-11-2022 at 8:29pm
|
I have indeed! There seems to be a slight amount of bend in the plates that were causing the bolts to bind slightly. I found that if I start them all with only 1-2 threads I had enough clearance otherwise I couldn’t access the holes without cross threading. However- and I’m ashamed to admit- I found some freeze/casting/frost/etc. plugs in the bilge.. we had a cold Texas evening.. and I didn’t winterize. I have to pull the motor in order to access the plug holes so I can drive new ones in. I’m praying that the block is okay. I’m gonna check the oil for water first thing. |
Posted By: KENO
Date Posted: March-12-2022 at 6:43am
|
Well maybe those plugs saved the day, maybe not. Instead of pulling the engine and putting new plugs in, then installing the engine again so you can see if it survived, why don't you get some 1 1/2 inch expansion plugs( aka rubber freeze plugs) and put them in the holes and fire up the engine to check for leaks. Not knowing which plugs popped out, even the difficult ones to access can be done without much problem. Just call it a temporary troubleshooting effort and you can decide what needs to be done from there. Sometimes "temporary" might mean a lot of years if there are no leaks. Now of course, those rubber plugs aren't gonna pop out in another freeze situation. And............. if your engine froze and popped some plugs, there's a good chance that your manifolds froze and have some cracks internally/externally. Here's a link to the plugs at NAPA. In keeping with earlier parts of the thread, as far as their country of origin, it begins with C and ends with hina. http://www.napaonline.com/en/p/NOE6004007" rel="nofollow - link |
Posted By: Spotrep
Date Posted: March-12-2022 at 10:45am
| Great idea Keno! I’ll give this a try! |
Posted By: Spotrep
Date Posted: March-12-2022 at 2:10pm
|
Update: After looking I’m definitely gonna have to pull the motor. Or at least remove the mounts somehow. These are commander mounts. Not sure if they’re too much different but there is no way of getting a plug in otherwise that I can think of |
Posted By: KENO
Date Posted: March-12-2022 at 5:15pm
|
You only have to get the front of the engine an inch or 2 up and have some blocking under the oil pan or harmonic balancer to let you unbolt the front mounts and get good access to the front plugs. If you're equipped to lift it out, just lift it up a little .............or lift it higher or out and do your choice of plugs
|
Posted By: Spotrep
Date Posted: March-12-2022 at 7:18pm
|
I have access to a chain hoist and a carport built out of semi truck frames! I’ll lift a bit, block it for safety, remove mounts, put in new plugs and reverse to get it back in! Then I’ll spend the week getting the flywheel back on as well as the starter and hope she runs - without leaking water everywhere |
Posted By: Spotrep
Date Posted: March-13-2022 at 9:16pm
|
Pulled the motor all the way out. Didn’t seem like much more trouble and having space to work is always nice. I’ll say though working on the boats is so much easier than working on cars, especially late model cars. Drained the oil once I got it out. The oil is very thin but not too dirty. I think that there may be fuel in it. It’s my understanding that water won’t mix very well with the oil. Is this correct? Could I confuse fuel in the oil with water? Also is there anything I should do to the motor while it’s out? |
Posted By: Jonny Quest
Date Posted: March-14-2022 at 12:01am
|
Fuel typically mixes very well with oil. Water has a higher specific gravity than oil, so the oil floats on top of the water. If the engine was running with water in the oil, the oil / water mix doesn't emulsify well and the color typically looks like chocolate milk. Milky brown oil is bad ju-ju. Dark brown oil that is very thin would lead me to evaluate fuel in the crankcase. JQ
------------- Current 2003 Ski Nautique 206 Limited Previous 2001 Ski Nautique Open Bow 1994 Ski Nautique Open Bow Aqua skiing, ergo sum |
Posted By: KENO
Date Posted: March-14-2022 at 7:49am
If everything was good with the engine before this happened, put it back in for it's test run to check for any freeze damage, otherwise one thing could lead to another and another and you'll end up rebuilding the engine
Put the transmission back on while it's out, it's easier than doing it after the engine is back in the boat. If you're thinking about checking the cutlass bearing or wanting to pull the driveshaft for any reason, do it now while you can slide the shaft out front once the prop is off. Much easier than pulling the coupling off to slide it out the back |
Posted By: Spotrep
Date Posted: March-14-2022 at 9:46am
|
This is what I was hoping to hear! Thank you for the confirmation JQ! Keno, I’m 98% sure the cutlass bearing needs to be replaced. I’ll order one today! |