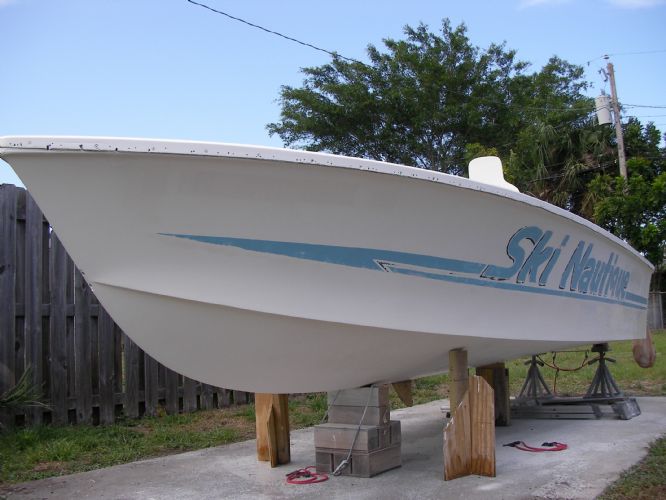
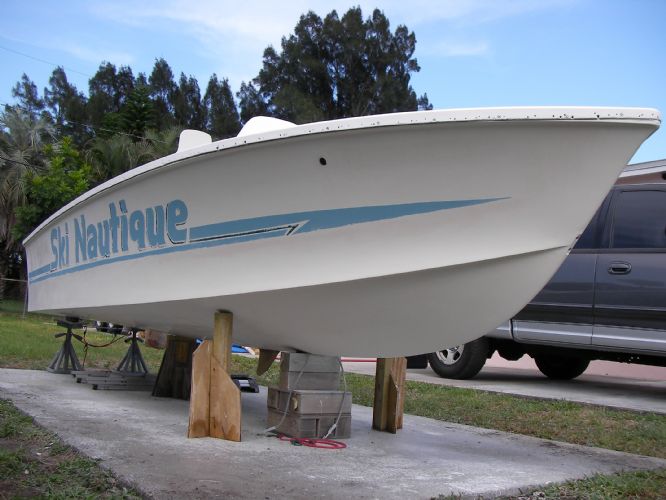
79 nautique rebuild
Printed From: CorrectCraftFan.com
Category: General Correct Craft Discussion
Forum Name: General Discussion
Forum Discription: Anything Correct Craft
URL: http://www.CorrectCraftFan.com/forum/forum_posts.asp?TID=48420
Printed Date: May-01-2025 at 2:19pm
Topic: 79 nautique rebuild
Posted By: wayoutthere
Subject: 79 nautique rebuild
Date Posted: February-29-2020 at 8:08pm
|
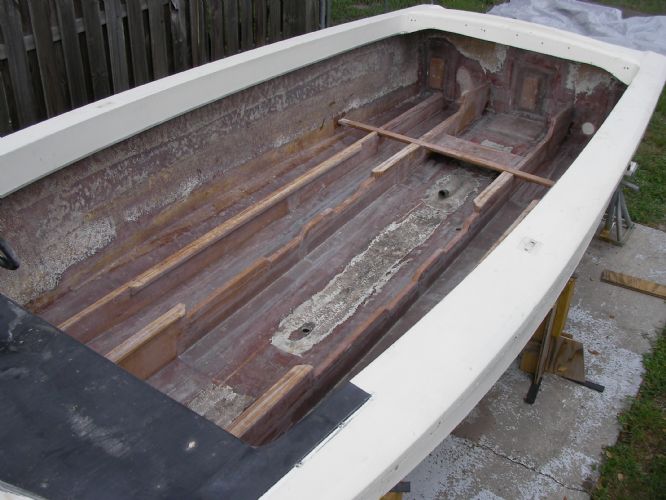
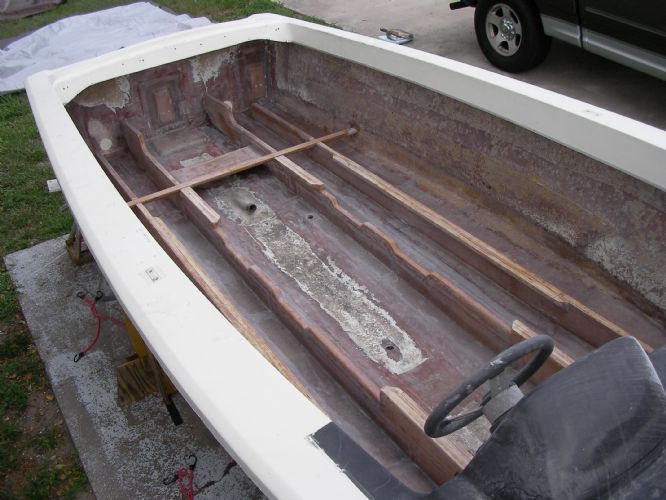
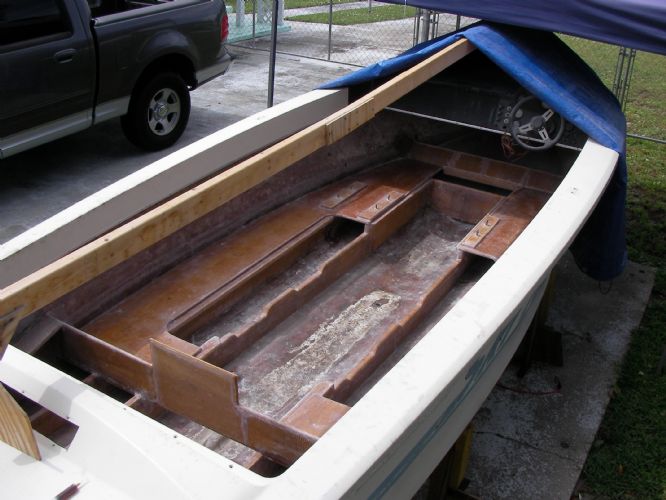
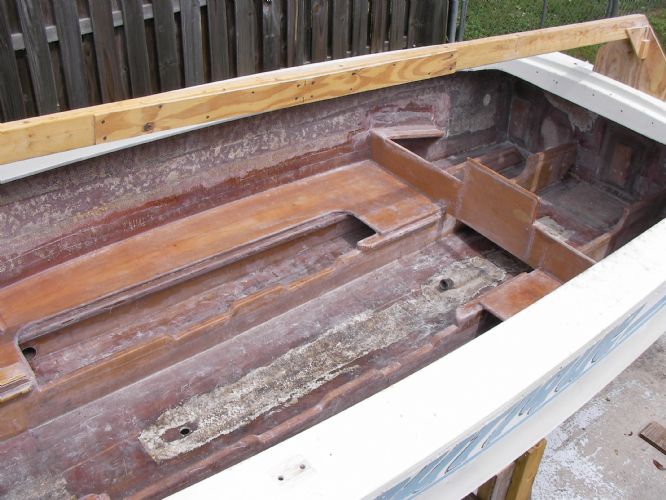
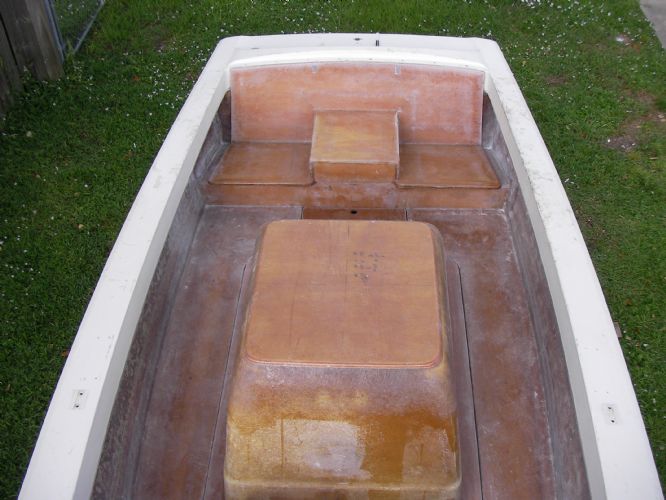
Almost completely stripped, the floor and foam are removed to the bow eye. Next week it goes onto the cradle to get the stringers cut out. and of course i cant figure how to attach pictures. Need some dimensions and an opinion. 1. Rear seat bench bottom box location and height. as in how far from either the transom or the glass panel is the front of the rear bench. 2. Opinions on battery location, id like to build a split rear bench with the battery in the middle. It would be just off the hull bottom between the shaft log and strut. That area would be used as a step to get on/off the swim platform. I also have a cracked windshield port side if you guys can point me to source for that. Thank you |
Replies:
Posted By: samudj01
Date Posted: March-01-2020 at 12:48am
|
I have a partial windshield for sale. Pm for details. ------------- 78 Ski Tique, 72 Skier w/302's, 93 SN w/351 & 17 GS22 w/zr409 Previous - 99 Sport Nautique w/GT40 and 87 Martinique w/351 |
Posted By: wayoutthere
Date Posted: March-01-2020 at 8:15am
|
Sorry, i dont know how to pm or post pics on this site. The icons dont do what they do on the other boat forums im on. How much for the glass? Thank you |
Posted By: KENO
Date Posted: March-01-2020 at 10:11am
You should probably have him measure the windshield and you'll find out that his Tique has a skinnier windshield than your SN does Unless he has an SN windshield hanging around  What are you trying to post pictures from? Phone. Ipad, laptop/PC |
 wayoutthere wrote:
Posted By: wayoutthere
Date Posted: March-01-2020 at 8:05pm
|
Keno thank you, I have a galaxy tablet that i either use to take pictures or another camera with a micro sd then inserted into the tablet. On another site for different type of boats i have 100 or so pics of that rebuild posted so i am 99 percent certain the image size is not a problem. The picture icons here on correctcraft either ask for a http and the other icon turns on the tablet camera. Thank you |
Posted By: KENO
Date Posted: March-01-2020 at 8:57pm
|
I'm not sure if the link will help with posting photos but click on it and there's another link a handful of posts from the end of the thread. Read both links It might help Look for a post by Bri892001. I don't know squat about Ipads and tablets but his info seems to have worked. http://www.correctcraftfan.com/forum/forum_posts.asp?TID=41475&KW=&title=third-party-photo-hosting-uploading-pictures" rel="nofollow - link |
Posted By: wayoutthere
Date Posted: March-13-2020 at 10:12pm
|
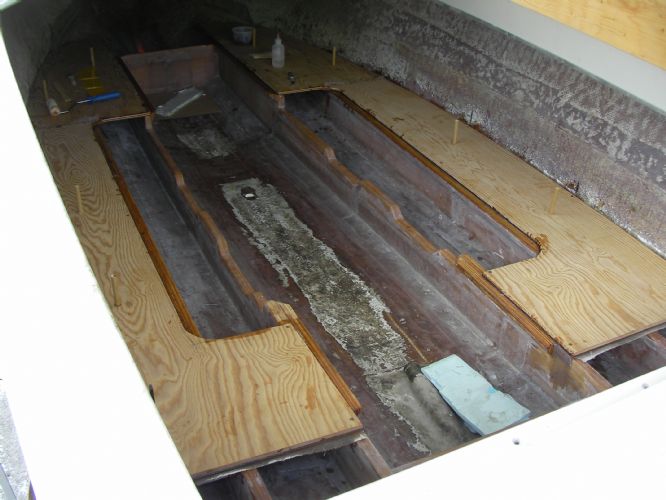
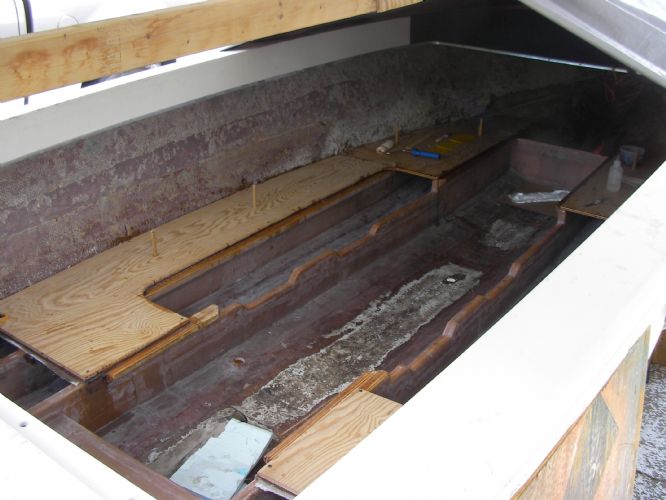
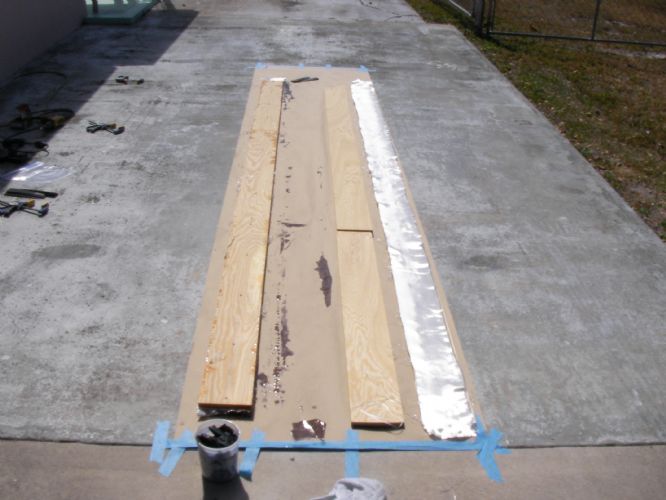
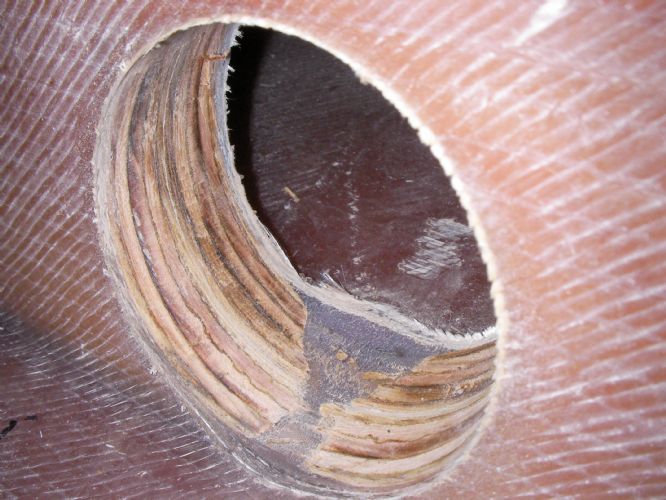
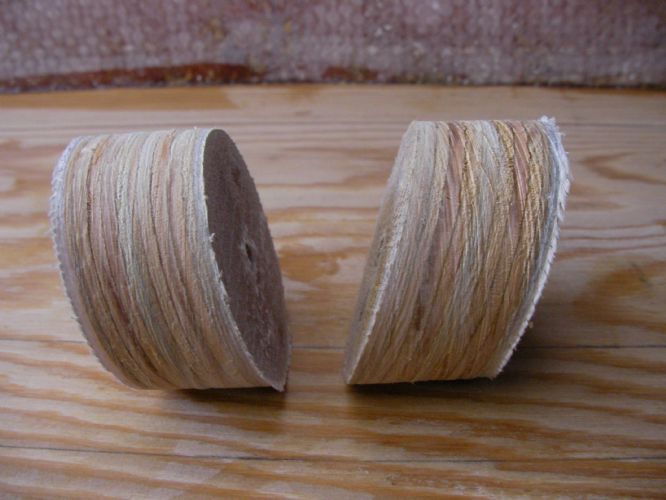
Update: The boat is off the trailer and blocked up on a combo cradle and jacks. 9 in all at 3 stations: transom, 5 1/2 ft, 11 ft. There is also 3 water levels on the boat and it is nice and sqaure. Marine ply, vynil-ester 700 resin and 1708 biax material are all here. The only piece of dry wood (mostly dry, some staining) on this boat was the at the rudder port, i cut it out because the wood directly above it for the stern lifting eye has been dripping water right till today, it came off in one piece. There are alot of pictures that will be posted hopefully in a few weeks. |
Posted By: TRBenj
Date Posted: March-13-2020 at 11:19pm
| Vinyl? Do you have some fg experience? |
Posted By: wayoutthere
Date Posted: March-13-2020 at 11:57pm
|
http://www.uscomposites.com/polyesters.html vynil-ester 700 sir, i am strictly an amature |
Posted By: TRBenj
Date Posted: March-14-2020 at 9:44am
|
Epoxy is generally favored for its ease of use and superior strength. It’s mixed at~3:1 (epoxy:hardener) and fairly tolerant of imperfect mixes. Low odor also. I have found vinyl and poly to be quite a bit trickier... they catalyze with a ~2% addition of catalyst- so a very precise measurement and thorough mixing required. I’ve had some batches take days to set up due to an imperfect mix or ambient conditions. PITA. Also very high odor. Would highly recommend epoxy for most uses, especially a beginner at fiberglass work. |
Posted By: SNobsessed
Date Posted: March-14-2020 at 10:58am
|
+1 on epoxy. It also plays well with CPES coated wood ------------- “Beer is proof that God loves us and wants us to be happy.” Ben Franklin |
Posted By: 8122pbrainard
Date Posted: March-14-2020 at 4:49pm
Another plus 1 ------------- /diaries/details.asp?ID=1622" rel="nofollow - 54 Atom /diaries/details.asp?ID=2179" rel="nofollow - 77 Tique 64 X55 Dunphy Keep it original, Pete < |
Posted By: wayoutthere
Date Posted: March-14-2020 at 10:09pm
|
I certaintly appreciate the avdice and fast replies. Absolutely agree on what your saying about the poly i mix ve with a timer and it still sometimes acts funny. |
Posted By: wayoutthere
Date Posted: December-05-2020 at 11:13pm
|
https://www.planetnautique.com/vb5/forum/nautique-topics/general-nautique-discussion/nautique-cc-boat-restorations/601131-new-member-first-ski-nautique Pics of the progress so far |
Posted By: 67 ski nat
Date Posted: December-06-2020 at 3:00am
| I’m confused. Going to PN to see pics of your restoration. Can you put pics on here too CCFAN |
Posted By: 67 ski nat
Date Posted: December-06-2020 at 3:27am
|
Looks like your doing a nice job Tons of work |
Posted By: KENO
Date Posted: December-06-2020 at 4:37am
I guess you'll probably have to explain to him how to post pictures here with his Galaxy tablet................or follow his link to PN like you did
|
Posted By: 67 ski nat
Date Posted: December-06-2020 at 9:42am
|
I know bummer. Just seems everything year 2000 below should be on ccfan Especially 78. My favorite |
Posted By: 67 ski nat
Date Posted: December-06-2020 at 9:51am
|
So. Longhorn and fishy Jeff are over there too So PN added to home screen |
Posted By: 67 ski nat
Date Posted: March-26-2021 at 4:31am
Go over to PN he’s doing a nice job. PN has a restoration section now |
Posted By: jbear
Date Posted: March-26-2021 at 6:43am
|
cant go to the link........Pete or KENO fix please? ------------- "Loud pipes save lives" AdamT sez "I'm Canadian and a beaver lover myself"... |
Posted By: 8122pbrainard
Date Posted: March-26-2021 at 6:57am
John, This one? https://www.planetnautique.com/vb5/forum/nautique-topics/general-nautique-discussion/nautique-cc-boat-restorations/601131-new-member-first-ski-nautique" rel="nofollow - New member first ski nautique - PlanetNautique Forums ------------- /diaries/details.asp?ID=1622" rel="nofollow - 54 Atom /diaries/details.asp?ID=2179" rel="nofollow - 77 Tique 64 X55 Dunphy Keep it original, Pete < |
Posted By: 67 ski nat
Date Posted: March-26-2021 at 9:49am
| Thanks Pete. It’s a worthy project |
Posted By: wayoutthere
Date Posted: March-27-2021 at 7:31pm
|
Im looking for plastic--- CorrectCraft ----nameplates that go on the sides of the boat at the transom. Taylor can't help with windshield, & i can't find reliable source for glass or rubber. And for a laugh, i'm having trouble logging in again, had to request a password and still have enter the super secret security image. Started work on the trailer, new axel ordered. minor cosmetic left on the boat which i suck at but it's that much closer to rigging which i don't suck at
|
Posted By: KENO
Date Posted: March-28-2021 at 7:38am
|
If you're looking for black letters on a white background click on the link below for Stan C contact info. http://www.correctcraftfan.com/forum/forum_posts.asp?TID=49664&KW=stan&title=correct-craft-emblem-help" rel="nofollow - link If you get in touch you could find out his new phone number and post it if he's Ok with that
|
Posted By: wayoutthere
Date Posted: March-29-2021 at 9:12pm
| Thank you, i'll get an email off to him |
Posted By: wayoutthere
Date Posted: April-22-2021 at 8:12pm
| Thank you to the members who directed me to stan, the emblems arrived today and are really 1st rate work. |
Posted By: wayoutthere
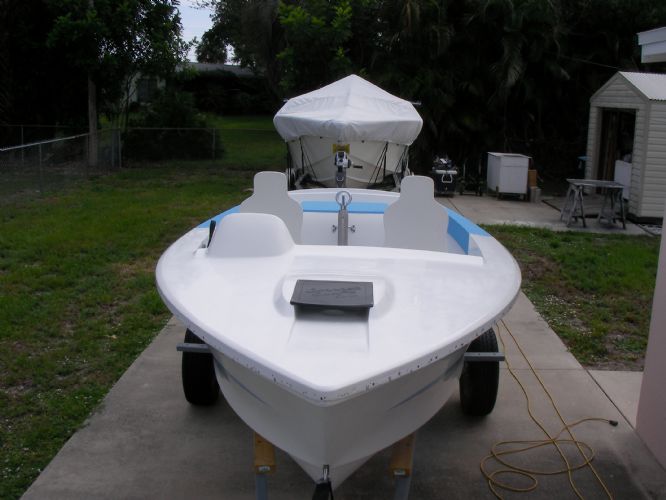
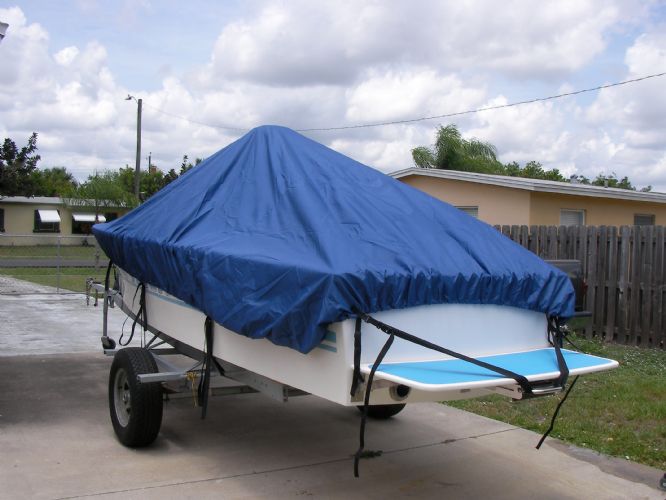
Date Posted: May-19-2021 at 10:26pm
|
Posted By: wayoutthere
Date Posted: May-19-2021 at 11:26pm
|
Posted By: Smithfamily
Date Posted: May-20-2021 at 7:01am
|
Looking Good! ------------- Js |
Posted By: 8122pbrainard
Date Posted: May-20-2021 at 7:14am
|
Dan, I'm impressed. Nice work. More like yourself should consider the LVL for stringers.  ------------- /diaries/details.asp?ID=1622" rel="nofollow - 54 Atom /diaries/details.asp?ID=2179" rel="nofollow - 77 Tique 64 X55 Dunphy Keep it original, Pete < |
Posted By: KENO
Date Posted: May-20-2021 at 7:53am
That must be some of that "homemade LVL" he used for stringers, AKA marine plywood glassed together ( and very well done)
My eyeballs aren't that sharp but I did read his threads on PN and the site for "different type boats" too  Or maybe you're telling him "nice work, but you should have considered LVL" |
Posted By: wayoutthere
Date Posted: May-20-2021 at 8:31am
             Thank you for the kind words.
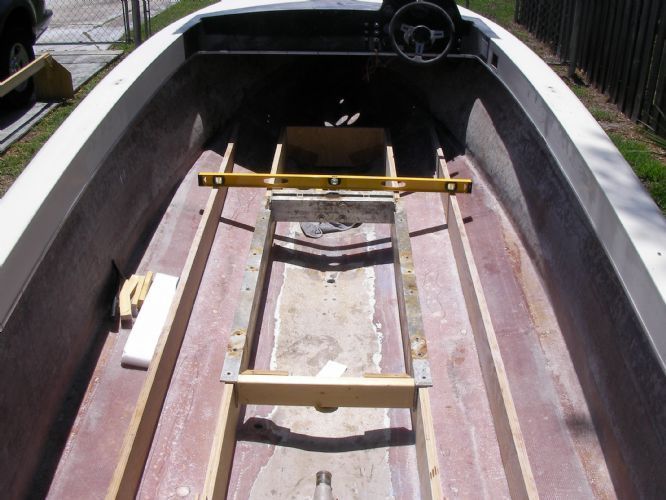
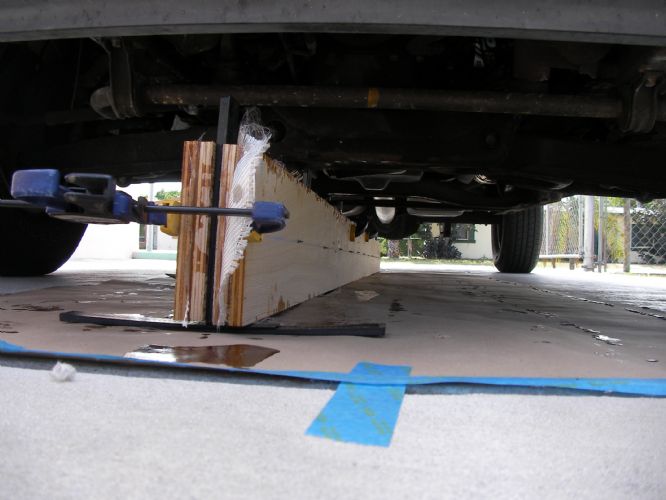
The stringers are 1/2 marine ply staggered seams glassed together, 12 feet long, and they are easy to make, anyone installing dimensional lumber is 2 steps away from these.
They got located with shims made from glass so after they're in place the engine mount fits, and they get bedded down on a strip of glass, no bare wood anywhere. The core samples (drainholes) all showed good bond and good bed, and when your a dummy like me and forget to put some in, you can always go back after spraying gel and cut more. |
Posted By: 8122pbrainard
Date Posted: May-20-2021 at 8:38am
|
Dan, Again, very nice work. I like the way you glassed the holes through the new stringers. Many haven't which allows the path for water. ------------- /diaries/details.asp?ID=1622" rel="nofollow - 54 Atom /diaries/details.asp?ID=2179" rel="nofollow - 77 Tique 64 X55 Dunphy Keep it original, Pete < |
Posted By: Gary S
Date Posted: May-20-2021 at 9:03am
Well well that’s not how Correct Craft intended it Mr Keep it Original is it?? 😆 😉 ------------- http://www.correctcraftfan.com/diaries/details.asp?ID=1711&sort=&pagenum=1&yrstart=1966&yrend=1970" rel="nofollow - 69 Mustang HM SS 95 Nautique Super Sport |
Posted By: 67 ski nat
Date Posted: May-20-2021 at 9:22am
|
Hey thanks very much for posting your project here on CCF You are very good at this stuff |
Posted By: wayoutthere
Date Posted: May-22-2021 at 8:35pm
 Some rigging today, gauges steering and controls, all cables installed as well. Some rigging today, gauges steering and controls, all cables installed as well.
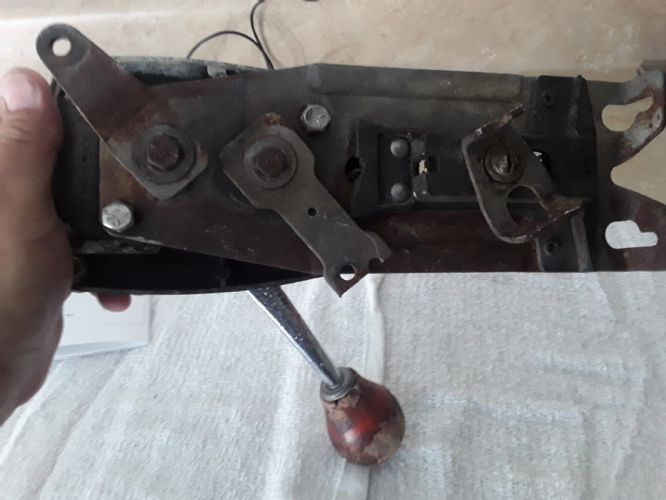
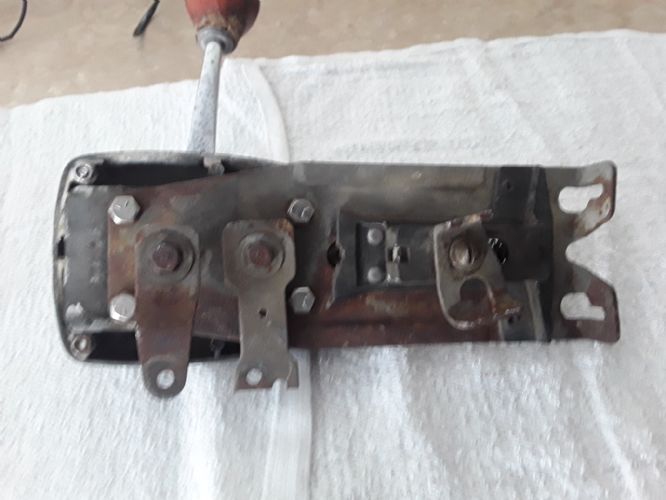
Which brings me to the transmission, the cable stay is on the engine/bell above the trans, every bw ive seen the lever goes forward into forward gear, and back for reverse. The oiginal throttle is broke at the throttle spring loaded slide, so i ordered a replacement. The old control pushed to shift and pulled to throttle, i checked it 4 times and noted it in the new controls installation manual, and i had the old control on the bench when i attached the cables to the new part, so i set the new one up to do the same. When i see the control push the cable and the location of the cable stay, push would move the lever on the transmission to the rear. I know the engine is rh rotation, is the transmission backwards too ? The steering shaft is a little sloppy, there probably is not a direct replacement is there?   |
Posted By: KENO
Date Posted: May-23-2021 at 6:25am
The lever on the transmission always goes forward to shift the transmission into forward no matter what rotation the transmission is set for. What did you buy for a new controller? Some pictures of it's backside would probably help.
|
Posted By: 8122pbrainard
Date Posted: May-23-2021 at 7:16am
|
Dan, I don't know of a helm control that can't be reversed to ether push or pull so take another look at the instructions that came with yours. As an example, here's the MV-2 manual out of out reference setion: https://www.correctcraftfan.com/Downloads/Morse_MV-2_Owner_Manual.pdf" rel="nofollow - Morse_MV-2_Owner_Manual.pdf (correctcraftfan.com) NOTE: The neutral safety switch in the helm is not used in our boats. The NSS is on the trans.
------------- /diaries/details.asp?ID=1622" rel="nofollow - 54 Atom /diaries/details.asp?ID=2179" rel="nofollow - 77 Tique 64 X55 Dunphy Keep it original, Pete < |
Posted By: wayoutthere
Date Posted: May-23-2021 at 8:15am
   I knew it was lever forward. I knew it was lever forward.
I'll have to look at the engine i don't remember the cable coming in from behind the trans, and looking at the picture on the ignition thread there are 2 cable stays, carb and trans. Switching push/pull is a matter of which side of the lever the cable is connected. The controls in my other boat can push or pull shift and throttle. It's single lever dual function also. I have a set of single function controls that can push or pull, it lets you rig from either direction. The old control pics are forward @ idle, full throttle & nuetral (still can't load pics in order i attach them) it pushes to shift so i must be wrong about the cable stay for the transmission. 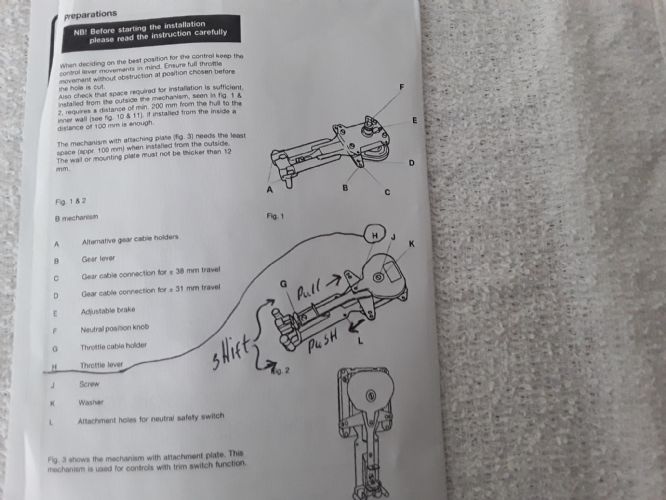 |
Posted By: 8122pbrainard
Date Posted: May-23-2021 at 8:19am
|
Sounds like you've figured it out. Yes, the shift cable comes from the front of the trans back to the shift lever.
------------- /diaries/details.asp?ID=1622" rel="nofollow - 54 Atom /diaries/details.asp?ID=2179" rel="nofollow - 77 Tique 64 X55 Dunphy Keep it original, Pete < |
Posted By: wayoutthere
Date Posted: May-23-2021 at 8:36am
|
The old control pushes to shift, the cable stay is in front of the transmission, push to shift would push the lever on the trans backward.
I'm a dummy it just dawned on me the cable probably swings a loop and pushes the lever. Gonna go outside & open the box now. |
Posted By: 8122pbrainard
Date Posted: May-23-2021 at 9:08am
|
Forward at the helm should pull the cable. ------------- /diaries/details.asp?ID=1622" rel="nofollow - 54 Atom /diaries/details.asp?ID=2179" rel="nofollow - 77 Tique 64 X55 Dunphy Keep it original, Pete < |
Posted By: KENO
Date Posted: May-23-2021 at 10:45am
|
WOT (that's short for wayoutthere or maybe wide open throttle) I'll post some pictures of the same Morse control as your original, set up for "Pull to go forward" and "Pull to open the throttle" with both cables entering at the front of the controller. For now let's just say they don't look like yours
|
Posted By: KENO
Date Posted: May-23-2021 at 5:14pm
|
Here are 3 pictures all cleverly rotated 90 degrees from the way they were by the picture gods. It's an MV1 like what you have. The arrow on the index card is only to point to the front of the boat It's setup for pull to go forward and pull to open the throttle with both cables going out the front. The shift cable curls up over the front of the engine, past the carburetor to the mount on the bell housing. The throttle cable goes under the engine, curls up under the transmission and hooks to the throttle cable mount. That was the typical setup for a mid to late 70's PCM 351 First picture is with the shifter in neutral shifter arm has an S marked on it 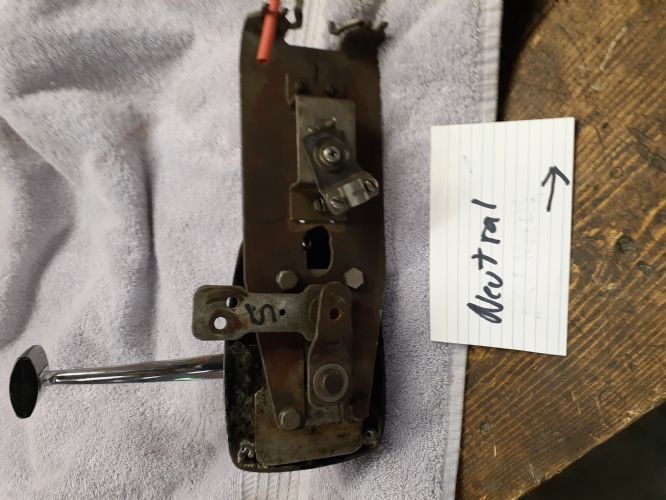 Second picture is at part throttle in Forward. You can see that the Shift arm is pulling back to go into Forwardand so is the throttle arm  Third picture is at part throttle in Reverse, the Shifter arm is moved forward so it's pushing the cable backwards to the Reverse position  Maybe this will help, maybe it won't Like you already know and mentioned, the controller can be set up a lot of different ways though.
|
Posted By: wayoutthere
Date Posted: May-23-2021 at 8:02pm
|
I verified right hand rotation via the firing order, it has a right hand propellor. It pulls to throttle and pushes to shift. Switching the shift cable to pull is very easy on the new controls. Just stumped why it's like that, i threw it in a bucket last year. Thanks keno, i appreciate you going thru the effort to help me out For fun and laughs there is a video https://youtu.be/_qBPX3UwH8k 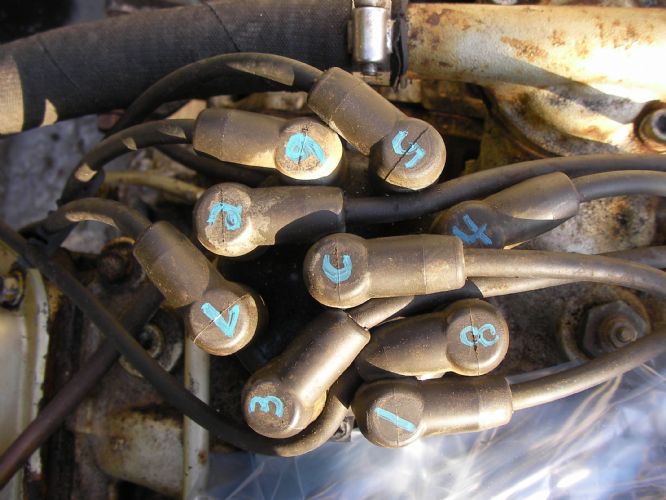 |
Posted By: KENO
Date Posted: May-24-2021 at 7:08am
|
No problem on the pictures. The controller was hanging around on a shelf. I did notice though in your pictures and video of the old controller, that the throttle lever on the back is on 90 degrees out of position and needs to be unbolted and rotated 90 degrees counter clockwise for the throttle and shifter to operate correctly together. |
Posted By: wayoutthere
Date Posted: May-24-2021 at 11:32am
|
Just placed an order with skiboatpartsonline, starter, harnesses, coil, packing, impeller kit, bearings, etc and he gave me some good reccomendations on misc stuff. I forgot to ask about a good spark plug and gap. A ways off yet but idle rpm timing and wot rpm info is greatly appreciated. Also the rh rotation distributor isn't available yet so we'll hope the existing one still works. Oops had to edit where the order was made
|
Posted By: 8122pbrainard
Date Posted: May-24-2021 at 12:35pm
Dan, It's the gear on the distributor shaft that makes it a RH/reverse rotation. So, You can purchase a new distributor and install your old gear on the new. ------------- /diaries/details.asp?ID=1622" rel="nofollow - 54 Atom /diaries/details.asp?ID=2179" rel="nofollow - 77 Tique 64 X55 Dunphy Keep it original, Pete < |
Posted By: KENO
Date Posted: May-25-2021 at 7:19am
Autolite 24 or a cross reference to your favorite brand of plug. With the Prestolite module, you'll see PCM literature with .035 and .045 Go figure Either will workThe screwdown cap distributor says 10 degees BTDC for initial timing at idle speed. WOT rpm 4000 to 4400. If you have the original 13X13 prop, you should have no problem getting to 4400 if the engine is healthy. What brand of distributor are you talking about at at Skiboatpartsonline? a Pertronix I'd figure since it's what they sell there. If it's a Pertronix, you can't swap your old gear on to the Pertronix shaft like Pete seems to think you can, ....well you could but it would be a really, really sloppy fit It would be nice to know the brand and shaft size before making a statement like that
|
Posted By: Duane in Indy
Date Posted: May-25-2021 at 4:02pm
In theory Pete is correct. BUT I have installed numerous gears and the cross drilled hole for the pin never seems to be in the correct location. Plus the diameter of the shaft has to be correct to that gear. There is a dimension from the mounting face of the dizzy to the bottom of the gear that also has to be correctly located. Seems as though they just install the gear to proper height and then pin it in a drill press, never is on center line. To add to the problem is the fact that some gears are not pre drilled for the pin anyway. Just my experience. Good luck, Duane ------------- Keep it as original as YOU want it 1978 Mustang (modified) |
Posted By: wayoutthere
Date Posted: May-25-2021 at 5:38pm
|
Keno, thank you for the tune up info, yes it's the petronix that isn't rh rotation yet.
I wouldn't even attempt a gear swap, i figured it was pressed on and off, i don't have those kinds of tools, Leave it alone and cross my fingers. Which is what i should've done w/ the carb, its apart and in the chem dip. |
Posted By: wayoutthere
Date Posted: May-25-2021 at 8:05pm
| The prop is an oj nibral 4 blade, on the hub behind the prop nut it reads oj 13, on the side of the hub it reads oj 1011. It could be a 13x10 reworked to 11, but the 10 & 11 stampings on the hub side don't look different like if it came out of a prop shop. |
Posted By: ultrarunner
Date Posted: May-25-2021 at 8:35pm
|
Carolina Blue, as it should be! GO HEELS! Classy
|
Posted By: KENO
Date Posted: May-25-2021 at 10:36pm
I wouldn't be holding your breath waiting for Pertronix to make a version of that with the RR gear on it. It's been in production a long time and it hasn't happened so they probably have very little reason to do it now. Maybe Ron at skiboatpartsonline knows something like where to get a .500 inch RR gear for it......or maybe not |
Posted By: wayoutthere
Date Posted: May-30-2021 at 4:17pm
|
Posted By: 8122pbrainard
Date Posted: May-30-2021 at 5:35pm
|
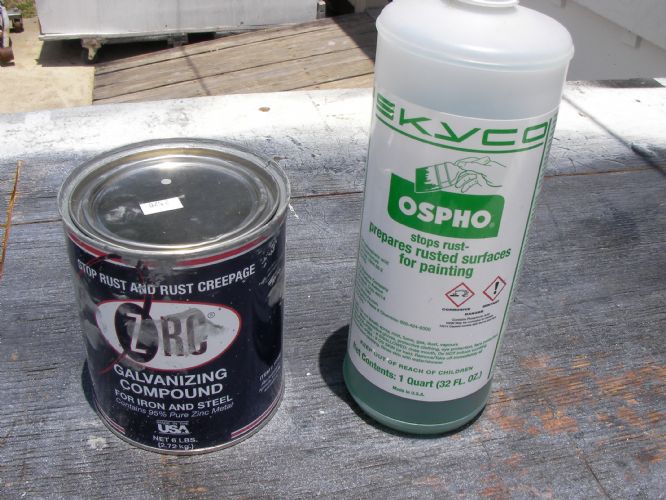
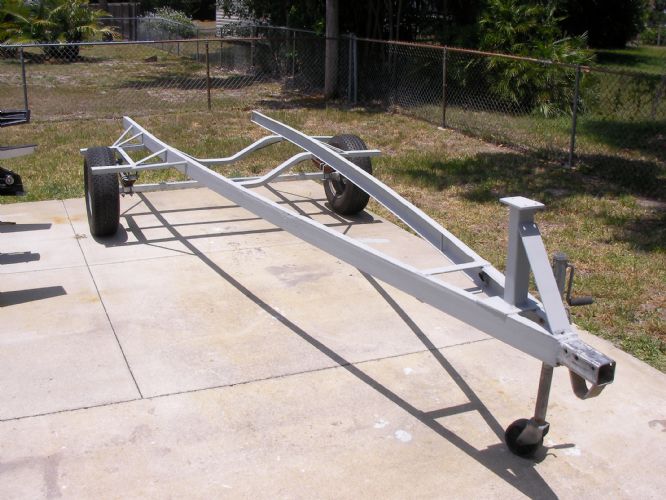
Dan, The trailer's looking great. I too have used the ZRC many times and have found it great for rust prevntion. OK, what's the round plate for? Spare tire mount? ------------- /diaries/details.asp?ID=1622" rel="nofollow - 54 Atom /diaries/details.asp?ID=2179" rel="nofollow - 77 Tique 64 X55 Dunphy Keep it original, Pete < |
Posted By: wayoutthere
Date Posted: May-30-2021 at 6:54pm
|
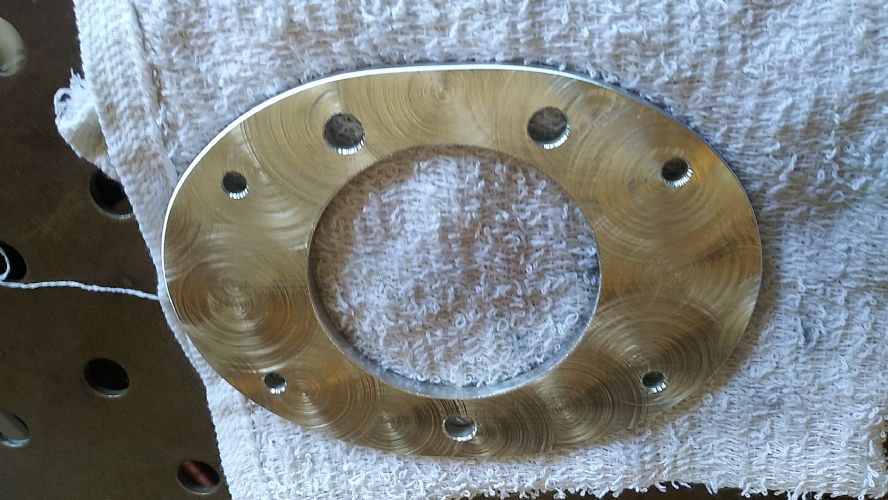
Helm conversion adapter plate.
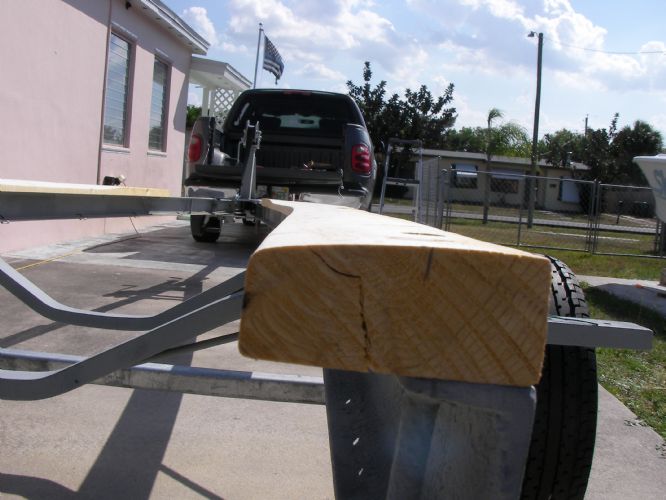
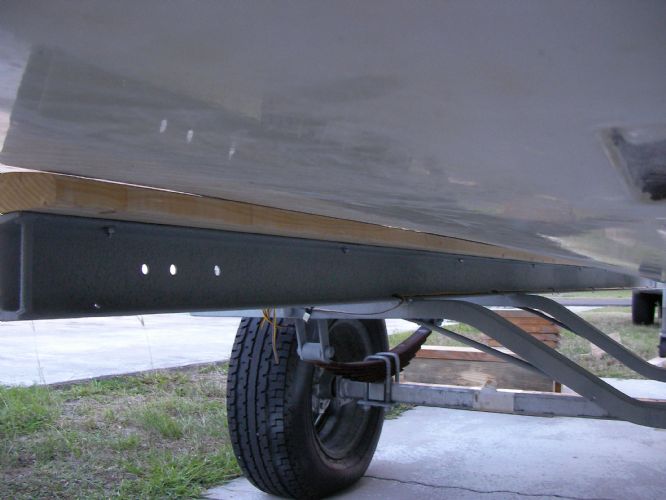
The original helm was updated at some point with the adapter for the new cable. It feels good left and right, but the bushings are worn and the shaft/wheel have a lot of play. Parts for the original helm for repair are no longer available, they still make it new tho, 400 bucks. Other option was 89 bucks but the cutout ended up being smaller and the bolt pattern is different. Ski boat parts online mentioned a plate, i just attempted to fancy it up. Next boat, no hole shall be left unpatched. Trailer ready for bunks and there is a tongue extension ready to get welded. Not looking forward to bunks, didn't understand the old ones, ripped on a 45 the whole length, bolts staples carpet could have been from factory, Oh ! now i understand !
|
Posted By: wayoutthere
Date Posted: May-31-2021 at 5:56pm
|
Posted By: 8122pbrainard
Date Posted: May-31-2021 at 6:37pm
|
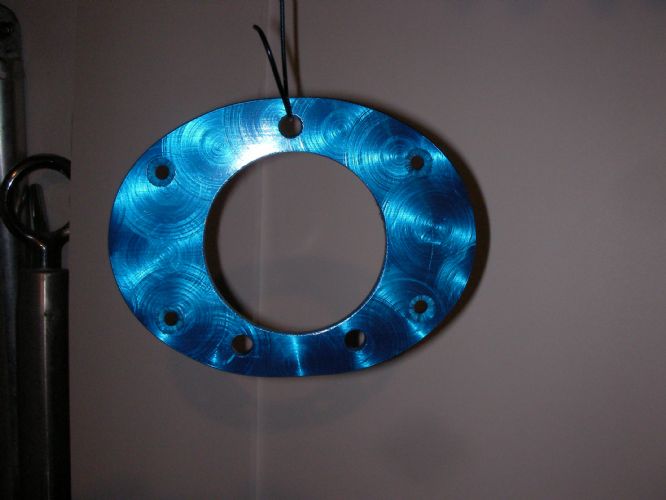
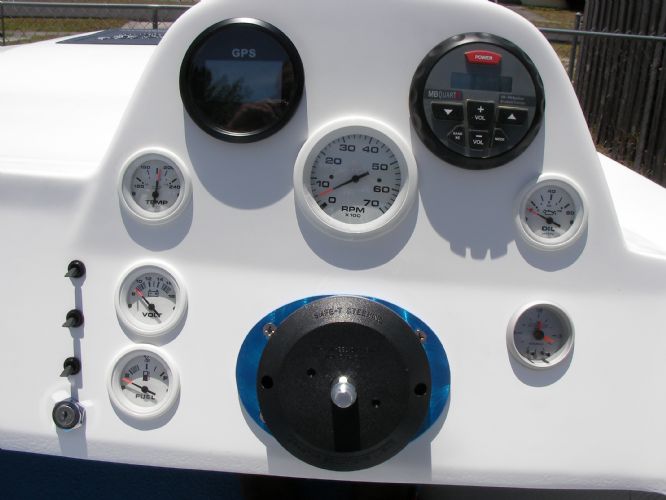
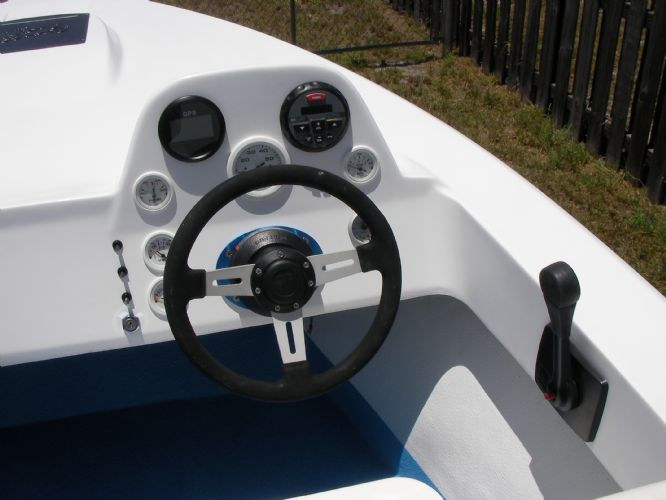
Nice work on the helm adapter.
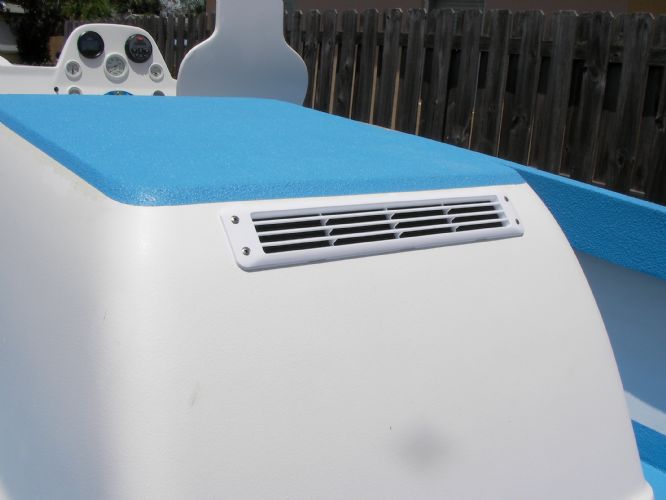
What's the air conditioning vent on the dog house for?  ------------- /diaries/details.asp?ID=1622" rel="nofollow - 54 Atom /diaries/details.asp?ID=2179" rel="nofollow - 77 Tique 64 X55 Dunphy Keep it original, Pete < |
Posted By: Smithfamily
Date Posted: June-01-2021 at 8:11am
|
Its really looking good!! ------------- Js |
Posted By: wayoutthere
Date Posted: June-02-2021 at 4:32pm
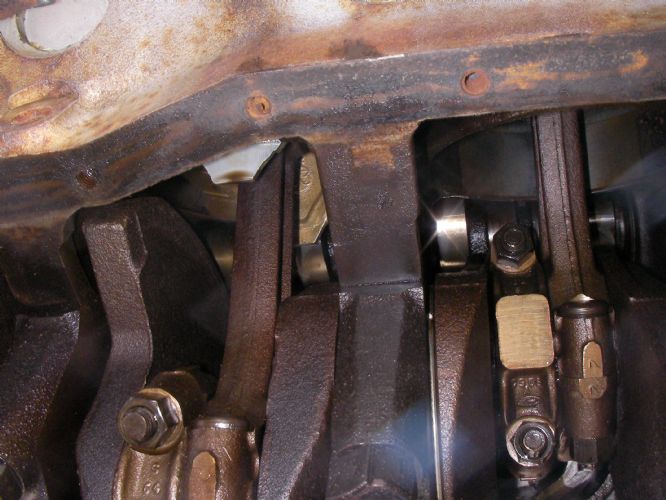
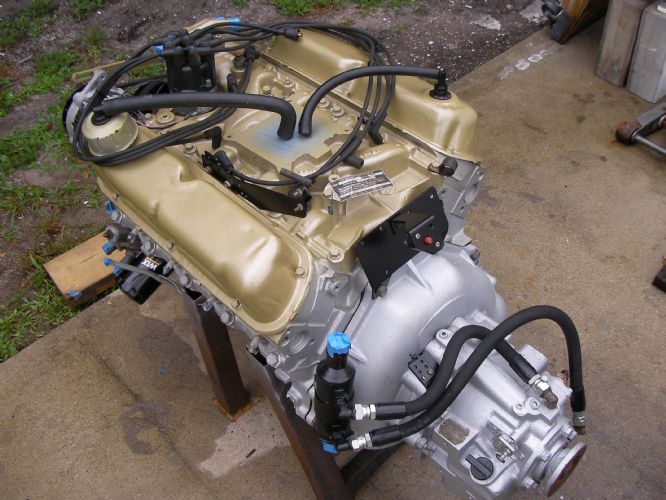
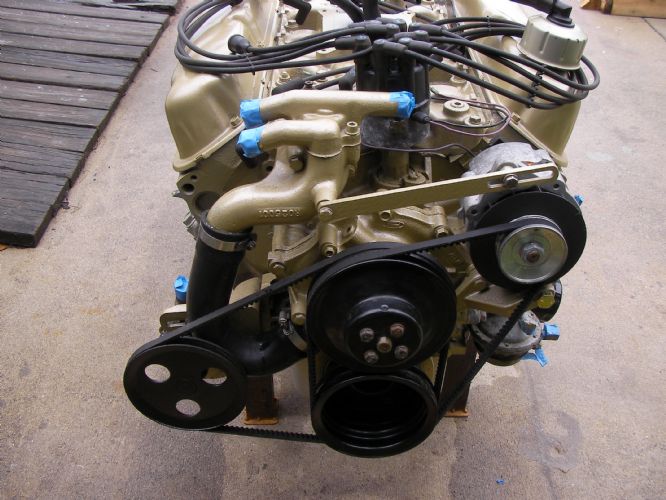
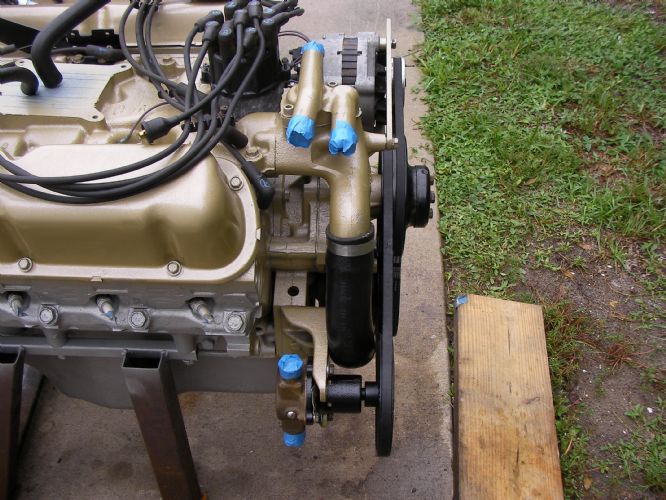
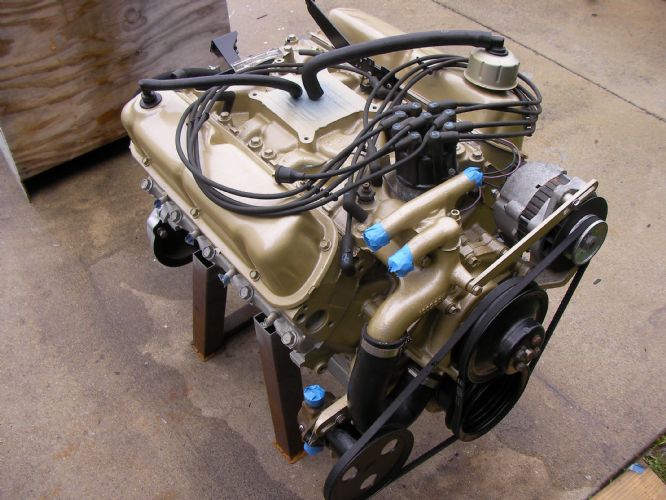
Hot air out i hope, should circulate better ? Smithfamily, thank you for the nice words. The plugs are in order as viewed from the flywheel. The valve cover bolts were just passed finger tight and that was where the worst of the oil seepage was Before the plugs went back in i put 1/2 teaspoon of 10w40 down the holes and rotated the engine past the timing mark 8 times by hand. Heres the plugs and top end, cylinders all looked shiny, engine has been sitting seven years. What do you guys think ? Looks ok right ? 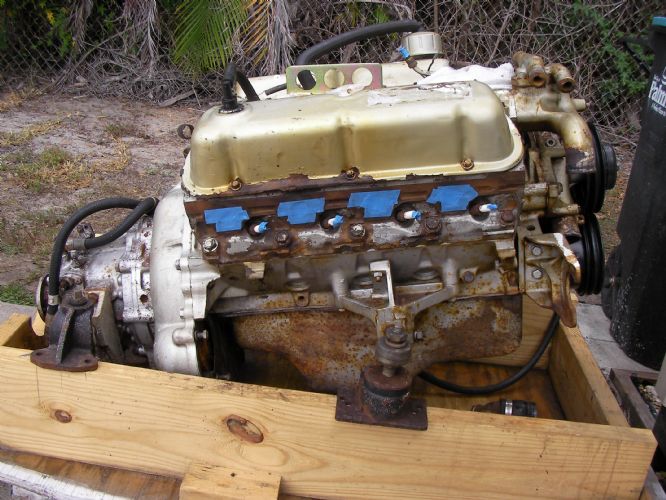 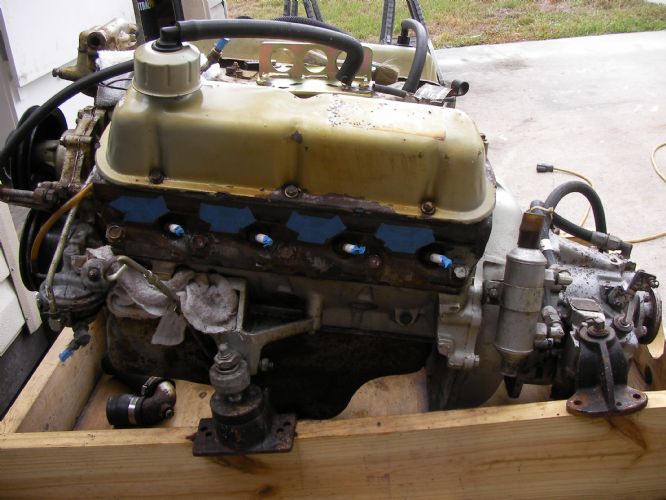 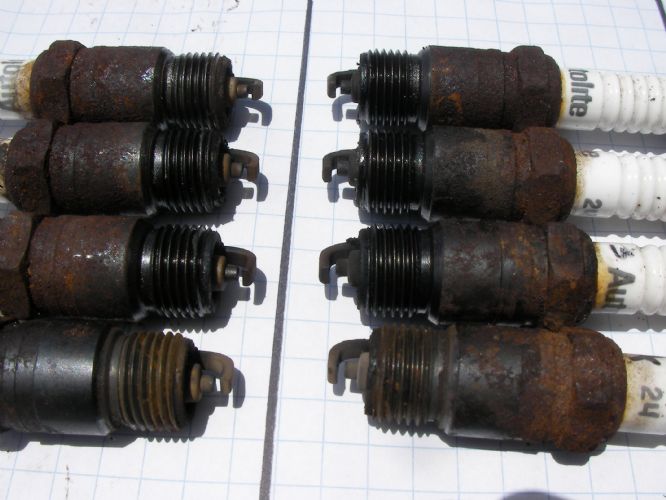 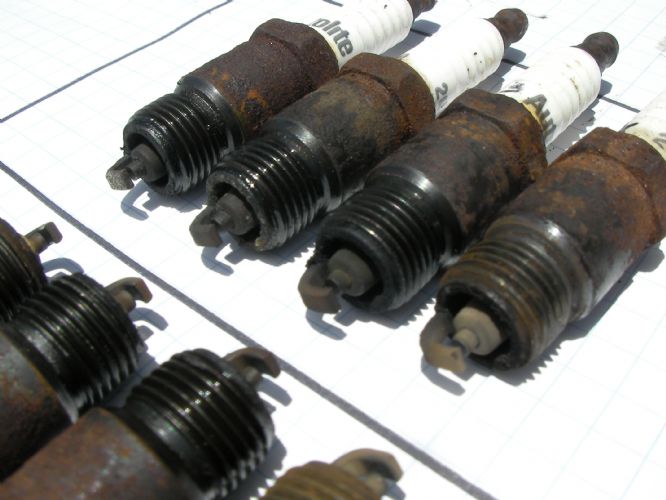 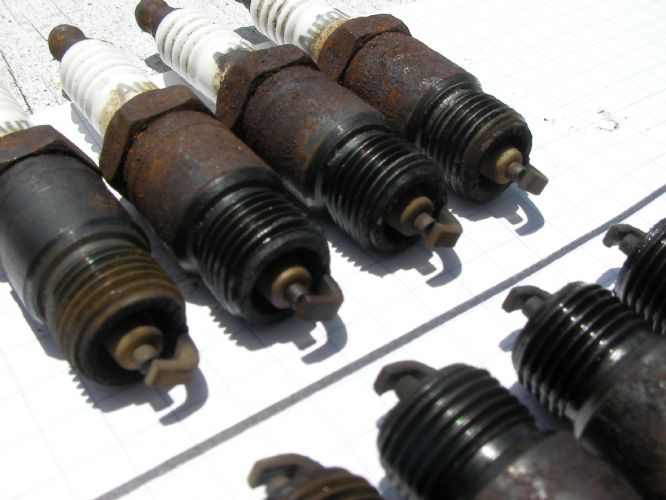 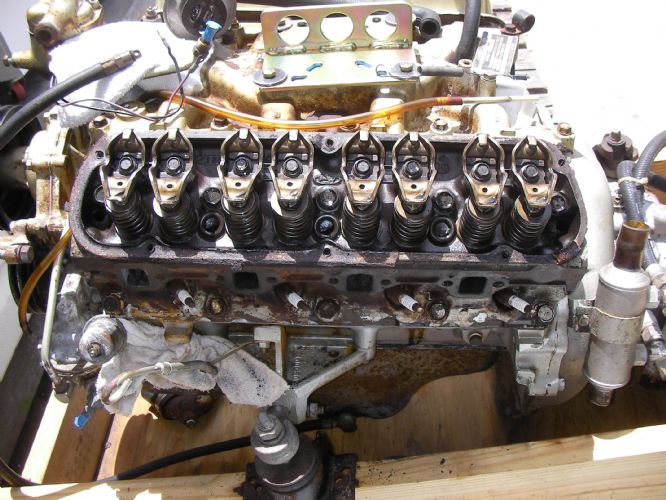 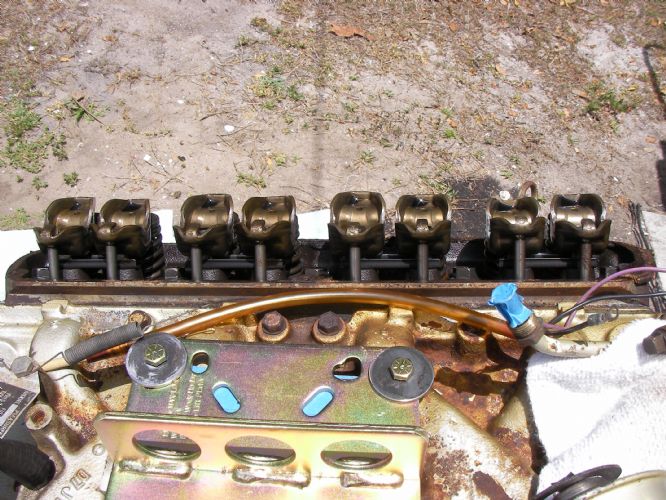  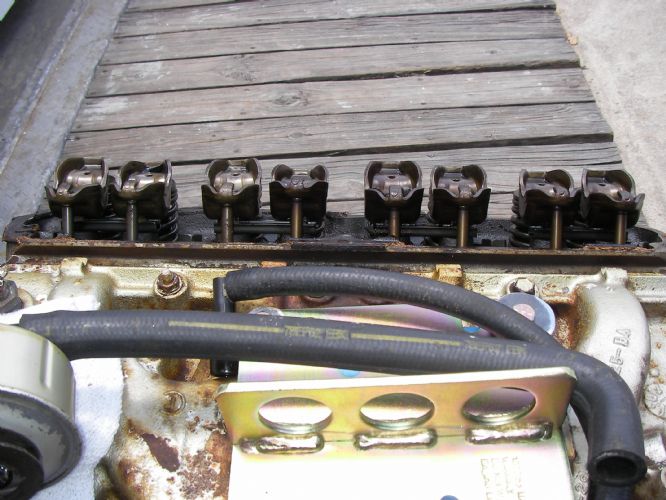 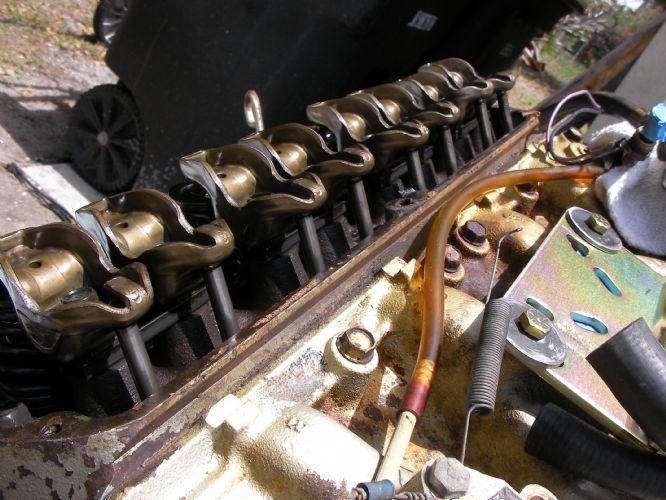 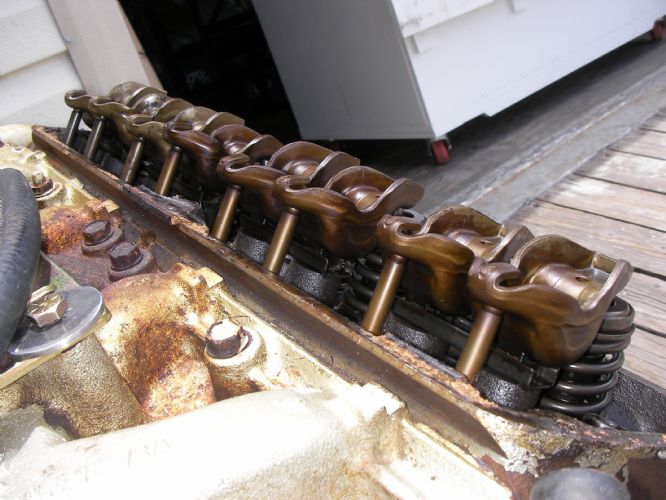  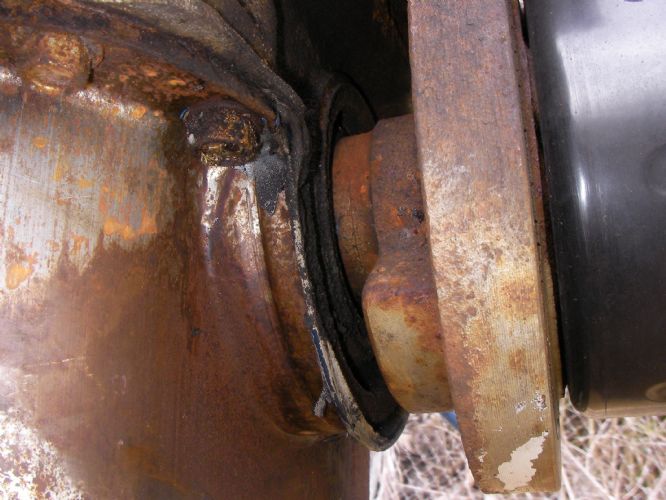 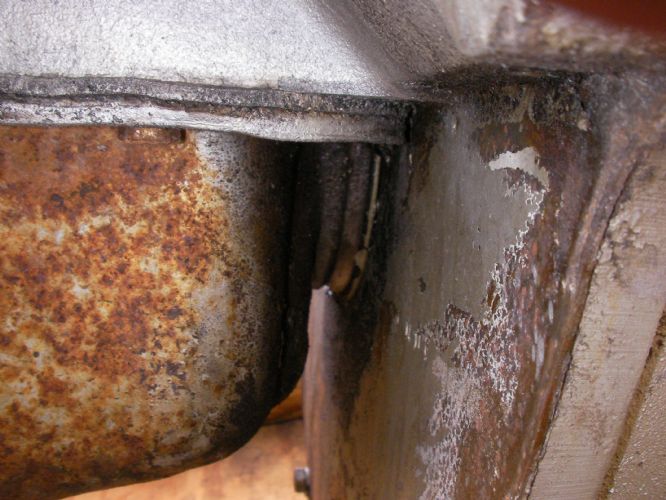 |
Posted By: 8122pbrainard
Date Posted: June-03-2021 at 7:50am
Dan, Unlike land based engines that rely on radiators to transfer excess heat to the air, our marine engines have unlimited supply of water to get rid of the heat. If the RWP (raw water pump) is doing it's job, there's not a problem with cooling. One area of concern is bilge venting to exhaust any potential fuel vapor. The typical method is to have forward facing vents on the foward deck or sometimes forward facing vents on the gunnels. Then aft facing vents on the aft deck. The combination has worked for many years.
------------- /diaries/details.asp?ID=1622" rel="nofollow - 54 Atom /diaries/details.asp?ID=2179" rel="nofollow - 77 Tique 64 X55 Dunphy Keep it original, Pete < |
Posted By: 67 ski nat
Date Posted: June-03-2021 at 8:54am
| Hey WOT. Thanks for pics |
Posted By: Gary S
Date Posted: June-03-2021 at 12:50pm
|
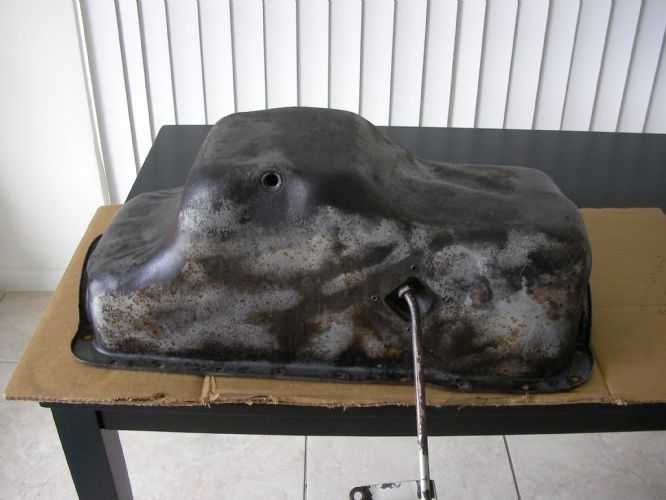
If you haven't already it would be a good idea to remove that oil pan and clean it up. They like to rust through and are almost impossible to find now. Boats looking great. ------------- http://www.correctcraftfan.com/diaries/details.asp?ID=1711&sort=&pagenum=1&yrstart=1966&yrend=1970" rel="nofollow - 69 Mustang HM SS 95 Nautique Super Sport |
Posted By: wayoutthere
Date Posted: June-04-2021 at 3:52pm
|
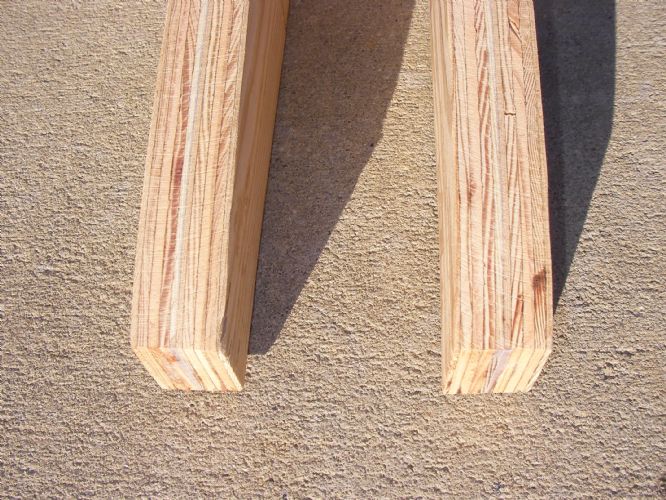
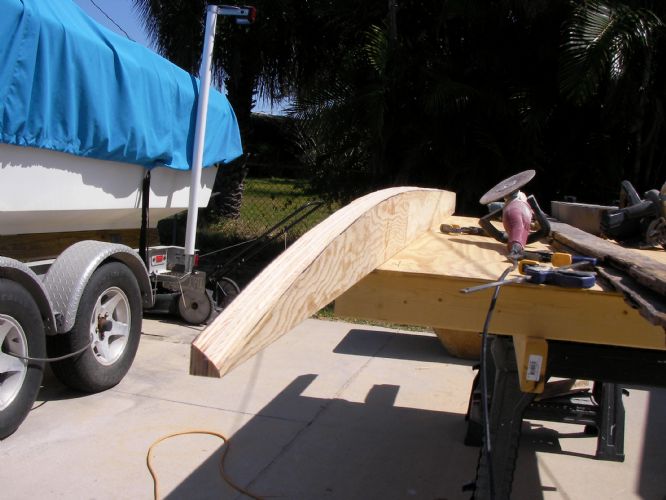
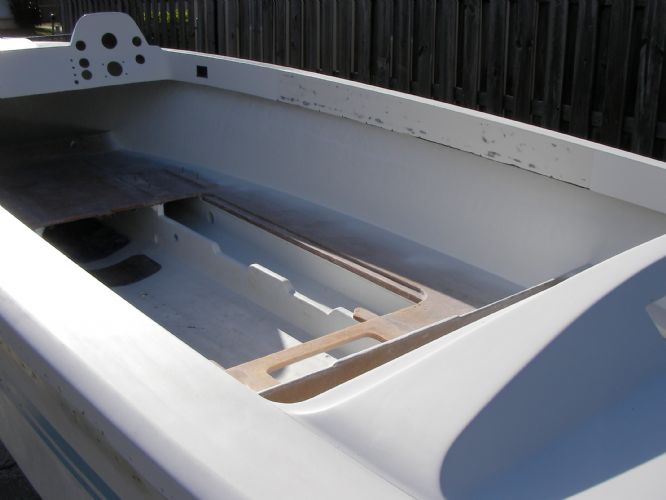
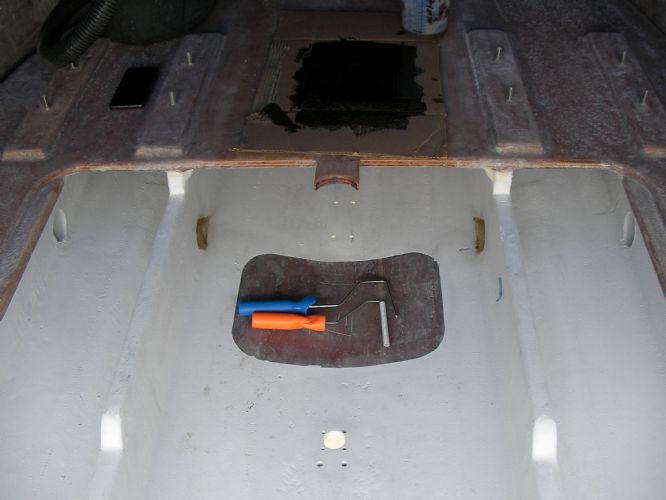
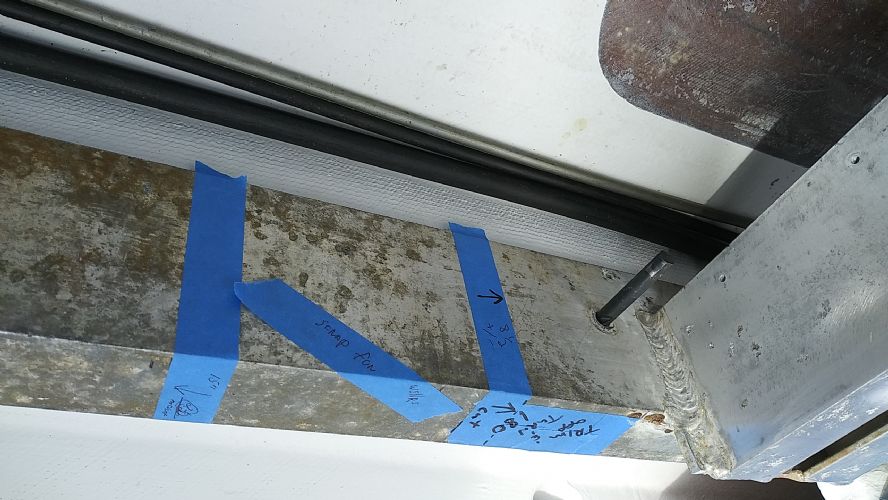
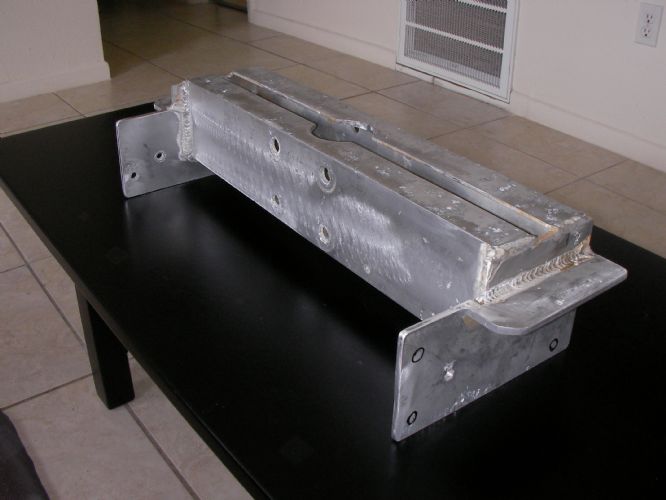
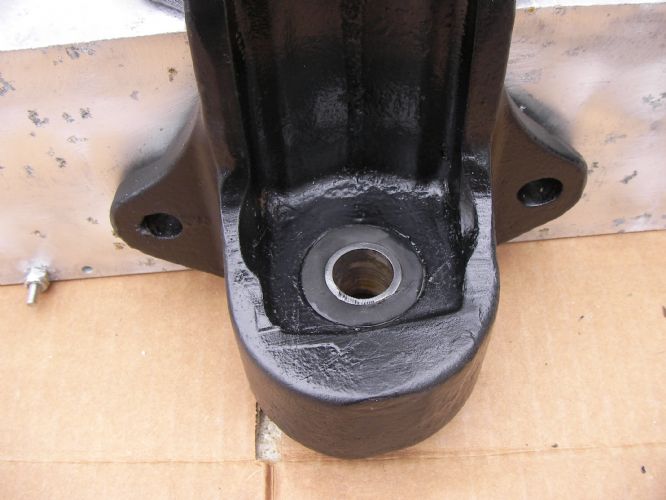
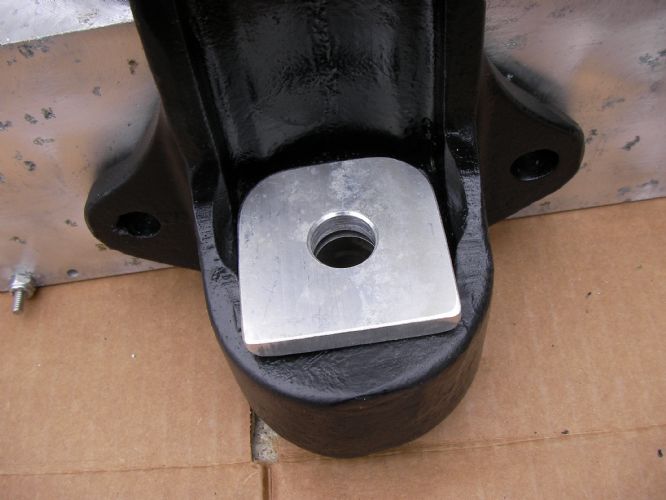
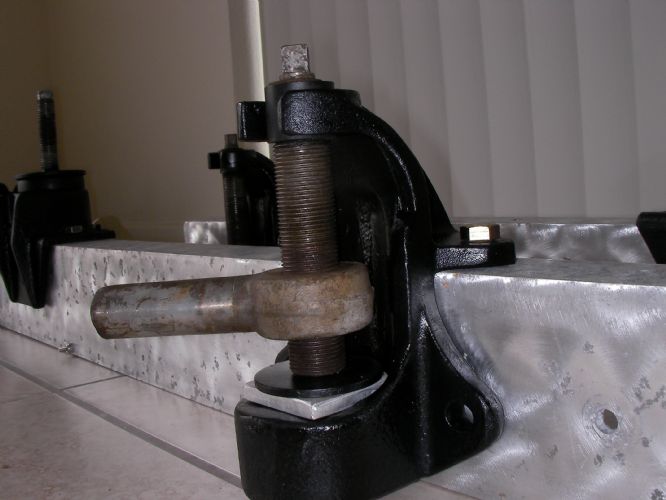
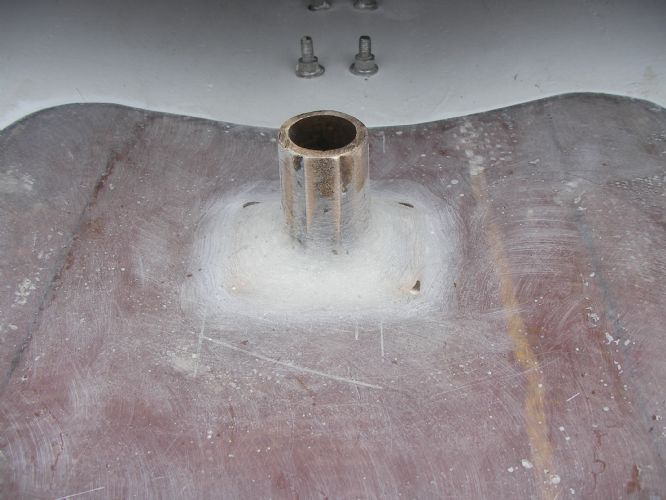
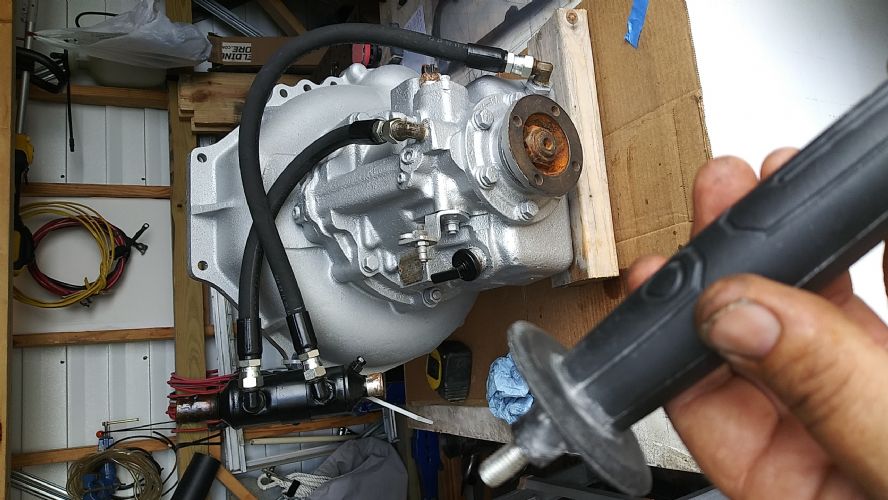
Way back i bought this engine/pylon mount and pylon because it solved the unknowns i had. worked out perfectly to space and cut s tringers, locate the engine, floor and dog box. At this point there is 3 issues, 1. it's out of sqaure from the heat when it got welded i think. 2. Since its out of sqaure i think it will hinder installation. 3. if it breaks @ the pylon the engine would have to come to repair it. When i located the stringers ther was wood wedged in at the back to hold spacing eqaul to the front. When i located the engine mount it had to be clamped in place, to be safe 1 hole was drilled in the stringer for location later on. Today i put the mount and pylon in to locate the foot and see how it lined up with the floor and dog box. It all looked good but still don't like putting all that force on the mount, so i cut it. Now the angle still gets bolted to the stringers and the engine still bolts to the angle but now the pylon mount is seperate. The foot can get bedded and glassed, the pylon mount can get installed without the engine being in the way. Pylon mount gets turned 180 and is notched to fit, angle gets cut 8 1/4 inches shorter allowing pylon mount to slide back and come out if need be. If the rain holds off tomorrow i can verify angle length and get a pic with the parts installed.
   |
Posted By: wayoutthere
Date Posted: June-11-2021 at 10:29pm
    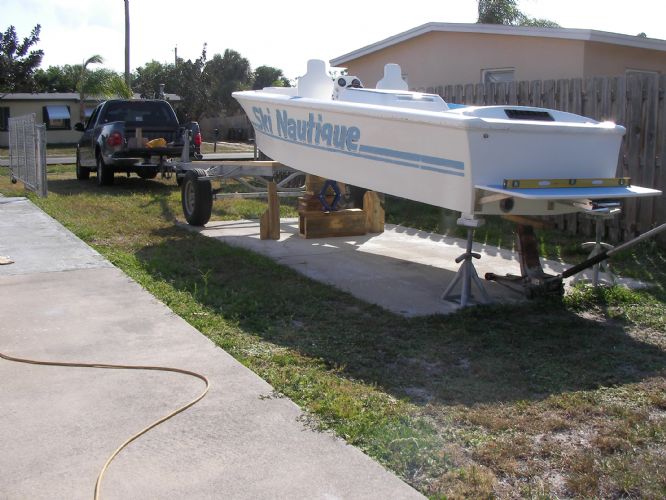  
The trailer bunks are 30 inches high and had to go up to 32 inches to get her back on it and forgot how high the trailer was. I think whoever approved the design was high, i get it ya know, it was the the 70's maybe they were roller boogying under the trailer on the shop floor during lunch getting all cocained up and ready for the disco later on. How did you not get water up to the roof window on the olds vista cruiser launching these things way back when ? Back on the engine tomorrow, all gaskets are here.
|
Posted By: wayoutthere
Date Posted: June-11-2021 at 10:39pm
Yeah that window
|
Posted By: 67 ski nat
Date Posted: June-12-2021 at 8:47am
| Awesome ‘looking’ tow vehicle |
Posted By: 8122pbrainard
Date Posted: June-12-2021 at 9:13am
Dan, I noticed it looks like new springs on the trailer? I'm not so sure but wondering if the springs were originally undermounted on the axle? With them being top mounted, that sure would add to the trailer height. Tim, What's your take on the spring set up? ------------- /diaries/details.asp?ID=1622" rel="nofollow - 54 Atom /diaries/details.asp?ID=2179" rel="nofollow - 77 Tique 64 X55 Dunphy Keep it original, Pete < |
Posted By: KENO
Date Posted: June-12-2021 at 11:16am
|
That's how plenty of 70's Correct craft #3 trailers were built. Springs over the axle and sitting pretty high. The bunk height from the ground sounds about right too. Once the fenders are on, it will look right One of them low boy trailers it's not
|
Posted By: KENO
Date Posted: June-12-2021 at 11:43am
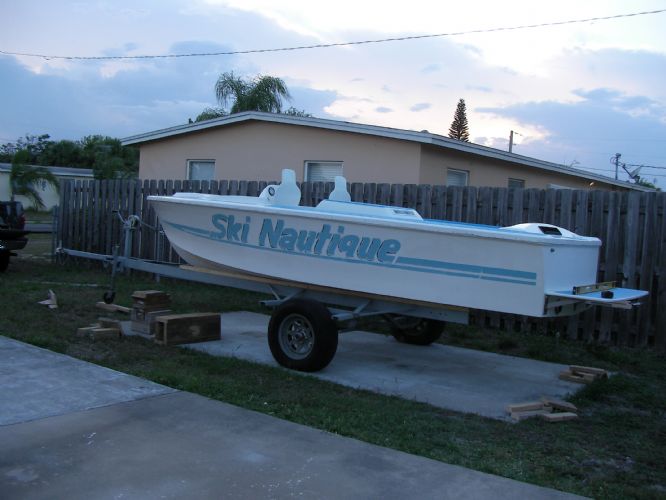
Here's a 79 on it's trailer from a CCF post sometime in the past
 |
Posted By: wayoutthere
Date Posted: June-13-2021 at 5:07pm
|
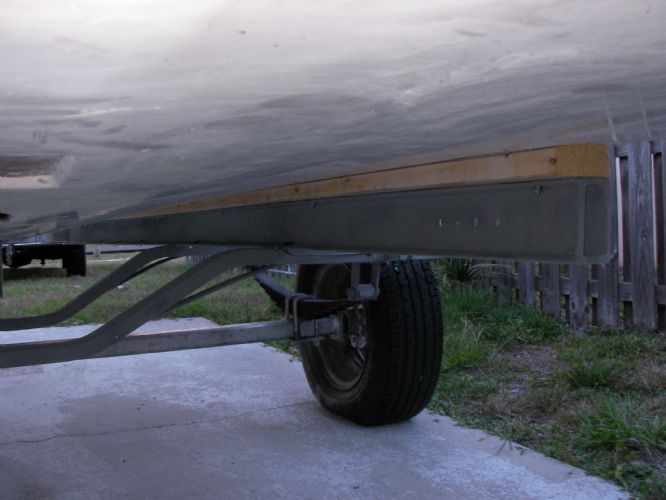
I measured wanting to go underslung and luckily have a "looking down the keel" picture before the engine was removed, underslinging the axel would help considerably but there is a crossmember brace the axel would be too close to.
The tongue is extended 3 1/2 feet, that should help load and launch, it backs up real good now.
|
Posted By: wayoutthere
Date Posted: June-14-2021 at 12:58pm
  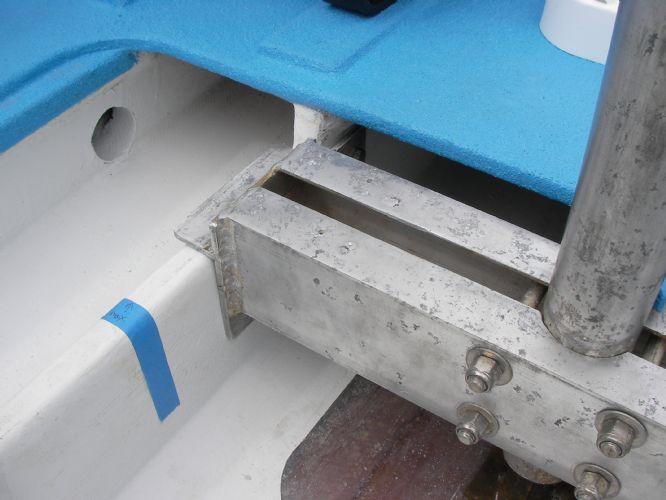 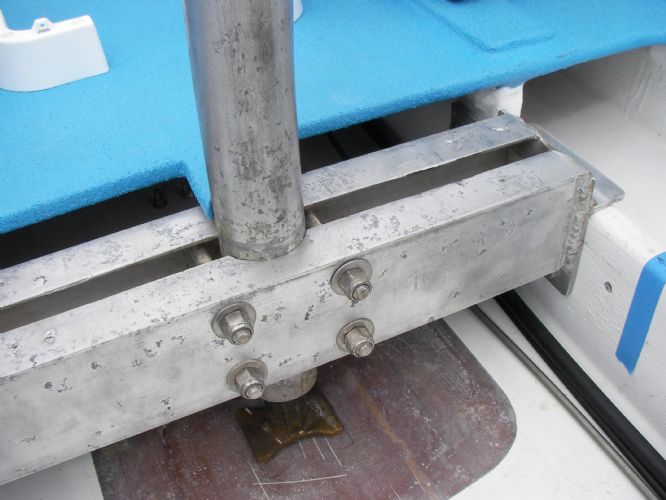 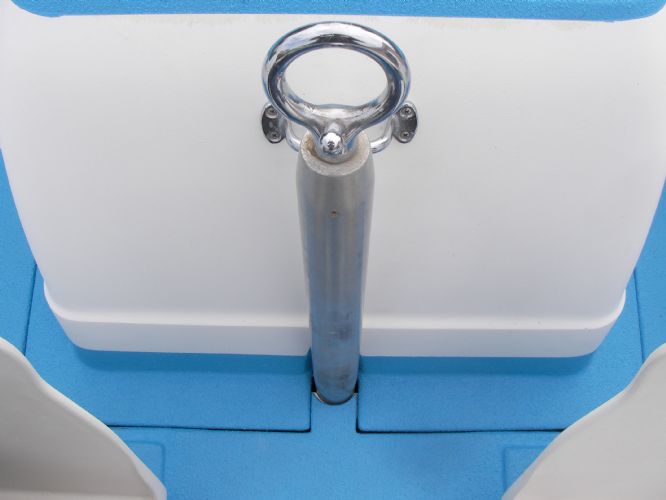  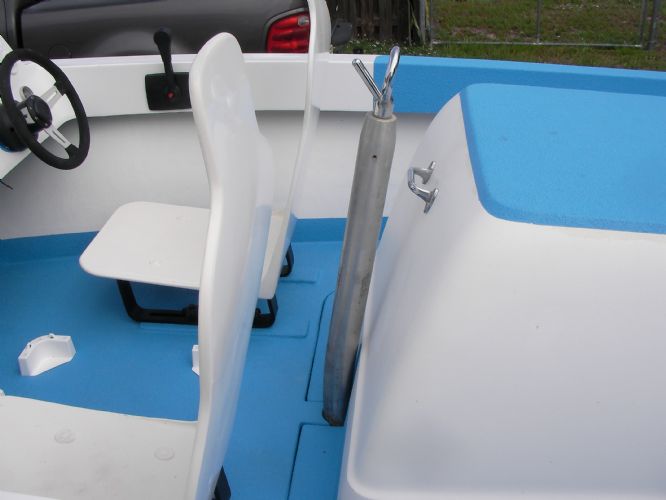   Pylon mount installed and all bolts tightened up to 15 pounds pylon ended up in a pretty good spot so the foot is located and ready to get bedded down and glassed in place.
The blue tape marks max length the engine angles can be and still allow the pylon mount to be removed, as seen by the stringer countours, theres more than enough room. The holes in the stringers will get resin swabbed when the foot is getting it's glass, and 4000 for final install of the mount. pics are just to confirm # of layers the stringers got during install.  |
Posted By: wayoutthere
Date Posted: June-14-2021 at 1:21pm
|
The other reasons for having separate pylon and engine mounts was simple, there was 2 inches of shaft sticking out the strut when i started. lots of math and drawings @ 12 degrees showed moving the engine 1 1/2 inches forward gives just a touch more clearance under the engine and thus more room to adjust the alignment. (Engine should actually go up to meet shaft c/w moving forward) Everything rotated smooth, no binding and nothing sprung or felt different after the couplers were unbolted. The stern tube is out and needs to be bedded once alignment is achieved, the old cutlas will keep it centered on the shaft. The engine was slid over to port but the shaft was centered in the tube, could still be bad part somewhere The engine will get centered in the boat and the strut will be adjusted to meet up with that center instead of the other way round, at that point final alignment will come from the mounts, i'm not going to just slam on the strut and hope the engine fits under the dog box, lines up the pylon and leaves the prop wih correct spacing from strut. I can check the prop, the strut doesn't show signs of damage or repair, like mentioned everything felt smooth, but my gut is telling me be ready for a new shaft. |
Posted By: wayoutthere
Date Posted: June-21-2021 at 1:07pm
  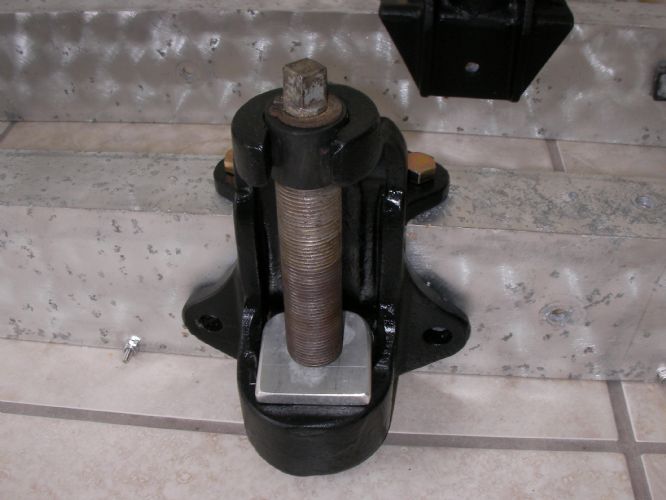    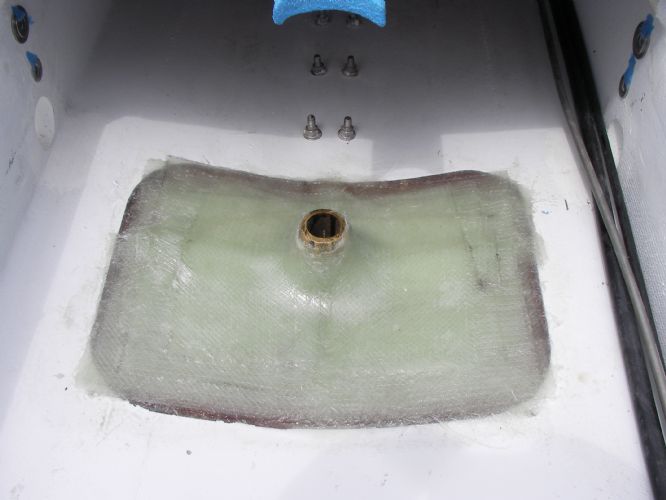 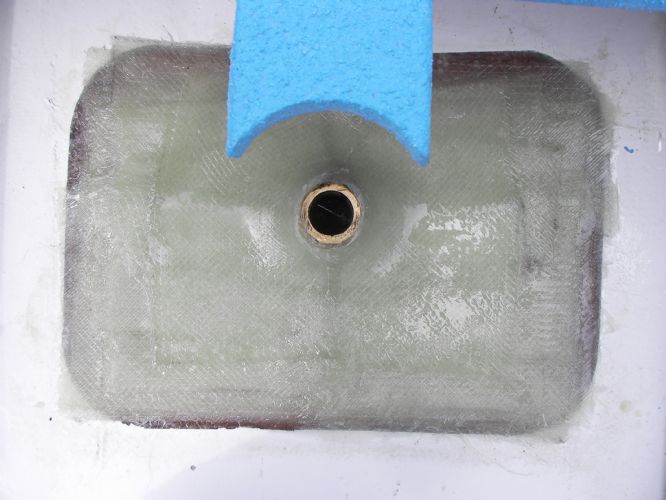
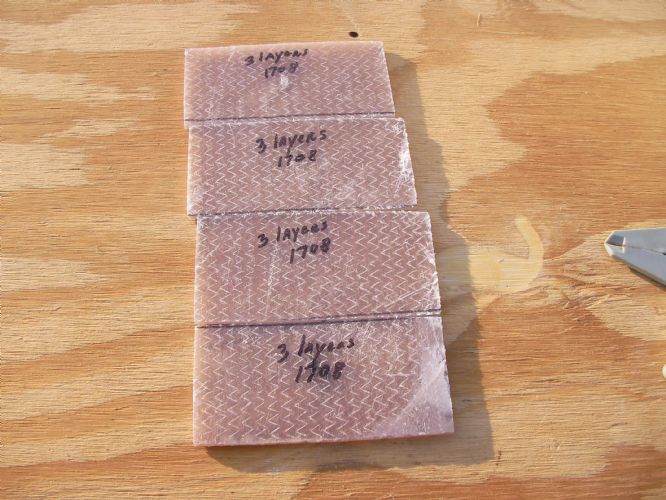
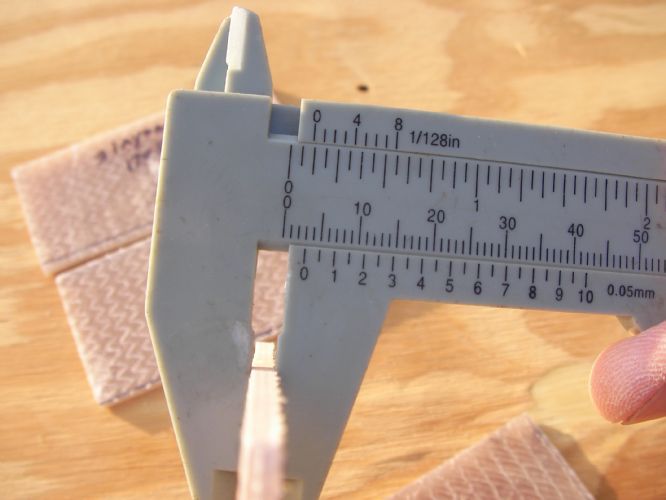
Long story short about the rear mounts, bushing locates center, spacer locates elevation (shim under spacer sqaures it up). They operate smoothly now with no up/down movement of adjustable bolt. 10 laced layers on pylon 1200 sqaure inches of material.
|
Posted By: wayoutthere
Date Posted: June-22-2021 at 7:35pm
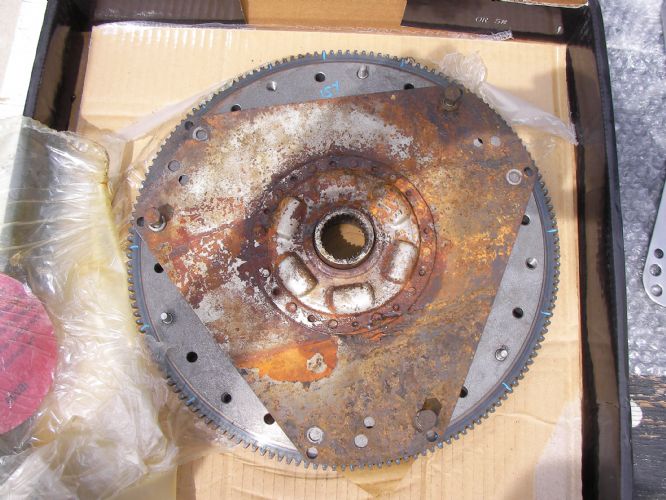
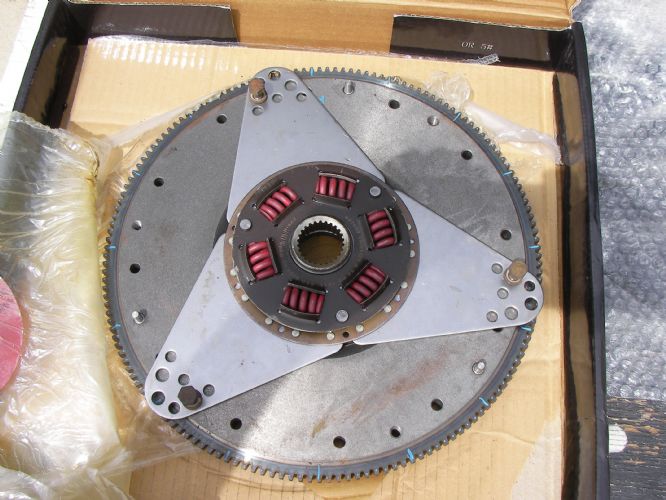
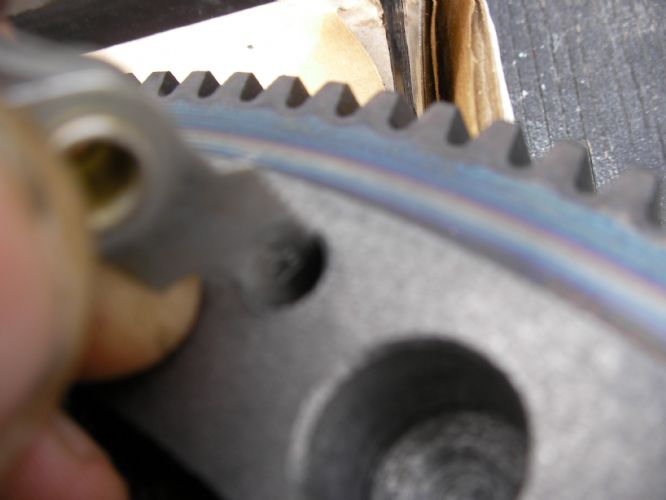
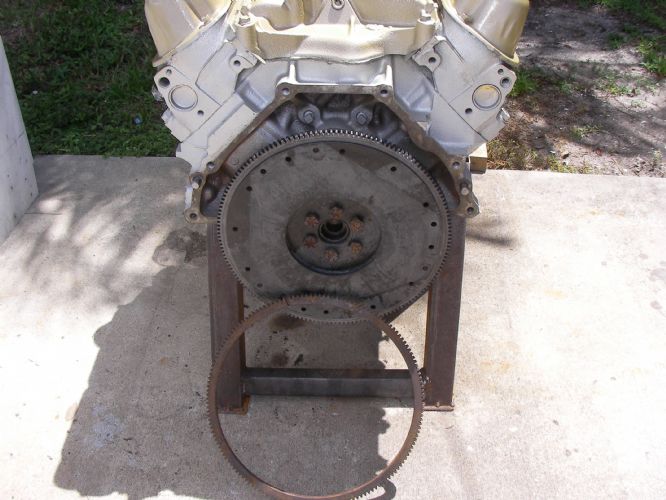
Don't see any wear on the cam, nothing bad in the pan, i think o.k. for 42 years old and sitting for 7 years now. 5-6 teeth in a row on the flywheel ring are worn, hopefully one of the shops around here can install a new one and for good measure while it's apart, i'll order a new dampener as well. |
Posted By: KENO
Date Posted: June-23-2021 at 7:04am
|
Do you want part numbers for the ring gear and the damper plate or are you all set? The ring gear is fairly straightforward to do it yourself with no special tools. Seeing everything else you've done, the ring gear wouldn't give you any challenges. A few early caveman tools are all you need, hammer, punch, heat square piece of tree  |
Posted By: wayoutthere
Date Posted: June-23-2021 at 12:44pm
|
Thanks keno, the help and advice are always welcome and appreciated. Ordered the dampener from ski boat parts (ron) @ 0830 this morning and local shop has a new flywheel on the way, cheaper than a ring with install. I heard it was common for the diy'er to pop a ring on but never done it myself. Anyways, this falls under the safe or sorry thinking, i never want to pull the engine or if i sell it, i wouldn't want the buyer cursing my name, so safer to put new parts on now that cant be changed without pulling and re aligning. |
Posted By: 8122pbrainard
Date Posted: June-23-2021 at 12:57pm
Dan, I sure don't know where you have shopped for a ring gear but I'm finding them for $10 to $20 new.
What's the number of teath on the flywheel you are getting?
------------- /diaries/details.asp?ID=1622" rel="nofollow - 54 Atom /diaries/details.asp?ID=2179" rel="nofollow - 77 Tique 64 X55 Dunphy Keep it original, Pete < |
Posted By: GottaSki
Date Posted: June-23-2021 at 1:25pm
|
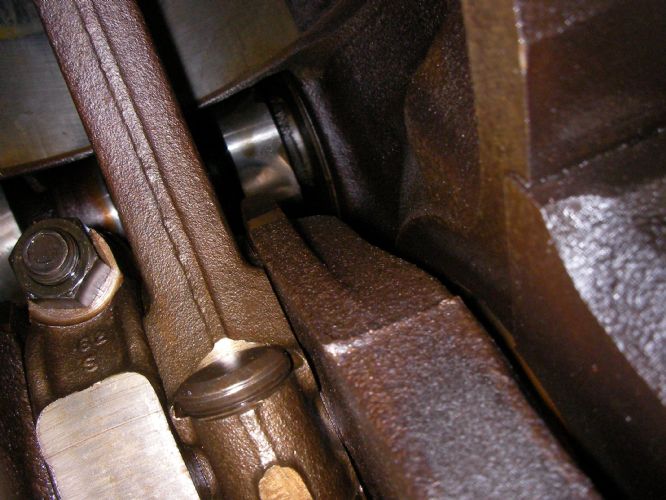
Wow, nice ride You are this close, consider take the #2 and #4 bearings caps off for inspection and replace the set if they show copper. if so, then just do the rods too. You can leave the heads on. If the mains look good, stop, just tap them back in place and retorque and resume If worn, just roll them in, new rear main seal, for 120 bucks or so the bottom end will be good to go for a long time ahead. ------------- "There is nothing, absolutely nothing, half so much worthwhile as messing around with boats...simply messing." River Rat to Mole |
Posted By: Gary S
Date Posted: June-23-2021 at 2:41pm
|
Aftermarket ring gear part numbers for future reference- Napa 6003030 Dorman 04410 Sealed Power 416121 ATP ZA 503 Ford C20z6384b ------------- http://www.correctcraftfan.com/diaries/details.asp?ID=1711&sort=&pagenum=1&yrstart=1966&yrend=1970" rel="nofollow - 69 Mustang HM SS 95 Nautique Super Sport |
Posted By: Smithfamily
Date Posted: June-23-2021 at 3:40pm
|
The info passed around here is second to none and quite impressive. I am enjoying the read. ------------- Js |
Posted By: KENO
Date Posted: June-23-2021 at 8:54pm
Can't forget the Pioneer FRG-157N ring gear that's pretty easy to find. I don't think it matters to Dan since he's got his parts already on the way, but for the next guy, here are a couple of flywheel numbers that can get cross referenced to whatever brand you might be looking if looking for a flywheel.
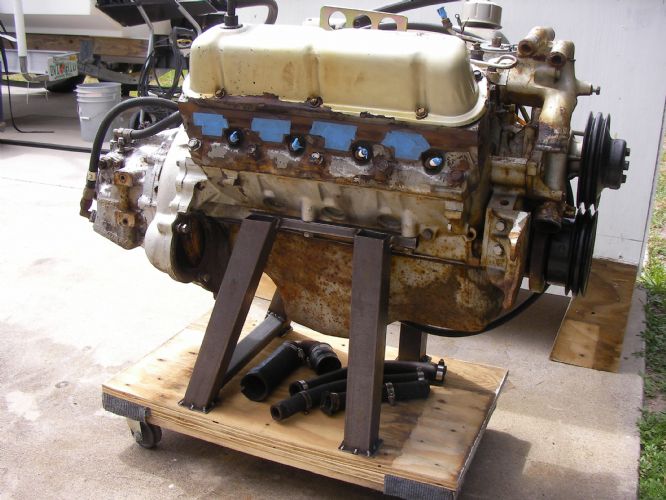
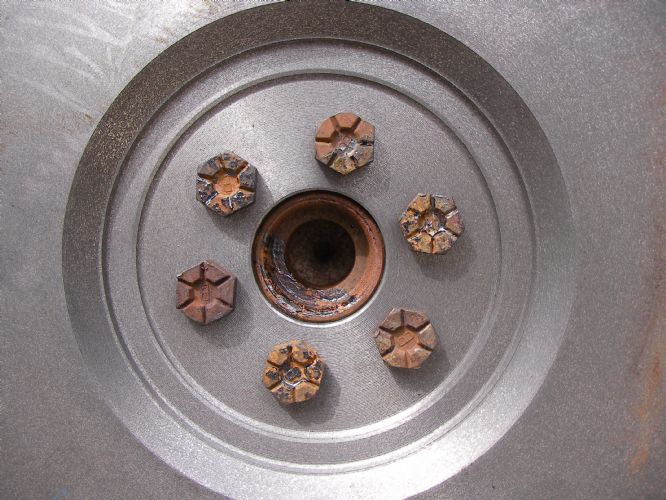
And a picture of an original flywheel with the Ford part number 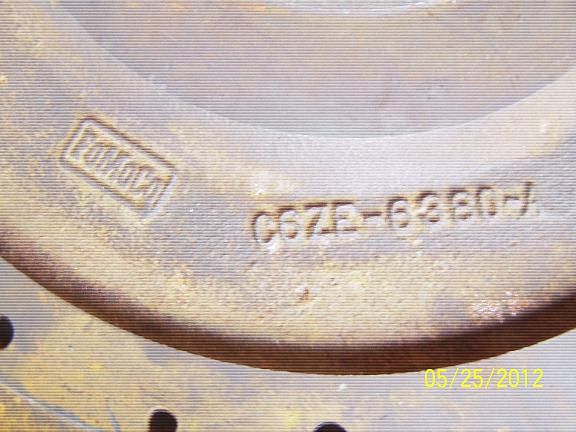 |
Posted By: KENO
Date Posted: June-23-2021 at 9:15pm
Pete How about a link to one of those 10 dollar ring gears?
|
Posted By: 67 ski nat
Date Posted: June-23-2021 at 10:17pm
|
Posted By: wayoutthere
Date Posted: June-26-2021 at 1:49pm
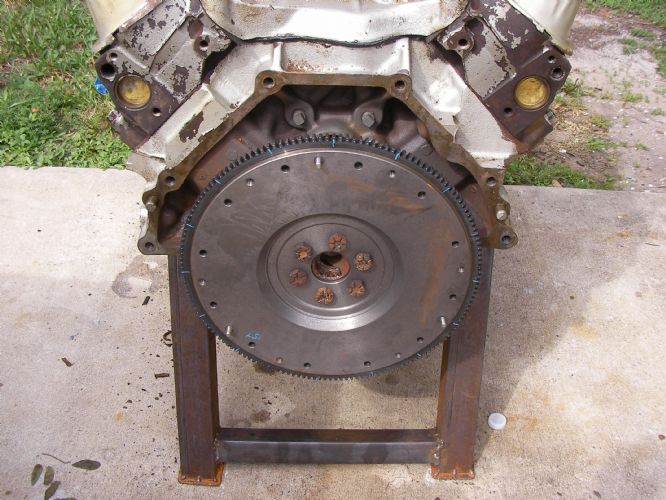
  Ended up getting a new flywheel, told them it was 157 tooth never counted it tho, guess i'd better. Ended up getting a new flywheel, told them it was 157 tooth never counted it tho, guess i'd better.new engine oil drain line and trans cooler lines, waiting on dampener, workin around rain, engine close to paint and oil pan osho'd Filled the trans, spun it up to prime it and she gets both gears, cant stop coupling by hand, hope that means it's good. It took 60 ounces. https://youtu.be/m2_jiIa3px0
|
Posted By: wayoutthere
Date Posted: June-26-2021 at 2:46pm
|
The info and speed in which is comes in at is second to none for sure. I just went out and counted the teeth, it's 157 and the old dampener lines up so we'll see how the new one fits. New ring gear wasn't expensive, it was the labor that made getting a new flywheel the better deal by 68 bucks. I don't have the room for an engine stand, so really can't pull mains and rod caps, good advice tho. If there is going to be another boat rebuild, the engine will have to either go to a shop or purchase a very clean low hour ready to drop in like i got for the raceboat. Oil/fluid/filters/lube/grease, general maintanence is not a problem but what i'm doing now is too much over too many days, there is grease and oil all over. Everything has to be cleaned constantly or the greasy oil mess migrates into the house into the shed and onto every surface tool, drawer, bench top etc etc Can't touch either boat, do any glass work or welding practice, can't touch the truck, the fridge door, nothing !!! |
Posted By: wayoutthere
Date Posted: June-26-2021 at 4:09pm
  Hooorrraaayyy !!!!! more engine BS !!!
This is typical, every engine, even mother mercury with her serial numbers and special generation parts, there is always more engine bs. The aftermarket custom parts from the highest praised highest qaulity highest polished and priced parts in the world all come with more engine bs. This issue today by comparison is peanuts, (diffent thread pitch is all) but it's aggravating and a stand still. The ad for the new dampener was clearly stated the ears may have to be trimmed, no problem, non issue. The dampener will only line up on 3 bolts regardless of the flywheel new or original, that's probably not an issue. The dampener bolts don't thread into the flywheel so monday i have to get new bolts from where i got the flywheel and get the old flywheel back in case the new one is metric which means it'll never line up on the crank. Hopefully i can return if neccessary and have them put a ring on the old one if it hasn't gone to scrap. Paid extra 5 bucks to get the dampener here to get painted and assembled by tomorrow so i could get going on the install Anyone wanna buy a ski boat that needs the engine bs sorted out. 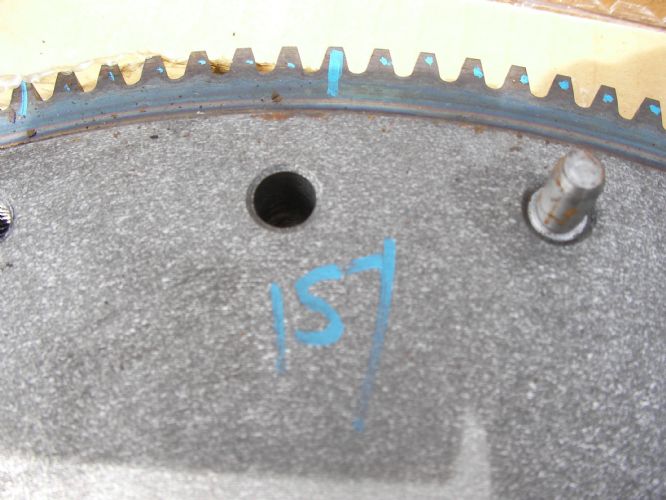 |
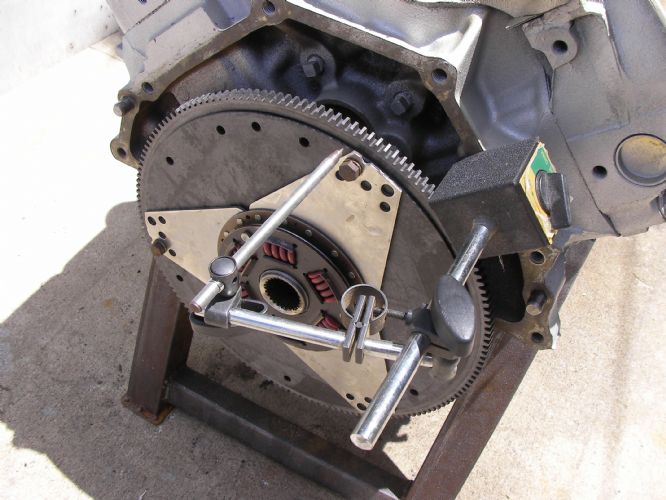
Posted By: wayoutthere
Date Posted: June-26-2021 at 5:14pm
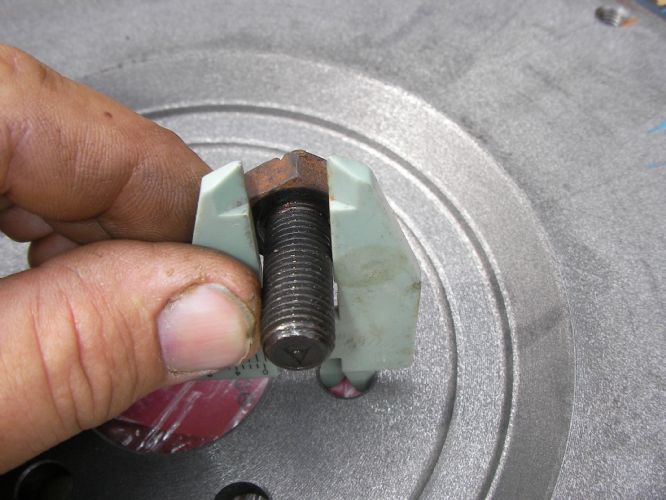
    Its metric, dampener holes are threaded 1.25 the bolt holes to crank are bigger and the flywheel isnt what i would call snug on the crank thing like hubcentric. It doesn't rattle around on the crank but i thought it should fit snug. It'll probably work, i only know enough about engines that there is no such thing as direct replacement w/o other parts and/or mods.
 |
Posted By: KENO
Date Posted: June-26-2021 at 6:45pm
|
Well............ there's some bad news to be given here You have a flywheel for a later 302 when they liked to call them 5.0 engines and it takes metric fasteners. It's also 50 oz imbalance on that flywheel and you want one with 28 oz imbalance otherwise you'll be able to make milkshakes on top of the engine if you were to install it and the damper plate with some bolts that would fit. Or in other words.........don't even think about trying to use that flywheel. The changes happened around 1983 or so for reasons known only to Ford The earlier 157 tooth flywheel that was on your engine was, like mentioned earlier a cross reference to a 67 Mustang with a 289 and a 4 speed which had 28 oz imbalance. So.........you either need to get your old flywheel back or go back in this thread to the part numbers for the right flywheel and get one of them, then your SAE bolts will fit and you already know you need to trim it and use only 3 bolts and you'll be back in business. .Just tell the parts guy what you need with the part numbers given earlier because the Ford marine 351 flywheel isn't on any 351 automotive engine. Once again only Ford knows why they did things the way they did |
Posted By: Gary S
Date Posted: June-26-2021 at 8:16pm
I have read that the reason for the change to 50 oz balance was because it was cheaper to produce. And when you think of how many 5.0 Lincoln,Mercury,Ford, and Ford trucks built with them in compared to the 5.8 it sounds plausible. When they are building millions even 50 cents is something. ------------- http://www.correctcraftfan.com/diaries/details.asp?ID=1711&sort=&pagenum=1&yrstart=1966&yrend=1970" rel="nofollow - 69 Mustang HM SS 95 Nautique Super Sport |
Posted By: wayoutthere
Date Posted: June-26-2021 at 8:34pm
|
Keno, that's not bad news at all, bad news would've been finding out after the engine was installed.
I'll copy the numbers and notes then take it all up there monday, meantime i'll price check it so i can make a decision, hopefully theres no restocking fee, i told them what it was. Appreciate it everybody, thank you for the help the part #'s, all the tech and advice. It's always the engines that screw the job
|
Posted By: KENO
Date Posted: June-27-2021 at 5:35am
|
If the shop has their doubts, give them the Ford part number cast into the flywheel to cross reference. If you get the old one back, like mentioned earlier you can get a ring gear pretty cheap and do it yourself. Maybe Pete will let you in on his source for a 10 dollar ring gear........maybe not He seems to have missed this question below from a little earlier in this same thread You can find one for under 20 though at that auto parts place that he just loves to bash. I think it ends in Zone
|
Posted By: 67 ski nat
Date Posted: June-27-2021 at 9:48am
| Nice work Ken |
Posted By: wayoutthere
Date Posted: June-29-2021 at 7:09pm
|
Hooorrraaayyyy !!!!!!! More engine BS !!!
New flywheel returned, "why whats wrong with it, it's 157 tooth" I gave them the part #'s for the ring gear and now waiting. Last week i ordered an oil drain line kit "for 351w old ski boats" it came today and it is the wrong thread, not to mention if you wanted yo use the 90* fitting on the pan it won't work because of the pushlock thing. Another part from super awesome parts we know our *************** dot com that's wrong. I either need a clean good running take out or the whole thing gone for what i have in it. 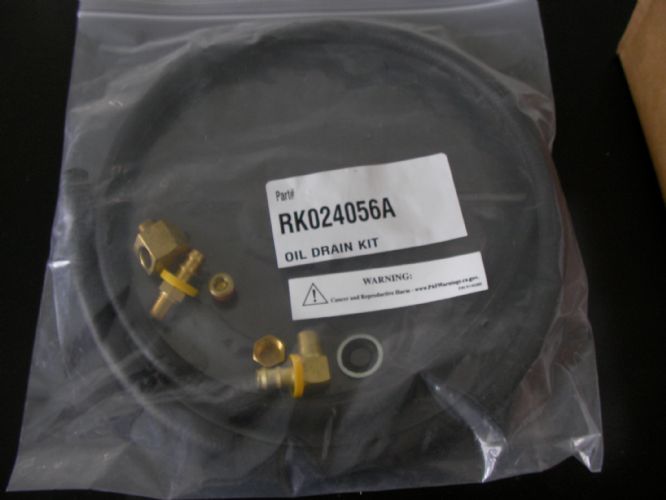 |
Posted By: wayoutthere
Date Posted: July-03-2021 at 5:11pm
       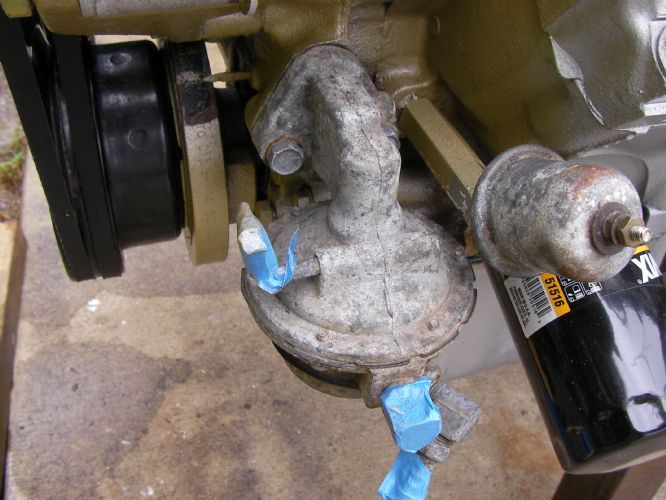 Got the flywheel back friday, got the dampener cut, then scribed it with the magnetic pointer and ground to finsh. Loctite and torqued thru the access hole in bell. Today, dressing the engine i had to stop and make bushings for the alternator and sea pump, there is no wear on their respective brackets or the accy's themselves, they just were not properly located and the belts were way off alignment. On/off on/off on/off took 6 hours to cut, fit, align the belts, paint the bushings and reassemble. Hoses had to be ordered, nothing in town that you'd want to pay for. Next off is the fuel pump, i don't know if there is any internal parts that will fall out or into the pan or if it's just the arm? Does the rotating assy have to be at a certain degree or tdc to correctly install it? Theres no clear info online and from memory the old mark4 454 had a rod that pushed the pump arm, have no idea how ford does it or how pcm may have changed it. Shooting for install next week.
|
Posted By: wayoutthere
Date Posted: July-03-2021 at 5:51pm
|
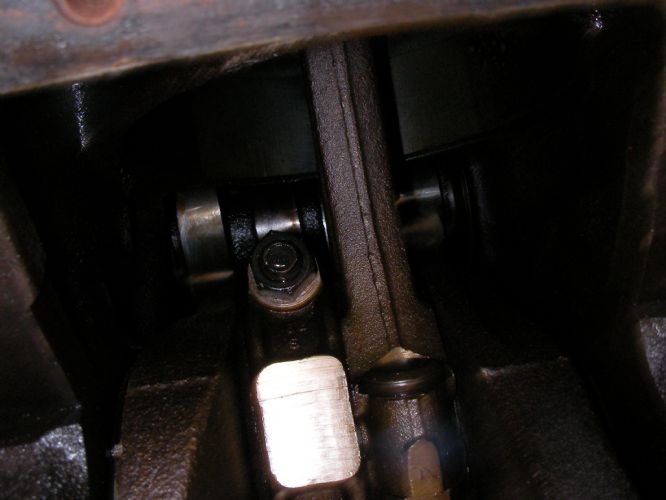
The sea pump, i surfaced both halves and the wear plate with 1000 grit wet before installing the new kit.
Concern i have is the torque, my click type inch pounds starts at 20, from memory 14-16 inch pounds was what most pumps i've seen required. No info online, no instructions with kit. Think 20 inch pounds is too tight ?
|
Posted By: KENO
Date Posted: July-03-2021 at 5:55pm
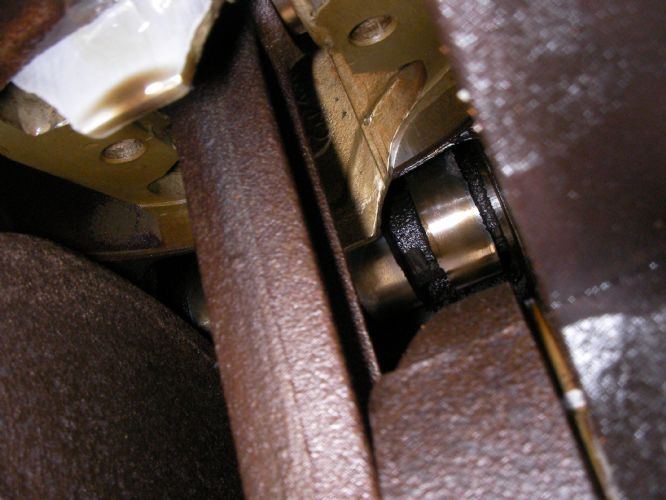
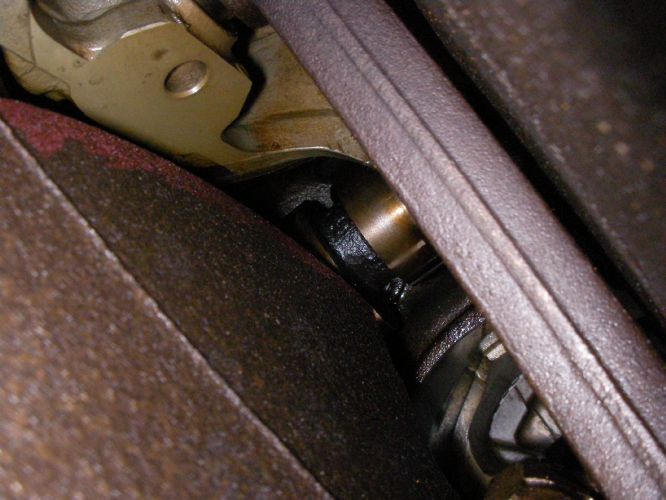
There aren't any parts that will fall out and like you said, there's just the arm on the pump The eccentric is mounted on the end of the cam and the arm is moved by the eccentric. Pretty much any engine position works, but you can find the position where the eccentric exerts the least pressure if you're having problems getting the pump into place against the spring pressure on the arm. Some people use a long stud or longer bolt to get one side started, then put the other bolt in, tighten it some and then take out the temporary bolt, put the original back in and tighten both sides incrementally. I'm kinda wimpy and I usually don't have a problem overcoming the spring pressure It's only hard the first time It's easier at least for me, than the Chevy pushrod setup Edit.......#1 at TDC on the compression stroke is maximum pressure on the arm, so putting #6 at TDC is the least pressure. so put#1 at TDC and rotate the crankshaft one full turn and you'll be in the right spot with #6 now at TDC.
|
Posted By: KENO
Date Posted: July-03-2021 at 6:32pm
|
Here's a picture borrowed from somewhere on the internet showing the eccentric position when the engine is at TDC on the compression stroke on #1 and would be exerting max pressure on the arm. One turn of the crankshaft rotates the camshaft 1/2 turn to the minimum pressure position. 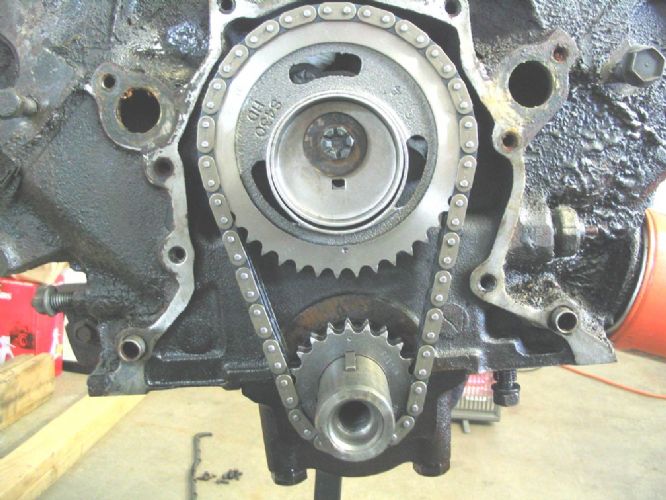 |