1977 Ski Nautique Rebuild
Printed From: CorrectCraftFan.com
Category: Repairs and Maintenance
Forum Name: Boat Maintenance
Forum Discription: Discuss maintenance of your Correct Craft
URL: http://www.CorrectCraftFan.com/forum/forum_posts.asp?TID=25004
Printed Date: May-01-2025 at 9:21pm
Topic: 1977 Ski Nautique Rebuild
Posted By: HatterBee
Subject: 1977 Ski Nautique Rebuild
Date Posted: February-24-2012 at 9:30pm
|
Hello all. I have started to tear down my '77 SN and thought I would fill you guys in on my plans and progress. I have already discussed this in my thread of tearing down the engine but I figured I would migrate that information over here eventually.
This will be a complete rebuild. I am rebuilding the original engine and will replace the stringers and floor with coosa. I will not be putting any foam back in the boat. I MAY fill in the bow around the air ducks but that is a stretch and the only place it will be considered. I found this boat in a shed covered in vines. I was able to get the engine running but I have never had it in the water. It hasn't been in the water for at least three years. I will advise everyone that this will not be a complete "original" restoration. I do plan on customizing and modernizing it a bit. Mainly the electrical and gauges but I'm sure other things will come along as well. I have removed the engine, all the wiring and gauges, fuel tank, shaft, carpet, etc. I am currently working on the foam due to the unusually nice weather lately. Below are some before and current pictures. 


This is my little buddy helping me out!!! 

Thanks for looking. This is not my first boat rebuild but it is my first ski boat and complete restore of this magnitude, so I am sure to have many questions. Thanks to all who have already helped! Allen ------------- 1977 Ski Nautique Under Re-construction http://www.correctcraftfan.com/forum/forum_posts.asp?TID=25004&title=1977-ski-nautique-rebuild" rel="nofollow - My Rebuild Thread |
Replies:
Posted By: Gary S
Date Posted: February-24-2012 at 9:51pm
|
Are you going to save the Ford tow vehicle next to it too? ------------- http://www.correctcraftfan.com/diaries/details.asp?ID=1711&sort=&pagenum=1&yrstart=1966&yrend=1970" rel="nofollow - 69 Mustang HM SS 95 Nautique Super Sport |
Posted By: HatterBee
Date Posted: February-24-2012 at 10:29pm
|
I had a hard enough time getting them to sell the boat, but I did ask. My Dad would have loved that. ------------- 1977 Ski Nautique Under Re-construction http://www.correctcraftfan.com/forum/forum_posts.asp?TID=25004&title=1977-ski-nautique-rebuild" rel="nofollow - My Rebuild Thread |
Posted By: DrStevens
Date Posted: February-24-2012 at 11:48pm
Looks like a great one to restore, especially with the great help you have doing the work. 
|
Posted By: connorssons
Date Posted: February-25-2012 at 1:36am
very cool! where,s the shed! 
|
Posted By: HatterBee
Date Posted: February-27-2012 at 8:47pm
|
Update:
I got all the foam out over the weekend. It was a chore but not as bad as I was anticipating. I have been measuring everything and taking lots of notes. I have a coupe of questions though. I want to rework the battery box to house two batteries, what group size are normal for these Nautiques? Also on the rear of the secondary stringers is the section of stringer in between the secondary and primary necessary? It seems the only use is to support the floor. I was thinking about just doubling up the secondary where the removable panel is and leaving out that extra stringer?? What do yall think. This would also allow more room to access the exhaust pipes and connections. 
In the pic below you can see that additional stringer. There is about an inch and a half of foam between it and the secondary. 
Thanks Allen ------------- 1977 Ski Nautique Under Re-construction http://www.correctcraftfan.com/forum/forum_posts.asp?TID=25004&title=1977-ski-nautique-rebuild" rel="nofollow - My Rebuild Thread |
Posted By: M_U_M_P
Date Posted: February-28-2012 at 5:52am
|
We may both get in trouble here for me saying this..
I am doing a 79 restore right now as well and I'm only slightly further ahead of you. I took that "secondary" 1x6 out and just ran my main.. And just a tip for removing stringers...I highly highly highly reccomend using a tool called a Rotozip for cutting the glass away from your stringers. We has l of our stringers out of the boat in less than 2 hours. It costs around 100$ from the lowes store I believe, but it is definitely worth every penny. |
Posted By: TRBenj
Date Posted: February-28-2012 at 11:39am
|
A group 65 battery fits in the factory battery box very nicely.
The reason CC built the exhaust cavities that way (narrower at the front) is because the motorbox is narrower than the full width of the cavities. If you leave them full width, rather than taper them inwards, then you will be left with exposed holes in your floor (to the cavities/bilge) with the engine box closed. It seems like a good idea to simplify the structure until you get the boat all back together at the end of your project and go "oh sht, thats why they did that." Ive seen it happen! Here is a visual. The "full width exhaust cavity shape is shown in yellow. It would leave a visible gap in the floor with the motorbox shut, shown in red. 
Its sort of a necessary evil, as the 2 options that would allow you to simplify the structure are even less desireable. 1)Increase motorbox width at the expense of interior room, 2)narrow the main stringers... deviating from the 20" industry standard, creating motor mount issues, etc. ------------- |
Posted By: Maximal691
Date Posted: February-28-2012 at 11:42am
| I love barn finds. Ive been lucky/cursed with a few myself. |
Posted By: HatterBee
Date Posted: February-28-2012 at 11:54am
|
Thanks, Tim. At least I understand their purpose now. I still may try to simplify the process but will make sure it does not leave any gaps in the floor. ------------- 1977 Ski Nautique Under Re-construction http://www.correctcraftfan.com/forum/forum_posts.asp?TID=25004&title=1977-ski-nautique-rebuild" rel="nofollow - My Rebuild Thread |
Posted By: HatterBee
Date Posted: February-28-2012 at 11:56am
MUMP thanks for the advice. Do you know which model Roto and blades you used? I have looked at those before. I wont have any trouble with my current tools until I get in that area in between those stringers, this is where a smaller tool would work better. Do you have a thread or pics of your restore? Thanks again. Allen ------------- 1977 Ski Nautique Under Re-construction http://www.correctcraftfan.com/forum/forum_posts.asp?TID=25004&title=1977-ski-nautique-rebuild" rel="nofollow - My Rebuild Thread |
 M_U_M_P wrote:
Posted By: Jllogan
Date Posted: February-28-2012 at 12:13pm
|
I used a rotozip but I used the little 3 inch sawblade attachment. That let me get right down by the bottom. Alot of guys use an angle grinder with a diamond blade. Same idea. ------------- http://correctcraftfan.com/diaries/details.asp?ID=5792&sort=&pagenum=1" rel="nofollow - 1986 Ski Nautique 2001 |
Posted By: M_U_M_P
Date Posted: February-28-2012 at 2:08pm
| I will find out what model for ya, but It was the three inch saw blade one. I know it worked like 100% better than the angle grinder..and it can fit in all the areas, and when pressed all the way to the guard, it still will not mess up your stringers, they will just have a shallow saw line down them. |
Posted By: Jllogan
Date Posted: February-28-2012 at 2:34pm
|
yes The nice thing about the zip is you can flip the end around and move the guard so you always have the angle. On my angle grinder its a pain to switch the grip or guard position. I think it worked best as well but I can see how the grinder would work if thats all you had. ------------- http://correctcraftfan.com/diaries/details.asp?ID=5792&sort=&pagenum=1" rel="nofollow - 1986 Ski Nautique 2001 |
Posted By: Jllogan
Date Posted: February-28-2012 at 2:36pm
|
http://www.amazon.com/Factory-Reconditioned-RotoZip-RZ20-2100-RT-Spiral-Saw/dp/B0000DEZO5/ref=tag_dpp_lp_edpp_ttl_in - This is the one I have
http://www.amazon.com/RotoZip-RZ2000-52-120-Volt-Variable-Spiral/dp/B002L3RUYI/ref=sr_1_2?ie=UTF8&qid=1330446867&sr=8-2 - Looks like they changed the design a bit on the new ones ------------- http://correctcraftfan.com/diaries/details.asp?ID=5792&sort=&pagenum=1" rel="nofollow - 1986 Ski Nautique 2001 |
Posted By: Jllogan
Date Posted: February-28-2012 at 2:38pm
|
http://www.sears.com/shc/s/search_10153_12605?vName=Tools&cName=Portable+Power+Tools&keyword=rotozip&viewItems=25&autoRedirect=true&redirectType=CAT_REC_PRED&prop17=rotozip - Sears has mine still
Reconditioned for 71 bucks and then get the zip mate attachment. ------------- http://correctcraftfan.com/diaries/details.asp?ID=5792&sort=&pagenum=1" rel="nofollow - 1986 Ski Nautique 2001 |
Posted By: 80SN Barnfind
Date Posted: February-29-2012 at 3:56pm
Guard? Who uses a guard??  That silly thing got thrown out with the box my Dewalt came in! That silly thing got thrown out with the box my Dewalt came in!
Diamond blade on the Dewalt and a pneumatic pencil grinder to finish, makes for quick clean work. Nice find Allen! Looking forward to the updates. ------------- Knowledge comes by taking things apart: analysis. But wisdom comes by putting things together. |
Posted By: HatterBee
Date Posted: February-29-2012 at 5:54pm
|
Well lots of research as the weather has not cooperated. I really want to do coosa, but have also been toying with the idea of Doug Fir. Is it really worth about $500 and double time to finish in order to have a boat with no wood in it. My preliminary calculations have the coosa costing around 1k but probably $1,200for the boards and extra glass to laminate. The Doug Fir would cost about $550 figuring the wood and CPES.
I have also been thinking if I do coosa that I could laminate two pieces of 3/4 coosa in stead of three pieces of 1/2 for the mains. This would save just over $200 and have plenty of scrap coosa for all the backing plates and air box. I have talked with Tim about this and he has advised me to use three 1/2 pieces. I know this is not a ton of money but it is like more than a quarter of my budget for the whole project and I keep forgetting it is a 34 year old boat. What do you all think? I am planning on ordering materials this week or next. My distributor will drop ship all my material even the coosa for free to Greenville, which is three hours from my house and I have to travel there next week. So I want to get this figured out. ------------- 1977 Ski Nautique Under Re-construction http://www.correctcraftfan.com/forum/forum_posts.asp?TID=25004&title=1977-ski-nautique-rebuild" rel="nofollow - My Rebuild Thread |
Posted By: TRBenj
Date Posted: February-29-2012 at 6:45pm
|
Dont bother weighing the value of the boat into the equation. Any way you cut it, you wont get your money back on a project like this! Its a labor of love.
I'll say one more time that 3 layers of 1/2" is a much better way to go than 2 layers of 3/4" on the mains. You'd be down to 1/2 strength at the joints if using 3/4", as opposed to retaining 2/3 strength if using 1/2". A single additional layer of coosa on the main stringers will not use up an entire additional sheet of material. The 1/2" is also a few bucks less expensive than the 3/4", so at $190 or so per sheet, I dont understand how going with 3/4" would save you $200+. I also found 1/2" to be much more useful, in general, as scrap/misc pieces. I only used 3/4" in the floor under where the seats mount- and when I do it again, I hope to simplify things and stick with one grade and width of coosa (1/2" Bluewater 26) for everything. Whether or not the $500 premium is worth it or not is up to you, after all, its your money. You may get a little better feedback here if you go into a little more detail on how you plan to build the structure. Foam vs. no foam, glass vs. wood/coosa floor, ribs (if any), etc. ------------- |
Posted By: HatterBee
Date Posted: February-29-2012 at 9:11pm
|
Tim, I can get away with four sheets [(1) 3/4 and (3) 1/2] but if I use all 1/2 then it will take 5 sheets. My cost on a sheet of 1/2 Bluwater 26 is 220 and the 3/4 is 260 the 1/2 bluwater 20 is 150. I might need to find a better price, but my supplier is usually a bit cheaper than everyone plus no shipping cost. That is where the difference is. I will be using Bluwater 20 for the floor.
I do not plan on putting in any foam and I will building ribs outboard of the secondaries. I also plan on installing as many inboard bulkheads as possible. One forward of the mains and one just aft of the battery box for sure. I am hoping to have room for at least one more. I am also going to frame out the air box and hopefully place my air hoses as far starboard as possible to allow for more storage forward of the observers seat under the bow. Coosa also makes a 3/4 bluwater 26 that is 4' by 12' and 1/2 that is 5' by 12'. My mains are 12' 3" and I just removed the port main and secondary today and the forward most 4 inches was not even touching the hull. I can make those 12 footers work if I can get them. I am checking with my distributor to see if I can get those. The price of either would help lower the total and make it easier to build. Thanks, whats the word on the speedos? Allen ------------- 1977 Ski Nautique Under Re-construction http://www.correctcraftfan.com/forum/forum_posts.asp?TID=25004&title=1977-ski-nautique-rebuild" rel="nofollow - My Rebuild Thread |
Posted By: 8122pbrainard
Date Posted: February-29-2012 at 10:21pm
Have you ever looked at the flex modulus? Calculations? Do you know how to use the formulas? Sorry but I feel you have NOT done the proper "homework". Do not proceed until you do so. Allen, you have not as mentioned done your "homework"!! Once again, it's the butt joint that's a concern. ------------- /diaries/details.asp?ID=1622" rel="nofollow - 54 Atom /diaries/details.asp?ID=2179" rel="nofollow - 77 Tique 64 X55 Dunphy Keep it original, Pete < |
Posted By: TRBenj
Date Posted: March-01-2012 at 11:24am
|
Allen, if you can get the 12' long sheets and avoid any joints, then Id say youre ok with 2 layers of 3/4" for the mains.
How close is your Coosa supplier to you? Have you looked at CompositesOne? They have a location in Rock Hill, SC, which appears to be about 2 hrs from you. I was quoted $191 for a 4x8 sheet of the 1/2" B26. Something to think about. If I understand you correctly, youre planning on using 1/2" B20 for the entire floor? Id say this is a good plan, except in the area where the floor spans the bilge (engine box to battery box). You'll need to reinforce that with a lot of glass to keep it from flexing. Id recommend doubling it up over the bilge area. I used 3/4" B26 for this piece in the BFN and still added another piece of 1/2" over the bilge. Have you laid out every single piece you'll be making? With a full foamless coosa build, 4 sheets will be cutting it close! Especially if you plan on doing the airbox and rear removable panel out of Coosa. For reference, both Joe and I used 6 sheets on our boats. They were slightly larger than your 2nd gen SN, but I doubt you could get away with 2/3 the material. I sent you an email about the speedo parts! ------------- |
Posted By: HatterBee
Date Posted: March-01-2012 at 12:01pm
|
I have laid it out on paper and yes it is close with four sheets however I can get it done. I am waiting to see about the 12' stuff.
I am going to double the floor in the forward area as well. I saw that on your boat and others. I also saw in mine where CC had reenforced that area as well. I am still in the planning phases and still tweaking my numbers but if I can get the 12' 3/4 then I can get all the stringers including the additional ones that taper the exhaust channels out of that with a little left over. The floor with reinforcement under the seat area will take two sheets. Oh yeah maybe I forgot, i do have some left over Coosa here that I think is enough for the airbox. Thanks again for looking and chiming in. Allen ------------- 1977 Ski Nautique Under Re-construction http://www.correctcraftfan.com/forum/forum_posts.asp?TID=25004&title=1977-ski-nautique-rebuild" rel="nofollow - My Rebuild Thread |
Posted By: HatterBee
Date Posted: March-01-2012 at 12:19pm
|
Talked with those guys at Composites one and the Rock Hill location only handles Airex (penske) boards. The Lakeland Fl location handles Coosa.
------------- 1977 Ski Nautique Under Re-construction http://www.correctcraftfan.com/forum/forum_posts.asp?TID=25004&title=1977-ski-nautique-rebuild" rel="nofollow - My Rebuild Thread |
Posted By: TRBenj
Date Posted: March-01-2012 at 12:26pm
|
Airex is a good option, its pretty much the same stuff as Coosa. The 320 lines up with the Bluewater 20 and the 420 lines up with the Bluewater 26.
Regardless of whether they normally stock it or not, they should be able to get the coosa. I was quoted a 6-8 week leadtime for the non-stocked Airex (they dont stock all sizes and grades, normally), and a 3 week leadtime for the non-stocked Coosa. Even though it wasnt stocked, the Coosa was still about $10/sheet cheaper. ------------- |
Posted By: HatterBee
Date Posted: March-01-2012 at 4:54pm
|
Well Composites One can get me 3/4X5'X/12' Bluwater 26, but I have to buy three sheets and shipping. The price of boards are great but waiting on a shipping quote.
Anyone in NC or SC interested in a sheet of Coosa Bluwater 3/4X5'X12'?? ------------- 1977 Ski Nautique Under Re-construction http://www.correctcraftfan.com/forum/forum_posts.asp?TID=25004&title=1977-ski-nautique-rebuild" rel="nofollow - My Rebuild Thread |
Posted By: TRBenj
Date Posted: March-01-2012 at 5:08pm
|
Allen, they want to charge you shipping to your door? It shouldnt cost anything to get it to your local distribution center (Rock Hill, SC). The quote I got from them in Dec said nothing about minimum quantities- I was quoted a number based on 1 sheet of each.
I only had the 8' sheets quoted though... maybe thats the difference? If so, you might want to price it out using 3 layers of 1/2" on the mains instead. ------------- |
Posted By: HatterBee
Date Posted: March-01-2012 at 5:43pm
|
Yeah I am weighing all the options now. At least I know I can get the 12 foot stuff. I have decided to do the 1/2 if I can't get the 12 foot 3/4.
I am also still waiting on a price from my normal distributor but the lead time is 4-5 weeks which isn't a deal breaker but wanted to get started sooner. The reasoning I got from Composites One on the shipping is that they do not stock Coosa at their place in Rock Hill, Lakeland Fl handles the Coosa for this area. They would have to special order from Coosa and they have a minimum 3 sheet order and freight to their place. I think it is a special order on both Composites One and Coosa. We are still hashing that out and while I don't need that much 3/4 depending on the shipping cost I may just do the whole thing in 3/4, stringers and floors. It should be a tank then. I don't think it would weigh too much, do you? ------------- 1977 Ski Nautique Under Re-construction http://www.correctcraftfan.com/forum/forum_posts.asp?TID=25004&title=1977-ski-nautique-rebuild" rel="nofollow - My Rebuild Thread |
Posted By: TRBenj
Date Posted: March-01-2012 at 5:56pm
|
Coosa is pretty light- you wont take a significant weight hit going with 3/4" vs. 1/2" if you end up going that route.
If CompOne stocks the Airex, then dont be afraid to go that route either, if it makes lead times and pricing better. In looking at the specs, its essentially the same stuff. ------------- |
Posted By: nautique frk
Date Posted: March-01-2012 at 6:13pm
|
Tim,
I am the one who Allen is working with here at Composites One. Just FYI I work with our buyers everyday on this material We stock what is used or pruchased every week by most boat mfg's in North And South Carolina, Regulator, Grady White, Key West and many others. The sheets Allen has inquired about 3/4 x 5 x 12 Blue water 26 from Coosa is not a stock item at any of our locations. Coosa requres C1 to buy a minimum of three sheets or more of this material at one time for us to meet their minimum order for this sheet size. One thing to remember about us is that we stock materials that our builders in many industries purchase in large volumes each week from us. Hope this helps clear this up. |
Posted By: TRBenj
Date Posted: March-01-2012 at 6:19pm
|
Mike, sounds like he's going right to the source!
So the min order and additional shipping charges pertain specifically to the oddball (5'x12') size? Im sure thats why there was no mention of that in my quote from your RI facility. ------------- |
Posted By: nautique frk
Date Posted: March-01-2012 at 6:32pm
|
Tim,
When Fountain /Donzi/Proline were still going in NC we used to supply them with 1 1/2 x 5 x 10 sheets but since they are shut down we are not stocking that at this time. Our Lakeland Florida C1 usually stocks the Brand Coosa in most densities in normal 4x8 sheet sizes based on the builders they supply and we stock the Baltek Airex here in Rock Hill SC. We can get anything its just a matter of costs and lead times and freight charges. I can look at inventory for 30 plus of our locations in the US and Canada and see any items availble at any time. Composites One works with many of the core and glass companies and the boat builders to make engineered kits of glass and foam and Airex (Penske board) to make pre cut kits for each item to produce a hull or deck to speed up production. Not many know this but that is how it is done with most mfg's. |
Posted By: TRBenj
Date Posted: March-01-2012 at 7:00pm
|
Mike, thats some good insight- and it makes perfect sense that manufacturers would be working with you to kit everything up for them. Saves them a lot of planning and headaches (and of course, $$$!), Im sure.
The non-stocked items on my quote were noted, and had additional lead times, but no mention of additional freight charges. Maybe I would have run into that issue when it came time to order! ------------- |
Posted By: nautique frk
Date Posted: March-01-2012 at 7:24pm
| Tim, That would be a good idea to ask David Paul in Bristol RI about shipping charges. On our regular delivery routes to our weekly customers the delivery charge is 15.00 if on our Composite one Trucks if it goes common carrier (Old Dominon southeastern etc) they have the rate based on material. The C1 locations that stock or supply boat building materials are Lakeland FL, Bristol RI, Rockland ME, Rock Hill,SC and Nashville TN based on population areas of our country's boat builders. |
Posted By: TRBenj
Date Posted: March-01-2012 at 7:36pm
|
Maybe Im confused- I was planning on having to pick up my materials at the distribution center (and assumed Allen would be doing the same). I thought he was getting hit with a freight charge to the store, not to his door.
If they can get the materials all the way to me for a reasonable price, even better! Thanks again for turning us onto C1, btw- great resource for these materials! ------------- |
Posted By: nautique frk
Date Posted: March-01-2012 at 7:51pm
|
You can do a customer pick up for sure, You just need to arrange that all materials that are not stock be shipped to that location for pick up at same time with stocked items, Just makes things go smoother on that end. I will be glad to help in any way I can. I know the general public does not know how we operate since we are a major distributor to many. Jamestown dist,Paxton, Bluewater all buy in bulk direct from us on core, bonding materials, glass, Vectorply,Resin and Gel coat we sell mostly in large quantities, We get calls for a quart of resin and gel We joke about that because the miinmums are 5 gal pails and 55 gal drums.
|
Posted By: HatterBee
Date Posted: March-02-2012 at 12:15am
|
Wow, Mike you didn't say anything about being on here. Still trying to determine the route I will take. I did talk to my salesman at Paxton again today and he said he could get me 1 sheet of the 3/4X12' it would just take about three to four weeks. I have someone else interested in some 3/4 also so I still may get the three sheets just not sure yet.
Either way I have definitely decided on the composite route. Mike I will be in touch. ------------- 1977 Ski Nautique Under Re-construction http://www.correctcraftfan.com/forum/forum_posts.asp?TID=25004&title=1977-ski-nautique-rebuild" rel="nofollow - My Rebuild Thread |
Posted By: nautique frk
Date Posted: March-02-2012 at 1:18pm
|
Allen,
Just let me know I will be glad to help. We sell to Paxton they are one our resellers. I just happened to look to see if you were on CCF site after you told me you were working on a Correct Craft and that is how I found you on this thread. I have been in the Marine Industry almost 25 years now, I used to be the warranty manager for Skier's Choice (Supra and Moomba boats) in Maryville, TN for several years until the economy killed my job in 2009 and I got laid off. Then came to work for Composites One. |
Posted By: HatterBee
Date Posted: March-18-2012 at 11:51pm
Sorry for the lack of updates been juggling things around the house. I have ground down all the old glass on the port side, just need to do some leveling. I have laminated and installed the rear lifting, rudder, platform and exhaust backing plates. Just waiting on the rest of my coosa to come so I can start building my stringers.   Allen ------------- 1977 Ski Nautique Under Re-construction http://www.correctcraftfan.com/forum/forum_posts.asp?TID=25004&title=1977-ski-nautique-rebuild" rel="nofollow - My Rebuild Thread |
Posted By: uk1979
Date Posted: March-19-2012 at 11:52am
Great work on the 77 thanks for sharing  ------------- Lets have a go 56 Starflite 77 SN 78 SN 80 BFN |
Posted By: HatterBee
Date Posted: March-25-2012 at 2:00pm
|
Not a lot to update you guys with. But I have painted some engine parts and started to prep the port stringer for tracing as soon as I get my Coosa for the stringers. I have started working on the Speedo Pod. I decided to change all my original gauges with new more modern gauges. With that change I needed to fabricate a new panel to raise the new "flush mounted" spedos in the same location as the originals. I have attached pictures of a prototype that I am working on. I will glass this and paint it. I have to fabricate a rear section to enclose the rear of the speedos, but I have a plan for and as soon as I make some progress there I will post. Please let me know what you guys think or if you think I should change it any.   ------------- 1977 Ski Nautique Under Re-construction http://www.correctcraftfan.com/forum/forum_posts.asp?TID=25004&title=1977-ski-nautique-rebuild" rel="nofollow - My Rebuild Thread |
Posted By: 8122pbrainard
Date Posted: March-25-2012 at 3:39pm
|
Allen, I really do not feel you want my opinion! Wait for others who may give you the advice needed. ------------- /diaries/details.asp?ID=1622" rel="nofollow - 54 Atom /diaries/details.asp?ID=2179" rel="nofollow - 77 Tique 64 X55 Dunphy Keep it original, Pete < |
Posted By: HatterBee
Date Posted: March-25-2012 at 3:47pm
|
Pete I know where you stand on this issue. But your comments are welcome as I have learned a great deal from your post on mine and other threads here. As for the gauges and other things that will be modernized. I just like the way they look and this way I am not always tied down to trying to find original replacements. If I have a problem or one goes out, I'll just buy a new one. Besides, my original gauges were in real bad shape and I sold them for more than it cost to replace all the gauges with new ones. Thanks ------------- 1977 Ski Nautique Under Re-construction http://www.correctcraftfan.com/forum/forum_posts.asp?TID=25004&title=1977-ski-nautique-rebuild" rel="nofollow - My Rebuild Thread |
Posted By: 80SN Barnfind
Date Posted: March-25-2012 at 11:19pm
|
The fact that you sold the originals that were in "bad shape" for more than what the new ones cost, speaks volumes. ------------- Knowledge comes by taking things apart: analysis. But wisdom comes by putting things together. |
Posted By: DrCC
Date Posted: March-25-2012 at 11:47pm
|
I like it Allen. The Teleflex Sterling gauges are what I used in a '73 SN resto. I think they are an attractive gauge. What was in the hole to the far left? Depth finder? |
Posted By: HatterBee
Date Posted: March-26-2012 at 12:28am
|
It was a radio remote. Not sure how I am going rearrange the gauges. I will have a radio remote but it will be larger than the standard 2" gauge hole. I am thinking that the far left hole (non-original) will now hold the water temp, then to the right oil pressure, then volt, and fuel at the bottom. On the right of the steering wheel will be a small depth finder and the new radio remote. Hour meter will be mounted under dash on the board for the glove box. ------------- 1977 Ski Nautique Under Re-construction http://www.correctcraftfan.com/forum/forum_posts.asp?TID=25004&title=1977-ski-nautique-rebuild" rel="nofollow - My Rebuild Thread |
Posted By: DrCC
Date Posted: March-26-2012 at 12:32am
|
Ya know, you probably have enough room to install the speedos in the hump for better visibility. Here's a pic of Jess W's 1973 with the Teleflex Sterlings.  |
Posted By: HatterBee
Date Posted: March-26-2012 at 12:35am
Maybe so, but it was a good deal for me because I was going new anyway. Made perfect sense to me. The boat will not be original by any means because it will be rebuilt with coosa and I plan on replacing any part that I feel will look better new. At least this way I can help finance my rebuild with selling the old original stuff. I know this is not method that many follow and that's ok. I like the way new and modern parts look and function. I would buy a newer boat but I can't drop that amount of cash and besides 1977 was a special year for me, which is why I bought it. By the way, I really like your signature. It is so true and speaks volumes for the amount of knowledge and wisdom on this site. Thanks Allen ------------- 1977 Ski Nautique Under Re-construction http://www.correctcraftfan.com/forum/forum_posts.asp?TID=25004&title=1977-ski-nautique-rebuild" rel="nofollow - My Rebuild Thread |
Posted By: 8122pbrainard
Date Posted: March-26-2012 at 12:37am
|
Al, That piece of plastic sure looks better than a piece of old plywood! ------------- /diaries/details.asp?ID=1622" rel="nofollow - 54 Atom /diaries/details.asp?ID=2179" rel="nofollow - 77 Tique 64 X55 Dunphy Keep it original, Pete < |
Posted By: HatterBee
Date Posted: March-26-2012 at 12:39am
I do have room but I thought it looked a little funny. I sketched a template and placed it up there, and to me it just didn't look right. Besides the tach is not in the middle of the hump and the rise in the pod makes it a little less noticeable. Placing them in the the hump would be a whole lot easier. But I believe this will look better. With my lack of knowledge on these boats...does the speedo pod rising above the hump really block visibility? I don't have a floor or seat at the moment to even try to see above it. ------------- 1977 Ski Nautique Under Re-construction http://www.correctcraftfan.com/forum/forum_posts.asp?TID=25004&title=1977-ski-nautique-rebuild" rel="nofollow - My Rebuild Thread |
Posted By: HatterBee
Date Posted: March-26-2012 at 12:41am
|
Pete, I thought the wood grain would add to the nostalgic look!! ------------- 1977 Ski Nautique Under Re-construction http://www.correctcraftfan.com/forum/forum_posts.asp?TID=25004&title=1977-ski-nautique-rebuild" rel="nofollow - My Rebuild Thread |
Posted By: GlassSeeker
Date Posted: March-26-2012 at 1:23am
|
I think you are going to block the view. The range on the speedos is too high, so using them in the normal skiing range they won't be as accurate. Since you are not going original why not go GPS? These garmin V's are about $50 on ebay. I run a gps just over my gauges but my boat has almost no bowrise. No it's not a CC.  ------------- This is the life |
Posted By: HatterBee
Date Posted: April-01-2012 at 8:43pm
|
Well guys a few updates for ya. Been busy the last few days. I have bedded both port side stringers and built the housing for the new speedo's. I decided to shorten the speedo pod after hearing concern on the height and the idea it might block my view. I also got the engine back from the machine shop and it is partially assembled. Pistons, bearings, crank and cam are in. Just need to paint the block and heads and then finish the assembly.     Until next time....Allen ------------- 1977 Ski Nautique Under Re-construction http://www.correctcraftfan.com/forum/forum_posts.asp?TID=25004&title=1977-ski-nautique-rebuild" rel="nofollow - My Rebuild Thread |
Posted By: HatterBee
Date Posted: April-26-2012 at 1:48am
|
Sorry for the delay in updates. I have reached a mile-stone today. I have completed the stringer installation. All four stingers have been bedded, tapped and capped. Now we move to building the two bulkheads, 26 supporting ribs and the exhaust channels. More to come.   ------------- 1977 Ski Nautique Under Re-construction http://www.correctcraftfan.com/forum/forum_posts.asp?TID=25004&title=1977-ski-nautique-rebuild" rel="nofollow - My Rebuild Thread |
Posted By: 8122pbrainard
Date Posted: April-26-2012 at 9:24am
 ------------- /diaries/details.asp?ID=1622" rel="nofollow - 54 Atom /diaries/details.asp?ID=2179" rel="nofollow - 77 Tique 64 X55 Dunphy Keep it original, Pete < |
Posted By: storm34
Date Posted: April-26-2012 at 12:44pm
|
Nice work! No need to be sorry for delays in progress as long as there's still some progress!!! ------------- |
Posted By: HatterBee
Date Posted: May-02-2012 at 5:00pm
|
Alright guys I have started to fit my forward bulkheads and I have found that the clearance for the battery is slim. I'm not sure how this happen, but I'm feel like the floor may be a little lower than it was. But thats ok. However, I was thinking about moving the battery from the bilge area to the bow on the topside of the air box. Moving the battery will put a little more weight forward but it will only be about 18" more forward than before. What do yall think? I am thinking that this help with water in the bilge ad fitting the air ducks and cable chases. ------------- 1977 Ski Nautique Under Re-construction http://www.correctcraftfan.com/forum/forum_posts.asp?TID=25004&title=1977-ski-nautique-rebuild" rel="nofollow - My Rebuild Thread |
Posted By: 8122pbrainard
Date Posted: May-02-2012 at 5:13pm
|
Allen, Is it the actual battery box that's tight? Will the battery itself fit with some clearance? If so, I'd consider just glassing in the area forming your own box. ------------- /diaries/details.asp?ID=1622" rel="nofollow - 54 Atom /diaries/details.asp?ID=2179" rel="nofollow - 77 Tique 64 X55 Dunphy Keep it original, Pete < |
Posted By: gun-driver
Date Posted: May-02-2012 at 5:54pm
|
After looking at your first post the 3/4 wood floor starts after the battery box. It looks like your new stringers start the notch for the 3/4 floor a little to far forward?? Could be the picture angle?? I also didn't like the way the stringers just ended so I built in a bulk head. 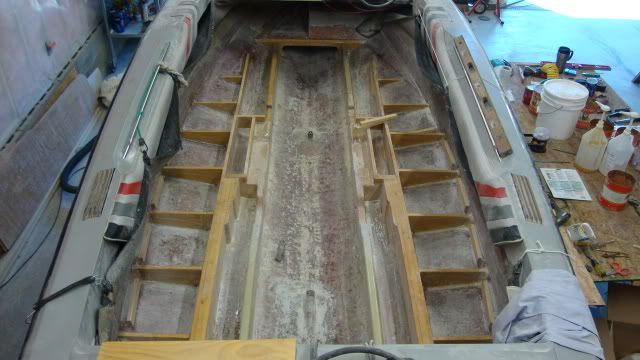
|
Posted By: HatterBee
Date Posted: May-02-2012 at 11:21pm
Pete, when I bought the boat there was no battery or battery lid so i am not sure how the old fit, but I am planning on a building my own box. The clearance is with the height of the battery being taller than the floor. I know I made the floor a little lower but I thought I could work around the battery. However, today I noticed that there is less clearance than I thought. I have regrouped and believe I may be able to slant the floor slightly towards the bow and make it work. I will keep you informed. On a side note, do you think that moving that weight a little forward would be that bad? I like the idea of keeping the battery above the water line. I try to do this all the offshore boats I work on. ------------- 1977 Ski Nautique Under Re-construction http://www.correctcraftfan.com/forum/forum_posts.asp?TID=25004&title=1977-ski-nautique-rebuild" rel="nofollow - My Rebuild Thread |
Posted By: HatterBee
Date Posted: May-02-2012 at 11:25pm
The cutout for the 3/4 sub floor is in the same place as the original stringer, I think my initial problem is coming from my measurements to cut down the stringer because I will be putting 1/2 on top of the entire floor. I think I may have figured a way around the clearance issue, but am still thinking of placing that battery under the bow on the air box to keep it above the water line. I was just curious if the weight change would alter the ride at all. I have also built a forward bulkhead to tie all four stringers together, this will serve as the forward part of the battery box. ------------- 1977 Ski Nautique Under Re-construction http://www.correctcraftfan.com/forum/forum_posts.asp?TID=25004&title=1977-ski-nautique-rebuild" rel="nofollow - My Rebuild Thread |
Posted By: baitkiller
Date Posted: May-02-2012 at 11:41pm
|
Bee, I hate the in-floor battery position and will be running two batteries anyway. So I insulated the crap out of the battery box and turned it into a (beer)cooler with drain plug and hinged lid. The batteries will go up, way up under the dash in front of the drivers feet in boxes. ------------- Jesus was a bare-footer............. |
Posted By: HatterBee
Date Posted: May-02-2012 at 11:47pm
|
Killer, this kinda my thought process but wanted to see what others thought. ------------- 1977 Ski Nautique Under Re-construction http://www.correctcraftfan.com/forum/forum_posts.asp?TID=25004&title=1977-ski-nautique-rebuild" rel="nofollow - My Rebuild Thread |
Posted By: 8122pbrainard
Date Posted: May-03-2012 at 9:11am
|
Allen, Did you get the correct group size battery? What's your concern about keeping the battery above the waterline? ------------- /diaries/details.asp?ID=1622" rel="nofollow - 54 Atom /diaries/details.asp?ID=2179" rel="nofollow - 77 Tique 64 X55 Dunphy Keep it original, Pete < |
Posted By: gun-driver
Date Posted: May-03-2012 at 9:57am
| Two batteries on the air box will add approx. an extra 100lbs to the driver’s side. Don't forget you have all your vent hoses and wiring conduit coming up through the top of the box. Plus it would be a pain in the a$$ getting at them for servicing. |
Posted By: uk1979
Date Posted: May-03-2012 at 5:47pm
|
Just a thought you may be able to make/let a box into the floor partially and the rest up out of the floor between the observer seat ally frames and between the main and sub stringers depending on your battery size, if you’re lucky you may fit 2 in width ways up into the bow or may need to go end to end up into the bow......hinge the seat frame and just unscrew back lock thumb screw and fold over to access battery pack/box.... may be worth playing around with. Keep up the great work. ------------- Lets have a go 56 Starflite 77 SN 78 SN 80 BFN |
Posted By: GlassSeeker
Date Posted: May-03-2012 at 6:26pm
|
I know a guy who has two batteries up front on drivers side plus a couple bass speakers and he wonders why the boat won't drive level-It always leans to the drivers side. I think he's gonna rip it all out because it kills top speed and makes a screwed up wake too. His is a Sanger but the theory is the same. ------------- This is the life |
Posted By: HatterBee
Date Posted: May-03-2012 at 10:02pm
My concern from the battery below the water line stems from my experience with offshore boats and the thought of a battery shorting out in a rough sea if it gets swamped with water. This has happened to me and several other acquaintances through the years. I always move my batteries from the bilge area on my fishing boats if they are located there. ------------- 1977 Ski Nautique Under Re-construction http://www.correctcraftfan.com/forum/forum_posts.asp?TID=25004&title=1977-ski-nautique-rebuild" rel="nofollow - My Rebuild Thread |
Posted By: HatterBee
Date Posted: May-03-2012 at 10:04pm
Thanks man. However, I am relocating all the air hoses and conduit to the starboard side of the air box and would put the battery (more than likely only one, not two) on the center line and not to one side or the other. ------------- 1977 Ski Nautique Under Re-construction http://www.correctcraftfan.com/forum/forum_posts.asp?TID=25004&title=1977-ski-nautique-rebuild" rel="nofollow - My Rebuild Thread |
Posted By: HatterBee
Date Posted: May-03-2012 at 10:07pm
Thanks, the wake and top speed is something I am concerned with on this idea because I am not real familiar with these boats. Do you think your friend would ok if he moved his batteries to the center line, and maybe only ran with one? ------------- 1977 Ski Nautique Under Re-construction http://www.correctcraftfan.com/forum/forum_posts.asp?TID=25004&title=1977-ski-nautique-rebuild" rel="nofollow - My Rebuild Thread |
Posted By: 8122pbrainard
Date Posted: May-03-2012 at 10:41pm
Well, you don't need to worry about the 77SN encountering heavy seas! 12 volts under water will do nothing. With a battery bank of 48 volts on a off shore maybe but that's SALT water! I truly feel you are overreacting in this case and not understanding the issue. In the cases of the battery banks shorting, did the boats take on that much water or weren't the batteries secured per USCG regs? ------------- /diaries/details.asp?ID=1622" rel="nofollow - 54 Atom /diaries/details.asp?ID=2179" rel="nofollow - 77 Tique 64 X55 Dunphy Keep it original, Pete < |
Posted By: HatterBee
Date Posted: May-03-2012 at 10:45pm
Pete, I am not so sure about over-reacting, but I am probably over-thinking this thing. However, I do think I have the issue worked out to allow me to install in the bilge area as it came, but I still wanted to get some thoughts from others if they had placed their batteries up forward. Thanks again for all your help!! ------------- 1977 Ski Nautique Under Re-construction http://www.correctcraftfan.com/forum/forum_posts.asp?TID=25004&title=1977-ski-nautique-rebuild" rel="nofollow - My Rebuild Thread |
Posted By: GlassSeeker
Date Posted: May-03-2012 at 10:50pm
|
yes and yes. I'm trying to get him to pull the bass out, run one battery just off centerline to passenger side, which is the oem location roughly. you'd likely be fine running the battery in the centerline or close. I am somewhat guessing here but I know your type of boat has a pretty good bowrise to the holeshot and so a battery mounted more forward might help keep the bow a bit lower but it will also possibly slow the topend a little. there are always trade offs. Somebody on here must have done some battery relocating and would know better than I. Along the lines of what Pete was saying I think if you've got enough water in the boat to short the battery you've got some serious trouble no matter what. But if it were mounted a bit higher I can't see how it would hurt. ------------- This is the life |
Posted By: HatterBee
Date Posted: May-03-2012 at 11:08pm
|
Thanks Andy, yeah I know there is serious issues if there is enough water in that hole. At least in a lake you are not too far from shore. The last time I an issue like that we had a valve on a seacock break and we started to take on water about 30 miles off Morehead City NC. It shorted out the engine batteries located in the bilge which were running the bilge pumps. Luckily I had a spare pump rigged with alligator clips and an electronics battery in the console. We were able to pump the water out enough to jam a wooden peg in the thru hull and get back to shore. ------------- 1977 Ski Nautique Under Re-construction http://www.correctcraftfan.com/forum/forum_posts.asp?TID=25004&title=1977-ski-nautique-rebuild" rel="nofollow - My Rebuild Thread |
Posted By: 8122pbrainard
Date Posted: May-03-2012 at 11:08pm
Andy, Yes, if the water gets that high in the bilge, there's a problem! However, understand that a 12 volt battery under water doesn't have the power (volts) to short especially in fresh water. ------------- /diaries/details.asp?ID=1622" rel="nofollow - 54 Atom /diaries/details.asp?ID=2179" rel="nofollow - 77 Tique 64 X55 Dunphy Keep it original, Pete < |
Posted By: baitkiller
Date Posted: May-03-2012 at 11:38pm
|
Two or three caveats to my suggestion: 1) i run 100% in sea water. 2) I run a LH propeller, Odd I know.. 3) I always have a full boat and with that much weight aft I need everything I can get fwd to clean the wash out. 4) Bonus! That location is much better served as a beer cooler on a boat with abysmal storage and no room for a proper cooler. Think about it. ------------- Jesus was a bare-footer............. |
Posted By: GlassSeeker
Date Posted: May-04-2012 at 2:08am
|
The cooler idea is pretty good. Out in the ocean-whole nuther story. Stuff like that makes a lasting impression. You can probably put the battery(s) where ever you like without issue. Wasn't the battery originally only partially in floor? I saw a chevy blazer once in water up to the windshield the guy reached around underwater and pulled the cable from his warn winch out and ran it to a tree and with the winch and battery underwater it pulled itself out. (So my 69 Jeepster Commando got a warn winch!) however the guy had turned the engine over-underwater and it bent all the rods-he got towed home. Overall looks like this boat is going to come out real nice-better than new. ------------- This is the life |
Posted By: uk1979
Date Posted: May-04-2012 at 8:38am
|
There always a plan B.........fit the batteries under the rear seat....one each side partially let into the floor space in-between as a cooler/sack/storage in a lift out tray/box or batteries in the middle again in a lift out tray/box and 2 tray/box each side for cooler/storage .....would be good to see and not seen it here yet on a 70’s SN there is allot of room in the middle as its after the log ........just needs to be well watertight seeing what you have done so far it would be, something to kick around here....... ------------- Lets have a go 56 Starflite 77 SN 78 SN 80 BFN |
Posted By: TimSpangler
Date Posted: May-04-2012 at 10:24am
|
All this talk about battery relocating got me thinking, I have never seen anyone modify the gas tank (shorten the length) This would allow a battery on each side of the tank above the floor. I know currently on my 82 SN there may be about 8-10" on each side of the tank. Maybe a custom tank that is shorter in length and sloped in the front (to match the rear seat). This would make up the difference in volume perhaps? Just thinking out loud. |
Posted By: baitkiller
Date Posted: May-04-2012 at 10:31am
|
Maybe Tim, custom aluminum tanks run about 12-15$ a gallon depending on builder and guage of plate. Its only a 20 gallon tank. My boat will run in sea water, not the ocean. just sayin'.... ------------- Jesus was a bare-footer............. |
Posted By: TimSpangler
Date Posted: May-04-2012 at 10:52am
|
I'm not ready for this yet, just thinking. One could "section" there stock tank (take out about 12+/-") near the end on the port side then just have it welded back together. May need to add an elbow neck to the side for the fuel inlet and weld the original location closed. I have an in floor cooler and battery box, this would give me (2) coolers. I'll have to look into this a bit more. I won't be really worried about this until next year, when I replace the stringers. |
Posted By: HatterBee
Date Posted: May-04-2012 at 8:40pm
|
Thanks guys. I have actually thought about cutting the fuel tank or replacing it with a custom tank. But this process seems like a lot for now especially since the fuel tank is fine. I have also looked into placing it in the rear under the back seat. This still maybe an option. This would allow multiple batteries and the idea of an in-floor cooler is appealing. I have worked the numbers and with a slight shim on the forward part of the floor I can get a group 34 in that hole with a lid on top, so at least I can continue with the build and if I decide to place the battery up front or in the rear I can still do so. I will keep everyone updated. ------------- 1977 Ski Nautique Under Re-construction http://www.correctcraftfan.com/forum/forum_posts.asp?TID=25004&title=1977-ski-nautique-rebuild" rel="nofollow - My Rebuild Thread |
Posted By: AMB
Date Posted: May-05-2012 at 12:34am
|
Just saw this thread, and man, does that boat bring back memories! It was my first SN. I took out a college loan for the downpayment in 1978. Bought it with about 110 hours on it, and no mufflers. I loved that sound going down the river. The pic is a little grainy when you zoom, but... 
|
Posted By: HatterBee
Date Posted: May-05-2012 at 1:18am
|
Al, that's cool. Do you have any more pictures? I am trying compile a mess of pictures of this era boat for when I start on the interior. ------------- 1977 Ski Nautique Under Re-construction http://www.correctcraftfan.com/forum/forum_posts.asp?TID=25004&title=1977-ski-nautique-rebuild" rel="nofollow - My Rebuild Thread |
Posted By: AMB
Date Posted: May-07-2012 at 2:58pm
|
I'll have to dig into boxes of old pics we have somewhere. My friend had a yellow on white same year. We put a bunch of hours on those boats. Great running. Wakes are a little stiff by today's standards. Great trick wake and an awesome barefoot boat with a top speed close to 50. Had 4 footers up one day with WOT at 42. What new boat could do that today? |
Posted By: gun-driver
Date Posted: May-08-2012 at 2:10am
Its funny that this post just popped up.
|
Posted By: HatterBee
Date Posted: May-08-2012 at 10:55am
|
Paul, that is interesting. What thread did this come from. I have pretty much decided to make it work to install the battery in its proper location, even if I have to raise the floor. Still only going with one though. Now is the time to do it. ------------- 1977 Ski Nautique Under Re-construction http://www.correctcraftfan.com/forum/forum_posts.asp?TID=25004&title=1977-ski-nautique-rebuild" rel="nofollow - My Rebuild Thread |
Posted By: HatterBee
Date Posted: May-08-2012 at 10:57am
|
A little update. I have been making progress with making the support ribs. I will post pics later. Still have a few more to cut out and then prep to glass in. Not sure how much progress I will make in the next few weeks. I will be going on Family Vacation. Anybody, by chance, taking a Disney Cruise on Saturday?? ------------- 1977 Ski Nautique Under Re-construction http://www.correctcraftfan.com/forum/forum_posts.asp?TID=25004&title=1977-ski-nautique-rebuild" rel="nofollow - My Rebuild Thread |
Posted By: HatterBee
Date Posted: May-08-2012 at 9:02pm
Here are the updated pictures. All the support ribs have been cut and fitted. Now just have to glass them in. I should have this done before the end of May and then can move to fitting the floor panels.   ------------- 1977 Ski Nautique Under Re-construction http://www.correctcraftfan.com/forum/forum_posts.asp?TID=25004&title=1977-ski-nautique-rebuild" rel="nofollow - My Rebuild Thread |
Posted By: HatterBee
Date Posted: May-08-2012 at 9:04pm
|
Oh yeah I forgot that I have to build the exhaust channels as well, but still should met the May goal. ------------- 1977 Ski Nautique Under Re-construction http://www.correctcraftfan.com/forum/forum_posts.asp?TID=25004&title=1977-ski-nautique-rebuild" rel="nofollow - My Rebuild Thread |
Posted By: TRBenj
Date Posted: May-09-2012 at 11:09am
|
Looking good! A few questions/comments: 1. You mentioned the exhaust cavities... good- you dont want to leave them full width at the front and have holes poking out from underneath the motorbox! 2. Why the dip in stringer (forward of the engine?)? Are you doubling up the floor in this area? I assume you are going foamless and a coosa floor over everything. 3. No drain holes in the ribs/bulkheads? Might want to add some so that *if* water ever makes it below the floor, all the cavities will drain together. 4. How do you plan to mount the engine? Lag into the coosa? I dont see any provisions for an engine cradle? ------------- |
Posted By: HatterBee
Date Posted: May-09-2012 at 12:21pm
|
Looking good! A few questions/comments: 1. You mentioned the exhaust cavities... good- you dont want to leave them full width at the front and have holes poking out from underneath the motorbox! Yes, I would love to keep them full width, but after our earlier conversation about it I went and measured. You were right it is narrower, so the cavities will go back. They will be a little different though. Where the removable panel starts and the floor is cut back and an angle is where the cavity will end. At that point the cavity will be full width and removable will span the entire width. 2. Why the dip in stringer (forward of the engine?)? Are you doubling up the floor in this area? I assume you are going foamless and a coosa floor over everything. Yes and Yes. There will be 3/4 sub and then the 1/2 over the entire floor. The removable panel aft of the engine will also be 3/4. I still think I will refoam the bow forward of the battery box. 3. No drain holes in the ribs/bulkheads? Might want to add some so that *if* water ever makes it below the floor, all the cavities will drain together. Everything will drain except for the bow. I am probably going to foam the bow so it will be sealed. But everything from that forward bulkhead aft will drain into the bilge. I have cut the original drain holes in primaries and added drains in the secondaries in the middle and aft. All ribs will have drain notches cut in them. This has not happened yet, but is a simple task. 4. How do you plan to mount the engine? Lag into the coosa? I dont see any provisions for an engine cradle? My plan for now is to try and keep the mounting like it was. I am not real familiar with engine cradles and such so I am not going to change it that much. I have reservations regarding the longevity of lags straight into the coosa, so I am thinking that I will drill the mounting holes out and then fill with thickened epoxy and then remount. I am also going to lag the horizontal wholes in the mount. The engine and gear will sit on a 1/4 piece of flat bar that will rest on the stringer. What do you think about these plans. Thanks for posting and asking. Allen ------------- 1977 Ski Nautique Under Re-construction http://www.correctcraftfan.com/forum/forum_posts.asp?TID=25004&title=1977-ski-nautique-rebuild" rel="nofollow - My Rebuild Thread |
Posted By: TRBenj
Date Posted: May-09-2012 at 12:36pm
Maybe I am misunderstanding what youre saying. I fail to see how the removable panel can be full width at the front edge though. The front edge of that panel needs to extend further forward than the rear edge of the motorbox (so you can mount the hinges to it). The way Im picturing it, your plan would either leave the panel short of the motorbox, or have a portion of the full width cavities under the motorbox (which would allow you to see the cavities with the box closed. Or am I missing something? Sounds good on #2 and #3.
I would be concerned about lagging into the coosa as well- both in the vertical and horizontal directions. That is the one shortcoming of the material- screw retention. Predrilling larger holes and filling with thickened resin may be an ok approach- Joe or Pete may be able to comment better on that. Through bolting would be much preferred, obviously. Were you planning on lagging the engine directly to the stringers, or was it going to sit on the floor? If the former, then you would need some nailers to support the floor where it would come short of the motor mounts, right? ------------- |
Posted By: HatterBee
Date Posted: May-09-2012 at 3:29pm
|
Tim i will drawn a picture of what I am talking about in the exhaust cavity. But for now...The original cavity towards the engine is reduced in size to about 4 inches and where the motor box mounts it is enlarged by about 2 inches which gives the removable panel the 45 degree angle at the back corner of the motor box. At this point the exhaust cavity is only 1-1/2 inches less in size than at the rear (in between the secondary and main stringers). I don't see the point in this except to keep the removable panel narrower. Instead of making the additional step in size at the back of the motor box I will take it all the way to the secondary. I know pictures will help here. If you remember on the mains I did put two pieces of 3/4 together and in the middle I have two layers of cloth to help but I am still a little uncertain about the longevity. I guess if I thru-bolt I could use Eric's idea of drilling a whole in the bottom and then I would place a piece of round stock (SS) in and tap it. I will be placing the engine on the stringers just like it was and yes there will be a "nailer" glassed on the inside of the main to support the floor in that area. Thanks again for all the questions and help. ------------- 1977 Ski Nautique Under Re-construction http://www.correctcraftfan.com/forum/forum_posts.asp?TID=25004&title=1977-ski-nautique-rebuild" rel="nofollow - My Rebuild Thread |
Posted By: TRBenj
Date Posted: May-09-2012 at 4:03pm
|
I think I understand what youre saying on the exhaust pockets. There is more than one jog in them... and youre eliminating the one towards the rear and keeping the pocket wider for longer. That sounds fine, so long as the width of the front end that corresponds to the motorbox width remains. On the engine install, yes, I remember that you laminated 2 pieces of 3/4" with cloth. I would still have reservations with lagging into them if you had 3 layers of 1/2" and glass between them all (as we did on the BFN). The glass certainly helps with screw retention, but thats in the lateral direction, not the "end grain" (lagging from the top). With the nailers already planned for the floor around the motor mounts, Ive got some ideas on how you could add some cradle-like mounting features. It gets a little tricky with notching the stringers, gaining access to the nuts on the through bolts, and some more complex nailers, but its possible. Ive been contemplating what the best way to do this would be, as Ive got a boat or 2 that will need rebuilding that didnt originally have cradles. Let me know if you want to discuss this in more detail. ------------- |
Posted By: HatterBee
Date Posted: May-09-2012 at 4:04pm
Ok Tim here are some pics and a drawing. Please I know I am not an artist. In this drawing you will see the original layout to the left. On the right is the new layout I plan to use. There will be a "nailer" or support glassed on the inboard side of the secondary to support the removable panel.  The red line shows where the change will be. ------------- 1977 Ski Nautique Under Re-construction http://www.correctcraftfan.com/forum/forum_posts.asp?TID=25004&title=1977-ski-nautique-rebuild" rel="nofollow - My Rebuild Thread |
Posted By: TRBenj
Date Posted: May-09-2012 at 4:05pm
|
^^Yup, I understood you correctly and agree that your approach on the pockets is fine^^ ------------- |
Posted By: HatterBee
Date Posted: May-09-2012 at 4:06pm
|
Sure Tim I would live to hear your ideas. I am always open to new ideas. ------------- 1977 Ski Nautique Under Re-construction http://www.correctcraftfan.com/forum/forum_posts.asp?TID=25004&title=1977-ski-nautique-rebuild" rel="nofollow - My Rebuild Thread |
Posted By: nautique frk
Date Posted: May-16-2012 at 5:48pm
| Allen It is looking good glad you decided to go the composite route, I like the dash pod you made for the speedos too ! Keep posting the photos of your progress. Mike |
Posted By: HatterBee
Date Posted: May-21-2012 at 1:02am
|
Thanks Mike. Been on vacation last week. Back in the country now and making my way back to NC. I will continue the work later this week. ------------- 1977 Ski Nautique Under Re-construction http://www.correctcraftfan.com/forum/forum_posts.asp?TID=25004&title=1977-ski-nautique-rebuild" rel="nofollow - My Rebuild Thread |