 Boats For Sale:


Stringer Replacement 86 Silver Nautique. |
Post Reply 
|
Page <1 234 |
| Author | |
andrewmarani 
Senior Member 
Joined: May-31-2005 Location: Baltimore, MD Status: Offline Points: 210 |
 Post Options Post Options
") Thanks(0) Thanks(0)
 Quote Reply Quote Reply
 Posted: February-23-2024 at 10:00pm Posted: February-23-2024 at 10:00pm |
|
Need some carpet suggestions. I did some searches and turned up https://marinecarpeting.com. Anyone buy carpet from someplace they like? Looks like 20 oz is standard. Depending on cost any reason not to go to 24 oz?
They also have Shaw indoor outdoor carpeting. That's a manufacturer subs i work with use on job sites. I might be able to buy that from a sub I know and get a better price. Anyone work with Shaw? Previous searches turned up DAP Weldwood All Weather Outdoor Carpet Adhesive to glue it down. anyone have pros or cons? Thanks Andrew |
|
|
Builder
|
|
 |
|
|
TRBenj
Grand Poobah 

Joined: June-29-2005 Location: NWCT Status: Offline Points: 21107 |
Post Options
Thanks(0)
Quote Reply
Posted: February-24-2024 at 8:01am |
|
Interesting. IMO, any path that allows water to drain also allows water to enter… I have thoughts on which I think is more likely!
16-20oz carpet would have been original. The thicker the carpet, the more plush it feels, and the more water it holds. |
|
|
|
|
andrewmarani
Senior Member
Joined: May-31-2005 Location: Baltimore, MD Status: Offline Points: 210 |
Post Options
Thanks(0)
Quote Reply
Posted: February-25-2024 at 10:45am |
|
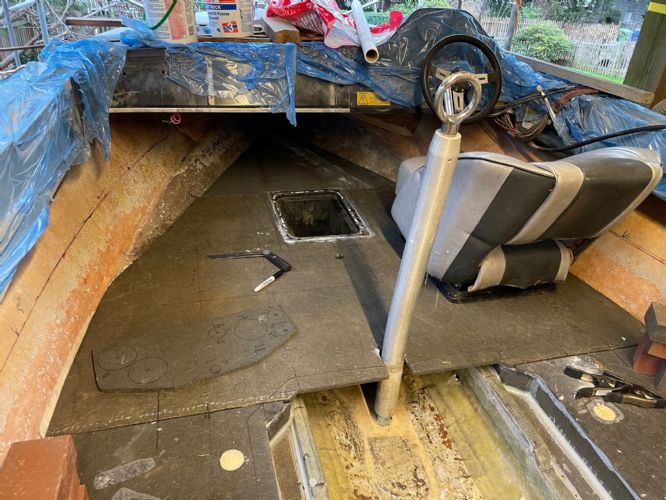
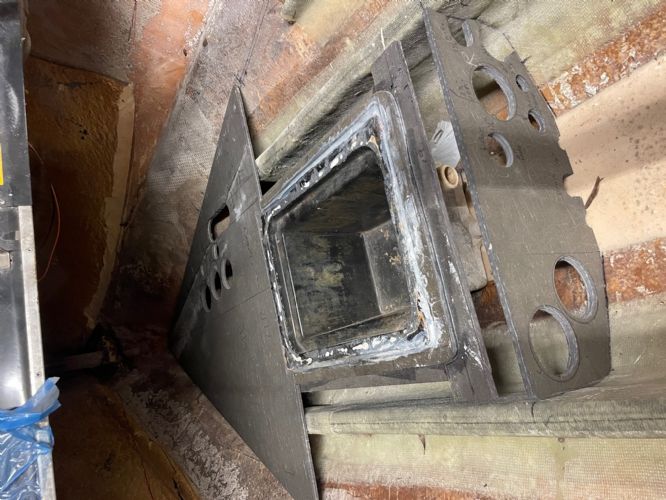
Picture shows a test fit of the two front sections of floor with the driver’s seat in place and the fit around the installed battery box. I needed to check where my feet landed when sitting in the seat to make sure my size 13's missed the vent tubes and other pipes i will discuss shortly. I won't have the airbox with it's sloping footrest so I also needed to locate a footrest I will make from some old mahogany gym bleacher wood I have laying around. I will epoxy some stainless T nuts into the Coosa floor so the footrest is removable.
When this thing is done, removing two bolts from the observers seat base and two bolts from the foot rest will give under the bow deck access like you see in the picture. I've spent enough time under there over the years to want easy, clear access. Even the drivers seat has T nuts and machine screws holding it down and can be pulled, though that's more complicated.
 |
|
|
Builder
|
|
|
|
|
andrewmarani
Senior Member
Joined: May-31-2005 Location: Baltimore, MD Status: Offline Points: 210 |
Post Options
Thanks(0)
Quote Reply
Posted: March-23-2024 at 11:59am |
|
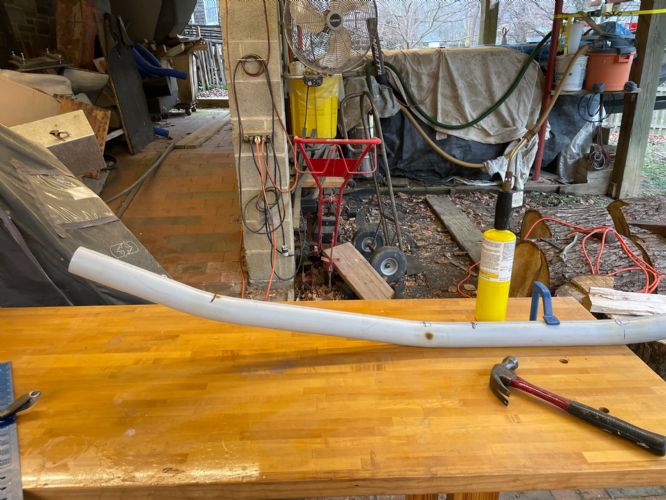
Originally the wire harness, speed tubes, steering and throttle cables and the bilge pump tube all ran in one pipe from engine to the bow. I’ve broken those into individual pipe chases for ease of repairs in the future, creating the need for some creative pipe bending using heat. And lots of different holes in the bow floor and that bulkhead behind the battery box. The steering cable has a 16” stainless bar on the end so the 2” pipe has two very light bends in it so the pipe can turn up through the bow floor and still allow the bar to slide through. At this point, all the flooring is cut and fit. With all the Coosa in place, I have a nice flat floor with only the pylon interrupting it. Next step is to test fit the carpet I bought while nothing is in the way.
|
|
|
Builder
|
|
|
|
|
andrewmarani
Senior Member
Joined: May-31-2005 Location: Baltimore, MD Status: Offline Points: 210 |
Post Options
Thanks(0)
Quote Reply
Posted: March-23-2024 at 4:50pm |
|
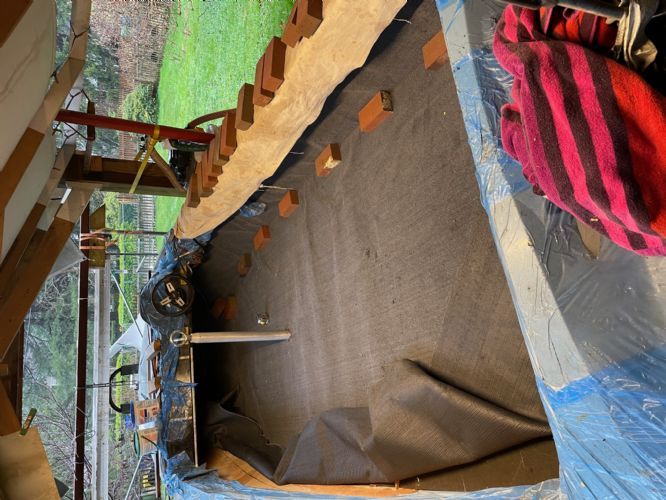
Bought 8’-6” wide carpet and tested it in the boat today. Not ready to install, still need to finish epoxying the floor down and install the foam. I was worried the 8’-6” wide carpet wouldn’t be wide enough to run up the sides but that turned out fine. I was hoping to be able to wrap the carpet up the sides without cutting. I think that would work starting at the back and getting about halfway to the front of the boat but after that the curve and flair of the side is going to create folds, so that plan is out. I’m going to have to cut it at the floor to side transition like was done originally. I was going to trim the carpet to fit today but I think it will work better if I glue the carpet down to maybe 6” from the sides, leave the last 6” loose and then cut it at the floor to side transition. Nothing moves during or after the cutting that way.
The original carpet trim strips are definitely not made for a 90 degree turn up the sides, CC just kind of made it work. If I reuse them I think I need to actually turn the side carpet out onto the floor a half inch or so to get it under the trim strip so the carpet doesn’t ravel. The floor carpet then slips into the trim on the other side. Does anyone have a source for a carpet trim strip that’s designed for a floor to side transition? Seems like a normal detail and there should be a trim piece for the 90 degree transition.
|
|
|
Builder
|
|
|
|
|
KENO
Grand Poobah
Joined: June-06-2004 Location: United States Status: Offline Points: 10639 |
Post Options
Thanks(0)
Quote Reply
Posted: March-23-2024 at 4:57pm |
On those year boats like yours, with rotary helms, you don't need to pull that 16 inch bar forward and around any corners to get the cable out. You remove it by pulling it out of the support tube at the back disconnecting the cable at the helm, taping a rope about 20 ft long or so and a plastic bag around the cable at the front end and pulling it out from the rear. Going back in, you tape the new cable end to the rope that's in the tube and pull it forward with the rope. The big awkward rear end never has to go around any sharp bends In the condition you're in right now, snake a rope through for when it's time to pull the cable through. If it was rack and pinion steering, then it's a different story
|
|
|
|
|
TRBenj
Grand Poobah
Joined: June-29-2005 Location: NWCT Status: Offline Points: 21107 |
Post Options
Thanks(0)
Quote Reply
Posted: March-25-2024 at 10:32am |
|
Not following your thoughts on the carpet trim. Walls should be cut at the floor, the trim sits up almost 1/2” and will cover that edge no problem. Floor should be cut 1/2-1” away from the wall so it tucks cleanly into the trim channel.
|
|
|
|
|
andrewmarani
Senior Member
Joined: May-31-2005 Location: Baltimore, MD Status: Offline Points: 210 |
Post Options
Thanks(0)
Quote Reply
Posted: March-25-2024 at 10:46am |
|
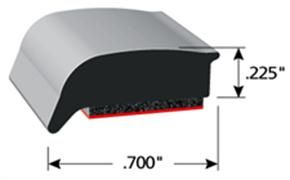
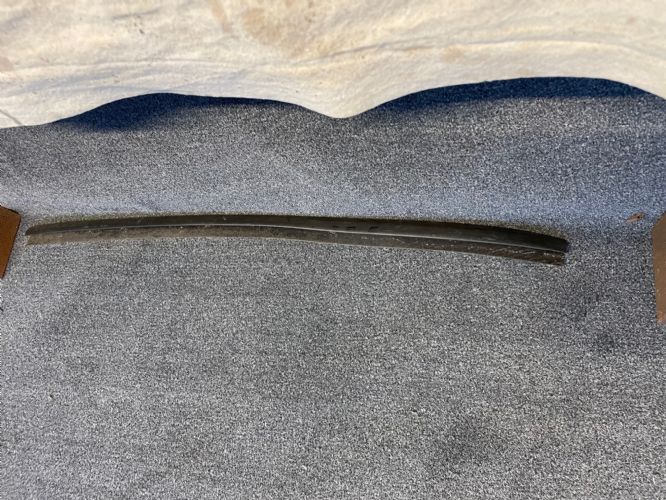
The trim that came with the boat is a 1/2" thick, maybe a touch more and sits flat on the floor. There's no spot to tuck the side carpet into it unless I turn the side carpet out onto the floor a half inch or so.
See the picture above. left side is where the floor carpet tucks into the trim. Right side goes against the side of the boat and tapers down to less than a 1/4" and is designed for carpet to tuck under it. I spent sometime on line looking at boat carpet trim and nothing is designed for a floor to side transition, don't really see boats with carpet on the sides much at all. I did find some trim that matches the old trim in the picture above, so if I need to go that route I will likely buy new stuff since it should be more flexible than the very stiff stuff I took off the boat. A picture of a relatively new Nautique showing how they currently handle that trim would be nice. Assuming CC still runs carpet up the sides of the boat. Thanks Andrew
|
|
|
Builder
|
|
|
|
|
TRBenj
Grand Poobah
Joined: June-29-2005 Location: NWCT Status: Offline Points: 21107 |
Post Options
Thanks(0)
Quote Reply
Posted: March-25-2024 at 9:55pm |
|
Nothing really tucks under from the wall carpet. Not sure why this is so confusing. It’s been several years since cc has been putting carpet in boats- not sure what you’d hope to learn. They used the trim in question at least ‘80-09, should still be available to buy from Nautique parts and others. Not exactly a mystery.
|
|
|
|
|
andrewmarani
Senior Member
Joined: May-31-2005 Location: Baltimore, MD Status: Offline Points: 210 |
Post Options
Thanks(0)
Quote Reply
Posted: March-26-2024 at 11:13am |
|
It's not difficult to solve, I can definitely make it work. it's just frustrating to me that something that's actually designed for this issue isn't available, I can be a bit ocd about details. I will turn the side carpet onto the floor a half inch to get it under that lip on the right side in the picture so it doesn't ravel.
The trim originally used on the boat and the one at Nautique Parts are designed for a carpet to VCT floor transition, flooring subcontractors we work with use it all the time. FYI a 12' length on Nautique Parts is $83. Same stuff in a choice of colors is $23 on line. |
|
|
Builder
|
|
|
|
|
andrewmarani
Senior Member
Joined: May-31-2005 Location: Baltimore, MD Status: Offline Points: 210 |
Post Options
Thanks(0)
Quote Reply
Posted: March-26-2024 at 11:27am |
|
Ordered a sample of this stuff by Trim-Lok. Might work a bit better plus I like the included 3M adhesive tape.
 EDIT: OK, bought a foot of it and I'm not impressed. The vertical section will cover a bit under a 1/4" of the side carpet, which works fine. The floor side will catch about 1/16" of the floor carpet, which is never going to work, there's no way i'm going to be able to cut the floor carpet that neatly. So NOT using this stuff.
|
|
|
Builder
|
|
|
|
|
Faceplant
Senior Member

Joined: July-27-2013 Location: Otter Lake , Mi Status: Offline Points: 402 |
Post Options
Thanks(0)
Quote Reply
Posted: March-29-2024 at 9:06pm |
|
Please keep us posted. I might be interested also.
|
|
|
Feels like I am hanging 10 but in reality - probably hanging 6.
|
|
|
|
|
1980SN2001
Groupie 
Joined: August-01-2022 Location: Rocklin, CA Status: Offline Points: 96 |
Post Options
Thanks(0)
Quote Reply
Posted: April-11-2024 at 4:02pm |
|
I also used something like what your holding in the picture at the transition from floor to wall. I got it from tools4flooring.com and it was called Burke 153.
https://www.tools4flooring.com/burke-153-3-8-black-cerco-bar-12-length.html |
|
|
|
|
Post Reply
|
Page <1 234 |
 Tweet
Tweet
|
| Forum Jump | Forum Permissions You cannot post new topics in this forum You cannot reply to topics in this forum You cannot delete your posts in this forum You cannot edit your posts in this forum You cannot create polls in this forum You cannot vote in polls in this forum |


 Topic Options
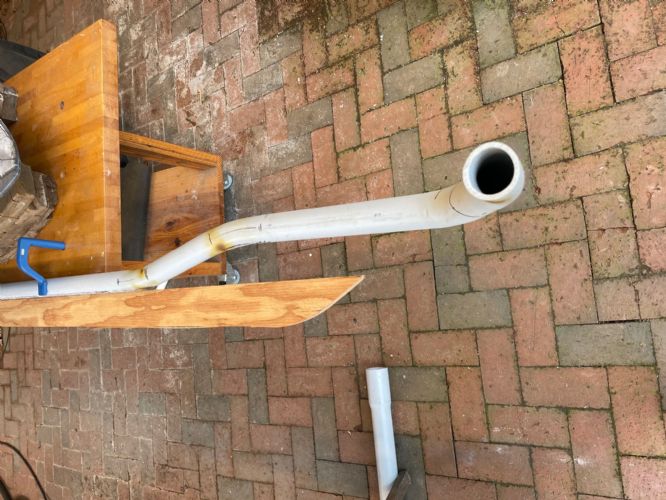

 andrewmarani wrote: