 Boats For Sale:


1978 Ski Nautique Restoration |
Post Reply 
|
Page 12> |
| Author | ||
KENO 
Grand Poobah 
Joined: June-06-2004 Location: United States Status: Offline Points: 10719 |
 Post Options Post Options
") Thanks(0) Thanks(0)
 Quote Reply Quote Reply
 Topic: 1978 Ski Nautique Restoration Topic: 1978 Ski Nautique RestorationPosted: February-08-2024 at 6:28pm |
|
|
See the other thread
|
||
 |
||
|
fanofccfan
Platinum Member 

Joined: December-13-2009 Location: North Bend NE Status: Offline Points: 1736 |
Post Options
Thanks(0)
Quote Reply
Posted: February-08-2024 at 9:47am |
|
|
I can try to measure tonight. My thoughts would be the load guides might have to come off and it just might squeeze in. Ill try to remember to measure it.
|
||
|
2004 196 LE Ski 1969 Marauder 19 1978 Ski
|
||
|
||
|
KENO
Grand Poobah
Joined: June-06-2004 Location: United States Status: Offline Points: 10719 |
Post Options
Thanks(0)
Quote Reply
Posted: February-05-2024 at 8:20pm |
|
|
Since it's am 8 foot door, the opening is probably a few inches less due to finishing trim.
Somewhere, sometime a long time ago, I think I remember backing a same vintage SN on it's factory trailer through the opening for an 8 foot door with at least an inch or 2 to spare on each side  Trailer width was the limiting factor, the boat is 76 inches wide but fender width is quite a bit more Somebody must have some measurements around here TRBenj is usually good for trailer info. Or............maybe you need to start a new thread with a title like " How wide is a #3 trailer from the 70's?" This is all assuming it's on a CC trailer built for the boat
|
||
|
||
|
NeilMcG
Senior Member 
Joined: September-20-2021 Location: Pittsburgh, PA Status: Offline Points: 200 |
Post Options
Thanks(0)
Quote Reply
Posted: February-05-2024 at 2:57pm |
|
|
Just a quick update on what will hopefully be the last stage in this rebuild.
Engine long block is all done, which was the most challenging part. Found a place in Pittsburgh for final assembly as it's a three hour round trip to where it is now. However the door width is 8ft and I can't remember the total width with trailer. Think that will be enough? 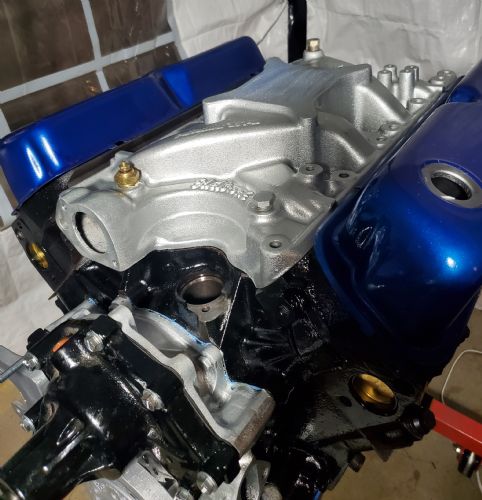 |
||
|
||
|
NeilMcG
Senior Member
Joined: September-20-2021 Location: Pittsburgh, PA Status: Offline Points: 200 |
Post Options
Thanks(0)
Quote Reply
Posted: May-20-2023 at 1:38pm |
|
Just searched "351w oil pan." Summit has them under $100, but after searching the OEM # R004005 with price tags of $400 and up, I just wanted to make sure there wasn't something that might be unique to PCM or correct craft. I think your link will answer this though. Captain Ken comes through again. |
||
|
||
|
63 Skier
Grand Poobah

Joined: October-06-2006 Location: Concord, NH Status: Offline Points: 4239 |
Post Options
Thanks(0)
Quote Reply
Posted: May-20-2023 at 1:37pm |
|
|
Someone might disagree with me, but I've never heard of any issues with a standard capacity pan on a 351. No need to cool oil in a marine application like ours and 351's don't have a tendency to suck the pan dry. So not sure I'd bother with an 8 quart pan for this engine.
|
||
|
'63 American Skier - '98 Sport Nautique
|
||
|
||
|
NeilMcG
Senior Member
Joined: September-20-2021 Location: Pittsburgh, PA Status: Offline Points: 200 |
Post Options
Thanks(0)
Quote Reply
Posted: May-20-2023 at 1:27pm |
|
Thanks. As long as it'll fit 😀 |
||
|
||
|
67 ski nat
Platinum Member
Joined: July-19-2018 Location: Santa rosa Status: Offline Points: 1184 |
Post Options
Thanks(0)
Quote Reply
Posted: May-20-2023 at 9:13am |
|
|
My ‘marine’ pan is aluminum (corrosion resistant?)
And holds 8 quarts (cooling ? ) Slight mopar improvement Just things to consider |
||
|
||
|
KENO
Grand Poobah
Joined: June-06-2004 Location: United States Status: Offline Points: 10719 |
Post Options
Thanks(0)
Quote Reply
Posted: May-20-2023 at 8:03am |
|
|
What are you looking at for an oil pan to replace it with.?
I'd probably read the thread linked below for some ideas Cross referencing the numbers can find you some cheaper prices in the 70 dollar range.
|
||
|
||
|
NeilMcG
Senior Member
Joined: September-20-2021 Location: Pittsburgh, PA Status: Offline Points: 200 |
Post Options
Thanks(0)
Quote Reply
Posted: May-19-2023 at 10:29pm |
|
|
OIL PAN DILEMMA !!!!
 While hoisting the '78 351 RH into position for parts harvesting, the straps broke. Fastest damn quick drain method you'd ever see. The good news is the concrete is fine. The pan from the '80 doesn't inspire much confidence as a sub. It's been repainted twice with a third layer consisting of a rubberized film, perhaps bed liner. The skin is wrinkled from over-torque and about 1/3 of the surface is lathered in JB Weld. Why is an standard stamped steel pan for a 351w $85 but over $500 when searching part # R005004? Is it a RH seals thing, drain plug location or general geometry? |
||
|
||
|
NeilMcG
Senior Member
Joined: September-20-2021 Location: Pittsburgh, PA Status: Offline Points: 200 |
Post Options
Thanks(0)
Quote Reply
Posted: April-22-2023 at 8:21pm |
|
Ah...ha. thank you! |
||
|
||
|
NeilMcG
Senior Member
Joined: September-20-2021 Location: Pittsburgh, PA Status: Offline Points: 200 |
Post Options
Thanks(0)
Quote Reply
Posted: April-22-2023 at 8:20pm |
|
Each side is still on and I haven't fiddled around with it yet. I'm assuming the key variable based in what you wrote is the purchase e.g. integrity of the interference fit. What am I measuring with the mic? |
||
|
||
|
wayoutthere
Senior Member
Joined: February-28-2020 Location: Florida Status: Offline Points: 391 |
Post Options
Thanks(1)
Quote Reply
Posted: April-22-2023 at 8:16pm |
|
My opinion on a new coupler ; spend 600 bucks and get the dual taper shaft and coupler to go along with the new cutlas bearings and hdpe stuffing box. Hand adjustable instead of 2 big pipe wrenches. Heres why; -an hour of changing nuts bolt washers and spacers to pull the original coupler off sucks almost as bad as oven heating and mig welding gloves to put the coupler back on the shaft only to find out after all your hard work theres a bent shaft and you have to break out the nuts bolts washers and spacers again. -even if the original coupler is perfect i'd bet there is some wear on the shaft from the stuffing box and strut. -the dual taper shaft is a breeze to install/remove making stuffing box and cutlas bearings in the future a much easier job. -it was priceless for me when it came to alignment because i had to solve it in a way other than the traditional method. https://skiboatpartsonline.com/ARE-Shaft-ARE-0035 https://skiboatpartsonline.com/stuffing-box?search=Stuffing%20box After your happy with alignment Remember to torque the new coupler to the transmission in a north south west east pattern and diveide final torque by 3 or 4 and make that number of passes to final torque i.e if torque is 30 ft pnds make 3 passes 10 20 & 30 don't just slam it together and tighten them up. |
||
|
||
|
KENO
Grand Poobah
Joined: June-06-2004 Location: United States Status: Offline Points: 10719 |
Post Options
Thanks(0)
Quote Reply
Posted: April-22-2023 at 7:50pm |
|
|
If the mounting flange is warped gouged, not concentric or if the coupler is loose on the shaft..............it's bad
It's a heat shrink interference fit Here's some reading in the link Plenty more with a search too
|
||
|
||
|
MrMcD
Grand Poobah

Joined: January-28-2014 Location: Folsom, CA Status: Offline Points: 3604 |
Post Options
Thanks(0)
Quote Reply
Posted: April-22-2023 at 7:44pm |
|
|
If the old one was tight as hell it is probably perfect. If you got it off with no problem the center hole is loosening up and it is shot. There is probably a spec you can measure with a Mic to verify but tight on removal is good.
|
||
|
||
|
NeilMcG
Senior Member
Joined: September-20-2021 Location: Pittsburgh, PA Status: Offline Points: 200 |
Post Options
Thanks(0)
Quote Reply
Posted: April-22-2023 at 7:35pm |
|
|
Only if you think or know the old one is bad, unless you're just kinda sadistic and enjoy doing miserable jobs, that may or may not go right How does one know it's bad? I'm already in recovery for sadism, and the romance of tackling miserable jobs is diminishing by the hour. |
||
|
||
|
KENO
Grand Poobah
Joined: June-06-2004 Location: United States Status: Offline Points: 10719 |
Post Options
Thanks(0)
Quote Reply
Posted: April-22-2023 at 7:11pm |
|
Only if you think or know the old one is bad, unless you're just kinda sadistic and enjoy doing miserable jobs, that may or may not go right |
||
|
||
|
NeilMcG
Senior Member
Joined: September-20-2021 Location: Pittsburgh, PA Status: Offline Points: 200 |
Post Options
Thanks(0)
Quote Reply
Posted: April-22-2023 at 2:10pm |
|
What's your opinion regarding installing a new coupler? |
||
|
||
|
63 Skier
Grand Poobah
Joined: October-06-2006 Location: Concord, NH Status: Offline Points: 4239 |
Post Options
Thanks(1)
Quote Reply
Posted: April-17-2023 at 12:00pm |
|
|
I've long been surprised that the thrust from 240 and more HP inboard drives didn't wreak more havoc with lagged motor mounts. I'd have thought that all that force forward, at the upward angle, would tend to work at the mounts more than it seems to in actual application. Through bolted cradles seem like a good upgrade but then again all these boats, assuming decent stringer condition, seem to survive just fine with the oem mounts. So I'd probably just do the same-old mounts over again.
|
||
|
'63 American Skier - '98 Sport Nautique
|
||
|
||
|
NeilMcG
Senior Member
Joined: September-20-2021 Location: Pittsburgh, PA Status: Offline Points: 200 |
Post Options
Thanks(0)
Quote Reply
Posted: April-16-2023 at 11:25am |
|
|
That's a relief.
|
||
|
||
|
KENO
Grand Poobah
Joined: June-06-2004 Location: United States Status: Offline Points: 10719 |
Post Options
Thanks(0)
Quote Reply
Posted: April-16-2023 at 8:08am |
|
Nobody's stopping you from putting 4 horizontal lag bolts in with your choice of sealer if you're so inclined. CC was never so inclined though when they built it. |
||
|
||
|
MrMcD
Grand Poobah
Joined: January-28-2014 Location: Folsom, CA Status: Offline Points: 3604 |
Post Options
Thanks(0)
Quote Reply
Posted: April-16-2023 at 3:05am |
|
|
4200 is easier to work with after it hardens. 5200 is harder, in my thoughts stronger but a bugger to work with once hard. Since I was able to remove my strut factory applied with 5200 I chose to stay with it and 5200 was applied when I re installed the strut. Many use 4200 because it is more friendly to work with.
|
||
|
||
|
NeilMcG
Senior Member
Joined: September-20-2021 Location: Pittsburgh, PA Status: Offline Points: 200 |
Post Options
Thanks(0)
Quote Reply
Posted: April-15-2023 at 9:37pm |
|
I was thinking a thru-bolt running horizontal in addition to the vertical lags.There's a pre-drilled hole at the bottom of the bracket that's center to the holes on the flange resting on the stringers, so a bolt could pass through without interference. The only thing it would need is a piece of flat bar on the outer side with a drilled hole for the bolt to pass through to distribute the load once tightened. But the stringers are now quite solid so it's ok. The only debate left is deciding what matrix to put in the bore holes...epoxy putty, peanut butter, 4200 etc. |
||
|
||
|
KENO
Grand Poobah
Joined: June-06-2004 Location: United States Status: Offline Points: 10719 |
Post Options
Thanks(0)
Quote Reply
Posted: April-15-2023 at 7:16pm |
|
Since you have 8 mounting lag bolts that go vertically into the stringers (no cradle), it would be kinda tough to use through bolts without quite a major redesign of the stringers.. |
||
|
||
|
Jonny Quest
Grand Poobah

Joined: August-20-2013 Location: Utah--via Texas Status: Offline Points: 2863 |
Post Options
Thanks(0)
Quote Reply
Posted: April-15-2023 at 4:19pm |
|
|
5200 is bomb-proof. Very difficult to remove. 4200 is less "permanent". Still the same high-quality 3M below-the-waterline sealant, just not so stubborn if one needs to remove it.
JQ
|
||
|
Current
2003 Ski Nautique 206 Limited Previous 2001 Ski Nautique Open Bow 1994 Ski Nautique Open Bow Aqua skiing, ergo sum |
||
|
||
|
NeilMcG
Senior Member
Joined: September-20-2021 Location: Pittsburgh, PA Status: Offline Points: 200 |
Post Options
Thanks(0)
Quote Reply
Posted: April-15-2023 at 4:05pm |
|
I thought the only difference with 4200 was cure time. Is it a more friendly version too? |
||
|
||
|
Jonny Quest
Grand Poobah
Joined: August-20-2013 Location: Utah--via Texas Status: Offline Points: 2863 |
Post Options
Thanks(0)
Quote Reply
Posted: April-15-2023 at 3:21pm |
|
|
Can you through-bolt it? I prefer through-bolts to lags if possible I would then bed the bolts in 3M 4200.
JQ
|
||
|
Current
2003 Ski Nautique 206 Limited Previous 2001 Ski Nautique Open Bow 1994 Ski Nautique Open Bow Aqua skiing, ergo sum |
||
|
||
|
NeilMcG
Senior Member
Joined: September-20-2021 Location: Pittsburgh, PA Status: Offline Points: 200 |
Post Options
Thanks(0)
Quote Reply
Posted: April-15-2023 at 2:58pm |
|
I was thinking of using bigger lags for a greater purchase into the stringers. What are your thoughts on also filling the bores with epoxy putty and using 5200 under the brackets? |
||
|
||
|
MrMcD
Grand Poobah
Joined: January-28-2014 Location: Folsom, CA Status: Offline Points: 3604 |
Post Options
Thanks(0)
Quote Reply
Posted: April-15-2023 at 12:53pm |
|
|
I did the same in my 1987 Malibu, found small rot area under the engine mounts, drilled holes, first poured in a product bought at the lumber supply designed to kill rot, really stinky stuff. Let that soak in to treat the old wood then filled it as you did with some type of recommended epoxy. That area was still hard and good when I sold the boat 10 years later after hundreds more hours use.
|
||
|
||
|
NeilMcG
Senior Member
Joined: September-20-2021 Location: Pittsburgh, PA Status: Offline Points: 200 |
Post Options
Thanks(0)
Quote Reply
Posted: April-15-2023 at 7:35am |
|
The stringers weren't replaced as they're in remarkably good shape; and I was actually unaware of any relationship between the two. Quite surprisingly, the rot did not propogate throughout so it was easy to localize. I exposed the bad areas with pilot holes and poured a pmma acrylic solution in multiple stages until saturated with the fluid pooling at the top. Those areas now are hard as rock. I definitely dodged a bullet there. |
||
|
||
|
Post Reply
|
Page 12> |
 Tweet
Tweet
|
| Forum Jump | Forum Permissions You cannot post new topics in this forum You cannot reply to topics in this forum You cannot delete your posts in this forum You cannot edit your posts in this forum You cannot create polls in this forum You cannot vote in polls in this forum |


 Topic Options
 KENO wrote: