 Boats For Sale:


Stringer Replacement 86 Silver Nautique. |
Post Reply 
|
Page <1234> |
| Author | |
andrewmarani 
Senior Member 
Joined: May-31-2005 Location: Baltimore, MD Status: Online Points: 213 |
 Post Options Post Options
") Thanks(1) Thanks(1)
 Quote Reply Quote Reply
 Posted: February-04-2023 at 4:55pm Posted: February-04-2023 at 4:55pm |
|
A secondary stringer fresh from the vacuum bag. Both primary stringers glued up, notched, cut to the hull shape and ready for installation.
  EDIT: Pretty as those stringers are, I made a mistake in the notches for the engine mount bolts. See my edit note on page 3 where I posted the layout sketch for the stringers.
|
|
|
Builder
|
|
 |
|
|
andrewmarani
Senior Member
Joined: May-31-2005 Location: Baltimore, MD Status: Online Points: 213 |
Post Options
Thanks(1)
Quote Reply
Posted: February-04-2023 at 4:50pm |
|
Stringer pieces cut and ready to epoxy up. Vacuum bagging a secondary stringer.
  |
|
|
Builder
|
|
|
|
|
andrewmarani
Senior Member
Joined: May-31-2005 Location: Baltimore, MD Status: Online Points: 213 |
Post Options
Thanks(0)
Quote Reply
Posted: February-04-2023 at 4:42pm |
|
Going to back up and post some pictures showing the progress now that I understand the IMGBB picture posting thing.
Starting with the hull cleaned out, ground down and ready for stringers. Probably still have a bit more work on the bilge section.   |
|
|
Builder
|
|
|
|
|
Gary S
Grand Poobah 

Joined: November-30-2006 Location: Illinois Status: Offline Points: 14096 |
Post Options
Thanks(0)
Quote Reply
Posted: January-30-2023 at 7:07pm |
|
If you want to save some money over the West system and have quality products check this place out- http://www.uscomposites.com/products.html many boats here in past have used their products. They ship fast and are there to answer any questions.
|
|
|
|
|
andrewmarani
Senior Member
Joined: May-31-2005 Location: Baltimore, MD Status: Online Points: 213 |
Post Options
Thanks(0)
Quote Reply
Posted: January-30-2023 at 4:12pm |
|
One more, then I need to go back to money making work. Leaving that 1" of old fiberglass on one side of the primary and one side of the secondary stringers (shows in my pictures) was awkward during demolition but made reinstalling the stringers very easy. Just put the epoxy on that 1" of fiberglass, put more on the bottom and push the stringer down and over against the 1" fiberglass. Then wedge a couple of boards from the sides of the boat to the secondary stringer to keep it pinned in place. On the primary, just wedge boards from the secondary. No need to worry about getting the stringers in the right spot or keeping them straight.
|
|
|
Builder
|
|
|
|
|
andrewmarani
Senior Member
Joined: May-31-2005 Location: Baltimore, MD Status: Online Points: 213 |
Post Options
Thanks(0)
Quote Reply
Posted: January-30-2023 at 4:03pm |
|
Adding in a lessons learned... I am using West Systems fast set epoxy (bought the 4 gallon jug at West Marine) and Total Boat for the fiberglass matts. I also bought six tubes of Total Boat Thixo adhesive epoxy to glue the stringers down. I really liked the Total Boat adhesive epoxy constancy and the using a caulk gun makes it super simple to install, plus you can stop in the middle of tube come back a day or week later and start up again just by changing the nozzle. BUT, due to the internal stuff in the tube, you probably get a half a tube of epoxy from each tube so it takes a lot of tubes and the stuff is moderately expensive. I used four tubes to install and fillet one secondary stringer.
Since I was reluctant to give up the simplicity of using a caulk gun but didn't want to spend that much money, I took an empty tube apart and redid the plunger part to make it shorter and removable. Now I mix up the West System to a peanut butter consistency and pour/scoop it into the tube, add the plunger and put it in my caulk gun. Works great and i've used that same tube for the rest of the stringers and the fillets. Pumping epoxy out of a tube is way cleaner and faster then scooping it out of a mixing bucket and apply it with a spatula. Does take 15 minutes or so to clean up the tube with acetone so it will work next time out.
|
|
|
Builder
|
|
|
|
|
andrewmarani
Senior Member
Joined: May-31-2005 Location: Baltimore, MD Status: Online Points: 213 |
Post Options
Thanks(0)
Quote Reply
Posted: January-30-2023 at 3:44pm |
|
I have all the stringers epoxied down but not yet glassed in. I'm now laying out and cutting the deck Coosa to fit but not install. Once I have the deck fitted, I will use the scraps to finish off the little parts that epoxy to the secondary stringers at the exhaust mufflers and the sections next to the motor and the primary stringers. THEN i can finally glass in the stringers and move on to foam. I will post my Coosa cutting plan at some point, though I keep revising it as I see a slightly better layout.
This has been a very patient process. I'm working outside so I'm temperature dependent on any epoxy work. I put a skirt (using something called a concrete blanket that we use in my company) around the hull to the ground. Two electric heaters under the boat on a 45 degree day will raise the hull to 60 degrees, good enough for West Systems fast set epoxy. But I need 45 degrees on a weekend to actually do any epoxy work.
Anyway, your dimensions are very timely and appreciated. Once I have the deck fitted, I'm going to set the seats and engine cover and mark out where everything is fastened onto the deck parts in permanent marker so I can install the anchor points in the Coosa. Should be there by this weekend with a couple of work nights this week. |
|
|
Builder
|
|
|
|
|
va-river-tique
Groupie 

Joined: February-01-2008 Location: Da Ville, Va Status: Offline Points: 63 |
Post Options
Thanks(0)
Quote Reply
Posted: January-30-2023 at 3:13pm |
|
I took these measurements from the bow side of the pylon.
pylon to base of observer's seat is 12 1/4 inches. pylon to inside edge of battery box is 26 1/4 inches. pylon to base of driver's seat is 6 inches. |
|
|
|
|
andrewmarani
Senior Member
Joined: May-31-2005 Location: Baltimore, MD Status: Online Points: 213 |
Post Options
Thanks(0)
Quote Reply
Posted: January-18-2023 at 5:01pm |
|
No, I still need those dimensions. If you can send them that would be awesome. Yeah, i've been following the elephant discussion as well. Not sure what I can do to help.
Currently I have the main stringers made, cut to the curve of the hull and notched for the engine cradle etc. Too cold last weekend to epoxy them in place and I'm taking my wife away this weekend just for fun or, perhaps, to make up for all the previous weekends spent working on the boat... Since it's been too cold to epoxy, I've started roughing out the Coosa floor panels and the installed secondary stringers give me a level line at the right height to work from. Lot's of measuring, cutting and shaving to fit the curve of the boat's sides. Once I have the floor panels cut and dropped temporarily in place, those dimensions will help me figure out where to reinforce for screws. i've got pictures of the progress to post but waiting for picture posting to go active again.
|
|
|
Builder
|
|
|
|
|
va-river-tique
Groupie
Joined: February-01-2008 Location: Da Ville, Va Status: Offline Points: 63 |
Post Options
Thanks(0)
Quote Reply
Posted: January-16-2023 at 7:03pm |
|
Did you ever get the dimensions you needed? I think all 86 Skis have the same measurements but I do have a Silver that I can grab some numbers for you. I'm also looking to so stringers in the next year or three so this thread caught my eye along with the elephant.
pylon to base of observer's seat. pylon to inside edge of battery box. pylon to base of driver's seat. |
|
|
|
|
andrewmarani
Senior Member
Joined: May-31-2005 Location: Baltimore, MD Status: Online Points: 213 |
Post Options
Thanks(0)
Quote Reply
Posted: January-14-2023 at 8:44am |
|
Welcome to the site. I usually start here when I plan a new repair to my boat. Thanks for the advice, I was planning to use the total boat bilge epoxy. Sounds like I'm not done grinding yet!
If you haven't run across it, electrical wire size is usually a problem in the older boats, Correct Craft was a bit light with the gauge. I've run larger positive and negative wires from the dash to the engine (Negative) and solenoid (positive) and completely rewired the dash. There's a post here somewhere describing the work.
|
|
|
Builder
|
|
|
|
|
1980SN2001
Groupie
Joined: August-01-2022 Location: Rocklin, CA Status: Offline Points: 96 |
Post Options
Thanks(0)
Quote Reply
Posted: January-12-2023 at 3:36pm |
|
I am as new to boat repair as it gets but I recently ground down my bilge all the way to raw fiberglass on my 1980 SN to put on new Total Boat Bilge Epoxy. I tried and tried and tried to just get the spots that were lifting up and cracking but the more I ground the more I found so eventually just took it all down to raw fiberglass. I figured if I am this far and I really don't want to have to do this again if the new Bilge Epoxy starts to lift up because of the old gel coat was cracking and peeling. Also if you only do some it will definitely be very visible, atleast with the Total Boat Bilge epoxy because it shows every minor blemish underneath. This part of my repairs generated the most dust though.
 Just thought I'd throw that out there. Just thought I'd throw that out there.P.S. Thank you for posting your stringer job here. I've only had my boat for about 6 months and have done a ton of work to it but I will inevitablly have to tackle the stringer job someday and these threads are a great resource. I haven't posted much at all but but this site and its users have already been invaluable to me with the knowledge and advice they freely share.
 |
|
|
1980 SN Project
|
|
|
|
|
andrewmarani
Senior Member
Joined: May-31-2005 Location: Baltimore, MD Status: Online Points: 213 |
Post Options
Thanks(0)
Quote Reply
Posted: December-24-2022 at 12:52pm |
|
Hull grinding is (hopefully) done. Currently I'm gluing up the stringers using the vacuum method I described earlier. Had some learning curve on that but it's working nicely, really does squish the three layers together well. Very easy to line things up once the stringer is in the bag before turning on the vacuum pump. Both secondary stringers are glued up and once my daughter wakes up, we will glue up the first of the primary stringers..
I'm coating one side of the Coosa with a flat spreader, basically just wetting in the Coosa. Epoxy on the mating piece of Coosa gets spread with a fine notched trowel. Epoxy is squeezing out of all joints so i'm getting a good coat but only a small amount comes out so sanding off the excess only takes 10 minutes or so. Once the picture gremlin is slain, I will post some pictures showing the operation. It's 15 degrees outside so if I feel really motivated in a bit I will heat up the pylon and see if I can twist it off the very cold steel base. Ahh, daughter just walked in and delegated this glue up to her brother. He objected by explaining she had already developed the necessary skills but she demanded he expand his horizons to help him with future work. Guess I am teaching her some people management techniques after all.
|
|
|
Builder
|
|
|
|
|
andrewmarani
Senior Member
Joined: May-31-2005 Location: Baltimore, MD Status: Online Points: 213 |
Post Options
Thanks(0)
Quote Reply
Posted: December-12-2022 at 7:48pm |
|
Removed the screws from the exhaust nipples and tried to tap them out with a hammer and block of wood but nothing moved. I will try a heat gun next and see how things go. Probably have another go at removing the pylon at the same time, working around it is a pain. Grinding is mostly done but I’m sure there will be some touch up work once I get to installing the stringers and start concentrating on exactly how the fiberglass matts are going to lay. I’m working up the layup schedule now using info from other stringer rebuilds. Once I’ve got the schedule finalized, I will post it for comments. Coosa Board has been delivered and I’ve set up an efficient cutting plan, won’t be much left after I’ve installed the stringers and deck. The secondary stringers where ¾” x 12’ and the mains where 1½” x 13’ so I’m going to lay up the secondaries out of three pieces of ¼” Coosa and the mains out of three pieces of ½”. Per some information from online, I will use a slightly thickened paste of resin to glue the Coosa together. I’m going to use a vacuum bag technique to press the three layers of Coosa together for the stringers when I glue them up. I have a vacuum pump that I picked up somewhere along the line so the rest of the vacuum bag setup only cost about $50 in fittings. Sometimes we use HEPA negative air machines on our jobs, which require venting to outside the construction area so I have 6 mill plastic disposable ducting that comes flat in a 100’ roll. Seems perfect for a vacuum bag to slide the stringers into. Just cut the length I need, install the little hose fitting, slide the stringer in, seal the ends, suck out the air and squish. What could possibly go wrong! |
|
|
Builder
|
|
|
|
|
Gary S
Grand Poobah
Joined: November-30-2006 Location: Illinois Status: Offline Points: 14096 |
Post Options
Thanks(0)
Quote Reply
Posted: December-04-2022 at 7:05pm |
|
Should just tap out- don't hurry. Little heat from a heat gun will help too. You might have to replace those wood blocks anyway including the lift ring block and the rudder block,they use the same pre rotted wood that were deemed not good enough for stringers
 As to white bilge paint think about that. I just painted one with Interlux white,it shows everything. My cooling system U dripped,it left a rust that really stood out. Personally IMHO a off white or a grey like the newer boats might be best.
|
|
|
|
|
andrewmarani
Senior Member
Joined: May-31-2005 Location: Baltimore, MD Status: Online Points: 213 |
Post Options
Thanks(0)
Quote Reply
Posted: December-04-2022 at 4:10pm |
|
It would simplify the grinding and glassing at the transom if I can get the two exhaust nipples out. I'm sure others have removed them. Can I just pull the screws and tap them out with a hammer and a block of wood or does it get complicated?
Thanks Andrew
|
|
|
Builder
|
|
|
|
|
andrewmarani
Senior Member
Joined: May-31-2005 Location: Baltimore, MD Status: Online Points: 213 |
Post Options
Thanks(0)
Quote Reply
Posted: December-04-2022 at 11:32am |
|
Thanks, gloss had me worried, shows all the flaws. I will probably go with satin.
Thoughts on how much of the gray and white pebble finish should I remove in the bilge? I need a solid bit for the stringer glass and i'm planning to coat the bilge with a white epoxy bilge coating when I finally get that far. The old pebble finish is stuck on hard, must be some type of epoxy. i'm leaning toward heavier removal close to the stringers and leaving more further inside the bilge but making sure all of it has it's surface sanded/ground to get a good bite for the new coatings. Along the lines of what shows in the picture, still have work to do around the rudder post and the bolts.. Thanks. 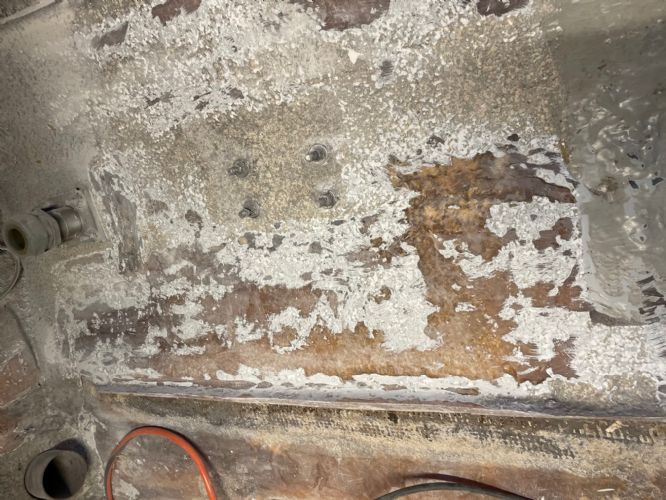 |
|
|
Builder
|
|
|
|
|
NCH20SKIER
Grand Poobah

Joined: December-16-2004 Location: United States Status: Offline Points: 2205 |
Post Options
Thanks(0)
Quote Reply
Posted: December-01-2022 at 1:28pm |
|
I had my windshield powered coated and am very pleased - for me satin was the choice.
Be prepared for some sanding and finessing the parts and pieces back together following coating and the oven bake. |
|
|
'05 206 Limited
'88 BFN |
|
|
|
|
GottaSki
Grand Poobah
Joined: April-21-2005 Location: NE CT Status: Offline Points: 3327 |
Post Options
Thanks(0)
Quote Reply
Posted: November-30-2022 at 3:43pm |
|
For the floor you could consider using the lighter density 3/4 coosa as a core and just epoxy some mat to both sides. it gets very rigid once the glass is there on the outside to take the brunt of the compressive and tensile forces.
and still wouldn't foam-fill it. neither my supreme nor response are foam filled, and they are the quietest boats in the local fleet of my hommes
|
|
|
"There is nothing, absolutely nothing, half so much worthwhile as messing around with boats...simply messing."
River Rat to Mole |
|
|
|
|
andrewmarani
Senior Member
Joined: May-31-2005 Location: Baltimore, MD Status: Online Points: 213 |
Post Options
Thanks(0)
Quote Reply
Posted: November-30-2022 at 12:42pm |
|
Got the last bit of main stringers out with a router and a half inch bit, used a guide to keep the bit in the middle of the stringer and cut down ALMOST to the hull (was very careful about that!). Then I was able to split one size of the stringer off in small pieces and pop the other side out in large lengths, so not as difficult or time consuming as I expected.
Pulled the windshield and knocked it down into it's component parts, will be sending the aluminum out to a local powder coat company for a new black finish. Trying to decide between a satin, semi or gloss sheen, any thoughts? I'm now into the apparently never ending grinding stage to prep the hull for fiberglass. I will post a picture once it looks like something has actually changed. Got pricing on Coosa board from a local supplier for the stringers. After laying things out, I will need 2 sheets of 1/4" for the secondaries and 2 sheets of 1/2" for the primaries in order to laminate up (3 layers wide) to get the lengths and widths I need. OMG that stuff is expensive. Still planning to go that way, just had to take a deep breath and adjust to the cost before I actually order it after getting the quote. The honeycomb board for the flooring is not available locally but some research on line says that the 26 lb Coosa board would work well for the floor but the 20 lb is too flexible. I will be going over 2 lb foam and am now planning to use 1/2" 26 lb Coosa. Anyone have a thickness recommendation? Only want to buy this stuff once! |
|
|
Builder
|
|
|
|
|
blammie
Groupie

Joined: June-27-2010 Location: Toledo Status: Offline Points: 46 |
Post Options
Thanks(0)
Quote Reply
Posted: November-27-2022 at 3:17pm |
|
You posts are well timed for me. I'm hoping you'll post more pictures. I'm just starting on my '68 Barracuda. I'll be interested to see your progress as you lay stringers back in. This is the part of the job that has me most worried.
|
|
|
|
|
samudj01
Gold Member 

Joined: March-10-2009 Location: NC Status: Offline Points: 933 |
Post Options
Thanks(0)
Quote Reply
Posted: November-26-2022 at 9:43am |
|
Enjoying this thread. Keep up the good work! Think about using thickened epoxy to bed the stringers instead of 3M caulk.
|
|
|
78 Ski Tique, 72 Skier w/302's, 93 SN w/351 & 17 GS22 w/zr409
Previous - 99 Sport Nautique w/GT40 and 87 Martinique w/351 |
|
|
|
|
uk1979
Platinum Member
Joined: June-13-2007 Location: United Kingdom Status: Offline Points: 1410 |
Post Options
Thanks(0)
Quote Reply
Posted: November-24-2022 at 9:29am |
|
I have played around with foam in the hull... I went with lining the area with DPC (Damp Proof Course Polythene) leaving plenty
running over the sides to fold over the top to seal up once set. After setting and sealing you can the lift the foam-covered
blocks and any puckering of the DPC can be shrunk using a hot air gun, I went
with a second covering of DPC and shrunk it over the first with the hot air gun
and the blocks still fit back in the hull, that up to you. The older hulls do let water through only by a very small
amount, but over time/years it’s a problem, once you have finished the stringer
work clean back the hull of all old coatings and tank it all in epoxy resin 2 coats the second before the
first is fully dry. Moisture will always be in the hull just by temp changes its
just keeping as low as you can. Thanks for saving an old SN and keep the pictures coming good
luck. roger. |
|
|
Lets have a go
56 Starflite 77 SN 78 SN 80 BFN |
|
|
|
|
andrewmarani
Senior Member
Joined: May-31-2005 Location: Baltimore, MD Status: Online Points: 213 |
Post Options
Thanks(0)
Quote Reply
Posted: November-23-2022 at 1:37pm |
|
Ok, no noodles. After reading lots of posts, foam is back in the project. Sound dampening was a large driver in my decision. Since I'm planning to use a composite board for the floor I don't need the foam for any significant support so 2 lbs foam should be fine and gives minimal weight gain.
Various posts discussed concerns about trapping water somewhere under/around the foam which I was worried about as well. In construction we use a plastic drainage board to eliminate hydraulic pressure against below grade walls, should work here to allow water to drain from under the foam. See the picture below, install dimple side down, pour the foam on top, put drain holes through the base of the stringers into the bilge. Still thinking this through, the drainage board could just move the trapped water up between the foam and drainage board. Also seems like there is just no place for water to be trapped in a fully foamed compartment...  |
|
|
Builder
|
|
|
|
|
Tomrupp
Groupie
Joined: October-14-2021 Location: MI Status: Offline Points: 73 |
Post Options
Thanks(0)
Quote Reply
Posted: November-23-2022 at 10:32am |
|
I like the star shaped large noodles from Wally World. Don’t do the wrapped model because they get waterlogged. You might end up listing and get swamped by a wake boat swell.
|
|
|
Tom
94 Ski Nautique Open Bow 351 with Carb 95 Double Decker Aqua Patio with 50hp Honda (3 carbs). |
|
|
|
|
KENO
Grand Poobah
Joined: June-06-2004 Location: United States Status: Offline Points: 10645 |
Post Options
Thanks(0)
Quote Reply
Posted: November-22-2022 at 6:16pm |
|
While you're noodling over what you're gonna do, here's a link to some CCF threads about using pool noodles for flotation Like everything else you'll get differing opinions and all noodles aren't created equal either I'd figure.
|
|
|
|
|
Gary S
Grand Poobah
Joined: November-30-2006 Location: Illinois Status: Offline Points: 14096 |
Post Options
Thanks(0)
Quote Reply
Posted: November-22-2022 at 5:44pm |
|
They sank Bruce taking their captains with them.
|
|
|
|
|
Riley
Grand Poobah
Joined: January-19-2004 Location: Portland, ME Status: Offline Points: 7946 |
Post Options
Thanks(0)
Quote Reply
Posted: November-22-2022 at 1:43pm |
|
What happened to the pool noodles for flotation in the early days of CCF? How did those boats work out? There were a few people that tried it.
|
|
|
|
|
andrewmarani
Senior Member
Joined: May-31-2005 Location: Baltimore, MD Status: Online Points: 213 |
Post Options
Thanks(0)
Quote Reply
Posted: November-22-2022 at 10:52am |
|
All good points. Hadn't considered the decrease in weight as the boat sinks.
I would say that short of a catastrophic event I can't imagine the boat sinking, but there was that one time years ago when we forgot the plug. Somehow my youngest son heard the sound of water over the engine noise as he pulled away from the ramp and opened the engine cover to see a fountain... Now his first question is always "Dad, did you put in the plug?", not sure why that's my job!
I was wondering if there was a structural component to the foam but that seems like a bad way to design a boat hull. I can easily add a couple of stiffeners running perpendicular to the stringers. Probably just from the secondaries to the sides of the boat, which is were most of the foam was anyway. The bow was full of foam but the curvature of the fiberglas hull in that area adds strength above just the thickness of the fiberglass. I will leave the floor elevation where it was, don't see any need to change. Noodles?! that's an odd and interesting idea. Lightweight closed cell foam, loose so water can drain around them. Easy enough to calculate the cubic footage that will fit in the available spaces. I will play around with the volume of the various solid parts of the boat and try to come up with a displacement number and see if noodles could float the boat at periscope depth. Anyone ever see or hear of a sunken ski nautique? |
|
|
Builder
|
|
|
|
|
GottaSki
Grand Poobah
Joined: April-21-2005 Location: NE CT Status: Offline Points: 3327 |
Post Options
Thanks(0)
Quote Reply
Posted: November-22-2022 at 8:06am |
|
Indeed, that math didn't factor displacement
early ski supreme before they went to composite in 86 had 4"x4"x8' foam strips in the lower hull, fastened to the hull with little straps of glass. not cavity-filled, so they see some air and have a chance to dry out. . Hence some pool noodle solution some have used.
 There is also more foam higher up, inside each inner gunnel that wraps to the floor. these stay very dry over the decades.. and the bow is filled with foam. This all together met level flotation requirements at the time and makes the boat recoverable, without accumulating much water weight/ bloating over the years. Consider some of those techniques if your want the boat to be at least recoverable if things go awry and wont have to search yellow pages for scuba  |
|
|
"There is nothing, absolutely nothing, half so much worthwhile as messing around with boats...simply messing."
River Rat to Mole |
|
|
|
|
Post Reply
|
Page <1234> |
 Tweet
Tweet
|
| Forum Jump | Forum Permissions You cannot post new topics in this forum You cannot reply to topics in this forum You cannot delete your posts in this forum You cannot edit your posts in this forum You cannot create polls in this forum You cannot vote in polls in this forum |


 Topic Options
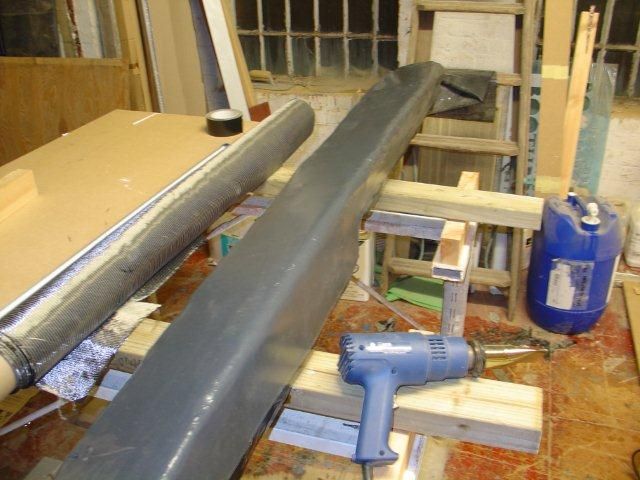 if you go with
foam (closed cell type) try to keep the hard skin which forms on the outside of
the foam as its less likely to soak up moisture.
if you go with
foam (closed cell type) try to keep the hard skin which forms on the outside of
the foam as its less likely to soak up moisture.