 Boats For Sale:


Transmission toast? |
Post Reply 
|
Page <123 |
| Author | |
Wilhelm Hertzog 
Senior Member 
Joined: June-14-2014 Location: Cape Town Status: Offline Points: 327 |
 Post Options Post Options
") Thanks(0) Thanks(0)
 Quote Reply Quote Reply
 Posted: October-01-2021 at 5:09am Posted: October-01-2021 at 5:09am |
So after getting the sleeves from a local SKF distributor, in my over-enthusiastic inexperience I proceeded to fit the sleeves to both the output coupler and the input shaft. Only to realise afterwards that the sleeve on the input shaft means the shaft won't fit through either the forward piston housing bearing or the forward and reverse adapter needle bearing. So I heated it up and carefully peeled it off (banging head against wall emoji goes here). I never noticed a leak from the front of the transmission in the past, so the sleeve was more preventative than corrective maintenance - to my untrained eye the shaft looked a bit rough where the seal rides. But now I need to decide:
Thanks as always for any opinions and suggestions, hugely appreciated! |
|
|
1982 Ski Nautique PCM351W RR II Velvet Drive 10-17-003 1:1 II PerfectPass Stargazer
Do not go gentle into that good night. Rage, rage against the dying of the light. |
|
 |
|
|
FFImarine
Senior Member
Joined: June-21-2016 Location: Medina Status: Offline Points: 142 |
Post Options
Thanks(1)
Quote Reply
Posted: October-01-2021 at 8:54am |
|
Install the sleeve at the end before you install the pump it’s the best way and it insures you’ll have no leaks in the future
|
|
|
You break it I’ll fix it
|
|
|
|
|
Wilhelm Hertzog
Senior Member
Joined: June-14-2014 Location: Cape Town Status: Offline Points: 327 |
Post Options
Thanks(0)
Quote Reply
Posted: October-01-2021 at 9:04am |
Thanks a lot Joe. Looks like the local distributor still has one in stock, so I won't have to wait the customary two to three weeks again.
|
|
|
1982 Ski Nautique PCM351W RR II Velvet Drive 10-17-003 1:1 II PerfectPass Stargazer
Do not go gentle into that good night. Rage, rage against the dying of the light. |
|
|
|
|
Wilhelm Hertzog
Senior Member
Joined: June-14-2014 Location: Cape Town Status: Offline Points: 327 |
Post Options
Thanks(0)
Quote Reply
Posted: October-17-2021 at 9:40am |
|
Hit another snag: the outside diameter of the rivets on the new damper plate (ALTDA-106A from Basic Power Industries) is slightly larger than that of the old damper plate. And it is also slightly larger than the counter bore of the flywheel (measurements in millimeters below):
   Which of course means the plate doesn't bolt down flush with the flywheel. Should I:
From reading on the forum, it seems this has been an issue with PCM transmissions as well (didn't come across a post where this was a problem with a Velvet Drive), and the solution was shimming. So I guess that will be the recommended option. Thanks as always!
|
|
|
1982 Ski Nautique PCM351W RR II Velvet Drive 10-17-003 1:1 II PerfectPass Stargazer
Do not go gentle into that good night. Rage, rage against the dying of the light. |
|
|
|
|
FFImarine
Senior Member
Joined: June-21-2016 Location: Medina Status: Offline Points: 142 |
Post Options
Thanks(1)
Quote Reply
Posted: October-17-2021 at 7:54pm |
|
It’s perfectly fine bolt that DA-106 on there I promise you’ll be just fine but use red lock tight on the threads of the bolts
|
|
|
You break it I’ll fix it
|
|
|
|
|
Wilhelm Hertzog
Senior Member
Joined: June-14-2014 Location: Cape Town Status: Offline Points: 327 |
Post Options
Thanks(0)
Quote Reply
Posted: October-18-2021 at 2:28am |
|
Thanks Joe.
I probably should have mentioned in my previous post, in case it makes a difference: I'm not using the OEM shouldered bolts (PCM part number R009001). For some unknown to me reason, the damper plate mounting bolts that I removed were M8 metric bolts, not 5/16 SAE bolts. Someone must have tapped the original bolt holes to change them from SAE to metric threads at some point. Be that as it may, I'm wondering if the shoulder on the OEM bolts results in a bit of clearance between the plate and the flywheel even when fully tightened down, leaving space for the rivets and thus preventing incorrect loading of the damper plate? I was thinking that using washers for shims may serve the same purpose as the shoulder of the OEM bolts. If it is of particular importance to use a shouldered bolt, I imagine I should be able to find metric ones that match the OEM bolt closely enough.
|
|
|
1982 Ski Nautique PCM351W RR II Velvet Drive 10-17-003 1:1 II PerfectPass Stargazer
Do not go gentle into that good night. Rage, rage against the dying of the light. |
|
|
|
|
KENO
Grand Poobah 
Joined: June-06-2004 Location: United States Status: Offline Points: 10646 |
Post Options
Thanks(0)
Quote Reply
Posted: October-18-2021 at 6:38am |
|
There isn't really a "shoulder" on the bolts.
Click on the link below for some info in an old thread There's a link in that thread to some ARP SAE bolts showing the dimensions and unthreaded portion. Since you need metric bolts, they won't do you any good, but you'll get the idea what your bolts should look like. The unthreaded portion of the shank above the threads is about 1/4 inch long with about 1/2 inch of threads. Some people are calling that unthreaded part a shoulder. It's the same diameter as the unthreaded portion of any 5/16 -18 bolt you'd get at a hardware store but it's only about 1/4 inch long Your metric bolts should resemble these dimensions. What's the part number cast into your flywheel? I think that if somebody threaded a 5/16-18 bolt hole for M8 threads, I'd be worried about the strength of those threads
|
|
|
|
|
KENO
Grand Poobah
Joined: June-06-2004 Location: United States Status: Offline Points: 10646 |
Post Options
Thanks(0)
Quote Reply
Posted: October-18-2021 at 6:54am |
|
Here's a link to the bolts at SkiDim, just for a picture, since you need metric bolts. They call them shoulder bolts for what it's worth. I'd call them pricey just like they did  |
|
|
|
|
Wilhelm Hertzog
Senior Member
Joined: June-14-2014 Location: Cape Town Status: Offline Points: 327 |
Post Options
Thanks(0)
Quote Reply
Posted: October-18-2021 at 5:20pm |
Looks to me like C6ZE-6380-A. 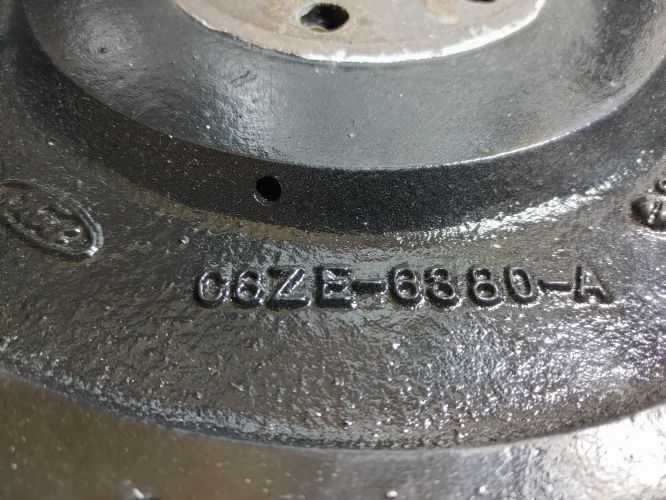 |
|
|
1982 Ski Nautique PCM351W RR II Velvet Drive 10-17-003 1:1 II PerfectPass Stargazer
Do not go gentle into that good night. Rage, rage against the dying of the light. |
|
|
|
|
Wilhelm Hertzog
Senior Member
Joined: June-14-2014 Location: Cape Town Status: Offline Points: 327 |
Post Options
Thanks(0)
Quote Reply
Posted: October-18-2021 at 5:32pm |
Noted. However, as Pete states in the last post in the thread you linked to, are these bolts not more 'in shear, not in tension', and hence the strength of the threads in the flywheel are maybe not of such critical importance as it may be in other applications? When I test fitted the damper to the flywheel, the alignment between the holes in the damper plate ears and the flywheel bolt holes are so tight, it almost seems that the last bolt won't thread squarely into the flywheel. Definitely no prospect of aligning the damper plate with the transmission input shaft and then tightening to spec via the starter hole or through an access hole drilled in the bellhousing, as I've read of others doing - there is zero play between the damper plate holes and the bolts going through them. How critical is it to use the 'shouldered' bolts, given the tightness of fit between the damper plate holes and the bolts in my situation? Or should I drill the damper plate holes ever so slightly larger, so as to allow for a bit of free play and hence alignment of the plate using the input shaft?
|
|
|
1982 Ski Nautique PCM351W RR II Velvet Drive 10-17-003 1:1 II PerfectPass Stargazer
Do not go gentle into that good night. Rage, rage against the dying of the light. |
|
|
|
|
TRBenj
Grand Poobah

Joined: June-29-2005 Location: NWCT Status: Offline Points: 21109 |
Post Options
Thanks(0)
Quote Reply
Posted: October-18-2021 at 6:50pm |
|
I’ve never actually encountered shouldered damper bolts that I can recall… and the bolts never seem to have enough slop to make the post trans mount tightening process worthwhile.
|
|
|
|
|
KENO
Grand Poobah
Joined: June-06-2004 Location: United States Status: Offline Points: 10646 |
Post Options
Thanks(0)
Quote Reply
Posted: October-18-2021 at 8:10pm |
|
Like I said before, and I think TRB seems to agree, what some people call a shoulder really isn't. It's just the smooth part of the shank above the threads.
And if your 5/16 holes were turned into M 8-1.25 threads for example, by someone, they're gonna be weaker than some that were done properly due to the closeness in diameter when comparing dimensions and drill sizes needed. (hard to explain, easy to see the weak end result) . Done properly would be.....drill the right size starter hole and make new threads, but that hole is smaller than the OD of the SAE threads that are already there and makes for some new metric threads that are weak when you're all done because you're "rearranging some of the old threads that weren't drilled out, while you're tapping the new ones. Those new threads don't have the meat or strength that they would have and will strip at some unknown lower torque value. You're pretty much rolling the dice, picking what seems like a "tight enough" value without saying "oops, I just went too far", maybe loading the threads with loctite and saying a couple of quick prayers that it will hold and a bolt won't work it's way out while the engine is at 3000 rpm or so.. Lots of ifs Later Ford autos used metric bolts that were fully threaded, but they also had locating dowels to keep the clutch pressure plate aligned. I've never done the post transmission installation tightening either with the stock "smooth shank" bolts. 20 to 22 ft lbs was a good value for the 5/16-18 original bolts, although you'll find people saying they torqued them to 35 or so. I'd probably take one of your metric bolts and thread it in and torque it to whatever value you pick for it and see if it strips or if it's torques down good and then make some decisions from there. Maybe this makes sense to you and maybe not, if not, that's OK
|
|
|
|
|
Wilhelm Hertzog
Senior Member
Joined: June-14-2014 Location: Cape Town Status: Offline Points: 327 |
Post Options
Thanks(0)
Quote Reply
Posted: October-20-2021 at 5:35pm |
|
Well, I went ahead with the fully threaded metric bolts, and looks like I'm in luck: torqued down smoothly to about 20 ft-lb, and no stripping of threads. Let's hope the Loctite (and lock washer) holds.
|
|
|
1982 Ski Nautique PCM351W RR II Velvet Drive 10-17-003 1:1 II PerfectPass Stargazer
Do not go gentle into that good night. Rage, rage against the dying of the light. |
|
|
|
|
Wilhelm Hertzog
Senior Member
Joined: June-14-2014 Location: Cape Town Status: Offline Points: 327 |
Post Options
Thanks(0)
Quote Reply
Posted: October-21-2021 at 4:55pm |
|
Looks like my luck didn't last long. Finished assembling the transmission (except for the selector valve and oil strainer assemblies), but when I torque the oil pump housing bolts to spec, the input shaft locks up. Backing off the bolts ever so slightly (less than half a turn) frees up the shaft again. Clearly something is wrong somewhere. Any advice as to where to start looking?
I was very careful to put the same number of clutch plates back in that came out. Thinking back, the forward clutch cylinder had to be pressed into the ring gear with some force to go in (it also came out with difficulty when I disassembled things), but the snap ring that holds it in place went in fine. There was a bit of fore-aft play on the input shaft before I tightened the oil pump housing bolts down - not sure if that is normal. |
|
|
1982 Ski Nautique PCM351W RR II Velvet Drive 10-17-003 1:1 II PerfectPass Stargazer
Do not go gentle into that good night. Rage, rage against the dying of the light. |
|
|
|
|
Wilhelm Hertzog
Senior Member
Joined: June-14-2014 Location: Cape Town Status: Offline Points: 327 |
Post Options
Thanks(0)
Quote Reply
Posted: October-21-2021 at 5:22pm |
|
I know: it must be that 12th reverse clutch pressure plate spring. 😅
Seriously though, I guess it must be something in the oil pump getting stuck, because the oil pum housing bolts don't exert any pressure on any of the clutch plates, right? |
|
|
1982 Ski Nautique PCM351W RR II Velvet Drive 10-17-003 1:1 II PerfectPass Stargazer
Do not go gentle into that good night. Rage, rage against the dying of the light. |
|
|
|
|
KENO
Grand Poobah
Joined: June-06-2004 Location: United States Status: Offline Points: 10646 |
Post Options
Thanks(0)
Quote Reply
Posted: October-21-2021 at 7:06pm |
If you take the pump off and you can rotate things freely, then your problem is in the pump and nothing internal is wrong. I might suspect that the key isn't seated right in the keyway and it's pushed back enough to contact the inner race of the needle bearing in the Forward-Reverse adapter when the bolts are torqued................or some other problem with the pump gears.
|
|
|
|
|
FFImarine
Senior Member
Joined: June-21-2016 Location: Medina Status: Offline Points: 142 |
Post Options
Thanks(0)
Quote Reply
Posted: October-21-2021 at 8:42pm |
|
Take a piece of 220grit sand paper and stick it to a flat surface, pour some trans fluid on the sand paper and rub both sides of your pump gears on the sand paper for roughly 30 seconds a side then clean the gears and re assemble it. You may have a slight imperfection on the gears and that’ll clean it right up and won’t take away any pressure it creates
|
|
|
You break it I’ll fix it
|
|
|
|
|
Wilhelm Hertzog
Senior Member
Joined: June-14-2014 Location: Cape Town Status: Offline Points: 327 |
Post Options
Thanks(0)
Quote Reply
Posted: October-23-2021 at 4:48pm |
|
Looks like I'm in luck again. Before going the sanding route, I decided to flip the outer pump gear over. I couldn't flip the inner gear over, as I had installed the input shaft sleeve already - again! I neglected to mark the pump gears when I disassembled the pump, so I wasn't sure which way around they should be installed, hence I thought it worth a shot to see if flipping the gear over would make a difference. I then proceeded to tighten the bolts down evenly in very small increments, trying to get the pump housing to be pulled down onto the forward/reverse adapter as evenly as possible. And it worked! Managed to get the bolts torqued to spec with the shaft still spinning freely.
Bit of touch up painting to do on the case, and then need to get the transmission back in the boat to test oil pressure. |
|
|
1982 Ski Nautique PCM351W RR II Velvet Drive 10-17-003 1:1 II PerfectPass Stargazer
Do not go gentle into that good night. Rage, rage against the dying of the light. |
|
|
|
|
KENO
Grand Poobah
Joined: June-06-2004 Location: United States Status: Offline Points: 10646 |
Post Options
Thanks(0)
Quote Reply
Posted: October-23-2021 at 6:03pm |
|
I guess that falls into the "some other problem with the pump gear" category.
Good job, hope it all works
|
|
|
|
|
Wilhelm Hertzog
Senior Member
Joined: June-14-2014 Location: Cape Town Status: Offline Points: 327 |
Post Options
Thanks(0)
Quote Reply
Posted: December-31-2021 at 10:34am |
|
So after painting and getting everything back into the boat, pressure test came out good, and the transmission has so far been working with no problems (or leaks) after a few hard days on the water so far this (southern hemisphere) summer. I am somewhat amazed that everything seems to have gone smoothly - thanks a lot to everyone who chimed in with help and guidance, especially Ken (as always) and Joe. It really is hugely appreciated. A complete novice like me would never have been able to get this done without all the input from you guys.
I have did have quite a major drive train incident on the lake yesterday, but I'll create a new thread on that.
|
|
|
1982 Ski Nautique PCM351W RR II Velvet Drive 10-17-003 1:1 II PerfectPass Stargazer
Do not go gentle into that good night. Rage, rage against the dying of the light. |
|
|
|
|
KENO
Grand Poobah
Joined: June-06-2004 Location: United States Status: Offline Points: 10646 |
Post Options
Thanks(0)
Quote Reply
Posted: December-31-2021 at 10:55am |
|
Well here I was having read all your other updates today and getting ready to say something like "Good job on everything, here's hoping for a good, trouble free South African summer and then I see the quote below  Hope it's an easy fix and you have that good, trouble free summer
|
|
|
|
|
Post Reply
|
Page <123 |
 Tweet
Tweet
|
| Forum Jump | Forum Permissions You cannot post new topics in this forum You cannot reply to topics in this forum You cannot delete your posts in this forum You cannot edit your posts in this forum You cannot create polls in this forum You cannot vote in polls in this forum |


 Topic Options
 Wilhelm Hertzog wrote: