 Boats For Sale:


1991 Sport Nautique Open Bow Stringer |
Post Reply 
|
Page 123 4> |
| Author | |
Ian H 
Groupie 
Joined: September-24-2020 Location: Hong Kong Status: Offline Points: 69 |
 Post Options Post Options
") Thanks(1) Thanks(1)
 Quote Reply Quote Reply
 Topic: 1991 Sport Nautique Open Bow Stringer Topic: 1991 Sport Nautique Open Bow StringerPosted: December-14-2020 at 10:46pm |
|
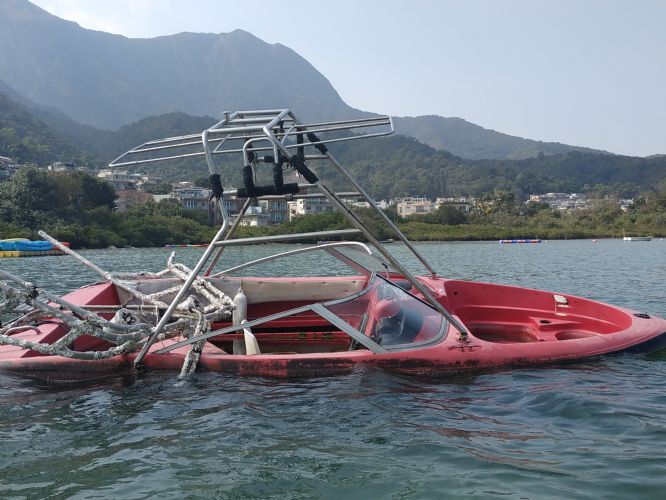
I have rescued a 1991 Sport Nautique with an Open Bow from the Jungle in Hong Kong. The floor is spongy so I expect a lot of rot and I have been studying hard for a full stringer replacement. But I cannot find an example of how to deal with the floor of the open bow. What's the method for open bow stringer replacement?
Photos to show I am a true dreamer    |
|
 |
|
|
SNobsessed
Grand Poobah 
Joined: October-21-2007 Location: IA Status: Offline Points: 7102 |
Post Options
Thanks(0)
Quote Reply
Posted: December-15-2020 at 7:26am |
|
That looks like quite a project just to move it. Some guys remove the whole top section (called the cap) so they can access the entire hull length. I hope you have a shop, this will take a few months to do.
|
|
|
“Beer is proof that God loves us and wants us to be happy.”
Ben Franklin |
|
|
|
|
fanofccfan
Platinum Member 

Joined: December-13-2009 Location: North Bend NE Status: Offline Points: 1721 |
Post Options
Thanks(0)
Quote Reply
Posted: December-15-2020 at 8:22am |
|
This one will be a great follow. Looking forward to watching the progress.
|
|
|
2004 196 LE Ski 1969 Marauder 19 1978 Ski
|
|
|
|
|
sport1999
Senior Member 
Joined: May-10-2015 Location: Florida Status: Offline Points: 313 |
Post Options
Thanks(0)
Quote Reply
Posted: December-15-2020 at 1:25pm |
|
Funny. There was a 1990 Sport Nautique with a trailer in similar condition near me. It was priced at a $100.00. Not sure about boat prices over there, but I wouldn't call that free. Good luck. There is a nice stringer replacement for a Sport Nautique on this forum somewhere.
Pictures are gone, but here is one with information. |
|
|
|
|
MechGaT
Senior Member

Joined: March-09-2015 Location: Chattanooga Status: Offline Points: 271 |
Post Options
Thanks(0)
Quote Reply
Posted: December-15-2020 at 9:35pm |
|
That was my ‘92. I didn’t split the boat and take off the cap. I saw elsewhere that basically it involves removing the rubrail and that is where the two pieces join. The stringers don’t go all the way under the front seating. They stop just in front of the driver and observer seats. If the floor in the bow is soft then the only way to fix it is split it, as you have said. Replacing the stringers was enough work for me. I will be glad to pass along whatever knowledge I can.
|
|
|
'92 Sport Nautique
|
|
|
|
|
Ian H
Groupie
Joined: September-24-2020 Location: Hong Kong Status: Offline Points: 69 |
Post Options
Thanks(0)
Quote Reply
Posted: December-18-2020 at 12:06am |
|
I am all prepped for cutting into the floor and having a look at what is there, but since the bolts holding the engine frame just rotate I think the stringers must be rotten so I don t expect anything but a full floor and stringer removal. So I am getting ready for a marathon cutting session tapped into a Tyvak suit with respirator. I made carboard templates of the floor since i guess making the right shape later will be a headache with not floor in place and marked datums on of the hull so I should be able to get the engine mount positions correct again
I should know shortly if I can reach the ends of the stringers or if I need to cut into the cap of the open bow. Did you replace the whole stringer without spitting the cap of open bow? Do you have any photos of what your stringer replacement was like? If I need to get in to the bow I am thinning of cutting out the floor of the open bow by cutting the red line and bolting boards over the cut line before I cut so I can bolt the boards on the back when I reassemble to get the location and then glass them in. I am sure I am going to need some advice once I get inside , I will post some photos of the itchy carnage.  Regards Ian   |
|
|
|
|
MechGaT
Senior Member
Joined: March-09-2015 Location: Chattanooga Status: Offline Points: 271 |
Post Options
Thanks(0)
Quote Reply
Posted: December-19-2020 at 10:43am |
|
I updated my thread with some pictures of the process I went through. One of the first posts includes a picture of the end of the stringers. They end right at the storage compartments in the foot area of the driver and passenger.
I would not cut at the red line you have shown. Splitting the cap involves removing the rubrail, removing the rivets or whatever holds the cap to the hull, then cutting along that line. There is foam inside under the gunwales that will probably be in the way a bit. Look under there and see what you have. The 1999 Longhorn thread has/had some pictures of what a cap and hull separated looks like. I just found on page 13 where it still has a picture of just the hull without a cap. Also, I was very concerned about locating everything, but the pylon, engine cradle, and lip around the edge of the floor that I kept as long as I could, helped to locate everything. Definitely take measurements, but don't worry if you miss a measurement or two. If you remove the pylon mount, then all bets are off.
|
|
|
'92 Sport Nautique
|
|
|
|
|
Ian H
Groupie
Joined: September-24-2020 Location: Hong Kong Status: Offline Points: 69 |
Post Options
Thanks(0)
Quote Reply
Posted: December-19-2020 at 8:36pm |
   I I cannot find or search the 1992 sport floor replacement post. So still not able to see your pictures. Can you send me a link.and I can try am work out what I am doing wrong.
Thanks for the advice on the cap. I got into the floor yesterday and can now see the stringers finish within reach. So I am not committed on the cap yet. I hope I will be able to check out the posts you sent and decide what to do as the next step I still have plenty to do in the back. I think it may be structurally ok but looks like there is an old termite next made of mud forward in the foam on the Port side which I will want to clean out so may need to open to access. The cradle is still in place and bolted to the pylon. i will take a few more measurements and make some more marks to be sure I know where it goes when I come to set up the stringers . The stringers are just empty shells all the wood is rotted away or been eaten by insects so I have no remnants of wood only the stringer boxes to try to make a pattern. After measuring today's job is cut out all the stringers and smooth off to the hull. Thanks for the help  |
|
|
|
|
MechGaT
Senior Member
Joined: March-09-2015 Location: Chattanooga Status: Offline Points: 271 |
Post Options
Thanks(0)
Quote Reply
Posted: December-19-2020 at 10:25pm |
|
'92 Sport Nautique
|
|
|
|
|
Ian H
Groupie
Joined: September-24-2020 Location: Hong Kong Status: Offline Points: 69 |
Post Options
Thanks(0)
Quote Reply
Posted: December-26-2020 at 7:31pm |
|
The fiberglass stronger sides of the stringers inside the bilge re good and strong. should I try to leave them in and put my new stringers in along side them ... or is fitting in and filling in the void to tricky? in the bilge the thickness is about 3 to 4 mm so feels like it is pretty strong even without the stringer.
not sure what is better clean start or add onto the existing strength.... |
|
|
|
|
8122pbrainard
Grand Poobah

Joined: September-14-2006 Location: Three Lakes Wi. Status: Offline Points: 41040 |
Post Options
Thanks(0)
Quote Reply
Posted: December-26-2020 at 7:37pm |
|
This has come up before and the general concensus you are better off starting over with a clean bare hull. If you try to use the existing glass, the big problem is bonding the new stringer to the old glass.
|
|
|
|
|
Ian H
Groupie
Joined: September-24-2020 Location: Hong Kong Status: Offline Points: 69 |
Post Options
Thanks(0)
Quote Reply
Posted: December-26-2020 at 9:41pm |
|
thanks , i thinks getting the fit and the bond under setting time pressure would be problematic.
So out they come! |
|
|
|
|
Ian H
Groupie
Joined: September-24-2020 Location: Hong Kong Status: Offline Points: 69 |
Post Options
Thanks(0)
Quote Reply
Posted: December-27-2020 at 10:41am |
|
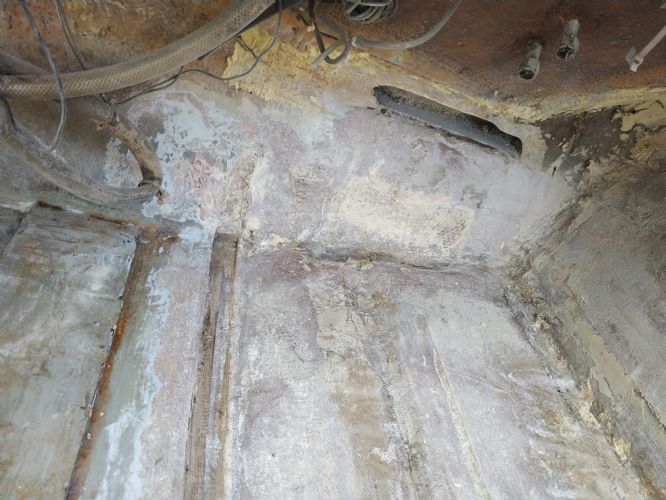
OK Stringers are out and Test with belt sander does a good job to clear up the remnants from the cutting. I guess the trick is to go down to material to get a good key for the glassing in of the new stringers. and not digging down to the hull itself. I now need time to do all the stringers.
I now turn to the puzzle of the front end, under the bow floor was plywood which is now just mush and the ski locker glass fixing it to hull has let go of the bond to the locker. The locker is filled with a home made basalt tank and so is the open bow they were glassed in, in place but are separate tanks with fill and empty pumps and an inlet through the hull just behind the pylon. Picture shows the ski locker tank on its way out , the bow foot well tank fills the full space level with the seats the front of it can be seen in the first bow shots when the boat was first recovered. ( I am new to this kind of boat so I ave no idea if ballast here will be good thing.) I have studied Youtube and there is no way for me to split cap this from this boat I am outside and need to get this finished before March when the furnace sun and 90% humidity + a lot of rain will make life very difficult. But I want to fix the floor properly the foot well of the open bow is filled with the second ballast tank so I am thinking again of removing just the foot well to get access to the floor and bolting then glassing through the lockers to put it back together after fixing the floor under the foot well. I guess under the bow floor is going to be another big mush of waterlogged foam and rotten wood now when I stand on the bow floor the screens move. So need to do something to get a solid floor under the bow floor.  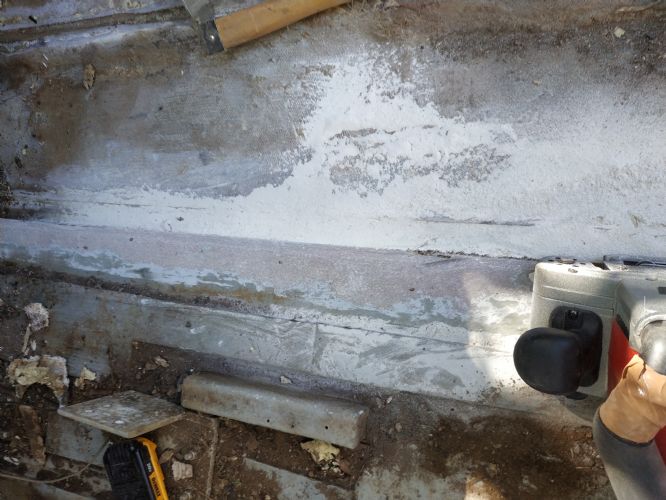   |
|
|
|
|
Ian H
Groupie
Joined: September-24-2020 Location: Hong Kong Status: Offline Points: 69 |
Post Options
Thanks(0)
Quote Reply
Posted: December-28-2020 at 10:26am |
|
I have had a bit more time digging round the front end and managed to get all the rotting carpet out to get a better look, most importantly I managed to get the carpet put under the floor of the cap on top of the ski locker.
Now I have a gap to work with to join the floor further forward bu the vent pipes. I still have the problem of the ballast tank in the ski locker. I cannot get it out until I get the pylon out which of course is corroded solid in cup. by the looks of it my pylon is going to get a bit shorter as I expect no amount of hammer violence is going to get it out and it will get cut it of flush with the cup and I can cut out the remnants of the corroded part from the inside. Cup already wobbles in the hull so do not want to bash it too much. Once I can see inside the ski locker I hope i can think of a good plan. It would help to know to rejoin with the ski locker any photo or a description would be helpful. ski locker I am thinking to make the whole floor with resin soaked marine ply rather than foam and skin on top. Im thinking what to do with the + 18mm of plywood thickness taking it off the stringers or making the floor a bit higher. I am now searching for my resin and mat supply. I have no idea how much of this I will need, anyone got an idea of what they used would be a great help. > tank needs to come past the pylon  how long is that locker? how long is that locker? So happy with this piece of scabby carpet out from under the front floor  bow ballast tank 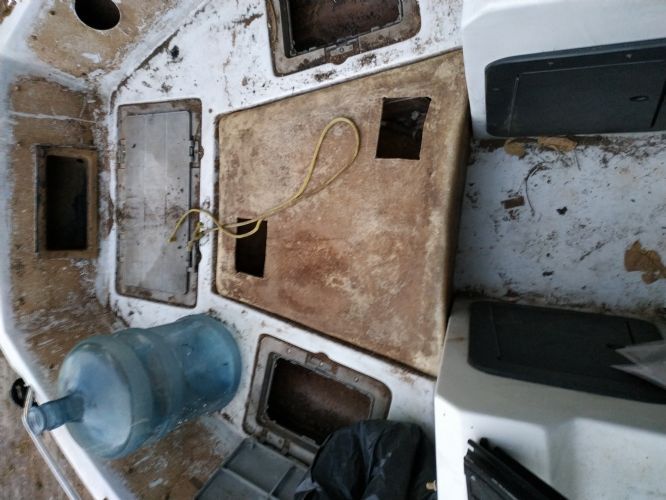 tank out  three ports bilge ballast out and ballast air vent ... Normal?  Great weather in Hong Kong  for now.... for now....  |
|
|
|
|
MechGaT
Senior Member
Joined: March-09-2015 Location: Chattanooga Status: Offline Points: 271 |
Post Options
Thanks(0)
Quote Reply
Posted: December-31-2020 at 2:32pm |
|
Here is the inside of the ski locker. Does this help?
 |
|
|
'92 Sport Nautique
|
|
|
|
|
Ian H
Groupie
Joined: September-24-2020 Location: Hong Kong Status: Offline Points: 69 |
Post Options
Thanks(0)
Quote Reply
Posted: December-31-2020 at 7:16pm |
|
Thanks, Yes it makes it clear that the tank must come out so i can see the condition of the top and if its still attached.
pylon is stuck fast in the cup with corrosion i will try a few more things but looks like the cup will have to be cut off the hull and re glassed in  I have my stingers now from a scrap yard close to the boarder with china and floor I have 15mm birch marine ply. I have a couple of things i cannot work out from your thread. I guess many of the pictures are not there ( sorry if they are obvious I am feeling very Newbie > Did you cut down the height of the stringers by the thickness of the floor and put it on top? What ply did you use? > If you used a plywood floor what is all the foam shaping? I was planning to put in the ply with some holes to put in the foam and just cut off the extra and smooth the holes. I think I am missing something fundamental.. > What did you do to join the old floor at the front under the dashboard and the new floor > Why is there a need to use faring compound ? I have now added l the supports using Scaffold Jacks to get the levels right I think have enough to make enough adjustments. now only a very small movement moving around inside the boat. I was considering step by step structure replacement but when I cut out the first rear primary stringer the boat did a twist which despite lots of support adjustments refused to be corrected. Cutting the second primary did the job and relieved the stress. With and lots of secondary jacks O now have an ok shape in the bottom of the hull and the width back to the size before the floor came out. Today is digging and deciding what to do in the front before the smooth down of all the stringer remnants with the the big belt sander to finally have a first big clean up. Happy new year!! |
|
|
|
|
MechGaT
Senior Member
Joined: March-09-2015 Location: Chattanooga Status: Offline Points: 271 |
Post Options
Thanks(0)
Quote Reply
Posted: January-01-2021 at 10:19am |
|
I used outdoor grade A/C plywood from my local building supply. I am pretty sure it was 1/2 inch (13 mm). I coated it with CPES and put a layer of fiberglass on it before putting it in the boat.
As they say, there are many ways to skin a cat, but I chose to reduce the height of both the primary and secondary stringers and put the plywood on top. I had seen the cut holes and pour foam method, but I chose to pour the foam, shave to the right height, and place the plywood on top. I believe that cutting holes will still leave voids and I was concerned about cutting holes in good plywood and trying to get it sealed and flush again. When joining to the original fiberglass I just laid the new stuff on it. The thickness is not that great so it isn’t an issue. The floor gets a lot of strength from the plywood and the epoxy fiberglass, I felt, was to give it a little protection from moisture and impact. I used some chopped strand and some cloth, but I don’t remember the details at this point. The fairing compound was to smooth out the joints. There were rib lines from the 1708, poorly shaped joints that weren’t nicely rounded, ends of cloth, etc. In the bilge these rough spots would make it harder to clean and drain. On the floor it makes it uneven. Fairing just makes these areas smoother. I would advise making sure you have a good formula. I think I used too much ground glass. It was strong, but when sanding was required and strength wasn’t, it was a pain. |
|
|
'92 Sport Nautique
|
|
|
|
|
MechGaT
Senior Member
Joined: March-09-2015 Location: Chattanooga Status: Offline Points: 271 |
Post Options
Thanks(0)
Quote Reply
Posted: January-01-2021 at 11:27am |
|
One thing I didn't mention, if you choose to do the foam then put plywood over it, I had the most success by wrapping a scrap piece of plywood in plastic and placing it over the area where the foam was poured.
 This picture shows the first bit of fairing I put down. It also shows the end of the plywood up front and how the foam supports the transition to the old floor. 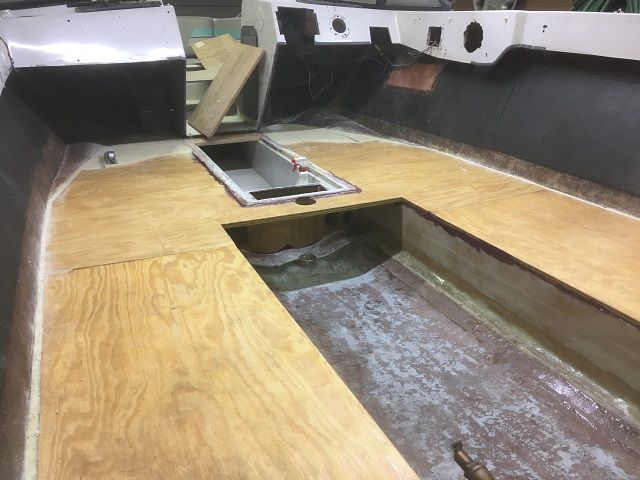 |
|
|
'92 Sport Nautique
|
|
|
|
|
Ian H
Groupie
Joined: September-24-2020 Location: Hong Kong Status: Offline Points: 69 |
Post Options
Thanks(0)
Quote Reply
Posted: January-01-2021 at 6:05pm |
|
Thanks the photo is really useful.
I plan the same construction as you I think but will fill with foam through 2 inch holes and glass over when on top after cutting off the extra foam. I hope this will save me tine but as you say there is the risk there could be voids. I have 15mm ply marine grace birch. its very tough, I was planning to reduce the stringers so the top of the ply is just below the lower surface of the old fiberglass floor, i hope this will solve the problem of how to attach the ski locker. i hope to put the ply under the lip for support and see if i can get some tabs in underneath in any case its going to be messy...How did you bond in the ski locker? After the stringers are in and how dis you fix the ply to the tops of the stringers and foam before you put in the top layer of glass on the plywood? I am planning to go forward tot he air vent with the ply so I can pre assemble the air vents so I can use a hole saw. I need to re foam the bow section floor as I had an old termite nest the size of Belgium in there which had to come out together with all the foam. This was an absolute BXXXXXD but saved me taking off the cap Cutting the corroded pylon out of the floor was really easy 5 mins with a sawsall thinking about it not knowing what was inside was long and difficult !! I am now starting to knock down all the stinger remnants and sand the surfaces where the fiberglass needs to bond to. Big belt sander gets this done well but very heavy work I hope a day will see this complete and then time for a full pressure wash out for a clean start. (still sunny here so drying out should be ok so much mud dirt and fiberglass dust to extract leaves no choice) Then its stringer time ( currently on our bedroom floor to stay dry) Is there a good way to measure the shape? I plan to put in a very tight string at the two top corners of the stringers and then at set distances measure down to the hull and transfer the shape to the stringers for each side to get the right shape marked on both sides to get it as close as possible first time . Any tried and tested method? Thanks for your time to help much appreciated. |
|
|
|
|
Ian H
Groupie
Joined: September-24-2020 Location: Hong Kong Status: Offline Points: 69 |
Post Options
Thanks(0)
Quote Reply
Posted: January-01-2021 at 6:17pm |
 8 scaffold jacks and a bunk trailer on bricks , shape is good and not moving while i work  Pylon out easy with sawsall and datum still there to put it back 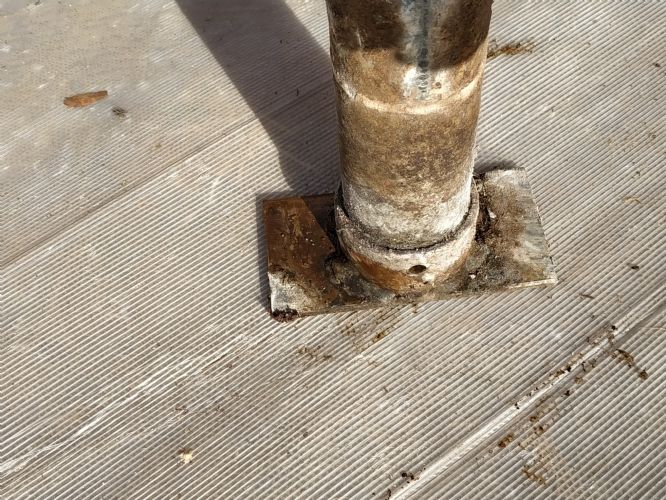  upside down ... floor in the driver side foam out  Tank build in the locker is finally out !!!  Big cleanup starting aft port |
|
|
|
|
Ian H
Groupie
Joined: September-24-2020 Location: Hong Kong Status: Offline Points: 69 |
Post Options
Thanks(0)
Quote Reply
Posted: January-02-2021 at 8:09am |
|
Just as I was about to congratulate myself on finishing the surface prep for the floor and stringers in complete white out . I was hit with a curve ball.... the lifting points are mush. its a funny story I was really angry that when I acquired the boat it was lifted with strops without a spacer instead of the lifting points and the deck was damaged. If they has used the lifting points I think it would have been gave over.
Sanding the last awkward corner I grabbed the lifting point to get to my feet and it came off in my hand! .... pulled completely out of the mounting. Port and starboard the same. Seems the lifting points were plywood and in my boat they were wet. Anyone know what the construction of the fore and aft lifting points are? I need a beer or two and a re-group.     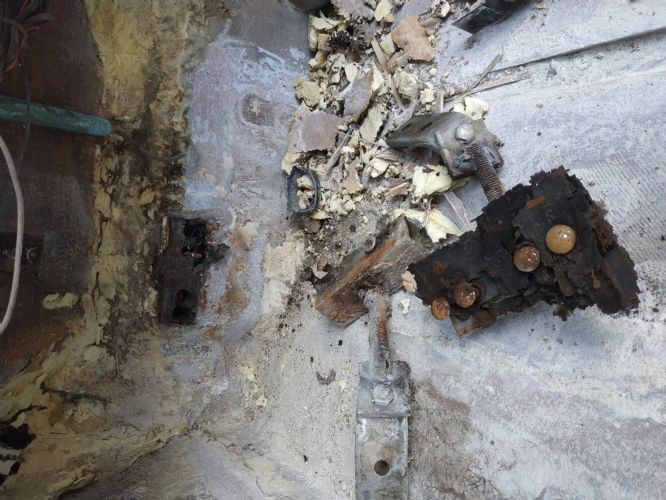  |
|
|
|
|
MechGaT
Senior Member
Joined: March-09-2015 Location: Chattanooga Status: Offline Points: 271 |
Post Options
Thanks(0)
Quote Reply
Posted: January-02-2021 at 9:11am |
|
I used the same mixture I used to bed the stringers to bed the plywood. I made the piece that goes under the seats out of one piece so it had to slide into place, making it a little tougher to bed down. The sections in the back were easy.
As far as the method to trace the stringers, get a little trimmed off in the front and rear so there’s not a huge gap in the middle and use a compass to transfer the shape of the hull to it. Be sure to do both sides of the stringers. Others have replaced the lifting points in their rebuilding threads. Not sure if pictures are on the site still. If you are searching for things on here the best way is go to Google, type “site:correct craft fan.com topic” and replace “topic” with what you are looking for. On the lift points, I assume the main question is how to get the studs sticking out through the plywood. Countersink and washers is all I can remember from another thread. Also, think about how to apply pressure until the bond to the hull is dry. |
|
|
'92 Sport Nautique
|
|
|
|
|
Ian H
Groupie
Joined: September-24-2020 Location: Hong Kong Status: Offline Points: 69 |
Post Options
Thanks(0)
Quote Reply
Posted: January-02-2021 at 5:49pm |
|
Thanks
For the floor I will try to make life a bit easier and an L shape a bit like the original I found in a factory tour video below. I still have to do my homework on peanut butter mix of chop cobosil etc (but need to stick to one step at a time or my head may explode. Engine and wiring also all moving along and parts piling up, but most important is to get the hull done while the weather is dry. and cool. I may put up another post to see if I can get some pics of the rear mounting I have not had any luck searching good advice on how to get the pressure on I had not thought about this but can rig something if I think in advance, My guess is that lifting points are just big pad of plywood stuck to the aft of hull and lots of g;ass over the top. I will cut them our today and see if i can piece it together. I really want o grind all the surfaces for new glass so i can properly clean up the itchy dust.! I am hoping the front lift point is not the same construction i hope it connects with the front bow u bolt. without any rotting wood. Thanks again  Best pic i can find of the front mount i hope there is nothing woody holding it in  ! ! |
|
|
|
|
Ian H
Groupie
Joined: September-24-2020 Location: Hong Kong Status: Offline Points: 69 |
Post Options
Thanks(0)
Quote Reply
Posted: January-03-2021 at 10:23am |
|
looks lie the construction of the lifting point anchors is two sheets of ply with a bed of chop strand with a chamber on the sides and two or three layers of weave on top . all cut out and prepped for the replacements. some overkill wont go amiss here to be sure they are strong. Still not able to find ant post for this . Working in this tight corner is really unpleasant to far to do at arms length so end up close to the swirling dust cramped up in the corner. Nasty. after this i could pressure wash, one of the few beefits of working outside! now all clean and the inching powder is gone for now.
|
|
|
|
|
MechGaT
Senior Member
Joined: March-09-2015 Location: Chattanooga Status: Offline Points: 271 |
Post Options
Thanks(0)
Quote Reply
Posted: January-05-2021 at 12:19pm |
|
On this thread there is a picture and sketch of the front lifting eye from a Barefoot Nautique. I have not seen the details on a Sport, but I imagine it to be similar, just tucked away behind the seats in the bow. I have seen another thread with details on how someone replaced the rear ones, but I can't seem to find it now.
|
|
|
'92 Sport Nautique
|
|
|
|
|
MechGaT
Senior Member
Joined: March-09-2015 Location: Chattanooga Status: Offline Points: 271 |
Post Options
Thanks(0)
Quote Reply
Posted: January-05-2021 at 4:13pm |
|
I found the thread I was looking for. In this one he rebuilt the rear lift points.
|
|
|
'92 Sport Nautique
|
|
|
|
|
Ian H
Groupie
Joined: September-24-2020 Location: Hong Kong Status: Offline Points: 69 |
Post Options
Thanks(0)
Quote Reply
Posted: January-06-2021 at 7:35am |
|
Thanks, lucky you have a good memory that post is really useful i could not turn anything up just searching or googleing
for the front mount i can see the bottom of the mount is really well glassed in and looks strong so I will just remove the u bolt ,and try to fill the void with epoxy re drill for the u bolt, ( cutting out and glassing in a small space is not my idea of fun!) This is what the fixing point looks like now. 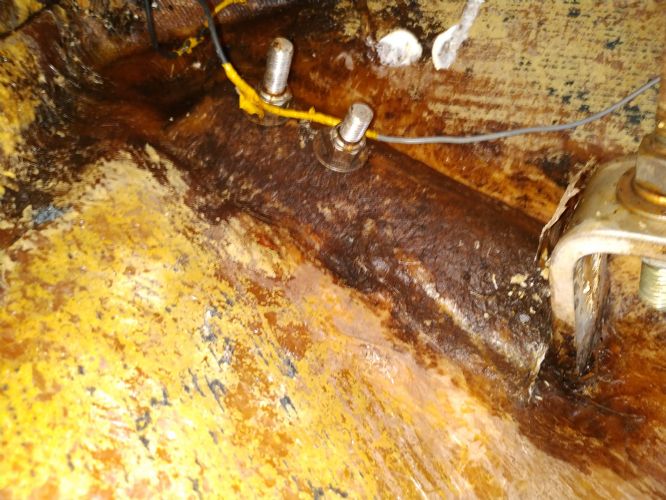  |
|
|
|
|
Ian H
Groupie
Joined: September-24-2020 Location: Hong Kong Status: Offline Points: 69 |
Post Options
Thanks(0)
Quote Reply
Posted: January-06-2021 at 8:54am |
|
I have very little fiberglass experience. I have been trawling lots of posts and videos ... wow people can get really angry about the method and choice of materials!! and in the process get me very confused. I have decided that Epoxy is the way to go I plan to paint the wood until it wont absorb more or about 4 coats of Clear Penetrating Epoxy Sealer or acetone and epoxy I plan to bed the stringers in with a bed of peanut butter epoxy and Cabosil (fumed silica) ( not sure if adding chip would be good too) piped in from the corner of a plastic bag then drop in the stringer on top and hold it in place with a jig at the right height and position and smooth the peanut butter into a desert spoon sized fillet each side of the stringer. Plan to follow your plan for the layup "" as below but is there anything you would change with hind sight? Primary stringers: 2" 8.7oz E cloth, 4" 8.7oz E cloth, with each of these running the length with half on the hull and half on the stringer then 8" 8.7 oz E cloth overlapping 1" on the hull and up the stringer ~5". Over this lay 12" wide 1708 tape that starts at the top of the stringer and runs down onto the hull. That should make it overlap 1" past the 8" cloth. Same on both sides. Secondary stringers: same application of 2", 4", and 8" cloth and 12" biaxial. Then drape 7.5oz cloth over the top of the stringers to give them some protection. For the bulkhead behind the ski locker I plant to use plywood and use the 2", 4", and 8" on the seams to the stringers and hull then drape it in the 7.5oz cloth also. I am using plywood for the floor and plan to wrap it in 1.5oz mat. The fiberglass material I can measure and work out how much to buy but I am clueless on how much resin and CPES to buy I can see the CSM uses about 2.5 times the weight of resin for every 1 of fiberglass and for woven stuff about 1 to 1 so I can calculate ..... But in reality roughly how much resin , cabosil and chop did you buy ? also acetone CPES rollers brushes ? I need to ship in all my materials from China in a big lot and not easy to pop out for a bit more if I am short. an rough idea would be very useful. Did you buy tape in the right widths or cut them to the right widths? I have got 600ml mixing cups , i guess this is about as much as can be worked in the time before it goes off ,Dis you do the same? Sorry fro so may questions fiber glassing is not my superpower I need to get the stuff shipped in from China so getting
|
|
|
|
|
Ian H
Groupie
Joined: September-24-2020 Location: Hong Kong Status: Offline Points: 69 |
Post Options
Thanks(0)
Quote Reply
Posted: January-06-2021 at 9:01am |
Now looking if I can rob a tower off an abandoned boat in front of my house. Not looking promising Alibaba time... |
|
|
|
|
Timr71
Groupie
Joined: March-28-2016 Location: Alabama Status: Offline Points: 80 |
Post Options
Thanks(0)
Quote Reply
Posted: January-06-2021 at 4:04pm |
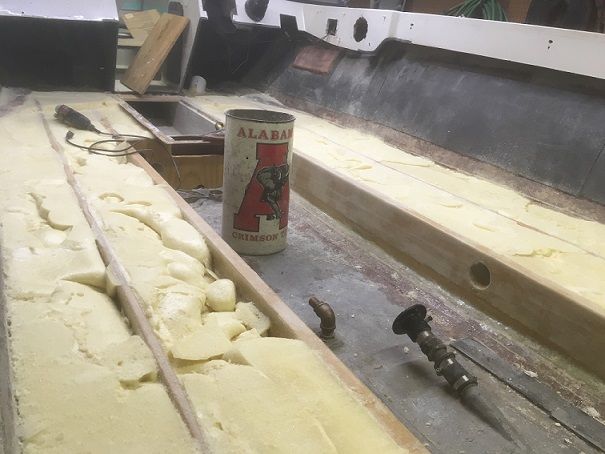
The key to this build is an Alabama trash can sporting a time period appropriate logo from the days when I was in school there. Just kidding. Good luck with your build. I like watching stringer jobs. You're doing a great job so far. Gonna be a great boat.
|
|
|
|
|
Post Reply
|
Page 123 4> |
 Tweet
Tweet
|
| Forum Jump | Forum Permissions You cannot post new topics in this forum You cannot reply to topics in this forum You cannot delete your posts in this forum You cannot edit your posts in this forum You cannot create polls in this forum You cannot vote in polls in this forum |


 Topic Options
 MechGaT wrote: