 Boats For Sale:


1991 Sport Nautique Open Bow Stringer |
Post Reply 
|
Page <1234> |
| Author | |
MechGaT 
Senior Member 

Joined: March-09-2015 Location: Chattanooga Status: Offline Points: 271 |
 Post Options Post Options
") Thanks(0) Thanks(0)
 Quote Reply Quote Reply
 Posted: January-06-2021 at 4:47pm Posted: January-06-2021 at 4:47pm |
|
I am not an expert using fiberglass either. Including the work I did on my boat, I have done the fiberglass on one boat and nothing else. Epoxy made it easy. I bought the 1 gallon kit of CPES from Rot Doctor and I still have some left over after giving every piece of wood that went into it at least 2 good coats. For Epoxy I used US Composites and got about three orders. I think the first was like 5 gallons and then I had to get like 3 more gallons. It has been a few years since I made my first purchase so I don't remember exactly, but I would say 8 gallons would be the minimum you would need.
I used the fiberglass tape that was already made to 2", 4", and 8" widths and the 12" biax. I would use the same layup schedule. It worked well and the cloth was fairly easy to handle. Like I said, my experience is limited so there may be someone else who chimes in, but my research prior to doing this showed this was a pretty common layup schedule for tabbing the stringers into the hull. Like I said, I used a lot of milled fiber in my peanut butter mix. I read in one of the posts that it would make a strong bond. It does, but I would also say it is harder to work with. If I had to do it again I would probably search for something better to use in the joints where the spoon rounds out the transition. I had trouble in this area with the surface being rough. I haven't done any research since then so I don't know what to tell you to use that would be formed more easily. You are making great progress. Keep up the good work.
|
|
|
'92 Sport Nautique
|
|
 |
|
|
2001SAN
Senior Member

Joined: June-26-2012 Location: Ireland Status: Offline Points: 242 |
Post Options
Thanks(0)
Quote Reply
Posted: January-08-2021 at 2:23am |
Pass on the tower. It is fugly as hell. Enjoying your progress though. These deep projects are always impressive! Good luck! D
|
|
|
A little knowledge is a dangerous thing...
2001 Super Air Nautique 1989 Fairline Corniche 31 www.bannrivercruises.co.uk |
|
|
|
|
Ian H
Groupie 
Joined: September-24-2020 Location: Hong Kong Status: Offline Points: 69 |
Post Options
Thanks(0)
Quote Reply
Posted: January-08-2021 at 8:45am |
|
Tower was a long shot it's another problem to be solved, I am really looking for the biggest shade I can find to shade in the super hot Hong Kong sun. It would be good to find something that would fill up the holes where the tower was taken off. bigger issues to solve right now;

|
|
|
|
|
Ian H
Groupie
Joined: September-24-2020 Location: Hong Kong Status: Offline Points: 69 |
Post Options
Thanks(0)
Quote Reply
Posted: January-08-2021 at 9:19am |
|
I noticed the pads the fuel tank sits on is plastic honeycomb I guess this has something to do with not soaking the deck with fuel?
I have by change some aircraft floor a with aluminium honeycomb and a aluminium skin. I am planning to use this for those two pads. All my materials are listed out and I am now battling through Taobao to get the materials out of China. Looking at sourcing in the US tis is going to be a serious bill. I will post the cost direct from China when i get it all sorted. I have tied to source tapes as much as possible I expect i will need to substitute plan with whats available. One really useful tip is a cardboard copy of the floor shape, It made thinking trough sides and coverage much easier and should help me get the first approximation of the new plywood floor. Tomorrows job is mark and cut the stringers, really looking to adding rather than taking away ???? still need a bit of help on floor glassing. I think I am clear on how to glass in the stringers but still a bit uncertain about plywood floor, I assume CEPS the plywood and then install on peanut butter and top with the 1.5oz woven fiberglass but should there be a drape down from the floor to the primary stringer / bilge and up to the hull around the sides? Or is the plywood wrapped like a parcel in the 1.5 oz? Cardboard memory jogger   |
|
|
|
|
8122pbrainard
Grand Poobah 

Joined: September-14-2006 Location: Three Lakes Wi. Status: Offline Points: 41040 |
Post Options
Thanks(0)
Quote Reply
Posted: January-08-2021 at 12:51pm |
|
Ian,
Coating the ply with CPES will do the job of keeping the water out. Wrapping the ply like a package with glass is to add strength typically if you are going no foam. If the cavities are foamed, then it adds support to the ply.
|
|
|
|
|
Ian H
Groupie
Joined: September-24-2020 Location: Hong Kong Status: Offline Points: 69 |
Post Options
Thanks(0)
Quote Reply
Posted: January-10-2021 at 8:22am |
|
I invested time in setting up for stringer and positioning, I glued in some braces tot eh hull and then added form to them so that the primary and secondary stringers have a positive position to but up against when I peanut butter them in. I can make sure the height is correct as J have marked the top stinger height on each of the braces. I was concerned that I will be scrabbling round trying to get stuff in the right place against the clock with sticky hands when I wan to be smoothing the fillets on the bottom corners of the stringers..
I think it will work out it should also help me with marking and fitting the stringers. I set the levels and positions of the primary stingers by putting the engine frame back in place to the datum's and dimensions i took before breakdown and then using this as the base, seems to match up ok with the old floor level which was a relief! This all took me two days of graft but I think it was a good investment.   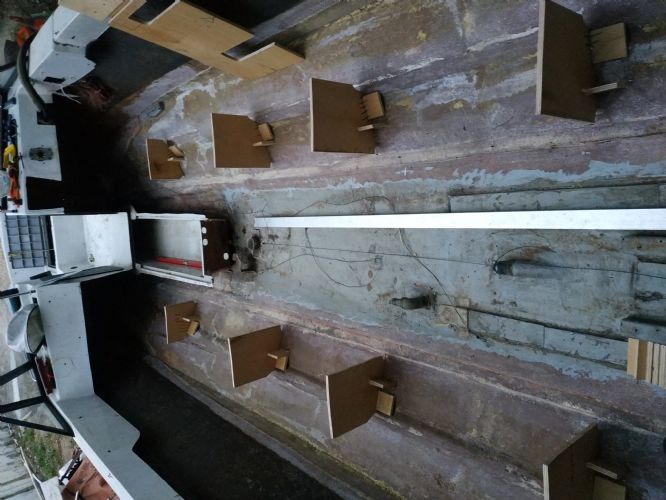 Marking out the hull shape on the stringers I guess I will just lift the stringer parallel to the level line on the guides and mark the the right offset to get the right depth? But its a big bit of wood so I think I will employ extra hands |
|
|
|
|
MechGaT
Senior Member
Joined: March-09-2015 Location: Chattanooga Status: Offline Points: 271 |
Post Options
Thanks(0)
Quote Reply
Posted: January-10-2021 at 11:22am |
|
That looks like a good plan to help you get the right spacing. I would recommend trying to get a basic shape on the bottom so that one of the bottom edges is close to the right line, I used a circular saw for this. Then lay it in next to the spacers you have made and use a compass to measure from the top of the stringer down to the line that is the level of the stringer (assuming you have already subtracted for the plywood that goes on top). Check this at each spacer. Now use the compass to scribe the cut line on in the inside and outside of the stringer. This will give you a line to follow the curvature of the hull. Don't forget that the fiberglass does have some thickness so that if the stringers are right up against the engine frame, it could be difficult to drop it in. It is not a lot of thickness, but I have seen other threads where this has been an issue.
As far as your question about applying the fiberglass to the floor, yes, I draped the cloth down the sides of the stringers to the bilge and up the wall a little. I also put a layer of fiberglass on the plywood before installing, but that may not have been necessary, apparently. I looked at it as a layer of protection from moisture.
|
|
|
'92 Sport Nautique
|
|
|
|
|
MourningWood
Gold Member 
Joined: June-13-2014 Location: NorCal Status: Offline Points: 885 |
Post Options
Thanks(0)
Quote Reply
Posted: January-11-2021 at 2:24pm |
|
Impressive work!!!
I have to say, this may be the most ambitious project I've seen here. As a collection of the work required, the challenging working conditions (no offense meant at all), parts and supplies availability, etc. Great job!!
|
|
|
1994 Ski Nautique "Riot"
1964 Dunphy X-55 "One 'N Dun" 'I measured twice, cut three times, and it's still too short!" |
|
|
|
|
Ian H
Groupie
Joined: September-24-2020 Location: Hong Kong Status: Offline Points: 69 |
Post Options
Thanks(0)
Quote Reply
Posted: January-12-2021 at 6:49am |
|
This project is really testing my ingenuity and tenacity. I dream of a garage with a bench and vice .
 Main objective now is not to think myself into a standstill, and keep moving forward. Floor in with the engine frame in the right place will be a massive landmark. Wiring is coming along slowly. Engine is now waiting for the last parts to arrive hopefully just as the floor is finished. Thanks for the encouragement! Main objective now is not to think myself into a standstill, and keep moving forward. Floor in with the engine frame in the right place will be a massive landmark. Wiring is coming along slowly. Engine is now waiting for the last parts to arrive hopefully just as the floor is finished. Thanks for the encouragement!
|
|
|
|
|
8122pbrainard
Grand Poobah
Joined: September-14-2006 Location: Three Lakes Wi. Status: Offline Points: 41040 |
Post Options
Thanks(0)
Quote Reply
Posted: January-12-2021 at 6:58am |
|
Ian,
I too am impressed especially with the progress you are making. Do you have any help or doing all this yourself? If yourself, are you getting any sleep?
 |
|
|
|
|
Ian H
Groupie
Joined: September-24-2020 Location: Hong Kong Status: Offline Points: 69 |
Post Options
Thanks(0)
Quote Reply
Posted: January-17-2021 at 10:22am |
|
No helping hands so far I'm afraid but I am lining up some for the glassing part.
The advice on how to mark the stringer shape was good and together with my fixture jigs it went OK for the two primary stringers, the fit with the hull is good gaps of no moper than about 4 mm credit card cut to the offset worked really well But I will need to sort out the height but can do this on the flat top with a circular saw. I intend to put some stainless round head screws on to fix the distance of the stringer to the hull when I squish down on the peanut butter. I guess about 2 or 3mm bed of 1/4 chop and Cabosil will be ok. I worry that I will lose all my levels when I come to assemble. I am not an experience glassing guy so I am trying to fix as much as possible rather than last minute adjustments. I used a laser level to check and correct before I set in the stringers etc. Cost about 40 USD worth every penny able to check lots of different points outside and inside the hull. great fro checking the floor is going to line up with the stringer and floor stack all around.     Things to fill the dashboard holes have now all arrived, lots of changes to wiring harness to get it to connect up. Struggling to find anywhere that will engrave the laminated plastic packs.   |
|
|
|
|
jimsport93
Platinum Member

Joined: February-20-2008 Location: Alpharetta Ga Status: Offline Points: 1749 |
Post Options
Thanks(0)
Quote Reply
Posted: January-17-2021 at 12:00pm |
|
Marty Mabe, member of this site, may be able to hook you up with the engraved dash plaques.
|
|
|
|
|
ultrarunner
Platinum Member

Joined: October-02-2005 Location: Ridgefield, Ct. Status: Offline Points: 1809 |
Post Options
Thanks(0)
Quote Reply
Posted: January-19-2021 at 11:49am |
|
Yep, Marty will hook you right up.
Now, I'm liking the gas tank in the locker. The Sports are always heavy in the back. Not as much on the slant-backs, but certainly on the round backs as so much 'stuff' gets put in the locker. And mine also had the ballast tanks and plumbing back there. I'd imagine a good change to the wake with no weight back there and fuel in the center of the boat....
|
|
|
|
|
Ian H
Groupie
Joined: September-24-2020 Location: Hong Kong Status: Offline Points: 69 |
Post Options
Thanks(0)
Quote Reply
Posted: January-20-2021 at 7:14am |
|
Thanks for the feedback on the tank , I needed to decide now to put the tanks back in or not..... I plan to put it back in.
I continued and finished off the secondary stringers much easier after the cycle of learning on the primary's and I am looking ok level after some super thin cuts off the flat top of the stringers I have all my round head SS screws setting the spacing for the peanut butter and the stringer holding jigs hold each stringer in place with just two screws so I am quite confident I can get the positions right when I glass them in. I will now start lifting points and locker bulkhead. All the glass, fillers and epoxy are sourced out of China using TaoBao but I have had a lot of help from a Hong Kong Chinese friend. I have more than enough to keep me busy till it arrives in about a week.   |
|
|
|
|
MechGaT
Senior Member
Joined: March-09-2015 Location: Chattanooga Status: Offline Points: 271 |
Post Options
Thanks(0)
Quote Reply
Posted: January-23-2021 at 7:25am |
|
Looking good.👍
|
|
|
'92 Sport Nautique
|
|
|
|
|
Ian H
Groupie
Joined: September-24-2020 Location: Hong Kong Status: Offline Points: 69 |
Post Options
Thanks(0)
Quote Reply
Posted: January-26-2021 at 12:58am |
|
Thanks, finally I am happy with the fit and the level of the stringers, I cannot really do anything on the floor fitting as my stringer positioning jigs are higher than floor level. I have finished the lifting mounts and rounded of the tops of the stringers to help with the glass.
I have been working on finishing the wiring, basically all redone from scratch badly corroded and endlessly cut about with lots of twisted fixes  . So all new. . So all new. I have one simple question . Where should the battery be? there was a tractor battery under the passenger side and an isolator but no mount to fix it in place and all battery cable corroded solid. A photo of the fitted battery would be really helpful.
|
|
|
|
|
ultrarunner
Platinum Member
Joined: October-02-2005 Location: Ridgefield, Ct. Status: Offline Points: 1809 |
Post Options
Thanks(0)
Quote Reply
Posted: January-26-2021 at 8:04am |
|
Hi Ian, you're making some great progress and your workmanship looks really good.
Regarding the battery, on Sport's the BATT would be located under that forward most hatch in the center of the bow. If you look in there, you might find evidence of that by holes drilled into the glass where that BATT cables would have been run. This is the BATT location on slightly newer Sport's, and I'm guessing similar on yours. It's a good spot. Others have also added second batteries in the adjacent lockers, if you thought you would have a need. One of the folks on here will shoot you a picture of their setup on that generation of Sport. Keep the pics coming Ian. Mark This was a change from the typical Ski Nautique which has the BATT in the general location of the aft portion of where the ski locker is on the Sport.
|
|
|
|
|
dockedwages1
Groupie
Joined: July-11-2016 Location: St . Louis Status: Offline Points: 50 |
Post Options
Thanks(0)
Quote Reply
Posted: January-26-2021 at 8:07pm |
|
I’m in the process of cleaning up my wiring harness. Can you tell me where to get appropriate wires and if you used heat shrink tubing to kind of keep everything together?
|
|
|
|
|
MechGaT
Senior Member
Joined: March-09-2015 Location: Chattanooga Status: Offline Points: 271 |
Post Options
Thanks(0)
Quote Reply
Posted: January-26-2021 at 9:42pm |
|
On our generation of Sport, the battery is located in the rear, under the center of the rear seat. I am on my phone and can’t post pictures, but the two blocks of wood between the rudder and shaft penetration are the blocks that hold it up off the bottom of the bilge. I am not sure my arrangement is factory. When I get some time I will try to find a picture of my battery.
|
|
|
'92 Sport Nautique
|
|
|
|
|
ultrarunner
Platinum Member
Joined: October-02-2005 Location: Ridgefield, Ct. Status: Offline Points: 1809 |
Post Options
Thanks(0)
Quote Reply
Posted: January-26-2021 at 9:49pm |
|
Hmmmm, battery located in the area of the gas tank would not seem ideal, or factory. Things that would keep me up at night!
|
|
|
|
|
KENO
Grand Poobah
Joined: June-06-2004 Location: United States Status: Offline Points: 10639 |
Post Options
Thanks(0)
Quote Reply
Posted: January-27-2021 at 8:17am |
For those times when you want to stay up all night just print this picture out and keep it in a handy spot for quick reference.  I think this is a 94 Sport Nautique factory location like MechGaT mentioned for his 92  |
|
|
|
|
ultrarunner
Platinum Member
Joined: October-02-2005 Location: Ridgefield, Ct. Status: Offline Points: 1809 |
Post Options
Thanks(0)
Quote Reply
Posted: January-27-2021 at 8:42am |
|
Wow! Some engineer needs a spanking for that brain-child of an idea! I’ve see batts fail. It’s not pretty. Less pretty next to fuel would be my guess;-) I’m guessing the factory saved a few bucks on copper cable with that short run.
|
|
|
|
|
samudj01
Gold Member

Joined: March-10-2009 Location: NC Status: Offline Points: 931 |
Post Options
Thanks(0)
Quote Reply
Posted: January-27-2021 at 8:56am |
|
Same location for the mid/late 80s Martiniques.
|
|
|
78 Ski Tique, 72 Skier w/302's, 93 SN w/351 & 17 GS22 w/zr409
Previous - 99 Sport Nautique w/GT40 and 87 Martinique w/351 |
|
|
|
|
ultrarunner
Platinum Member
Joined: October-02-2005 Location: Ridgefield, Ct. Status: Offline Points: 1809 |
Post Options
Thanks(0)
Quote Reply
Posted: January-27-2021 at 8:58am |
|
Learn something every day!
|
|
|
|
|
8122pbrainard
Grand Poobah
Joined: September-14-2006 Location: Three Lakes Wi. Status: Offline Points: 41040 |
Post Options
Thanks(0)
Quote Reply
Posted: January-27-2021 at 9:06am |
Mark, What falure are you speaking of?
|
|
|
|
|
ultrarunner
Platinum Member
Joined: October-02-2005 Location: Ridgefield, Ct. Status: Offline Points: 1809 |
Post Options
Thanks(0)
Quote Reply
Posted: January-27-2021 at 9:35am |
|
I had a lead acid catch fire a bunch of years ago. Wasn't in a boat. Nicads can be nasty also. The AGM's might be a better option next to fuel.
|
|
|
|
|
8122pbrainard
Grand Poobah
Joined: September-14-2006 Location: Three Lakes Wi. Status: Offline Points: 41040 |
Post Options
Thanks(0)
Quote Reply
Posted: January-27-2021 at 10:05am |
Mark, I've been around boats for around 60 years and have never seen nor heard of a battery problem causing a dangerous situation. I feel you concern is unfounded.
|
|
|
|
|
ultrarunner
Platinum Member
Joined: October-02-2005 Location: Ridgefield, Ct. Status: Offline Points: 1809 |
Post Options
Thanks(0)
Quote Reply
Posted: January-27-2021 at 10:10am |
|
You could be right. I was just thinking 'big picture' of an electrical source and fuel source in such close proximity, in an area not well ventilated. Clearly, however, we're not seeing issues with all these older boats with batteries in the back.
Mark
|
|
|
|
|
MechGaT
Senior Member
Joined: March-09-2015 Location: Chattanooga Status: Offline Points: 271 |
Post Options
Thanks(0)
Quote Reply
Posted: January-27-2021 at 5:36pm |
|
I always wondered if it was supposed to have a battery box. It is good to know that my boat is not the only one without one.
|
|
|
'92 Sport Nautique
|
|
|
|
|
Ian H
Groupie
Joined: September-24-2020 Location: Hong Kong Status: Offline Points: 69 |
Post Options
Thanks(0)
Quote Reply
Posted: January-31-2021 at 6:56pm |
|
I have had to almost completely redo the wiring but I have managed to keep the original big connectors.
I used the heat shrink crimp connectors in the photo below. You need a good heat gun to melt the glue and get them to seal. they are great as they are rock hard and impossible to pull the wires out of the crimp after they hare shrunk. It is much easier to get good joints with the think ring crimp like the RS pro ones in the photo the crimp is always good the think one are a bit variable so worth hunting these down. One other tip is that where you need to splice a wire to the old harness and there are oxidated black wires normal flux is not good enough to allow a solder or the crimp has a bad resistance. I was very successful in solving this by soaking the stripped ends in vinegar and salt solution for a few hours and then soaking in bicarbonate of soda to neutralize the effect. I was able to get perfect tinning for my soldered splices like this. Saved the day for me!      |
|
|
|
|
Post Reply
|
Page <1234> |
 Tweet
Tweet
|
| Forum Jump | Forum Permissions You cannot post new topics in this forum You cannot reply to topics in this forum You cannot delete your posts in this forum You cannot edit your posts in this forum You cannot create polls in this forum You cannot vote in polls in this forum |


 Topic Options
 Ian H wrote:
 Alibaba time...