 Boats For Sale:


79 nautique rebuild |
Post Reply 
|
Page <1 45678 12> |
| Author | |
wayoutthere 
Senior Member 
Joined: February-28-2020 Location: Florida Status: Offline Points: 391 |
 Post Options Post Options
") Thanks(0) Thanks(0)
 Quote Reply Quote Reply
 Posted: August-26-2021 at 11:13am Posted: August-26-2021 at 11:13am |
|
Bedding compound as i understand it,
Too much and will crack, glass on one side only and other side is exposed to the outside, also i don't know how much it could shrink during cure.
The glass tube can be scuffed inside once it's fitted and a good mating surface should only need a small amount to bed and radius, after that it can be glassed on both sides. This is my thinking, i still don't know which tube will get used and what prep work will need to be done to that area till after alignment is completed. Corner of dog box and riser, When i put the risers on, the port side was rubbing the dog box and i slid the engine over to equal out the gap. Had the original shaft not been bent i would have completed alignment and bedded the strut and stern tube before the engine was dressed, only reason i moved to wiring was because a riser bolt broke, only reason i moved to the risers was the shaft was bent. I'd be in trouble if everything was aligned bedded and glassed only to find out the dog box didn't close. The dog box is part of the floor now, zero wiggle room, good chance it wasn't symetrical to start with, and/or i glassed it together caddywompus. The port riser was burning the dog box when i took the boat apart, whatever is out at this point i'm sure will come to light when the shaft is bolted to the trans and im holding the strut on the other end of it. It's going to take a lot of monkeying around but with the stern tube out and the strut holes not drilled, the easier in and out of the a.r.e. shaft will go along way making all the monkeying go a bit easier, i hope. either way the engine can't touch the dog box, the dog box can't be moved so alignment is starting at that point for the needed clearance.
|
|
 |
|
|
67 ski nat
Platinum Member 
Joined: July-19-2018 Location: Santa rosa Status: Offline Points: 1180 |
Post Options
Thanks(0)
Quote Reply
Posted: August-26-2021 at 1:39pm |
|
I had same concerns my warm manifold would blister paint too
So I found some medium thick foil reflective heat shield mat with adhesive backing put under dog house. Works good No blisters on pearl paint yet Have you ever played with carbon fiber Relatively cheap and handles like glass Super tough and looks good |
|
|
|
|
wayoutthere
Senior Member
Joined: February-28-2020 Location: Florida Status: Offline Points: 391 |
Post Options
Thanks(0)
Quote Reply
Posted: August-26-2021 at 9:09pm |
|
Can't see it but there are 2 battery cables attached to the solenoid, 1 from the battery switch, the other to the starte
The guy who made them up for me yesterday put both cables into 1 ring terminal. Overall not so bad looking, all cables installed. Engine wiring tomorrow @ first light. The exhaust hose, fuel line and expandable hose for the ram air all came today, those i'll start after the wiring, by that time it'll be 100 degrees out. The heat shield/foil sounds like something to look into, thanks. No, ive never worked with carbon, yes i have 1 yard of 2x2 twill carbon fiber, i think 5 oz-ish for finish and 1 yard of (i can't remember the weave or weight) carbon fiber that is strictly for reinforcing. It's still wrapped on the tubes, sleeved and bubble wrapped so i can't even look at it yet Along the way there was some side projects (small molds) plus the seat mold that got made and stored, plus a few other small molds in the works, so after the ski boat is done and dialed in i need to get on something else immediately or another boat will end up in the yard and i'm not so sure i want that. Small fiberglass, carbon and kevlar-carbon hybrid material maybe some small vacuum tinkering projects no bigger than a seat/swim platform, no more than 1 gallon per part that fit on the cut table in the shed out of the sun and rain sound good and i enjoy doing it. Combined with the ac/dc tig welding which is clean, detail oriented and relaxing.    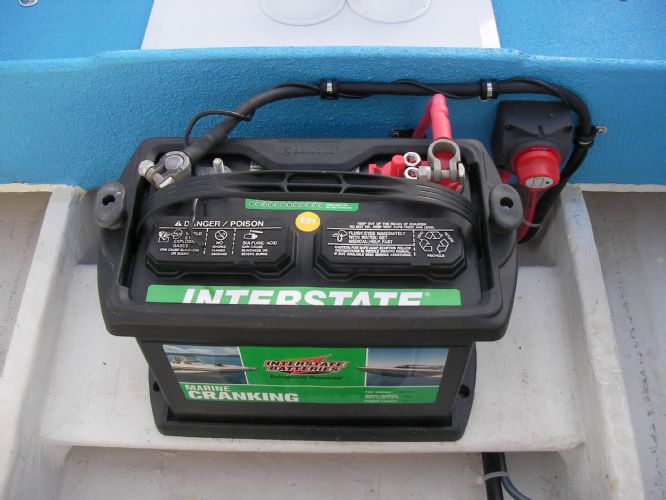 |
|
|
|
|
KENO
Grand Poobah 
Joined: June-06-2004 Location: United States Status: Offline Points: 10644 |
Post Options
Thanks(0)
Quote Reply
Posted: August-27-2021 at 8:02am |
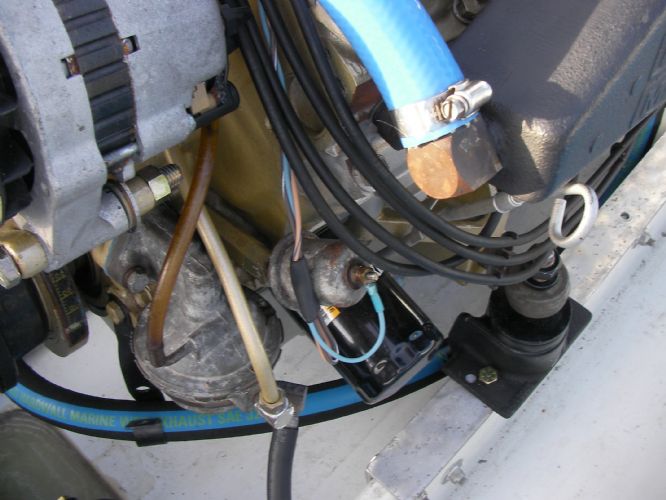
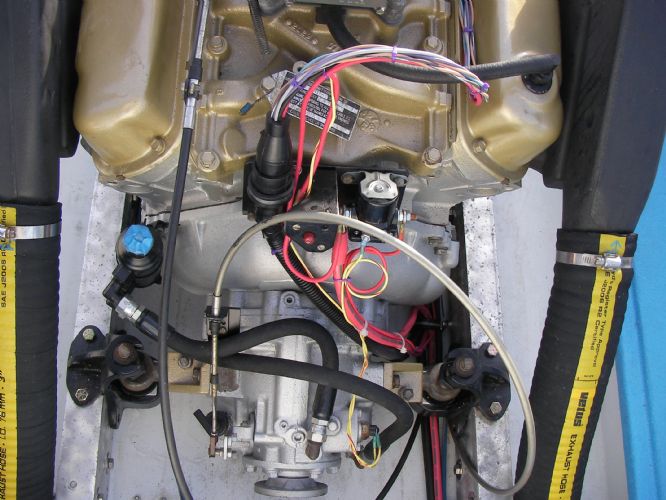
Since it's light out, you're probably outside doing some wiring, but is the Yellow wire in the first picture that's on the "S' terminal of the solenoid/relay hooked to the NSS? And in the second picture, is the Yellow wire on the starter still waiting to be hooked to the other big lug on the solenoid/relay. I'm thinking/hoping the pictures show 2 different yellow wires It looks like maybe you have it hooked from the starter to the solenoid/relay "S" terminal and that wouldn't be right
 |
|
|
|
|
wayoutthere
Senior Member
Joined: February-28-2020 Location: Florida Status: Offline Points: 391 |
Post Options
Thanks(0)
Quote Reply
Posted: August-27-2021 at 6:49pm |
|
It rained on/off all day, total bust zero work on ski boat.
Yep, the yellow w/red tracer is connected to start on the solenoid and runs down and clips onto the starter, It came with the kit so i thought that must be where it goes. There are 2 lugs on the starter ground and hot, the battery cable is on the hot lug, the other lug has a ground bar to the housing, and the other wire is clipped onto the spade that was on the starter out of the box. The box that the starter came in has 2 sets of instruction that contradict eachother and what you and i discussed and i wrote down/drawn. I quit ! nothing electrical on the engine side makes sense, purple ignition (wake up & run) Yel w/red start (momemtary) Why this thing is lunar module complicated is beyond me What are my options a new cable from battery switch to starter and throw out the solenoid I don't get it???????? |
|
|
|
|
KENO
Grand Poobah
Joined: June-06-2004 Location: United States Status: Offline Points: 10644 |
Post Options
Thanks(0)
Quote Reply
Posted: August-27-2021 at 7:23pm |
|
Just a minor setback.
That yellow wire can stay on the starter (it's 12 volt power to energize the solenoid on the starter) and the other end you would take off the solenoid "S" terminal and probably need a bigger ring terminal to hook it to the empty big lug on the solenoid. The only ground is the starter body to the bell housing. Call me tonight before 8 or tomorrow after about noon if you want.
|
|
|
|
|
wayoutthere
Senior Member
Joined: February-28-2020 Location: Florida Status: Offline Points: 391 |
Post Options
Thanks(0)
Quote Reply
Posted: August-27-2021 at 7:25pm |
 
 |
|
|
|
|
KENO
Grand Poobah
Joined: June-06-2004 Location: United States Status: Offline Points: 10644 |
Post Options
Thanks(0)
Quote Reply
Posted: August-27-2021 at 7:37pm |
|
The middle picture (the ARCO instructions) is right.
In a boat keeping the remote solenoid is good since it provides a better path for the power, with less power loss due to long runs of wire to the starter mounted solenoid. Your red/yellow wire from the key goes back to the Neutral Safety Switch, then another length of wire goes to the "S" terminal on the remote solenoid and with your yellow or red/yellow wire that you would move to the other big lug, when you turn the key to Start, the remote solenoid energizes and sends power down to the starter solenoid and it spins and engages.
|
|
|
|
|
wayoutthere
Senior Member
Joined: February-28-2020 Location: Florida Status: Offline Points: 391 |
Post Options
Thanks(0)
Quote Reply
Posted: August-27-2021 at 7:53pm |
|
Not surprised if i'm wrong,
but isn't START yellow w/red from key to solenoid (i thought yel w/red was the spade on this on) and #2 battery cable from battery to big lug on starter, turn the key - yel w/red throws out the bendix gear and the battery cable spins the motor The battery isnt hooked up, theres no fuses and the engine wiring harness isn't completed yet so nothing got hurt. What's my best option Remove extra solenoid go directly from battery switch to starter with battery cable ( what throws out the bendix)??? 1 direction says solenoid/relay not needed, the other shows the remote solenoid wired ??
|
|
|
|
|
KENO
Grand Poobah
Joined: June-06-2004 Location: United States Status: Offline Points: 10644 |
Post Options
Thanks(0)
Quote Reply
Posted: August-27-2021 at 8:25pm |
|
Best option.............give me a call tomorrow
Here's a marked up copy of a diagram from earlier in this thread. The wiring circled in blue is what you should be concerned with for the starter 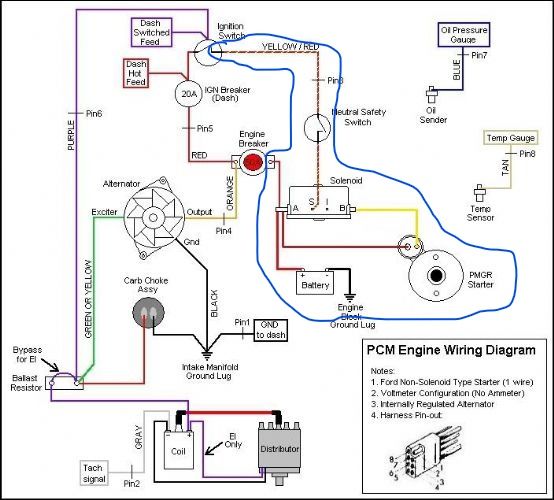 |
|
|
|
|
wayoutthere
Senior Member
Joined: February-28-2020 Location: Florida Status: Offline Points: 391 |
Post Options
Thanks(0)
Quote Reply
Posted: August-28-2021 at 11:01pm |
|
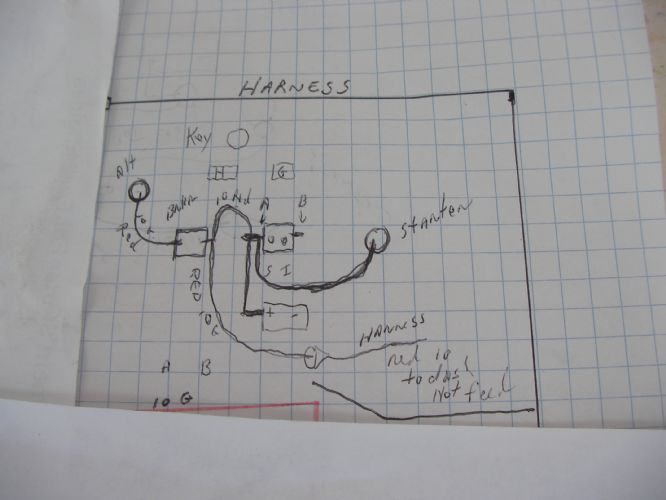
Sorry keno, i didn't see this until tonight.
Thanky you for the drawing, it coincides with the notes and drawing i made when we talked. Today i put the carb together and on the engine, cut the exhaust hose and slipped it on, and got set up to run the fuel line and water sepearator which i'll do tomorrow along with wire the engine for everything but START. The start circuit will be dead last, that's probably were the smoke and fire will be coming from I just dont see how 2 wires on 1 side of the other solenoid doesn't send electricity to the starter when the battery switch is turned on. I thought the yellow w/ red tracer from the key to the start side of the solenoid clicked it over and then sent power to the starter. I may go back to basics (off /on-run / momentary-start) and pull the harness out put a 10 g yellow w/red tracer wire in it from the key to the solenoid on the starter, pull the double battery cable and other solenoid off and start over I'm so out of sorts because of the electrician black magic going on. I see it using 1 1/2 solenoids wired together jumped over and criss crossed hocus pocus because some cheapskate wired it to work instead buying new wire and doing the job right that i could sell or part and/or scrap this thing. Bring the hot dogs and marshmallows over, all the hot wires are getting connected together Edit in; it reminds me of the diesel 1986 surplus army blazer i owned, it had 2 batteries wired positive to negative and a voodoo doohickey on the firewall that converted it to 12 volts for the civilian side of the wiring. Never had to do anything but change the oil and grease it. The truck ran, never let me down, never had a hiccup and went coast to coast twice with 4 years of breath on the key and it's running inbetween those long no ac drives. |
|
|
|
|
KENO
Grand Poobah
Joined: June-06-2004 Location: United States Status: Offline Points: 10644 |
Post Options
Thanks(0)
Quote Reply
Posted: August-29-2021 at 5:29am |
2 wires on the same terminal of the remote solenoid will provide constant power to the PMGR starter solenoid, (even with the key removed and stuffed in your pocket, the big lug on the starter solenoid is always energized) but nothing happens till the solenoid on the starter is energized through the wire from the remote solenoid to the starter mounted solenoid (In the diagram above it's the yellow wire). At that time the solenoid gives power to the motor and also kicks the gear outward for engagement. It's a totally different animal than the old style one wire Ford starter which would be running constantly if both wires were hooked up on the same post of the remote solenoid. No need for the dogs and marshmallows unless you have the grill fired up
|
|
|
|
|
wayoutthere
Senior Member
Joined: February-28-2020 Location: Florida Status: Offline Points: 391 |
Post Options
Thanks(0)
Quote Reply
Posted: August-29-2021 at 9:01am |
|
Alright, thanks keno, I appreciate it, heading out there now.
|
|
|
|
|
wayoutthere
Senior Member
Joined: February-28-2020 Location: Florida Status: Offline Points: 391 |
Post Options
Thanks(0)
Quote Reply
Posted: August-30-2021 at 8:11pm |
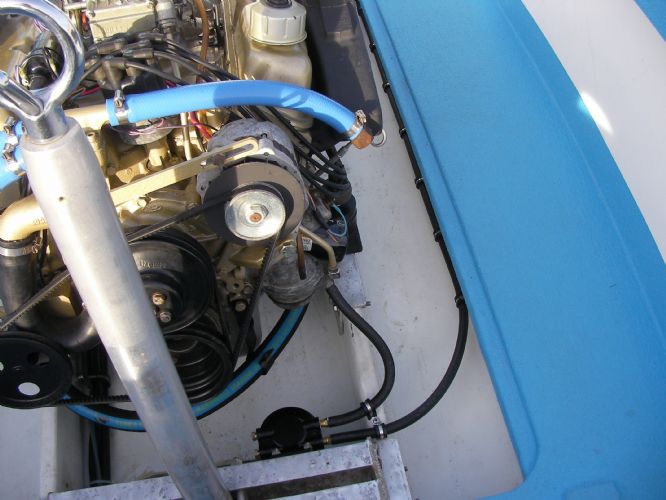    
Harness red 10g goes to port side of breaker 10g red jumper from port side of breaker to port side of solenoid Alternator 10g red goes to starboard side of breaker 10g red from starboard side of solenoid to starter. I disconnected the volt meter sending wire gray w/ white tracer from under the dash and the other end is shrink wrapped with the other not used wire down by the oil sender, i did that because everything pointed to only 3 wires on the alternator red purple and black. Add gas garden hose and turn on the battery first thing, fingers are crossed but i think it's right. If not, or either way i can't thank you enough for the help on my wiring debacle along the way.
|
|
|
|
|
wayoutthere
Senior Member
Joined: February-28-2020 Location: Florida Status: Offline Points: 391 |
Post Options
Thanks(0)
Quote Reply
Posted: August-31-2021 at 11:13am |
|
No dice,
Make an offer. Hull and trailer are 100 percent If you have a good engine i'll complete alignment and it will be a drop in.
|
|
|
|
|
wayoutthere
Senior Member
Joined: February-28-2020 Location: Florida Status: Offline Points: 391 |
Post Options
Thanks(0)
Quote Reply
Posted: August-31-2021 at 11:44am |
|
Video uploaded but i couldn't shorten it, 3 minutes trying to start. |
|
|
|
|
KENO
Grand Poobah
Joined: June-06-2004 Location: United States Status: Offline Points: 10644 |
Post Options
Thanks(1)
Quote Reply
Posted: August-31-2021 at 1:05pm |
|
Alright Dan, you can't quit now, and besides I ain't ready to quit yet.
 You turn the key and the starter turns, you're like halfway there. I'd check that when you turn the key to run, you have about 12 volts to the positive terminal on the coil. if you have zero volts, then run a temporary jumper between a 12 volt source like the input side of the main breaker and the coil positive terminal and see what happens when you try to start it. Only keep it connected when trying to start the boat or when it's running.. If you do have voltage, maybe your electronic module is wired wrong or dead. I watched all 3:21 of that boring video and it sure sounds like you have no spark The wires from the module would be Purple to coil positive and black to coil negative. We'll call this the first step or two of making sure you have spark The module can be checked but start with this stuff.
|
|
|
|
|
wayoutthere
Senior Member
Joined: February-28-2020 Location: Florida Status: Offline Points: 391 |
Post Options
Thanks(0)
Quote Reply
Posted: August-31-2021 at 5:19pm |
|
Thanks keno, my buddy called and asked a list of questions, he said the same thing about checking voltage and checking cranking voltage to verify ignition just doesn't have 12 volts with key on run but not with key on start (said it will crank but never fire)
to continue he said it still doesnt have fuel, and dumping some down the carb probably didn't help, said it's dry and will take alot . Also mentioned 15-20 seconds of cranking getting fuel to the bowls and bowls are worth 14 ounces and wont deliver until full. I may look at the voltage and try again, might loosen the fuel line at the carb to verify pumping, but all day it's been brutal hot and i've had enough of it, yesterday was 7 hours of wiring that engine harness with plenty of breaks and water. Distributor is back ordered, mech fuel pump is back ordered, what else does it need and by the time it gets here and i get it running boating season will be just kicking off and i'll be too busy bedding and glassing the stern tube in. No, it'll make a great boat for someone, it just needs a complete drop in, or an engine guy. Fyi i unlocked the trailer tongue and i'm a heavy sleeper Edit in, it's probably a simple fix and i appreciate you not giving up, nothing has ever beat me and i've never quit, normally i would see this as a challenge, think how dare you and go to no ends beating it and winning
|
|
|
|
|
KENO
Grand Poobah
Joined: June-06-2004 Location: United States Status: Offline Points: 10644 |
Post Options
Thanks(1)
Quote Reply
Posted: August-31-2021 at 8:15pm |
All right heavy sleeper, this is no time to quit, you never have and you ain't starting now Take a few days off, then get back at things with the engine. When you get back at it, hook a temporary can directly to the fuel pump with some clear 3/8 tubing and you'll be able to see if it pumps. Do the jumper mentioned earlier to the coil to see if you get spark. And if you have spark, you can check/set the timing to be around 10 degrees BTDC while cranking the engine Get your buddy to stop in for a visit If you have spark and the pump works, prime it with a little gas down the carburetor primaries and hang on for some nice rumbling noises. Now it's time for everybody to jump in here and give Dan some encouragement, don't be bashful
|
|
|
|
|
wayoutthere
Senior Member
Joined: February-28-2020 Location: Florida Status: Offline Points: 391 |
Post Options
Thanks(0)
Quote Reply
Posted: August-31-2021 at 8:35pm |
|
I just closed up and walked in from round 2, the first time it wasn't pumping fuel, lost prime.
It sat on the charger all day it was low, i mean why shouldn't it be, it's brand new. The engine still seems like it's turning slow (by hand it's butter smooth). This time it had a good prime, the hose from the jerry can was whipping at the same tempo of pump lever, it pumps real good, right up the clear vinyl tube and sprays all over the engine so earlier when i said it was back ordered i jinxed myself. So 60 bucks for the marine replacement pump from summit and they dont know when it'll be back in stock. Won't buy the same part number i got from carter from a boat place for 200. I'll add up fiberglass materials and list the hull for that price. Thanks guys
|
|
|
|
|
Wilhelm Hertzog
Senior Member
Joined: June-14-2014 Location: Cape Town Status: Offline Points: 327 |
Post Options
Thanks(1)
Quote Reply
Posted: September-01-2021 at 4:24am |
Go Dan! It will be such a tragedy to see you abandoning this so close to the finish line. Everything's looking so good, and it really does seem (even to my very inexperienced eye and intuition) that these last few gremlins should be simple to sort out compared to what has gone into the build so far.
|
|
|
1982 Ski Nautique PCM351W RR II Velvet Drive 10-17-003 1:1 II PerfectPass Stargazer
Do not go gentle into that good night. Rage, rage against the dying of the light. |
|
|
|
|
Hysteria
Groupie 
Joined: May-31-2020 Location: Indiana Status: Offline Points: 70 |
Post Options
Thanks(1)
Quote Reply
Posted: September-01-2021 at 8:23am |
|
Don't give up on it, you're not far from finishing it. You may not think you're an "engine guy", but this is how you become one.
|
|
|
|
|
samudj01
Gold Member

Joined: March-10-2009 Location: NC Status: Offline Points: 933 |
Post Options
Thanks(1)
Quote Reply
Posted: September-01-2021 at 9:15am |
|
I agree. I didn’t know anything about engines and multiple people on this site have taken time (many times…thanks guys for always answering my texts) to teach me. I still don’t know much but every time I get stumped I learn a little more. Keep it up…you are so close to the pay off and enjoyment. Agree with keno, get that friend of yours to drop by for a beer or six. Looking forward to seeing that SN on the water.
|
|
|
78 Ski Tique, 72 Skier w/302's, 93 SN w/351 & 17 GS22 w/zr409
Previous - 99 Sport Nautique w/GT40 and 87 Martinique w/351 |
|
|
|
|
67 ski nat
Platinum Member
Joined: July-19-2018 Location: Santa rosa Status: Offline Points: 1180 |
Post Options
Thanks(1)
Quote Reply
Posted: September-01-2021 at 9:24am |
Exactly. Your an engine guy NOW w.o.t. Your one wire away from success Take your time, be calm and noodle through it. I’ll buy you a couple beers when it starts |
|
|
|
|
wayoutthere
Senior Member
Joined: February-28-2020 Location: Florida Status: Offline Points: 391 |
Post Options
Thanks(0)
Quote Reply
Posted: September-01-2021 at 10:08am |
|
Alright, i got the multi meter wire and alligator clips in a bucket.
Slept in and it's a comparatibely cool and breezy day outside, i'll go see what it's got and to where. My buddys' in another state, another pair of eyes and a second brain would be great but i can't discount and certainly appreciate the motivation and advice i'm getting
|
|
|
|
|
wayoutthere
Senior Member
Joined: February-28-2020 Location: Florida Status: Offline Points: 391 |
Post Options
Thanks(0)
Quote Reply
Posted: September-01-2021 at 2:41pm |
|
first off, the battery after being on the charger all day yesterday was reading 10 volts today, therefore i get 10 volts with key on run and with key on start all the way thru to the alternator.
the battery is on a switch and nothing is hot unless it's on, the switch was 100 percent turned off yesterday, i had to turn it on to test everything today. i have good continuity of ground all the way thru to the alternator. disconnect distributor purple from coil positive and black from coil negative and have no continuity of ground to the block or the housing on the black wire, the housing has continuity to the block. what i think is wrong is continuity is everywhere, choke coil and alternator purple wires to block, to ground, to itself across the board. Distributor tag reads FOJL 12100 CA 7808 BS 3J 27 i disconnected the battery completely and called it quits |
|
|
|
|
KENO
Grand Poobah
Joined: June-06-2004 Location: United States Status: Offline Points: 10644 |
Post Options
Thanks(0)
Quote Reply
Posted: September-01-2021 at 8:11pm |
|
If you had continuity like zero ohms everywhere to ground you'd be popping that main breaker pretty quickly.
The distributor is grounded through the body to the block like you said and the black wire when disconnected like you had it will not be grounded. When it's hooked to the coil negative and the engine is turning it will be grounded and ungrounded continually as the distributor turns. When it's grounded by the electronic module it's letting the coil charge and when ungrounded, it sends a spark to the terminal the rotor is pointed at. If it had points it would be the same as points closed charging the coil and points open you get a spark You could check this with your multimeter hooked to the coil negative and ground. If you have it on the 20 volt scale you should be able to watch it fluctuate between about 12 and zero as the engine turns over. A steady non fluctuating reading means the module is bad and not letting the coil charge and discharge. Is this a new 10 volt battery? I hope not You have the good representative TRB diagram that got your starter wiring straightened out, now make sure your wiring goes with the rest of the diagram. Don't forget, I'm always open to a phone call and we haven't quit yet
|
|
|
|
|
wayoutthere
Senior Member
Joined: February-28-2020 Location: Florida Status: Offline Points: 391 |
Post Options
Thanks(0)
Quote Reply
Posted: September-01-2021 at 9:01pm |
|
I got the tach gray wire on coil positive, i see that is wrong based on the drawing, i will switch that and test the module following the steps you provided first thing in the morning.
Yes the battery is brand new interstate 24xd marine cranking bought less than a week ago when they made up my battery cables. It wasn't connected to the cables until the day i first tried to start the engine. if the gr in pmgr means gear reduction is that why it cranks slow even with a full charge ? Also i'll write down and list the wires in run start and charge from where they originate to their end point. Thanks for the continued support and advice |
|
|
|
|
Hysteria
Groupie
Joined: May-31-2020 Location: Indiana Status: Offline Points: 70 |
Post Options
Thanks(0)
Quote Reply
Posted: September-01-2021 at 10:01pm |
|
A full charge on a resting 12V battery will be around 12.7-12.8V. If you only have 10V without a pretty decent load on it, you have a battery that is extremely undercharged or damaged.
|
|
|
|
|
8122pbrainard
Grand Poobah

Joined: September-14-2006 Location: Three Lakes Wi. Status: Offline Points: 41040 |
Post Options
Thanks(0)
Quote Reply
Posted: September-01-2021 at 10:20pm |
Correct
|
|
|
|
|
Post Reply
|
Page <1 45678 12> |
 Tweet
Tweet
|
| Forum Jump | Forum Permissions You cannot post new topics in this forum You cannot reply to topics in this forum You cannot delete your posts in this forum You cannot edit your posts in this forum You cannot create polls in this forum You cannot vote in polls in this forum |


 Topic Options
 wayoutthere wrote: