 Boats For Sale:


The 1979 Ski Tique Resto-Mod Story |
Post Reply 
|
Page 123> |
| Author | ||
LeftFieldEngineering 
Senior Member 

Joined: December-20-2010 Location: Monson, MA Status: Offline Points: 384 |
 Post Options Post Options
") Thanks(0) Thanks(0)
 Quote Reply Quote Reply
 Topic: The 1979 Ski Tique Resto-Mod Story Topic: The 1979 Ski Tique Resto-Mod StoryPosted: March-13-2015 at 3:57pm |
|
|
It’s a long one, but pretty good if you ask me : )
You could say it all started about 5 years ago. I wanted a boat to go fishing with my old man so we picked up a 1970 MFG Gipsy. She was a 15’ cathedral hull bow-rider with a 1990 50hp outboard. I replaced the carpet & seats, tuned up the motor and added a stereo. At first we were just happy to be on the water, but it didn’t take long to realize that fishing was fun when we were catching fish, but skiing looked like fun all the time. With that in mind I picked up a used wakeboard and off I went. Over the next few years I managed to teach myself how to wakeboard and joined a waterski show team. The team was a great experience as it exposed me to a world of watersports beyond the capacity of my 50hp outboard. Needless to say the first time an inboard pulled me out of the water I was sold, I would own one someday.  I kept my eyes open and thought I struck gold a few years back when I found a “free Nautique” on craigslist. What the add didn’t say was it had been wrecked on the driver side and was stripped of every nut, bolt and screw. Rebuilding it wasn’t an option so instead I decided to turn it into a bar which was a huge hit with the drinking team… I mean skiing team. Nautiki Bar - CCF Forum My search for a ski boat continued; I had a lead of a 70’s Nautique in Coventry RI. It was advertised as having a crate motor and being in good shape. On a dark and rainy October evening my father and I made the 2 hour drive down there to find a pile of fiberglass and leaves that resembled a Correct Craft. Apparently the seller and I had different definitions of a “crate motor”. The motor was as old as the boat, drenched in oil and made up of mostly hardware store plumbing parts. Even at that I was still thinking of making an offer until I discovered the HIN was removed at which point I knew the boat wasn’t for me and got the hell out of there. Up to this point the MFG was still holding its own, but 2 years of skiing 3x a week took its toll. The transom was weak and the floor had a few soft spots. It would have been cost prohibitive to rebuild it so I opted to pick up a 1966 MirroCraft Ski ‘n Troll hull for $150 bucks and transfer the running gear out of the MFG. 500 lbs lighter than its waterlogged predecessor the Mirrocraft was a rocket ship. It had a reinforced transom, custom seat, and a hand full of other tasteful modifications. It was even fast enough for the team’s youngest barefooted to step off behind the boat for a 5 minute ride. It was a step closer to a ski boat, but still nothing like an inboard.    Last summer my patients paid off. I got a phone call from a friend with a once in a life time deal. $500 bucks for ’79 Ski Tique, It was a take it or leave it kind of deal. I showed up with cash in hand and took home my first Correct Craft. The seller claimed it was leaking water from a bad freeze plug, but once replaced it would be good to go. I figured why not? Worst case I’ll make another bar. I replaced the freeze plug, installed a battery and turned the key. Son of a bitch if it didn’t fire right up. I was smiling ear to ear until I found milky oil and warm water leaking out of the bell housing. Naturally I started to freak out as I could see my ski boat dreams slipping through my fingers. I called a friend (the same one who got me the lead on the Tique) and told him what was happening. He said “Don’t worry; I have a lead on another one, it’s a 83 Nautique 2001 that was totaled by a falling tree, but it has a good motor.” I hung up the phone shaking my head thinking “Great, now I have to tell my wife I’m buying a 2nd one this week”.    As I said earlier I thought the $500 bucks for the Tique was a great deal until we showed up with $200 bucks and left with a wrecked Nautique and 2 beers. After getting the Nautique home I sat down with my good buddy Jack Daniels and came up with a plan: Take apart the Nautique – Keep all the parts that fit the Tique and sell the rest. Thankfully the spare parts were a hit here on CCF and I sold them for just under $1300 bucks. Not bad to come home with 2 boats and be UP $600. Of course the money didn’t last long as there were plenty of new parts to buy for the Tique. Should be a simple motor swap right? Nope. While I was removing the blown 302 I discovered the stringers were junk and the “replacement floor” was made up of pressure treated wood, deck screws and great stuff. My simple motor swap just turned into a complete boat rehab. It took about a week of demolition and power washing to remove the old stringers & oil residue. While cleaning the boat I noticed that water pooled behind the primary and secondary stringers. This meant that if the floor was breached and water got in behind the stringers there was nowhere for it to go. (Unless it was foam filled, but that’s another argument) This got me thinking; instead of doing the original stringer layout with a permanent glass floor I would design a 2 part system that was independent of each other. The stringers would be glassed into place with sub-stringers run to the hull for support. The sub stringers were cut long and pressed into place meaning the wood and fiberglass would always be in compression. To keep everything level I used a laser level mounted in the pylon base to give a constant reference point. Each piece of wood was sealed with resin before being bedded with hull & deck putty. Once in place it got 1 layer of chopped mat and 2 layers of biax cloth.      The fiberglass over wood system only works if it’s sealed, forever. To minimize penetrations into the stringers I machined a bunch of pre-tapped aluminum standoff blocks. The blocks were carefully sealed and mounted to the stringer giving me a place to mount wire, control cables, fuel lines, etc without screwing to the stringers themselves. The only other penetrations into the stringers were the 6 motor carriage bolts and the steering mount. Each meticulously sealed. |
||
 |
||
|
LeftFieldEngineering
Senior Member
Joined: December-20-2010 Location: Monson, MA Status: Offline Points: 384 |
Post Options
Thanks(0)
Quote Reply
Posted: March-13-2015 at 4:02pm |
|
|
The next step was the controls & electrical. The electrical on the Tique was a nightmare so I opted to tear out everything. The dash includes a JBL PRV-175 marine radio, gauges from the ’83 Nautique, new (nonCC) speedo, HawkEye depth finder, matching Correct Craft switches, a USB / Aux input, individually engraved switch name plates made from 303 s.s. washers and entirely new wiring from dash to motor.
 Living in New England I like to ski from April – October. We typically just suck it up, put on our wet suits and head to the lake. Of course when there’s somebody new on the boat I’ll jokingly say “you cold? You want me to turn on the heat?” No longer will it be a joke. I installed a Summit Racing 28,000 BTU universal heater under the dash with plans to run hottubes in the winter. Figure if I can keep the wife warm we can ski longer.  You also may have noticed the front kick plate is aluminum. I own a part-time fab shop so working with metal is my strong suit. When it came to ripping out the trashed kick plate I opted to replace it with a removable metal one. You never know when you’ll need to get up there for something. Under the floor the boat has 2 new bilge pumps, new blower, new blower hose, new strainer, all new hoses including exhaust hose & speedo tube. The floor panels are made of ¾” exterior plywood covered with fiberglass mat and painted on the bottom. The panels are isolated from the stringers via closed cell foam spacers. The foam spacers eliminate any chaffing between panels and make up for any variation along the fiberglass. The floor panels themselves are designed to be throw-always. No sense in fighting it, the carpet will get ruined at some point and the floor will get beat up. I can whip up a spare set of floorboards in the off season and swap them out in 15 min. Not to mention I can lift them up and inspect the bilge / stringers at any point in time.   
|
||
|
||
|
LeftFieldEngineering
Senior Member
Joined: December-20-2010 Location: Monson, MA Status: Offline Points: 384 |
Post Options
Thanks(0)
Quote Reply
Posted: March-13-2015 at 4:05pm |
|
|
With the mechanical and structure stories out of the way it’s time to address the esthetics. I learned a long time ago IF YOUR GOING TO BE DIFFERENT, OWN IT. No false advertising here, she’s the “Incorrect Craft” now. Somebody along the way decided it was a good idea to “paint the boat”. Overall the paint is in good shape except a hand full of gouges and scuffs. I figured there would be no sense in trying to match the paint so I’ll just airbrush metal panels over the bad spots. It’s actually a great plan because you can constantly touch up bad spots by just adding another panel. Don’t get me wrong it if was all gel-coat I would have fixed it, but that ship had sailed (pun totally intended). One place I had to draw the line was the transom. I have envisioned skiing behind that classic correct craft logo for all these years. To pay respect to its beginning I decided to white out the transom and hand paint the original logo on the back. Naturally you can’t have a rat-rod without a pinup girl so I made some “get wet waterskiing” stickers. I also had the “Incorrect Craft” sticker made with a galvanized metal background to add to the theme. Since it’s still a budged based build I had to get creative with the interior. Along with the beat factory seats the previous owner gave me 2 pretty decent fishing boat seats which at a quick glance don’t look too bad. I fabbed up some aluminum seat brackets that mount in the same position as the originals. That way I can always reupholster the factory seats at a later date. The rear seat cover was a temporary fix as well, I had it made at a local shop for $60 bucks and it’s better than sitting on bare foam. Seeing as the Tique has NO storage I had to come up with something. I found these 20 x 48 cargo nets on Amazon for $11 bucks each. Folded in half they make great hanging baskets to keep my stuff off the deck. Other interior features include stainless cup holders and some don’t mess with my Ski Tique warning stickers.
        
|
||
|
||
|
LeftFieldEngineering
Senior Member
Joined: December-20-2010 Location: Monson, MA Status: Offline Points: 384 |
Post Options
Thanks(0)
Quote Reply
Posted: March-13-2015 at 4:07pm |
|
|
Since the seating in limited in the Tique I wanted to add an extended pylon to clear the back seat. Of course to do this I would have to pull the ring & finger and replace the pylon top. I machined a new top from some 2” aluminum round bar. I machined the extended pylon top and it will be mounted in some 3” aluminum tubing and will be interchangeable from a 12” extension to a 6’ extension depending on what we’re doing.
 
|
||
|
||
|
LeftFieldEngineering
Senior Member
Joined: December-20-2010 Location: Monson, MA Status: Offline Points: 384 |
Post Options
Thanks(0)
Quote Reply
Posted: March-13-2015 at 4:10pm |
|
|
Like every other part on the boat the swim platform has its own story. The original was shot, and I mean SHOT. There wasn’t one good piece of teak on it and somebody screwed some 2x6’s on the bottom for support. Thankfully the platform from the Nautique was in better shape. I completely disassembled it, sanded each piece, oiled them and rebuild the platform. Of course the Tique had a 3 bracket mount and the Nautique has 4 so I filled the center mount holes in the Tique and modified the Nautique brackets to fit the hull. When it came to attaching them to the boat I had a problem with the current method which was stainless lag bolts (not even bolts & nuts). Since I knew I’d have to remove the platform to stick it in the garage I machined some custom mounts. The mounts are sealed and thru bolted to the hull and have tapped holes for the brackets to mount to.
 Every piece of hardware on the boat from the heater hardware to the carpet staples is stainless, aluminum or brass. I don’t like rust, ANYWHERE. |
||
|
||
|
LeftFieldEngineering
Senior Member
Joined: December-20-2010 Location: Monson, MA Status: Offline Points: 384 |
Post Options
Thanks(0)
Quote Reply
Posted: March-13-2015 at 4:12pm |
|
|
The trailer that came with the boat was clearly not an original. I installed all new parts including an axle, winch, LED trailer lights, LED loading light, bow stop, custom fender steps & guide poles
Don't have any real good pictures of the trailer because it's been crammed in the garage, but here's a picture of the CNC Plasma side step.  |
||
|
||
|
LeftFieldEngineering
Senior Member
Joined: December-20-2010 Location: Monson, MA Status: Offline Points: 384 |
Post Options
Thanks(0)
Quote Reply
Posted: March-13-2015 at 4:13pm |
|
|
Of course the build is only ½ the story, the other ½ is why I built the boat. From 100 degree days ripping up the floor in August to 19 degree days wiring the boat in February, it’s the thought of the skiers that’s kept me going. Upon completion I will be volunteering 2 nights a week to drive for a local ski club. The Tique was designed to be a workhorse through and through, ready to take dropped skis, scratched paint and melted chocolate like a champion.
Hands down she’s the most beautiful "piece of junk" out there and I’m proud to say she’s my Incorrect Craft. BTW, I’m into it for $1992.38 as of 3/13/15. That’s every penny, registration included. Not bad if you ask me. More pix in the future. |
||
|
||
|
TRBenj
Grand Poobah 

Joined: June-29-2005 Location: NWCT Status: Offline Points: 21108 |
Post Options
Thanks(0)
Quote Reply
Posted: March-13-2015 at 4:30pm |
|
|
Not my style but the quality of work is quite high. Should treat you well! The only thing that makes me nervous is the pre-loaded floor supports... Might lead to stress cracks. General consensus is to leave those short of the hull wall and let the glass bridge the gap a bit more softly.
Those seat brackets came out nice- want to make more? I could give you some napkin sketches, I have a few changes in mind. Pm me! |
||
|
||
|
rebel skier
Gold Member 

Joined: October-17-2014 Location: Middle Tenn Status: Offline Points: 771 |
Post Options
Thanks(0)
Quote Reply
Posted: March-13-2015 at 5:14pm |
|
|
LFE, now that you posted this year I have nothing to read at Planet Nautique. Your thread has been the old action over there in the old school nautiques area!
Nice job! |
||
|
||
|
phatsat67
Grand Poobah
Joined: March-13-2006 Location: Indiana Status: Offline Points: 6147 |
Post Options
Thanks(0)
Quote Reply
Posted: March-13-2015 at 5:45pm |
|
|
I like the trailer step Idea. It will really feel good when you get to take it for a spin.
|
||
|
||
|
LeftFieldEngineering
Senior Member
Joined: December-20-2010 Location: Monson, MA Status: Offline Points: 384 |
Post Options
Thanks(0)
Quote Reply
Posted: March-14-2015 at 8:05am |
|
|
This week's project is finishing the bottom of the hull. I had planned to do the work outside under my large gantry crane, but there's still 2' of snow in the back yard so I had to come up with a plan B. Thankfully I had enough extra steel lying around I whipped up a 2nd "mini-crane" and lifted the Tique up in the garage. Looks like I'll be limited to Tiques's as I can't fit anything larger in the garage ;)
   
|
||
|
||
|
Smithfamily
Platinum Member

Joined: December-26-2007 Location: Orlando, Fl Status: Offline Points: 1602 |
Post Options
Thanks(0)
Quote Reply
Posted: March-14-2015 at 11:52am |
|
|
Very Impressive work.
|
||
|
Js
|
||
|
||
|
8122pbrainard
Grand Poobah

Joined: September-14-2006 Location: Three Lakes Wi. Status: Offline Points: 41040 |
Post Options
Thanks(0)
Quote Reply
Posted: March-14-2015 at 12:36pm |
|
Be careful with the stainless fasteners. There are situations where they WILL rust if not allowed to dry. Wood is a good example so silicon bronze should be used. |
||
|
||
|
jimsport93
Platinum Member

Joined: February-20-2008 Location: Alpharetta Ga Status: Offline Points: 1749 |
Post Options
Thanks(0)
Quote Reply
Posted: March-15-2015 at 1:08pm |
|
|
Nicely done Andy. Especially for $1900.
Keep us up to date on your progress this Spring. And the fun this summer.....with pics 
|
||
|
||
|
LeftFieldEngineering
Senior Member
Joined: December-20-2010 Location: Monson, MA Status: Offline Points: 384 |
Post Options
Thanks(0)
Quote Reply
Posted: March-16-2015 at 1:29pm |
|
|
Weekend Progress:
I finished my first of 2 pylon extensions. This one extends about 14" over the orignal height and is enough to clear the raised motor box and the back seat. I plan on making a 2nd version that's about 3' taller and will tether to the front like a normal pylon extension  I also finished the motor box spacer. The exhaust risers on the 351w were too tall so I had to raise the motor box 2". The spacer assembly is mounted to the 2 side floor panels via stainless & aluminum brackets. Remove the 4 button head cap screws and the spacer can be taken out in minuets.   I wanted to keep the spacer frame as small as possible so I didn't extend it out far enough to mount the hinges. Instead I opted for some nice teak blocks.  Clearly the motor box has seen better days so when it's due for a re-cover I plan on modifying the fiberglass to fit the 351w risers. At that point I'll just remove the spacer and go back to the proper floor mount. One of my next projects will be coming up with something to cover the pylon / engine cradle in front of the doghouse. I don't have a set design yet, but I'm thinking it'll have to include some more teak, engraved aluminum plates & probably some cup holders. |
||
|
||
|
wataugasn84
Senior Member

Joined: January-06-2013 Location: East Tennessee Status: Offline Points: 118 |
Post Options
Thanks(0)
Quote Reply
Posted: March-18-2015 at 11:19am |
|
|
Very nice , Lots of talent and skill most of us have to pay dearly for.
|
||
|
Watuugasn84
|
||
|
||
|
75 Tique
Grand Poobah

Joined: August-12-2004 Location: Seven Lakes, NC Status: Offline Points: 6097 |
Post Options
Thanks(0)
Quote Reply
Posted: March-18-2015 at 11:29am |
|
Cracks me up, what some people can just "whip up". Nice work. |
||
|
_____________
“So, how was your weekend?” “Well, let me see…sun burn, stiff neck, screwed up back, assorted aches and pains….yup, my weekend was great, thanks for asking.” |
||
|
||
|
SNobsessed
Grand Poobah
Joined: October-21-2007 Location: IA Status: Offline Points: 7102 |
Post Options
Thanks(0)
Quote Reply
Posted: March-18-2015 at 12:04pm |
|
|
I envy your skills & even more your shop.
Looks very cool. Do you have the shakedown cruise scheduled yet? |
||
|
“Beer is proof that God loves us and wants us to be happy.”
Ben Franklin |
||
|
||
|
LeftFieldEngineering
Senior Member
Joined: December-20-2010 Location: Monson, MA Status: Offline Points: 384 |
Post Options
Thanks(0)
Quote Reply
Posted: March-18-2015 at 1:53pm |
|
As soon as the 2' of snow & ice melt off the lakes. Originally I thought it was going to be a photo-finish with spring, but Mother Nature had other plans this year. |
||
|
||
|
LeftFieldEngineering
Senior Member
Joined: December-20-2010 Location: Monson, MA Status: Offline Points: 384 |
Post Options
Thanks(0)
Quote Reply
Posted: March-24-2015 at 8:51am |
|
|
My latest project was finishing & installing the trailer guide poles.
The mounting brackets are made from aluminum and utilize a cross-pin to retain the guide poles. I figured it was just complicated enough for people not to mess with at the boat ramp, but still easy to pull if a pole needed to be removed.  The guide poles themselves are made from 2" PVC pipe. I chose PVC over a ridged pole for 3 reasons: It's cheap, It's light, and It's just strong enough to function as a guide pole, while allowing some flex.    |
||
|
||
|
LeftFieldEngineering
Senior Member
Joined: December-20-2010 Location: Monson, MA Status: Offline Points: 384 |
Post Options
Thanks(0)
Quote Reply
Posted: March-25-2015 at 7:08am |
|
|
Little interior work yesterday.
With the interior almost complete there were just 2 items that needed a home; the fire extinguisher and dry box. After some thinking I came up with this 1/8" aluminum under seat mount. It's mounted using the seat studs and has easy to release bungee catch holding the dry box in place.  Another finishing touch was a blue LED strip under the dash. 
|
||
|
||
|
Smithfamily
Platinum Member
Joined: December-26-2007 Location: Orlando, Fl Status: Offline Points: 1602 |
Post Options
Thanks(0)
Quote Reply
Posted: March-25-2015 at 7:28am |
|
|
Looking GOOD!!
|
||
|
Js
|
||
|
||
|
Mojo
Grand Poobah

Joined: December-06-2006 Location: United States Status: Offline Points: 3104 |
Post Options
Thanks(0)
Quote Reply
Posted: March-25-2015 at 10:18am |
|
|
Andy,
The "Incorrect Craft" is coming along great !! Those trailer side guides are sick !! Looks like you made removable swim platform brackets??? Can you show us some up close pics of how they work? Moj' |
||
|
05' SV211 TE
73' Martinique had:96' SNOB had:76' Nautique had 77 Tique |
||
|
||
|
LeftFieldEngineering
Senior Member
Joined: December-20-2010 Location: Monson, MA Status: Offline Points: 384 |
Post Options
Thanks(0)
Quote Reply
Posted: March-25-2015 at 11:34am |
|
|
Thanks.
As for the swim platform mounts; I'd love to explain. 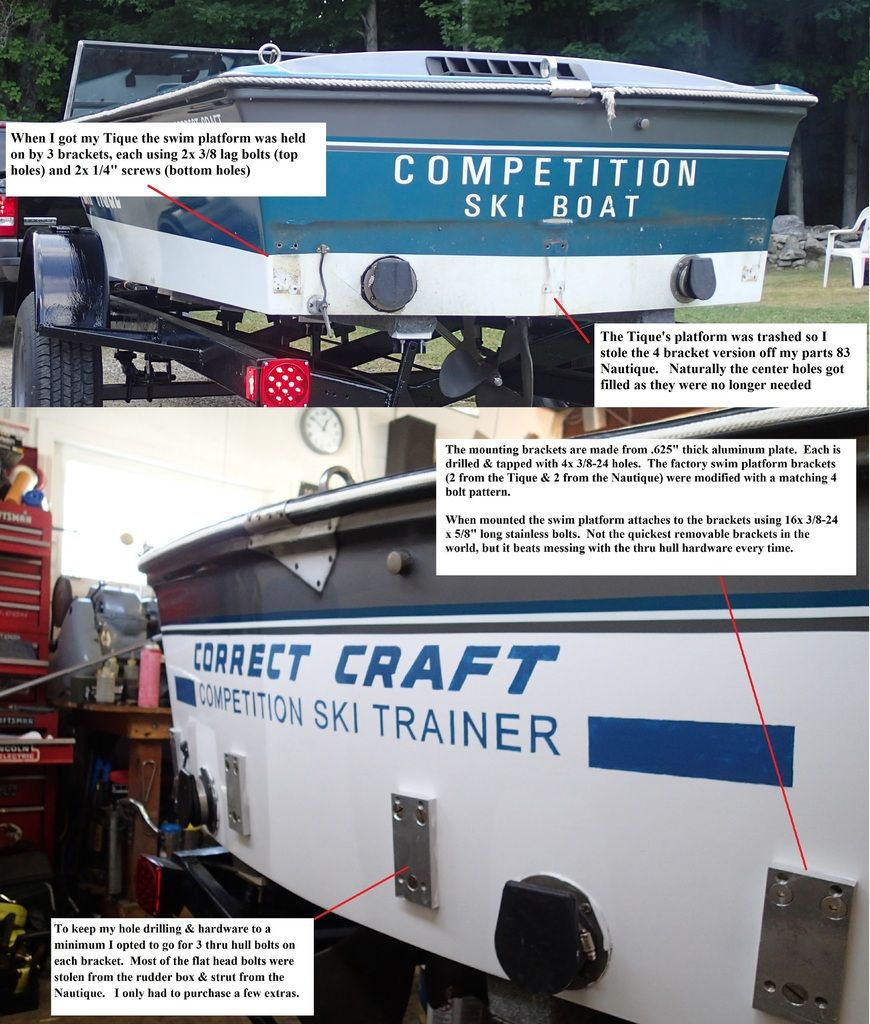 I'll take some pictures of it mounted as soon as it's out of the garage. |
||
|
||
|
TRBenj
Grand Poobah
Joined: June-29-2005 Location: NWCT Status: Offline Points: 21108 |
Post Options
Thanks(0)
Quote Reply
Posted: March-25-2015 at 11:50am |
|
|
Yikes, dollars to donuts says the rise and swing angles of the transom are different between the 2 boats. Hope they're the same- even a very small variation of a degree or 2 (esp in rise) will make the platform look very silly once installed. Have you test fit it yet? Any mods needed?
|
||
|
||
|
LeftFieldEngineering
Senior Member
Joined: December-20-2010 Location: Monson, MA Status: Offline Points: 384 |
Post Options
Thanks(0)
Quote Reply
Posted: March-25-2015 at 12:22pm |
|
|
I appreciate the concern, but do you really think I would have just "gone for it" without proper measuring & a good mockup?
 That being said Tim is correct; the angles are different between the Tique & Nautique. For that reason I kept the Tique's original outer brackets and used them to get everything lined up. Once in position I modified the 2 Nautique inner brackets to match the hull. The only difference now is my platform sits 3/4" higher due to a hardware interference. |
||
|
||
|
TRBenj
Grand Poobah
Joined: June-29-2005 Location: NWCT Status: Offline Points: 21108 |
Post Options
Thanks(0)
Quote Reply
Posted: March-25-2015 at 1:15pm |
|
|
I would have restored the Tique's teak and kept the brackets the same but judging by your skill set it was probably quicker for you to make the metal fab modifications.
 I was gonna say that the brackets looked to be mounted pretty high- the platform I put on my Tique was basically bottomed out on the lower hull corners... And even then, the platform was partially covering the original stripes. |
||
|
||
|
Mojo
Grand Poobah
Joined: December-06-2006 Location: United States Status: Offline Points: 3104 |
Post Options
Thanks(0)
Quote Reply
Posted: March-25-2015 at 1:25pm |
|
|
Why did you decide to add a 4th bracket in the middle?
I'm trying to figure out a quick disconnect system. While yours works, I dont have the patience to remove 12 screws to take my platform off haha.. Thanks for the explaination.. I've seen where some have made a bracket like yours, but put 2 small angled bars down either side and added the opposite middle to the old platform angles and then pin the two. Kind of how Alloy makes (well when they actually work)... |
||
|
05' SV211 TE
73' Martinique had:96' SNOB had:76' Nautique had 77 Tique |
||
|
||
|
LeftFieldEngineering
Senior Member
Joined: December-20-2010 Location: Monson, MA Status: Offline Points: 384 |
Post Options
Thanks(0)
Quote Reply
Posted: March-25-2015 at 3:39pm |
|
|
The Tique platform was in pretty rough shape. Somebody decided to use 2x6's to support the bottom, thru bolt it with carriage bolts to the brackets, and shot about 50 screws into it (all of which were ground down on the topside)
 The picture should help explain the 4th bracket addition. I didn't feel like adding a center runner to the Nautique platform so I opted to just add the 4th bracket. Also the brackets were never designed to be a "quick disconnect" just removable. I looked at making a slide in version, but there wasn't enough room on the left side where the hull bumps-out for the pitot mount. 
|
||
|
||
|
75 Tique
Grand Poobah
Joined: August-12-2004 Location: Seven Lakes, NC Status: Offline Points: 6097 |
Post Options
Thanks(0)
Quote Reply
Posted: March-25-2015 at 3:46pm |
|
|
Given the caliber of the work to date, I wasn't too concerned about things not lining up right.
|
||
|
_____________
“So, how was your weekend?” “Well, let me see…sun burn, stiff neck, screwed up back, assorted aches and pains….yup, my weekend was great, thanks for asking.” |
||
|
||
|
Post Reply
|
Page 123> |
 Tweet
Tweet
|
| Forum Jump | Forum Permissions You cannot post new topics in this forum You cannot reply to topics in this forum You cannot delete your posts in this forum You cannot edit your posts in this forum You cannot create polls in this forum You cannot vote in polls in this forum |


 Topic Options
 TRBenj wrote: