Stubborn cutlass bearing
Printed From: CorrectCraftFan.com
Category: Repairs and Maintenance
Forum Name: Boat Maintenance
Forum Discription: Discuss maintenance of your Correct Craft
URL: http://www.CorrectCraftFan.com/forum/forum_posts.asp?TID=47434
Printed Date: April-26-2024 at 8:01am
Topic: Stubborn cutlass bearing
Posted By: gcam4
Subject: Stubborn cutlass bearing
Date Posted: May-11-2019 at 10:30am
|
On our 95SN, I am having a hard time getting the cutlass bearing out. I used a fine blade reciprocating saw and then grabbed a hacksaw to finish it. The bearing from the factory is in there and it looks like a single. It appears as if I have cut through it on each end but it surely doesn't want to tap or curl out. I ended up drilling out the set screws as they almost seem stripped out to begin with and wouldn't budge even with an easy out. How much is typically needed to cut into the strut? I'm guessing i'm in it about 0.010" now on each end. I looked through the FAQ's and several other threads regarding this topic. Any help is appreciated. FYI, I ordered a ARE shaft as ours was out of spec at the taper once I bench tested it. The cutlass was so worn out I couldn't even do an alignment check. Boat has ~1400 hours and it is the factory bearing. Bought a new prop as well. Once all is back in I will check alignment and adjust accordingly. |
Replies:
Posted By: gt40KS
Date Posted: May-11-2019 at 2:39pm
I feel your pain Grant  I went through the same thing, exactly, a couple years ago. Yes, those factory bearings are stubborn, especially after 24 years. Even after I cut the bearing and was sure I'd gotten it all the way, when I finally got the thing out there was an area in the center that was still intact. Those set screws can really cause you an issue if you don't get 100% of it out. Best thing is to drill them out with a larger bit than the tapped threads and re-tap to a larger size after the fact. Then, if some solid raps on the bearing don't seem to dislodge the bearing you may have to use an extractor. I built my own, but there are a few like http://www.starlineind.com/products/marine-tools/cutlass%20bearing.htm" rel="nofollow - THIS ONE on the net. I went through the same thing, exactly, a couple years ago. Yes, those factory bearings are stubborn, especially after 24 years. Even after I cut the bearing and was sure I'd gotten it all the way, when I finally got the thing out there was an area in the center that was still intact. Those set screws can really cause you an issue if you don't get 100% of it out. Best thing is to drill them out with a larger bit than the tapped threads and re-tap to a larger size after the fact. Then, if some solid raps on the bearing don't seem to dislodge the bearing you may have to use an extractor. I built my own, but there are a few like http://www.starlineind.com/products/marine-tools/cutlass%20bearing.htm" rel="nofollow - THIS ONE on the net. ------------- JCCI 1995 Ski Nautique GT40 |
Posted By: Jonny Quest
Date Posted: May-12-2019 at 3:03am
|
I ended up removing the strut on my 1994 as I couldn't get the bearing out with the strut in place. Ended up being a good plan. I have a 20 ton press, and that did the trick with removing a 20+ year old bearing. I tried using the threaded rod and washers method, but I just wouldn't work for me. After removing the old bearing, I used a brake cylinder hone to lightly clean up the inside of the strut bearing. The new 6" bearing went in without issues. I also went with an ARE dual taper drive shaft. JQ ------------- Current 2003 Ski Nautique 206 Limited Previous 2001 Ski Nautique Open Bow 1994 Ski Nautique Open Bow Aqua skiing, ergo sum |
Posted By: MrMcD
Date Posted: May-12-2019 at 6:00am
|
I did my 95 5 years ago. Taking out the strut bearing was a chore. I was very afraid of cutting into the strut so I went slow and careful. Cost me extra time. I ended up hitting it hard with a small tip chisel to get it to start to collapse in. I had my strut off the boat at the time. FYI: when you put the shaft in the cutlass and slide it up towards the engine the shaft has enough weight that it will sag before it reaches the coupler at the tranny. To support it and avoid that sag I cut a short piece of 2x4, maybe 5" long. I cut a V in the top of the 2x4. Put the V on the shaft and slip the 2x4 back away from the tranny till the shaft is supported by the bottom of the boat with the 2x4. The happy spot where the shaft spins with the least resistance in the cutlass bearing is the spot you are looking for. The 2x4 was behind the coupling just enough to allow you to work. You can take some measurements and make the 2x4 the right length.. ------------- |
Posted By: gcam4
Date Posted: May-12-2019 at 11:36am
| Thanks guys! I'm going to spray some penetrating oil on it today and let it soak for several days. I would rather not pull the strut if at all possible. I have access to basically any piece of shop equipment I would need for this so I think I will fab up a remover. I have plenty of steel to choose from! Regarding the ARE coupler, has anyone lapped it to the propshaft similar to how the prop would get lapped to the shaft? The coupler is electroless nickel coated so I'm kind worried about lapping that in because nickel is typically ~0.0004"-0.0008" thick. |
Posted By: Duane in Indy
Date Posted: May-12-2019 at 3:07pm
Personally I see no reason to lap the coupling to the shaft. Both pieces were turned on CNC machinery. The tapers are programmed in for the exact taper both in length and diameter. With modern machinery you are not going to get them any better. For that matter the new CNC machined props are cut on the same accuracy machines as the other parts and I see no reason to lap them either. In the "old" days before CNC machining then yes, there was reason to lap. Using reamers and turning the taper by setting the lathe on an angle and hand turning then, then yes there were variations on the angles. Not so in modern times. Just my opinion here, others will vary. I only worked in the trade for 50 years so what do I know.  ------------- Keep it as original as YOU want it 1978 Mustang (modified) |
Posted By: MrMcD
Date Posted: May-12-2019 at 4:25pm
|
I would beg to differ on the CNC theory. I have installed 3 props on my ARE shaft now. Each time you lap one in you can feel a difference in fit. Even the brand new Acme 422 I installed last year. I would certainly lap in the prop. ------------- |
Posted By: 8122pbrainard
Date Posted: May-12-2019 at 4:30pm
I also beg to differ with Duane. I have first hand experience that lapping was needed on both an ARE and a General Propeller shaft to coupling as well as the prop end. ------------- /diaries/details.asp?ID=1622" rel="nofollow - 54 Atom /diaries/details.asp?ID=2179" rel="nofollow - 77 Tique 64 X55 Dunphy Keep it original, Pete < |
 MrMcD wrote:
Posted By: gt40KS
Date Posted: May-12-2019 at 4:36pm
|
Well Mark I think Duane was speaking of the shaft to the coupler and assuming that they are both new, ARE pieces I might agree that it shouldn't be necessary. Having said that, both times I installed new shafts with their new couplers I did go ahead with lapping - one didn't need it really, the blue showed they were 90% mated or better. But the other one would have been risky IMO with 50% or less mated surface, so I'm certainly glad I did. Doesn't hurt to check it and it really only takes a few minutes anyway. My 2 cents. Props are a different matter ... I will always lap those every time  ------------- JCCI 1995 Ski Nautique GT40 |
Posted By: 8122pbrainard
Date Posted: May-12-2019 at 5:13pm
|
Joe, Since you mention percentages, I'll say the two ARE's I did were around 60% mated and the General Propeller was at 50% coupling to shaft. Yes, it sure doesn't take long to spin some lapping compound around to be sure. ------------- /diaries/details.asp?ID=1622" rel="nofollow - 54 Atom /diaries/details.asp?ID=2179" rel="nofollow - 77 Tique 64 X55 Dunphy Keep it original, Pete < |
Posted By: gcam4
Date Posted: May-12-2019 at 6:58pm
| Pete, do you feel you went thru the nickel coating at all on the coupler? |
Posted By: 8122pbrainard
Date Posted: May-12-2019 at 7:21pm
|
Grant, I wouldn't worry about the electroless nickel. It's more for protection on the outside of the coupling. Even if it's removed in the taper bore, not much is going to get in there due to the lapped fit. ------------- /diaries/details.asp?ID=1622" rel="nofollow - 54 Atom /diaries/details.asp?ID=2179" rel="nofollow - 77 Tique 64 X55 Dunphy Keep it original, Pete < |
Posted By: gcam4
Date Posted: May-12-2019 at 9:40pm
| Thanks Pete! I'll lap them both in this week. Hopefully I'll have everything done by memorial day weekend. Gotta do shaft, steering cable, helm, tilt mechanism, rudder box, cutlass bearing, and cruise. I'll be busy... |
Posted By: gcam4
Date Posted: May-16-2019 at 3:47pm
| Made a nice little bearing puller with some 1/2" plate and all thread. Worked like a charm. After removing the bearing it was apparent that I wasn't even close to cutting through it except for on either end. If anyone would like to borrow the tool I made let me know. Would be happy to loan it out. |
Posted By: gun-driver
Date Posted: May-16-2019 at 11:58pm
Good deal. After reading your posts my guess was that you didn't cut all the way through, I've replaced several and I know it's a pain cutting them. I used a dowel on my last one that worked great but it was off the boat. Any pictures of the tool you made??
|
Posted By: gcam4
Date Posted: May-18-2019 at 12:12am
|
I'll get a few pictures of it. It is basically two plates, two pcs of all thread, and a bearing pusher I machined. I changed the bearings tonight. I quickly put the shaft in and there is more movement than i anticipated. I had to force the coupler up to the trans to line it up. The shaft was centered in log very well though. I know the shaft would naturally droop but I didnt expect to have to lift it as much as I did. The alignment was tight on the bottom but loose on the top. It was just a quick check but I figured it would be completely opposite to that. I'll do a proper alignment in the morning. |
Posted By: MrMcD
Date Posted: May-18-2019 at 5:29pm
|
I don't remember exact sag in the prop shaft but I am guessing it was 1/2' to 3/4" That was what made me use the 2x4 to help hold the happy location to align the engine to. You want to bring the engine alignment directly to the happy spot of the shaft. If the shaft is not in the right location you start at the shaft support and start aligning but that has to be done before it is glued in with 5,200 or 4,200. ------------- |
Posted By: 8122pbrainard
Date Posted: May-18-2019 at 7:51pm
Grant, As Mark mentioned you what to maintain the "happy spot" (turns freely) with the shaft pretty close to center in the log. From your description of the shaft being tight on the bottom and loose on the top, is that in the cutlass?. And if so, do you mean the shaft is on an angle (not parallel with the bore) through the cutlass? Again if so, you can use some stainless flat washers between the strut base and hull ether at the two forward bolts or at the two aft. Dry fit to see what happens and report back if needed. ------------- /diaries/details.asp?ID=1622" rel="nofollow - 54 Atom /diaries/details.asp?ID=2179" rel="nofollow - 77 Tique 64 X55 Dunphy Keep it original, Pete < |
Posted By: gcam4
Date Posted: May-19-2019 at 12:54am
|
Thank you Mrmcd, I may resort to that. Pete, I was talking about at the coupler. I used the rubber hose in the log trick. Is the wooden vblock a better method? I got the alignment within 0.0015-0.002. What I found odd was that I needed to lower the rear of the engine to get the alignment within spec. I figured I would need to raise the rear. The boat is 24 years old and it has never had an alignment except at the factory. |
Posted By: FLCaptain
Date Posted: May-19-2019 at 1:13am
| Think about the body. We slump and our legs get sore as we age. Boats sag in the back an the bow with age. Mostly the back. So the hull slumps. Then the strut follows. The. The motor must too. But your alignment sounds good. |
Posted By: 8122pbrainard
Date Posted: May-19-2019 at 6:41am
Grant, Thanks for the clarification. What was "loose" and what was "tight" wasn't clear but at the coupling did cross my mind. I prefer laying the shaft on something to support the weight over using a spacer (rubber hose) in the log because the former allows you to still check to see if the shaft turns freely. Did you find that the shaft was free to turn when it was centered in the log? Keep in mind alignment starts at the strut and not just aligning the engine to the shaft. ------------- /diaries/details.asp?ID=1622" rel="nofollow - 54 Atom /diaries/details.asp?ID=2179" rel="nofollow - 77 Tique 64 X55 Dunphy Keep it original, Pete < |
Posted By: gcam4
Date Posted: May-19-2019 at 10:41am
|
Mods, feel free to change the name of this thread as it has morphed into other topics besides the title. Pete, The shaft spun freely with the shaft on the rubber hose and even spun better when I lifted it slightly. I'll cut a piece of wood to support it and see how it feels. I put a dripless stuffing box on, will I need to move that forward? I'll recheck alignment then as well. Do most people reuse the coupler bolts or buy new? Another oddity was that one of the motor mount jam nuts was completely loose and the other was loose enough to adjust it. What size are they? 1.5" or 1.4375"? I ordered both crowsfoot wrenches last night to be double sure I had the right one. Also, when I was cleaning the rudder port I noticed some issues around the rudder box on the bottom of the hull. What would you guys do there? There is obviously some fiberglass damage. I'm thinking I should seal that up with some gelcoat and or sealant repair. The damage is on the trailing edge. Thoughts? I have no idea where anything like that would have come from. My parents bought the boat new ans it has basically been on a private lake it's whole life. Other than some minor minor dings on the prop I know of no hits that the boat has taken in it's life. The rudder is in perfect condition. 
|
Posted By: 8122pbrainard
Date Posted: May-19-2019 at 11:36am
|
Grant, I wouldn't worry too much about the jam nut being loose on the mount as long as the actual jack bolt was tight sharing the engine load. The gel at the rudder port looks like it's just cosmetic probably from cavitation at the rudder. . ------------- /diaries/details.asp?ID=1622" rel="nofollow - 54 Atom /diaries/details.asp?ID=2179" rel="nofollow - 77 Tique 64 X55 Dunphy Keep it original, Pete < |
Posted By: gcam4
Date Posted: May-19-2019 at 3:24pm
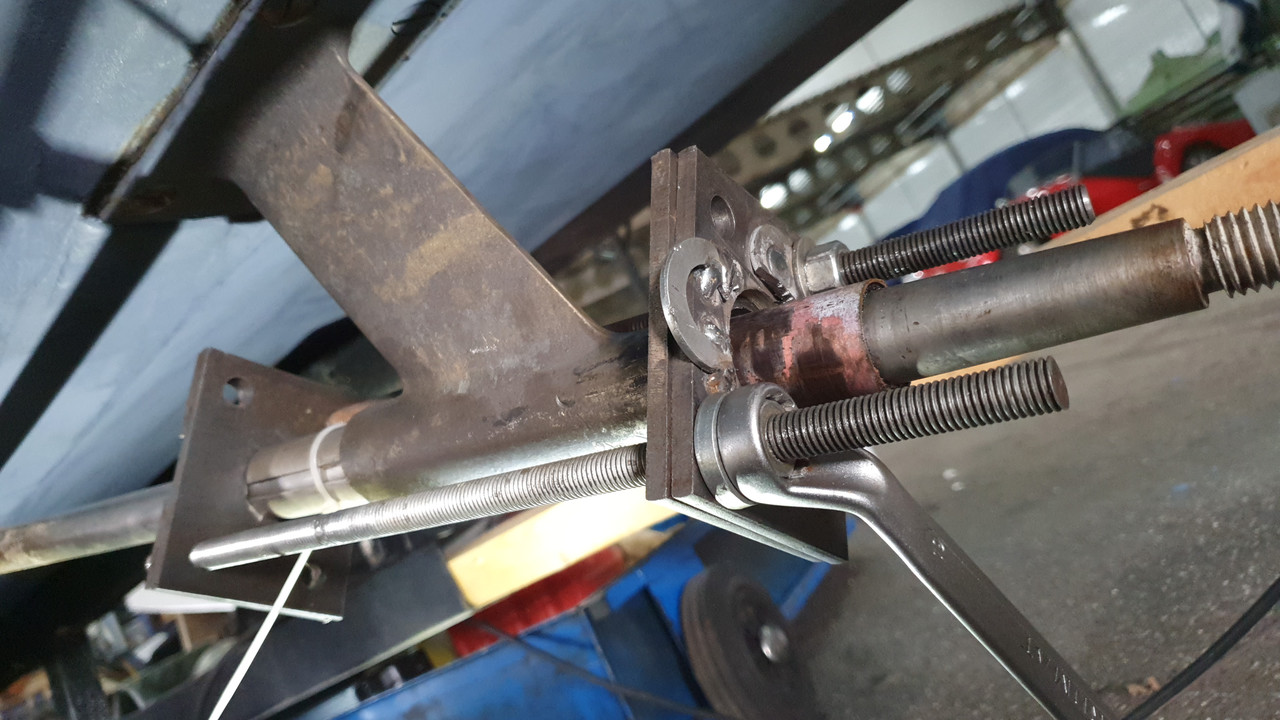
Looks like I have a larger issue than originally thought. Using the wooden block method and moving it around until the shaft was happiest left me with this. Not sure what to do other than look at the strut. The shaft spins free when I center it in the log, it does have more resistance than where it is with the wooden block. It isn't touching the log but it is shifted to the right side. If it is bent, I'm not sure what would have caused it. Thanks guys for all the help!  Here is a picture of the cutlass bearing puller. I also used a piece of the threaded rod to get the new bearings in. 
|
Posted By: MrMcD
Date Posted: May-19-2019 at 5:10pm
|
Since you have a new prop shaft you might have the old one on hand still. The old shaft makes a nice tool to tweak the strut the right direction. It is a 5' persuader if needed. It looks like you need a twist to get where you need to be. For a minor adjustment If your strut is firmly glued into place this can work. If your strut is still loose you can pull the bolts and add washers where needed to get the correct angle. To get mine where it needed to be I changed the angle of the base plate by setting it on my 4" sander and removing some material to get dialed in, even with that I had to add stainless washers in the rear. I bought a handful of washers, measured each and marked them for size. They each varied in thickness by .001 or more. It took some time but worked. I chose 5200 because my strut was adjusted by washers and did not touch the hull in the back. I think the 5200 is tougher and helps hold the alignment. It will be hard to remove in the future and that is Ok by me. You have some serious skills, That strut tool is the bomb! It could be sold to Boat shops. Maybe you can rent it out to Forum members in need. Have a very high deposit because you want it back each time. Nice work. At your rudder port a little gel coat can fix it up or if you remove the port you could put it back on with 5200 and fill in the bad spot with it also. That stuff dries tough. ------------- |
Posted By: 8122pbrainard
Date Posted: May-19-2019 at 9:28pm
|
Grant, Yes, it looks like some tweaking of the strut is needed. Mark is correct that minor adjustments of the strut can be done in place. An old shaft in the cutlass can be used but to avoid damaging the new rubber, I prefer A large pipe wrench (and cheater pipe) on the strut web. It won't take much of a twist to get the strut back. ------------- /diaries/details.asp?ID=1622" rel="nofollow - 54 Atom /diaries/details.asp?ID=2179" rel="nofollow - 77 Tique 64 X55 Dunphy Keep it original, Pete < |
Posted By: gcam4
Date Posted: May-20-2019 at 1:09am
|
Mark, Thanks for the suggestions and complements. I will likely try to to tweak the strut some. I trigged it out and I think I need to defect the front ~0.030"-0.040" in order to get it centered in the log. The puller is just made from some scrap 2.5" X 1/2" 1018 plate and some all thread. I turned down a piece of DOM tubing to about 0.988" to have some clearance but still have good fit to the bore. I'll be happy to loan it out, I hope I won't have to use it for a long time. I will say that my boss gives me access to anything in the shop where I work. That is really the reason why I was able to make the puller. Even though we have awesome equipment, it wouldn't matter if I didn't have an awesome owner/boss/friend that let me use the equipment for government work! Pete, Thanks for the encouragement! I will get a pipe wrench and tweak it some with a piece of pipe. We have plenty of that laying around the shop! Is there a tolerance of the shaft to log clearance? I'm going to judge it with some dill bits to get a good idea of where I'm at. I'm sure I won't be able to get it perfect but I think I can tweak it within reason. |
Posted By: MrMcD
Date Posted: May-20-2019 at 3:17pm
|
If you get it close the engine can be adjusted quickly to match. BTW: Pete is our resident expert on alignment. Listen to him and he will get you squared away. Most of what I shared was learned on this site 5 years ago when I did the same job. ------------- |
Posted By: gcam4
Date Posted: May-20-2019 at 3:39pm
|
Mark, Sounds good. I'm going to pull the shaft tonight and get a plumb bob and mark the strut where it and try to tweak it. I've got a 18" cresent wrench and a 12' cheater bar to attach to it. I'll do my best to slowly sneak up on it using the plumb bob and the shaft to check. If I cannot get it right, it appears I will be pulling the strut. To all of those that have to do this work, do yourself a favor and get an ARE shaft! The time savings alone pay for it! Yeah, I watched Pete's video several times but must have missed it where he said to use a vblock to support the shaft until it finds it's happy spot. I'll check my concentricity to the log with drill bits and I'm thinking if I can get it within 1/16" side to side I'll be good. I feel that lateral movement is much more important since it's more difficult to get the engine to cooperate laterally. My thoughts may be incorrect though. Do most people put a two piece safety collar on the shaft? I don't like the idea of marring up the new shaft with the old collar. But, I also don't like that the split ones are technically not balanced. Thanks again to all those that have chimed in. |
Posted By: gcam4
Date Posted: May-21-2019 at 1:06am
|
Mark and Pete, I tweaked my strut tonight and feel like I got it as good as possible next to pulling the strut. a 12 ft long piece of pipe sure can put some torque on some things! The shaft is centered left to right within ~1/32". It is still low in the log, but has ~1/8" clearance still. I don't see a way to get that better without pulling the strut. Do y'all think those clearances are acceptable? It is much much better than I originally had. I will likely need to adjust all four engine mounts to get the alignment correct now though. Pardon the bad lighting, I didn't pay attention until I had pulled the boat out of the shop and covered it up. 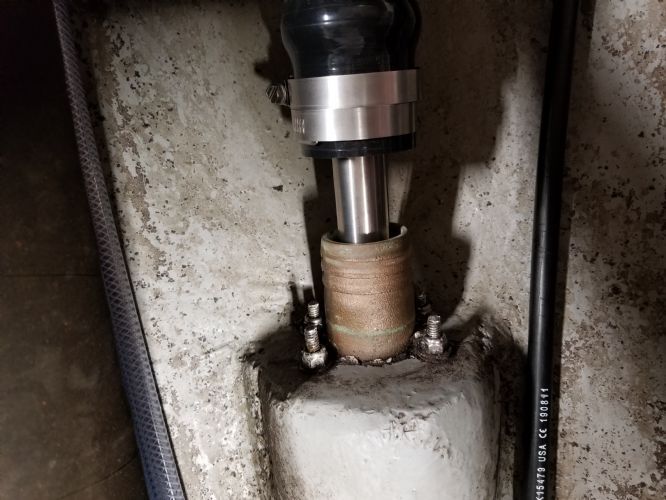
|
Posted By: MrMcD
Date Posted: May-21-2019 at 5:42am
|
It does not matter where the shaft is in the log, the logs were not that accurate on install at the factory. It does matter where the shaft runs in your cutlass bearing, as long as it does not drag or touch the log it is OK, It has to be straight as it spins in the cutlass. The term happy place has been used for that spot where the shaft spins with the least amount of drag. When in that spot you want to align your engine to match it. In this spot the cutlass will have the least amount of drag and last the longest. Maybe your boat will pick up a few RPM! If the Cutlass is off center making your prop shaft not point at your transmission you adjust the cutlass. You have yours now tweaked to be within 1/16? That is pretty close, should be easy to align your engine to match now. It looked like you were at least a 1/2" off yesterday. My Engine mounts had not been moved in 19 years and did not wish to adjust easy. After loosening the mounts I hit them with some penetrating oil and found I could tap on them with a ball pen hammer and things moved in as needed. I seem to remember using a crowbar on one to move the mount out as needed. The up and down movements are easy with a wrench it is the in and out movements on the mounts that took some English to make them happen. You may need to open the mount a little after loosening the lock bolt. It pinches the in and out shaft to hold it tight. Just loosening the bolt does not necessarily free up the slider. The Coupler adjustment can be played with to get close to zero. Mine ended up at .0015 and I quit trying to get closer. I think .003 is acceptable. ------------- |
Posted By: 8122pbrainard
Date Posted: May-21-2019 at 7:14am
|
Grant, Yes, you are good to go onto aligning the engine to the shaft  As Mark mentioned, centering in the log doesn't have to be perfect. If up and down centering is needed, then the strut would need shimming as previously mentioned. As Mark mentioned, centering in the log doesn't have to be perfect. If up and down centering is needed, then the strut would need shimming as previously mentioned.
Great job on tweaking the strut!  ------------- /diaries/details.asp?ID=1622" rel="nofollow - 54 Atom /diaries/details.asp?ID=2179" rel="nofollow - 77 Tique 64 X55 Dunphy Keep it original, Pete < |
Posted By: gcam4
Date Posted: May-21-2019 at 10:47am
|
Mark, I hope my mounts move well. I know they move well up/ down but as you alluded to it's the side-side that is difficult for a 24 year old boat! I moved the strut about 1/8-3/16 to port so I feel pretty good. It's as good side-side as I feel I can get it! I dont think it was off 1/2" but at least 1/4". I will post pictures soon of the tweaking process and of a few other items. As mentioned before I'll be happy to loan the bearing puller/installer out. I'll likely post pictures of that project as well. If all goes well, I'll have it in the water this weekend. Thanks Pete! What is everyone doing for safety collars for the ARE shaft? |
Posted By: MrMcD
Date Posted: May-21-2019 at 3:16pm
|
My boat is still in wrap for winter but If I remember it had a round safety collar held with a set screw. I think I put it back on the ARE shaft. I will be opening it up soon to check the brakes and charge the battery, I will have to take a look at the shaft. We have rain for the next week so it will wait a bit. ------------- |
Posted By: 8122pbrainard
Date Posted: May-21-2019 at 4:49pm
Grant,The twopiece collars work great.  https://www.mcmaster.com/shaft-collars" rel="nofollow - McMaster has them in stainless ------------- /diaries/details.asp?ID=1622" rel="nofollow - 54 Atom /diaries/details.asp?ID=2179" rel="nofollow - 77 Tique 64 X55 Dunphy Keep it original, Pete < |
Posted By: TRBenj
Date Posted: May-21-2019 at 5:11pm
| Climax Metal 2C-100-S T303 Stainless Steel Two-Piece Clamping Collar, 1" Bore Size, 1-3/4" OD, With 1/4-28 x 5/8 Set Screw https://www.amazon.com/dp/B001VXU0UK/ref=cm_sw_r_cp_api_i_i1e5CbGCC3BET" rel="nofollow - https://www.amazon.com/dp/B001VXU0UK/ref=cm_sw_r_cp_api_i_i1e5CbGCC3BET |
Posted By: MrMcD
Date Posted: May-23-2019 at 4:53am
|
Nice tip Tim on the Coupler. That should work great. ------------- |
Posted By: gcam4
Date Posted: May-29-2019 at 12:46am
|
Thanks to everyone's help on the forum. I got the alignment within 0.002" and under, it did take a little bit to get there but I did manage. Did it in the front yard at the house and boy It was hot! The prop took a really long time to lap in though. I was at it for at least 45 min. There is absolutely no drag on this system at all. The wind will almost spin the the prop now! Put the boat in on Sunday and ran it easy to make sure all was well with it. It ran really well with less vibration and noise. The prop change really made a big difference as I went from a factory OJ 14X16 to a OJ 428 CNC. Hard turns to the left are now not obnoxiously loud as they had been since the boat was new. The one downside was I felt a hiccup once at ~36 mph. I put the boat on the lift and checked everything to see if there was an indication of anything. In my head I thought the prop had gotten loose so I tightened the nut down on the prop as I had installed it with the original castle nut and then put the nyloc on it afterrwards which wasn't firm against the prop. Hindsight always being 20/20, I should have loosened the nut and tried to move the prop. I ordered another nyloc and cotter pin and I'm going to pull the boat tomorrow night and verify the prop again. If indeed it got loose the only reason why I see that happening was if I didn't get all the lapping compound out or the key held it up. I did mark the shaft with a sharpie during dry fit up and it went on fully. So, any ideas on this? Also, I noticed when the boat is in neutral the prop shaft spins ever so slightly. I don't think this a major concern but I don't know if it's common or not. As mentioned before the system has exceptionally low drag now. |
Posted By: 8122pbrainard
Date Posted: May-29-2019 at 7:11am
|
Grant, Concerning your "hiccup" Understand the prop nut seats the prop onto the taper. If the taper is good, then the nut isn't even needed. Then, if the key wasn't in the keyway causing the prop to not seat on the taper, you would have had lots of vibration. So, I have a feeling what happened is the prop cavitated briefly. Get out on the water and try it again. For whatever reason, under certain conditions, props will let loose of the water occasionally. All it takes is a small pocket of air getting to the prop say from making a turn and going over a wave. ------------- /diaries/details.asp?ID=1622" rel="nofollow - 54 Atom /diaries/details.asp?ID=2179" rel="nofollow - 77 Tique 64 X55 Dunphy Keep it original, Pete < |
Posted By: KENO
Date Posted: May-29-2019 at 8:25am
From your description, you're describing a "dirty neutral". You can search here on CCF or click on the link below and do some reading. If it's as slow as you say, I wouldn't worry about it especially if you can stop the shaft with something like a 2 by 4 lightly pressed against the coupling. https://www.google.com/search?q=correctcraftfan+dirty+neutral&oq=correctcraftfan+dirty+neutral&aqs=chrome..69i57.7026j0j4&sourceid=chrome&ie=UTF-8" rel="nofollow - link What kind of metal is your nyloc nut made of? |
Posted By: gcam4
Date Posted: May-29-2019 at 12:16pm
Pete, Sounds good and your points make sense. The boat ran great before and after the "hiccup" but it just seemed odd. I was in middle school when this boat was bought by my parents and I do not know of any times that it has done this. I will say I was driving through our slalom course when this happened so it wasn't wave or turn induced. There was no indication of vibration after it did it though so I would imagine you are correct. There is definitely a noticeable tone difference in the 3-4k rpm range, it is slightly louder. I believe this is just the nature of the prop change by itself. |
Posted By: gcam4
Date Posted: May-29-2019 at 12:18pm
Keno, Thanks, I will look that up. It doesn't seem excessive at all but will check the linkage and see how much drag it takes to stop the shaft. Prop nyloc is brass. I'm well aware of stainless and it's propensity to gall with stainless fasteners. |
Posted By: MrMcD
Date Posted: May-30-2019 at 4:01am
|
Sounds like you have made great progress. You will figure out the bugs soon enough. How did your new prop RPM compared to the old prop? ------------- |
Posted By: wetskier2000
Date Posted: March-29-2021 at 7:55am
|
Dumb questions... What's the log?? How is cutlass wear determined? Visual inspection? Micrometer? ------------- Current: 1997 Nautique Previous: 1987 Nautique 1964 American Skier |
Posted By: 8122pbrainard
Date Posted: March-29-2021 at 8:19am
The log is where the prop shaft goes through the hull. It holds the shaft packing gland keeping the water out.  Regarding the cutlass bearing, if you can feel movement in the shaft, then it's time for a new cutlass.
------------- /diaries/details.asp?ID=1622" rel="nofollow - 54 Atom /diaries/details.asp?ID=2179" rel="nofollow - 77 Tique 64 X55 Dunphy Keep it original, Pete < |
Posted By: wetskier2000
Date Posted: March-29-2021 at 9:13am
|
disconnect the coupling to check for movement? ------------- Current: 1997 Nautique Previous: 1987 Nautique 1964 American Skier |
Posted By: 8122pbrainard
Date Posted: March-29-2021 at 9:18am
Rick, There's no need to disconnect the shaft at the trans coupling. The movement you what to look for is radial of the shaft in the cutlass. ------------- /diaries/details.asp?ID=1622" rel="nofollow - 54 Atom /diaries/details.asp?ID=2179" rel="nofollow - 77 Tique 64 X55 Dunphy Keep it original, Pete < |
Posted By: fahtal
Date Posted: April-13-2021 at 6:54am
|
Hi We are planning to replace the cutlass bearing. it the prop can wiggle1 a 2 mm sideways in the bearing. so far i can see there is this type of bearing inside. see picture can anybody tell me this is the correct type of bearing? it has a neopreem inside lining. Also can anybody direct me to the type of cutlass bearing you would order. or dimensions. I see on youtube movies it somtimes are 2 bearings ours looks like one long piece. we have SN from 89 with a 1" shaft. it is a bit difficult to find nautique specialised companies in the Netherlands  |
Posted By: 8122pbrainard
Date Posted: April-13-2021 at 7:20am
|
Frank, Look for the Johnson brand of cutlass. You should be able to find it over there. If not, cutlass bearings are very standard worldwide. You will want one with a 1" ID and a 1/1/4" OD. One or two piece styles have been used. Take a close look at what's in your strut but, I personally feel ether doesn't make a big difference. I'd go with one at 4" long.
https://www.deepblueyachtsupply.com/naval-brass-inch-bearings" rel="nofollow - Standard Brass Cutlass Bearings | Propeller Shaft Bearing (deepblueyachtsupply.com)
------------- /diaries/details.asp?ID=1622" rel="nofollow - 54 Atom /diaries/details.asp?ID=2179" rel="nofollow - 77 Tique 64 X55 Dunphy Keep it original, Pete < |
Posted By: fahtal
Date Posted: April-13-2021 at 8:27am
|
great thank you that looks like what i found here. couldn`t find the johnsons brand. but this will also work. next mission finding an acme 542;) in europe |
Posted By: fahtal
Date Posted: April-19-2021 at 2:21pm
   So I Removed the old bearing, made myself a tool;) but the last bit was a bit difficult becaus my pushers were a bit short. so with a forcegrip and a puller i got it out... But as recommended i bought a 4" bearing. but now i am in doubt. the old one is 6" and the strut is allittlebit more then 6". can i use the 4" and is it ok to put it flush with the back of the strut? then there will be 2" of space waar sand and stuff can accumulate.. or is that not a problem? |
Posted By: Jonny Quest
Date Posted: April-19-2021 at 3:56pm
|
I would want a 6” bearing in a single-piece design. ------------- Current 2003 Ski Nautique 206 Limited Previous 2001 Ski Nautique Open Bow 1994 Ski Nautique Open Bow Aqua skiing, ergo sum |
Posted By: fahtal
Date Posted: April-20-2021 at 3:35am
in retro spec i would agree that was the better way to go. But I can`t find them in the netherlands. So can we manage with a 4 inch? and is it an idea to cut 2" from the old one and put in in front of the new one so there is less change of getting dirt in there? |
Posted By: 8122pbrainard
Date Posted: April-20-2021 at 5:17am
|
I wouldn't worry about dirt getting in the forward empty space in the strut. Very few struts are completely filled with a cutlass bearing. Cutting the 4" in half to install one on each end is a option although I feel not needed. ------------- /diaries/details.asp?ID=1622" rel="nofollow - 54 Atom /diaries/details.asp?ID=2179" rel="nofollow - 77 Tique 64 X55 Dunphy Keep it original, Pete < |
Posted By: fahtal
Date Posted: April-20-2021 at 6:28am
Ok great. we will do that then only problem left is dat it have only one screw holding it in place instead of two. |
Posted By: 8122pbrainard
Date Posted: April-20-2021 at 7:03am
One set screw in each half should be plenty since the fit of the bearing to the strut should be pretty tight. If not, you can always drill and tap for some extra set screws. ------------- /diaries/details.asp?ID=1622" rel="nofollow - 54 Atom /diaries/details.asp?ID=2179" rel="nofollow - 77 Tique 64 X55 Dunphy Keep it original, Pete < |
Posted By: KENO
Date Posted: April-21-2021 at 6:30am
|
Since it looks like you're using it full length and not cutting the cutlass bearing in half, one set screw will work just fine as long as the fit is pretty tight like mentioned above. |
Posted By: fahtal
Date Posted: April-21-2021 at 8:37am
Plan so far is 4" flush with backside strut. 1 screw. And 1 screw open so dirt can escape.;) |