 Boats For Sale:


mustang #1 pictures |
Post Reply 
|
Page 123 4> |
| Author | |
farmer 
Senior Member 

Joined: July-23-2006 Location: United States Status: Offline Points: 442 |
 Post Options Post Options
") Thanks(0) Thanks(0)
 Quote Reply Quote Reply
 Topic: mustang #1 pictures Topic: mustang #1 picturesPosted: December-09-2006 at 10:16pm |
|
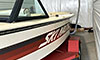
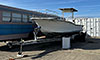
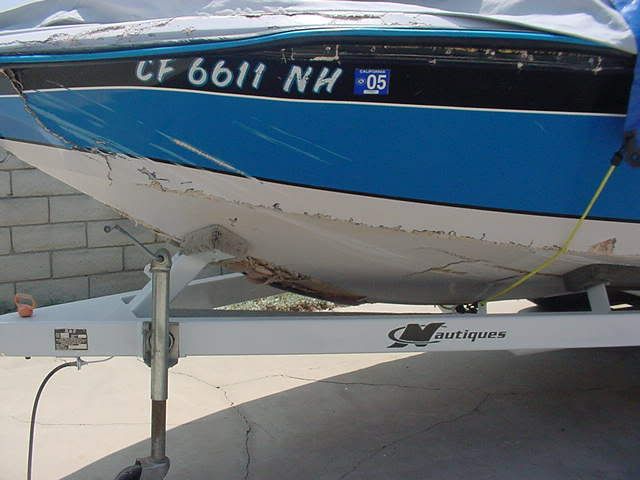
Just thought I'd upload a couple of pictures that were lost during the server change. These pictures were the day I brought it home.Pretty nasty huh?   
|
|
|
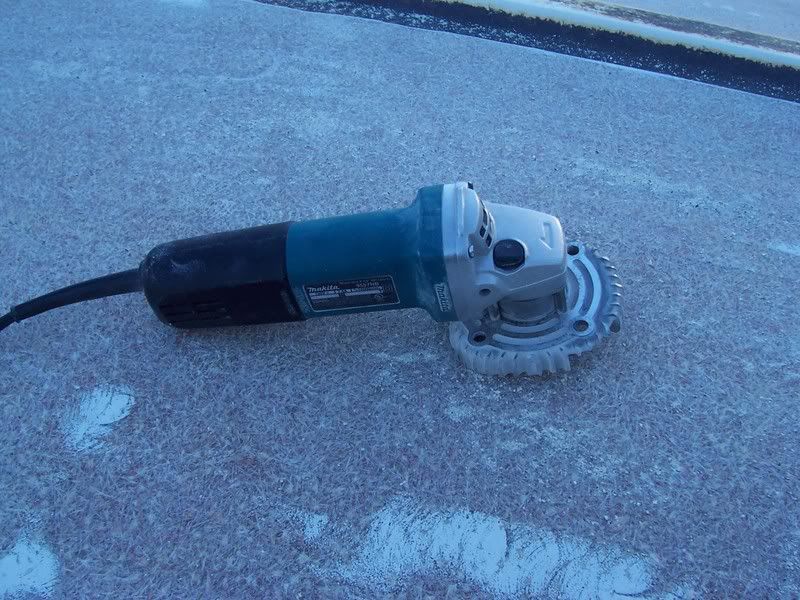
Watch your fingers.
|
|
 |
|
|
bkhallpass
Grand Poobah 

Joined: March-29-2005 Location: United States Status: Offline Points: 4723 |
Post Options
Thanks(0)
Quote Reply
Posted: December-10-2006 at 12:10am |
|
Looks like a good project. Everything's there. Have fun. BKH
|
|
|
Livin' the Dream
|
|
|
|
|
jbear
Grand Poobah

Joined: January-21-2005 Location: Lake Wales FL. Status: Offline Points: 8193 |
Post Options
Thanks(0)
Quote Reply
Posted: December-10-2006 at 1:23am |
|
Speaking of having fun.................hows it goin' Brian? Denese and the little one doing ok?
john |
|
|
"Loud pipes save lives"
AdamT sez "I'm Canadian and a beaver lover myself"... |
|
|
|
|
Randy_in_Ohio
Platinum Member 

Joined: September-13-2006 Location: N. Canton, OH. Status: Offline Points: 1891 |
Post Options
Thanks(0)
Quote Reply
Posted: December-10-2006 at 10:26am |
|
farmer - that should be a nice winter project... I love the old Mustangs, what a cla$$ic! keep us updated with pics of your progress. I think a good cleaning would make a huge difference. it looks like it was left in the water. When i got mine i tried everything to clean the hull (muriatic acid, hull cleaner, etc.) found that Purple Power worked the best worked great cleaning the bilge too. $9.99 for 2.5 gal. at Autozone. Good Stuff!
BTW- next time you post pics try hitting the enter button after each pic post. when you put each pic post on it's own line it will stack them vertically instead of side-by-side. makes it a little easier to browse through. trying to help... Brian- hope your getting some sleep over there! |
|
|
|
|
farmer
Senior Member
Joined: July-23-2006 Location: United States Status: Offline Points: 442 |
Post Options
Thanks(0)
Quote Reply
Posted: December-10-2006 at 7:32pm |
|
Randy, thanks for the tip. I'll try it next time. I have more up to date pictures of my progress and also of the rigging I used to turn the boat over if anyone is interested. thanks again Farmer
|
|
|
|
|
Randy_in_Ohio
Platinum Member
Joined: September-13-2006 Location: N. Canton, OH. Status: Offline Points: 1891 |
Post Options
Thanks(0)
Quote Reply
Posted: December-11-2006 at 11:04am |
|
Turn the boat over??? How Why??
|
|
|
|
|
eric lavine
Grand Poobah
Joined: August-13-2006 Location: United States Status: Offline Points: 13413 |
Post Options
Thanks(0)
Quote Reply
Posted: December-11-2006 at 4:34pm |
|
I had to go into the next room to finish reading those posts, what happened?? nice boat, nice lines
|
|
|
"the things you own will start to own you"
|
|
|
|
|
farmer
Senior Member
Joined: July-23-2006 Location: United States Status: Offline Points: 442 |
Post Options
Thanks(0)
Quote Reply
Posted: December-17-2006 at 12:10pm |
|
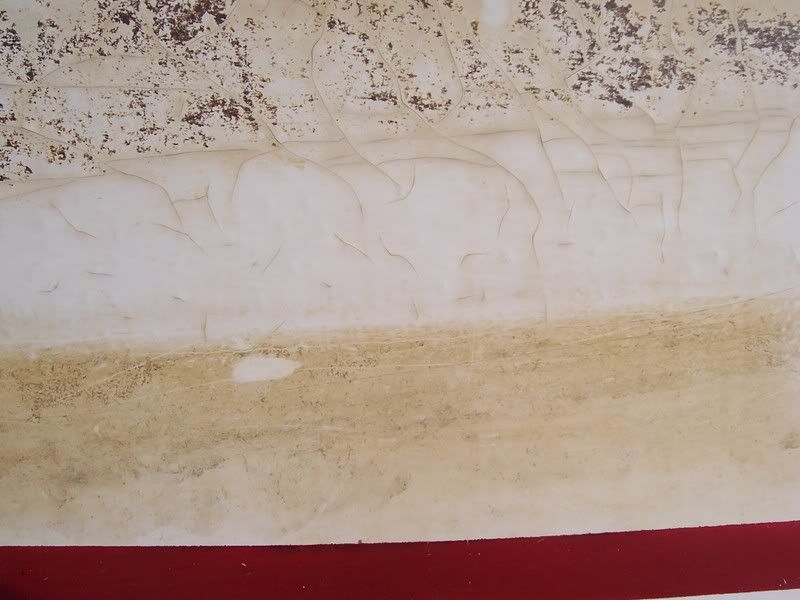
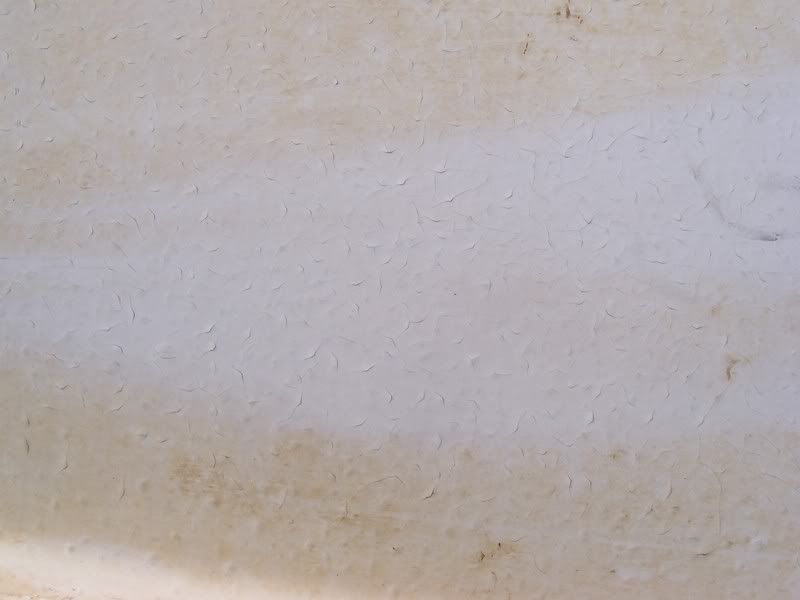
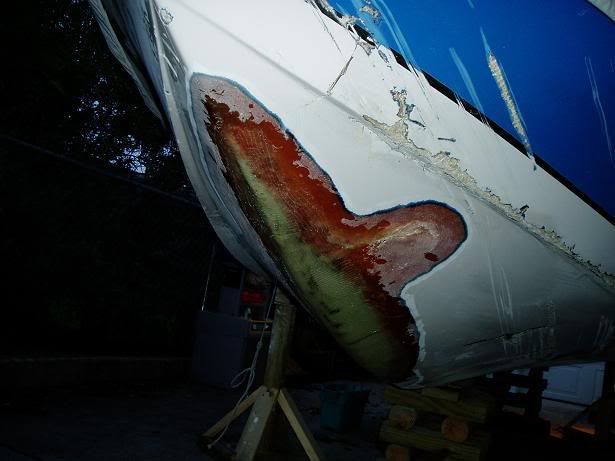
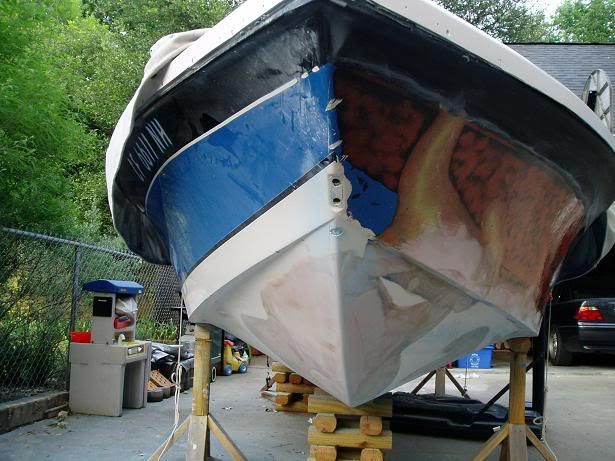
Randy in Ohio Here are a couple of pics of the gelcoat below the waterline. The entire bottom is like this so I felt the easiest way to work on it was to turn the boat over. Does anyone have any experience with gelcoat in this condition? Farmer

|
|
|
|
|
farmer
Senior Member
Joined: July-23-2006 Location: United States Status: Offline Points: 442 |
Post Options
Thanks(0)
Quote Reply
Posted: December-17-2006 at 12:15pm |
|
Help. why did the text stretch out so far past the pictures? Farmer
|
|
|
|
|
81nautique
Grand Poobah

Joined: September-03-2005 Location: Big Rock, Il Status: Offline Points: 5765 |
Post Options
Thanks(0)
Quote Reply
Posted: December-17-2006 at 12:29pm |
That's an easy one, your pics in the first post are all on the same line so they dictate the frame of the post window for all subsequent posts. All you have to do is put a carriage return(enter key) after each Picture when you're uploading them and the pics will line up vertically stacked shortening the window width. So your problem is not with the last post you made but with the first.  I hope that makes sense I hope that makes sense
|
|
|
|
|
farmer
Senior Member
Joined: July-23-2006 Location: United States Status: Offline Points: 442 |
Post Options
Thanks(0)
Quote Reply
Posted: December-17-2006 at 12:54pm |
|
Thanks.If I post anyhting else I'll start a new topic Farmer
|
|
|
|
|
David F
Platinum Member
Joined: June-11-2004 Location: United States Status: Offline Points: 1770 |
Post Options
Thanks(0)
Quote Reply
Posted: December-19-2006 at 9:08am |
|
You got yourself a quit a project there. All complete, but you should consider removing all the gelcoat via grinding and painting the hull. Or, you can re-apply gelcoat if you are up to all the sanding involved.
Good luck and keep us updated. |
|
|
|
|
Randy_in_Ohio
Platinum Member
Joined: September-13-2006 Location: N. Canton, OH. Status: Offline Points: 1891 |
Post Options
Thanks(0)
Quote Reply
Posted: December-19-2006 at 10:40am |
|
Farmer-
I see now why you turned it over. Man, that looks like a lot of work. also seen the rig you used to flip it. pretty slick. Keep posting pics of your progress. |
|
|
|
|
farmer
Senior Member
Joined: July-23-2006 Location: United States Status: Offline Points: 442 |
Post Options
Thanks(0)
Quote Reply
Posted: December-19-2006 at 7:01pm |
|
David,do you have any experience with gelcoat removal etc?
|
|
|
|
|
TRBenj
Grand Poobah

Joined: June-29-2005 Location: NWCT Status: Offline Points: 21107 |
Post Options
Thanks(0)
Quote Reply
Posted: December-19-2006 at 8:48pm |
|
You could say DavidF has a little bit of experience on the subject.

|
|
|
|
|
M3Fan
Grand Poobah

Joined: October-22-2005 Location: United States Status: Offline Points: 3185 |
Post Options
Thanks(0)
Quote Reply
Posted: December-19-2006 at 9:09pm |
|
...and the 7 series in the garage shows that this guy doesn't fool around.
|
|
|
|
|
farmer
Senior Member
Joined: July-23-2006 Location: United States Status: Offline Points: 442 |
Post Options
Thanks(0)
Quote Reply
Posted: December-19-2006 at 9:52pm |
|
DavidF. That looks beautiful. Is that gelcoat or paint?
|
|
|
|
|
TRBenj
Grand Poobah
Joined: June-29-2005 Location: NWCT Status: Offline Points: 21107 |
Post Options
Thanks(0)
Quote Reply
Posted: December-20-2006 at 8:17am |
|
Its gel- DavidF doesnt mess around!
|
|
|
|
|
farmer
Senior Member
Joined: July-23-2006 Location: United States Status: Offline Points: 442 |
Post Options
Thanks(0)
Quote Reply
Posted: December-26-2006 at 7:44pm |
|
Hi everybody. I just realized I could edit my picture post after the fact to arrange them vertically. Duh....
Farmer
|
|
|
|
|
David F
Platinum Member
Joined: June-11-2004 Location: United States Status: Offline Points: 1770 |
Post Options
Thanks(0)
Quote Reply
Posted: December-28-2006 at 9:27am |
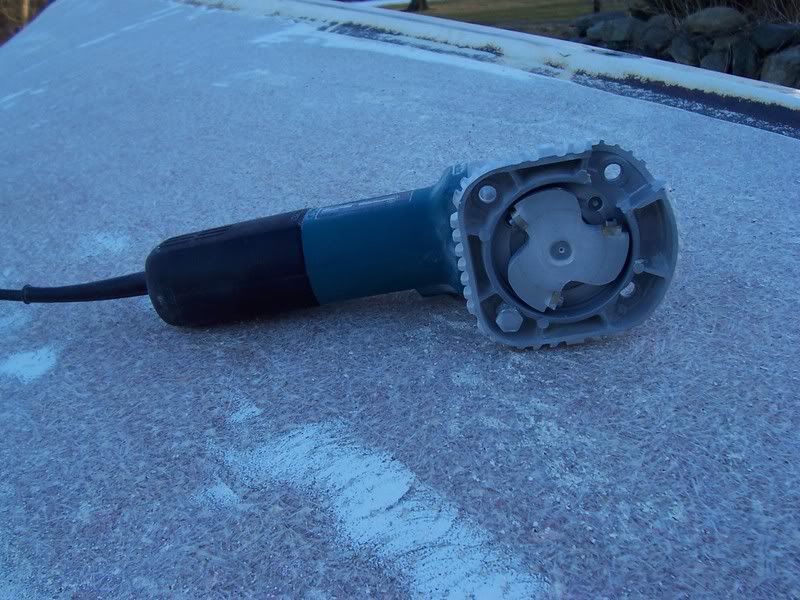
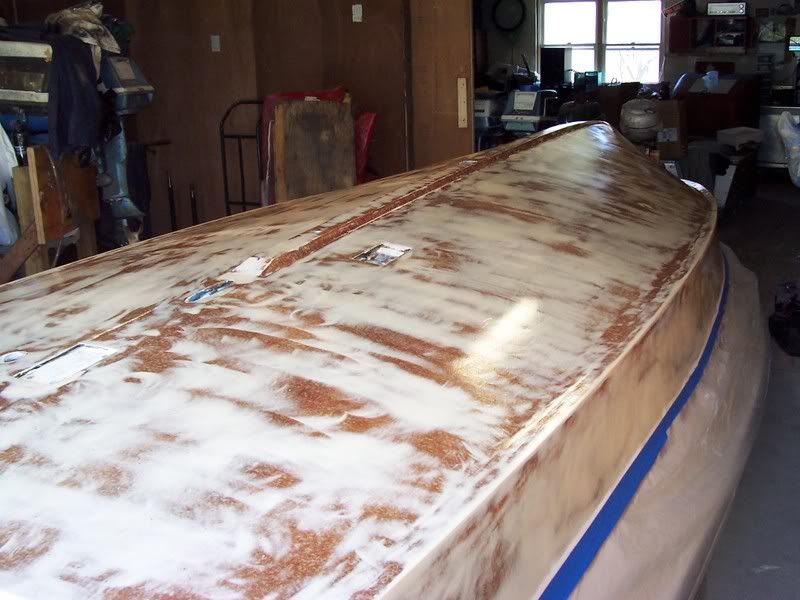
Yes, just a bit of experience  The easiest way to remove the gelcoat is with a 4" or 4.5" grinder with a 36 grit pad. Do not be tempted to use a 7" grinder as it does not work nearly as well and the extra weight will wear you out more than twice as fast. The easiest way to remove the gelcoat is with a 4" or 4.5" grinder with a 36 grit pad. Do not be tempted to use a 7" grinder as it does not work nearly as well and the extra weight will wear you out more than twice as fast.
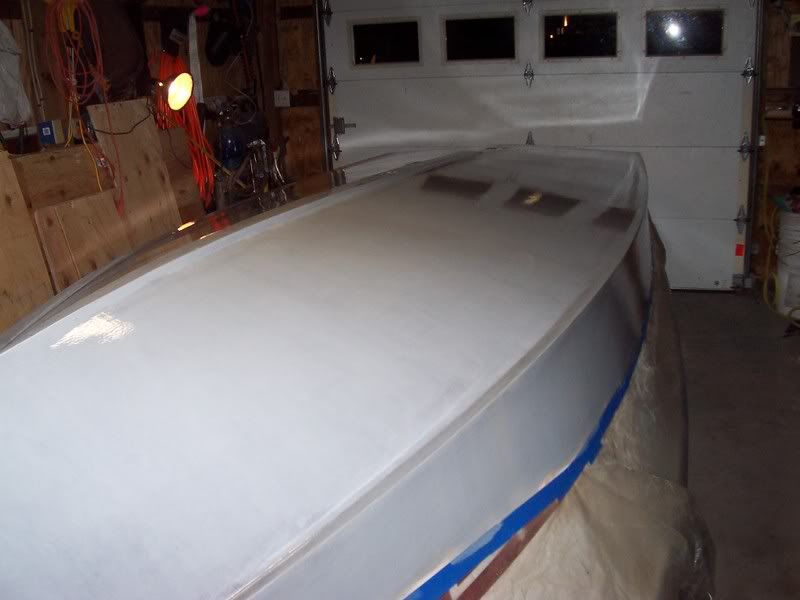
When you get down to the fibergla$$, you could switch to a 7" grinder to help even out the fibergla$$ surface. You will then have to fair (fare?) the entire hull. Bondo is fine for fairing, or you can use thickened epoxy which is what I used as evident in the pictures above. |
|
|
|
|
farmer
Senior Member
Joined: July-23-2006 Location: United States Status: Offline Points: 442 |
Post Options
Thanks(0)
Quote Reply
Posted: May-06-2007 at 8:35pm |
|
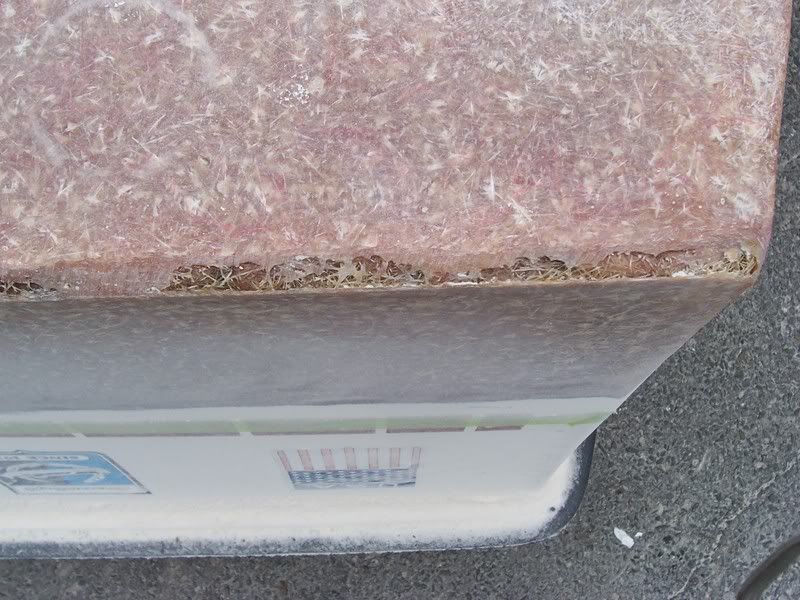
Finally got to putting the epoxy bottom on my mustang.It took a long time to fair the bottom. I made the mistake of knocking off the edges because the fiberglass looked like it had crystallized and was brittle.DO NOT DO THAT.It would have been much better to leave the edges and just cover them with the epoxy.

|
|
|
|
|
farmer
Senior Member
Joined: July-23-2006 Location: United States Status: Offline Points: 442 |
Post Options
Thanks(0)
Quote Reply
Posted: January-30-2008 at 12:22am |
|
Thought I'd repost the pictures that were lost.
|
|
|
|
|
farmer
Senior Member
Joined: July-23-2006 Location: United States Status: Offline Points: 442 |
Post Options
Thanks(0)
Quote Reply
Posted: March-27-2008 at 12:55am |
|
Well here we are almost a year later and I finally got back at the Mustang.I'm in the process of sanding the epoxy bottom. The epoxy did not cure smoothly. It feels and looks like an eggshell texture. I don't know if it's something I did or what. So,I'm sanding with 80 grit(had to do it anyway for the bottom paint) I'm using the Interlux VC hard bottom paint with teflon.It comes in white so I'm hoping it won't be too noticeable that low on the sides. 


I still have to get all the old sealer out of the strut pocket so the base fits flush. I took off more thickness than I put back with the epoxy. Was it Lifetime caulk that some of you have used with good results? Farmer |
|
|
|
|
JoeinNY
Grand Poobah

Joined: October-19-2005 Location: United States Status: Offline Points: 5693 |
Post Options
Thanks(0)
Quote Reply
Posted: March-27-2008 at 12:06pm |
|
Lifetime or 3M 5200 will both do the job as a sealant, the 5200 is a better adhesive but that is not always a good thing.
|
|
|
|
|
farmer
Senior Member
Joined: July-23-2006 Location: United States Status: Offline Points: 442 |
Post Options
Thanks(0)
Quote Reply
Posted: March-28-2008 at 12:15am |
|
You're right,I should plan ahead alittle and use the lifetime in case I need to re-bush anything. |
|
|
|
|
8122pbrainard
Grand Poobah

Joined: September-14-2006 Location: Three Lakes Wi. Status: Offline Points: 41040 |
Post Options
Thanks(0)
Quote Reply
Posted: March-28-2008 at 7:23am |
|
Gary, I would go with the 5200 just because of it's adhesive qualities. Re bushing can be easily done on the boat. If you ever do need to remove the strut, that's a easy one too especially with the non recessed base type strut. Hot wiring works great. A piece of nichrome wire or even stainless mig wire hooked to a car battery cuts right through the 5200.
Since you removed more thickness on the bottom than what you put back on, you may need to add some stainless flat washers under the strut so the shaft bore in the strut will line up with the hole and log in the bottom of the hull. That's another good reason to go with the 5200. If the strut if off more than 1 thickness of a flat washer, I have used thickened epoxy under the strut to build up a base. Use a piece of wax paper when bolting the strut down into the epoxy so it doesn't stick. |
|
|
|
|
farmer
Senior Member
Joined: July-23-2006 Location: United States Status: Offline Points: 442 |
Post Options
Thanks(0)
Quote Reply
Posted: March-28-2008 at 9:11am |
|
Pete,the base of this strut fits flush with the bottom of the boat.I just looked at the picture and realized that it doesn't look that way but there is a recessed area that the base fits into. So the alignment shouldn't be affected. would you still use the 5200 ? |
|
|
|
|
8122pbrainard
Grand Poobah
Joined: September-14-2006 Location: Three Lakes Wi. Status: Offline Points: 41040 |
Post Options
Thanks(0)
Quote Reply
Posted: March-28-2008 at 9:28am |
|
Gary, I would because I really like the 5200 and it's sealing. I worry about removal later! The recess I'm reffering to is the new boats where the whole strut base sits in a pocket molded in the bottom of the hull. If you can't get a hot wire under a strut, a torch can be used to heat the strut. I seem to remember that it only takes about 200 degrees to soften the 5200. That temp will not affect the temper of the bronze strut.
Did you catch my post about using a hard plastic bushing in place of the rubber cutlass as a temp means of using the prop shaft to line up the strut with the hole and log in the hull? Edit: I do see the recess now! Don't count on it being the same. Do check the strut to the hole alignment. |
|
|
|
|
TRBenj
Grand Poobah
Joined: June-29-2005 Location: NWCT Status: Offline Points: 21107 |
Post Options
Thanks(0)
Quote Reply
Posted: March-28-2008 at 2:11pm |
|
Pete, would there be any harm in using 4200 instead? That would be easier to remove (someday) and still seal as well, correct?
|
|
|
|
|
82wake2001
Senior Member

Joined: February-14-2008 Location: United States Status: Offline Points: 240 |
Post Options
Thanks(0)
Quote Reply
Posted: March-28-2008 at 4:48pm |
|
wow that is amazing Farmer.....wish i had those skills ....
|
|
|
|
|
Post Reply
|
Page 123 4> |
 Tweet
Tweet
|
| Forum Jump | Forum Permissions You cannot post new topics in this forum You cannot reply to topics in this forum You cannot delete your posts in this forum You cannot edit your posts in this forum You cannot create polls in this forum You cannot vote in polls in this forum |


 Topic Options
 farmer wrote: